
Для работы проектов iXBT.com нужны файлы cookie и сервисы аналитики.
Продолжая посещать сайты проектов вы соглашаетесь с нашей
Политикой в отношении файлов cookie
Стараниями корпорации Microsoft современные версии Windows давно превратились из удобных операционных систем для общения человека с компьютером в навязчивый сервис с сотнями ненужных фоновых процессов, следящих за действиями пользователя и изрядно нагружающих компьютер. В этой небольшой инструкции вы узнаете, как, используя всего одну программу, отключить телеметрию в Windows 10/11 и существенно повысить производительность своего ПК.

В стремлении угодить широкому кругу пользователей корпорация Microsoft год за годом превращала изначально спартанскую ОС в швейцарских нож, где на каждую задачу должно быть готовое решение. Например, даже если у вас нет принтера, служба, отвечающая за его работу, постоянно висит в фоне, что хоть и немного, но нагружает ПК. И так с десятками служб/процессов, которые не всем пользователям Windows необходимы.
Чтобы отключить лишние процессы и убрать телеметрию из Windows 10/11, программистами были придуманы сотни способов, но наиболее проверенный — это использовать небольшую бесплатную утилиту под названием O&O ShutUp10++.
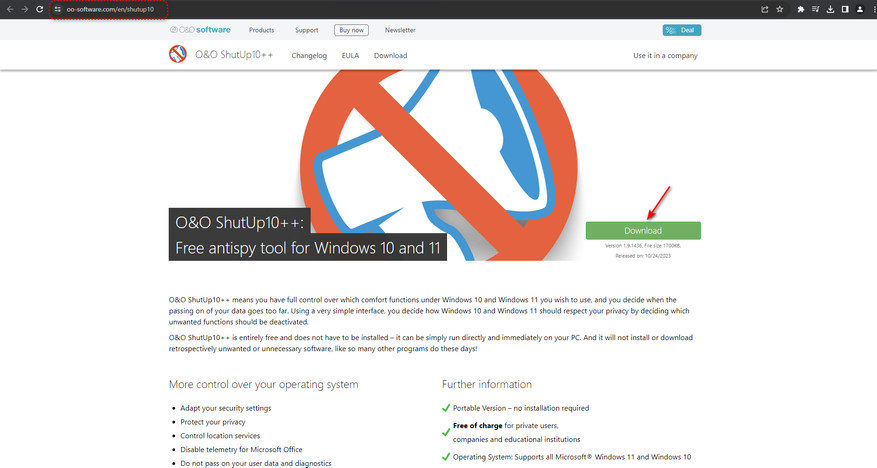
1. Скачиваем программу с официального веб-сайта.
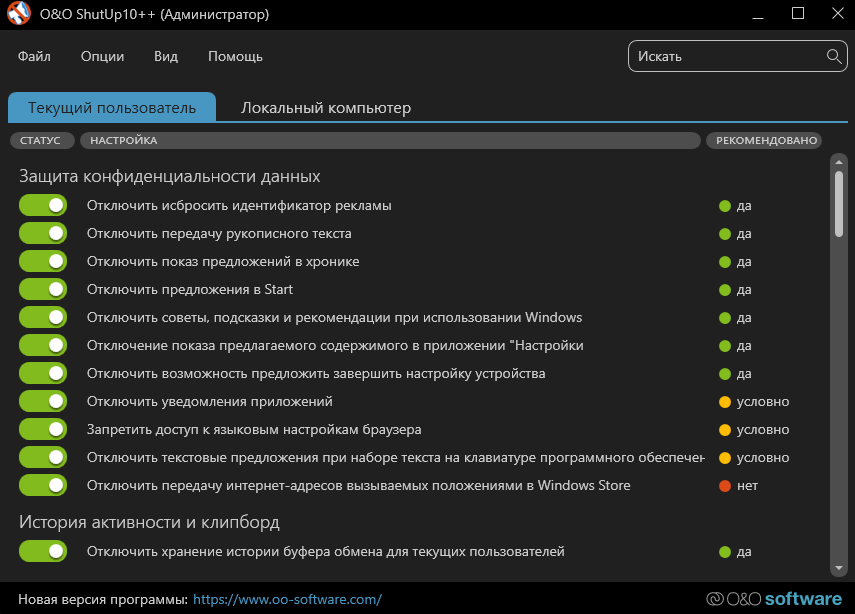
2. Запускаем от имени администратора файл OOSU10.exe. Если всё прошло успешно, то перед вашим взором появится окно программы.
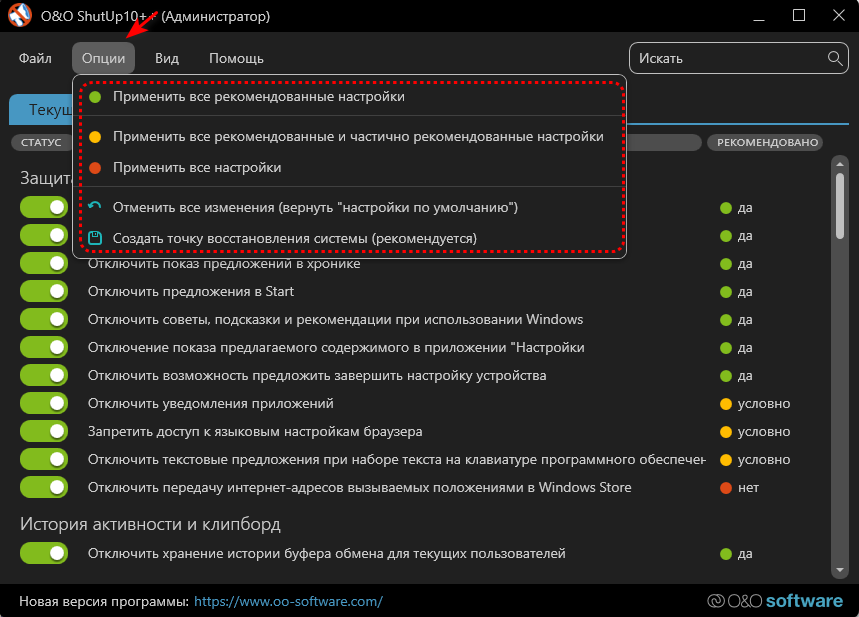
3. Переходим в раздел «Опции» и применяем желаемый профиль. Советую ограничиться настройками «Применить все рекомендованные настройки» если вам по каким-то причинам нужен Microsoft Store. Также вы можете, используя удобный интерфейс ПО, в ручную отключить только ненужные вам службы/процессы. Однако будьте осторожны, потому как бездумное отключение всего и вся может существенно повлиять на работу операционной системы. Обязательно создайте точку восстановления, если не уверены в своих действиях!
4. Закрываем программу, перезагружаем ПК и наслаждаемся более быстрой и плавной работой Windows!
Дабы не прослыть голословным, проведём небольшое тестирование на примере Windows 10 Pro x64 22H2 (19045.4046) с применением различных профилей программы O&O ShutUp10++.
Результат потрясает!
Несмотря на многократный запуск и холостой простой в 5 минут для каждого теста, по умолчанию Windows 10 потребляла внушительные 3.9 Гб оперативной памяти и существенно нагружала процессор фоновой активностью 124 процессов. Применение же рекомендованных настроек программы O&O ShutUp10++ позволило значительно снизить потребляемый объём RAM до 1.8 Гб и разгрузить CPU. Два оставшихся профиля также возымели эффект и позволили ещё более сократить потребление до уровня в 1.6 Гб и 1.4 Гб, а также 107 и 95 фоновых процессов соответственно. Базовый функционал и сервисы Windows не пострадали!
Я бы солгал, сказав, что был потрясён итогом полученных результатов. Тем не менее факт остаётся фактом: более 30% всей фоновой активности Windows 10/11 состоит из телеметрии и ненужных среднестатистическому пользователю ПК процессов. Возможно, что успех Steam Deck и популяризация Linux заставит корпорацию Microsoft пересмотреть свою стратегию. А пока имеем то, что имеем. Уважайте свободу, используйте только проверенное ПО и ни в коем случае не позволяйте компаниям диктовать вам свои условия. С вами был Павел. Ещё увидимся!
Сейчас на главной
Новости
Публикации

Науке уже довольно давно известны виды грибков, которые могут овладевать муравьями и использовать их в своих целях. Однако совсем недавно, при съемках научно-документального сериала «Winterwatch»,…

Представьте себе гигантское, ветвистое древо жизни, где каждая веточка, каждый листик — это отдельный вид, а корни уходят в глубокое прошлое, к общим предкам. Понимание того, как именно…

В
русских деревнях крестьянская изба
была не просто жильём
— деревянные
срубы, сложенные из брёвен, хранили
тепло семейного очага и тайны древних
традиций. Мастерство строительства…

Черные дыры. Одно только это словосочетание будоражит воображение, рисуя картины космических монстров, пожирающих всё на своем пути. И, честно говоря, классическое представление о них, уходящее…

Мы живём в эпоху удивительных технологий. Смартфоны, ставшие продолжением нашей руки, электромобили, меняющие облик городов, медицинские томографы, заглядывающие внутрь человеческого…

Огурцы — любимая культура многих огородников, радующая сочными плодами всё лето. Однако их выращивание требует внимания к деталям, и один из частых вопросов: стоит ли срезать усы?…
Здравствуйте Дмитрий, вопрос! Как отключить телеметрию Windows 10? Расскажу всё с самого начала. На моём ноутбуке была установлена Windows 8.1, затем она без моего ведома обновилась до Windows 10 и всё случилось именно так, как вы написали в одной из своих статей, в один прекрасный день с утра на ноутбуке загрузилась Win 10. Вообще новая система мне понравилась и я быстро к ней привык, единственное, решил отключить телеметрию (некоторые шпионские функции). Зашёл в настройки конфиденциальности и всё там выключил, даже камеру, после этого несколько дней наблюдал за системой и вот что заметил.
Загруженность процессора в простое всегда 2-3% и иногда вырастает и до 10%, также постоянно чем-то занята Сеть 1-2% (хотя обновления отключены), а загруженность жёсткого диска в простое тоже не маленькая 11-12 %. Самое интересное, после очередного обновления в настройках конфиденциальности сами собой включились некоторые ранее отключенные мной параметры и камера в том числе. Тогда я принял такое решение, отключить «Службу диагностического отслеживания», которая напрямую связана со всем шпионским функционалом в OS, после этого загруженность в простое процессора, сети и диска снизилась до 0-1%. В таком состоянии система проработала несколько месяцев и обновилась до финального выпуска Anniversary Update Windows 10 build 1607. После обновления проблемы с загруженностью процессора повторились и я опять решил отключить «Службу диагностического отслеживания», но меня ждал сюрприз, в Службах такой не оказалось! Соответственно вопрос, как теперь отключать шпионский функционал в Win 10?
Как отключить телеметрию Windows 10
Привет друзья! Телеметрия, от греческого обозначает — получение информации о значениях каких-либо измеряемых параметрах и уж так повелось, что определенный функционал в Windows 10, позволяющий разработчикам собирать подробные сведения о действиях пользователей (позднее названный шпионским функционалом) называется именно телеметрией.
В самых первых тестовых версиях Win 10 отключить шпионский функционал было невозможно совсем, да и никто не пытался этого делать, так как все считали, что телеметрия нужна разработчикам для доведения OS до ума и в финальной версии Win 10 её не будет, но не тут-то было, вышла финальная версия системы и шпионский функционал только расширился новыми параметрами. Несмотря на то, что настройки отключения телеметрии появились, эффективность их оставляла желать лучшего, поэтому многие пользователи просто отключали службу диагностического отслеживания и географического положения. С выходом финального выпуска Anniversary Update Windows 10 build 1607 нас опять ждал сюрприз, ранее знакомые службы, ответственные за сбор пользовательской информации исчезли! Произошедшее активно обсуждалось в сети и в итоге выяснилось, что шпионские службы были переименованы и заново запущены на всех компьютерах с Windows 10!
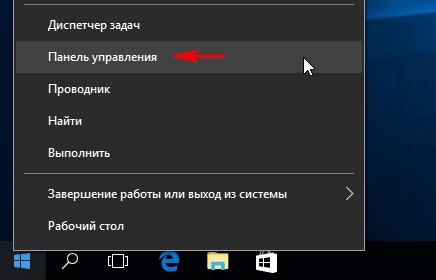
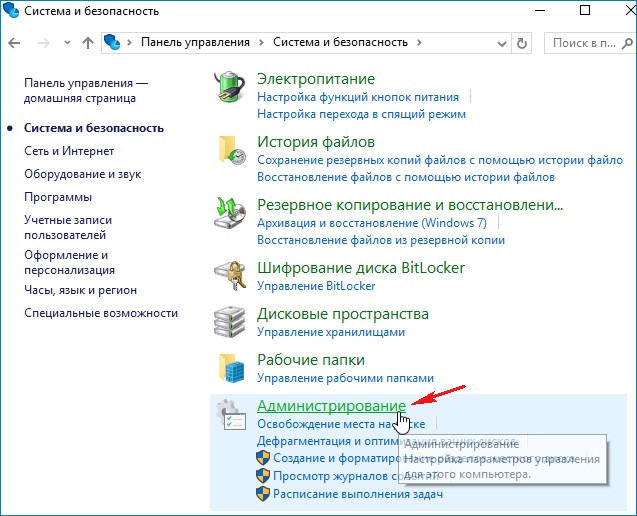
Итак, если вы хотите отключить телеметрию в Windows 10, то для этого нужно проделать такие шаги. Щёлкаем правой кнопкой мыши на меню «Пуск» и выбираем «Панель управления».
«Система и безопасность»

«Администрирование»
Most users are not comfortable sharing their activity or data on the computers with anyone, Microsoft included. However, Microsoft gathers the user’s data through a feature called Telemetry, where your computer collects and sends your data to Microsoft, which is then presumably used to make your Windows experience better.
The Telemetry and Data Collection feature in Windows is enabled by default. This feature collects data of user’s activity and sends it to Microsoft as feedback. It is used to:
- Keep Windows up to date.
- Keep Windows secure and reliable.
- Improve Windows through analyzing.
The data which is recorded includes the type of hardware, applications being used, application and network usage, and much more.
Let us now discuss how to manage and disable Telemetry in Windows.
Table of Contents
How to Manage Telemetry in Windows
Sometimes other data is also shared with Microsoft, such as the user’s current location, searches performed online, wallpapers or screen savers being used, etc. Some users might be uncomfortable with this and want to disable the feature entirely.
Unfortunately, you cannot disable it using the conventional method. However, you can choose to send only the required data, or the required data plus the optional data to Microsoft.
Follow the steps below to manage your Telemetry preferences via Windows Settings.
In Windows 11
- Navigate to the following:
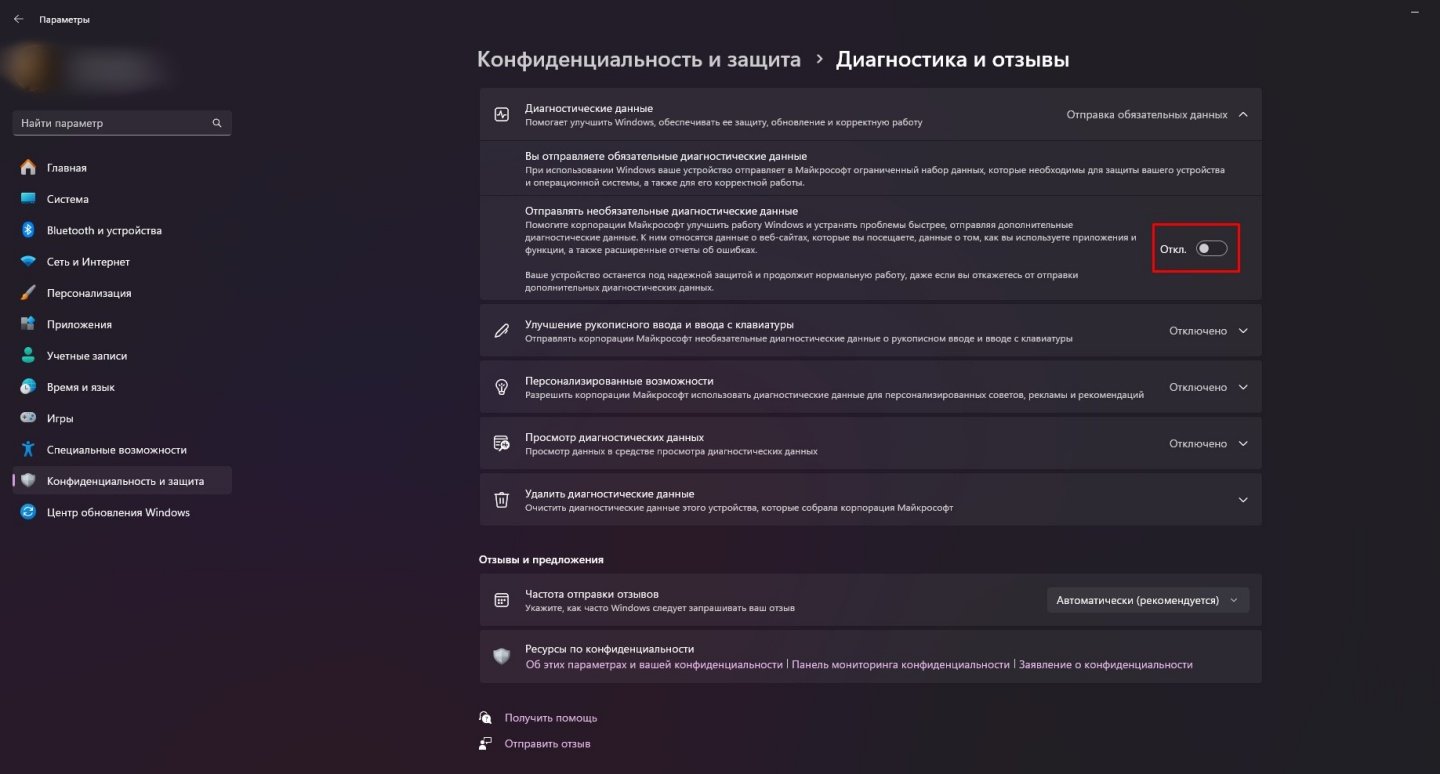
Settings app >> Privacy and Security >> Disgnostics and feedback - Expand Diagnostic Data.

- Now toggle the slider under “Send optional diagnostic data” into the Off position to disable sending optional data.


In Windows 10
- Navigate to the following:
Settings app >> Privacy >> Disgnostics and feedback - Here, select “Required diagnostics data” to disable the optional data from sending to Microsoft.


If you are using an older version of Windows 10, you may see the following 3 options on the Feedback and Diagnostics page:

- Basic: This will give basic data of your device to Microsoft.
- Enhanced: This includes the basic data plus data about how you use Windows, which apps you use frequently, etc.
- Full (Recommended): This includes Enhanced data plus the advanced diagnostics information.
As you may find, the actions performed above will only disable Windows from sending the optional data. However, the required data will still be available to Microsoft. Which is why, if you wish to disable Telemetry and Data Collection entirely, you must perform any of the given solutions below in this post.
How to Disable Telemetry and Data Collection in Windows
Using Group Policy
This method is only valid for Windows 11. If you are using Windows 10, continue to the next section of this post.
Perform the following steps to disable Telemetry entirely on your Windows 11 PC using the Group Policy Editor:
- Launch the Group Policy Editor by typing in gpedit.msc in Run.
- Navigate to the following using the left pane:
Computer Configuration >> Administrative Templates >> Windows Components >> Data collection and Preview Builds - Now double-click the following Group Policy “Allow Diagnostic Data” in the right pane.
- From the popup window, select Enabled, then select Diagnostic data off under Options, and then click Apply and Ok.

- Now run the following command in Command Prompt with administrative rights for the changes to take effect:
gpupdate /force


You will now find that Telemetry has been disabled for your PC. This can be confirmed when you see “Your organization prevents sending diagnostic data to Microsoft” written on the Diagnostics and Feedback Settings page.

From Windows Registry
Misconfiguration of critical values in the system’s registry could be fatal for your operating system. Therefore, we insist that you create a system restore point before proceeding forward with the process.
Perform the following steps to disable Telemetry on your PC using the Registry Editor:
- Open the Registry Editor by typing in regedit in Run.
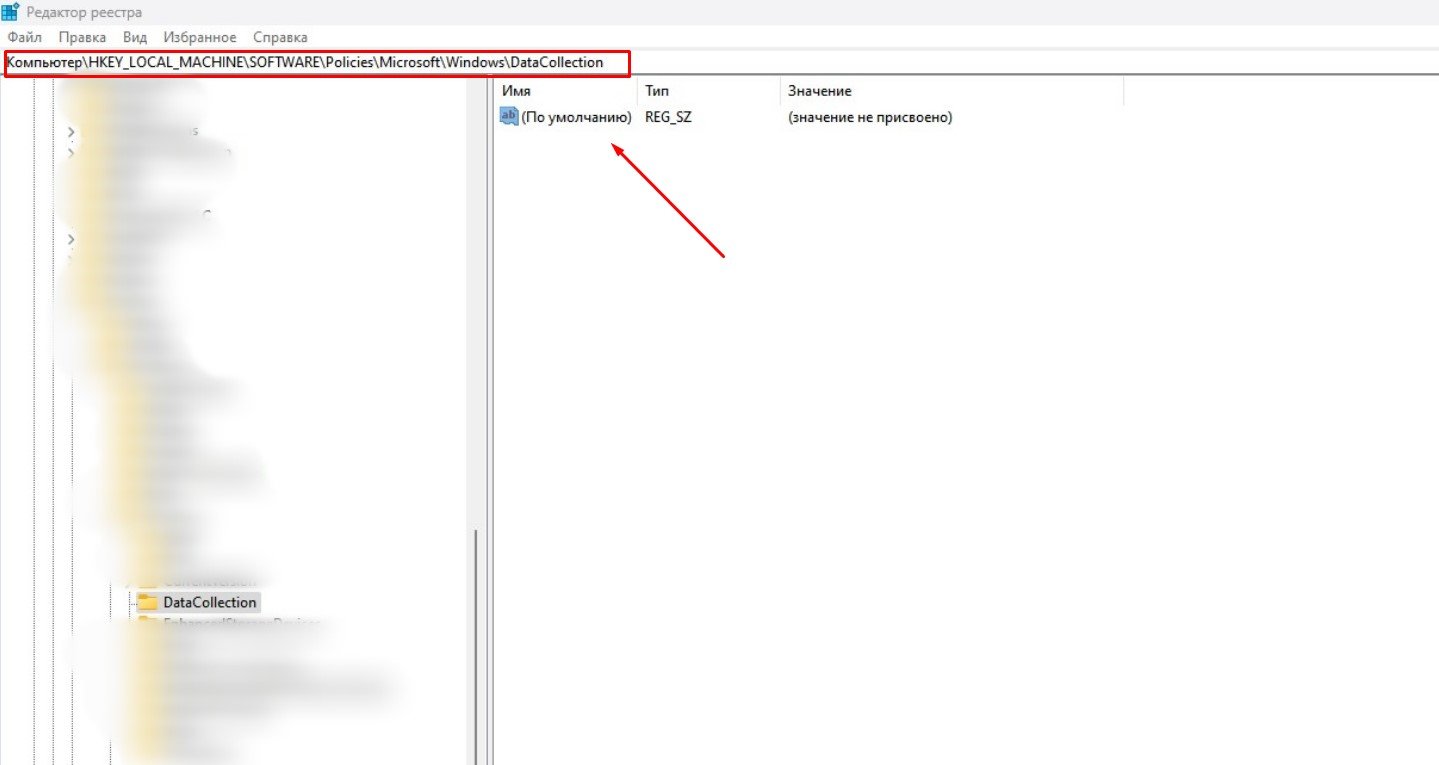
- Now paste the following in the address bar at the top for quick navigation:
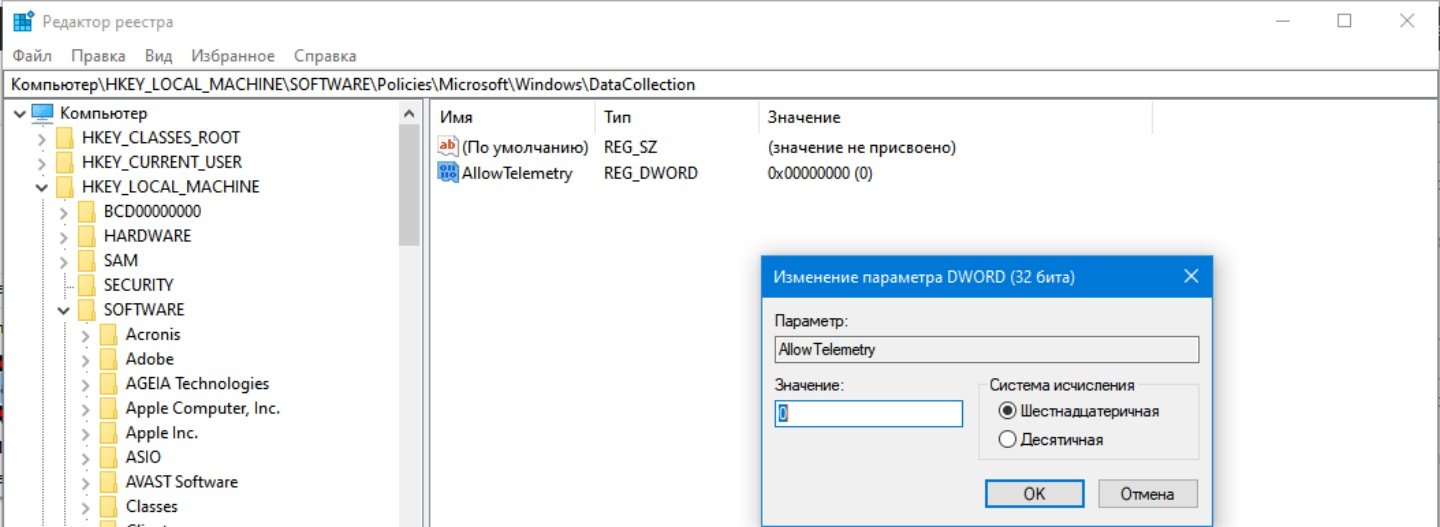
Computer\HKEY_LOCAL_MACHINE\SOFTWARE\Policies\Microsoft\Windows\DataCollection
- Right-click DataCollection key, expand New from the context menu, and then click DWORD (32-bit) Value.
- Name this DWORD “AllowTelemetry.”
- Double-click AllowTelemetry and set its Value Data to 0. Then click Ok.
- Now restart your computer for the changes to take effect.


You will now find that Telemetry has been disabled and the respective options in the Settings app have been greyed out.
By Disabling Services
You can also disable the Telemetry and Data Collection feature in Windows by disabling the respective service. Here is how:
- Open the Windows services page by typing in services.msc in Run.
- Here, double-click the service “Connected User Experience and Telemetry.” (If you are using an older version of Windows 10, the service’s name might be “Dignostics Tracking Service.”)

- From the popup properties window, select Startup Type as Disabled, then click Apply and Ok.
- Now restart the computer for the changes to take effect.


Once the computer restarts, the changes will be applied to your Registry settings and now your data won’t be accessible to Microsoft.
From Command Prompt
You can also disable Telemetry by performing the following task using Command Prompt. This is easier for the people who are familiar with the Command Line Interface (CLI) of Windows.
Launch the Command Prompt with administrative rights and then enter the following commands one after the other:
sc delete DiagTrack

sc delete dmwappushservice

echo “” > C:\\ProgramData\\Microsoft\\Diagnosis\\ETLLogs\\AutoLogger\\AutoLogger-Diagtrack-Listener.etl

reg add “HKLM\SOFTWARE\Policies\Microsoft\Windows\DataCollection” /v AllowTelemetry /t REG_DWORD /d 0 /f

Now restart your computer for the changes to take effect. When it does, you will find that the Diagnostics and Feedback Settings page has been greyed out as Telemetry has been disabled.

Disable Microsoft Compatibility Appraiser
Using Task Scheduler
As with every automated process in Windows, the Task Scheduler run a task that manages Telemetry on your Windows PC. Once this task is disabled, as will telemetry. Follow the steps below to disable the scheduled task:
- Open Task Scheduler by typing in taskschd.msc in Run.
- Now navigate to the following from the left pane:
Task Scheduler Library >> Microsoft >> Windows >> Application Experience - Here, in the middle pane, right-click “Microsoft Compatibility Appraiser” and then click Disable from the context menu.


Windows Telemetry will now be disabled. You can also perform the same task via Windows PowerShell.
Using PowerShell
To disable Microsoft Compatibility Appraiser using PowerShell, launch Windows PowerShell with administrative privileges and then run the following command:
Disable-ScheduledTask -TaskName "Microsoft Compatibility Appraiser" -TaskPath "\Microsoft\Windows\Application Experience"

Closing Words
These methods are necessary for users for whom privacy and security are more important than any update or improvement by the manufacturer. That’s why they can easily disable the Telemetry feature from their system.
В Windows есть много служб, которые выполняют незаметные для обычного пользователя функции. Одной из них является Microsoft Compatibility Telemetry. В этой статье мы расскажем, зачем она нужна и как ее отключить.

Microsoft Compatibility Telemetry – это компонент Windows, который собирает и передает данные об использовании и производительности вашей ОС.
Эти данные помогают Microsoft улучшать работу различных процессов, выявлять ошибки совместимости и разрабатывать решения проблем. В компании уверяют, что все собранные данные анонимны и просит не беспокоиться о конфиденциальности.
Microsoft Compatibility Telemetry нагружает процессор или диск
Встречаются случаи, когда Microsoft Compatibility Telemetry может и сам стать проблемой. Чаще всего MCT излишне загружает систему, поэтому многие стараются отключить службу.
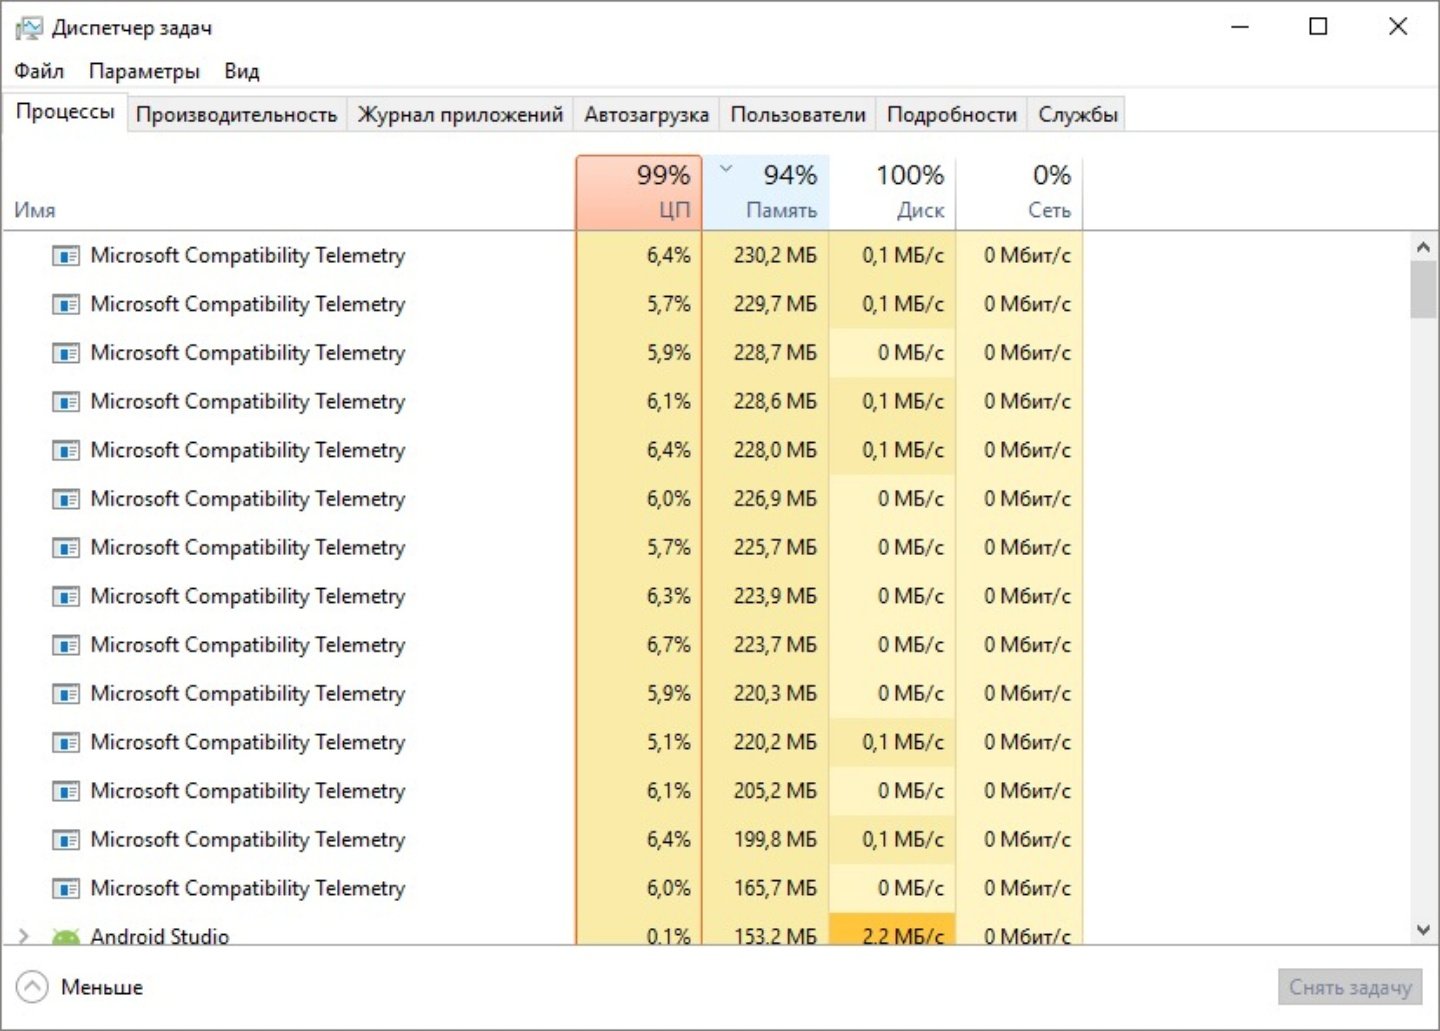
Если вы столкнулись с тем, что Microsoft Compatibility Telemetry нагружает процессор или диск yf 99%, то компонент лучше отключить.
Способ 1 – Службы
- В поиске Windows найдите «Службы»;
- В представленном списке найдите компонент «Функциональные возможности для подключенных пользователей и телеметрия» (в старых версиях он называется «Служба диагностического отслеживания») и кликните на него дважды;
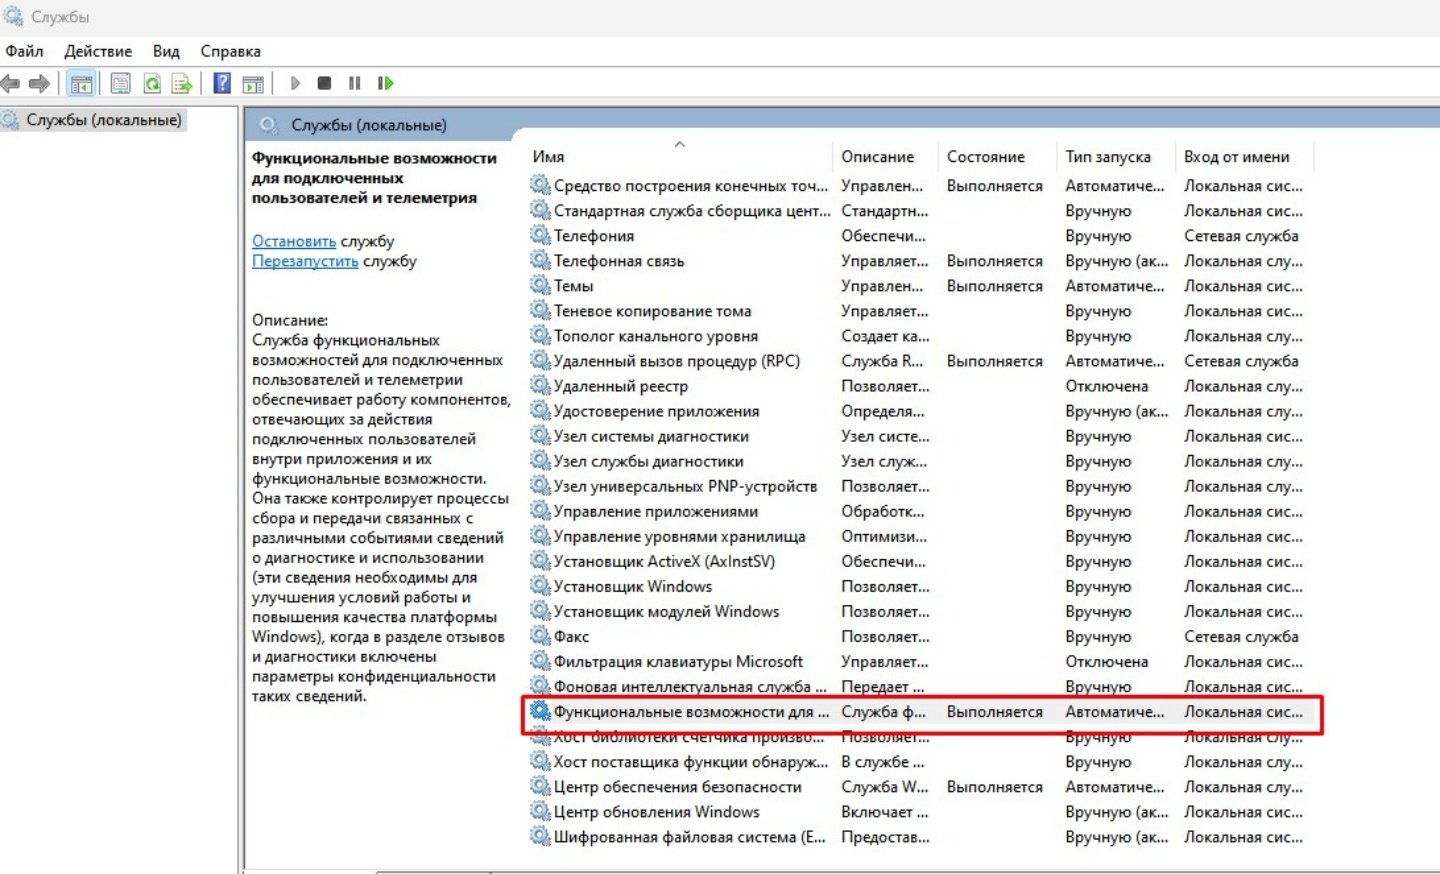
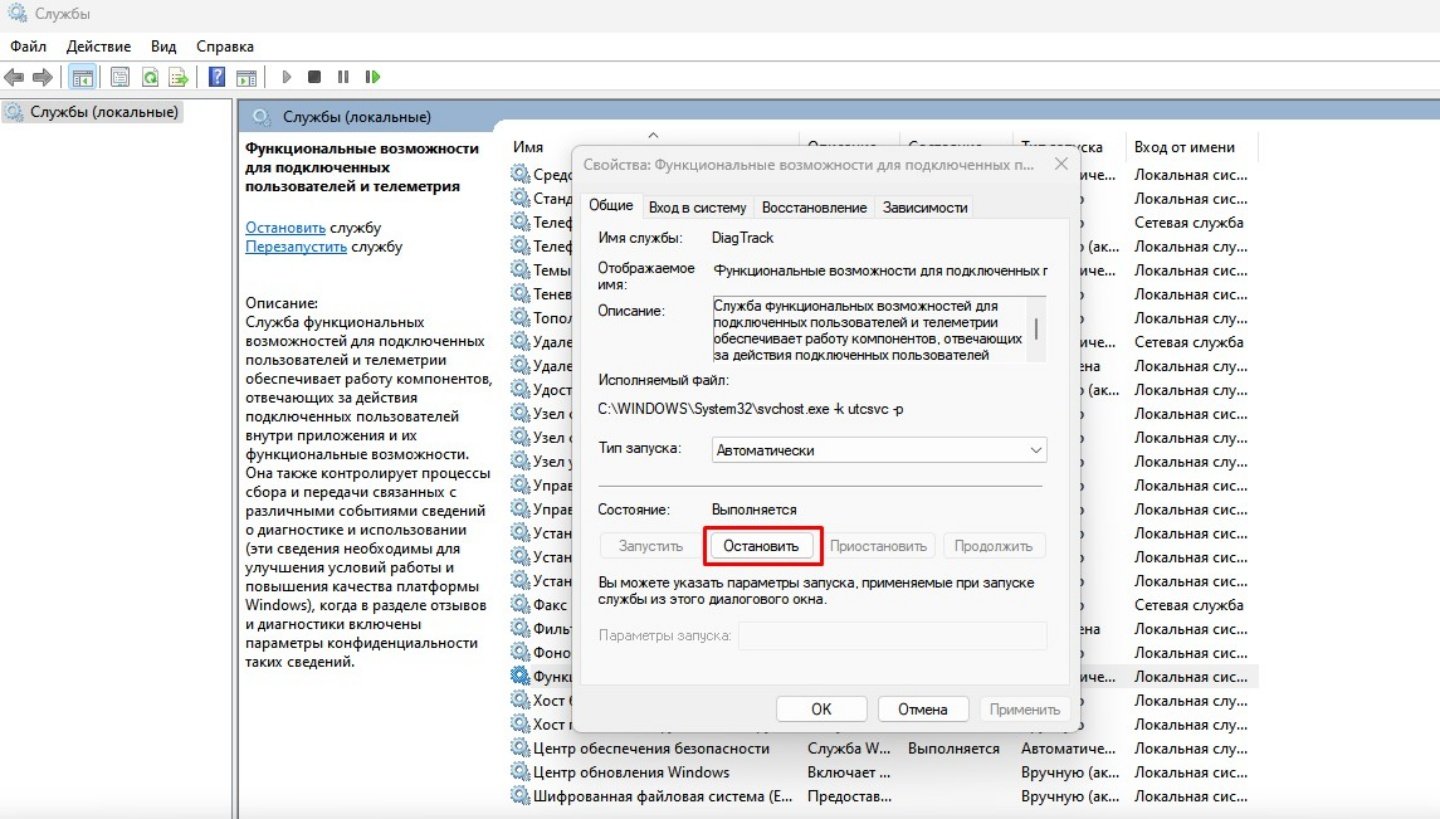
- В новом окне кликните на «Остановить»;
- В разделе «Тип запуска» выберете «Отключена» или «Вручную»;
- Нажмите OK.
Способ 2 – Параметры
- Откройте «Параметры» (через поиск или комбинацию клавиш Win+I);
- Выберете раздел «Конфиденциальность»;
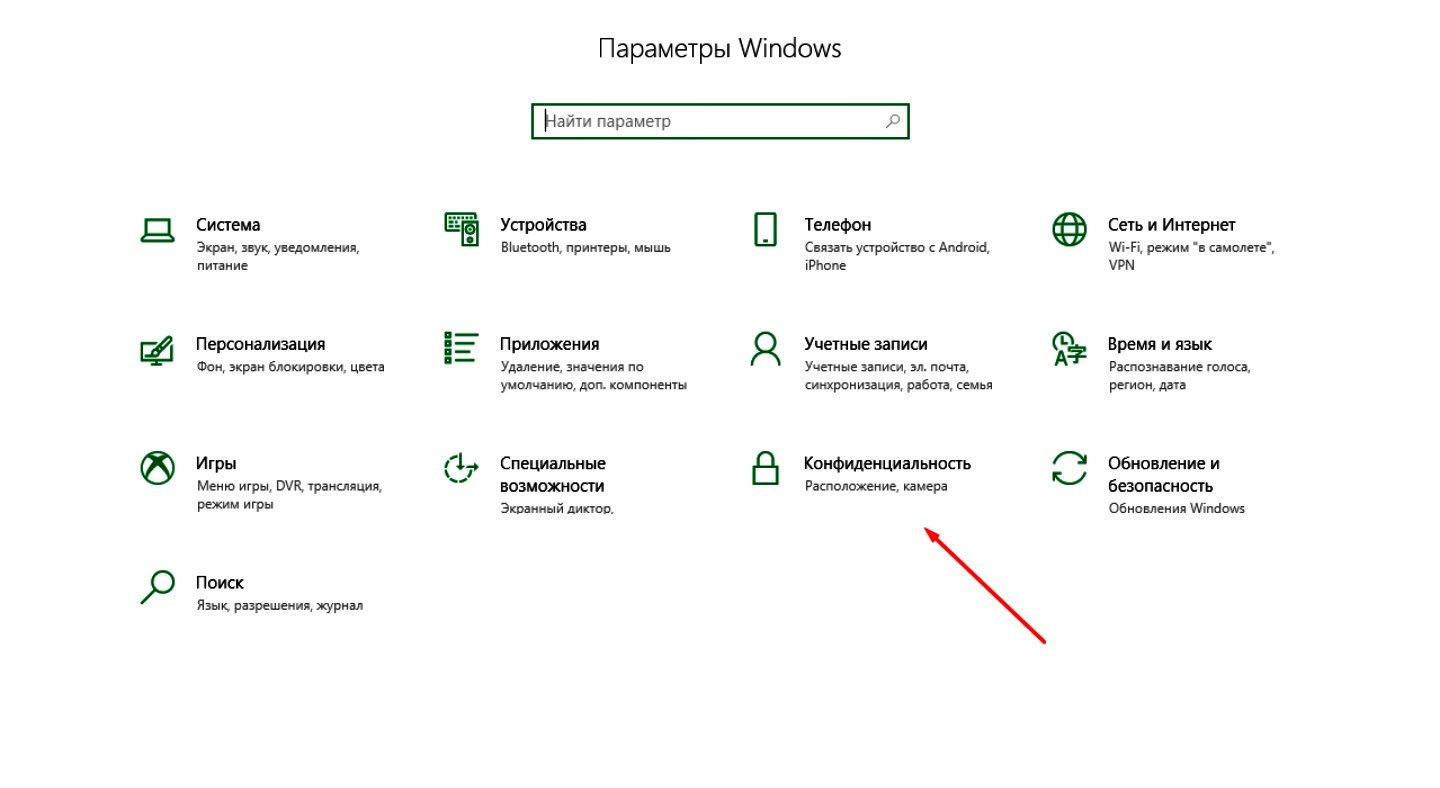
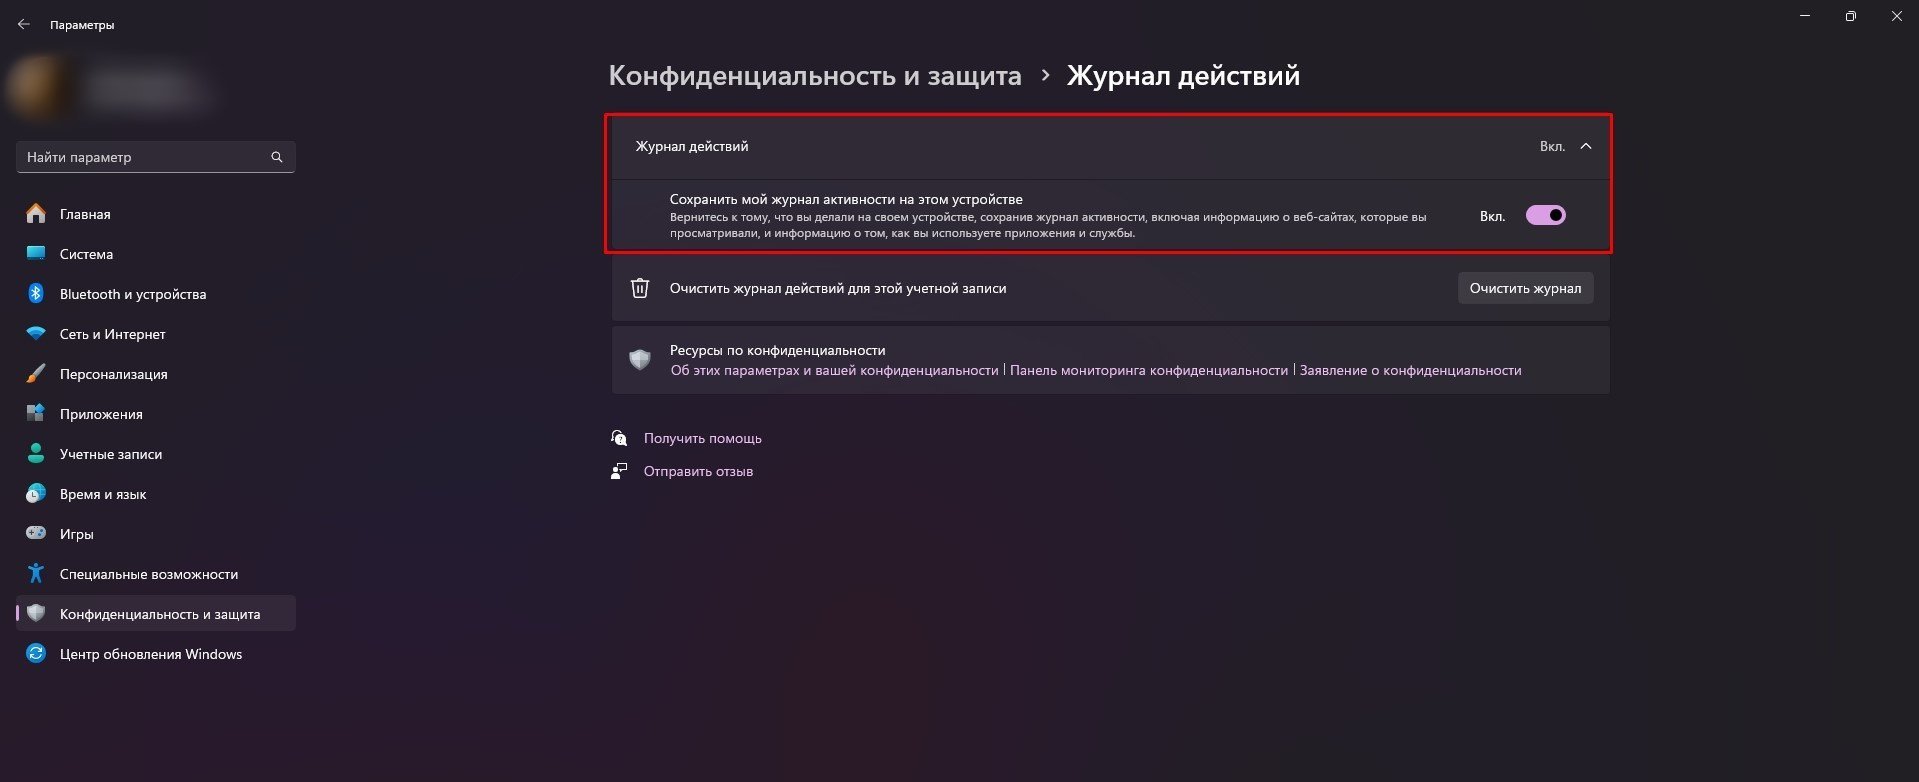
- В подпунктах «Диагностика и отзывы» и «Журнал действий» отключите все параметры, которые связаны с передачей данных.
Способ 3 – Групповая политика
Этот способ подойдет всем версиям WIndows, кроме «Домашней».
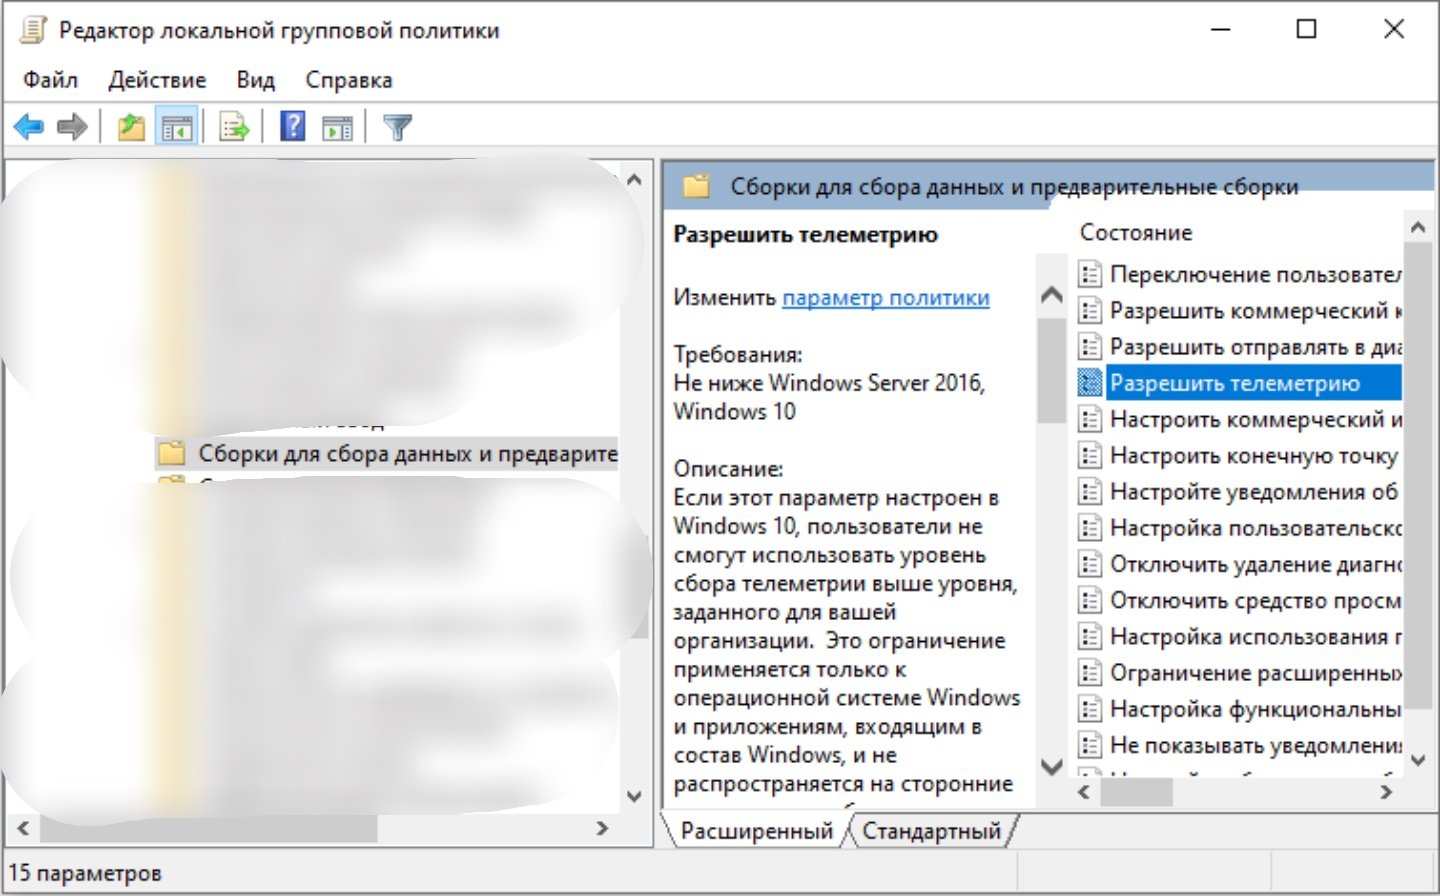
- Нажмите комбинацию клавиш Win+R и введите в строку gpedit.msc;
- Перейдите в разделы «Конфигурация компьютера» — «Административные шаблоны» «Компоненты Windows» — «Сборки для сбора данных и предварительные сборки»;
- Дважды кликните по «Разрешить телеметрию» и выберете «Отключено»;
- Нажмите ОК.
Способ 4 – Реестр
- Нажмите комбинацию клавиш Win+R и введите regedit;
- Перейдите по пути: HKEY_LOCAL_MACHINE\SOFTWARE\Policies\Microsoft\Windows\DataCollection;
- Создайте параметр DWORD 32 под названием «AllowTelemetry» и задайте ему значение 0.
Способ 5 – Сторонние программы
Наиболее популярными считаются O&O ShutUp10 и, например, Ashampoo AntiSpy.
- Установите нужную программу;
- Найдите в ней раздел Security;
- Активируйте три пункта Telemetry disabled.
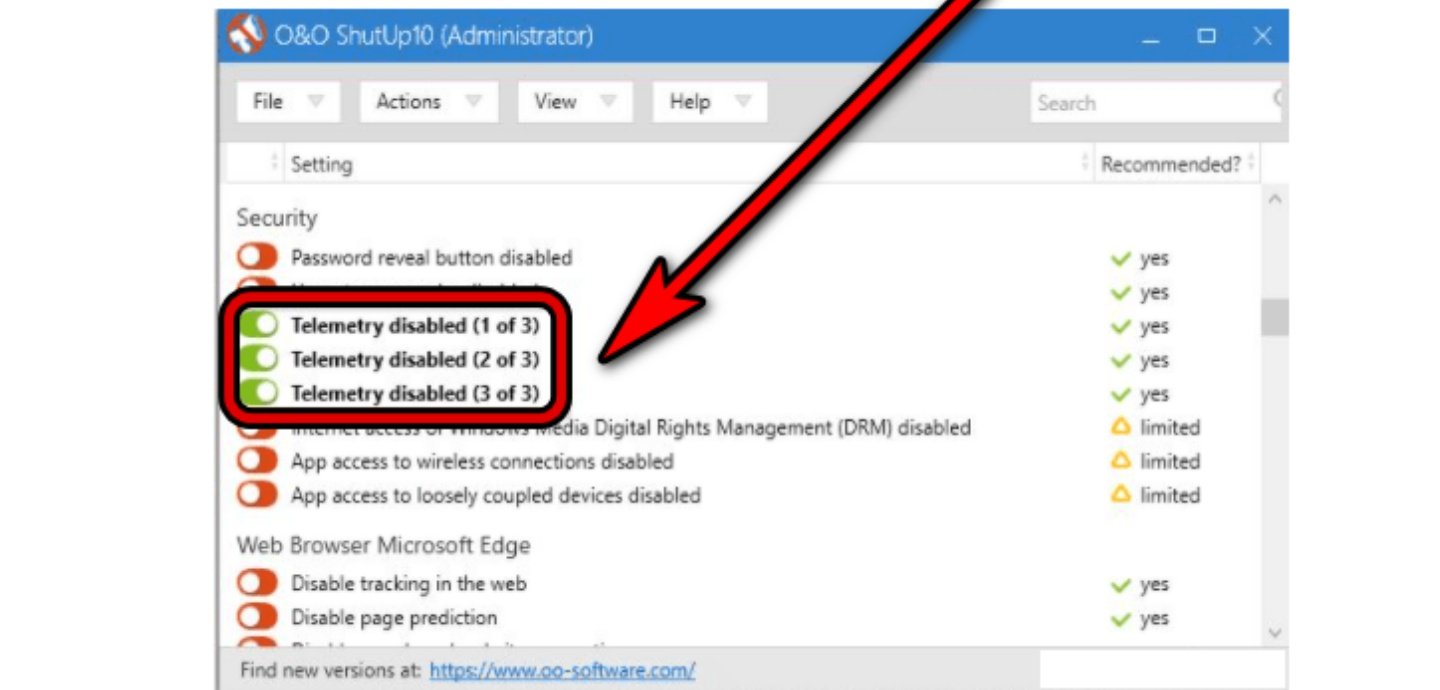
Пример из ShutUp10
Проверка нагрузки на процессор или диск
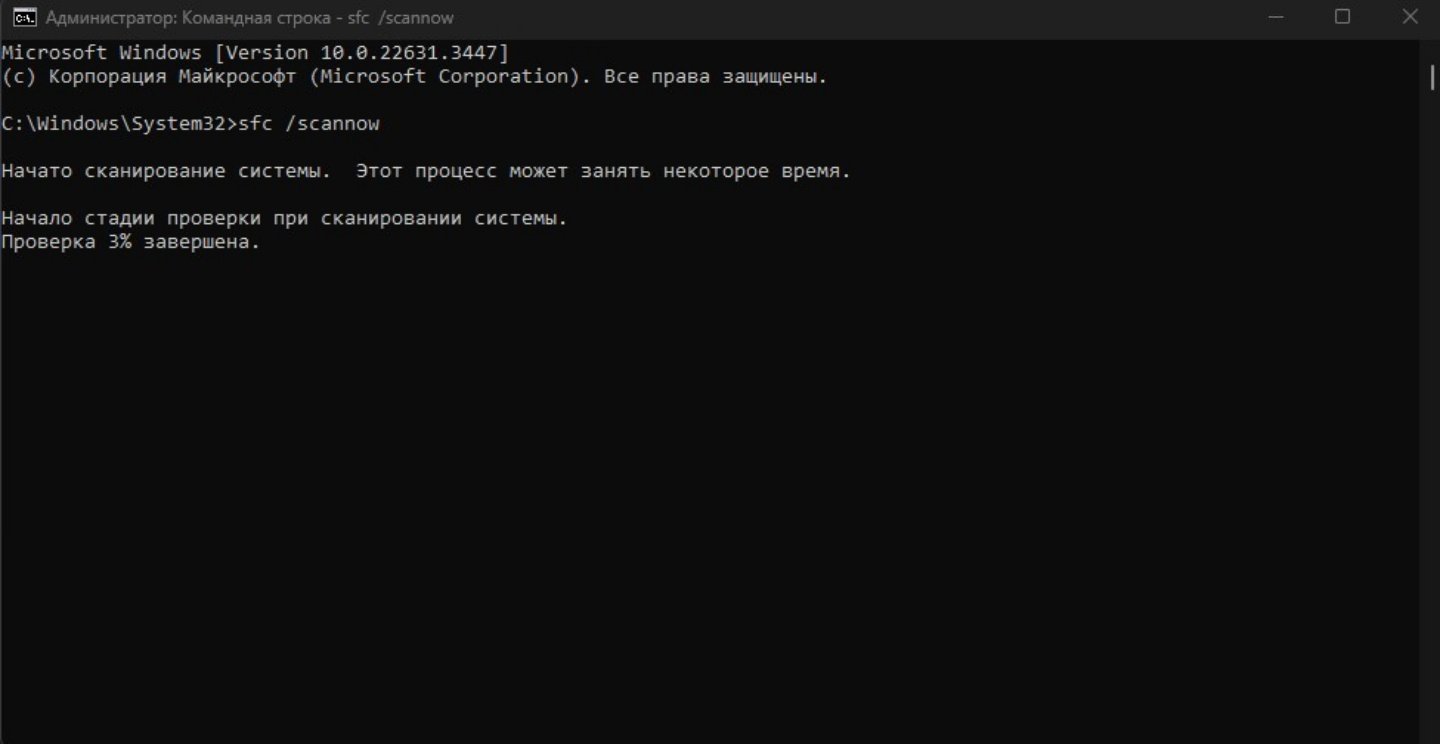
Проблема с высокой загрузкой диска или высокой загрузкой ЦП из-за Microsoft Compatibility Telemetry может быть вызвана повреждением системных файлов.
Чтобы решить эту проблему, вы можете запустить сканирование для поиска и замены поврежденных элементов.
- Введите в поиске «Командная строка» и выберите «Запуск от имени администратора»;
- Введите sfc /scannow и нажмите Enter;
- Подождите, пока утилита исправит ошибки.
Отключение Microsoft Compatibility Telemetry никак не повлияет на работу вашей Windows.
Заглавное фото: windowslatest
Microsoft’s telemetry feature tracks all your computer activities and sends it to Microsoft. This has left many users concerned about their privacy, as Microsoft actively collects the user information in the background. In an earlier version of Windows like Windows 7, telemetry only collected the required data for its updates. However, in Windows 10, it tracks all your daily computing habits.
It’s wise to never let anyone have so much information about you. However, in Windows 10 you can’t just disable telemetry completely from the GUI menu. But there are other methods you can use to do it. In this article, we have discussed how to disable telemetry in Windows 10.
Also, check out this article on how to turn off display in Windows 10.
In Windows 10 disable telemetry data collection is an urgent requirement for every user. Microsoft may say that they use the data for updating Windows or enhance the security, in my opinion, they are overdoing it by a mile. It is each user’s right to decide what data they share and what they keep private. Microsoft, however, does not allow users to turn off telemetry completely.
It’s still your right to protect your data. The following methods given can significantly decrease the amount of data that telemetry collects. Even if you can’t completely stop them, you can set a limit.
Method 1: Change Privacy Settings
Most of the options on the Privacy settings are on by default for telemetry to collect the data. You can disable these and limit telemetry significantly. To change Privacy settings, follow the steps given below:
- Open the Search bar and type Privacy settings. Select the appropriate option.
- In the General section, disable everything.
- Next, select the Diagnostic and Feedback option.
- Change the Diagnostic data to Basic.
- Also, disable the Tailored experience toggle.
- You can further disable allowing apps to access your location, contacts, messages. Just keep scrolling through the settings and disable anything you don’t want to share.
Method 2: Disable Microsoft Compatibility Telemetry
This is an advanced method as it will disable the main service for telemetry data collection. Disabling it will affect all the applications that use the Compatibility telemetry services.
This method will also stop telemetry from collecting your system data. To disable the Compatibility telemetry services, follow the steps given below:
- Open the Run utility by pressing the Windows + R keys.
- Type cmd in the search bar and press Ctrl + Shift + Enter to open an elevated Command Prompt.
- Enter the following commands in the given order:
sc delete DiagTrack , press Enter
sc delete dmwappushservice , press Enter
echo “” > C:\\ProgramData\\Microsoft\\Diagnosis\\ETLLogs\\AutoLogger\\AutoLogger-Diagtrack-Listener.etl , press Enter
reg add “HKLM\\SOFTWARE\\Policies\\Microsoft\\Windows\\DataCollection” /v AllowTelemetry /t REG_DWORD /d 0 /f , press Enter
- After the above commands finishes running, restart your PC
Method 3: Disable Using From The Registry Editor And Services App
This is the GUI method of the steps in Method 2, and should be done carefully. In this method, you will have to disable Windows 10 telemetry collection service using the Registry Editor and the Services app.
Caution: Using this method will hinder the PC’s ability to fetch and install Windows updates.
If you want to use this method, then follow the steps given below:
- Open the Run utility again.
- Type regedit in the search bar and press Enter to open the Registry Editor.
- Now, navigate to the following registry key:
HKEY_LOCAL_MACHINE\SOFTWARE\Policies\Microsoft\Windows\DataCollection - In the right panel after selecting the DataCollection key, right-click on the open white area.
- Select the New option and then click on the DWORD (32-bit) Value option. Name the DWORD AllowTelemetry and open it.
- Next, change the Base to the Hexadecimal option and set the Value data to 0.
- Click on OK to save the new DWORD.
- Now, open the Run utility again and search services.msc. This will open the Services utility.
- Locate the Connected User Experiences and Telemetry service and double-click on it to open its properties.
- In the General tab, change the Startup type to Disabled.
- Click on Apply and OK to save the changes.
- Repeat the 9th 10th and 11th step with the Diagnostics Tracking Service.
- Finally, restart your computer.
Method 4: Disable From The Local Policy Editor
This final method will only work for Windows 10 Pro and Enterprise users. You can use the Local Policy Editor to stop the police that is linked with Data Collection and Preview Builds. To do it, follow the steps given below:
- Open the Run utility again.
- Type gpedit.msc and press Enter to open the Local Policy Editor.
- Next, navigate to the following location:
Computer Configuration -> Administrative Templates -> Windows Components -> Data Collection and Preview Builds - Locate and double-click on the Allow telemetry option.
- Change the status of Allow telemetry to Disabled.
- Click on Apply and OK to save the changes.
- Finally, close the Local Group Policy Editor and restart your computer.
This method will disable Windows 10 telemetry.
Wrapping Up
There you have it, now you know how to disable telemetry on Windows 10. Execute the above methods before carefully reading the repercussions of those methods. If you have any questions related to this article, ask them in the comment section below.