
По умолчанию в Microsoft Windows разных версий есть приложение «Ваш телефон», которое используется в момент подключения смартфона к ПК. Процесс YourPhone.exe не является вирусом, даже несмотря на то, что он может потреблять довольно много ресурсов компьютера без видимых причин. Сервис выполняет роль своеобразного моста между устройствами.
Вариантов здесь несколько. Первый — полностью отключить сервис, если он тянет сильно много ЦП и ОЗУ или он просто не нужен. Можно даже полностью удалить его с ПК. Второй – пытаться исправить службу, если она повреждена. Для этого нужно запускать средство исправления неполадок и сканирование системы через sfc. Поломки процесса встречаются нечасто, преимущественно пользователи просто хотят его отключить для экономии ресурсов ПК. На этом и сконцентрируемся в инструкции.
Отключаем YourPhone.exe
Если сейчас нет потребности в подключении смартфона к компьютеру, можно выключить процесс. Его в любой момент можно будет запустить повторно, но до тех пор, сэкономим немного ОЗУ и ЦП, так как штатно он работает в фоновом режиме.
Для отключения нужно:
- Перейти в «Параметры» сочетанием клавиш Ctrl + I и выбрать пункт «Конфиденциальность».
- Открываем вкладку «Фоновые приложения» и отключаем службу «Ваш телефон».

Удаляем Yourphone.exe
Метод подразумевает полное удаление приложения «Ваш телефон», но для этого нужно использовать командую строку или PowerShell. Просто так встроенную утилиту не удалить.
Пошаговая инструкция:
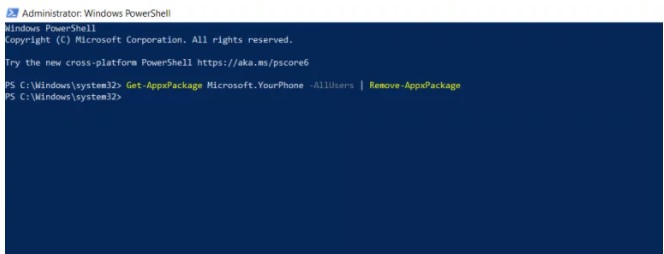
- Вводим в поисковую строку PowerShell и открываем консоль с правами администратора.
- Вставляем команду Get-AppxPackage Microsoft.YourPhone -AllUsers | Remove-AppxPackage и жмем Enter.
- После непродолжительного ожидания высветится сообщение об успешном завершении процедуры.
Если в будущем снова потребуется программа «Ваш телефон», ее можно установить из магазина Microsoft Store. Поэтому ничего страшного в удалении нет, все действия легко обратимы.
Пользователи Windows 11 и 10 могут обратить внимание на процесс PhoneExperienceHost.exe в диспетчере задач: обычно он не вызывает проблем, но для некоторых не ясно его назначение, а часть пользователей хотели бы убрать его из списка выполняемых в фоновом режиме процессов, чтобы он не потреблял системные ресурсы.
В этой инструкции о том, для чего используется процесс PhoneExperienceHost и как отключить его, если он вам не требуется.
Назначение процесса

Процесс PhoneExperienceHost.exe относится к встроенному приложению «Связь с телефоном» (ранее — «Ваш телефон»), которое позволяет подключать Android, а с недавнего времени — и iPhone к компьютеру для выполнения звонков, работы с сообщениями, приложениями, доступа к фото на телефоне.

Если вы используете эти возможности в Windows 11/10, что-либо делать с процессом не нужно: именно он обеспечивает работу соответствующих функций.
В ситуации, когда приложение «Связь с телефоном» и предлагаемые им возможности не используются, вы можете отключить процесс так, чтобы в дальнейшем он не появлялся в списке процессов.
Как отключить PhoneExperienceHost.exe
Первое действие для отключения фоновой работы процесса PhoneExperienceHost.exe — зайти в параметры автозагрузки (Параметры — Приложения — Автозагрузка или раздел «Автозагрузка» в диспетчере задач) и отключить автозагрузку для приложения «Связь с телефоном».

После этого потребуется выполнить следующие шаги:
- В Windows 11 зайти в Параметры — Bluetooth и устройства — Связь с телефоном и отключите опцию «Связь с телефоном».
- В Windows 10 зайти в Параметры — Телефон и выключите опцию «Включить связь с телефоном».
В редких случаях это не срабатывает, в этом случае возможно полное отключение: достаточно удалить приложение «Связь с телефоном», в случае если оно вам не требуется. Сделать это можно вручную:
- Запустите Windows PowerShell или Терминал Windows от имени администратора (например, с помощью меню по правому клику на кнопке «Пуск»).
- Введите команду
get-appxpackage *Microsoft.YourPhone* | remove-appxpackage
и нажмите Enter.

- Приложение будет удалено, а работа соответствующего процесса прекратится.

Также вы можете использовать сторонние деинсталляторы для удаления этого приложения.
Оригинальный файл PhoneExperienceHost.exe находится в системной папке (версия в имени папки может отличаться)
C:\Program Files\WindowsApps\Microsoft.YourPhone_1.23092.142.0_x64__8wekyb3d8bbwe
а в свойствах файла можно увидеть, что он подписан цифровой подписью Майкрософт.
В случае, если расположение отличается или есть иные основания предполагать небезопасность процесса, используйте диспетчер задач, чтобы открыть расположение файла, после чего проверьте его с помощью virustotal.com или другими способами на наличие угроз.
The “MS-Windows Support Alert” page is a browser-based scam that displays fake error messages to trick you into calling a Tech Support Scam phone number.
 1")
What is “MS-Windows Support Alert”?
The “MS-Windows Support Alert” fake error message is a scam that pretends to be from Microsoft to trick you into thinking that your computer has crashed or that a virus has been detected. It does this to try and scare you into calling one of the listed numbers in order to receive support.
If you call these phone numbers, scammers will ask you to install a program that gives them remote access to your computer. Using remote access, these experienced scammers rely on confidence tricks typically involving utilities built into Windows (eg. Event Viewer) in order to gain your trust and trick you into paying for a “support” services or even steal credit card account information.
The “MS-Windows Support Alert” tech support scam will put your browser on full-screen mode and display pop-up messages that won’t go away, essentially locking your browser. If this happens, you can use the Windows Task Manager to close your browser and stop this pop-up.
- Open the “Task Manager” by right-clicking the taskbar and then selecting Task Manager. You can also open the Task Manager by pressing Ctrl+Alt+Del on your keyboard and then select Task Manager.
- Scroll through the list until you see your web browser’s process and left-click on it once so it becomes highlighted. Once you have selected the browser’s process, click on the End Task button as shown in the image below.
- Your browser window should now be closed. The next time you open your browser, do not allow the browser to open the last opened page.
This is the fake error message that the “MS-Windows Support Alert” page will display:
VIRUS ALERT FROM MS-Windows
This computer is BLOCKED
Do not close this window and restart your computer
Your computer’s registration key is Blocked.
Why we blocked your computer?
The window’s registration key is illegal.
This window is using pirated software.
This window is sending virus over the internet.
This window is hacked or used from undefined location.
We block this computer for your security.
Contact MS-Windows helpline to reactivate your computer.
MS-Windows Security Tollfree:————-
MS-Windows Support Alert
Your System Detected Some Unusual Activity.
It might harm your computer data and track your financial activities.
As you can imagine, the above alert is not real and its purpose is to scare you into allowing the scammer remote access to your computer. If your browser has been redirected to the “MS-Windows Support Alert” tech support scam, we recommend to close the page and do not call the listed phone number.
Why am I seeing the “MS-Windows Support Alert” pop-up ads?
You are seeing the “MS-Windows Support Alert” tech support scam because your device is infected with malware, malicious push notifications, or a site you have visited has redirected your browser.
Less than reputable sites can display malicious ads that redirect your browser to the “MS-Windows Support Alert” tech support scam to generate advertising revenue. If this happens, you can close the page and install an ad blocker like AdGuard to block the malicious ads. However, if you are continuously seeing pop-ups like the “MS-Windows Support Alert” tech support scam, then your computer might be infected with a malicious program and you need to scan your device for adware and remove it.
Here are a few typical signs that you have a malicious program installed on your computer:
- Advertisements appear in places they shouldn’t be.
- Your web browser’s homepage has mysteriously changed without your permission.
- Web pages that you typically visit are not displaying properly.
- Website links redirect to sites different from what you expected.
- Browser popups appear which recommend fake updates or other software.
- Other unwanted programs might get installed without your knowledge.
To check your computer for the “MS-Windows Support Alert” adware and remove it for free, please use the guide below.
How to remove “MS-Windows Support Alert” pop-up scam (Virus Removal Guide)
The below instructions are for Windows users, however, we also have an Android Guide and a Mac Guide which should help clean up your device.
This malware removal guide may appear overwhelming due to the number of steps and numerous programs that are being used. We have only written it this way to provide clear, detailed, and easy to understand instructions that anyone can use to remove malware for free.
Please perform all the steps in the correct order. If you have any questions or doubts at any point, stop and ask for our assistance.
To remove the “MS-Windows Support Alert” tech support scam, follow these steps:
- STEP 1: Uninstall the malicious programs from Windows
- STEP 2: Use Malwarebytes Free to remove “MS-Windows Support Alert” adware
- STEP 3: Double-check for malicious programs with HitmanPro
- STEP 4: Remove “MS-Windows Support Alert” pop-ups from browser
STEP 1: Uninstall the malicious programs from Windows
In this first step, we will check if there are any malicious programs installed on your computer. Sometimes browser hijackers or adware programs can have usable Uninstall entries that can be used to remove these programs.
Windows 10Windows 8Windows 7
-
Open the “Settings” menu.
Click the Start button on the taskbar, then select “Settings” (gear icon).

-
Click on “Apps”, then on “Apps and Features”.
When the “Windows Settings” window opens, click on “Apps“. By default, it should open “Apps and Features” but if it doesn’t, select it from the list on the left.

-
Find the malicious program and uninstall it.
The “Apps and Features” screen will be displayed with a list of all the programs installed on your computer. Scroll through the list until you find the malicious program, then click to highlight it, then click the “Uninstall” button.
Look out for any suspicious program that could be behind all the drama – anything you don’t remember downloading or that doesn’t sound like a genuine program.
Here are some known malicious programs: PDFPoof, BatBitRst, MessengerNow, SearchAd, MyPrintableCoupons, Reading Cursors, ProMediaConverter, PDFOnline-express, See Scenic Elf, Clickware, Easy Speedtest, or WebDiscover.
The malicious program may have a different name on your computer. If you cannot find any malicious programs on your computer, you can continue with the second step from this guide.

-
Follow the on-screen prompts to uninstall the program.
In the next message box, confirm the uninstall process by clicking on Uninstall, then follow the prompts to uninstall the program.
Make sure to read all of the prompts carefully, because some malicious programs try to sneak things in hoping that you won’t read closely.


-
Go to “Program and Features”.
Right-click on the Start button in the taskbar, then select “Programs and Features”. This will take you directly to your list of installed programs.
 2")
-
Find the malicious program and uninstall it.
The “Programs and Features” screen will be displayed with a list of all the programs installed on your computer. Scroll through the list until you find the malicious program, then click to highlight it, then click the “Uninstall” button that appears on the top toolbar.
Look out for any suspicious program that could be behind all the drama – anything you don’t remember downloading or that doesn’t sound like a genuine program.
Here are some known malicious programs: PDFPoof, BatBitRst, MessengerNow, SearchAd, MyPrintableCoupons, Reading Cursors, ProMediaConverter, PDFOnline-express, See Scenic Elf, Clickware, Easy Speedtest, or WebDiscover.
The malicious program may have a different name on your computer. If you cannot find any malicious programs on your computer, you can continue with the next step from this guide.
 3")
-
Follow the on-screen prompts to uninstall the program.
In the next message box, confirm the uninstall process by clicking on Yes, then follow the prompts to uninstall the program. Make sure to read all of the prompts carefully, because some malicious programs try to sneak things in hoping that you won’t read closely.
 2")
 3")
-
Open the “Control Panel”.
Click on the “Start” button, then click on “Control Panel“.
-
Click on “Uninstall a Program”.
When the “Control Panel” appears, click on “Uninstall a Program” from the Programs category.
 5")
-
Find the malicious program and uninstall it.
The “Programs and Features” screen will be displayed with a list of all the programs installed on your computer. Scroll through the list until you find the malicious program, then click to highlight it, then click the “Uninstall” button that appears on the top toolbar.
Look out for any suspicious program that could be behind all the drama – anything you don’t remember downloading or that doesn’t sound like a genuine program.
Here are some known malicious programs: PDFPoof, BatBitRst, MessengerNow, SearchAd, MyPrintableCoupons, Reading Cursors, ProMediaConverter, PDFOnline-express, See Scenic Elf, Clickware, Easy Speedtest, or WebDiscover.
The malicious program may have a different name on your computer. If you cannot find any malicious programs on your computer, you can continue with the next step from this guide.
 6")
-
Follow the on-screen prompts to uninstall the program.
In the next message box, confirm the uninstall process by clicking on Yes, then follow the prompts to uninstall the program. Make sure to read all of the prompts carefully, because some malicious programs try to sneak things in hoping that you won’t read closely.
 5")
 6")
STEP 2: Use Malwarebytes Free to remove “MS-Windows Support Alert” adware
In this second step, we will install Malwarebytes to scan and remove the “MS-Windows Support Alert” adware from your computer. Malwarebytes Free is one of the most popular and most used anti-malware software for Windows, and for good reasons. It is able to destroy many types of malware that other software tends to miss, without costing you absolutely nothing. When it comes to cleaning up an infected device, Malwarebytes has always been free and we recommend it as an essential tool in the fight against malware.
-
Download Malwarebytes Free.
You can download Malwarebytes by clicking the link below.
MALWAREBYTES DOWNLOAD LINK
(The above link will open a new page from where you can download Malwarebytes) -
Double-click on the Malwarebytes setup file.
When Malwarebytes has finished downloading, double-click on the MBSetup file to install Malwarebytes on your computer. In most cases, downloaded files are saved to the Downloads folder.

You may be presented with an User Account Control pop-up asking if you want to allow Malwarebytes to make changes to your device. If this happens, you should click “Yes” to continue with the Malwarebytes installation.

-
Follow the on-screen prompts to install Malwarebytes.
When the Malwarebytes installation begins, you will see the Malwarebytes setup wizard which will guide you through the installation process. The Malwarebytes installer will first ask you on what type of computer are you installing this program, click either Personal Computer or Work Computer.

On the next screen, click “Install” to install Malwarebytes on your computer.

When your Malwarebytes installation completes, the program opens to the Welcome to Malwarebytes screen. Click the “Get started” button.
-
Select “Use Malwarebytes Free”.
After installing Malwarebytes, you’ll be prompted to select between the Free and the Premium version. The Malwarebytes Premium edition includes preventative tools like real-time scanning and ransomware protection, however, we will use the Free version to clean up the computer.
Click on “Use Malwarebytes Free“.
-
Click on “Scan”.
To scan your computer with Malwarebytes, click on the “Scan” button. Malwarebytes will automatically update the antivirus database and start scanning your computer for malware.

-
Wait for the Malwarebytes scan to complete.
Malwarebytes will scan your computer for adware and other malicious programs. This process can take a few minutes, so we suggest you do something else and periodically check on the status of the scan to see when it is finished.
-
Click on “Quarantine”.
When the scan has completed, you will be presented with a screen showing the malware infections that Malwarebytes has detected. To remove the malicious programs that Malwarebytes has found, click on the “Quarantine” button.

-
Restart computer.
Malwarebytes will now remove all the malicious files and registry keys that it has found. To complete the malware removal process, Malwarebytes may ask you to restart your computer.
When the malware removal process is complete, you can close Malwarebytes and continue with the rest of the instructions.


STEP 3: Double-check for malicious programs for HitmanPro
In this third step, we will use HitmanPro to do a final scan for malicious programs. HitmanPro is a second opinion scanner that takes a unique cloud-based approach to malware scanning. HitmanPro scans the behavior of active files and also files in locations where malware normally resides for suspicious activity. If it finds a suspicious file that’s not already known, HitmanPro sends it to their clouds to be scanned by two of the best antivirus engines today, which are Bitdefender and Kaspersky.
Although HitmanPro is shareware and costs $24.95 for 1 year on 1 PC, there is actually no limit in scanning. The limitation only kicks in when there is a need to remove or quarantine detected malware by HitmanPro on your system and by then, you can activate the one time 30-days trial to enable the cleanup.
-
Download HitmanPro.
You can download HitmanPro by clicking the link below.
HITMANPRO DOWNLOAD LINK
(The above link will open a new web page from where you can download HitmanPro) -
Install HitmanPro.
When HitmanPro has finished downloading, double-click on “hitmanpro.exe” (for 32-bit versions of Windows) or “hitmanpro_x64.exe” (for 64-bit versions of Windows) to install this program on your PC. In most cases, downloaded files are saved to the Downloads folder.

You may be presented with an User Account Control pop-up asking if you want to allow HitmanPro to make changes to your device. If this happens, you should click “Yes” to continue with the installation.
 8")
-
Follow the on-screen prompts.
When HitmanPro starts you will be presented with the start screen as shown below. Click on the “Next” button to perform a system scan.


-
Wait for the HitmanPro scan to complete.
HitmanPro will now begin to scan your computer for malicious programs. This process will take a few minutes.

-
Click on “Next”.
When HitmanPro has finished the scan, it will display a list of all the malware that the program has found. Click on the “Next” button to remove the malicious programs.

-
Click on “Activate free license”.
Click on the “Activate free license” button to begin the free 30 days trial and remove all the malicious files from your PC.


When the process is complete, you can close HitmanPro and continue with the rest of the instructions.

 8")


STEP 4: Remove “MS-Windows Support Alert” pop-ups from browser
In this final step, if your browser is still redirected to “MS-Windows Support Alert” scam sites, we will need to reset the web browser settings to their original defaults. This step should be performed only if your issues have not been solved by the previous steps.
ChromeFirefoxMicrosoft EdgeInternet Explorer
Remove “MS-Windows Support Alert” pop-ups from Google Chrome
To remove “MS-Windows Support Alert” pop-ups from Chrome we will reset the browser settings to its default. Resetting your browser settings will reset the unwanted changes caused by installing other programs. However, your saved bookmarks and passwords will not be cleared or changed.
-
Click the menu icon, then click on “Settings”.
In the top right corner, click on Chrome’s main menu button, represented by three vertical dots. When the drop-down menu appears, click on “Settings“.

-
Click “Advanced”.
Chrome’s “Settings” should now be displayed in a new tab or window, depending on your configuration. Next, scroll to the bottom of the page and click on the “Advanced” link.
-
Click “Reset settings to their original defaults”.
Scroll down until the “Reset and clean up” section is visible, as shown in the example below. Click on “Reset settings to their original defaults“.
-
Click “Reset Settings”.
A confirmation dialog should now be displayed, detailing the components that will be restored to their default state should you continue on with the reset process. To complete the restoration process, click on the “Reset Settings” button.


 9")
Remove “MS-Windows Support Alert” pop-ups from Firefox
To remove “MS-Windows Support Alert” pop-ups from Firefox we will reset the browser settings to its default. The reset feature fixes many issues by restoring Firefox to its factory default state while saving your essential information like bookmarks, passwords, web form auto-fill information, browsing history, and open tabs.
-
Click the menu icon, then click on “Help”.
Click on Firefox’s main menu button, represented by three horizontal lines. When the drop-down menu appears, select the option labeled “Help“.

-
Click “Troubleshooting Information”.
From the Help menu, click on “Troubleshooting Information“.
-
Click on “Refresh Firefox”
Click the “Refresh Firefox” button in the upper-right corner of the “Troubleshooting Information” page.
-
Confirm.
To continue, click on the “Refresh Firefox” button in the new confirmation window that opens.
-
Click “Finish”.
Firefox will close itself and will revert to its default settings. When it’s done, a window will list the information that was imported. Click on “Finish“.
Your old Firefox profile will be placed on your desktop in a folder named “Old Firefox Data“. If the reset didn’t fix your problem you can restore some of the information not saved by copying files to the new profile that was created. If you don’t need this folder any longer, you should delete it as it contains sensitive information.

 10")


Remove “MS-Windows Support Alert” pop-ups from Microsoft Edge
To remove “MS-Windows Support Alert” pop-ups from Microsoft Edge we will reset the browser settings to its default. This will reset your startup page, new tab page, search engine, and pinned tabs. It will also disable all extensions and clear temporary data like cookies. Your favorites, history and saved passwords will not be cleared.
-
Open the “Settings” menu.
In the top right corner, click on Microsoft Edge’s main menu button, represented by three horizontal dots. When the drop-down menu appears, click on “Settings“.”.

-
Click on “Reset Settings”.
On the left side of the window, click on “Reset Settings”.
-
Click on “Restore settings to their default values”.
In the main window, click on “Restore settings to their default values”.
-
Click “Reset”.
A confirmation dialog should now be displayed, detailing the components that will be restored to their default state should you continue on with the reset process. To complete the restoration process, click on the “Reset” button.


 11")
Remove “MS-Windows Support Alert” pop-ups from Internet Explorer
To remove “MS-Windows Support Alert” pop-ups from Internet Explorer we will reset the browser settings to its default. You can reset Internet Explorer settings to return them to the state they were in when Internet Explorer was first installed on your computer.
-
Go to “Internet Options”.
Open Internet Explorer, click on the gear icon in the upper right part of your browser, then select “Internet Options“.
-
Select the “Advanced” tab, then click “Reset”
In the “Internet Options” dialog box, select the “Advanced” tab, then click on the “Reset” button.
-
Click on “Reset”.
In the “Reset Internet Explorer settings” section, select the “Delete personal settings” checkbox, then click on the “Reset” button.
-
Click on “Close”.
When Internet Explorer has completed its task, click on the “Close” button in the confirmation dialogue box.
Close your browser and then you can open Internet Explorer again.
Your computer should now be free of the “MS-Windows Support Alert” tech support scam pop-ups. If your current antivirus allowed this malicious program on your computer, you may want to consider purchasing the full-featured version of Malwarebytes Anti-Malware to protect against these types of threats in the future.
If you are still having problems with your computer after completing these instructions, then please follow one of the steps:
- Run a computer scan with ESET Online Scanner
- Ask for help in our Windows Malware Removal Help & Support forum.
Here are 10 basic security tips to help you avoid malware and protect your device:
Use a good antivirus and keep it up-to-date.
It’s essential to use a good quality antivirus and keep it up-to-date to stay ahead of the latest cyber threats. We are huge fans of Malwarebytes Premium and use it on all of our devices, including Windows and Mac computers as well as our mobile devices. Malwarebytes sits beside your traditional antivirus, filling in any gaps in its defenses, and providing extra protection against sneakier security threats.
Keep software and operating systems up-to-date.
Keep your operating system and apps up to date. Whenever an update is released for your device, download and install it right away. These updates often include security fixes, vulnerability patches, and other necessary maintenance.
Be careful when installing programs and apps.
Pay close attention to installation screens and license agreements when installing software. Custom or advanced installation options will often disclose any third-party software that is also being installed. Take great care in every stage of the process and make sure you know what it is you’re agreeing to before you click «Next.»
Install an ad blocker.
Use a browser-based content blocker, like AdGuard. Content blockers help stop malicious ads, Trojans, phishing, and other undesirable content that an antivirus product alone may not stop.
Be careful what you download.
A top goal of cybercriminals is to trick you into downloading malware—programs or apps that carry malware or try to steal information. This malware can be disguised as an app: anything from a popular game to something that checks traffic or the weather.
Be alert for people trying to trick you.
Whether it’s your email, phone, messenger, or other applications, always be alert and on guard for someone trying to trick you into clicking on links or replying to messages. Remember that it’s easy to spoof phone numbers, so a familiar name or number doesn’t make messages more trustworthy.
Back up your data.
Back up your data frequently and check that your backup data can be restored. You can do this manually on an external HDD/USB stick, or automatically using backup software. This is also the best way to counter ransomware. Never connect the backup drive to a computer if you suspect that the computer is infected with malware.
Choose strong passwords.
Use strong and unique passwords for each of your accounts. Avoid using personal information or easily guessable words in your passwords. Enable two-factor authentication (2FA) on your accounts whenever possible.
Be careful where you click.
Be cautious when clicking on links or downloading attachments from unknown sources. These could potentially contain malware or phishing scams.
Don’t use pirated software.
Avoid using Peer-to-Peer (P2P) file-sharing programs, keygens, cracks, and other pirated software that can often compromise your data, privacy, or both.
To avoid potential dangers on the internet, it’s important to follow these 10 basic safety rules. By doing so, you can protect yourself from many of the unpleasant surprises that can arise when using the web.
Readers help support Windows Report. We may get a commission if you buy through our links.
Read our disclosure page to find out how can you help Windows Report sustain the editorial team. Read more
Some users have wondered what the YourPhone.exe process is in Windows 10. That is, as some might now guess, a Your Phone process that sends notifications from mobiles to Windows desktops.
Your Phone is a UWP app included with Windows 10 1903. That is a Microsoft app that synchronizes Windows 10 with Android and iOS phones.
It lets users sync photos across Windows 10, Android, and Apple devices. In addition, users can utilize Your Phone to send SMS texts from desktop or laptop.
Is Your Phone exe a virus?
As mentioned earlier, Your Phone is a background app that integrates Windows with mobile devices. Hence, it is not a virus, and you have nothing to worry about.
But, if you are still looking to disable the app, we will show you the best ways to do it in this guide.
How do I disable Yourphone.exe in Windows 10?
1. Use the Settings app
- Press the Windows key + S, type background, and select the Background apps option.

- Scroll down to the Your Phone app.
- Now, toggle the switch before it backward to disable it.

- Finally, close the Settings app and restart your PC.


The first method to disable Microsoft yourphone.exe is to turn it off under background apps. With this, the app will stop using your resources, and it will not be visible in Task Manager.
2. End the process in Task Manager
- Press the Windows key + X and select the Task Manager option.
- Right-click Your phone under processes.
- Now, select End task.


If yourphone.exe is running, you can disable it for good in Task Manager by following the steps above.
3. Reset the app
- Press the Windows key + I and select the Apps option.

- Scroll down and click Your Phone in the right pane.
- Now, click Advanced options under it.

- Finally, click the Reset button and wait for the process to complete.


Sometimes, you might want to disable yourphone.exe because it is consuming too much resources or because it encountered a problem. The best thing to do is to reset the app and it should be back to normal.
- Plugin-container.exe: What is it & Should I Remove it?
- Conhost.exe: What is it & how to Fix Its High CPU Usage
4. Remove the app completely
- Press the Windows key, type powershell and select Run as administrator under Windows PowerShell.
- Type the command below and hit Enter to run it:
Get-AppxPackage Microsoft.YourPhone -AllUsers | Remove-AppxPackage
- Now, wait for the command to finish running and the app will be removed.


If you want to remove yourphone.exe on Windows 10 and 11 for some reason, you only need to run the commands above. Thankfully, you can download it in Microsoft Store if the need arises.
Can I delete Your Phone exe?
Your Phone is not an essential Windows process, so you can disable or remove it. We have shown how to uninstall the app in solution 4 above.
So, you can always follow the step if you need to.
So, that’s how users can disable the YourPhone.exe process in Windows 10. You will find this guide useful if you are also looking to remove the app completely.
If you want to keep the Your Phone app but it won’t connect to your mobile device, check our detailed guide to solve the problem.
Feel free to let us know the solution that helped you fix this issue in the comments below.
Matthew Adams
Windows Hardware Expert
Matthew is a freelancer who has produced a variety of articles on various topics related to technology. His main focus is the Windows OS and all the things surrounding it.
He is passionate about the tech world, always staying up-to-date with the latest and greatest. With an analytical view, he likes problem-solving, focusing on errors and their causes.
In his free time, he likes to read and write about history and tries to always develop new skills.