
Введение
Бывают ситуации, когда очень хочется использовать любимый редактор, но под рукой нету *nix операционных систем, либо разработка ведётся на Windows.
Первое что приходит на ум — использование Windows версии gVim, но в этом случае возникает куча проблем с установкой плагинов, переносом конфигов и адаптации всего и вся. Что-то не будет компилироваться без бубна (например Ctrl-p), а что-то падать во время работы.
Cygwin и Mintty спешат на помощь
Качаем с сайта и устанавливаем последнюю версию Cygwin.
При установке выбираем любое зеркало из списка доступных.
Выбираем следующие пакеты:
- git
- Vim
- ruby
- libsasl2
- ca-certificates
Пока пакеты качаются и ставятся, самое время добыть удобный терминал. Мой выбор пал на mintty. Установка осуществляется копированием mintty.exe в папку bin Cygwin-а.
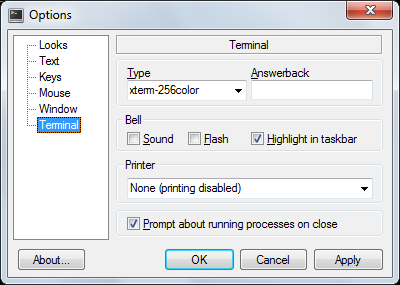
Для того, чтобы всё выглядело прилично — его нужно поднастроить. Запускаем mintty, тыкаем правой кнопкой на иконку в левом верхнем углу консольки и выбираем «Options…».
Выключаем опцию Blinking, чтобы не отвлекало, выбираем привычный Block в качестве курсора.

Выбираем шрифт по вкусу, ставим сглаживание в Full, Locale — C, Character Set — UTF-8.

Очень важно поставить тип терминала в xterm-256color.
VIM
Одно несомненное преимущество данного подхода это то, что теперь можно использовать ту же самую конфигурацию Vim, что и в *nix системе. А так же мы получаем в своё распоряжение полноценную консоль и можем работать с Windows файлами с помощью утилит grep, find, ack.
Рекомендую создать приватный репозиторий со всеми конфигами совершенно бесплатно на каком-нибудь Bitbucket. Такие подборки обычно называют dotfiles.
Одним приятным открытием в плане конфигурации Vim-а для меня стал Vimified, который базируется на Vundle.
Его лучше ставить по шагам, а то мало-ли что-то пропустили во время установки Cygwin. Шаги установки подробно расписаны в описании к репозиторию.
cd
git clone git://github.com/zaiste/vimified.git
ln -sfn vimified ~/.vim
ln -sfn vimified/vimrc ~/.vimrc
cd vimified
Затем
mkdir bundle
mkdir -p tmp/backup tmp/swap tmp/undo
Клонируем Vundle
git clone https://github.com/gmarik/vundle.git bundle/vundleПервый запуск Vim может пройти с ошибками из-за того, что предусмотренные конфигурацией пакеты ещё не установлены, но это не страшно.
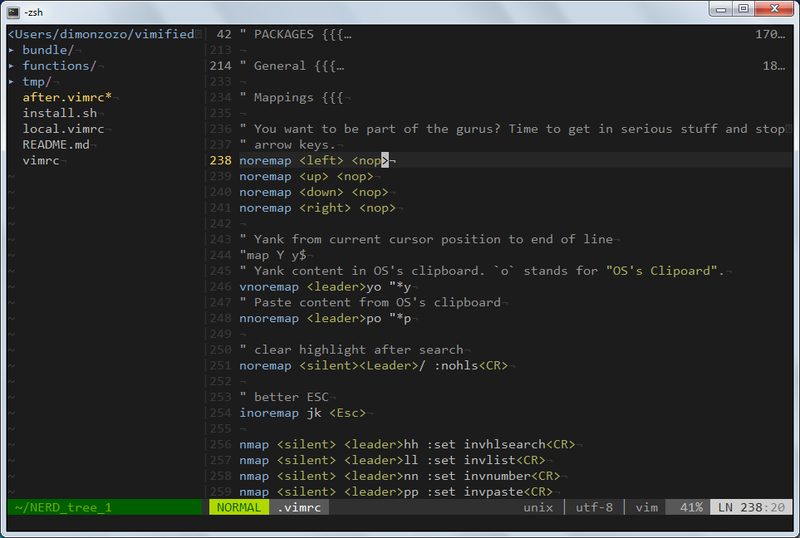
vim +BundleInstall +qallПерезапускаем Vim. И вот что у нас должно получится после небольших корректировок и правок.
Заключение
В итоге мы получили:
- Полноценный рабочий Vim
- Приятная цветовая схема и палитра, которая радует глаз
- Работает прокрутка колесом мыши (для любителей)
- Работает изменение размера панелей простым кликом и перетаскиванием
Спасибо за внимание. Надеюсь кому-нибудь пригодится.
Извещения об ошибках — хабрапочтой.
Только зарегистрированные пользователи могут участвовать в опросе. Войдите, пожалуйста.
Каким VIM-ом вы пользуетесь?
Проголосовали 588 пользователей. Воздержались 307 пользователей.
micro is a terminal-based text editor that aims to be easy to use and intuitive, while also taking advantage of the capabilities
of modern terminals. It comes as a single, batteries-included, static binary with no dependencies; you can download and use it right now!
As its name indicates, micro aims to be somewhat of a successor to the nano editor by being easy to install and use.
It strives to be enjoyable as a full-time editor for people who prefer to work in a terminal, or those who regularly edit files over SSH.
Here is a picture of micro editing its source code.

To see more screenshots of micro, showcasing some of the default color schemes, see here.
You can also check out the website for Micro at https://micro-editor.github.io.
Features
- Easy to use and install.
- No dependencies or external files are needed — just the binary you can download further down the page.
- Multiple cursors.
- Common keybindings (Ctrl-s, Ctrl-c, Ctrl-v, Ctrl-z, …).
- Keybindings can be rebound to your liking.
- Sane defaults.
- You shouldn’t have to configure much out of the box (and it is extremely easy to configure).
- Splits and tabs.
- nano-like menu to help you remember the keybindings.
- Extremely good mouse support.
- This means mouse dragging to create a selection, double click to select by word, and triple click to select by line.
- Cross-platform (it should work on all the platforms Go runs on).
- Note that while Windows is supported, Mingw/Cygwin is not (see below).
- Plugin system (plugins are written in Lua).
- micro has a built-in plugin manager to automatically install, remove, and update plugins.
- Built-in diff gutter.
- Simple autocompletion.
- Persistent undo.
- Automatic linting and error notifications.
- Syntax highlighting for over 130 languages.
- Color scheme support.
- By default, micro comes with 16, 256, and true color themes.
- True color support (set the
MICRO_TRUECOLORenvironment variable to 1 to enable it). - Copy and paste with the system clipboard.
- Small and simple.
- Easily configurable.
- Macros.
- Smart highlighting of trailing whitespace and tab vs space errors.
- Common editor features such as undo/redo, line numbers, Unicode support, soft wrapping, …
Installation
To install micro, you can download a prebuilt binary, or you can build it from source.
If you want more information about ways to install micro, see this wiki page.
Use micro -version to get the version information after installing. It is only guaranteed that you are installing the most recent
stable version if you install from the prebuilt binaries, Homebrew, or Snap.
A desktop entry file and man page can be found in the assets/packaging directory.
Pre-built binaries
Pre-built binaries are distributed in releases.
To uninstall micro, simply remove the binary, and the configuration directory at ~/.config/micro.
Third-party quick-install script
curl https://getmic.ro | bash
The script will place the micro binary in the current directory. From there, you can move it to a directory on your path of your choosing (e.g. sudo mv micro /usr/bin). See its GitHub repository for more information.
Eget
With Eget installed, you can easily get a pre-built binary:
Use --tag VERSION to download a specific tagged version.
eget --tag nightly zyedidia/micro # download the nightly version (compiled every day at midnight UTC)
eget --tag v2.0.8 zyedidia/micro  # download version 2.0.8 rather than the latest release
You can install micro by adding --to /usr/local/bin to the eget command, or move the binary manually to a directory on your $PATH after the download completes.
See Eget for more information.
Package managers
You can install micro using Homebrew on Mac:
Note for Mac: All micro keybindings use the control or alt (option) key, not the command
key. By default, macOS terminals do not forward alt key events. To fix this, please see
the section on macOS terminals further below.
On Linux, you can install micro through snap
snap install micro --classic
Micro is also available through other package managers on Linux such as dnf, AUR, Nix, and package managers
for other operating systems. These packages are not guaranteed to be up-to-date.
- Linux:
- distro-specific package managers:
dnf install micro(Fedora).apt install micro(Ubuntu and Debian).pacman -S micro(Arch Linux).emerge app-editors/micro(Gentoo).zypper install micro-editor(SUSE)eopkg install micro(Solus).pacstall -I micro(Pacstall).apt-get install micro(ALT Linux)- See wiki for details about CRUX, Termux.
- distro-agnostic package managers:
nix profile install nixpkgs#micro(with Nix and flakes enabled)flox install micro(with Flox)
- distro-specific package managers:
- Windows: Chocolatey, Scoop and WinGet.
choco install micro.scoop install micro.winget install zyedidia.micro
- OpenBSD: Available in the ports tree and also available as a binary package.
pkg_add -v micro.
- NetBSD, macOS, Linux, Illumos, etc. with pkgsrc-current:
pkg_add micro
- macOS: Available in package managers.
sudo port install micro(with MacPorts)brew install micro(with Homebrew)nix profile install nixpkgs#micro(with Nix and flakes enabled)flox install micro(with Flox)
Note for Linux desktop environments:
For interfacing with the local system clipboard, the following tools need to be installed:
- For X11,
xcliporxsel - For Wayland,
wl-clipboard
Without these tools installed, micro will use an internal clipboard for copy and paste, but it won’t be accessible to external applications.
Building from source
If your operating system does not have a binary release, but does run Go, you can build from source.
Make sure that you have Go version 1.19 or greater and Go modules are enabled.
git clone https://github.com/zyedidia/micro
cd micro
make build
sudo mv micro /usr/local/bin # optional
The binary will be placed in the current directory and can be moved to
anywhere you like (for example /usr/local/bin).
The command make install will install the binary to $GOPATH/bin or $GOBIN.
You can install directly with go get (go get github.com/zyedidia/micro/cmd/micro) but this isn’t
recommended because it doesn’t build micro with version information (necessary for the plugin manager),
and doesn’t disable debug mode.
Fully static or dynamically linked binary
By default, the micro binary is linked statically to increase the portability of the prebuilt binaries.
This behavior can simply be overriden by providing CGO_ENABLED=1 to the build target.
Afterwards the micro binary will dynamically link with the present core system libraries.
Note for Mac:
Native macOS builds are done with CGO_ENABLED=1 forced set to support adding the «Information Property List» in the linker step.
macOS terminal
If you are using macOS, you should consider using iTerm2 instead of the default terminal (Terminal.app). The iTerm2 terminal has much better mouse support as well as better handling of key events. For best keybinding behavior, choose xterm defaults under Preferences->Profiles->Keys->Presets..., and select Esc+ for Left Option Key in the same menu. The newest versions also support true color.
If you still insist on using the default Mac terminal, be sure to set Use Option key as Meta key under
Preferences->Profiles->Keyboard to use option as alt.
WSL and Windows Console
If you use micro within WSL, it is highly recommended that you use the Windows
Terminal
instead of the default Windows Console.
If you must use Windows Console for some reason, note that there is a bug in
Windows Console WSL that causes a font change whenever micro tries to access
the external clipboard via powershell. To fix this, use an internal clipboard
with set clipboard internal (though your system clipboard will no longer be
available in micro).
Colors and syntax highlighting
If you open micro and it doesn’t seem like syntax highlighting is working, this is probably because
you are using a terminal which does not support 256 color mode. Try changing the color scheme to simple
by pressing Ctrl-e in micro and typing set colorscheme simple.
If you are using the default Ubuntu terminal, to enable 256 color mode make sure your TERM variable is set
to xterm-256color.
Many of the Windows terminals don’t support more than 16 colors, which means
that micro’s default color scheme won’t look very good. You can either set
the color scheme to simple, or download and configure a better terminal emulator
than the Windows default.
Cygwin, Mingw, Plan9
Cygwin, Mingw, and Plan9 are unfortunately not officially supported. In Cygwin and Mingw, micro will often work when run using
the winpty utility:
Micro uses the amazing tcell library, but this
means that micro is restricted to the platforms tcell supports. As a result, micro does not support
Plan9 or Cygwin (although this may change in the future). Micro also doesn’t support NaCl (which is deprecated anyway).
Usage
Once you have built the editor, start it by running micro path/to/file.txt or micro to open an empty buffer.
micro also supports creating buffers from stdin:
You can move the cursor around with the arrow keys and mouse.
You can also use the mouse to manipulate the text. Simply clicking and dragging
will select text. You can also double click to enable word selection, and triple
click to enable line selection.
Documentation and Help
micro has a built-in help system which you can access by pressing Ctrl-e and typing help. Additionally, you can
view the help files here:
- main help
- keybindings
- commands
- colors
- options
- plugins
I also recommend reading the tutorial for
a brief introduction to the more powerful configuration features micro offers.
There is also an unofficial Discord, which you can join at https://discord.gg/nhWR6armnR.
Contributing
If you find any bugs, please report them! I am also happy to accept pull requests from anyone.
You can use the GitHub issue tracker
to report bugs, ask questions, or suggest new features.
For a more informal setting to discuss the editor, you can join the Gitter chat or the Discord. You can also use the Discussions section on Github for a forum-like setting or for Q&A.
Sometimes I am unresponsive, and I apologize! If that happens, please ping me.
Micro — это текстовый редактор, работающий в терминале. Он поставляется как статический бинарный файл без зависимостей, готовый к работе из коробки.
Как видно из названия, micro пытается стать преемником редактора nano в плане простоты использования и установки. Однако разработчики стараются сделать его удобным для тех, кто пользуется терминалом как по собственному желанию, так и вынужденно.
Чем может похвастаться micro?
- Не требуются зависимости и внешние файлы — только бинарник.
- Поддержка нескольких курсоров.
- Знакомые сочетания клавиш (Ctrl-S, Ctrl-C, Ctrl-V, Ctrl-Z …).Можно изменять сочетания, исходя из своих предпочтений.
- Удобные настройки по умолчанию.Не нужно ничего настраивать «из коробки» (а если и придётся, то это легко сделать).
- Поддержка разделения экрана и вкладок.
- Очень хорошая поддержка мыши.Можно использовать перетаскивание мыши для выделения текста, двойной клик для выделения слова и тройной клик для выделения строки.
- Кроссплатформенность.Поддержка Windows есть, но пока проскакивают ошибки.
- Система плагинов.В micro встроен диспетчер плагинов, который автоматически устанавливает, удаляет и обновляет все ваши плагины.
- Автоматический линтинг и уведомление о ошибках.
- Поддержка различных цветовых тем.По умолчанию micro поставляется с 4-, 8- и 24-битными (TrueColor) темами.
- Подсветка синтаксиса для более чем 90 языков.
- Сниппеты.Плагин сниппетов может быть установлен с помощью команды plugin install snippets.
- Поддержка буфера обмена системы.
- Поддержка макросов.
Также в будущем планируется добавление функций автозаполнения и древовидного представления файлов.
Установка
Вы можете скачать уже собранный бинарник или собрать его самостоятельно. Больше информации об установке можно найти на вики-страничке проекта.
Менеджеры пакетов
Вы можете установить micro с помощью Homebrew на Mac:
С помощью Chocolatey или Scoop на Windows:
или
А на Linux с помощью snap:
snap install micro --edge --classic
Сборка исходного кода
Если для вашей операционной системы нет собранного бинарника, но она поддерживает Go, вы можете собрать micro из исходного кода.
Убедитесь, что у вас установлен Go версии 1.5 или выше.
			go get -d github.com/zyedidia/micro/cmd/micro
cd $GOPATH/src/github.com/zyedidia/micro
make install
Бинарник будет установлен в $GOPATH/bin (или ваш $GOBIN).
Можно произвести установку и с помощью go get (go get -u github.com/zyedidia/micro/cmd/micro), но данный способ не рекомендуется, так как он собирает micro без информации о версии, которая полезна для диспетчера плагинов.
Терминал macOS
Если вы используете macOS, то вам стоит использовать iTerm2 вместо терминала Mac, установленного по умолчанию. iTerm2 обладает лучшей поддержкой мыши, сочетаний клавиш и цветовых схем.
Поддержка буфера обмена Linux
Для поддержки данной функции на Linux требуется утилита xclip или xsel. Для Ubuntu:
sudo apt-get install xclip
Если у вас нет xclip или xsel, micro будет использовать внутренний буфер обмена для копирования и вставки, но он не будет работать с внешними приложениями.
Цвета и подсветка синтаксиса
Если вы откроете micro и поймете, что подсветка синтаксиса не работает, то причина, скорее всего, в том, что вы используете терминал, который не поддерживает 256 цветов. Попробуйте изменить цветовую схему на simple , использлвав сочетание клавиш Ctrl-E и набрав set colorscheme simple.
Если вы используете терминал Ubuntu, убедитесь, что переменная TERM установлена в xterm-256color.
Многие терминалы Windows не поддерживают более 16 цветов, поэтому цветовая схема micro, установленная по умолчанию, будет выглядеть не лучшим образом. Вы можете либо установить цветовую схему simple , либо загрузить эмулятор терминала вроде mintty.
Plan9, Cygwin
Micro использует библиотеку tcell, поэтому он не поддерживает Plan9, Cygwin (хотя в будущем это может измениться) и Native Client (NaCl).
Использование
Установив редактор, его можно запустить командой micro path/to/file.txt или просто micro, открыв пустой буфер.
Micro также поддерживает создание буфера из stdin:
Можно использовать мышь и клавиатуру для управления курсором.
Документация и справка
В micro встроена система поддержки, которую можно запустить, нажав Ctrl-E и напечатав help . Кроме того, вы можете просматривать файлы справки здесь:
Также к прочтению рекомендуется руководство, которое быстро познакомит вас с более сложными функциями.
Home » KB » SysAdmin » 5 Best Command-Line Text Editors for Linux, Windows and Mac
Editing files quickly and effectively using the command line is vital for every user or system administrator. Whether it is a configuration file, user file, text document, or log, it is a good idea to have a reliable and powerful command-line text editor.
This article describes the top five open-source command-line text editors available on Windows, Linux, and macOS.
Top 5 Command-Line Text Editors for Linux, Windows & Mac
Choosing the right command-line text editor depends on your needs and comfort level. The top five command line editors we have chosen to cover in this article are:
- Vim
- Emacs
- Nano
- Micro
- Gedit
The table below shows an overview of the editors’ key features:
| Editor | Supported OS | Capabilities | Expandability | GUI |
|---|---|---|---|---|
| Vim | Windows, Linux, macOS | Highly configurable, syntax highlighting, code folding, powerful text commands. | Extensive plugins available. | Optional GUI through gVim. |
| Emacs | Windows, Linux, macOS | Supports multiple languages, email, calendar, and more. | Highly extensible with packages and modes. | Built-in GUI version available. |
| Nano | Windows, Linux, macOS | Simple and user-friendly, basic text editing. | Limited, but supports syntax highlighting and basic plugins. | / |
| Micro | Windows, Linux, macOS | Modern and intuitive, mouse support, multiple cursors, syntax highlighting. | Supports plugins written in Lua. | / |
| Gedit | Windows, Linux, macOS | Full-featured text editor, syntax highlighting, search/replace. | Supports plugins to extend functionality. | Primarily GUI, terminal mode on Linux. |
For more information about each text editor, refer to the sections below.
1. Vim
Vim is a very flexible text editor that is suitable for performing many different operations on text. It is widely regarded as one of the most powerful text editors available. Vim was released in 1991 as an enhanced version of the Vi editor, and it has since become a highly configurable text editing tool.
The editor is supported on Windows, Linux, and macOS. It has a steep learning curve, but once you learn how to use it, it becomes incredibly efficient. Some of its features include syntax highlighting, code folding, find and replace with regular expressions, complex text transformations with minimal keystrokes, color schemes, and much more.
Vim’s functionality can be even further extended with a wide variety of plugins available through its plugin manager. The plugins enable syntax highlighting, auto-completion, integration with version control systems, and more.
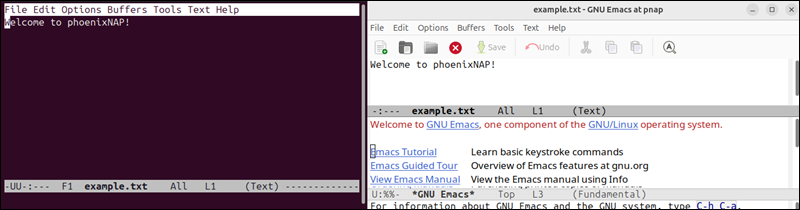
The editor also comes with a graphical user interface, gVim, which adds menus and toolbars while retaining Vim’s powerful command-line interface. The following image shows Vim’s terminal and GUI view:
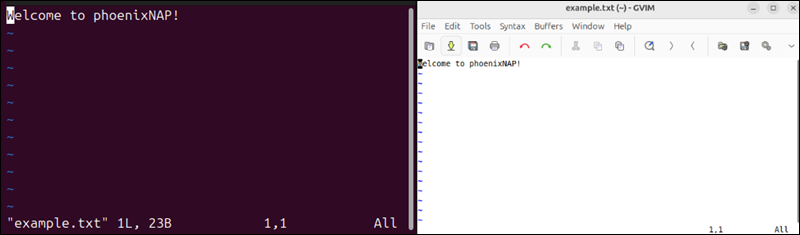
Vim’s flexibility and power make it the top choice for advanced users who need a highly customizable text editor.
2. Emacs
GNU Emacs is a powerful text editor that is part of an entire app ecosystem. It was created by Richard Stallman in 1976 and has since become one of the most extensible and feature-rich editors available. Emacs is supported on Windows, Linux, and macOS.
The editor is highly versatile and supports editing in almost every programming language. Its built-in package manager provides functionalities that range from email clients to calendar systems. Its powerful scripting language, Emacs Lisp, enables users to customize and automate almost any aspect of the text editor.
Emacs’ functionality can be extended with various packages and modes, including specialized programming environments, document processing, and even games. The editor is also available in the GUI mode, with a more user-friendly interface with a menu and toolbars. The image below shows its terminal and GUI view:
Emacs focuses on adaptability, making it a preferred tool for users who want an all-in-one editor capable of much more than text manipulation.
3. Nano
GNU Nano is the go-to text editor for many users who need something simple and straightforward. It was designed with ease of use in mind, as part of the GNU Project that provides a more user-friendly alternative to the traditional Unix text editor, Pico.
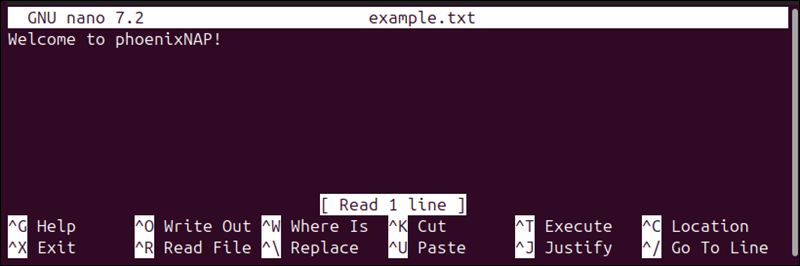
Nano is supported on Windows, Linux, and macOS, and it offers basic text editing functions like cut, copy, paste, and simple search/replace, all within a clean and minimal interface. Unlike Vim or Emacs, Nano does not require users to remember complex commands. Most functions are accessible via keyboard shortcuts that the terminal displays at the bottom of the screen:
Although Nano is less flexible than Vim or Emacs, it supports some basic enhancements such as syntax highlighting and automatic indentation through configuration files. However, there is no GUI version, as Nano is a command-line-only editor.
Nano’s simplicity and accessibility make it a great choice for beginners or anyone who needs to make quick edits without the overhead of more complex editors.
4. Micro
Micro is a modern text editor that combines many benefits of traditional editors like Vim and Emacs with simplicity and ease of use. It is intuitive, making it accessible even to those new to command-line editors.
The editor is available on Windows, Linux, and macOS, and it offers a user-friendly experience on all operating systems. It boasts features like mouse support, multiple cursors, and syntax highlighting out of the box. Its default keybindings are easy to learn.
Unlike many other command-line editors, Micro provides a more modern interface with smooth scrolling, split-pane editing, and an easy-to-navigate help system. The features are expandable through plugins, such as auto-completion, theming, and more.
Although Micro is a strictly command-line editor, its modern interface provides an experience similar to that of a GUI editor. The image below shows an example of its CLI:
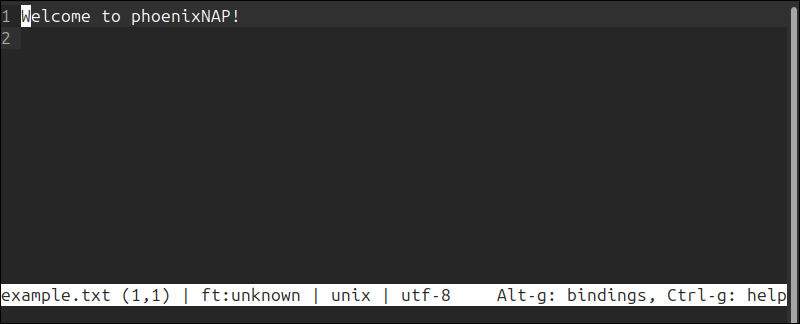
It is an excellent choice for users who want the power of a command-line editor with a more modern and user-friendly interface.
5. Gedit
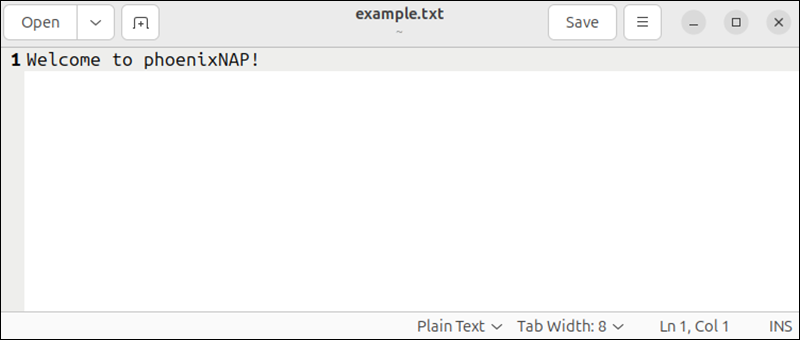
Gedit is primarily the default text editor for the GNOME desktop environment. Although it is mainly a graphical editor, it can be used in terminal mode on Linux, making it a versatile option for those who switch between GUI and CLI.
The editor is available in Windows and Linux, with unofficial macOS support. Some of the text editors’ features include syntax highlighting, search and replace, file backups, text wrapping, and more.
Gedit’s functionality can be extended with plugins for additional features like version control integration, spell checking, and more advanced editing tools. Although Gedit is primarily a graphical editor, it can also be launched in terminal mode on Linux systems. It is one of the few editors that is GUI-first.
The editor’s ease of use and cross-platform availability make it suitable for those who want a consistent experience across different environments.
Conclusion
This article listed the top command-line editors for Linux, Windows, and macOS. Choosing between them depends on what you expect from a text editor. Each editor has its strengths, so whether you are looking for raw power, simplicity, or something in between, this list should help you find the right tool for the job.
If you are a Linux user, check out our list of 7 best Linux text editors.
Was this article helpful?
YesNo
In the Windows Command Prompt (cmd), you can use the built-in text editor called `edit` to create and modify text files easily.
Here’s how you can open a text file in the cmd text editor:
edit filename.txt
Understanding CMD Text Editors
What is a Text Editor in CMD?
A text editor in CMD refers to software tools that allow users to create, modify, and manage text files directly from the Command Prompt interface. Unlike graphical text editors that rely on a visual interface, CMD text editors are purely command-line-based, which means they operate solely on text commands. The primary advantage of using a text editor within CMD is its simplicity and speed. Fundamental tasks can be performed quickly without the distractions of a graphical user interface. This can be particularly useful for developers, system administrators, and users working with scripts or configuration files.
Types of Text Editors Available in CMD
While there are various text editors, some common ones utilized in CMD include:
- Notepad: The most basic text editor available in Windows.
- Edit: A simple command-line text editor that allows basic file editing.
- Vim/Nano: Popular text editors on UNIX-like systems, though these may require additional installations on Windows environments.
Each of these editors comes with its unique set of features and commands, allowing users to tailor their editing experience to fit their specific needs.
Mastering Exit in Cmd: A Quick Guide
Getting Started with CMD Text Editor
Opening CMD
To begin using a text editor in CMD, first, you’ll need to open the Command Prompt:
- Click on the Start Menu.
- Type «cmd» in the search bar.
- Press Enter or click on Command Prompt from the results.
Alternatively, you can use the Windows + R keys to open the Run dialog, then type «cmd» and hit Enter.
Creating and Editing Files with Notepad in CMD
One of the simplest ways to create and edit text files in CMD is by using the `notepad` command. Here’s how you can do it:
To open or create a new text file, type:
notepad filename.txt
When you run this command, Notepad will open. If `filename.txt` does not already exist, Notepad will prompt you to create it.
In Notepad, you can write and modify your text. To save your changes, simply go to File > Save, or use the shortcut Ctrl + S. After saving, you can close Notepad.
Using the Edit Command for Quick Edits
The `edit` command provides a quick way to open a text file for editing directly in CMD. To use it, enter:
edit filename.txt
This command launches an in-built text editor. If the specified file does not exist, it will create a new one.
In this editor, you can use keyboard shortcuts to navigate and perform actions. For example:
- Arrow keys for navigation
- F1 to help view tips
- Ctrl + S to save
Make sure to save your work as you go, then exit by pressing Alt + F, followed by X.
List Disks in Cmd: A Quick Guide to Disk Management
Advanced Features of CMD Text Editors
Using the `echo` Command for Quick Text Creation
The `echo` command in CMD is a quick way to create files with predefined content. To generate a text file and write a line into it, use the following syntax:
echo Your text here > filename.txt
This command creates `filename.txt` with the text «Your text here.»
To append additional text without overwriting the existing content, you can use the double greater-than symbol `>>`.
echo Additional text >> filename.txt
This method is particularly useful for scripts and logs where you want to quickly document information without needing to open the file manually.
Viewing File Contents with `type`
To check the contents of a text file directly in CMD, you can use the `type` command:
type filename.txt
This command outputs the entire content of `filename.txt` in the Command Prompt. It’s a quick way to verify what you have written without opening the editor.

Mastering Telnet En Cmd: A Quick How-To Guide
Practical Applications of CMD Text Editors
Scripting with CMD Text Editors
One of the most practical applications of using a text editor in CMD is writing batch files to automate tasks. You can create a new batch file like this:
notepad myscript.bat
Inside Notepad, you can write a simple script:
@echo off
echo Hello, World!
pause
Save the file, and then run it directly from CMD by typing:
myscript.bat
Code Snippet Examples for Developers
Developers can greatly benefit from using CMD text editors for creating configuration files or scripts. Here’s how to create a basic HTML file within CMD:
notepad index.html
You can then add your HTML content:
<!DOCTYPE html>
<html>
<head>
    <title>My Web Page</title>
</head>
<body>
    <h1>Welcome to My Web Page</h1>
</body>
</html>
After saving the file, this HTML snippet can be opened in any web browser.
Change Color in Cmd: A Quick Guide to Customizing Your Shell
Best Practices for Using Text Editors in CMD
Tips for Efficient Editing
To utilize text editors in CMD effectively, familiarize yourself with keyboard shortcuts for navigation, editing, and managing files. Organizing your text files with clear naming conventions can also save you time when retrieving or editing files in the future.
Troubleshooting Common Issues
Common challenges while using a text editor in CMD include file permission errors. Ensure you have the necessary permissions to create and modify files in the designated folder. Running CMD as an administrator can often resolve these issues.
Create File in Cmd: A Quick Guide to Getting Started
Conclusion
By understanding how to leverage a text editor in CMD, users can efficiently create, modify, and manage text files directly from the command line. Embracing these tools can simplify workflows, particularly for those involved in scripting and automation tasks. Feel free to explore these commands and share your experiences in mastering more CMD functionalities!