
Всем привет, решил написать запись по установки Toyota Techstream на Windows 10 Вот решил я написать более подробно : нам понадобится кабель mini-vci j2534 и скачать файл тут фаил платный, ( я не являюсь тех поддержкой, и вслучае каких-нибудь ошибок я попробую вам помочь но не уверен что получится)так скачали мы файл приступаем мы к установке и запускаем

Далее запускаем

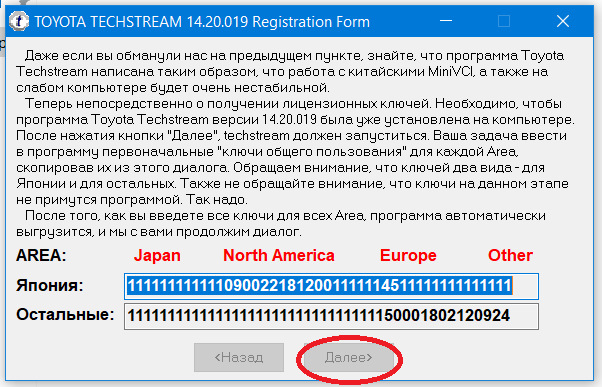
появляется

Выбираем Японию (Japan)


Скопировали вставили и ок


выбираем следующие


После того как вы активируете 4 арии, появиться клавиша далее
после чего появляется файл LicenseKeys

открываем и меняем еще раз ключи на те что в фале
Продолжение в Часть 2(картинок очень много оказалось)
Подробная и простая инструкция по установке TechStream для Тойота
В данной инструкции описан процесс установки программного обеспечение Toyota Techstream версии 16.00.020 с поддержкой автомобилей Тойота, выпускаемых до 2022 года.
Установка производилась на компьютер с Windows 10 x64. Совместимо ПО с приборами Moongoose Toyota, Сканматик 2 PRO, Openport и любой другой адаптер J2534.
Примечание. Если Вам потребуется более свежая версия Techstream 18.00 Вы также можете приобрести ее в нашем магазине.
Toyota Techstream скачать по ССЫЛКЕ
Важно! Инструкция предназначена в первую очередь для покупателей нашего магазина. Данная ссылка под паролем и что бы получить пароль бесплатно Вам потребуется предъявить фото гарантийного талона, подтверждающего покупку в нашем магазине. В противном случае мы принимаем символическую плату, которая стимулирует дальнейшее написание инструкций.
КОНТАКТЫ ДЛЯ СВЯЗИ С НАШИМИ СПЕЦИАЛИСТАМИ:
— Telegram, Viber, Whatsapp по номеру +375 44 790-99-09;
— Онлайн чат расположенный справа внизу экрана;
— Instagram: xdiag.by — https://instagram.com/xdiag.by?igshid=tumuxztpoxxw
— VK: Автодиагностика XDIAG.by — https://vk.com/xdiagby
Примечание. Предлагаемая версия найдена на просторах интернета и предоставляется «как есть». Претензии по функционалу не принимаются.
Важно! Перед установкой обязательно отключите все антивирусные программы, в том числе и Защитник Windows.
Переходим к установке Techstream
- После того как Techstream скачан, распаковываем папку.
- Запускаем установку с помощью ярлыка Techstream_Setup_V16.00.020.
- В первом окне выбираем язык. В нашем случае English (United States) и жмем кнопку Next>. Начнется процесс установки.


4. После завершения установки нажимаем Next>.

5. В новом окне выбираем пункт «I accept the terms of the license agreement» и нажимаем Next>.

6. В следующем окне во все окна вводим 1 и Next>.

7. Далее Install. Начнется установка Techstream.

8. После установки нажмите Finish.

9. Далее перейдите в папку со скаченной TechStream и распакуйте папку 2-TS_loader. Скопируйте файл 2-TS_Loader из папки и вставьте его последующему пути: Диск С/Program Files (x86)/Toyota Diagnostics/Techstream/bin
Примечание. Более быстрый способ найти нужный путь – правой кнопкой мыши нажать по ярлыку Techstream на рабочем столе выбрать пункт свойства и нажать «Расположение файла».
10. После того как файл вставили нажмите на нем правой кнопкой мыши, дале в выпадающем меню выбирайте пункт «Отправить» и в следующем списке выбирайте пункт «Рабочий стол (создать ярлык)».

Установка Techstream завершена.
Далее устанавливаем драйвера для адаптера J2534 Mongoose
11. Распаковываем архив Mongoose_JLR_PRO_drivers, переходим в папку x64 (если у Вас Windows 86 бит, то переходим в папку x86). Далее en-us и запускаем ярлык J2534_MongoosePro_JLR_x64.
12. После запуска нажимаем все кнопки как на фото.


Важно! Запускаем программу ярлыком 2-TS_losder, который ранее Вы отправили на рабочий стол.
После запуска выбираете регион, язык и заполняете данные. В нашем случае проставили 1 во всех окнах.


How to Install Mini VCI Toyota Techstream Driver on Win10 64bit?
Many people have trouble loading Mini VCI Toyota Techstream software and driver on Windows 10 64bit system. Obdii365.com here shares some approaches to set it up on Win10 64bit.
If one fails, try another.
Method 1:
The guide below comes from a very helpful Australian forum.
It works.
This guide implies:
1) You know what you’re doing around computers and have the basic necessary skills to create directories, copy files, and import registry keys.
2) You download the file linked below (or have a Mini-VCI CD with the contents roughly matching the included files)
Win64 MVCI Driver for TOYOTA TIS
3) Your Techstream version doesn’t matter as far as I can tell, I’m using V12 (search v12 download on our blog).
4) Windows 10, 64bit (other 64 bit versions, 7, 8, etc should all work too)
5) Tested on Mini-VCI cable J2534 with firmware 1.4.1 (should also work on newer cables too)
Grab the file above, it contains the necessary Mini-VCI 64 bit files. Make sure you copy and paste the entire link and doesn’t parse the URL correctly.
For your own safety, feel free to verify the file is safe from viruses using https://www.virustotal.com/ or any other of the various online virus testing tools.
When you extract the file it will contain the following contents.
All right, let’s get to it.
1) Create some new folders under your C:Program Files (x86) folder and copy some files there.
C:Program Files (x86)XHorse Electronics
then
C:Program Files (x86)XHorse ElectronicsMVCI Driver for TOYOTA TIS
2) Copy the files FirmwareUpdateTool and MVCI32.dll from the linked ZIP file to the “MVCI Driver for TOYOTA TIS” folder.
It should look like this
I’ve found that every time I’ve installed the VCI drivers from the MSI file, it never created those folders, and put those two files in there. That’s one of the key steps to getting this working.
If those files aren’t in those folders, then Techstream won’t work with 64bit Windows and the Mini VCI cable. In fact, if you’ve done everything else on your 64bit system, check this first, and if those files aren’t in that folder try doing this step and test Techstream, it may just work.
Now, my version of Windows (Win 10 Creators Update – 1709) detected and loaded the drivers for the Mini VCI cable automatically. I’ve found that these drivers don’t always work, so I manually installed the drivers supplied in the ZIP linked above. To install them and enable them on your devices you do the following:
1) Under the ftdibus folder, right click the ftdibus.inf file and click install, and accept any warnings that appear.
2) Under the ftdiport folder, right click the ftdiport.inf file and click install, again accept any warnings that appear.
Get those out of the way before moving onto the next section.
1) Plug in your Mini-VCI cable and wait for windows to recognize it and load the drivers.
2) Open the device manager (Win Key+X then select Device Manager) and open the node “Ports (COM & LPT)” and double click the “USB Serial Port (COM?)” device, and then go to the “Driver” tab.
3) Refer to this image
– if the driver version is 2.6.0.0 then you don’t need to change anything, otherwise go to the next step.
4) If the driver version isn’t 2.6.0.0 then click on the “Update Driver” button.
5) Next click “Browse my computer for driver software”
6) Next click “Let me pick from a list of available drivers on my computer”
7) It should list two drivers,
– the one Windows likes (2.12.28.0) and the one installed manually in step 2 which is 2.6.0.0. Select the driver version 2.6.0.0 and click “Next” wait for the drivers to install then close that window. It should now display the driver version as 2.6.0.0 as installed.
Now, it’s time to do the same with the USB Serial Converter device. So keep that MiniVCI cable plugged in.
1) With the device manager open, expand the “Universal Serial Bus controllers” node.
2) Double click the “USB Serial Converter” device and go to the “Driver” tab.
3) Following the same process in the previous section, check for and change if necessary the driver to version 2.6.0.0. It’s the same process, just replace the device name appropriately.
4) Once both the Port and Converter are on 2.6.0.0 you can now go back to the FirmwareUpdateTool.exe file that you copied and open it, once open click the “Device Info” button and it should say it’s connected, and return the firmware version of the cable.
That’s the Mini VCI cable taken care of.
—–
Now, you need to import the mvci-x64.reg file included in the ZIP. Without this imported, Techstream won’t know how to load the necessary files for the MiniVCI cable, namely the MVCI32.dll done in the first section. So simply double click it, and import it when prompted. It’s that easy.
—–
It’s implied you already have Techstream installed and licensed, this guide won’t cover that step (there’s tons of guides out there that cover it if you need it). You may also need the IT3 ini files in the zip for your Techstream. They go in the ENV folder inside the Techstream install folder.
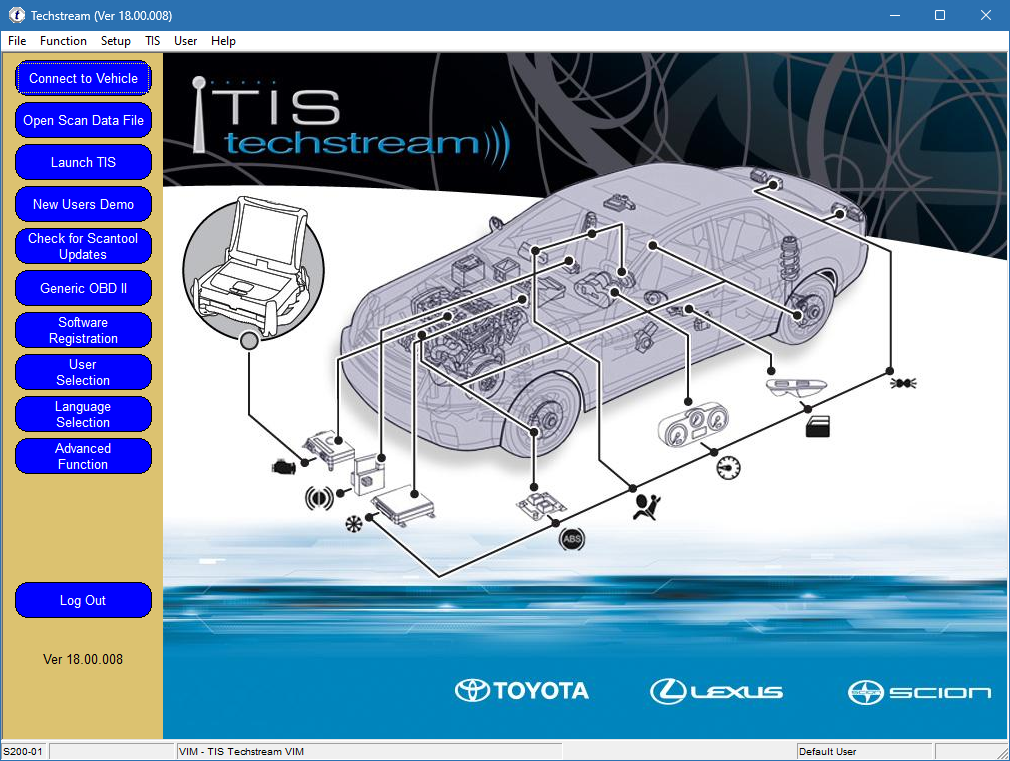
Now, you should be safe to open Techstream and verify operation. So with the MiniVCI cable still plugged in, open Techstream.
1) Go to “Setup” then “VIM Select”. It should open with the Interface setup of “XHorse – MVCI”
2) Refer to this image at the bottom, with the arrow
Techstream should show “VIM – Xhorse – MVCI J2534 DLL v1.4.7” (dll version may differ if you used your own files) the key is, if you get this far and it’s not just saying “VIM – Xhorse – MVCI” (which happens when you open Techstream without the MiniVCI cable plugged in) then you should be right to connect to the car. So turn on the ignition and connect.
3) If it has all gone well, then you should be presented with a progress window and if you get this far then Techstream is talking to the MiniVCI cable on your 64bit Windows.
That’s it all done, have fun.
Method 2:
Get the correct driver from FTDI website. The document is to get Windows 10 64-bit computer to recognize the Mini VCI J2534 with 1.4.1 firmware (FT232RQ chip). This is not a comprehensive guide but rather should be used as a supplement to the plethora of driver + Techstream instructions available online. Hopefully, this will help others by reducing the number of hours it takes to get this damn thing to work.
The Mini VCI J2534 (aka MVCI) device is a OBDII to USB “dongle” used to connect laptops to Toyota/Lexus vehicles, often for the purpose of using Techstream. This device utilizes a USB to serial signal converter produced by FTDI (ftdichip.com). The chip is essentially a translator so that the computer can communicate with the vehicle, and vice versa. The MVCI I bought had the 1.4.1 firmware (not the 2.0.4) which has the FTDI chip part# FT232RQ.
1) I first started with a freshly reformatted burner laptop with 64bit Windows 10. Never connected to the internet, disabled auto update of drivers using three methods (1. Device installation settings – > “No, let me choose”, 2. gpedit.msc, and 3.regedit), and uninstalled the preinstalled/bloat anti virus.
2) Connected the MVCI to the laptop and saw an unknown device in the Device Manager. Note that only one unknown device was listed, NOT TWO! Many guides state that there should be two: one unknown/warning within the “Universal Serial Bus controllers” and one in the “Ports (COM & LPT)”. I was beginning to think that my dongle was somehow damaged since I only saw one.
3) The two commonly suggested methods for installing the driver for the FTDI chip is to either extract the driver files into C:Program Files (x86)XHorse ElectronicsMVCI Driver for TOYOTA TIS or to use the AutoKent program, followed by the registry edit program. I did both extract and AutoKent, and ran the registry edit (mvci-x64.reg).
4) Updated the driver of the unknown device by Device Manager -> Right click -> Update Driver -> Browse my computer for drivers -> Let me pick from a list of available drivers on my computer -> Have Disk -> Browse -> [now navigate to XHorse or Autokent folder]. Neither worked as it now showed a yellow exclamation mark.
5) Download/transfer onto the laptop the 2.12.36.4 driver from (ftdichip.com/drivers/d2xx-drivers/) which is the most recent driver for 64 bit Windows. As soon as I dropped the driver onto the burner laptop, the Device Manager picked it up and auto updated, even though it shouldn’t have. The USB Serial Converter no longer has the yellow exclamation mark and the properties of the Converter shows a Driver Version of 2.12.36.4. The red LED of the dongle is now permanently on! Constant red led = computer understands how to use the dongle.
6) Install techstream.
Probably the two important steps were to 1) disable auto update of drivers and/or disconnect from internet and 2) download the latest FT232RQ driver. I was able to get this same cable to work on a 32bit Win7 machine months ago, but the cable would spontaneously work then not. I wonder if it was because the driver was automatically being replaced.
Anyways, all of that work so I can program a new key. The analog on-off (x5), open-close (x6) method to add immobilizers only works if there are 3 or less keys registered.
Method 3:
Although the site was listed version 18. I do not need this program, just for information.
I encountered such a problem that in the disk “MVCI Driver for TOYOTA.msi” the driver was only for 32-bit Windows OS, and I have Windows 10, x64 bit installed on my laptop.
I searched for a driver on the Internet for a long time and came across one, where he left a link to the desired driver and thanks to him for that!Download “Mini-VCI-Setup.exe” and run, the installation is standard. After installation, this cord appeared in the MMCodingWriter settings and connected to the car without any problems.

Toyota Techstream — это специализированное программное обеспечение, разработанное для диагностики, обслуживания и ремонта автомобилей марки Toyota и Lexus. Оно используется как в авторизованных сервисных центрах, так и независимыми механиками для управления диагностическими системами автомобилей, анализа кодов ошибок, выполнения программирования и настройки различных компонентов автомобиля. Techstream обеспечивает доступ к специализированной информации, необходимой для эффективной работы с автомобилями этих марок, что делает его важным инструментом в арсенале любого автосервиса.
Основной функционал Toyota Techstream включает в себя диагностику электронных систем автомобиля. Поскольку современные автомобили оснащены множеством электронных систем, таких как системы управления двигателем, трансмиссией, ABS, подушками безопасности и другими компонентами, крайне важно иметь инструмент, который сможет взаимодействовать с этими системами. Techstream позволяет проводить полное сканирование всех доступных модулей, выявляя коды ошибок и другие параметры, которые могут сигнализировать о неисправностях или отклонениях в работе автомобиля.
Интерфейс Toyota Techstream интуитивно понятен и предоставляет пользователю доступ ко всем необходимым функциям. Главное окно программы содержит меню с возможностью выбора конкретного автомобиля и выполнения различных диагностических операций. Пользователь может легко выбрать необходимый модуль и выполнить диагностику, а также получить подробные сведения о выявленных ошибках и оречениях системы.
Как только код ошибки был обнаружен, Techstream предлагает детальные инструкции по интерпретации полученного кода и возможным вариантам его устранения. Это очень полезная функция для механиков, так как она значительно упрощает процесс диагностики и ремонта. Также программа предоставляет схемы и технические характеристики, что очень важно при выполнении сложных ремонтов.
Одной из сильных сторон Toyota Techstream является возможность выполнения специальных функций, таких как программирование ключей, адаптация датчиков и других компонентов системы управления. Эти функции особенно полезны в случаях, когда требуется замена ключа или ремонт системы управления двигателем. Techstream также позволяет обновлять программное обеспечение на различных модулях автомобиля, обеспечивая его актуальность и совместимость с современными технологиями.
Toyota Techstream поддерживает работу с широким спектром моделей автомобилей, начиная от самых старых моделей и заканчивая новейшими. Благодаря этому, механики могут использовать одно и то же решение для сервиса различных моделей, что делает программу универсальной. Важно отметить, что для работы с Techstream необходимо использовать интерфейс диагностического устройства, такого как Toyota Diagnostic Tester или более доступный, например, VCI (Vehicle Communication Interface). Это устройство устанавливается между автомобилем и компьютером, обеспечивая передачу данных и команд.
Обновление программы Techstream — довольно важный процесс, так как производитель постоянно добавляет новые модели и обновляет коды ошибок для ранее выпущенных автомобилей. Для автосервисов, использующих Techstream, поддержание актуальности программного обеспечения критически важно, так как это гарантирует точность диагностики и возможность работы с самыми последними технологиями, используемыми в автомобилях Toyota и Lexus.
Программа также предлагает возможность выполнения автоматических тестов, которые помогают механикам провести комплексную диагностику систем автомобиля за минимальное количество времени. Это особенно полезно в условиях загруженной эксплуатационной среды, где кажд Minute имеет значение.
Поскольку работа с Techstream требует определенных знаний в области автосервиса и диагностики, программа может показаться сложной для новых пользователей. Тем не менее, обширная документация, справочные материалы и онлайн-ресурсы значительно помогают пользователям разобраться с функциями и возможностями программы. Для повышения квалификации механиков также доступны курсы и обучения, которые позволяют быстро погружаться в работу с этим инструментом и максимально эффективно использовать его возможности.
Toyota Techstream также позволяет создавать и сохранять отчеты о проведенных диагностических работах. Это упрощает документирование всех действий, что является особенно важным в случае предоставления отчетов клиентам или для внутренней бухгалтерии автосервиса. Возможность генерации отчетов помогает хорошо организовать работу сервиса и повышает доверие клиентов к предоставляемым услугам.
Кроме того, Toyota Techstream имеет модульную архитектуру, что позволяет пользователям адаптировать программу под свои нужды и добавлять новые функции по мере необходимости. Это делает её гибким инструментом, который может меняться и развиваться в соответствии с требованиями пользователей и технологий.
Одной из ключевых особенностей Techstream является возможность расширенной диагностики, которая включает в себя тестирование на соответствие различным стандартам, настройку параметров и тестирование отдельных систем. Это особенно важно для продвинутых пользователей и технических специалистов, которые хотят извлечь максимальную информацию из системы.
В заключение, Toyota Techstream — это мощное, гибкое и многофункциональное диагностическое решение для автомобилей Toyota и Lexus. Его возможности по диагностике, программированию и обслуживанию делают его незаменимым инструментом для всех профессионалов в области автосервиса. Удобный интерфейс, поддержка современных технологий и возможность работы с широким спектром моделей делают Techstream одним из лучших решений для диагностики автомобилей этого бренда. Благодаря постоянным обновлениям и поддержке разработчиков, Toyota Techstream остается актуальным и мощным инструментом в арсенале каждого механика.

Mini VCI (Vehicle Communication Interface) and Techstream software are essential tools for diagnostics and programming in Toyota and Lexus vehicles. In this article, we will provide you with a step-by-step guide on how to install Mini VCI Techstream on Windows 10/11 64-bit.
Note: Before starting, make sure you have administrative privileges on your computer.
Mini J2534 VCI Cable Setup
Download Drivers:
Mini J2534 VCI Driver Here
https://mega.nz/file/hbsHGDiQ#f-NUMq1luM0V9t0bUE0MoYrys225RV7-v9QSW2-tNLI
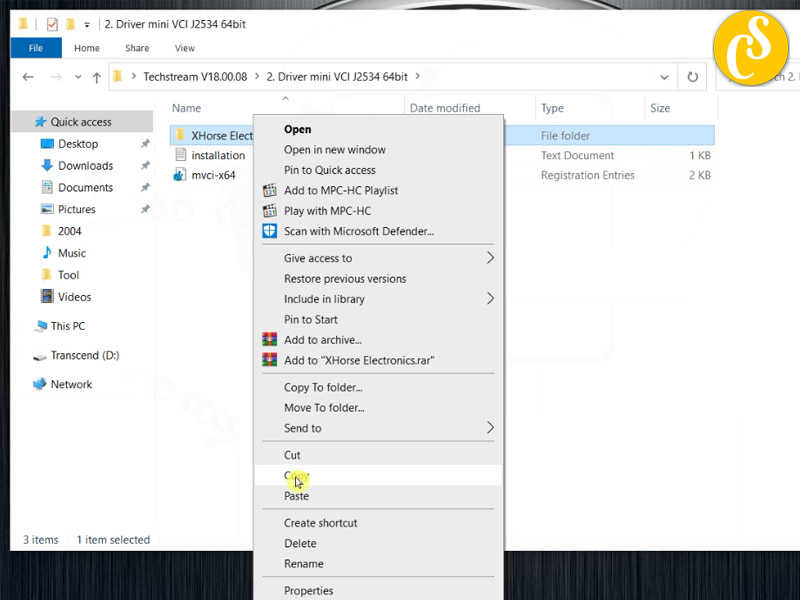
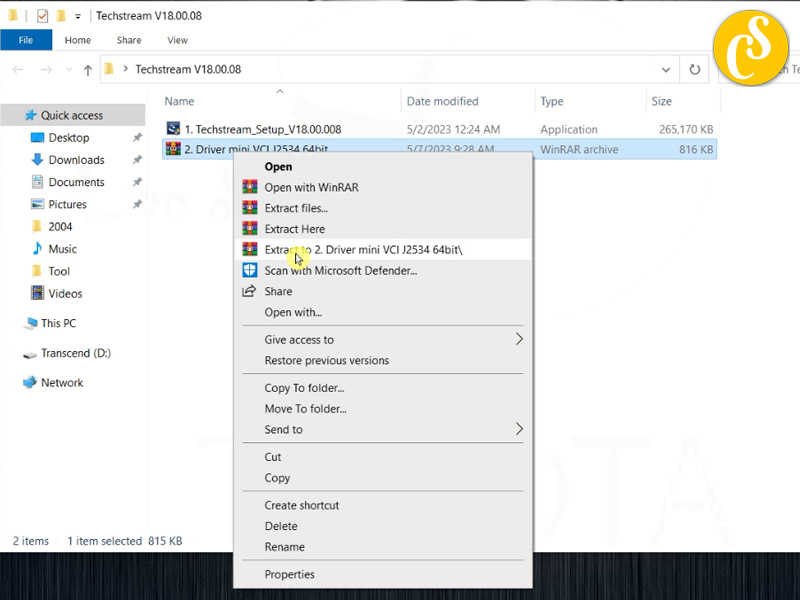
Extract Drivers:

Copy Xhorse Electronics folder
Then Paste to C:\Program Files (x86)
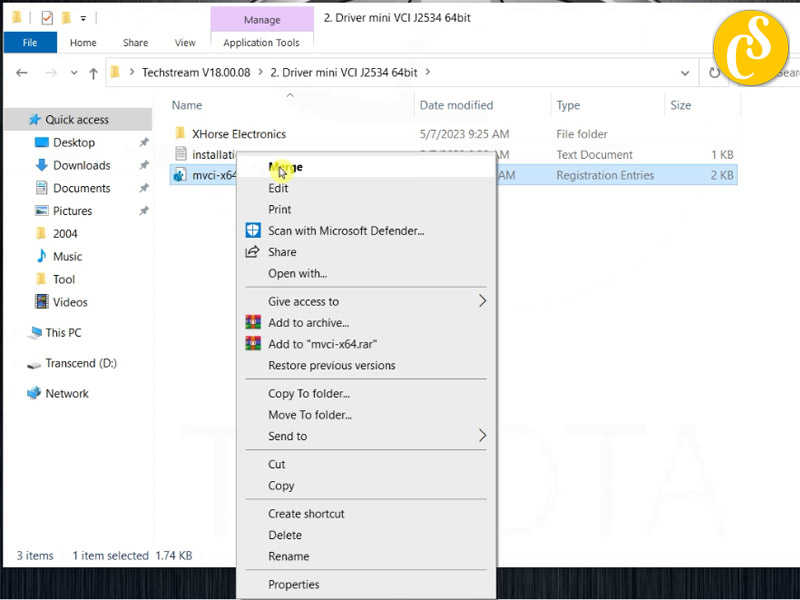
Right-Click mvcix64 select Merge

Connect Mini VCI Cable
Connect the Mini VCI cable to your vehicle’s OBD-II port and then connect it to your computer’s USB port.
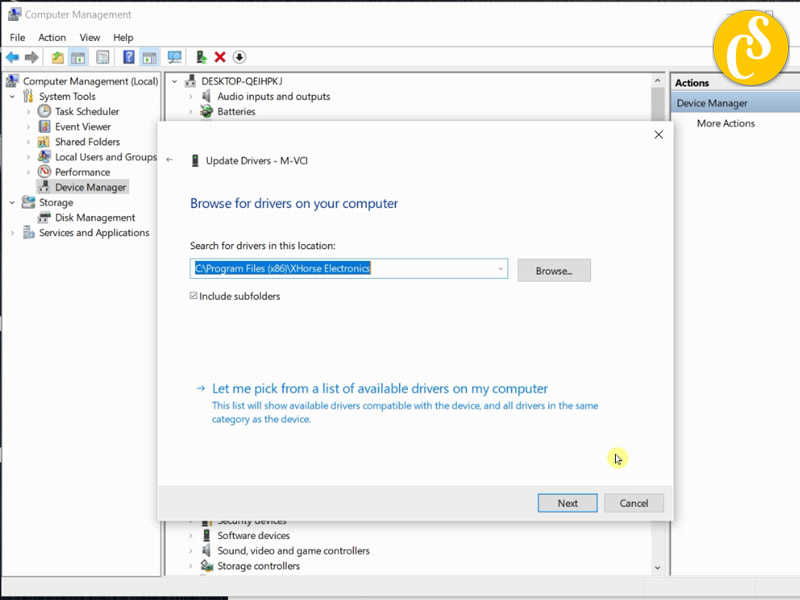
Check Device Manager:
Press Win + X and select “Device Manager” from the menu.
Look for the Mini VCI cable under “Ports (COM & LPT)” or “Universal Serial Bus controllers.”
If there’s a yellow triangle icon, it indicates an issue with the driver. Right-click and choose “Update driver” to C:\Program Files (x86)\XHorse Electronics.
Techstream Software Installation
Read more: Download and install Techstream V18.00.008
Download Techstream:
Visit the Toyota Techstream software download site or the official Techstream website to obtain the software.
Install Techstream:
Run the Techstream installer and follow the on-screen instructions.
When prompted, choose the destination folder for the installation.
Select Cable Type:
During the installation, you may be prompted to select the cable type. Choose “MINI VCI” or the appropriate option for your cable.
Activate Software:
After the installation, you may need to activate the Techstream software.
Get Activation Code 5000 days:
Activation Code Here
Launch Techstream:
Once installed and activated, launch the Techstream software.
Connect the Mini VCI cable to your vehicle and turn the ignition on.
Configure Connection:
In Techstream, go to “Setup” > “VIM Select” and choose “XHorse – MINI VCI” or the corresponding option.
Connect to Vehicle:
Go to “Connect to Vehicle” and follow the prompts to establish a connection with your vehicle.
Perform Diagnostics
Once connected, you can perform various diagnostics and programming functions using the Techstream software.
Important: Always use the software and hardware responsibly,and ensure that you are aware of any potential risks associated with vehicle diagnostics and programming. Incorrect use may lead to vehicle malfunctions. If you are unsure or unfamiliar with the process, consider seeking professional assistance.