
Taskbar Groups
Taskbar groups is a lightweight utility for Windows that lets the users create groups of shortcuts in the taskbar.
Download & Release Notes

📖 Table of Contents
- ➤ Installation
- ➤ Creating your first group
- ➤ Screen/Window Documentation
- Main Screen
- Group Creation Screen
- Extra Notes
- ➤ Image/Icon Caching
- ➤ Program Shortcuts
- ➤ File/Folder Structure
- ➤ License
🔽 How to download Taskbar groups:
1. Download the .zip-file from the latest release (link above)
2. Unpack the .zip-file at a desired location
3. Run the TaskbarGroups.exe file in the extracted folder
🛠️ Creating your first group
1. Press on the "Add taskbar group"
2. Give the group a name and an icon
3. Click on the "Add new shortcut" and select an .exe or .lnk (repeat until you got all your desired shortcuts)
    a. You can select multiple .exe or .lnk files at once
    b. You can drag and drop .exe, .lnk, or folders into the add new shortcut field
4. Save the group
enter image description here5. Left click on the group
6. In the folder that opens up, right click on the highlighted shortcut
7. Select "Pin to taskbar"
🖥️ Screen/Window Documentation
Below will be some documentation for each of the screens with explaining the functionality of each of the components.
Main screen
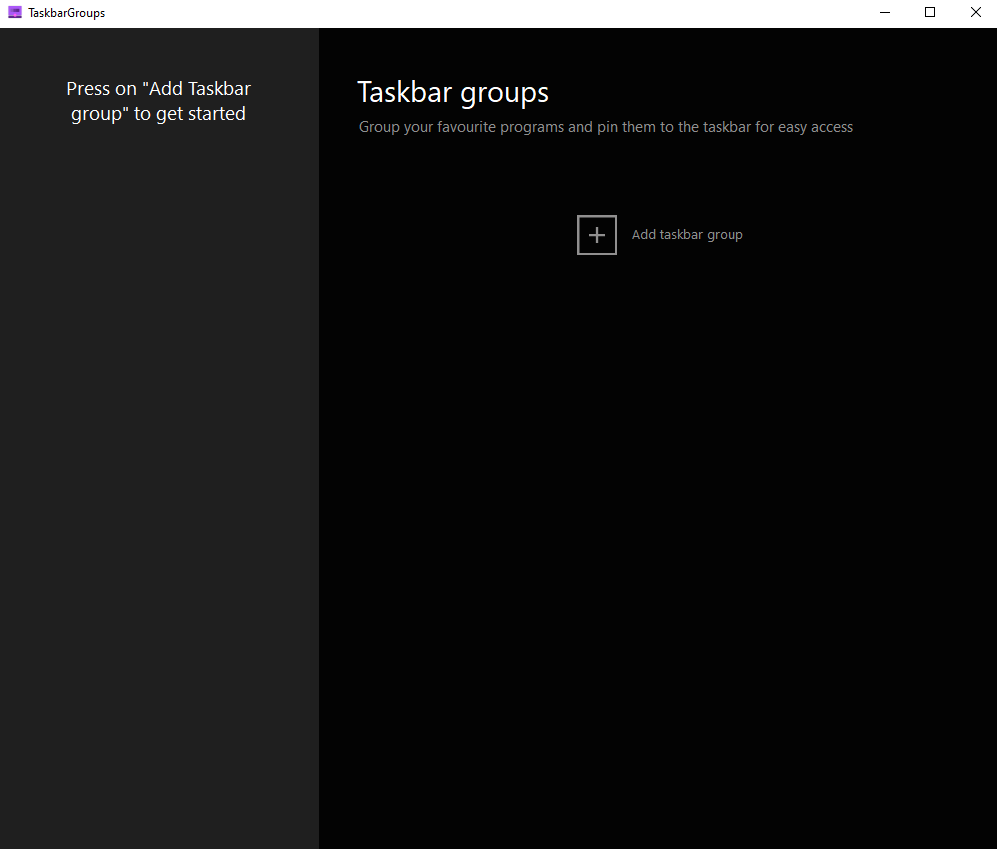
Here is the main group configuration screen. You get here by executing the TaskbarGroups.exe file. Here you can add groups and see what groups you have created.
Group Creation Screen
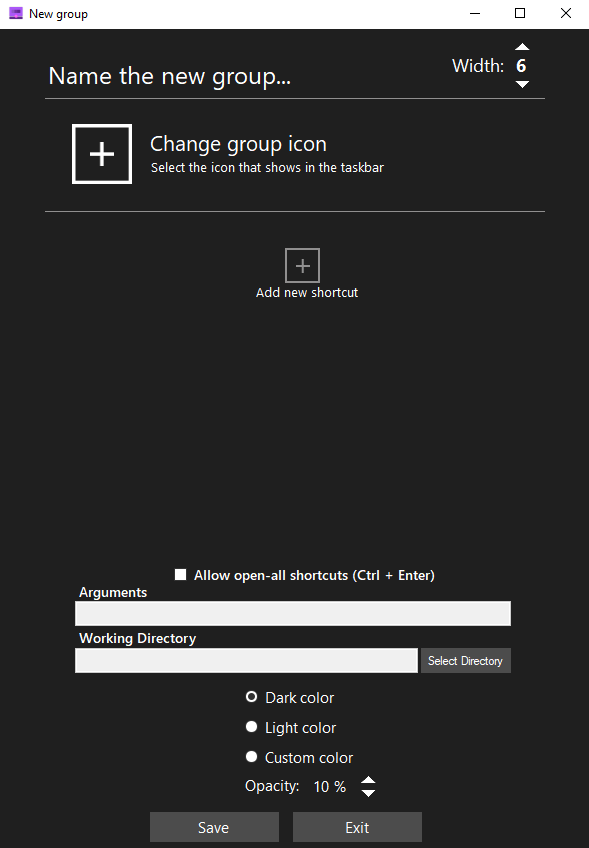
Here is the group creation screen. Here you can start customizing and configuring your group. Here is the quick rundown of the features of this window.
Name the new group — You can insert any group name (no special characters) that you would like with a maximum character limit of 49 characters in total.
Width — You can set the limit for how many shortcuts will appear on each line. For example I have 12 shortcuts and I have a width of 6. It will display 6 shortcuts per row/line.
Change Group Icon — You can click the (+) icon and it will bring up a file dialogue. You can select any type of image files (.png, .jpg, etc.), icon files (.ico), and any sort of executable or shortcut files (.exe, .lnk). On top of this you can drag and drop any of the mentioned file types above to use the icons from those files.
Add new shortcuts — You can click the (+) icon and it will bring up a file dialogue like the change group icon section. You can select any type of executable or extension files (.exe, .lnk) to add to your group. You can also add shortcuts leading to the windows store apps along with steam games/software. Do note however that if the shortcuts are moved, the application can no longer launch those applications and you will have to re-edit your group.
Allow open-all shortcuts — When you launch the group to try to launch an app, you have the option to launch all the executables inside the group. To enable this feature, this checkbox has to be checked and the group has to be saved. All shortcuts can be launched through the usage of the Ctrl + Enter keybinds.
Shortcut Item Selection — Once you have added shortcuts/applications, you can click on the sides of the individual entries of those shortcuts/applications or anywhere that a text or image aren’t blocking the background area. Clicking on them will «select» them and they would have a permanent background that is darker than the rest of the entries. This will be the same color as when you hover over applications/shortcuts. This will be needed to set Working Directories and Arguments.
Working Directory — Once you have selected an item, this textbox and the choose folder beside it will be enabled. Here you can change what working directory the application starts with. This may be required for some applications. By default for older groups, the working directory is the directory of the taskbar groups application. For new added shortcuts/applications, the working directory will be set as the location of the application or the directory of the target file for shortcuts. You can also manually set a loation through the Select Directory button. Any directory that is changed manually will be checked to be valid and if the working directory is invalid, the target path will be set with the same process as if you added a new application/shortcut.
Arguments — Once you have selected an item, this textbox is enabled and you can type any launch arguments that you would like to include with the application on launch.
Dark color/Light color/Custom color — Here you can select what color you want the background of your group to be.
Opacity — Here you can select how transparent you want the background of your application to be. The scale work from 0% (Solid color, no opacity) to 100% (Fully transparent).
Entry Name — Whenever you add an application, the entry will have the text assumed from the name of the application without the extension at the end (.exe, .txt, etc.). This can be changed if you select the text directly and you can type into field. The textbox that you type in expands/shrinks based on the length of the text to make room to select the entry. The character limit here is 27 characters.
Extra Notes
With fetching the icons of executables, the application will directly take the icon of the executable. With extensions, it works a little bit different. The application will try to fix the icon location for the extension to see if that exists anywhere on the system and use that if possible. If not, then the application would try to use the icon of the target file of that extension.
On top of this, this works a bit differently for Microsoft App Store extensions. These extensions don’t contain any sort of target path nor icon location. Here the application will try to fetch the image from the system folder where these icons are stored using the ID of the application grabbed from the extension.
📦 Image/Icon Caching
Image/icon caching is done through recreating the icon and placing it locally in the icons folder of the group in the config folder. Here it is loaded up locally as to not waste resources to recreate the icon every time. When icons are deleted/not found, the application will display an x. The icon cache can be regenerated by simply saving the group again through the main application.
⌨️ Program Shortcuts
When you open a group once its created through the shortcut provided, there are a list of hotkeys to make the program more easily usable.
Top row numbers 1,2,3,4,5,6,7,8,9,0 — Opens the shortcuts at those positions respective from 1-10.
Ctrl + Enter — Opens all applications/shortcut within the group at once
(Feature must be enabled through the settings when editing/creating the group for this to work)
📁 Folder Structure Documentation
/config
In the config folder, you will have the data regarding each group that you have created.
/config/<Goup_Name>/Icons
This is the icon cache that comes with the folder. All icons of the shortcuts that you added are added into that cache. This cache will be read from when using your group to not have to fetch each individual icon every time.
/config/<Goup_Name>/GroupIcon.ico / GroupImage.png
Created image from the group icon you selected. This will be your application icon and read from when you start up the group.
/config/<Goup_Name>/ObjectData.xml
Crucial information about the shortcuts and the group itself stored inside of here. It saves your settings for the group and is important in determining what goes into the group when you open it and any other visual settings you may have configured.
/JITComp
In here stores the individual profiles for each form. Essentially these profiles are per-compiled code that the application can read from to improve loading times and responsiveness in the system.
/Shortcuts
Here is where all of your shortcuts to activate your group will go. All groups created will have their shortcut created here and after creation, you can feel free to move the shortcut or pin it to any desired locations.
📜 License
This project is licensed under the MIT License.
Last Updated :
21 Oct, 2024
If you’re looking to ungroup taskbar icons on Windows 11, you’re not alone. Windows 11 automatically groups similar application windows together in the taskbar, but many users prefer the old way of seeing each window as a separate icon. In this article, we’ll show you how to separate taskbar icons on Windows 11 by customizing the Windows 11 taskbar icon settings. Whether it’s for convenience or personal preference, you can easily disable this feature and enjoy ungrouped icons on Windows 11.
Table of Content
- Method 1: Ungroup the Taskbar Using Taskbar Settings
- Method 2: Ungroup Taskbar Icons Using Start11
- Method 3: Ungroup Taskbar Icons Using StartAllBack
Method 1: Ungroup the Taskbar Using Taskbar Settings
Step 1: Right-click on the taskbar and select “Taskbar Settings”.

Step 2: Scroll down to the bottom and click on “Taskbar Behaviors”.
Step 3: Under “Taskbar Behaviors”, look for the setting that reads “Combine Taskbar Buttons and Hide Labels”.
Step 4: In the dropdown menu, select “Never”.

Method 2: Ungroup Taskbar Icons Using Start11
Step 1: Download and install Start from this link.
Step 2: Install and Launch Start11 and click on the “Taskbar” tab.
Step 3: Toggle the «Let Start11 enhance the taskbar» slider to the On position, and it will automatically ungroup your taskbar items. For more customization click on «Configure enhanced taskbar»
Step 4: Then from the dropdown select «Never combine taskbar buttons».
Method 3: Ungroup Taskbar Icons Using StartAllBack
Step 1: Visit the StartAllBack website and download the installation file.
Step 2: Run the installer and follow the on-screen instructions.
Step 3: In the StartAllBack window, choose «Taskbar» from the left sidebar.
Step 4: Under «Tweak pre-installed and superpowers,» locate the «Combine taskbar buttons» dropdown menu.
Step 5: Select «Never» to ungroup your taskbar icons.
Conclusion
Customizing your taskbar to ungroup taskbar icons on Windows 11 is a simple way to enhance your multitasking experience. By following the steps to disable taskbar grouping in Windows 11, you can regain control over your workspace and have each open window displayed as a separate icon. Explore more Windows 11 taskbar customization options to optimize your desktop for your workflow.
When it comes to Windows 11 Taskbar Grouping Disable, did you know that it allows users to customize their taskbar and organize their open windows in a way that suits their workflow? This feature provides greater flexibility and control, enhancing productivity and efficiency.
Windows 11 Taskbar Grouping Disable has become an essential tool for many professionals. By disabling taskbar grouping, users can keep their open windows separate, making it easier to switch between applications and find specific documents. This feature eliminates the frustration of having similar icons grouped together, improving workflow and saving valuable time.
To disable taskbar grouping in Windows 11, follow these steps:
- Right-click on the taskbar and select «Taskbar settings.»
- In the «Taskbar behaviors» section, find the «Taskbar apps» option and click on it.
- Under «Combine taskbar buttons,» select the «Never» option.
- Close the settings window, and your taskbar will no longer group similar items together.

Introduction to Windows 11 Taskbar Grouping Disable
In Windows 11, the taskbar grouping feature allows you to organize and manage multiple open windows by grouping them under a single taskbar button. While this can be useful for streamlining your workspace and reducing clutter, there may be instances where you prefer to disable taskbar grouping and have each window represented as a separate button on the taskbar. Whether it’s for personal preference or specific workflow requirements, disabling taskbar grouping gives you more control over how your windows are displayed and accessed.
Why Disable Taskbar Grouping?
There are several reasons why you might want to disable taskbar grouping in Windows 11:
- Improved visibility: Each open window has its own taskbar button, making it easier to locate and switch between specific applications.
- Efficient navigation: With individual buttons, you can directly click on the desired window in the taskbar, eliminating the need to hover over grouped buttons to access a specific window.
- Optimized workflow: Certain tasks may involve working with multiple windows simultaneously. Disabling taskbar grouping allows for seamless multitasking without the need to constantly rearrange and manage grouped buttons.
- Preference for familiarity: Some users may be accustomed to the traditional taskbar behavior in older versions of Windows or simply prefer the visual aesthetics and functionality of individual window buttons.
Whatever your reason may be, Windows 11 provides the flexibility to disable taskbar grouping and customize your desktop experience to suit your needs.
Disabling Taskbar Grouping in Windows 11
To disable taskbar grouping in Windows 11, you can follow these steps:
| Step 1: | Right-click on an empty area of the taskbar. |
| Step 2: | From the context menu, select «Taskbar settings.» |
| Step 3: | In the Taskbar settings window, scroll down to the «Combine taskbar buttons» section. |
| Step 4: | Click on the drop-down menu and select «Never.» |
Once you have completed these steps, each open window or application will have its own individual button on the taskbar, and taskbar grouping will be disabled.
Benefits of Disabling Taskbar Grouping
Disabling taskbar grouping offers several benefits for users who prefer individual window buttons on their taskbar:
- Effortless multitasking: With each window having its own taskbar button, it becomes easier to switch between applications and manage multiple tasks simultaneously.
- Improved accessibility: Individual window buttons allow for quicker access to specific applications, reducing the time spent searching through grouped buttons.
- Better organization: Taskbar grouping can sometimes make it challenging to track and organize open windows. Disabling it ensures a more organized taskbar, especially for users who work with multiple windows throughout the day.
- Visual clarity: By disabling taskbar grouping, you can enjoy a cleaner and less cluttered taskbar appearance, which can enhance your overall desktop experience.
These benefits contribute to a more efficient and personalized workflow, allowing you to make the most out of your Windows 11 experience.
Customizing Individual Window Buttons
Disabling taskbar grouping not only gives you individual window buttons but also allows for further customization options:
- Reorder buttons: You can rearrange the position of individual window buttons on the taskbar by clicking and dragging them to your desired location.
- Pin or unpin buttons: Right-clicking on a window button provides options to pin or unpin applications to the taskbar for easy and quick access.
- Manage notifications: Individual window buttons may display notifications specific to the corresponding application, enabling you to stay updated without the need to open each program.
- Personalize taskbar settings: Windows 11 offers various customization options for the taskbar, including icon size, taskbar alignment, and more. You can access these settings by right-clicking on an empty area of the taskbar and selecting «Taskbar settings.»
These customization features provide enhanced control over your Windows 11 taskbar, allowing you to create a personalized and efficient desktop environment.
Exploring Additional Features
In addition to disabling taskbar grouping, Windows 11 introduces several other noteworthy features designed to enhance user productivity and experience. Let’s explore some of these features below:
Snap Layouts and Snap Groups
Windows 11 introduces new window management features, such as Snap Layouts and Snap Groups, to help users organize and manage their open windows more efficiently.
Snap Layouts allow you to quickly snap windows into predefined positions or layouts, such as side by side, quadrant view, or full-screen. Snap Groups, on the other hand, remember and group together your preferred arrangement of open windows, making it easy to restore the layout later.
These features are particularly useful for multitasking and working with multiple applications simultaneously, providing a seamless window management experience.
Virtual Desktops
Windows 11 introduces enhanced virtual desktop functionality, enabling users to create multiple virtual desktops to organize their workspaces effectively.
Virtual desktops allow you to create separate desktop environments with their own sets of open windows, applications, and backgrounds. This feature proves beneficial when you want to group related tasks or projects, switch between workspaces quickly, or keep personal and professional tasks separate.
To access virtual desktops in Windows 11, click on the task view button located on the taskbar or use the shortcut key combination «Windows key + Tab.»
Widgets and News Feed
Windows 11 introduces a new Widgets feature that provides personalized and relevant information at a glance. Widgets can display a wide range of content, such as weather updates, news headlines, calendar events, and more, allowing you to stay informed without the need to open individual apps or websites.
The News Feed, accessible through the Start menu, curates news articles and topics from various sources based on your interests, providing a convenient way to stay up to date with the latest news.
These features enhance the overall experience by providing quick access to information and keeping you connected with relevant updates and news.
In Conclusion
Disabling taskbar grouping in Windows 11 offers a range of benefits, including improved visibility, efficient navigation, optimized workflow, and the ability to personalize your desktop experience. With individual window buttons, you can effortlessly multitask and easily locate specific applications. Windows 11 also introduces additional features like Snap Layouts and Snap Groups, virtual desktops, and widgets, further enhancing productivity and customization options. By leveraging these features, you can create a highly tailored and efficient workflow that suits your preferences and work style.

Windows 11 Taskbar Grouping Disable
The taskbar in Windows 11 comes with a new feature called «grouping» that automatically organizes similar open windows into a single icon. While this can be helpful in keeping the taskbar organized, some users may prefer to disable this feature for various reasons.
To disable taskbar grouping in Windows 11, follow these steps:
- Right-click on an empty space on the taskbar
- Select «Taskbar settings» from the context menu
- In the «Taskbar behaviors» section, toggle off the «Combine taskbar buttons» option
- The taskbar will now display each open window as a separate icon
Disabling taskbar grouping can be beneficial for users who prefer a more traditional taskbar layout or need to easily switch between multiple instances of a specific application. However, it’s important to note that this feature may be useful for users who have a large number of open windows, as it helps conserve space on the taskbar.
Key Takeaways: Windows 11 Taskbar Grouping Disable
- Windows 11 allows users to disable taskbar grouping for better organization.
- Disabling taskbar grouping in Windows 11 can make it easier to switch between open windows.
- By disabling taskbar grouping, each open window will have its own separate button on the taskbar.
- Disabling taskbar grouping can help improve productivity by providing a clearer view of open windows.
- To disable taskbar grouping in Windows 11, right-click on the taskbar, go to «Taskbar settings,» and toggle off the «Combine taskbar buttons» option.
Frequently Asked Questions
Here are some frequently asked questions related to disabling taskbar grouping in Windows 11:
1. How can I disable taskbar grouping in Windows 11?
To disable taskbar grouping in Windows 11, follow these steps:
1. Right-click on an empty area of the taskbar.
2. Select «Taskbar settings» from the context menu.
3. Scroll down to the «Combine taskbar buttons» section.
4. Click on the drop-down menu and select «Never».
2. Why would I want to disable taskbar grouping in Windows 11?
Disabling taskbar grouping in Windows 11 can be beneficial for several reasons:
— It allows you to see individual icons for each open window or application in the taskbar.
— It makes it easier to differentiate between multiple instances of the same application.
— It provides a visual representation of which windows or applications are currently open.
3. Will disabling taskbar grouping affect the performance of my computer?
No, disabling taskbar grouping in Windows 11 will not have any impact on the performance of your computer. It is simply a visual preference that does not affect the underlying functionality of your system.
4. Can I customize the taskbar grouping settings in Windows 11?
No, Windows 11 does not offer extensive customization options for taskbar grouping. The only available option is to either enable or disable taskbar grouping.
5. Can I re-enable taskbar grouping after disabling it in Windows 11?
Yes, if you have disabled taskbar grouping in Windows 11 and want to re-enable it, you can follow the same steps mentioned earlier. Instead of selecting «Never» from the drop-down menu, you can choose from other available options like «Always» or «When taskbar is full».
In summary, disabling taskbar grouping on Windows 11 is a straightforward process that can help improve productivity and organization. By following a few simple steps, users can customize their taskbar to suit their preferences and work style.
With taskbar grouping disabled, individual app icons will always be visible on the taskbar, making it easier to locate and switch between open applications. This can be especially beneficial for users who frequently multitask or have a large number of applications open at once.
- You can enable “never combine taskbar buttons” from Settings > Personalization > Taskbar > Taskbar behaviors > Combine taskbar buttons and hide labels.
- Other ways to disable icon grouping in the taskbar include using the Group Policy, Windows Registry, and a third-party app named “StartAllBack.”
Windows operating systems, both 10 and 11, have come a long way since they were originally released. Microsoft has made significant changes to both of them, where they have added new features, and also omitted some. This is probably why some people prefer updating their operating systems, while others prefer remaining on the same versions.
The taskbar is one of the features in the Windows operating system that Microsoft has meddled with quite often. One of the features of the taskbar used to be that it would show you the labels of each open window, and the icons would not be grouped on top of each other. This would allow you to quickly navigate between apps and windows without wondering which one is which.
This feature was later removed, as Microsoft wanted to save space on the taskbar for more icons. However, this feature has recently returned to both Windows 10 and 11 operating systems. You can now choose whether you want to ungroup the taskbar icons or keep them grouped, which is the default setting.
Table of Contents
What is taskbar grouping?
From the Windows taskbar, you can quickly open and access apps and programs just by single-clicking on their respective icons. You can pin the icons so that they are saved there, and move them about to arrange them according to your preferences.
If you open multiple instances or multiple windows of the same app, they will not show as different icons in the taskbar by default. Instead, when you will hover your cursor over the icon, it will then display different windows of the same app, and then you must click on the respective window that you wish to access.
When you set the taskbar to ungroup the icons, each instance of the same app will be displayed as a separate entity and will also be labeled, allowing you to quickly access the right window.
How to ungroup taskbar icons in Windows
There are multiple ways of regrouping the taskbar icons on a Windows computer. If one method does not work for you for any reason, you can continue to the next method.
Enable “Never combine taskbar icons” from Settings
The Windows operating system now allows you to set whether you want the taskbar icons to be grouped and unlabeled or ungrouped and labeled. Here are the steps to enable the “Never combine taskbar icon” if you want to:
-
Press the Windows Key + i shortcut keys to open the Settings app.
-
Click Personalization on the left and then click Taskbar on the right.

Open taskbar settings -
Scroll down and click “Taskbar behaviors” to expand it.
Open taskbar behavior settings -
Expand the drop-down menu in front of “Combine taskbar buttons and hide labels” and select Never.
Never combine taskbar icons from Settings


All windows will now be shown individually in the taskbar.
If you want to revert settings in the future, all you need to do is select “Always” from the same drop-down menu, or select “When taskbar is full,” depending on your preferences.
Additionally, performing the steps above will only make changes to the taskbar icons on your primary display device. If you have multiple display devices, then you also need to select “Never” from the drop-down menu in front of “Combine taskbar buttons and hide labels on other taskbar” as well.
Note: If you find that these options are missing from your Settings app, install any pending Windows updates and then recheck. Alternatively, you can also adopt any one of the following methods.
Ungroup taskbar icons from Group Policy
Another method to ungroup the taskbar icons is from the Group Policy editor. Here is how:
Note: If you are using the Windows Home edition, then the Group Policy editor will be missing. Learn how to install gpedit.msc in Windows Home.
-
Press the Windows Key + R keys to open the Run Command box.
-
Type in “gpedit.msc” and press Enter to open the Group Policy editor.

Open Group Policy editor -
Navigate to the following from the left pane:
Local Computer Policy > User Configuration > Administrative Templates > Start Menu and Taskbar
-
Double-click the policy “Prevent grouping of taskbar items.”
Open policy to prevent grouping of icons in the taskbar -
Select Enabled, and then click Apply and Ok.
Enable policy to ungroup taskbar icons -
Restart your computer for the changes to take effect.
Note: Although policy enforcement should impact the changes, it didn’t. Therefore, restarting File Explorer or the complete PC does the trick.

When the computer restarts, you should see individual and leveled icons in the taskbar for every window. If you want to revert the changes, return to the “Prevent grouping of taskbar items” policy, select “Not configured” or “Disabled,” and restart the PC.
If this method doesn’t work for you, you can try the remaining two methods discussed below.
Ungroup taskbar icons from Windows Registry
You can also ungroup the taskbar icons from the Windows Registry. Here is how:
Note: Misconfiguration of critical values in the system’s registry could be fatal for your operating system. Therefore, we insist that you create a system restore point or a complete system image backup before proceeding forward with the process.
You can also use our top selection of disk imaging and backup software so you never lose your data or operating system again.
-
Press the Windows Key + R keys to open the Run Command box.
-
Type in “regedit” and press Enter to open the Registry editor.
Open the Registry Editor -
Navigate to the following path from the left pane:
Computer\HKEY_CURRENT_USER\SOFTWARE\Microsoft\Windows\CurrentVersion\Policies\
-
Right-click the Policies key, expand New, and then click Key. Name this key “Explorer“.
Note: If the Explorer key already exists under the Policies key, then skip this step.
Create the Explorer key -
Right-click the Explorer key, expand New, and then click DWORD (32-bit) Value. Name this DWORD “NoTaskGrouping“.
Create the NoTaskGrouping DWORD -
Double-click the DWORD “NoTaskGrouping,” set its Value Data to 1, and click Ok.
Disable icon grouping in taskbar from Windows Registry -
Restart your computer for the changes to take effect.


This will disable the icon grouping in the taskbar and you should be able to see separate icons for every open window, with labels.
If you want to revert the changes and re-enable icon grouping, you can change the Value Data for the NoTaskGrouping DWORD to 0, delete the DWORD, or delete the Explorer key.
Ungroup taskbar icons using third-party app
You can also use a third-party app to ungroup taskbar icons for you. The StartAllBack application is used to tackle the annoyances many people face while using the Windows OS. One of these is configuring the layout and setting the preferences, including enabling and disabling icon grouping.
You can use the StartAllBack application to ungroup the icons in the taskbar. Here is how:
-
Open the StartAllBack website and download the app.

Download StartAllBack -
Run the downloaded setup file.
-
Select either of the following installation options according to your preferences:
- Install for me
- Install for everyone

Select installation preferences The application will now be installed almost immediately, and you will notice some changes in the taskbar.
Note: You can undo the automatic changes from within the StartAllBack app.
-
Open the StartAllBack app. Although it should launch automatically, if it doesn’t, right-click on the Start menu and then click Properties to open it.
Launch the StartAllBack app -
Switch to the Taskbar tab on the left.
-
In front of “Combine taskbar buttons,” expand the drop-down menu and select Never.

Disable icon grouping in taskbar from StartAllBack -
If more than one display device is connected, also select Never from the drop-down menu in front of “On secondary taskbars“.
Disable icon grouping on secondary taskbars using StartAllBack


The taskbar should now display individual icons with labels instead of grouped icons.
If you want to revert changes, you can do so from the same drop-down menus in the StartAllBack app.
Ending words
Each of us has different preferences when it comes to Windows settings and layouts. This is exactly why Microsoft continuously works on improving the user experience and giving them the option to manage their preferences.
You can choose whether you want grouped icons or separate icons in the taskbar for both Windows 10 and Windows 11. You can also do so without having to install the latest Windows update (it is always recommended that you keep your computers updated at all times).
If you have a question in mind i.e. How do I group taskbar icons in Windows 11, then this blog post is dedicated to you.
Microsoft has added limited options to customize the taskbar in Windows 11 and grouping taskbar icons is one of them. Check out how to make the taskbar transparent in Windows 11.
If you made up this blog post then you want to group your favorite apps on the taskbar so that you can quickly access them, right?
Officially it’s impossible to arrange or group taskbar icons in Windows 11, but you can take the help of a freeware app named Taskbar Groups.
So let’s learn how to use the Taskbar Groups app to group icons on the taskbar in Windows 11.
Download the Taskbar Groups app zip file from GitHub.
Extract the zip file to obtain the folder containing the Taskbar Groups applications.
Double-click to open Taskbar Groups app.
In the Taskbar Groups app UI, you need to click on the Add Taskbar group button.

In the New Group window, give your group a name. I want to create a taskbar group for a browser so I will name it Browsers.
Set the Group icon. For that, click on the Big Plus icon next to Select group icon. Locate the icon, select and open it.

Select the apps shortcut. For that click on the Big plus icon next to Add new shortcut. This will open the Programs folder, where you will find shortcuts for all apps installed on the PC. Again I will select all browser shortcuts.

Next, you need a select a color scheme for the group window, it could be dark, light, or custom color. You can also manage the opacity of the window as well.
To show App shortcuts in the group vertically, you need to set the Width to 1. To show them horizontally, select the number depending on the list of shortcuts. If you add 4 shortcuts, then set it to 4.
At last, click on the Save button.
Now open the Taskbar Groups folder that you obtained in the first step. Now open the Shortcuts folder inside it, open it, and you will find a shortcut for the group that you have created recently.
To pin the same shortcut, drag-and-drop it to the Taskbar or right-click > Show more options > Pin to taskbar.
Now, if you click on the Shortcut, it will show you shortcuts for either apps or games, depending on what you have added in the particular Taskbar group.

As simple as that!
What is your opinion about the Taskbar Groups application for Windows 11? Did you like it? Are you useful for another taskbar customization tool? Let us know in the comments.
Viney Dhiman, the mind behind GeekerMag, is a seasoned content writer with over 12 years of experience. Specializing in simplifying complex tech concepts, he covers Windows OS, Android, iOS, web apps, and product reviews. His work can be found on popular tech websites like Gizmodo and The Verge, and he has been interviewed by the Microsoft Edge team.