
In this guide, I will show you how to perform the Windows 11 22H2 upgrade using SCCM (ConfigMgr). We will explore different methods to upgrade to Windows 11 22H2, such as Windows servicing feature update deployment, servicing plan, and task sequence.
On September 20, 2022, Microsoft announced the release and availability of the Windows 11 2022 Update, the latest version of Windows 11. Users with eligible devices running Windows 11, version 21H2 can install it on their device by going to Settings > Windows Update and selecting Check for updates.
Existing customers running Windows 11 21H2 can upgrade to version 22H2 via Windows Update. This step-by-step guide will help you to upgrade from Windows 10 21H2 to 22H2 using SCCM (Configuration Manager). We will also use ConfigMgr Servicing Plans to upgrade to Windows 11 version 22H2.

Widows 11 feature update release cycles are now set to one per year. This means you will have to perform Windows 11 upgrades once a year. Thanks to Microsoft for this superb decision. The same applies to Windows 10 releases too.
Note: You must use ConfigMgr 2107 and above to upgrade computers to Windows 11. Configuration Manager 2107 supports Windows 11 as client.
Recommended Article: Create Windows 11 Device Collection in SCCM
Different Methods to Upgrade to Windows 11, 22H2
There are different methods that you can use to upgrade Windows 10/11 devices to Windows 11 22H2:
- Use the SCCM in-place upgrade task sequence to upgrade to Windows 11, version 22H2.
- Use the Configuration Manager Windows Servicing feature to upgrade to Windows 11 22H2.
- Manually upgrade to Windows 11, version 22H2 using the Installation Assistant.
- Upgrade from Windows 10/11, 21H2 to Windows 11, version 22H2 using ISO Installation Media.
- Upgrading to Windows 11 version 22H2 through Windows Update (for Home users)
- Use Intune to deploy the Windows 11 22H2 upgrade.
Most of these upgrade methods are covered in the upgrade to Windows 11 using different methods article.
Download Windows 11 22H2 ISO | VLSC | Visual Studio Subscriptions
With the release of Windows 11, 22H2, the ISO files are now available for Visual Studio subscribers and even for VLSC customers. For Visual Studio Subscriptions, the Windows 11 22H2 consumer and business editions are available for download. So, you got to know three locations from where you can download the ISO for Windows 11 version 22H2.

Also Read: Download and Install Microsoft Office 2021
Upgrade Windows 10 to Windows 11 22H2
If you are running Windows 10 version 2004 or later, you can check to see if your device is eligible (meets the minimum system requirements for Windows 11) to upgrade using the PC Health Check app. You can then check to see if Windows 11, version 22H2 is ready for your specific device by opening Windows Update settings (Settings > Update & Security > Windows Update) and selecting Check for updates. If your device is eligible and the upgrade is ready, the option to download and install will appear.
Can I skip Windows 11 21H2 and upgrade to Windows 10 22H2? Yes, absolutely. If you haven’t yet upgraded to Windows 11, you can skip the Windows 11 21H2 update and go straight to version 22H2 of Windows 11.

Use Windows Update to Upgrade to Windows 11 version 22H2
If you are running Windows 11 21H2 on your PC, you can upgrade to Windows 11 22H2 using Windows Update:
- Click Start and launch the Settings app.
- Select Windows Update and run “Check for Updates.”
- The Windows 11, version 22H2 update now appears under Windows Updates.
- To begin the upgrade, click Download and Install.

Note: When you run a check for updates, you may find multiple cumulative updates before you see the 22H2 version. Make sure you install all these updates and restart your computer.
Recommended Article: Fix Windows Update Download Error 0x8024a206
Windows 11 22H2 Upgrade using SCCM | ConfigMgr
In SCCM, you can use different methods to deploy Windows 11 22H2 upgrade. You can use Servicing Plans, deploy Feature Update to endpoints or use a task sequence to upgrade to Windows 11 22H2. No matter which method you use, the final goal is to upgrade the computers to Windows 11 version 22H2. We will look at these methods in the next section.
Prerequisites
Let’s look at some prerequisites for Windows 11 22H2 servicing and Windows 11 feature update 22H2 deployment using SCCM.
- First, configure Software Update Point for Windows 11 22H2.
- Ensure the service connection point is online.
- Enable dynamic update for feature updates in Client Settings.
- Windows 11 product must be enabled under SUP > Products.
1. The most important prerequisite for deploying the Windows 11 22H2 upgrade is the Software Update Point. The SUP must be configured and there should be no errors during software updates synchronizations. Refer to the following guide on how to install and configure software update point role in SCCM.
Under the Software Update Point properties, select the Classifications tab and enable Upgrades. Next, switch to Products tab and enable Windows 11 product. Here is a dedicated guide on how to enable Windows 11 22H2 updates in SCCM and WSUS.

Note: If you don’t enable “Upgrades” Classification from the classification tab of SUP properties, you will not see Windows 11 22H2 upgrades in Configuration Manager console.
2. You must enable the dynamic updates in the Client Settings. If not enabled, use the following steps to enable the dynamic update for feature updates in SCCM:
- In the Configuration Manager console, go to the Administration workspace, and select the Client Settings node.
- Select Default Client Settings. On the Home tab of the ribbon, select Properties.
- Select the Software Updates tab and configure the following settings:
- Specify thread priority for feature updates: Normal.
- Enable Dynamic Update for feature updates: Yes.
If you have already enabled the above settings, you can move on to the next step.

Locate Windows 11 Feature Updates in Configuration Manager
If you have gone through the above list of prerequisites, the Windows 11 feature updates should be available in Software Library\Overview\Windows Servicing\All Windows Feature Updates.
Use the below steps to list all the Windows 11 22H2 feature updates in SCCM console:
- Launch the Configuration Manager console and go to the Software Library workspace.
- Select Windows Servicing > All Windows Feature Updates. This will show all the Windows 11 feature updates.
- In the search box, type “22H2” to filter Windows 11 version 22H2 updates and click Search.
- Now you should see all Windows 11 22H2 updates in the ConfigMgr console.

In case you want to filter the languages for Windows 11 22H2, click the Add Criteria and select the appropriate product and language to filter out Windows 11 Feature Updates per your requirement. Listed below are the different languages for which Windows 11 versions of 22H2 are available. The updates are classified into two editions: business editions and consumer editions.
Windows 11 (business editions), version 22H2 ar-sa arm64
Windows 11 (business editions), version 22H2 ar-sa x64
Windows 11 (business editions), version 22H2 bg-bg arm64
Windows 11 (business editions), version 22H2 bg-bg x64
Windows 11 (business editions), version 22H2 cs-cz arm64
Windows 11 (business editions), version 22H2 cs-cz x64
Windows 11 (business editions), version 22H2 da-dk arm64
Windows 11 (business editions), version 22H2 da-dk x64
Windows 11 (business editions), version 22H2 de-de arm64
Windows 11 (business editions), version 22H2 de-de x64
Windows 11 (business editions), version 22H2 el-gr arm64
Windows 11 (business editions), version 22H2 el-gr x64
Windows 11 (business editions), version 22H2 en-gb arm64
Windows 11 (business editions), version 22H2 en-gb x64
Windows 11 (business editions), version 22H2 en-us arm64
Windows 11 (business editions), version 22H2 en-us x64
Windows 11 (business editions), version 22H2 es-es arm64
Windows 11 (business editions), version 22H2 es-es x64
Windows 11 (business editions), version 22H2 es-mx arm64
Windows 11 (business editions), version 22H2 es-mx x64
Windows 11 (business editions), version 22H2 et-ee arm64
Windows 11 (business editions), version 22H2 et-ee x64
Windows 11 (business editions), version 22H2 fi-fi arm64
Windows 11 (business editions), version 22H2 fi-fi x64
Windows 11 (business editions), version 22H2 fr-ca arm64
Windows 11 (business editions), version 22H2 fr-ca x64
Windows 11 (business editions), version 22H2 fr-fr arm64
Windows 11 (business editions), version 22H2 fr-fr x64
Windows 11 (business editions), version 22H2 he-il arm64
Windows 11 (business editions), version 22H2 he-il x64
Windows 11 (business editions), version 22H2 hr-hr arm64
Windows 11 (business editions), version 22H2 hr-hr x64
Windows 11 (business editions), version 22H2 hu-hu arm64
Windows 11 (business editions), version 22H2 hu-hu x64
Windows 11 (business editions), version 22H2 it-it arm64
Windows 11 (business editions), version 22H2 it-it x64
Windows 11 (business editions), version 22H2 ja-jp arm64
Windows 11 (business editions), version 22H2 ja-jp x64
Windows 11 (business editions), version 22H2 ko-kr arm64
Windows 11 (business editions), version 22H2 ko-kr x64
Windows 11 (business editions), version 22H2 lt-lt arm64
Windows 11 (business editions), version 22H2 lt-lt x64
Windows 11 (business editions), version 22H2 lv-lv arm64
Windows 11 (business editions), version 22H2 lv-lv x64
Windows 11 (business editions), version 22H2 nb-no arm64
Windows 11 (business editions), version 22H2 nb-no x64
Windows 11 (business editions), version 22H2 nl-nl arm64
Windows 11 (business editions), version 22H2 nl-nl x64
Windows 11 (business editions), version 22H2 pl-pl arm64
Windows 11 (business editions), version 22H2 pl-pl x64
Windows 11 (business editions), version 22H2 pt-br arm64
Windows 11 (business editions), version 22H2 pt-br x64
Windows 11 (business editions), version 22H2 pt-pt arm64
Windows 11 (business editions), version 22H2 pt-pt x64
Windows 11 (business editions), version 22H2 ro-ro arm64
Windows 11 (business editions), version 22H2 ro-ro x64
Windows 11 (business editions), version 22H2 ru-ru arm64
Windows 11 (business editions), version 22H2 ru-ru x64
Windows 11 (business editions), version 22H2 sk-sk arm64
Windows 11 (business editions), version 22H2 sk-sk x64
Windows 11 (business editions), version 22H2 sl-si arm64
Windows 11 (business editions), version 22H2 sl-si x64
Windows 11 (business editions), version 22H2 sr-latn-rs arm64
Windows 11 (business editions), version 22H2 sr-latn-rs x64
Windows 11 (business editions), version 22H2 sv-se arm64
Windows 11 (business editions), version 22H2 sv-se x64
Windows 11 (business editions), version 22H2 th-th arm64
Windows 11 (business editions), version 22H2 th-th x64
Windows 11 (business editions), version 22H2 tr-tr arm64
Windows 11 (business editions), version 22H2 tr-tr x64
Windows 11 (business editions), version 22H2 uk-ua arm64
Windows 11 (business editions), version 22H2 uk-ua x64
Windows 11 (business editions), version 22H2 zh-cn arm64
Windows 11 (business editions), version 22H2 zh-cn x64
Windows 11 (business editions), version 22H2 zh-tw arm64
Windows 11 (business editions), version 22H2 zh-tw x64
Windows 11 (consumer editions), version 22H2 ar-sa x64
Windows 11 (consumer editions), version 22H2 bg-bg x64
Windows 11 (consumer editions), version 22H2 cs-cz x64
Windows 11 (consumer editions), version 22H2 da-dk x64
Windows 11 (consumer editions), version 22H2 de-de x64
Windows 11 (consumer editions), version 22H2 el-gr x64
Windows 11 (consumer editions), version 22H2 en-gb x64
Windows 11 (consumer editions), version 22H2 en-us x64
Windows 11 (consumer editions), version 22H2 es-es x64
Windows 11 (consumer editions), version 22H2 es-mx x64
Windows 11 (consumer editions), version 22H2 et-ee x64
Windows 11 (consumer editions), version 22H2 fi-fi x64
Windows 11 (consumer editions), version 22H2 fr-ca x64
Windows 11 (consumer editions), version 22H2 fr-fr x64
Windows 11 (consumer editions), version 22H2 he-il x64
Windows 11 (consumer editions), version 22H2 hr-hr x64
Windows 11 (consumer editions), version 22H2 hu-hu x64
Windows 11 (consumer editions), version 22H2 it-it x64
Windows 11 (consumer editions), version 22H2 ja-jp x64
Windows 11 (consumer editions), version 22H2 ko-kr x64
Windows 11 (consumer editions), version 22H2 lt-lt x64
Windows 11 (consumer editions), version 22H2 lv-lv x64
Windows 11 (consumer editions), version 22H2 nb-no x64
Windows 11 (consumer editions), version 22H2 nl-nl x64
Windows 11 (consumer editions), version 22H2 pl-pl x64
Windows 11 (consumer editions), version 22H2 pt-br x64
Windows 11 (consumer editions), version 22H2 pt-pt x64
Windows 11 (consumer editions), version 22H2 ro-ro x64
Windows 11 (consumer editions), version 22H2 ru-ru x64
Windows 11 (consumer editions), version 22H2 sk-sk x64
Windows 11 (consumer editions), version 22H2 sl-si x64
Windows 11 (consumer editions), version 22H2 sr-latn-rs x64
Windows 11 (consumer editions), version 22H2 sv-se x64
Windows 11 (consumer editions), version 22H2 th-th x64
Windows 11 (consumer editions), version 22H2 tr-tr x64
Windows 11 (consumer editions), version 22H2 uk-ua x64
Windows 11 (consumer editions), version 22H2 zh-cn x64
Windows 11 (consumer editions), version 22H2 zh-tw x64
Download Windows 11 22H2 Feature Update
Before you deploy Windows 11 22H2 upgrade using SCCM feature update, you must download the update and distribute the content to SCCM distribution points. I will be downloading the “Windows 11 (business editions), version 22H2 en-us x64” and “Windows 11 (business editions), version 22H2 en-gb x64“feature update for my client computers.
In the Configuration Manager console, right-click on Windows 11 (business editions), version 22H2 en-us x64 and select Review license. Note that in my case, the license terms showed up as Required in the console. The license terms can be accepted later as well, during the feature update deployment.

On the License Terms window, select Accept License Terms and click OK.

To download the Windows 11 22H2 feature update, right-click Windows 11 (business editions), version 22H2 en-us x64 update and select Download.

Create Deployment Package for Windows 11 22H2 Feature Update
In this step, we will create a deployment package for Windows 11 22H2 and this package will be deployed to the client computers for upgrade. There are many steps involved here, so perform each step with proper attention.
On the Deployment Package page of the Download Software Updates wizard, select Create a new deployment package. Specify the package name as Windows 11 22H2 Feature Update and add a brief description of this package. Next, you must specify the package source, which is typically a shared folder path to save the Windows 11 22H2 feature update. Click Next.

Click Add button to specify the distribution points or distribution point groups to host the content. Click Next.

Leave the settings to default on Distribution Settings page and click Next.

Specify the source location for downloading software updates. Select Download software updates from the internet and click Next.

Specify Update Languages for Products, and I am going to stay with default selections. Click Next.

We have successfully downloaded Windows 11 22H2 feature update. Click Close on the Completion window.

In case you encounter issues while downloading the Windows 11 22H2 feature update, review the PatchDownloader.log located in the %temp% folder. This log file will log all the errors that occur during the download of Windows 11 feature updates.
In my case, there were no errors in the PatchDownloader.log and the 22H2 feature update downloaded without any issues.
Trying to connect to the root\SMS namespace on the CORPCM.PRAJWAL.LOCAL machine.	Software Updates Patch Downloader
Connected to \\CORPCM.PRAJWAL.LOCAL\root\SMS	Software Updates Patch Downloader
Trying to connect to the \\CORPCM.PRAJWAL.LOCAL\root\sms\site_IND namespace on the CORPCM.PRAJWAL.LOCAL machine.	Software Updates Patch Downloader
Connected to \\CORPCM.PRAJWAL.LOCAL\root\sms\site_IND	Software Updates Patch Downloader
Download destination = \\corpcm\22H2DP\6639240d-a0df-47c1-878b-82170d5bbb3c.1\WindowsUpdateBox.exe .	Software Updates Patch Downloader
Contentsource = http://b1.download.windowsupdate.com/d/upgr/2022/09/windowsupdatebox_83143ef7320dda963dd98277c9f258615de4bc74.exe
Download destination = \\corpcm\22H2DP\6639240d-a0df-47c1-878b-82170d5bbb3c.1\22621.382.220806-0833.ni_release_svc_refresh_CLIENTBUSINESS_VOL_x64FRE_en-us.esd .
Contentsource = http://b1.download.windowsupdate.com/d/upgr/2022/09/22621.382.220806-0833.ni_release_svc_refresh_clientbusiness_vol_x64fre_en-us_6a4c8c9bfecd043a32bbd3120fee781c50bf189f.esd
Query to run: select f.FileName, ct.ContentSource from SMS_CIToContent c join SMS_CIContentFiles f on c.ContentID = f.ContentID join SMS_Content ct on c.ContentID = ct.ContentID where c.ContentDownloaded = 1 and f.FileHash = 'SHA1:83143EF7320DDA963DD98277C9F258615DE4BC74'	Software Updates Patch Downloader	21-09-2022 13:59:42	4832 (0x12E0)
Downloading content for ContentID = 16778383,  FileName = WindowsUpdateBox.exe.	Software Updates Patch Downloader
Proxy is enabled for download, using registry settings or defaults.	Software Updates Patch Downloader
Connecting - Adding file range by calling HttpAddRequestHeaders, range string = "Range: bytes=0-"	Software Updates Patch Downloader
Download http://b1.download.windowsupdate.com/d/upgr/2022/09/windowsupdatebox_83143ef7320dda963dd98277c9f258615de4bc74.exe in progress: 10 percent complete	Software Updates Patch Downloader
Download http://b1.download.windowsupdate.com/d/upgr/2022/09/windowsupdatebox_83143ef7320dda963dd98277c9f258615de4bc74.exe in progress: 20 percent complete	Software Updates Patch Downloader
Download http://b1.download.windowsupdate.com/d/upgr/2022/09/windowsupdatebox_83143ef7320dda963dd98277c9f258615de4bc74.exe in progress: 30 percent complete	Software Updates Patch Downloader
Download http://b1.download.windowsupdate.com/d/upgr/2022/09/windowsupdatebox_83143ef7320dda963dd98277c9f258615de4bc74.exe in progress: 40 percent complete	Software Updates Patch Downloader
Download http://b1.download.windowsupdate.com/d/upgr/2022/09/windowsupdatebox_83143ef7320dda963dd98277c9f258615de4bc74.exe in progress: 50 percent complete	Software Updates Patch Downloader
Download http://b1.download.windowsupdate.com/d/upgr/2022/09/windowsupdatebox_83143ef7320dda963dd98277c9f258615de4bc74.exe in progress: 60 percent complete	Software Updates Patch Downloader
Download http://b1.download.windowsupdate.com/d/upgr/2022/09/windowsupdatebox_83143ef7320dda963dd98277c9f258615de4bc74.exe in progress: 70 percent complete	Software Updates Patch Downloader
Download http://b1.download.windowsupdate.com/d/upgr/2022/09/windowsupdatebox_83143ef7320dda963dd98277c9f258615de4bc74.exe in progress: 80 percent complete	Software Updates Patch Downloader
Download http://b1.download.windowsupdate.com/d/upgr/2022/09/windowsupdatebox_83143ef7320dda963dd98277c9f258615de4bc74.exe in progress: 90 percent complete	Software Updates Patch Downloader
Download http://b1.download.windowsupdate.com/d/upgr/2022/09/windowsupdatebox_83143ef7320dda963dd98277c9f258615de4bc74.exe to C:\Users\cmadmin\AppData\Local\Temp\CABC8C7.tmp.exe returns 0	Software Updates Patch Downloader
Using machine settings for CRL checking.	Software Updates Patch Downloader
Cert revocation check is disabled so cert revocation list will not be checked.	Software Updates Patch Downloader
To enable cert revocation check use: UpdDwnldCfg.exe /checkrevocation	Software Updates Patch Downloader
Verifying file trust C:\Users\cmadmin\AppData\Local\Temp\CABC8C7.tmp.exe	Software Updates Patch Downloader
File trust C:\Users\cmadmin\AppData\Local\Temp\CABC8C7.tmp.exe verified:	Software Updates Patch Downloader
Verifying file hash C:\Users\cmadmin\AppData\Local\Temp\CABC8C7.tmp.exe	Software Updates Patch Downloader
File hash verified: C:\Users\cmadmin\AppData\Local\Temp\CABC8C7.tmp.exe	Software Updates Patch Downloader
Successfully moved C:\Users\cmadmin\AppData\Local\Temp\CABC8C7.tmp.exe to \\corpcm\22H2DP\6639240d-a0df-47c1-878b-82170d5bbb3c.1\WindowsUpdateBox.exe	Software Updates Patch Downloader
Attempting to delete 0 byte tmp files from previous downloads	Software Updates Patch Downloader
Query to run: select f.FileName, ct.ContentSource from SMS_CIToContent c join SMS_CIContentFiles f on c.ContentID = f.ContentID join SMS_Content ct on c.ContentID = ct.ContentID where c.ContentDownloaded = 1 and f.FileHash = 'SHA1:6A4C8C9BFECD043A32BBD3120FEE781C50BF189F'	Software Updates Patch Downloader	21-09-2022 13:59:47	4832 (0x12E0)
Downloading content for ContentID = 16778383,  FileName = 22621.382.220806-0833.ni_release_svc_refresh_CLIENTBUSINESS_VOL_x64FRE_en-us.esd.	Software Updates Patch Downloader
Proxy is enabled for download, using registry settings or defaults.	Software Updates Patch Downloader	21-09-2022 13:59:47	4832 (0x12E0)
Connecting - Adding file range by calling HttpAddRequestHeaders, range string = "Range: bytes=0-"	Software Updates Patch Downloader
Download http://b1.download.windowsupdate.com/d/upgr/2022/09/22621.382.220806-0833.ni_release_svc_refresh_clientbusiness_vol_x64fre_en-us_6a4c8c9bfecd043a32bbd3120fee781c50bf189f.esd in progress: 10 percent complete	Software Updates Patch Downloader
Download http://b1.download.windowsupdate.com/d/upgr/2022/09/22621.382.220806-0833.ni_release_svc_refresh_clientbusiness_vol_x64fre_en-us_6a4c8c9bfecd043a32bbd3120fee781c50bf189f.esd in progress: 20 percent complete	Software Updates Patch Downloader
Download http://b1.download.windowsupdate.com/d/upgr/2022/09/22621.382.220806-0833.ni_release_svc_refresh_clientbusiness_vol_x64fre_en-us_6a4c8c9bfecd043a32bbd3120fee781c50bf189f.esd in progress: 30 percent complete	Software Updates Patch Downloader
Download http://b1.download.windowsupdate.com/d/upgr/2022/09/22621.382.220806-0833.ni_release_svc_refresh_clientbusiness_vol_x64fre_en-us_6a4c8c9bfecd043a32bbd3120fee781c50bf189f.esd in progress: 40 percent complete	Software Updates Patch Downloader	21-09-2022 14:05:11	5348 (0x14E4)
Download http://b1.download.windowsupdate.com/d/upgr/2022/09/22621.382.220806-0833.ni_release_svc_refresh_clientbusiness_vol_x64fre_en-us_6a4c8c9bfecd043a32bbd3120fee781c50bf189f.esd in progress: 50 percent complete	Software Updates Patch Downloader
Download http://b1.download.windowsupdate.com/d/upgr/2022/09/22621.382.220806-0833.ni_release_svc_refresh_clientbusiness_vol_x64fre_en-us_6a4c8c9bfecd043a32bbd3120fee781c50bf189f.esd in progress: 60 percent complete	Software Updates Patch Downloader
Download http://b1.download.windowsupdate.com/d/upgr/2022/09/22621.382.220806-0833.ni_release_svc_refresh_clientbusiness_vol_x64fre_en-us_6a4c8c9bfecd043a32bbd3120fee781c50bf189f.esd in progress: 70 percent complete	Software Updates Patch Downloader
Download http://b1.download.windowsupdate.com/d/upgr/2022/09/22621.382.220806-0833.ni_release_svc_refresh_clientbusiness_vol_x64fre_en-us_6a4c8c9bfecd043a32bbd3120fee781c50bf189f.esd in progress: 80 percent complete	Software Updates Patch Downloader
Download http://b1.download.windowsupdate.com/d/upgr/2022/09/22621.382.220806-0833.ni_release_svc_refresh_clientbusiness_vol_x64fre_en-us_6a4c8c9bfecd043a32bbd3120fee781c50bf189f.esd in progress: 90 percent complete	Software Updates Patch Downloader
Download http://b1.download.windowsupdate.com/d/upgr/2022/09/22621.382.220806-0833.ni_release_svc_refresh_clientbusiness_vol_x64fre_en-us_6a4c8c9bfecd043a32bbd3120fee781c50bf189f.esd to C:\Users\cmadmin\AppData\Local\Temp\CABDBC4.tmp.esd returns 0	Software Updates Patch Downloader
Using machine settings for CRL checking.	Software Updates Patch Downloader
Cert revocation check is disabled so cert revocation list will not be checked.	Software Updates Patch Downloader
To enable cert revocation check use: UpdDwnldCfg.exe /checkrevocation	Software Updates Patch Downloader
Verifying file hash C:\Users\cmadmin\AppData\Local\Temp\CABDBC4.tmp.esd	Software Updates Patch Downloader
File hash verified: C:\Users\cmadmin\AppData\Local\Temp\CABDBC4.tmp.esd	Software Updates Patch Downloader
Successfully moved C:\Users\cmadmin\AppData\Local\Temp\CABDBC4.tmp.esd to \\corpcm\22H2DP\6639240d-a0df-47c1-878b-82170d5bbb3c.1\22621.382.220806-0833.ni_release_svc_refresh_CLIENTBUSINESS_VOL_x64FRE_en-us.esd	Software Updates Patch Downloader
Attempting to delete 0 byte tmp files from previous downloads	Software Updates Patch Downloader
Renaming \\corpcm\22H2DP\6639240d-a0df-47c1-878b-82170d5bbb3c.1 to \\corpcm\22H2DP\6639240d-a0df-47c1-878b-82170d5bbb3c	Software Updates Patch Downloader
Successfully moved \\corpcm\22H2DP\6639240d-a0df-47c1-878b-82170d5bbb3c.1 to \\corpcm\22H2DP\6639240d-a0df-47c1-878b-82170d5bbb3c	Software Updates Patch Downloader

Let’s check the size of the Windows 11 22H2 feature update. Browse to the download location of Windows 11 22H2 update. Right-click the download folder and select Properties. The size of Windows 11 22H2 feature update is 3.43 GB. It’s a big update, and you should find two files within that folder. An ESD file and WindowsUpdatebox.exe file.
This completes the steps to create a deployment package for Windows 11 feature update 22H2.

1. Deploy Windows 11 22H2 Feature Update using SCCM
In this step, we will deploy the Windows 11 22H2 feature update to our clients. Using Windows Servicing, we will perform the Windows 11 22H2 feature update deployment using Configuration Manager. You can deploy the feature update to a single client or to multiple devices using device collection.
I advise testing the upgrade on a Pilot device collection if you are deploying the Windows 11 22H2 update for the first time. Few devices that are intended to test the upgrade to 22H2 should be included in this device collection. Use the following guides to create a device collection in SCCM.
- Create Windows 11 device collection in SCCM
- Create Windows 10 Device Collections in Configuration Manager
- Windows 10 21H1 Device Collection
Use the following steps to deploy the Windows 11 22H2 feature update using SCCM:
- In the ConfigMgr console, navigate to Software Library\Overview\Windows Servicing\All Windows Feature Updates.
- Right-click Windows 11 (business editions), version 22H2 x64 feature update, and select Deploy.

On the General page, enter the details for Windows 11 22H2 feature update deployment.
- Deployment Name: Enter a suitable name for deployment such as Windows 11 22H2 feature update.
- Description: Windows 11 22H2 feature update to upgrade computers to version 22H2.
- Software Update Group: This is created automatically and is visible under Software Update Groups in Configuration Manager console.
- Collection: Click Browse and select a device collection consisting of few pilot devices selected for testing Windows 11 upgrade.
Click the Next button to continue.

On the Deployment Settings page, specify the type of deployment. Choose whether you want to make the Windows 11 22H2 upgrade available for users in the Software Center or deploy it as required. Read more about SCCM Available vs. Required to know the differences. Click Next.

The Scheduling page lets you configure schedule details for the deployment. Configure the following settings:
- Schedule Evaluation | Time Based on: Select Client Local Time.
- Software Available Time: As soon as possible.
If you want to make the Windows 11 22H2 upgrade available at a specific date and time, select Specific time and define them. Define the deadline installation to ensure the upgrade happens in the defined period.
Click Next to continue.

Specify the following user experience settings for the deployment.
- User Notifications: Display in Software Center and show all notifications
- Commit changes at the deadline or during a maintenance window (requires restarts): Yes
- If any update in this deployment requires a system restart, run updates deployment evaluation cycle after restart: No.
Click Next.

On the Download settings page, specify the download settings for the current deployment:
- Client Computers can use distribution points from neighbor boundary: No
- Download and install software updates from the fallback content source location: Yes
Click Next to continue.

Review the deployment settings of Windows 11 version 22H2 update on Summary page and click Next. On the Completion window, click Close.

Windows 11 22H2 Servicing: End-User Experience for Upgrade
After you have deployed Windows 11 22H2 feature update using Windows Servicing, it’s time to test the upgrade installation on end computers. The end-user experience is similar to other feature upgrades.
On the client computer, first launch the Software Center. Once the Software Center has been opened, select Windows 11 (business editions), version 22H2 update by clicking the Updates tab. Click on the Install button to begin the Windows 11 22H2 upgrade.

Confirm you want to upgrade the operating system on this computer. It will take some time to upgrade the operating system, and your computer might restart several times. Note that this is an in-place upgrade to version 22H2, and the setup automatically migrates your apps, data, and settings. Click on the Install button to begin the Windows 11 22H2 upgrade.

After a few restarts, your computer’s operating system is upgraded to Windows 11 version 22H2. The procedure for upgrading to Windows 11 22H2 using the SCCM Windows Servicing method is now complete.
2. Upgrade to Windows 11 22H2 using Servicing Plans
With SCCM servicing plans, you ensure that all the Windows 11 devices are kept up-to-date when new builds are released. A Windows 11 Servicing Plan in SCCM is an ADR (Automatic Deployment Rule) that allows you to upgrade Windows 10 computers to Windows 11. You can also use ConfigMgr ADR to deploy Windows 11 updates.
By creating a Windows 11 22H2 servicing plan in SCCM, you can upgrade the computers running Windows 11 21H2 to Windows 11 version 22H2. With Windows 11 22H2 upgrades available in ConfigMgr, you must first enable Windows 11 product for patching. Then you can create a servicing plan to upgrade Windows 10/11 21H2 to Windows 11 22H2.
Note: You cannot use the SCCM servicing plans to upgrade Windows 7 or Windows 8.1 to Windows 11 22H2. Therefore, you must follow the instructions in this post exactly if you want to upgrade Windows 10/11 to Windows 11 version 22H2.
Use the below steps to create a new servicing plan in SCCM to perform Windows 11 22H2 upgrade:
- In the SCCM console, go to Software Library > Overview > Windows Servicing.
- Right click Servicing Plans and click Create Servicing Plan.

Specify the name of the servicing plan as ‘Windows 11 22H2 Servicing Plan‘. Click Next to continue.

Click Browse and select the target collection to which you want to deploy this servicing plan. Again, I recommend picking a test device collection for upgrade deployment. You can extend the servicing plan to a larger group of devices once you’ve established that the upgrade is functional. Click Next.

Specify the deployment ring wherein you define “How many days after Microsoft releases a new upgrade do you want to wait before deploying it in your setup?“. I am going to leave the value as default, which is 0 meaning the upgrade will deployed immediately. If you are creating this servicing plan in your production setup, ensure you test it properly and choose the desired value. Click Next.

This is an important section where you refine Windows 11 22H2 upgrades by using search criteria and property filters. You don’t have to use all the property filters, only use the ones that will help you select your upgrade file.
For example, I am going to define the following search criteria for Windows 11 22H2 upgrade for English language (en-gb). Here is how my configuration looks:
- Language: English
- Product Category: Windows 11
- Title: Windows 11 (business editions), version 22H2 en-gb x64
After you define the search criteria, click on the Preview button to preview the updates that meet the criteria. In my case, I filtered the results to a specific Windows 11 22H2 upgrade. You may include multiple updates and this will surely increase the size of the deployment package.
For example, if you include Windows 11 (business editions), version 22H2 en-us and en-gb, your deployment package will include both the upgrade files. I hope you got my point.
Click Next to continue.

Specify the deployment schedule for the Windows 11 22H2 servicing plan. You basically define when you want the servicing plan to be available and set the installation deadline. Click Next.

Specify the user experience for the Windows 11 22H2 servicing plan. Under the Deadline behavior, I am going to enable – Software Update Installation option. For device restart behavior, enable Workstations to suppress the system restart upon completing the upgrade. Click Next.

When you create a servicing plan, you create a new deployment package that will contain the upgrade files. In this case, I already have a deployment package created for Windows 11 22H2 upgrade. Therefore, I am going to use the same deployment package for my servicing plan.
In case you don’t have a deployment package in your setup, select the option “Create a new deployment package“. Specify the deployment package name and also the package source. The package source here is a folder that contains all the Windows 11 22H2 upgrade files that servicing plan downloads. Click Next.

Specify the Download Location for this Servicing Plan (ADR) to download software updates from the internet. Click Next.

On the Language Section window, you specify the additional Update languages for your products. I am going to with default ones, click Next.

The Summary window shows the entire list of settings that you have configured for the servicing plan. Click Next. On Completion window, close the Create Servicing Plan wizard. This completes the steps to create Windows 11 22H2 Servicing plan in Configuration Manager.

After you have created the servicing plan in SCCM, you can run the Windows 11 22H2 servicing plan on demand. In the ConfigMgr console, go to Software Library\Overview\Windows Servicing\Servicing Plans. Right click Windows 11 22H2 Servicing Plan and select Run Now.
With servicing plans, the 22H2 upgrade may take some time to appear in Software Center. Once the 22H2 upgrade appears, click on the Install button to begin the upgrade.
3. Windows 11 22H2 In-Place Upgrade using SCCM Task Sequence
In this method, we will use a task sequence to perform an in-place upgrade to Windows 11 version 22H2. This task sequence will include an “Upgrade operating system” step, and within that step we will include the Windows 11 22H2 feature update.
If you are deploying Windows 11 22H2 using a task sequence in Configuration Manager, don’t forget to update the Windows ADK to version 22H2. To download Windows ADK for Windows 11 version 22H2, read Windows 11 ADK versions and downloads article.
This method is probably the easiest way to perform an in-place upgrade of Windows 11 to version 22H2. Let’s get started by creating a new task sequence.
In the Configuration Manager console, go to Software Library\Overview\Operating Systems\Task Sequences. On the top-ribbon click Create Task Sequence.

On Create a new task sequence page, select Create a new custom task sequence. Click Next.

Specify the task sequence name and add a brief description. Do not select any boot image. Click Next.

Review the settings on Summary page and on the Completion window click Close.

Right-Click the Windows 11 22H2 in-place upgrade task sequence and click Edit. The task sequence doesn’t include any steps because it’s a custom task sequence. Click Add button and select Images > Upgrade Operating System step.

In the Upgrade Operating System step, select Install the following feature updates. Click the Yellow star icon and add the Windows 11 version 22H2 feature update. Click Apply and OK.
You must deploy the task sequence to a device collection. Right-click the Windows 11 22H2 in-place task sequence and select Deploy. Complete the TS deployment wizard.

Within few minutes, the in-place upgrade task sequence appears in the Operating Systems tab of Software Center. Select the Windows 11 22H2 task sequence and click Install.

A message box appears asking you to confirm the operating system upgrade on the computer. Click on Install button to begin the in-place upgrade to Windows 11 22H2.

The task sequence downloads the Windows 11 22H2 upgrade and in-place upgrade begins.

A couple of reboots, and we see the Windows 11 21H2 has been upgrade to version 22H2. The Software Center shows the task sequence has been installed, and you can use the Reinstall option in case you encountered failures.
Checking the build number of Windows 11 PC now shows OS build 22621.382 and version as 22H2.

Windows 11 22H2 Upgrade Log Files
During the in-place upgrade to Windows 11 22H2, your PC may encounter errors and to determine why it failed, you will need the log files. Refer to the below Windows 11 log files to troubleshoot issues with in-place upgrade issues.
- C:\Windows\Panther\Setupact.log
- C:\Windows\panther\setuperr.log
- C:\Windows\inf\setupapi.dev.log
- C:\Windows\panther\PreGatherPnPList.log
- C:\Windows\panther\miglog.xml
Log Files for Windows 11 22H2 Servicing
The following are the important SCCM and Windows log files associated with Windows 10 servicing.
- C:\Windows\Logs\CBS\CBS.log
- Dism.log – C:\Windows\Logs\DISM
Conclusion
I hope you’ve read this article all the way through because I’m sure this is the best instruction on how to upgrade Windows 11 to version 22H2 using SCCM. I have covered three ways to upgrade to Windows 11 22H2: feature update deployment using Windows Servicing, Servicing Plan, and in-place upgrade to Windows 11 22H2 with task sequence. You can use any of these methods to upgrade to Windows 11 22H2. Please let me know if you have any questions in the comments area.
Still Need Help?
If you need further assistance on the above article or want to discuss other technical issues, check out some of these options.
This question has recently come up a few times on Reddit and it’s something I initially struggled with as well. It’s one of those things that should be dead simple but in reality takes a lot of tribal knowledge to pull off.
Wait! A TS Step Not Working As Advertised? Say It Ain’t So!
Alas, yes my dear administrators … not all task sequence steps were created equal. There are some steps that just love to watch the world burn and Install Software Updates is their king. Don’t just take my word for it either, the users have spoken: Fix the Software Update Task Sequence. It is not by chance that this is currently the second most popular User Voice item with 1,421 votes. It’s been so bad for so long that many places have just given up entirely and use MDT solely for their build and captures. Speaking of build and captures…
To B&C or Not To B&C. That is the Question.
What I outline below is going to apply most directly to build and captures for legacy operating systems that you should be migrating away from. As you move to Windows 10 and Office 365 it’s probably worth taking a step back and asking if doing B&Cs is still necessary. With the release cadence of those products we will never see the multi-year backlog of updates that their predecessors had. Furthermore, both products have used a cumulative update model from the start. If you’re doing B&Cs primarily for software updates they will still save you some deployment time but ask yourself how much and if doing so is still worth it. I see a lot of ‘I shaved X minutes off my deployment by doing Y’ talk in the community. While such tricks are cool from a technical perspective I don’t always understand the practical value. In my organization the techs kick off a bunch of devices and then check back … eventually. A 15 minute OS deployment doesn’t save anyone time if the tech doesn’t come back for four hours. As always, your requirements and therefore mileage may vary.
Twelve Steps to Recovery
Below I’m going to outline the steps I took to install updates at least semi-reliably during task sequences. Some of this information might already be dated and unnecessary due to product enhancements. However, it’s what I’m using in production right now so I’m sticking to it. There’s thousands of ways for update installation to fail meaning there’s no silver bullet but this is what took me from something broken to something usable.
Deploying Updates to Unknown Devices
This is a simple step but it’s one I see many people miss and I can’t find it documented anywhere by Microsoft (note to self: fix that). In order for clients to install updates they must be deployed to them. As that applies to devices running OSD task sequences it means deploying to the two unknown computer objects. The easiest way to do that is to use the ‘All Unknown Computers’ collection. Whatever your patching strategy is, make sure that it includes deploying updates to those two devices. My ADRs all have a deployment specifically for this purpose with a deadline that matches my final production rollout. That ensures that when the whole organization gets the patches so do any newly imaged devices.
Provide Adequate Memory, CPU, and Disk Resources
This primarily applies to virtual machines and doubly so during during build a captures for legacy operating systems. If you try and update Windows 7 from the ‘latest’ ISO using a VM with one CPU, a couple GBs of memory, and 20 Gb of disk … things will not turn out well for you. Below I’ll outline strategies to lower the resources required but my standard is a VM with four CPU cores, 8 GB of memory, and 64 GB of disk. When I tried using VMs with half those resources it would timeout (described below), run out of memory (0x8007000E), or run out of disk space (0x80070070). Please, do not try to solve this problem using physical devices … you don’t want to capture drivers in your base image. I’ll admit to bending this rule for VMWare drivers which are very small and unlikely to conflict with physical devices.
Apply The Convenience Rollups
In 2016 Microsoft released Convenience rollup update for Windows 7 SP1 and Windows Server 2008 R2 SP1 (KB3125574) specifically to make build and captures easier. Building this into your image before you run the Install Software Updates step will greatly reduce the number of applicable updates. Keep in mind though that to install this rollup you need to install the April 2015 servicing stack update for Windows 7 and Windows Server 2008 R2 (KB3020369) first. I accomplish this by creating a package for each update, creating a program that uses WUSA to install the updates (ex. wusa.exe Windows6.1-KB3020369-x64.msu /quiet /norestart) , and then using the Install Package task sequence step.
If you use VMWare in your organization take special note of the first known issue listed for the rollup. I kid you not, the official solution from Microsoft is to run the provided VB script right before or after the update is installed. I included the script in that update’s package, added a second program to run it, and called it in the task sequence.
Maintain Software Updates To Minimize Your Update Catalog
I wrote on this at length here: Software Update Maintenance: It’s a Thing. That You Should Do. When the Install Software Updates step runs it first needs to know which updates are applicable to the device. That means doing a software update scan which, since the device is unknown, is going to be the first scan the device has ever done. Scanning against three thousand updates rather than ten thousand makes a real difference. As I’ll discuss below, it could mean the difference between success and failure.
Update the Windows Update Agent (WUA)
The flip side of minimizing your update catalog is to make sure you have a recent, if not latest, version of the Windows Update Agent which has to consume it. Back in 2015 and 2016 Microsoft released a whole bunch of updates to the WUA to just keep things afloat for Windows 7. Apparently ‘efficiency’ wasn’t part of the initial WUA design and it took them several releases to reign in the agent from snarfing up all the CPU and memory you threw at it. At the time, the agent was simply consuming more memory than 32-bit versions of the OS could support. In my current build and capture I am installing Windows Update Client for Windows 7 and Windows Server 2008 R2: March 2016 (KB3138612) to do this. As above, I make a package and install it before the Install Software Update Step.
Increase the Scan Timeout Value using SMSTSSoftwareUpdateScanTimeout
One of the biggest problems with the Install Software Update step is that the update scan will timeout. This step historically has had an arbitrary hard coded timeout value of 30 minutes at which point it will just fail. Now, if you’ve done everything above you probably aren’t going to hit that timeout. In Current Branch 1606 the team added the SMSTSSoftwareUpdateScanTimeout variable to allow you to control this value in seconds. Just to be safe I set it to an hour (3,600 seconds).
As an aside, this is one of the beefs I have with how the product team solves certain issues. They create a new variable, maybe mention it in the release notes, and eventually document it. So they ‘fix the problem’ but leave it as an exercise for the new admin to come across the issue, bang their head for a few days, and then find some reference about it on the internet. I understand the concern for breaking existing workflows but this just seems designed to frustrate new users of the product and encourage them to give up. Why did I have to spend three weeks of my life tweaking the default task sequence to get it to do what is says it does?
Handle Multi-Reboot Updates Using SMSTSWaitForSecondReboot
It’s not a frequent occurrence but some updates require two reboots to install successfully. When that happens during a task sequence the first reboot is initiated by the task sequence engine but the second one is not which means the task sequence environment is not properly saved and the sequences fails with ‘Task Sequence environment not found’. In Current Branch 1602 (and CU3 for 2012 versions) the team added the SMSTSWaitForSecondReboot variable which will allow you to set a value in seconds to wait for that second reboot. My experiences suggests that this is a hard wait and the sequence will always pause for the specified length for every subsequent reboot. I set this to ten minutes (600 seconds) in all of my OSD task sequences. In my deployment task sequences I turn it back down to zero after updates are installed so that subsequent restarts don’t needlessly wait.
More details on this issue here: Task sequence fails in Configuration Manager if software updates require multiple restarts
By Repeating Yourself You Will Convince It
A single Install Software Updates step is never going to install all applicable updates. There’s so many inter-dependencies between them all for that to ever be the case. When Microsoft moved to the cumulative update model the promise was that they would become fully cumulative to the latest ISO by June 2017. I think it’s safe to say that they missed that date and I wouldn’t hold my breath for it to happen at this point. In any case, the solution to this is to repeat the step numerous times. However, simply lining them up in a neat row doesn’t seem to work. What I settled on was repeating the following steps three times:
- Check for Updates
- Install Software Updates
- Reboot Computer
The check for updates step above is a Run Command Line task sequence step that runs the command line below. This triggers the client to scan for software updates. I’ve seen some people recommend putting a wait step after the scan since it runs asynchronously but I haven’t found that to be necessary.
cmd.exe /c wmic /namespace:\\root\ccm path sms_client CALL triggerSchedule "{00000000-0000-0000-0000-000000000113}" /NOINTERACTIVE
Putting It All Together
Ok, so I lied. I only made it to eight steps. Feel free to admit that this step has a problem and that it needs a power greater than itself. Then, work to remove its shortcomings and have it make amends to the devices it has harmed.
Putting everything together, here is what installing software updates looks like in my Windows 7 build and capture task sequence:
Late in the game of writing this I came across this relevant MS blog post which is worth a read: Building Windows 7 Images in 2017
I’ve been exploring ways to get my Windows XP (plus other versions of Windows) task sequences to deploy with all Windows updates installed. I found a couple of different ways: using ZTIWindowsUpdate (an MDT 2010 script), and using WSUS Offline update. Each of these work relatively well but neither takes care of every update. So, I decided to combine these processes to ensure all available updates are installed.
Downloads
- MDT 2010: Microsoft Downloads
- WSUS offline update: WSUSOffline.net
Using ZTI Windows Update from MDT 2010 Source Files
ZTIWindowsUpdate.wsf is a script included with MDT 2010 which automates Windows Update installation. If you are not already running MDT 2010, download and install it to use ZTIWindowsUpdate.wsf. After installing, open the Windows start menu, expand ‘Microsoft Deployment Toolkit’ and choose ‘Configure ConfigMgr Integration.’ This will copy the MDT source files and integrate them with SCCM in Configuration Manager. Next, you need to make an MDT source files package. For steps on how to do this, check out Windowsmasher‘s post (about halfway down, do only “integrating and installing MDT” ).
Within your task sequence do the following to use ZTIWindowsUpdate:
- Add step “Use Toolkit Package” (found under ‘MDT’)
- Choose MDT 2010 Source Files package
- Add step “Run Command Line,” name it “ZTI Windows Update”
- The command is:
cscript.exe "%SCRIPTROOT%\ZTIWindowsUpdate.wsf"

This will run the MDT script ZTI windows update (ZTIWU) during your task sequence. ZTIWU will download and install most of the windows updates needed for your machine. During the process, ZTIWU will restart your computer as needed. Note that ZTIWU is configured to reject any updates that can accept user input (because SCCM will not display dialogue), so any updates that need user input will not install with ZTIWU. Beware that this step can take a while. You can configure updates and packages that you want skipped, for information on how to do this check out this article at Xtreme Deployment: Windows Update in MDT 2010.
Using WSUS Offline Update
WSUS Offline Update provides the ability to download all available updates for an OS and use it as a package to update a machine running the given OS at later time. This takes a lot less time during deployment do to the fact that you don’t have to download all the updates every time you deploy. In addition, Offline Update seems to get some of the updates that ZITWU skips. On the downside, you will have to make new update packages as new updates are rolling out, but you could likely automate this process. I found some useful direction on the capabilities WSUS Offline Update at myITforum: WSUS Offline Update – Installing Windows updates without an Internet connection and WSUS.
Here is what you need to do to deploy these drivers:
- Select the desired OS\language options
- Navigate to the ‘iso’ folder in the offline update directory
- Extract the contents of the iso
- Create a folder called ‘WSUS offline updates’ in you SCCM package source directory, and move the extracted iso contents there
- Create a package in ConfigMgr linking to the source
- Make a program within the package that calls ‘update.cmd’ from the package source
- Add the program to your task sequence

Run UpdateGenerator.exe to Make an iso Containing Updates
Combining the Two Processes
Personally, my goal is to deploy a Windows XP machine, go to update.microsoft.com and find that there are no available updates for the machine. After experimenting with these two processes, I found that both left some updates out. You can further eliminate any missing updates by running both processes in a build XP task sequence. It is most efficient for Offline Update to run first, since these updates are already downloaded, and ZTIWU can download and install any extras afterward.
Further Updates
Even after using ZTIWU and WSUS offine update, some updates may remain when checking windows update. You can install them with a batch file:
- Download the needed updates
- Make a folder called “Supplemental Windows Updates’ in you SCCM package source directory
- Move the downloaded files to this location and make a package in SCCM linking to the source
- Write a batch file which executes each update, using the /Q /Z switches to install silently with no restarts
- Create a program which executes the batch file and add it to your task sequence
For instance, I downloaded my updates and created a batch file that looked like this:
 WindowsXP-KB973687-x86-ENU.exe /Z /Q

WindowsXP-KB951978-x86-ENU.exe /Z /Q

WindowsXP-KB968389-x86-ENU.exe /Z /Q

WindowsXP-KB971029-x86-ENU.exe /Z /Q

WindowsXP-KB975467-x86-ENU.exe /Z /Q

WindowsXP-KB905474-ENU-x86.exe /extract:"%cd%" /Q

wganotifypackageinner.exe /passive /Q /Z

REG ADD "HKLM\SOFTWARE\Microsoft\Windows Genuine Advantage" /v InstallID /t REG_SZ /d {30F230D0-7940-499e-8A01-748682288985} /f
A note: most updates install silently just fine with the /Q switch. An exception to this is Windows Genuine Advantage (WGA). WGA will prompt the user for feedback even if run with /Q. Therefore, you need to run these commands to extract the package, run the inner installer, and add the program to the Windows registry (already in the above script):
WindowsXP-KB905474-ENU-x86.exe /extract:"%cd%" /Q

wganotifypackageinner.exe /passive /Q /Z

REG ADD "HKLM\SOFTWARE\Microsoft\Windows Genuine Advantage" /v InstallID /t REG_SZ /d {30F230D0-7940-499e-8A01-748682288985} /f
Wrap Up
After combining all of these processes and adding them to your basic XP task sequence, you should end up with and image with all current Windows Updates installed. Therefore, you can deploy from that image without having to wait on many updates to install. You can even use ZTI Windows Update in the deploy stage (with the same steps as above) to search for any new updates that were not put on the image. This should make for easy XP deployment without the end-user having to deal with many updates.
post views: 26,706
Introduction
This is not exactly an A-Z guide on the topic, but rather a story of my experiences with upgrading Windows 10 over the Internet with In-Place Upgrade (IPU) Task Sequence using ConfigMgr and how it works in my environment.
I’m using a Cloud Management Gateway (CMG) with enhanced HTTP as well as initially being connected to the on-premises infrastructure with Always On VPN. The VPN in this scenario is a user-initiated tunnel and thus obviously disconnects once the upgrade restarts the computer. It’s not completely without challenges and I will try to cover those during this post.
Curious? Read on 🙂
Oh yeah, seeing I now allow IPU to happen over the Internet, I also created something in Powershell App Deployment Toolkit which extraordinarily warns the user if the upgrade is being initiated from outside the office network. A preview of that in the end of the post 🙂
Pre-Cache Content
If precaching content wasn’t considered mandatory already, making in-place upgrades available over the Internet surely does so.
In my opinion there’s absolutely no reason to make IPU available over the Internet, if content isn’t precached already, other than providing the end user with a horrible experience. We don’t want to do that 🙂
I have previously gone into details on the precaching part here: https://www.imab.dk/windows-as-a-service-sharing-my-precache-and-in-place-upgrade-task-sequences-part-1/
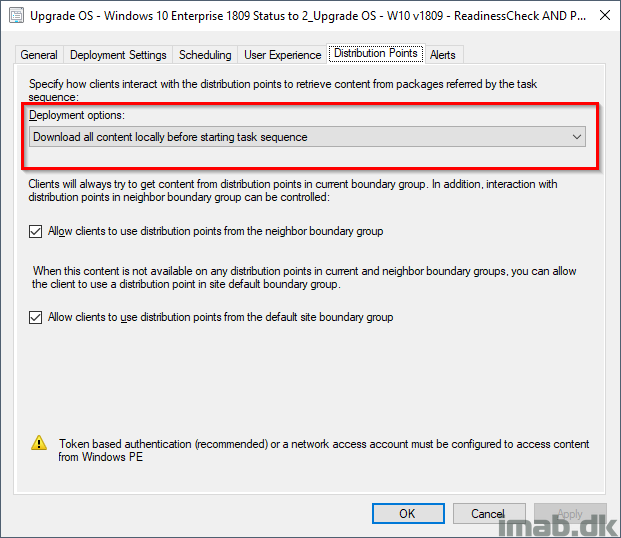
As I said, precaching is MANDATORY. When making IPU available through the Cloud Management Gateway, the task sequence is REQUIRED to be deployed with ‘Download all content locally before starting task sequence’. If content isn’t on the client already, you do the math. The complete download can take hours depending on Internet speed etc.
SMSTSRebootDelay
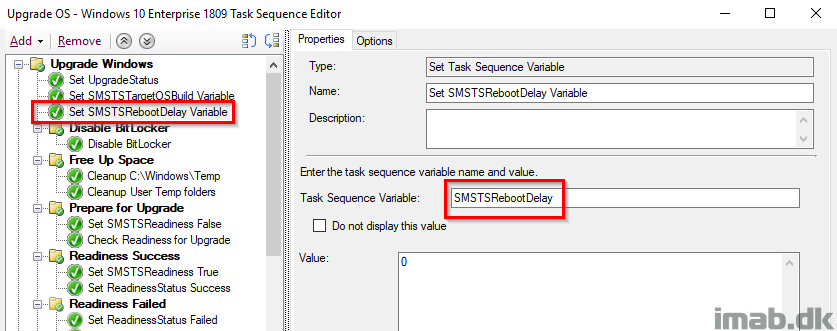
Time is precious. During my testing I realized how much time I spent watching a countdown to complete. The Windows setup still initiates a few reboots and each is being count down from 15-20 seconds.
Prevent that and any delays from any reboot during the task sequence by setting SMSTSRebootDelay to 0 (zero).
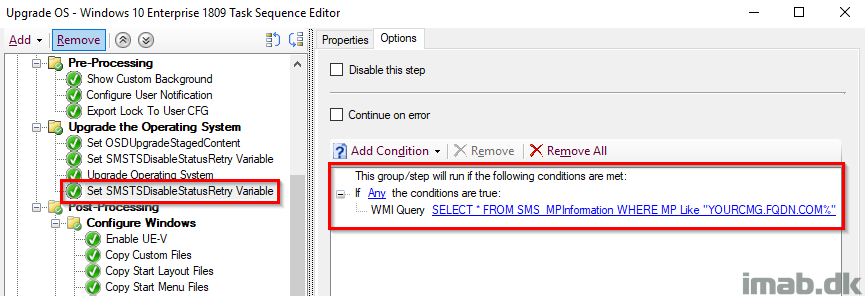
SMSTSDisableStatusRetry
This might cause some wondering for some, but remember that in my scenario I initially have a user-centric Always On VPN tunnel active, which is being disconnected during the first reboot. From there the SCCM client switches to Currently Internet and connects to the Cloud Management Gateway and I’ve seen some waiting here and there for status messages to be sent back to the CMG.
This is also to cater for poor private wifi connections. I want the highest chance of success, regardless of Internet connection.
Important: For now I set it twice. Once before the Upgrade OS step and once after. The first because this is where my VPN disconnects and the SCCM client doesn’t switch to the CMG instantly. The second due to the nature of the step, where the variable will be ignored after a reboot in case a status message is sent successfully. Read more here: https://docs.microsoft.com/en-us/sccm/osd/understand/task-sequence-variables#SMSTSDisableStatusRetry
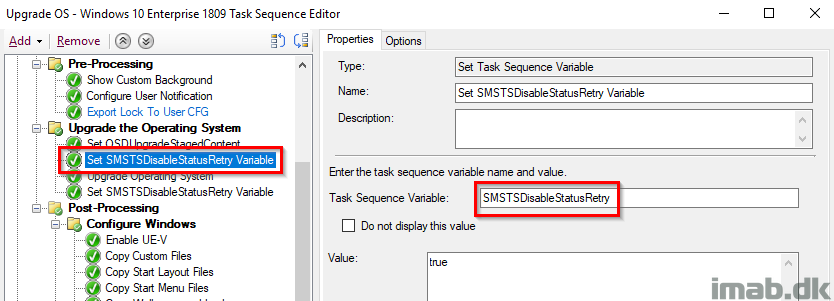
Now, the second time is being set conditionally if the current Management Point is the Cloud Management Gateway. This is done to only skip status messages if the client indeed is being upgraded from the Internet and possibly will be done so from a crappy connection.
Additional Steps
This is more of a inspirational section, and will vary a lot depending on what your task sequence looks like.
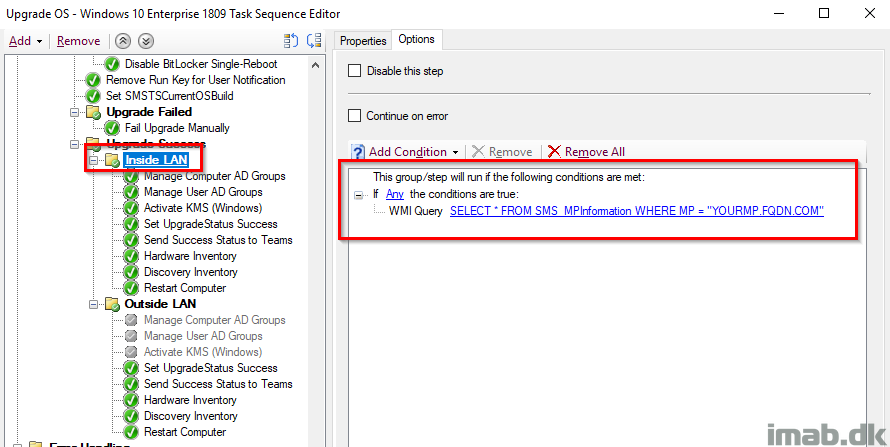
During my usual IPU task sequence, I do stuff which is only possible if the client is inside local LAN/or have an active VPN tunnel. For one I manage groups in the local Active Directory through a web service. That is not possible for a Internet client through the Cloud Management Gateway without exposing the web service to the Internet, so that’s something to consider as well.
I have solved that by running steps conditionally and only manage AD groups if the current Management Point is my local Management Point.
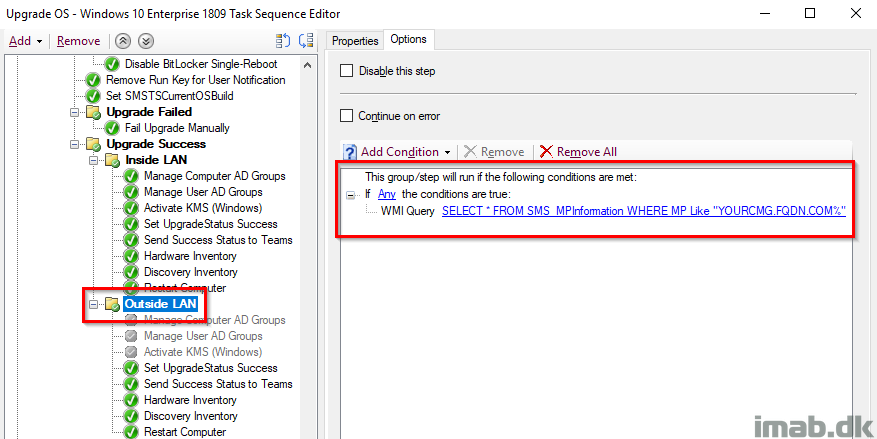
And another step conditionally to only run if the CMG is acting as Management Point and the client thus is being considered on the Internet.
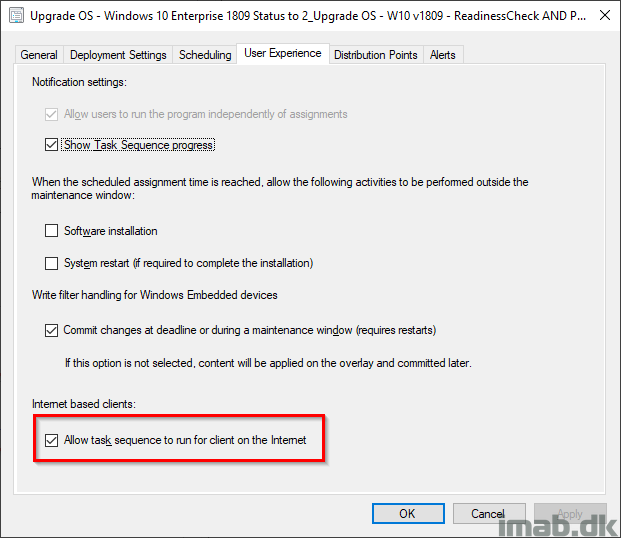
Deployment
The task sequence is being deployed with the option ‘Allow task sequence to run for client on the Internet‘, allowing the TS to actually run regardless of my VPN connection being active or not.
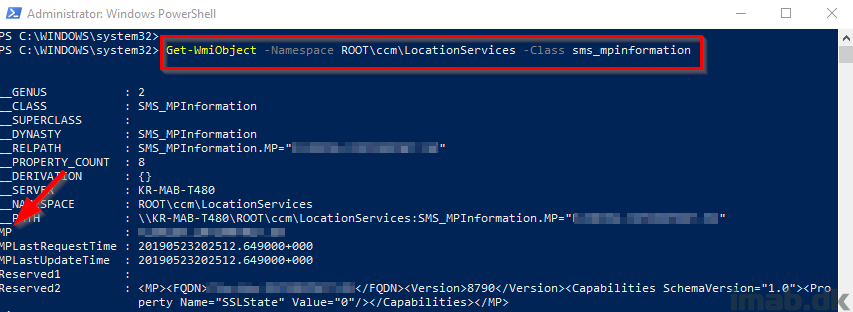
More details
You can get the Management Point details from WMI running following Powershell:
Get-WmiObject -Namespace ROOT\ccm\LocationServices -Class sms_mpinformation
Get-WmiObject -Namespace ROOT\ccm\LocationServices -Class sms_activempcandidate
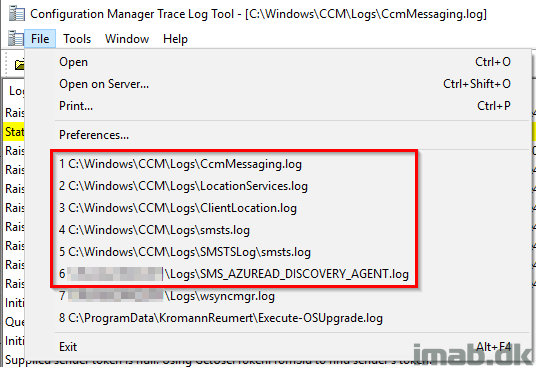
Logging
While working through all of this, there are a bunch of useful logs to investigate:
CcmMessaging.log
LocationServices.log
ClientLocation.log
smsts.log
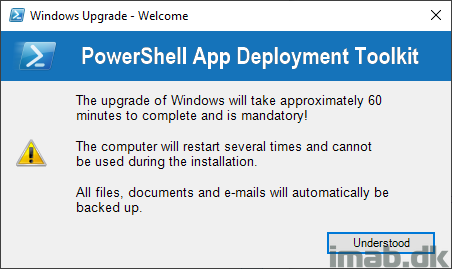
Powershell App Deployment Toolkit preview
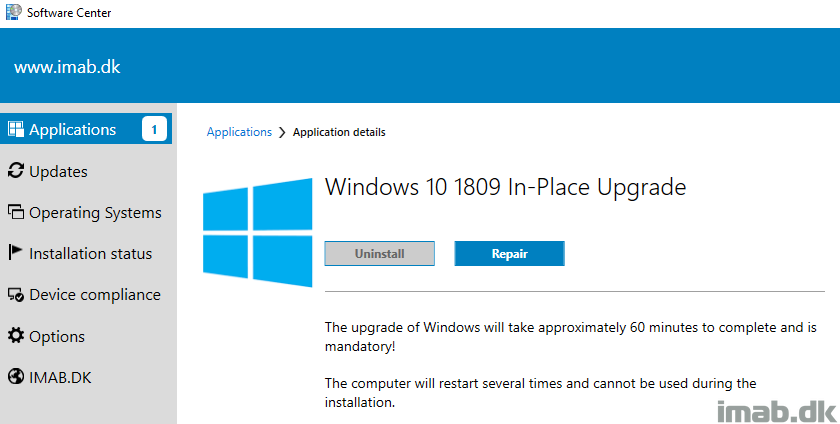
I use PSADT with an application to initiate the In-Place Upgrade task sequence. Though my content have changed slightly since then, you can find more on that here: https://www.imab.dk/how-can-i-in-place-upgrade-to-windows-10-1803-using-powershell-app-deployment-toolkit-and-sccm-system-center-configuration-manager-part-2/
- The initial welcome message.
- If installation is initiated outside of office network, below message is shown, allowing the user to continue or wait.
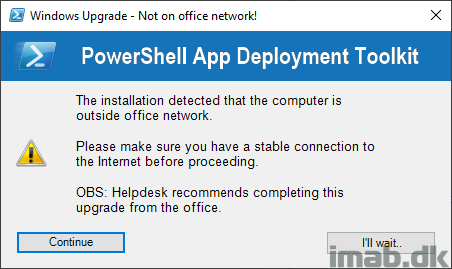
- If the installation is initiated from a cellular/LTE connection, I currently prevent that with below message.

Hit me up if you need something elaborated – enjoy 🙂
This post will show the steps to perform the Windows 10 21H1 Upgrade using the SCCM In-place upgrade Task Sequence. Various Windows 10 deployment scenarios are available to install the latest version of Windows 10 21H1. To successfully deploy the latest operating system and choose among these scenarios, it’s important to understand its capabilities and limitations.
If you are looking to deploy a new device or wipe an existing device and deploy with a fresh image (Bare metal) – Deploy Windows 10 21H1 Using SCCM Task Sequence | ConfigMgr | Step-by-Step Guide
The simplest path to upgrading PCs currently running Windows 7, Windows 8, or Windows 8.1 to Windows 10 is through an in-place upgrade, which is completely automated with the SCCM task sequence.
In-place upgrade provides a simple, automated process that leverages the Windows setup process to upgrade from an earlier version of Windows automatically. This process automatically migrates existing data, settings, drivers, and applications.

Microsoft has built-in extremely robust fallback options. If something goes wrong, the In-place Upgrade can quickly revert the Windows Update to the previous version by returning to an earlier build. The process can be automated and handled remotely with deployment tools.
Table of Contents
Prerequisites – Windows 10 21H1 Upgrade
- Make sure that your device has enough space. Your device requires at least 16 GB of free disk space to upgrade to a 32-bit OS or 20 GB for a 64-bit OS to upgrade to Windows 10.
- Supported Deployment Tools
- You must use Configuration Manager Version 2103 to manage Windows 10 version 21H1.
- Configuration Manager version 2103
- Deploy Windows 10 Feature Update Using SCCM Task Sequence | ConfigMgr
What are the upgrade paths available?
You can upgrade to Windows 10 from Windows 7 or a later operating system. Migrating from one edition of Windows 10 to a different edition of the same release is also supported. Check out the Summary of the available Windows 10 upgrade paths.
Note: In-place upgrades from the Windows 7, Windows 8.1, or Windows 10 semi-annual channel to Windows 10 LTSC are not supported.
Windows 10 Upgrade Phases – Overview
The upgrade process consists of four phases: Downlevel, SafeOS, First Boot, and Second Boot. In a successful Windows 10 upgrade, the computer will reboot once between each phase.
| Windows 10 Upgrade Phases |
|---|
| Downlevel |
| SafeOS |
| First Boot |
| Second Boot |

Why Consider an In-Place Upgrade?

Limitations
The following tasks aren’t compatible with the in-place upgrade –
You can’t use a captured or custom image for an upgrade.
- Changing disk partitions.
- Changing the system architecture (x86 to x64 bits).
- Modifying the base OS language.
- When we have dual or multi-boot systems.
- Changing the computer’s domain membership or updating the local Administrators group.
- Outdated device drivers.
- WinPE Offline operation and third-party disk encryption.
Add an Operating System Upgrade Package
To create upgrade packages, you need to import the complete Windows 10 installation media. We will use this upgrade package to upgrade an existing Windows to Windows 10 21H1.
Launch Configuration Manager Console, Go to Software Library > Operating Systems > Operating System Upgrade Packages.
Right-click Operating System Upgrade Packages and select Add Operating System Upgrade Packages. (you can create a custom folder for selection)

In Data Source, click Browse and specify the network-shared path to the root folder where you extracted the source of an ISO file. Select the option to Extract a specific image index from the specified WIM file. Then, select the Image index from the drop-down list. Click Next.
You can now specify to automatically import a single index rather than all image indexes in the file. Using this option results in a smaller image file.

In the General tab, provide information on the upgrade package: name, version, and comment. Click Next.

Review the provided information and click Next to complete the wizard.

Please wait for a moment while exporting, which is in progress.

After successfully completion, click close to exit the wizard.

The new Operating System Upgrade Package appears in the configuration manager console’s Operating System Upgrade Packages node.
This is a known issue that you might be experienced. Let’s understand why Windows 10 21H1 OS Version Appears wrong 10.0.19041.928 in SCCM Console Operating Systems Node.

Distribute Operating System Upgrade Packages
Let’s follow the steps to distribute the OS image to distribution points.
After importing the upgrade package, you must distribute the content to the distribution point. Right-click on Upgrade Packages and select Distribute Content.

Review the selected content for distribution. Click Next.

Add the distribution point or distribution point groups to distribute the content. Review the selected distribution points, and groups. Click Next.

On the Summary page, review the settings. Click Next.

Click Close to complete the Distribute Content wizard.

You can monitor the content status, if its showing yellow color that means distribution is in progress.
Select the Content Status node. This node displays the packages. If it’s yellow, that means distribution is in progress.

If the content distribution were successful, it would appear with Green color as shown.

Create an In-place upgrade task sequence to upgrade an OS
In the Configuration Manager console, Go to the Software Library workspace, expand Operating Systems, right-click Task Sequences and select Create Task Sequence.
Select Upgrade an operating system from an upgrade package, then select Next.

On the Task Sequence Information page, specify the following settings and click Next.
- Task sequence name: Specify a name that identifies the task sequence
- Description: Optionally specify a description
- Select Run as high performance power plan check box

On the Upgrade, the Windows Operating System page, specify the following settings and click Next.
- Upgrade package: Specify the upgrade package that contains the OS upgrade source files. Click on the Browse option to select the source file. Verify that you’ve chosen the correct upgrade package by looking at the information in the Properties pane.
- Edition index: If multiple OS edition indexes are available in the package, select the desired edition index. By default, the wizard selects the first index if you already extracted it while adding the upgrade OS Package.
- Product key: Specify the Windows product key for the OS to install.

Specify whether to install required, all, or no software updates on the Include Updates page. Then select Next.
If you specify the installation of software updates, the Configuration Manager installs only those updates targeted to the collections of which the destination computer is a member.

On the Install Applications page, specify the applications to install on the destination computer and select Next.
If you select more than one application, specify whether the task sequence should continue if the installation of a specific application fails. I’m leaving it default, but you can add it later if needed.

Review the task sequence details, and click Next.

After completion successfully, Click Close to complete the wizard.

The new Windows 10 21H1 upgrade task sequence now appears in the Task Sequences node of the Configuration Manager console. You’ve finished creating an In-place upgrade task sequence.

Use the following procedure to modify an existing upgrade task sequence
Under Software Library > Operating Systems > Task Sequences. Right-click on the task sequence and select Edit.

An In-place upgrade task sequence will give you more granular control to –
- Perform pre-deployment checks
- Pre-Upgrade
- Manage drive encryption state
- Uninstall known problematic drivers and apps
- Upgrade the Operating System
- Post-upgrade
- Install additional drivers and apps
- Manage drive encryption state
- Configuration
Review other settings added in Task Sequence. If you have made any changes here, click Apply and OK.

Deploy Windows 10 Upgrade Task Sequence
Use the following procedure to deploy a task sequence to the computers in a collection.
In the Task Sequence list, select the task sequence you have created, Right-click and select Deploy.

On the General, click Browse to select the device collection where you wish to perform the deployment.
You can manage the behavior for high-risk task sequence deployments. Learn more about How to Configure Collection Size Limits for Task Sequence Deployment Settings | Configuration Manager | SCCM

On the Deployment Settings, select the Purpose of the deployment and click Next.
Available – The task sequence will appear in software center, Process will start only when users initiates.
Required - Configuration Manager automatically runs the task sequence according to the configured schedule. If the task sequence isn't hidden, a user can still track its deployment status.

To use a Upgrade OS deployment, For the Make available to the following setting, Only Configuration Manager clients is already selected. 
On the Scheduling tab, you can specify the schedule for this deployment. Click Next.

On the User Experience tab, leave the default selected options. Click Next.

On the Alerts page, leave it as default. Click Next.

On the Distribution Points page, you can specify how clients interact with the DPs to retrieve content from reference packages. Click Next.
To understand the available options in the Distribution Points tab during task sequence deployment – SCCM Task Sequence Available Deployment Options in Distribution Points Tab | ConfigMgr

Review the selected settings and click Next.

The Deployment targeted successful collection. Click Close to exit the wizard.

Results – Windows 10 In-Place Upgrade
To run the in-place upgrade task sequence on the computer. Launch the Software Center, select the Upgrade Task Sequence deployment, and click Install.
Important – If multiple users are signed into the device, package and task sequence deployments may not appear in the Software Center.

Confirm you want to upgrade the operating system on this computer by clicking Install again.
To provide maximum information to your end-users about task sequences deployment in the Software Center. Check out this article to create a Custom Software Center User Notification for SCCM Task Sequence Deployment | ConfigMgr

The deployment will take around 60-90 minutes when the upgrade process starts, depending on the environment. Allow the Upgrade Task Sequence to perform an automated upgrade. The target computer has started to apply an in-place upgrade and apply your added steps.

After completing the task sequence, the computer will be fully upgraded to Windows 10 Version 21H1.
How to Find the Latest Windows 10 Version Number? Windows 10 21H1 Version Number | Build Number | Best Easiest Way to Find out Build Numbers

Troubleshooting Reference
Suppose task sequence deployments have not appeared in the Software Center. Open Command Prompt and Run the following command: Control smscfgrc. On the Actions tab, select Machine Policy Retrieval & Evaluation Cycle, click Run Now, and then click OK in the popup dialogue box that appears.
Starting in Configuration Manager version 2103, if the task sequence fails because the client doesn’t meet the requirements configured in the Check readiness step. The user can now see more details about the failed prerequisites What’s New Improvement with SCCM Task Sequence Check Readiness Step | ConfigMgr.
Let’s check the Windows 10 Deployment Upgrade Process Logs to troubleshoot Windows 10 upgrade issues – Windows 10 Deployment Upgrade Process Logs for SCCM Admins.

During the In-Place Upgrade Task Sequence, if you want to remove or uninstall modern UWP apps, one of the best options is to use Microsoft Store for business to sync all inbuilt apps to remove and run and uninstall deployment – SCCM Sync with MSfB Microsoft Store for Business | ConfigMgr
Resources
- Perform an in-place upgrade to Windows 10 using Configuration Manager
- Easiest Option to Upgrade to Latest Version of Windows 10 21H1 | No Need to Download 21H1 | Best Upgrade Option
- Deploy Windows 10 21H1 Using SCCM Task Sequence | ConfigMgr | Step-by-Step Guide
We are on WhatsApp. To get the latest step-by-step guides and news updates, Join our Channel. Click here –HTMD WhatsApp.
Jitesh Kumar has over five years of experience in the IT Industry. He writes and shares his experiences related to Microsoft device management technologies and IT Infrastructure management. His primary focus area is the Windows 10 Deployment solution with Configuration Manager, Microsoft Deployment Toolkit (MDT), and Microsoft Intune.