
Все способы:
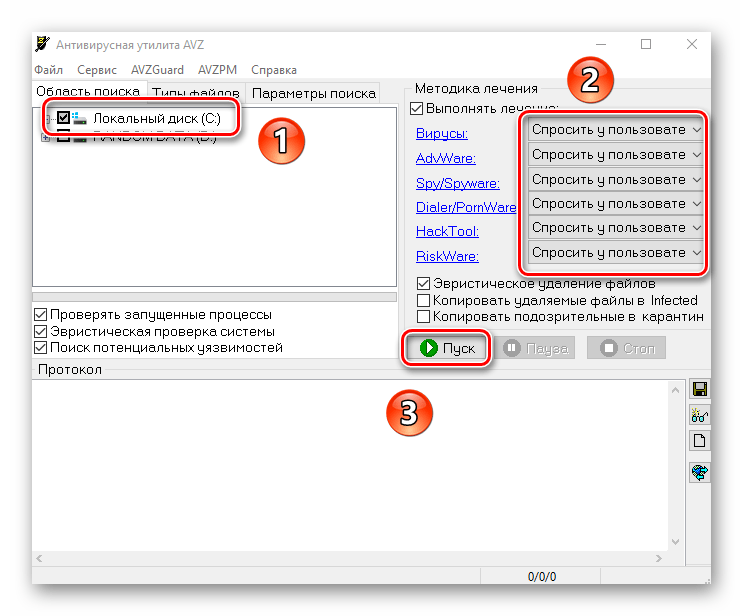
- Способ 1: Сканирование на вирусы
- Способ 2: Проверка системных файлов на целостность
- Способ 3: Чистая загрузка системы
- Способ 4: Сброс «Диспетчера задач» к настройкам по умолчанию
- Способ 5: Восстановление системы к заводским настройкам
- Способ 6: Использование аналогичных программ
- Вопросы и ответы: 0
Способ 1: Сканирование на вирусы
Наиболее распространенная причина зависаний системных средств, в частности «Диспетчера задач», связана с деятельностью вредоносных утилит. Такое поведение системы характерно именно вследствие действий вирусов, поэтому для решения неполадки первым делом проверьте Windows на их наличие. В ОС предустановлено средство защиты, но лучше воспользоваться антивирусными продуктами от сторонних разработчиков. Ранее мы уже писали о методах проверки.
Подробнее: Методы удаления вируса с компьютера под управлением Windows 10
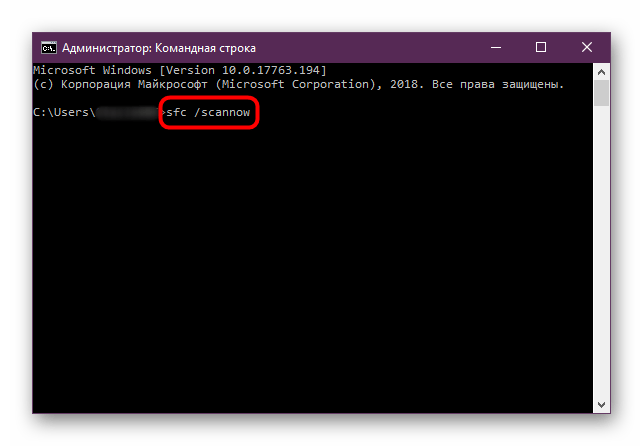
Способ 2: Проверка системных файлов на целостность
В Windows 10 встроены полезные инструменты для сканирования системных файлов на целостность – SFC («Проверка системных файлов») и DISM («Система обслуживания образов развертывания и управления ими»). Утилитами стоит воспользоваться, когда зависает «Диспетчер задач», потому что такая проблема может быть связана с тем, что важные файлы были повреждены по каким-то причинам. Самый простой способ запустить их — воспользоваться консолью, о чем ранее мы уже писали в нашем отдельном материале.
Подробнее: Использование и восстановление проверки целостности системных файлов в Windows 10
Способ 3: Чистая загрузка системы
Вероятно, сторонняя программа или служба конфликтует с системными файлами, что и становится причиной зависания «Диспетчера задач». Попытайтесь выполнить чистую загрузку Windows 10, чтобы проверить, так ли это:
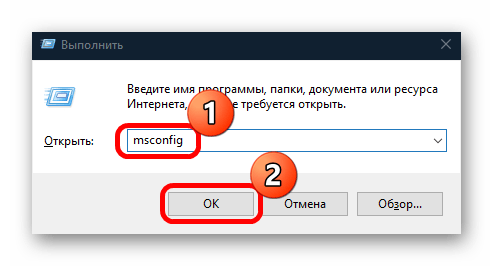
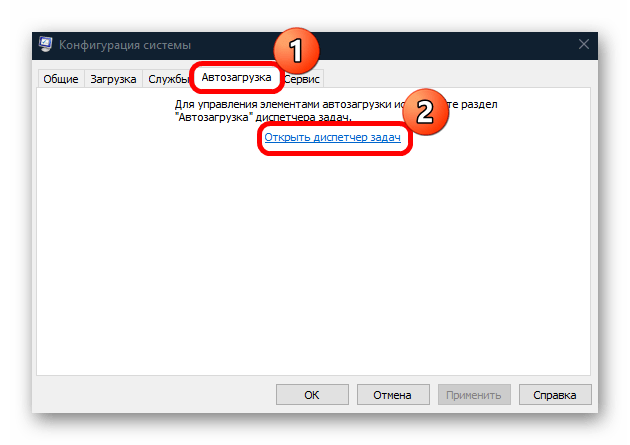
- Одновременно нажмите на клавиши «Win + R» для вызова оснастки «Выполнить», затем в текстовом поле введите
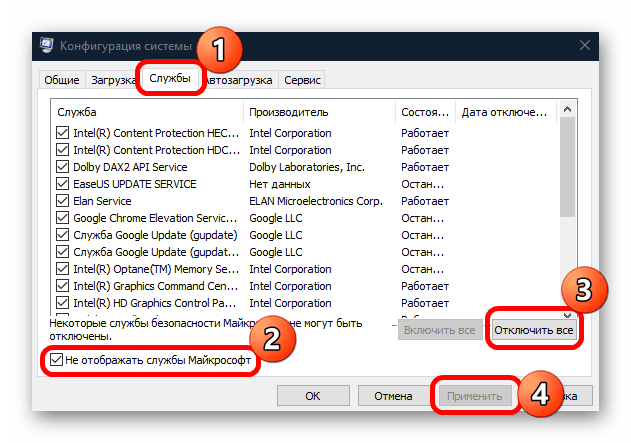
msconfigи нажмите на кнопку «ОК» или клавишу «Enter». - В открывшемся окне «Конфигурация системы» перейдите на вкладку «Службы». Отметьте пункт «Не отображать службы Майкрософт», что позволит избежать различных ошибок из-за отключения важных процессов. Останется список служб, которые связаны лишь со сторонними программами. Чтобы отключить их все, нажмите на соответствующую кнопку ниже. Примените настройки.
- Далее откройте вкладку «Автозагрузка» и перейдите через нее в «Диспетчер задач».
- Вы будете автоматически направлены на соответствующую вкладку «Диспетчера». Отключите все процессы, которые запускаются вместе с системой: поочередно выделяйте их и нажмите на кнопку «Отключить».
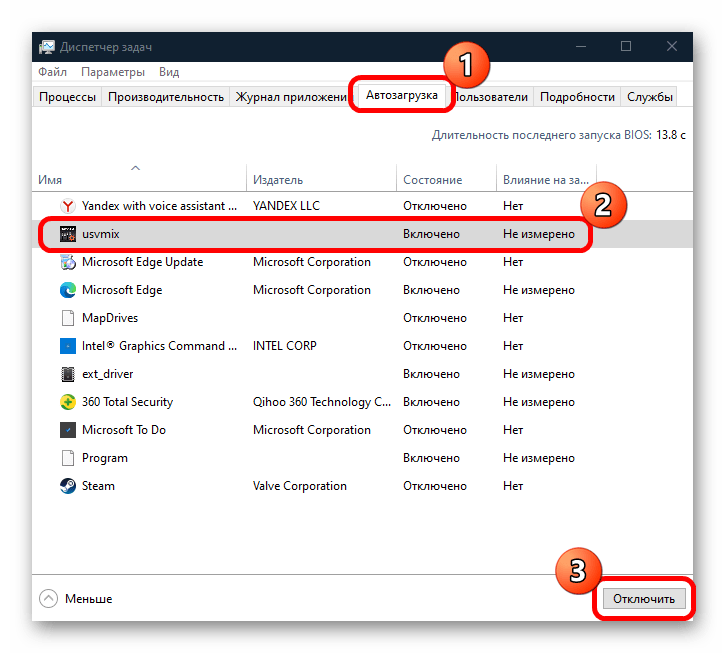
Поскольку отключить элементы автозагрузки через «Диспетчер задач» может быть сложно ввиду рассматриваемой проблемы, воспользуйтесь альтернативными решениями, которые помогут исключить эти процессы из автозагрузки. Для этого ознакомьтесь с нашей отдельной статьей на эту тему.
Подробнее: Отключение автозапуска программ в Виндовс 10
После того как все лишнее отключено, перезагрузите компьютер. Система будет запущена без сторонних элементов — тогда можно проверить, зависает ли «Диспетчер задач». Если нет, следует искать проблему в установленных приложениях, которые могли вызвать конфликт и, соответственно, данную неполадку.
Читайте также: Установка и удаление программ в Windows 10
Способ 4: Сброс «Диспетчера задач» к настройкам по умолчанию
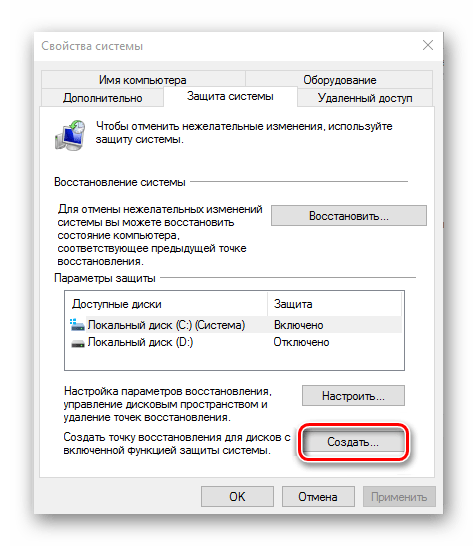
Если ошибка произошла в работе самого «Диспетчера задач», то есть способ сбросить его настройки по умолчанию. Таким образом будут стерты и ошибки, но для этого придется вручную отредактировать системный реестр. Прежде не забудьте создать контрольную точку, которая поможет восстановить состояние ОС, если что-то пойдет не так.
Читайте также: Инструкция по созданию точки восстановления Windows 10
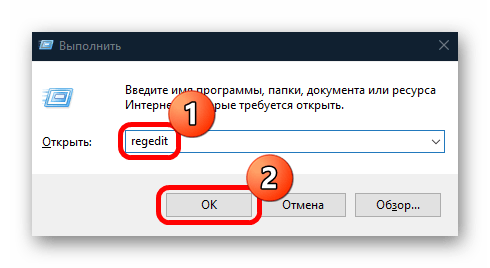
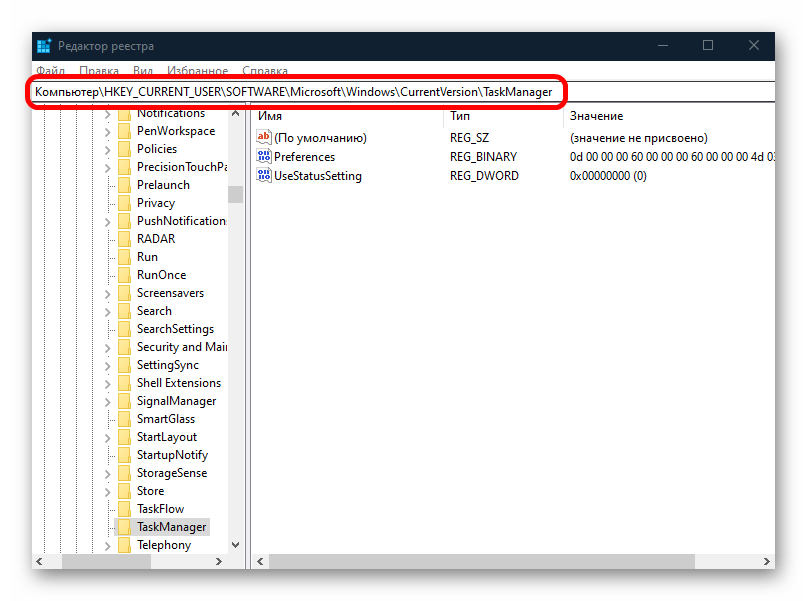
- Вызовите диалоговое окно «Выполнить» и используйте команду
regedit, чтобы открыть «Редактор реестра». - Перейдите по следующему пути:
HKEY_CURRENT_USER\Software\Microsoft\Windows\CurrentVersion\TaskManager, разворачивая соответствующие подразделы на левой панели или вставив путь в адресную строку сверху и нажав Enter. - Кликните правой кнопкой мыши по подразделу «TaskManager» и из контекстного меню выберите пункт «Удалить».
- Подтвердите действие в окне с предупреждением.

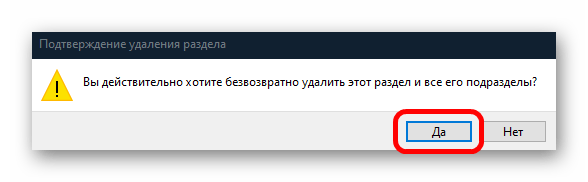
После удаления ключей из реестра перезагрузите компьютер. Как только система запустится, «Диспетчер задач» и все настройки будут восстановлены к тем значениям, которые были по умолчанию.
Способ 5: Восстановление системы к заводским настройкам
Если вы вносили какие-либо нестандартные изменения в параметры системы или недавно устанавливали непроверенные программы, это могло вызвать различные сбои. Вручную найти причину удается не всегда, поэтому если проблема появилась не так давно, лучше произвести откат состояния системы до рабочей точки восстановления. О том, как это сделать, читайте в нашем отдельном руководстве.
Подробнее: Откат к точке восстановления в Windows 10
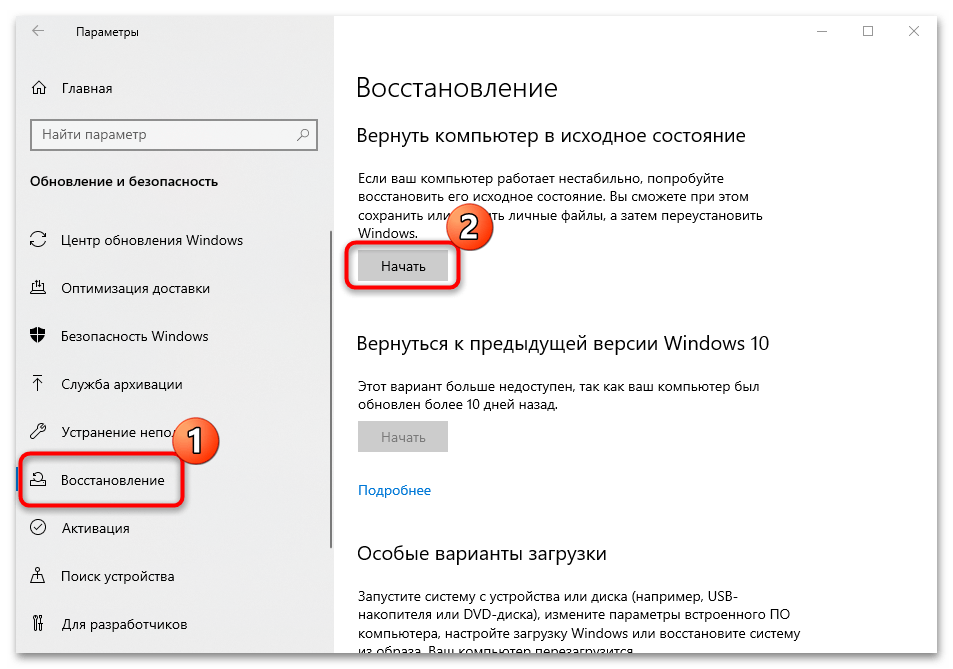
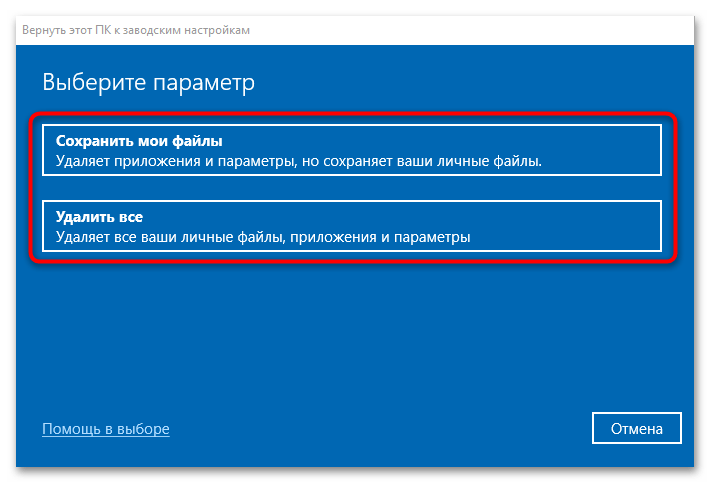
Если совсем ничего не помогло, можете выполнить сброс настроек операционной системы к заводским. Следует учитывать, что все параметры и внешний вид Windows 10 примут свой первоначальный вид, а установленные программы будут полностью удалены, но встроенные средства позволяют сохранить некоторые личные файлы (те, что хранятся в папках «Документы», «Изображения» и т. п.).
- Нажмите на кнопку «Пуск» и выберите запуск системных «Параметров».
- В открывшемся окне перейдите в раздел «Обновление и безопасность».
- На панели слева кликните по вкладке «Восстановление», затем в блоке возврата компьютера к исходному состоянию нажмите на кнопку «Начать».
- Запустится мастер восстановления, и на первом этапе будет предложено выбрать, удалять ли личные данные в том числе или оставить их.
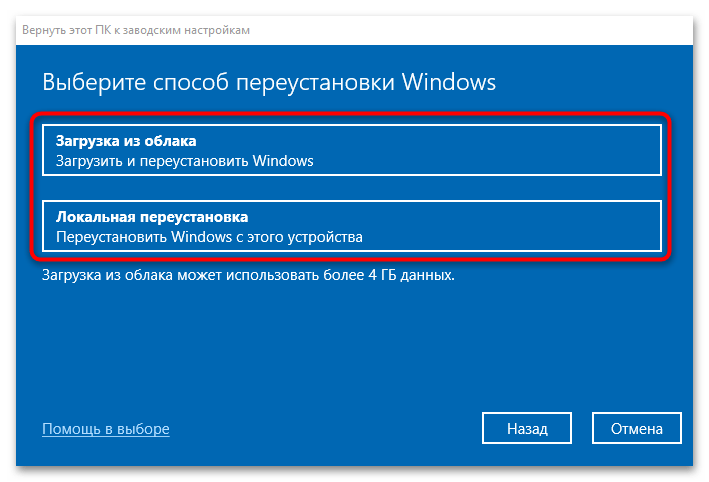
- Следующий шаг предполагает выбор способа переустановки Виндовс, после чего нужно подтвердить сброс настроек.

Этот метод является радикальным, но иногда способен помочь, если ни один метод исправления не срабатывает. Кроме того, после этого исчезнут и другие системные ошибки, которые могут влиять на работоспособность и производительность системы.
Способ 6: Использование аналогичных программ
В качестве альтернативы для работы с процессами и службами можно воспользоваться аналогами «Диспетчера задач» от сторонних разработчиков. Такие программы так же, как и штатное средство, предоставляют подробную информацию об активных задачах, причем некоторые из них предусматривают дополнительные функции.
Этот вариант особенно пригодится, если нужно в срочном порядке произвести работу с процессами, а «Диспетчер задач» зависает и нет времени или возможности искать причину такого поведения. Переходите по ссылке ниже, чтобы ознакомиться с аналогами «Диспетчера задач».
Подробнее: Альтернативы «Диспетчера задач» для Windows 10

Наша группа в TelegramПолезные советы и помощь
Task Manager is probably one of the tools in Windows that even the least tech-savvy users would know due to its ability to view processes, their resource usages and more. Sometimes, when you try to open the Task Manager, it might start in a blank window, not responding at all, or even crashes instantly upon launch. The problem can happen regardless of how you start Task Manager, whether from the taskbar or using the usual Ctrl + Alt + Del.
If your Task Manager opens an empty window or freezes in Windows 11 or 10, this guide might be able to help you sort out the problem.
How to fix the Task Manager not responding issue
Before trying any of the fixes below, the first thing you should do is to restart your computer. A restart would usually fix the issue if it’s just a minor software conflict issue. Alternatively, if restarting is not an option for you right now, you can try to sign out of Windows and then sign in again.
Also see: Force Close Program in Windows 11 without Task Manager
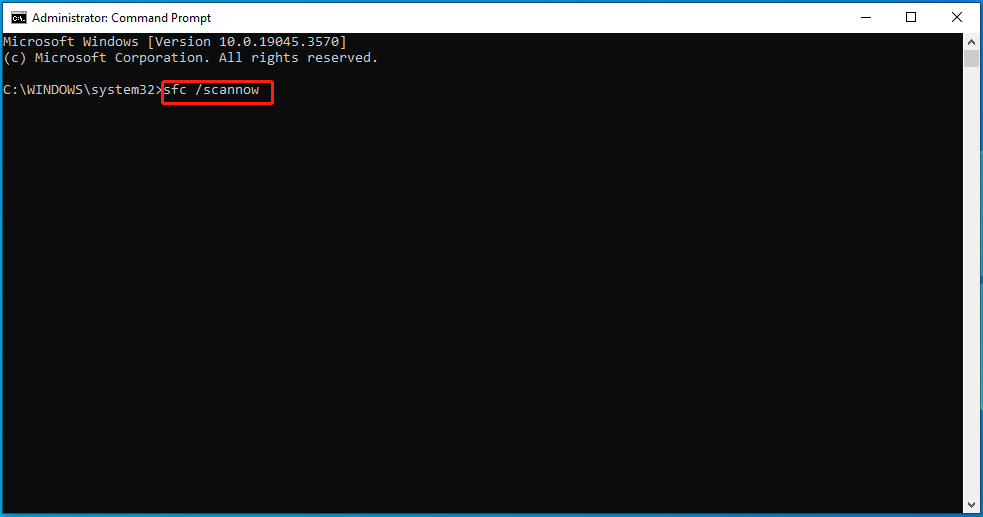
Fix 1: Run SFC and DISM Tools
SFC (System File Checker) and DISM (Deployment Image Servicing and Management) are built-in tools in Windows that can fix corrupted system files and other issues related to Windows components. Here’s how to run these tools: You’ll need to run them in a command prompt window.
- Go to the start menu.
- Search for Command Prompt and run it as an administrator.
- In the command prompt, enter the following commands one by one and wait for each command to complete before entering the next:
sfc /scannow
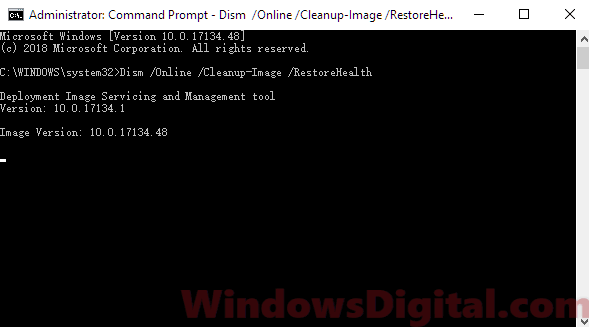
Dism /Online /Cleanup-Image /RestoreHealth
Once both commands have been executed successfully, restart your computer and see if the issue is resolved.
Fix 2: Run a PowerShell Command
Another way to fix the Task Manager not responding issue is by running a PowerShell command. Here’s how to do it:
- Go to the start menu.
- Search for Windows PowerShell.
- Right-click on it and select Run as administrator.
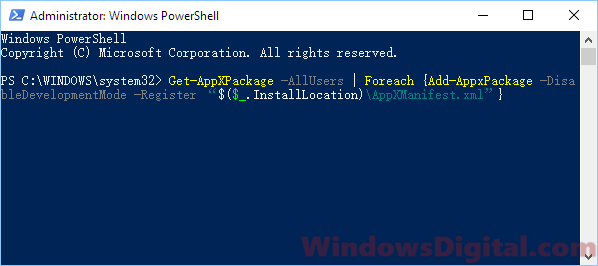
- In the PowerShell window, copy and paste the following command:
Get-AppXPackage -AllUsers | Foreach {Add-AppxPackage -DisableDevelopmentMode -Register “$($_.InstallLocation)\AppXManifest.xml”}
- Once the command has been executed successfully, close PowerShell.
- Press Win+R key to open the Run window.
- Type the following path and open it:
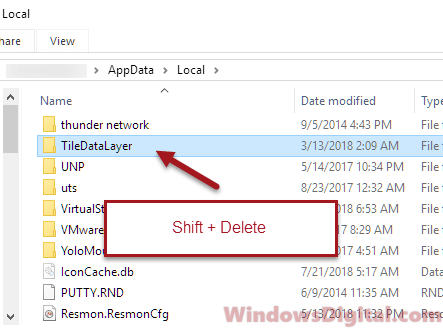
C:\Users\%username%\AppData\Local\
- Find a folder called TileDataLayer. Select the folder and press Del key to delete the folder.

- If you can’t see the folder in the said path, it may be hidden and you will need to unhide it.
- While you’re in File Explorer, click View.
- Click on Options on the right, then Change folder and search options.
- Under Hidden files and folders, enable Show hidden files, folders, and drives.
- Restart your computer and see if the issue is fixed.
If you can’t delete the file because it’s currently in use, press Win+R key to open the Run window. Type service.msc and open it. Find and right-click on Tile Data model server service, then click Stop. Now try to delete the file again.
Fix 3: Run Windows Update
The Task Manager freezing and crashing issue is one of the common issues after installing an update. If there is any bug that can cause an issue to the UI such as Task Manager, you may want to run Windows Update again to see if there is any hotfix patch. Try to run Windows Update to install the latest updates for your Windows 11 or 10 and see if the issue is resolved.
To check for updates, go to Settings > Update & Security > Windows Update > Check for updates.
Fix 4: Safe Boot Windows 11 or 10
There may be software that is conflicting with how Task Manager works, thus, causing it to freeze and not respond at all. Try to boot your PC in safe mode and see if Task Manager will work. If it’s working again, it must be something that you’ve recently installed that is causing Task Manager to not work properly in Windows 10 or 11.
To boot your PC in safe mode, follow these steps:
- Go to the start menu.
- Type msconfig and open it.
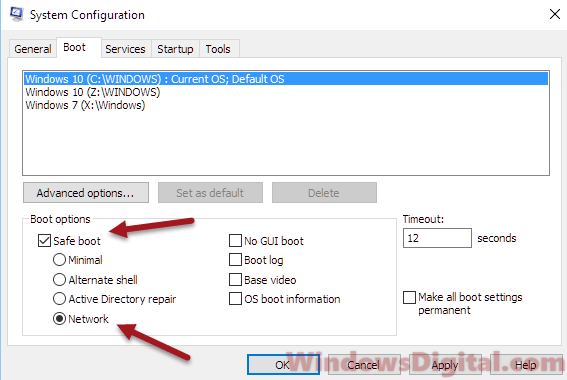
- Go to the Boot tab.
- Under boot options, enable Safe boot and select Network only.

- Click OK then Apply to restart your PC.
- This will stop all other services and processes (except Windows services) from running on startup.
Windows Task Manager allows you to see all the running processes & apps and the system resources they use. In some cases, this utility might stop responding and you are unable to access the information you want. In this guide from MiniTool System Booster, we try our best to find 6 effective and easy solutions for Task Manager not opening or responding for you.
Task Manager offers information about the hardware resources usage and performance to help you quickly identify system bottlenecks that lead to performance issues. The information contains the CPU, GPU, disk, network usage of the system, and the running tasks. It also makes you terminate applications & processes and modify processing priorities for better performance and stability.
However, there might be wrong with Task Manager and it even becomes unreachable sometimes. If it is still not responding after a simple restart, the solutions presented below deserve a shot.
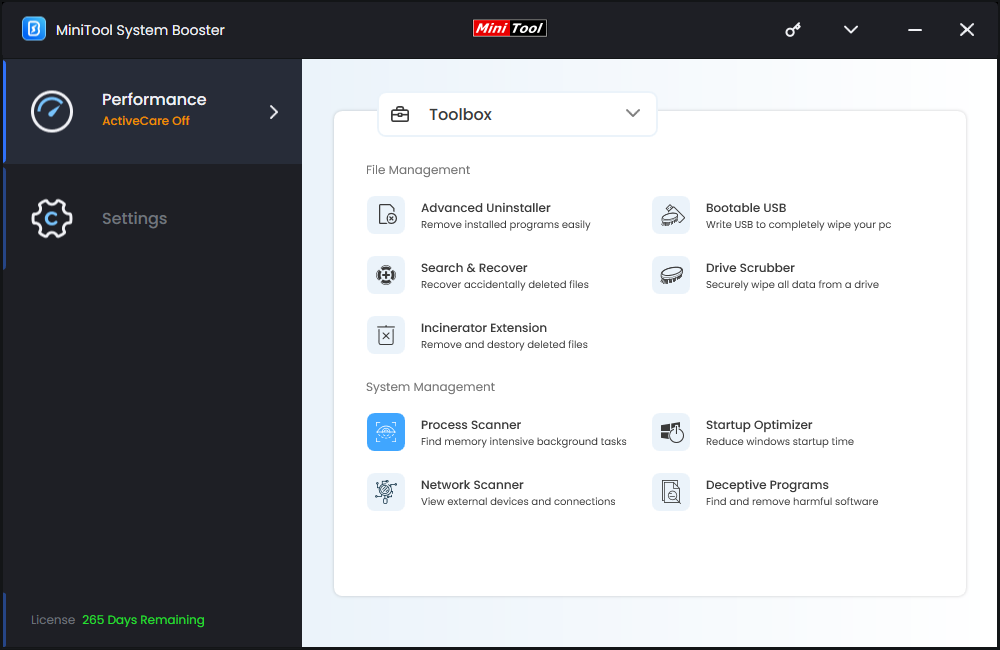
Task Manager Alternative
When you fail to access Task Manager to manage and troubleshoot tasks on your computer, a free PC monitoring tool – MiniTool System Booster can help you out. This tool supports maximizing your system performance by speeding up CPU, RAM, and hard drive resources on Windows 11/10/8.1/8/7.
The Process Scanner feature is also a good choice for you to quickly terminate any task slowing or disrupting your computer performance. If you need to end some intensive tasks, follow these steps:
Step 1. Download, install, and launch MiniTool System Booster Trial Edition for free.
MiniTool System Booster TrialClick to Download100%Clean & Safe
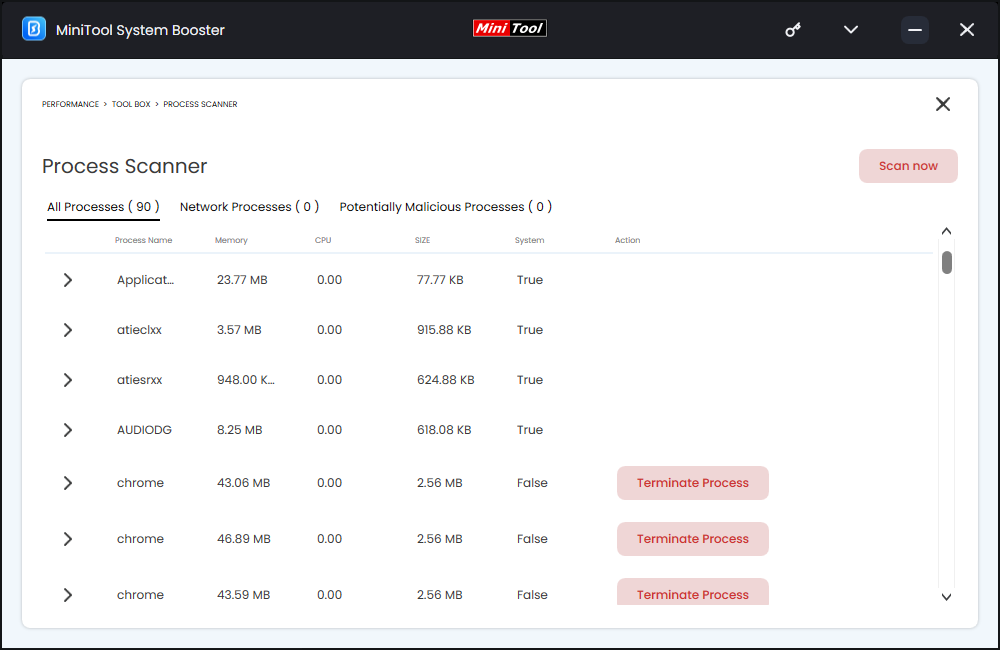
Step 2. Go to the Toolbox page and hit Process Scanner under System Management.
Step 3. Then, this utility will list all the processes on your computer and their memory & CPU usage, size and more for you. If you want to close some tasks to free up more system resources, click on the Terminate Process button beside them.
Tips:
Like Task Manager, MiniTool System Booster also enables you to enable, disable, or delay startup programs according to your needs. To do so, you can try the Startup Optimizer feature in the Toolbox page.
How to Fix Task Manager Not Responding Windows 10/11?
Fix 1: Tweak the Registry
Registry Editor allows you to modify some registry settings to fix some issues like Task Manager not responding. To do so:
Tips:
It is noted that modifying certain data entries accidentally might damage your computer, so make sure to back up important files with a free PC backup software – MiniTool ShadowMaker before proceeding.
MiniTool ShadowMaker TrialClick to Download100%Clean & Safe
Step 1. Press Win + R to evoke the Run dialog.
Step 2. Type regedit.exe and hit Enter.
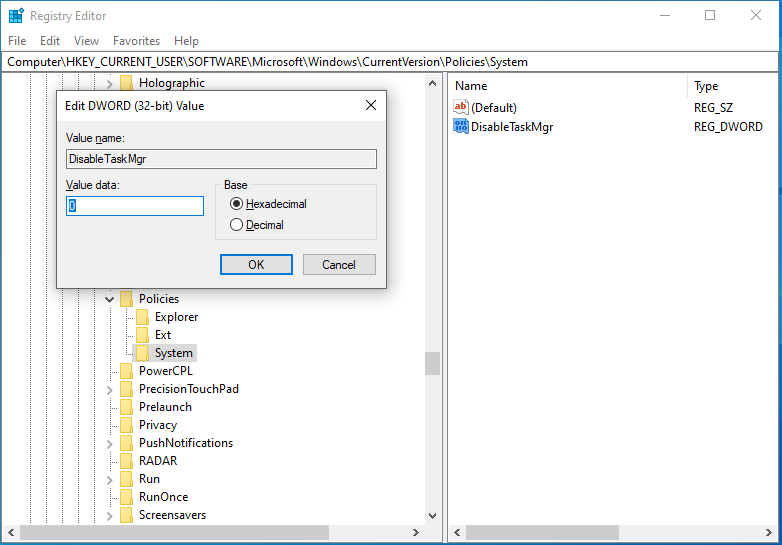
Step 3. Navigate to the following path:
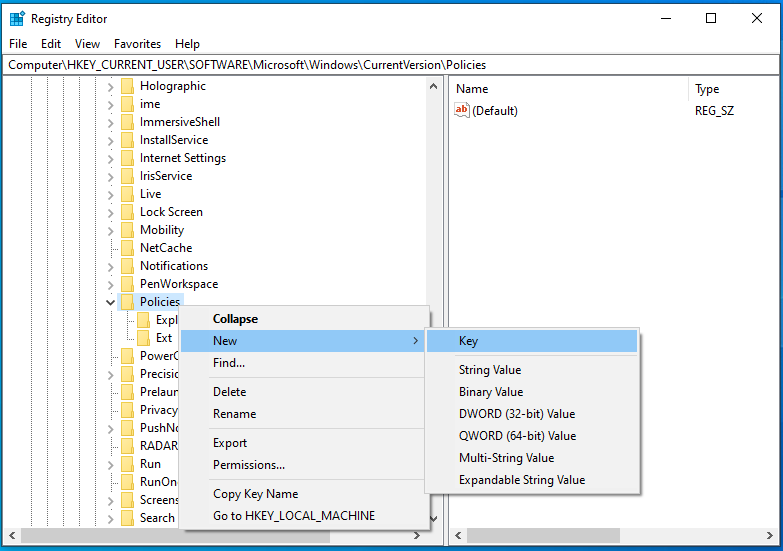
Computer\HKEY_CURRENT_USER\SOFTWARE\Microsoft\Windows\CurrentVersion\Policies\System
Step 4. In the right pane, right-click on DisableTaskMgr > select Modify > set Value data to 0 > save the changes,
Tips:
If you cannot find the System key under Policies, please right-click on Policies > select New & Key to create the System folder > right-click on the blank space in the right pane > select New & DWORD (32-bit) Value > rename it as DisableTaskmgr.
Fix 2: Scan with SFC &DISM
Sometimes, your system files might get corrupted and that can result in multiple problems like Task Manager not responding. In this case, you can take advantage of SFC and DISM to detect and repair corrupted or faulty system files on your computer. Here’s how to do it:
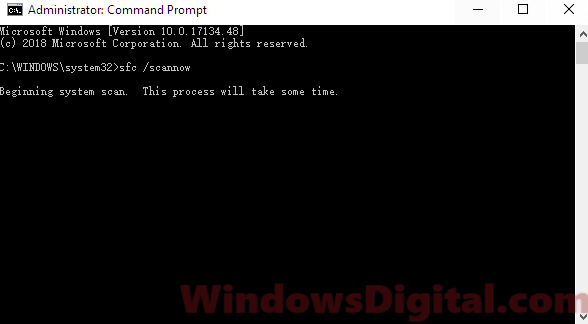
Step 1. Launch an elevated Command Prompt.
Step 2. In the command window, type sfc /scannow and hit Enter.
Step 3. After the process is done, reboot your system. If Task Manager freezing is still there, launch Command Prompt as an administrator again and run the command below:
DISM.exe /Online /Cleanup-image /Restorehealth
Step 4. After completion, restart your computer again to check if Task Manager not working is gone.
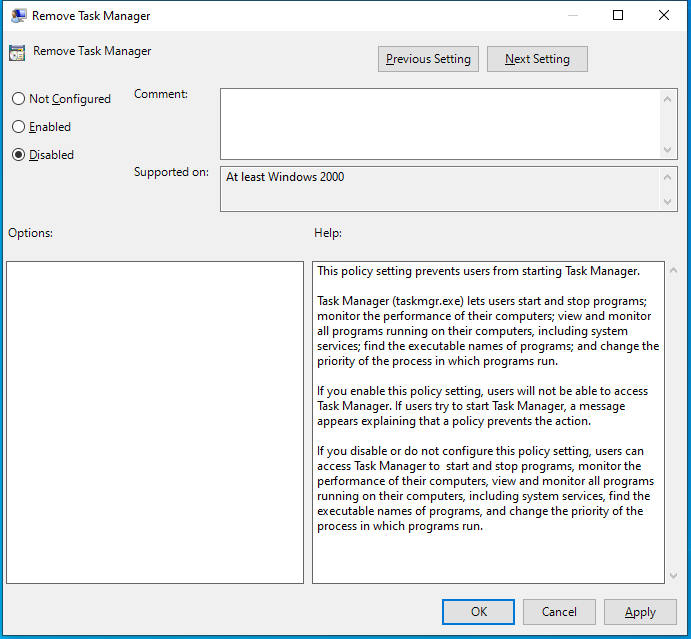
Fix 3: Edit Local Group Policy Settings
Local Group Policy Editor is an inbuilt utility in Windows system that helps you to control the working environment of your computer by editing the local policy settings. If your Task Manager is still not responding, follow these steps to make some changes in group policy:
Tips:
Since Windows Home edition doesn’t come with Local Group Policy Editor, you can skip this solution if you are a Windows Home user.
Step 1. Type gpedit.msc in the Run box and hit OK to open Local Group Policy Editor.
Step 2. Navigate to: User Configuration > Administrative Templates > System > Ctrl + Alt + Del Options.
Step 3. In the right pane, double-click on the Remove Task Manager policy > tick Disabled > hit OK.
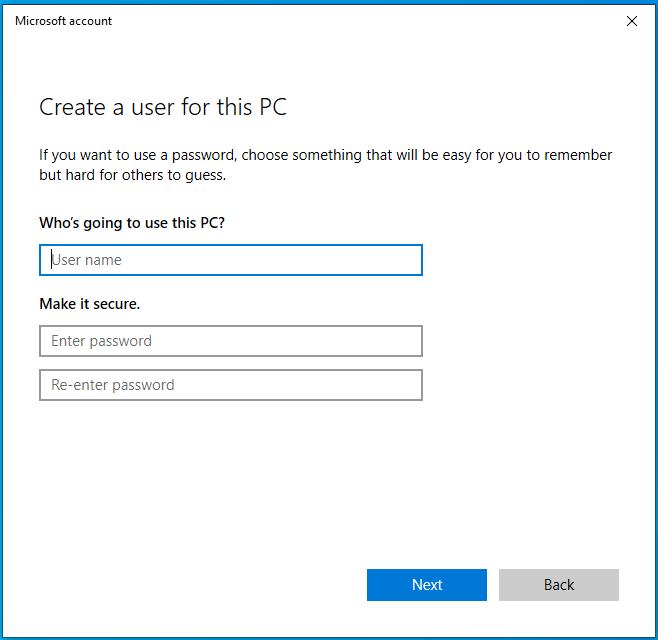
Fix 4: Create Another User Account
Chances are that Task Manager not responding is caused by some errors in your profile or insufficient administrative rights. If you are the owner of this computer, switching to a new user account might do the trick. To do so:
Step 1. Press Win + I to launch Settings and then click on Accounts.
Step 2. In the Family & other users section, hit Add someone else to this PC.
Step 3. Hit I don’t have this person’s sign-in information and select Add a user without Microsoft.
Step 4. Enter your user name, password and confirm the password to create an account for this PC.
Step 5. Then, go to Settings > Accounts > Your info > Sign in with a Microsoft account instead > log in to your account.
Also see: How to Add or Remove a User/Microsoft Account on Windows 11
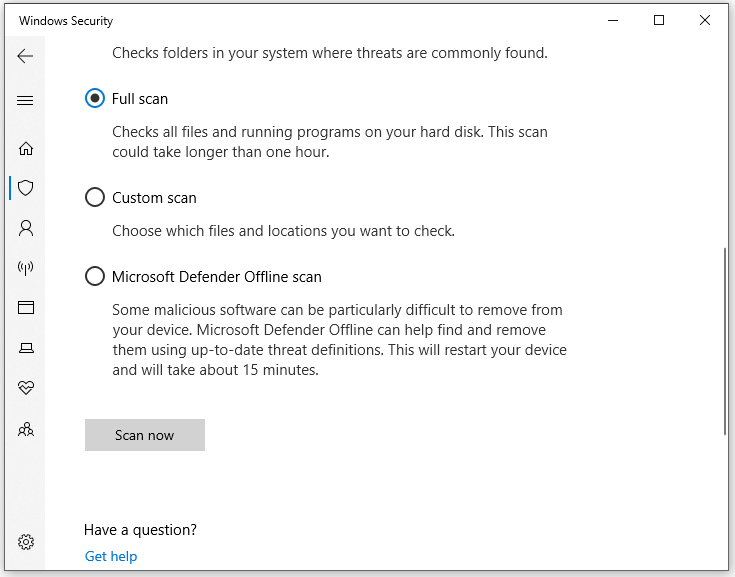
Fix 5: Perform a Malware Scan
If there is any malware or virus present in your Windows device, Task Manager not responding or opening will also crop up. Windows Defender provides you with 4 scanning options – Quick scan, Full scan, Custom scan, and Microsoft Defender Offline scan to help you get rid of the threats on your computer. Here’s how to perform a comprehensive scan with it:
Step 1. Type windows defender in the search bar and hit Enter.
Step 2. Click on Virus & threat protection > Scan options > tick Full scan > hit Scan now to start the process.
Also see: How to Run Windows Defender Full/Quick/Custom/Offline Scan
Final Words
These are the 5 top solutions to Task Manager not responding. Hope one of them can assist you in addressing this issue. For any further queries about MiniTool software, please contact us directly via [email protected].
Windows 10 Task Manager not responding? You’ve got the company. There are lots of Windows 10 users facing this annoying issue. So keeping this thing in mind I decided to cover some possible ways to troubleshoot the issue.

Task Manager is one of the essential programs of Windows operating system. It provides you information about the programs, services, and process running on your computer. You can also manage your startup programs right from it. One of the best features of Windows 10 Task Manager is that you can force close unresponsive apps or programs just with a single click. But what if it stops working or not responding?
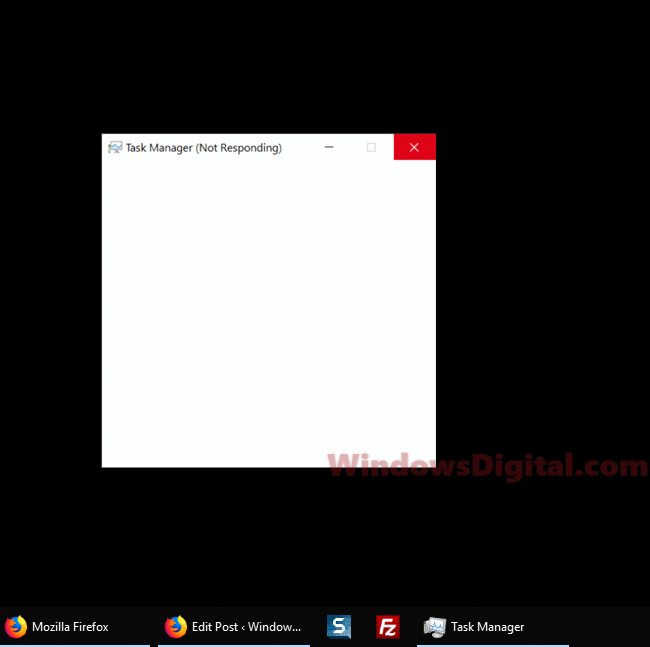
Lots of Windows 10 users reporting that when they trying to launch Task Manager it showing the white blank box with the message which reads:
Task Manager (Not Responding)”
After reading responses of the users over the web it is confirmed that they start facing this issue after upgrading to the latest build available for Windows 10. This is a really annoying issue and I’m sure lots of Windows 10 users want to fix this issue quickly.
In case, Windows 10 Task Manager not responding or not working properly, freezes, become unresponsive or stops working randomly, then you can try suggestion discussed in upcoming line to troubleshoot the issue.
1. Quick Reboot
Quick reboot is one of the simple solutions to fix almost all the issues in Windows operating system. So you can try this and check if this fixes Task Manager not responding windows issue or not. In case, you’ve already tried this step head over to second suggestion.
2. Install Available Updates (If any)
Microsoft always fixes to know issue via Windows Update. So it is recommended to check if any update or fix is released by the company officially. You need to open Settings app and navigate to Update & Security -> Windows Update -> Check for update.

If any update available download, install and reboot your system. Now check if this fixes the issue. In case, no update is available to try the next suggestion.
3. Sign out from current user
Microsoft also suggests that some problems of Windows 10 can be fixed by signing out from the current user account in Windows 10. One of the representatives from Microsoft provide this as a solution to troubleshoot the issue on Microsoft Answers thread which reads “Windows 10 Task Manager not responding”
To Sign out from the current user account, press ALT + CTRL + DELETE key combo and from the options available click on Sign out.
Alternatively, Right click on Start button -> Shut down or Sign out -> Sign out.

After that reboot your pc and Sign into to the Admin account and check if this fixes the issue or not
4. Uninstall Third Party Antivirus or Apps
Some users suggested that they able to fix the issue by uninstalling third party antivirus or apps. If above suggestions didn’t help you, trying this suggestion. To uninstall apps in Windows 10 navigate to:
Settings -> Apps -> Apps & features. On the right pane, you will get a list of all the apps installed on your system. Select the app and then click on Uninstall button.

It is highly recommended to uninstall Antivirus first and check if this fixes the issue. After that go for apps.
5. Run System File Scanner
You can also run system file scanner to troubleshoot Windows 10 task manager not working issue. Here is how you can run system file scanner:

Launch Elevated Command Prompt(Run as administrator). In the command terminal type sfc /scannow and hit Enter. Once the process is completed reboot your system.
6. Repair Windows Image
You can take help of DISM to repair Windows Image and fix Task Manager not responding issue in Windows 10. This is how you can repair windows image:

Launch Elevated Command prompt(Run as administrator). Type or Copy-Paste following code in the command terminal and hit Enter.
DISM.exe /Online /Cleanup-Image /ScanHealth
DISM.exe /Online /Cleanup-Image /RestoreHealth
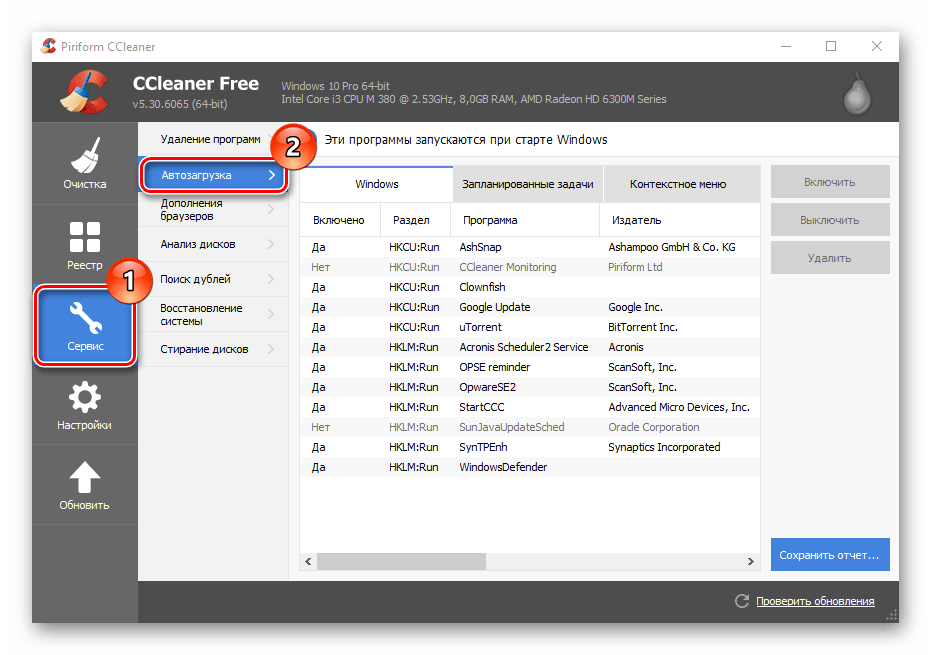
7. Run CCleaner
CCleaner is one of the most popular cache cleaning tool for Windows operating system. You can download it from the official website. Run CCleaner to clear cache and unnecessary files on your system.

Once the process is completed reboot your system and check if this fixes the issue.
8. Re-register the taskbar using Windows Powershell
This is another solution which worked for the majority of the users. To apply this fix, you need:
Type Windows Powershell in Start menu search bar when it appears in the search results make a right click and Run as administrator. When UAC screen appears click Yes to continue

In the Powershell window, type copy & paste following code and hit Enter.
Get-AppXPackage -AllUsers | Foreach {Add-AppxPackage -DisableDevelopmentMode -Register “$($_.InstallLocation)\AppXManifest.xml”}
Before following below step: Make sure option to show hidden file in Windows 10 is enabled. For that, launch File Explorer -> Switch to View tab -> Check Hidden items box. If you do not follow this step, you will not find TileDataLayer folder.

Once the process is completed. Navigate to following directory C:/Users/name/AppData/Local/ in this, you need to replace Users with your account name. Here delete the folder named as “TileDataLayer”
In case, you’re unable to delete TileDataLayer folder, then press WIN + R to launch Registry Editor. In the space provided type services.msc and click OK. Here scroll down until you find “Tile Data model server“. Right-click and select Stop it.

Now again try to delete TileDataLayer folder.
Reboot your system and check if this fixes the Windows 10 task manager not responding issue.
9. Clean Install Windows 10
In case, none of the steps discussed above helped you fail to fix Task Manager not responding in Windows 10, then last resort is to perform a clean installation of Windows 10 with the latest build available from Microsoft.
So these are some possible ways which you can use to troubleshoot Windows 10 task manager not responding issue. I hope you find these steps useful. Use comments section below and share your thoughts.
Диспетчер задач в Windows — это инструмент, позволяющий отслеживать приложения, процессы и службы, работающие на ПК. Благодаря ему можете узнать, как используются ресурсы системы, также здесь доступна возможность быстро отключить необходимые программы и процессы.
Многие пользователи жалуются, что диспетчер задач часто зависает или закрывается сразу после запуска. Происходят подобные действия могут по нескольким причинам. Ниже рассмотрим каждую из них по отдельности и предложим действенные методы исправления.
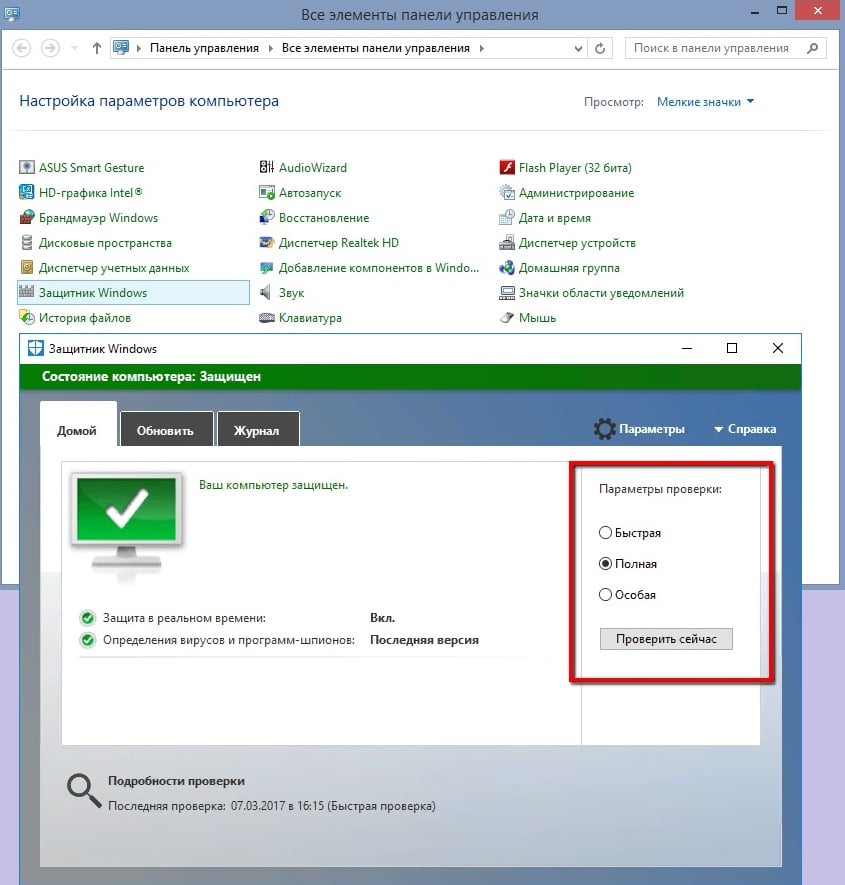
Решение 1. Сканирование на наличие вирусов и вредоносных программ
В большинстве случаев антивирусные программы надёжно защищают систему, однако иногда их приходиться отключать для запуска определённых приложений. В таких ситуациях компьютер остаётся незащищённым. Часто вирус или вредоносное ПО, попадая в систему, изменяют файлы и настройки ОС, что может привести к сбою диспетчера. Первым шагом необходимо удостовериться, что причина не в этом.
- Запустите антивирус и проведите сканирование на наличие вирусов. Если антивирусное ПО не установлено, можно воспользоваться встроенным защитником Windows.
- Нажмите комбинацию Win + X и выберите Панель управления.
- Откройте раздел Защитник Windows и выполните полную проверку системы.
Решение 2. Запустите сканирование SFC и DISM
SFC (Проверка системных файлов) и DISM (Система обслуживания образов развертывания) — наиболее полезные инструменты, доступные в Windows. Их запуск производится с помощью системных команд, и большинство пользователей о них не знают.
- Чтобы запустить SFC сканирование, снова нажмите Win + X и выберите Командная строка (Администратор).
- Когда откроется системное окно, введите: sfc /scannow и нажмите Enter.
- Данная команда запустит процесс сканирования и автоматически исправит проблемы с системными файлами.
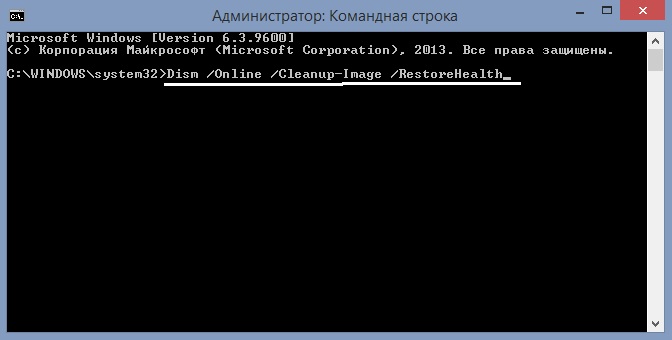
Чтобы запустить сканирование DISM, ещё раз откройте командную строку от имени администратора.
- В окне приложения введите следующую команду и нажмите Enter: Dism /Online /Cleanup-Image /RestoreHealth.
- Этот процесс позаботится о повреждённых файлах и восстановит их по необходимости.
Решение 3. Устранение неполадок в состоянии чистой загрузки
Ещё один действенный метод устранения неполадок в Windows 10 — это чистая загрузка компьютера только с необходимыми программами и драйверами. Благодаря этому можно выявить проблемное приложение, из-за которого диспетчер задач закрывается или вылетает.
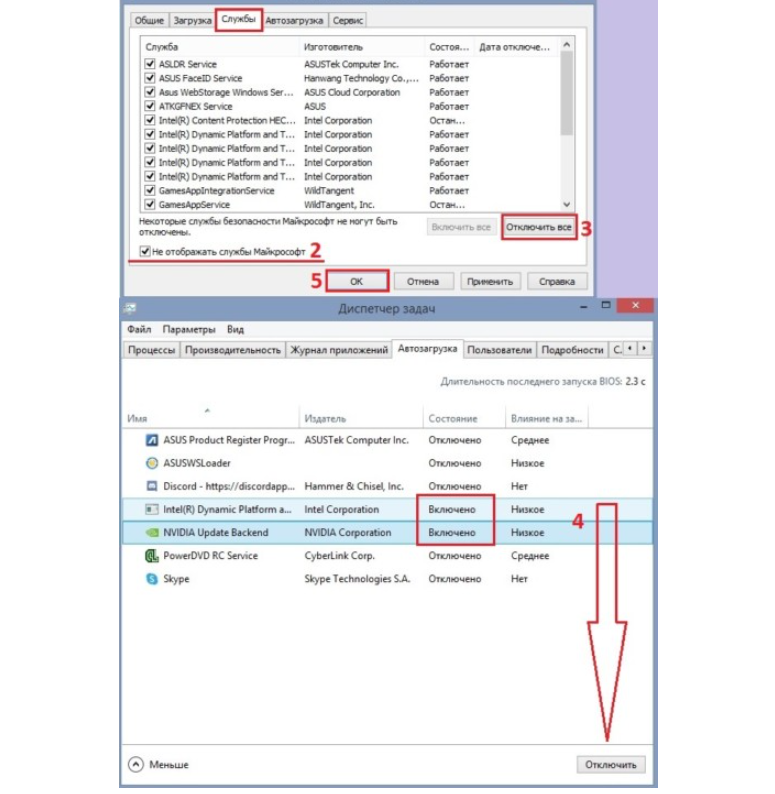
- Чтобы выполнить чистую загрузку, нажмите Win + R на клавиатуре, введите msconfig и нажмите Enter.
- В открывшемся окне конфигурации системы, выберите вкладку «Общие».
- Снимите флажок с пункта: «Загружать элементы автозагрузки».
- Перейдите на вкладку «Службы» и установите флажок «Не отображать службы Microsoft».
- Затем нажмите «Отключить всё».
- После этого откройте вкладку «Автозагрузка» и перейдите в диспетчер задач.
- Там следует отключить все программы, запускающиеся вместе с системой. Если диспетчер не открывается, нажмите Ок и перезагрузите компьютер.
После этого система будет запущена в режиме чистой загрузки, где работают только основные программы Microsoft. Снова попробуйте открыть диспетчер задач. Если он работает нормально, проблема вызвана каким-то сторонним приложением, которое нужно найти вручную. Включайте поочерёдно каждое приложение и проверяйте работу диспетчера. После выявления проблемной программы, её следует удалить и заменить альтернативным решением.
Решение 4. Воспользуйтесь функцией Сброса системы к начальным настройкам
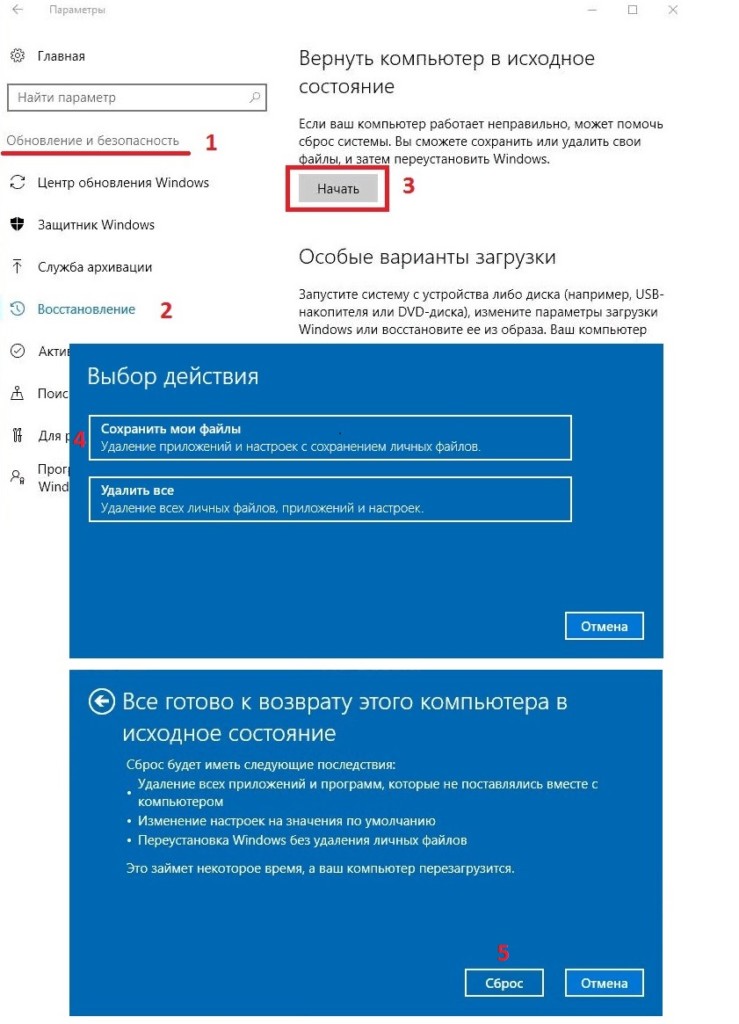
Если диспетчер задач по-прежнему не запускается, попробуйте сбросить систему к начальным настройкам.
- Для этого нажмите Win + X и выберите «Параметры».
- Перейдите в раздел «Обновления и безопасность».
- Затем выберите «Восстановление» на левой боковой панели и нажмите «Начать» справа, в разделе «Вернуть компьютер в исходное состояние».
- Следуйте дальнейшим подсказкам на экране.
Эти четыре способа исправляют проблему с вылетом и зависанием диспетчера задач. Если у вас есть сомнения или предложения, оставьте комментарий ниже.