
OpenVPN – это набор open source программ, который заслуженно является одним из самых популярных и легких решений для реализации защищенной VPN сети. OpenVPN позволяет объединить в единую сеть сервер и клиентов (даже находящиеся за NAT или файерволами), или объединить сети удаленных офисов. Серверную часть OpenVPN можно развернуть практически на всех доступных операционных системах (пример настройки OpenVPN на Linux). Вы можете установить OpenVPN сервер даже на обычный компьютер с десктопной редакцией Windows 10.
В этой статье, мы покажем, как установить OpenVPN сервер на компьютер с Windows 10, настроить OpenVPN клиент на другом Windows хосте и установить защищенное VPN подключение.
Содержание:
- Установка службы OpenVPN сервера в Windows
- Создаем ключи шифрования и сертификаты для OpenVPN
- Конфигурационный файл OpenVPN сервера в Windows
- Настройка OpenVPN клиента в Windows
Установка службы OpenVPN сервера в Windows
Скачайте MSI установщик OpenVPN для вашей версии Windows с официального сайта (https://openvpn.net/community-downloads/). В нашем случае это OpenVPN-2.5.5-I602-amd64.msi (https://swupdate.openvpn.org/community/releases/OpenVPN-2.5.5-I602-amd64.msi).
Запустите установку.
Если вы планируете, OpenVPN сервер работал в автоматическом режиме, можно не устанавливать OpenVPN GUI. Обязательно установите OpenVPN Services.
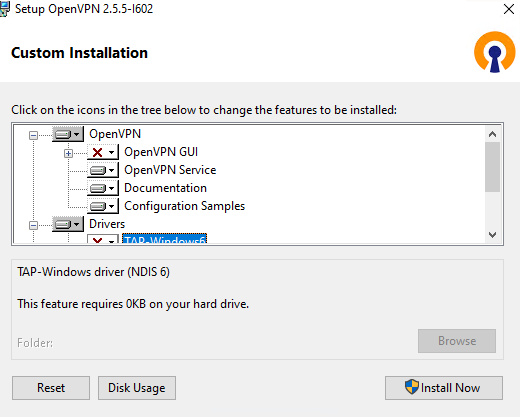
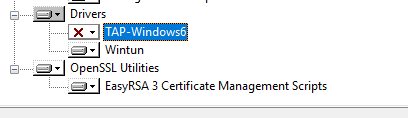
Начиная с версии OpenVPN 2.5, поддерживается драйвер WinTun от разработчиков WireGuard. Считается, что этот драйвер работает быстрее чем классический OpenVPN драйвер TAP. Установите драйвер Wintun, откажитесь от установки TAP-Windows6.
Установите OpenSSL утилиту EasyRSA Certificate Management Scripts.
Запустите установку.
По умолчанию OpenVPN устаналивается в каталог C:\Program Files\OpenVPN.
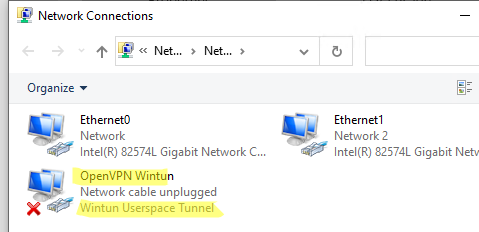
После окончания установки появится новый сетевой адаптер типа Wintun Userspace Tunnel. Этот адаптер отключен, если служба OpenVPN не запущена.
Создаем ключи шифрования и сертификаты для OpenVPN
OpenVPN основан на шифровании OpenSSL. Это означает, что для обмена трафиком между клиентом и серверов VPN нужно сгенерировать ключи и сертификаты с использованием RSA3.
Откройте командную строку и перейдите в каталог easy-rsa:
cd C:\Program Files\OpenVPN\easy-rsa
Создайте копию файла:
copy vars.example vars
Откройте файл vars с помощью любого текстового редактора. Проверьте пути к рабочим директориям.
Обязательно поправьте переменную EASYRSA_TEMP_DIR следующим образом:
set_var EASYRSA_TEMP_DIR "$EASYRSA_PKI/temp"

Можете заполнить поля для сертификатов (опционально)
set_var EASYRSA_REQ_COUNTRY "RU"
set_var EASYRSA_REQ_PROVINCE "MSK"
set_var EASYRSA_REQ_CITY "MSK"
set_var EASYRSA_REQ_ORG "IT-Company"
set_var EASYRSA_REQ_EMAIL " [email protected] "
set_var EASYRSA_REQ_OU " IT department "

Срок действия сертификатов задается с помощью:
#set_var EASYRSA_CA_EXPIRE 3650
#set_var EASYRSA_CERT_EXPIRE 825
Сохраните файл и выполните команду:
EasyRSA-Start.bat
Следующие команды выполняются в среде EasyRSA Shell:
Инициализация PKI:
./easyrsa init-pki
Должна появится надпись:
init-pki complete; you may now create a CA or requests.
Your newly created PKI dir is: C:/Program Files/OpenVPN/easy-rsa/pki
Теперь нужно сгенерировать корневой CA:
./easyrsa build-ca
Задайте дважды пароль для CA:
CA creation complete and you may now import and sign cert requests.
Данная команда сформировала:
- Корневой сертификат центра сертификации: «C:\Program Files\OpenVPN\easy-rsa\pki\ca.crt»
- Ключ центра сертификации «C:\Program Files\OpenVPN\easy-rsa\pki\private\ca.key»
Теперь нужно сгенерировать запрос сертификата и ключ для вашего сервера OpenVPN:
./easyrsa gen-req server nopass
Утилита сгенерирует два файла:
req: C:/Program Files/OpenVPN/easy-rsa/pki/reqs/server.req
key: C:/Program Files/OpenVPN/easy-rsa/pki/private/server.key
Подпишем запрос на выпуск сертификата сервера с помощью нашего CA:
./easyrsa sign-req server server
Подтвердите правильность данных, набрав yes.
Затем введите пароль CA от корневого CA.
В каталоге issued появится сертификат сервера («C:\Program Files\OpenVPN\easy-rsa\pki\issued\server.crt»)

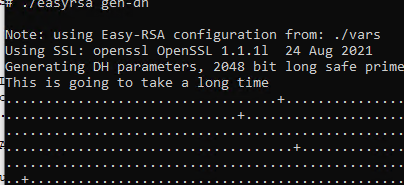
Теперь можно создать ключи Диффи-Хеллмана (займет длительное время):
./easyrsa gen-dh
Для дополнительной защиты VPN сервера желательно включить tls-auth. Данная технология позволяет использовать подписи HMAC к handshake-пакетам SSL/TLS, инициируя дополнительную проверку целостности. Пакеты без такой подписи будут отбрасываться VPN сервером. Это защитит вас от сканирования порта VPN сервера, DoS атак, переполнения буфера SSL/TLS.
Сгенерируйте ключ tls-auth:
cd C:\Program Files\OpenVPN\bin
openvpn --genkey secret ta.key
Должен появиться файл «C:\Program Files\OpenVPN\bin\ta.key». Переместите его в каталог C:\Program Files\OpenVPN\easy-rsa\pki
Теперь можно сформировать ключи для клиентов OpenVPN. Для каждого клиента, который будет подключаться к вашему серверу нужно создать собственные ключи.
Есть несколько способов генерации ключей и передачи их клиентам. В следующем примере, мы создадим на сервере ключ клиента и защитим его паролем:
./easyrsa gen-req kbuldogov
./easyrsa sign-req client kbuldogov
Данный ключ («C:\Program Files\OpenVPN\easy-rsa\pki\private\kbuldogov.key») нужно передать клиенту и сообщить пароль. Клиент может снять защиту паролем для ключа:
openssl rsa -in "C:\Program Files\OpenVPN\easy-rsa\pki\private\kbuldogov.key"-out "C:\Program Files\OpenVPN\easy-rsa\pki\private\kbuldogov_use.key"

Если вы хотите сгенерировать ключ, не защищенный паролем, нужно выполнить команду:
./easyrsa gen-req имяклиента nopass
На сервере с OpenVPN вы можете создать неограниченное количество ключей и сертификатов для пользователей. Аналогичным образом сформируйте ключи и сертфикаты для других клиентов.
Вы можете отохвать скомпрометированные сертификаты клиентов:
cd C:\Program Files\OpenVPN\easy-rsa
EasyRSA-Start.bat
./easyrsa revoke kbuldogov
Итак, мы сгенерировали набор ключей и сертификатов для OpenVPN сервера. Теперь можно настроить и запустить службу OpenVPN.
Конфигурационный файл OpenVPN сервера в Windows
Скопируйте типовой конфигурационный файл OpenVPN сервера:
copy "C:\Program Files\OpenVPN\sample-config\server.ovpn" "C:\Program Files\OpenVPN\config-auto\server.ovpn"
Откройте файл server.ovpn в любом текстовом редакторе и внесите свои настройки. Я использую следующий конфиг для OpenVPN:
# Указываем порт, протокол и устройство
port 1194
proto udp
dev tun
# Указываем пути к сертификатам сервера
ca "C:\\Program Files\\OpenVPN\\easy-rsa\\pki\\ca.crt"
cert "C:\\Program Files\\OpenVPN\\easy-rsa\\pki\\issued\\server.crt"
key "C:\\Program Files\\OpenVPN\\easy-rsa\\pki\\private\\server.key"
dh "C:\\Program Files\\OpenVPN\\easy-rsa\\pki\\dh.pem"
# Указываем настройки IP сети, адреса из которой будет будут получать VPN клиенты
server 10.24.1.0 255.255.255.0
#если нужно разрешить клиентам подключаться под одним ключом, нужвно включить опцию duplicate-cn (не рекомендуется)
#duplicate-cn
# TLS защита
tls-auth "C:\\Program Files\\OpenVPN\\easy-rsa\\pki\\ta.key" 0
cipher AES-256-GCM
# Другая параметры
keepalive 20 60
persist-key
persist-tun
status "C:\\Program Files\\OpenVPN\\log\\status.log"
log "C:\\Program Files\\OpenVPN\\log\\openvpn.log"
verb 3
mute 20
windows-driver wintun
Сохраните файл.
OpenVPN позволяет использовать как TCP, так и UDP для подключения. В этом примере я запустил OpenVPN на 1194 UDP. Рекомендуется использовать протокол UDP, это оптимально как с точки зрения производительности, так и безопасности.
Не забудьте открыть на файерволе порты для указанного вами порта OpenVPN на клиенте и на сервере. Можно открыть порты в Windows Defender с помощью PowerShell.
Правило для сервера:
New-NetFirewallRule -DisplayName "AllowOpenVPN-In" -Direction Inbound -Protocol UDP –LocalPort 1194 -Action Allow
Правило для клиента:
New-NetFirewallRule -DisplayName "AllowOpenVPN-Out" -Direction Outbound -Protocol UDP –LocalPort 1194 -Action Allow
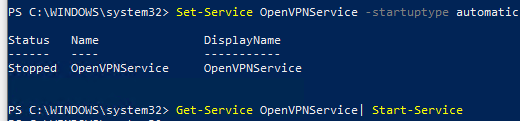
Теперь нужно запустить службу OpenVPN и изменить тип ее запуска на автоматический. Воспользуйтесь таким командами PowerShell, чтобы включить службу:
Set-Service OpenVPNService –startuptype automatic –passthru
Get-Service OpenVPNService| Start-Service
Откройте панель управления, и убедитесь, что виртуальный сетевой адаптер OpenVPN Wintun теперь активен. Если нет, смотрите лог «C:\Program Files\OpenVPN\log\server.log»
Если при запуске OpenVPN вы видите в логе ошибку:
Options error: In C:\Program Files\OpenVPN\config-auto\server.ovpn:1: Maximum option line length (256) exceeded, line starts with..
Смените в файле server.ovpn символы переноса строки на Windows CRLF (в notepad++ нужно выбрать Edit -> EOL Conversion -> Windows CR LF). Сохраните файл, перезапустите службу OpevVPNService.
Данный конфиг позволит удаленным клиентам получить доступ только к серверу, но другие компьютеры и сервисы в локальной сети сервера для них недоступны. Чтобы разрешить клиентам OpenVPN получить доступ к внутренней сети нужно:
Включить опцию IPEnableRouter в реестре (включает IP маршрутизацию в Windows, в том числе включает маршрутизацию меду сетями Hyper-V): reg add «HKLM\SYSTEM\CurrentControlSet\Services\Tcpip\Parameters» /v IPEnableRouter /t REG_DWORD /d 1 /f
Добавьте в конфгурационный файл сервера OpenVPN маршруты до внутренней IP сети:
push "route 10.24.1.0 255.255.255.0"
push "route 192.168.100.0 255.255.255.0"
Если нужно, назначьте клиенту адреса DNS серверов:
push "dhcp-option DNS 192.168.100.11"
push "dhcp-option DNS 192.168.100.12"
Если нужно завернуть все запросы клиента (в том числе Интернет трафик) на ваш OpenVPN сервер, добавьте опцию:
push "redirect-gateway def1"
Настройка OpenVPN клиента в Windows
Создайте на сервере шаблонный конфигурационный файла для клиента VPN (на базе iшаблона client.ovpn) со следующими параметрами (имя файла kbuldovov.ovpn)
client
dev tun
proto udp
remote your_vpn_server_address 1194
resolv-retry infinite
nobind
persist-key
persist-tun
ca ca.crt
cert kbuldogov.crt
key kbuldogov.key
remote-cert-tls server
tls-auth ta.key 1
cipher AES-256-GCM
connect-retry-max 25
verb 3
В директиве remote указывается публичный IP адрес или DNS имя вашего сервера OpenVPN.
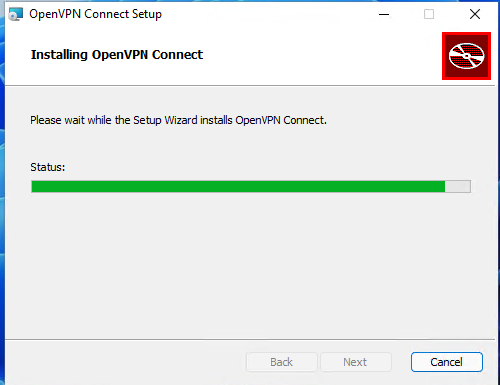
Скачайте и установите клиент OpenVPN Connect для Windows (https://openvpn.net/downloads/openvpn-connect-v3-windows.msi).
Теперь на компьютер с клиентом OpenVPN нужно с сервера скопировать файлы:
- ca.crt
- kbuldogov.crt
- kbuldogov.key
- dh.pem
- ta.key
- kbuldogov.ovpn
Теперь импортируйте файл с профилем *.ovpn и попробуйте подключиться к вашему VPN серверу.
Если все настроено правильно, появится такая картинка.
Проверьте теперь лог OpenVPN на клиенте «C:\Program Files\OpenVPN Connect\agent.log»
Mon Dec 27 08:09:30 2021 proxy_auto_config_url
Mon Dec 27 08:09:31 2021 TUN SETUP
TAP ADAPTERS:
guid='{25EE4A55-BE90-45A0-88A1-8FA8FEF24C42}' index=22 name='Local Area Connection'
Open TAP device "Local Area Connection" PATH="\\.\Global\{25EE4A55-BE90-45A0-88A1-8FA8FEF24C42}.tap" SUCCEEDED
TAP-Windows Driver Version 9.24
ActionDeleteAllRoutesOnInterface iface_index=22
netsh interface ip set interface 22 metric=1
Ok.
netsh interface ip set address 22 static 10.24.1.6 255.255.255.252 gateway=10.24.1.5 store=active
IPHelper: add route 10.24.1.1/32 22 10.24.1.5 metric=-1
Клиент успешно подключится к OpenVPN серверу и получил IP адрес 10.24.1.6.
Проверьте теперь лог на сервере («C:\Program Files\OpenVPN\log\openvpn.log»). Здесь также видно, что клиент с сертификатом kbuldogov успешно подключится к вашему серверу.
2021-12-27 08:09:35 192.168.13.202:55648 [kbuldogov] Peer Connection Initiated with [AF_INET6]::ffff:192.168.13.202:55648
2021-12-27 08:09:35 kbuldogov/192.168.13.202:55648 MULTI_sva: pool returned IPv4=10.24.1.6, IPv6=(Not enabled)
2021-12-27 08:09:35 kbuldogov/192.168.13.202:55648 MULTI: Learn: 10.24.1.6 -> kbuldogov/192.168.13.202:55648
2021-12-27 08:09:35 kbuldogov/192.168.13.202:55648 MULTI: primary virtual IP for kbuldogov/192.168.13.202:55648: 10.24.1.6
With the dangers of surfing online, more and more people look for solutions that may guarantee their privacy.
One such solution is a VPN, which often requires the installation of files on your device.
One must choose a VPN service that not only ensures that your data is secure, but also that the service is compatible with your device.
If you are a frequent VPN user, chances are that you might’ve come across a file called TAP-Windows Adapter v9.21.2. Before going further let us understand what VPN is.
VPN, the acronym for Virtual Private Network, is a service that lets you access websites that are blocked in your country, gives you privacy from internet providers, hackers, ISP’s or sites that collect data and speed up your server connections by using private, direct routes.
Since it reduces the risk of many online and spy attacks, using a VPN is highly recommended by IT experts. VPN allows you to:
- Avoid ISP tracking
- Use public networks safely
- Downloads files anonymously from the Internet
- Stream blocked content
- Bypass traffic shaping
Now, let us understand what it is actually.
Most Windows users panic when they find an application they don’t remember which is a valid fear because many malware and spyware are capable of seemingly appearing out of nowhere as an app on your device. That being said, it is entirely harmless.
This is a network driver used by VPN services to connect to servers. Since it’s a driver, it can be found in the Device Manager. If you’re using a browser extension, you won’t come across it.
On the other hand, most full-featured VPN clients such as ExpressVPN, NordVPN, CyberGhost, etc require this driver to function properly.
In simple words, it is a Windows adapter that acts as a virtual network interface, allowing VPN clients access to create a VPN connection.
There are 2 different versions of this that you will come across depending on the version of your Windows:
- On Windows XP – NDIS 5 driver (tap windows 9.9.x)
- On windows vista / 7 / 8 / 10 – NDIS 6 driver (tap windows 9.21.x)
If you have configured your VPN client to not use it for establishing private connections, you can safely remove it. However, in this case, it may cause issues such as interfering with your internet connection, making it near impossible to go online. If you’re suffering from the same fate.
Although there are no drawbacks to keeping the adapter on your computer, there are cases in which the adapter makes it impossible to connect to the Internet.
Read more: How to Add Widgets To Windows 10 Desktop?
Uninstall your VPN client
This will become a useless driver if you have customized or uninstalled your VPN client, in which case it might start to interfere with your connection, not allowing you to get online.
The solution to this is to completely remove it from your system. The following steps will show you how to uninstall and reinstall it:
- Terminate all VPN connections and close your VPN. This is an important step that will make sure that it can be removed safely without any interruptions.
- Go to device manager and expand the Network adapters section
- Locate your file. You might see a yellow exclamation mark next to the icon of the driver. This means that a reinstall is required.
- Right-click on the driver’s option and select uninstall.
- Once it is successfully uninstalled, open your VPN client, which might prompt you to install the missing drivers, or reinstall the adapter automatically.
- If the VPN client only prompts the missing driver error but not an option to install them, reinstall the VPN client itself. This will prompt the installer to install the missing drivers as well.
- When the installation is complete, check if your connection issues are resolved.
If you want to completely remove it, you will also have to remove the VPN clients that require the adapter. If you do not remove the clients, the driver might appear the next time you boot up.
Other than that, the VPN clients will detect the missing drivers and attempt to reinstall them now and then.
Conclusion
It is a network adapter that allows your VPN client to function properly. This article talked about what a VPN is and how it helps.
Other than that it also discussed how you can uninstall and reinstall the driver to resolve connection issues.
Read more: How to Clear Printer Queue in Windows 10?
Github help: here
Клиент OpenVPN в Windows с настройками по-умолчанию поддерживает только одно активное VPN подключение. Если вы при активном VPN подключении попробуете запустить еще одно, появится ошибка:
OpenVPN GUI
Connecting to VPNname has failed
All TAP-Windows adapters on the system are currently in use
TCP/UDP: Socket bind failed on local address [undef]: Address already in use (WSAEADDRINUSE)
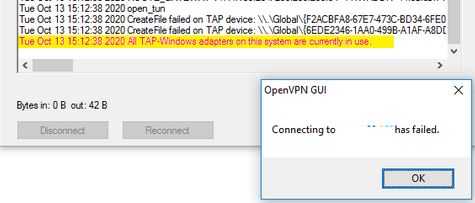
При установке OpenVPN в Windows создается только один вертикаль адаптер типа TAP или Wintun. Если вы хотите одновременно подключаться к нескольким OpenVPN серверам, вам нужно создать дополнительные сетевые адаптер WinTAP или WinTUN.
Чтобы исправить эту проблему и разрешить одновременное подключение к двум VPN хостам, нужно добавить еще один виртуальный TAP сетевой адаптер. Каждое VPN подключение при этом будет использовать собственный TAP интерфейс.
Откройте командную строку с правами администратора и перейдите в каталог:
Cd “C:\Program Files\TAP-Windows\bin”
Запустите файл:
addtap.bat

BAT файл запустит программу tapinstall.exe с параметрами. Данная команда установит в Windows еще один сетевой адаптер c драйвером TAP-Windows Adapter V9. Запустите bat файл столько раз, сколько одновременных OpenVPN подключений вы хотите использовать.
Device node created. Install is complete when drivers are installed...
Updating drivers for tap0901 from C:\Program Files\TAP-Windows\driver\OemVista.inf.
Drivers installed successfully.
После этого в списке сетевых адаптеров Windows появится новое устройство типа TAP-Windows Adapter #2.
Для ручной установки TAP адаптера и драйвера можно использовать команду:
tapinstall.exe install “C:\Program Files\TAP-Windows\driver\OemVista.inf” tap0901
Начиная с версии OpenVPN 2.5 для управления TAP адаптерами в Windows нужно использовать утилиту tapctl.exe, которая заменила команду tapinstall.exe из предыдущих версий.
Чтобы добавить новый TAP адаптер, достаточно выполнить команду:
"c:\Program Files\OpenVPN\bin\tapctl.exe" create
Если нужно создать TUN адаптер, выполните:
"c:\Program Files\OpenVPN\bin\tapctl.exe” create --hwid wintun

WinTun драйвер от разработчиков WireGuard появился в OpenVPN 2.5. Wintun драйвер работает быстрее чем классический OpenVPN драйвер WinTAP.
Вывести список сетевых адаптеров OpenVPN:
tapctl.exe list
{1199219C-C5AD-4722-B195-C80332101710}  OpenVPN Wintun
{E91285C8-728F-4643-9485-114970074AF7}  OpenVPN TAP-Windows
{9C5FB378-505E-4F49-8E04-9E862D14024B}  OpenVPN Wintun2

Вы можете вывести список сетевых TAP адаптеров, доступных клиенту OpenVPN с помощью команды:
“C:\Program Files\OpenVPN\bin\openvpn.exe” --show-adapters
Available TAP-WIN32 / Wintun adapters [name, GUID, driver]:
'OpenVPN Wintun' {1199219C-C5AD-4722-B195-C80332101710} wintun
'OpenVPN TAP-Windows2' {E91285C8-728F-4643-9485-114970074AF7} tap-windows6
'OpenVPN Wintun2' {9C5FB378-505E-4F49-8E04-9E862D14024B} wintun

Чтобы удалить все установленные TAP адаптеры, запустите файл deltapall.bat в этом же каталоге.
Или воспользуйтесь командой:
tapctl.exe delete "OpenVPN TAP-Windows6"
Затем нужно внести изменения в конфигурационный файлы .ovpn ваших клиентских подключений OpenVPN (по умолчанию хранятся в каталоге C:\Program Files\OpenVPN\config). Добавьте в текстовые файлы, следующие параметры:
- nobind – использовать динамических UDP порт источника для каждой VPN сессии
- dev-node ‘OpenVPN TAP-Windows2’ – привязать OpenVPN подключение к конкретному сетевому интерфейсу (указывается имя сетевого адаптера в Window)
При подключении клиент OpenVPN будет привязываться к конкретному интерфейсу. Можно добавить команду подключения к OpenVPN в автозапуск Windows. Дополнительно вы можете назначить статический IP для OpenVPN клиента.
Если не привязать OVPN профили к конкретному сетевому адаптеру, то при попытке создать второе OpenVPN подключении может появится ошибка:
TCP/UDP: Socket bind failed on local address [undef]: Address already in use (WSAEADDRINUSE)
Обратите внимание, что при использовании нескольких OpenVPN подключений сервер должен отправлять вам маршрут к своим подсетям через параметр:
push "route 10.10.10.0 255.255.255.0 10.10.20.1"
Теперь ваш OpenVPN клиент на Windows позволит одновременно запускать два и более активных VPN-подключений. В Linux при подключении к OpenVPN из консоли, множественные подключения доступны по-умолчанию.
Recommended Posts
SHMID
Posted
(edited)
Добрый день.
Есть TAP-Windows adapter V9, подскажите пожалуйста как из кабинета KES Cloud перевести его тип сети в «локальная сеть».
пробовал отменять политики на тестовой машине и руками ставить тип сети, после чего удаленное подключение начинает к машине работать.
А так же пробовал прописать IP сети в которой работает этот адаптер — через политики KES Cloud. (без успешно..)
прикладываю скрин на выключенных политиках тетовой машины.:
Спойлер

1 — подписка KES Cloud Plus
2 — версия KES 11.10.0.399
Edited by SHMID
ElvinE5
Добрый день
в разделе политики тут добавляли эту сеть как на вашем скрине ?
Спойлер
в связи с тем что у вас облачные сервис измененные настройки сразу не применяться к устройству … нужно будет подождать периода синхронизации клиента с сервером.
и в настройках сети у вас маска 32 это верно ? 1 хост? то есть правило справедливо только для 192.158.0.0
SHMID
- Author
Posted
15 минут назад, ElvinE5 сказал:
Добрый день
Цитата
в разделе политики тут добавляли эту сеть как на вашем скрине ?
Да, в данном разделе добавлял подсеть 192.158.0.0, но не помогло (интервал синхронизации выжидал, как я понял это 15 минут, но в любом случае, пока на тестовой машине не увижу, что синхронизация была меньше минуты, не брался проверял.)
Скрыть контент

в связи с тем что у вас облачные сервис измененные настройки сразу не применяться к устройству … нужно будет подождать периода синхронизации клиента с сервером.
и
Цитата
в настройках сети у вас маска 32 это верно ? 1 хост? то есть правило справедливо только для 192.158.0.0
да, все верно, только для сети 192.158.0.0
помогло в разделе «Правила для обработки сетевых пакетов и потоков данных »
правило Remote Desktop — разрешил.
в Опции выбора Адреса удаленной сети, выбрал Адреса из списка, в который добавил 192.158.0.0.
после чего, у меня получилось подключиться к удаленному серверу.
Правильно ли я сделал? может какое нибудь альтернативное решение имеется?
Безопасна ли настройка данная?
ElvinE5
Posted
(edited)
18 часов назад, SHMID сказал:
Правильно ли я сделал? может какое нибудь альтернативное решение имеется?
Безопасна ли настройка данная?
Это зависит от того насколько вы доверяете этой сети …
в вашем правиле вы разрешили ЛЮБОЙ входящий трафик (по любым протоколам) из указанной сети
RDP тут не причем это просто название, у вас там протокол ЛЮБОЙ.
если это вас устаревает, то почему нет …
Edited by ElvinE5
SHMID
- Author
Posted
1 час назад, ElvinE5 сказал:
Это зависит от того насколько вы доверяете этой сети …
в вашем правиле вы разрешили ЛЮБОЙ входящий трафик (по любым протоколам) из указанной сети
RDP тут не причем это просто название, у вас там протокол ЛЮБОЙ.
если это вас устаревает, то почему нет …
Да, этой сети доверяю, но сейчас внес коррективы, разрешил протокол TCP и Локальный порт 3389.
-
1
SHMID
- Author
Posted
3 часа назад, ElvinE5 сказал:
Это зависит от того насколько вы доверяете этой сети …
в вашем правиле вы разрешили ЛЮБОЙ входящий трафик (по любым протоколам) из указанной сети
RDP тут не причем это просто название, у вас там протокол ЛЮБОЙ.
если это вас устаревает, то почему нет …
Спасибо Вам.?
Please sign in to comment
You will be able to leave a comment after signing in
Sign In Now
Do you want to know how to fix the error? TAP — Windows Adapter V9? The TAP-Windows Adapter V9 is a network controller that VPN required to establish secure connections.
From time to time, the TAP adapter driver may not work as it should. Here we will show you how to fix it in no time.
TAP-Windows Adapter V9 What is it?
The TAP — Windows Adapter V9 is a network driver that is essential for VPN connections. Most of the time, this network driver is automatically installed along with VPN clients. Typically, the default path for the driver is: C:/Program Files/Tap-Windows.
You may also be interested in learning about: No Bootable Device: Error 3f0 (Boot Device Not Found)
However, sometimes you may notice that your Internet connections will not always work as the adapter driver TAP — Windows Adapter V9 is enabled.
What’s even stranger is that even disabling it wouldn’t work, as the TAP network driver would be re-enabled shortly after.
Therefore, you will not be able to establish a connection. If that ever happens to you, we invite you to check out these easy-to-follow tips that might fix your TAP-Windows Adapter V9 error.
How to fix TAP-Windows Adapter v9 error?
Now, let’s look at some feasible solutions that will help you resolve the TAP-Windows Adapter v9 error:
Option 1: Use the Internet Connections Troubleshooter
The easiest solution would be to use the built-in Internet Connections troubleshooter. Windows. This tool can usually fix a number of connectivity issues, so it might be worth using. Here’s what you need to do:
- Step 1:: Press the key
- Step 2:: Writes: solve problems.
- Step 3:: Choose Problem solving recommended available.
- Step 4:: Click on the hyperlink of the troubleshooter available.
- Step 5:: Choose Internet connections and click Run the troubleshooter.
- Step 6:: Choose Troubleshooting my Internet connection.
- Step 7:: Follow the steps in the troubleshooting wizard.
If this option does not help you resolve the TAP-Windows Adapter v9 error issue, try the following solution:
Option 2: Reset the TAP-Windows Adapter v9 connection
Disabling and re-enabling the TAP-Windows Adapter v9 driver will (or better yet should) reset your networking capabilities. Additionally, you can also fix the TAP-Windows Adapter V9 error and it is a really simple task. All you have to do is the following:
- Step 1:: Press the Win key on your keyboard
- Step 2:: Choose Network type
- Step 3:: Select the network status
- Step 4:: Click the button Center network and sharing.
- Step 5:: Select option Change adapter settings.
- Step 6:: Right click on TAP-Windows Adapter V9.
- Step 7:: Choose Deactivate
- Step 8:: Right-click on the TAP-Windows adapter once again.
- Step 9:: Choose Enable
- Step 10:: Restart your PC and check for any improvement.
If this option does not help you resolve the TAP-Windows Adapter v9 error issue, try the following solution:
Option 3: Reinstall the TAP-Windows Adapter v9 and the VPN client
The best solution for the TAP-Windows Adapter V9 error might be to reinstall the driver completely. However, considering that most TAP adapter drivers depend on VPN clients, most VPN providers come with their own version.
Therefore, it would be easier to simply uninstall the TAP driver and the VPN client, and perform a clean install of both services once you’re done.
Here is how you should reinstall your TAP driver and VPN client:
- Step 1:: Right click on the Home button.
- Step 2:: Choose Device administrator.
- Step 3: Expand the category network adapters.
- Step 4: Right click on TAP-Windows Adapter V9.
- Step 5: Click on Uninstall device.
- Step 6: Choose uninstall to confirm.
- Step 7: Press the key combination Windows + R.
- Step 8: Write the following: Cpl and press Get in.
- Step 8: Select your VPN software in the window.
- Step 10: Press the button uninstall to remove it.
- Step 11: Continue with the uninstallation.
- Step 12: Restart your PC shortly after uninstalling both services.
- Step 13: Reinstall VPN software + TAP adapter driver
NOTE: : If you find that reinstalling your VPN client and TAP adapter driver doesn’t work, you may want to consider switching to a better alternative. Private Internet Access, for example, is an excellent VPN service that comes with its own TAP driver. Plus, even if it stops working at some point, you can easily reinstall it right from the VPN client’s configuration screen.
If this option does not help you resolve the TAP-Windows Adapter v9 error issue, try the following solution:
Option 4: Reset Windows 10
Apparently, resetting Windows 10 fixes the TAP-Windows Adapter V9 error in most cases. You can reset Windows 10 and keep your files as well. However, you will need to reinstall all apps and drivers as they will be erased from your PC.
Also, you will lose any settings you made before resetting your PC. Of course, this method is one of the most drastic, but it also gets the job done most of the time. Follow these steps to reset your Windows 10 PC:
- Step 1:: Press the Win key on your keyboard.
- Step 2:: type the action command Reset PC.
- Step 3: Click on the option Reset this PC.
- Step 4: Select option
- Step 5: Press the button Conserve my files
- Step 7: Click on the Next.
- Step 8: Select option Resetting to continue.
- Step 9: Wait for the process to complete.
Here you can read about: Net::err_cert_authority_invalid: Error in Google Chrome. 9 Solutions
Conclusion
Finally, if you notice that your TAP-Windows Adapter V9 triggers several connectivity errors, there are a few things you can try. Most of the time, reinstall TAP driver and VPN client will fix the problem.
However, you may need to go as far as resetting your PC completely. We advise you to follow the instructions to the letter or go to a professional technician to resolve this error. We hope we have helped you.
My name is Javier Chirinos and I am passionate about technology. Ever since I can remember, I have been interested in computers and video games, and that passion has turned into a job.
I have been publishing about technology and gadgets on the Internet for over 15 years, especially in mundobytes.com
I am also an expert in online marketing and communication and have knowledge in WordPress development.