
With the dangers of surfing online, more and more people look for solutions that may guarantee their privacy.
One such solution is a VPN, which often requires the installation of files on your device.
One must choose a VPN service that not only ensures that your data is secure, but also that the service is compatible with your device.
If you are a frequent VPN user, chances are that you might’ve come across a file called TAP-Windows Adapter v9.21.2. Before going further let us understand what VPN is.
VPN, the acronym for Virtual Private Network, is a service that lets you access websites that are blocked in your country, gives you privacy from internet providers, hackers, ISP’s or sites that collect data and speed up your server connections by using private, direct routes.
Since it reduces the risk of many online and spy attacks, using a VPN is highly recommended by IT experts. VPN allows you to:
- Avoid ISP tracking
- Use public networks safely
- Downloads files anonymously from the Internet
- Stream blocked content
- Bypass traffic shaping
Now, let us understand what it is actually.
Most Windows users panic when they find an application they don’t remember which is a valid fear because many malware and spyware are capable of seemingly appearing out of nowhere as an app on your device. That being said, it is entirely harmless.
This is a network driver used by VPN services to connect to servers. Since it’s a driver, it can be found in the Device Manager. If you’re using a browser extension, you won’t come across it.
On the other hand, most full-featured VPN clients such as ExpressVPN, NordVPN, CyberGhost, etc require this driver to function properly.
In simple words, it is a Windows adapter that acts as a virtual network interface, allowing VPN clients access to create a VPN connection.
There are 2 different versions of this that you will come across depending on the version of your Windows:
- On Windows XP – NDIS 5 driver (tap windows 9.9.x)
- On windows vista / 7 / 8 / 10 – NDIS 6 driver (tap windows 9.21.x)
If you have configured your VPN client to not use it for establishing private connections, you can safely remove it. However, in this case, it may cause issues such as interfering with your internet connection, making it near impossible to go online. If you’re suffering from the same fate.
Although there are no drawbacks to keeping the adapter on your computer, there are cases in which the adapter makes it impossible to connect to the Internet.
Read more: How to Add Widgets To Windows 10 Desktop?
Uninstall your VPN client
This will become a useless driver if you have customized or uninstalled your VPN client, in which case it might start to interfere with your connection, not allowing you to get online.
The solution to this is to completely remove it from your system. The following steps will show you how to uninstall and reinstall it:
- Terminate all VPN connections and close your VPN. This is an important step that will make sure that it can be removed safely without any interruptions.
- Go to device manager and expand the Network adapters section
- Locate your file. You might see a yellow exclamation mark next to the icon of the driver. This means that a reinstall is required.
- Right-click on the driver’s option and select uninstall.
- Once it is successfully uninstalled, open your VPN client, which might prompt you to install the missing drivers, or reinstall the adapter automatically.
- If the VPN client only prompts the missing driver error but not an option to install them, reinstall the VPN client itself. This will prompt the installer to install the missing drivers as well.
- When the installation is complete, check if your connection issues are resolved.
If you want to completely remove it, you will also have to remove the VPN clients that require the adapter. If you do not remove the clients, the driver might appear the next time you boot up.
Other than that, the VPN clients will detect the missing drivers and attempt to reinstall them now and then.
Conclusion
It is a network adapter that allows your VPN client to function properly. This article talked about what a VPN is and how it helps.
Other than that it also discussed how you can uninstall and reinstall the driver to resolve connection issues.
Read more: How to Clear Printer Queue in Windows 10?
Github help: here

Except if you are a tech-savvy person, most Windows users are not familiar with TAP-Windows Adapter, and many would mistake it as a virus or malware. But actually, it is not. If you have installed a VPN on your computer, then you might have noticed TAP-Windows Adapter 9.21.2.

Nowadays, most people worldwide rely on the internet, whether it is for personal, business, school, or home use. Hence, most IT professionals recommend using a VPN to protect critical data and individual files from espionage and computer viruses.
However, many users complained about issues with their internet connections once enabled. So, in this article, you will know what a TAP-Windows is, how to uninstall it and reinstall it again.
What is a TAP-Windows Adapter 9.21.2?
TAP-Windows Adapter is a Shareware software installed by VPN software allowing Windows users to use a virtual TAP device functionality, and it is entirely safe and virus-free. For many VPN clients such as NordVPN, CyberGhost, ExpressVPN, etc., TAP-Windows are included in the VPN installers alongside the VPN software, so you don’t need to install it separately or individually. You can find your TAP-Windows driver in the C: Program Files TAP-Windows folder, and it is required for your VPN to work.
Suppose you are connecting to a VPN browser extension. In any case, you won’t find any TAP-Windows Adapter, and neither will you enjoy any benefits such as the full features of a VPN client installed directly from your computer’s system.
If you have configured your VPN not to use the TAP-Windows Adapter for your own private connections, you can simply remove it safely. However, TAP-Windows Adapter might result in issues like an interruption with your internet connection.
What is a VPN?
VPN stands for Virtual Private Network, a kind of private network that protects your privacy, identity, and security online from cyber attacks, sites that get data, and other intruders. Using VPN, you can enjoy the benefit of accessing blocked websites in your country.
Where to Find TAP-Windows Adapter 9.21.2
You can find TAP-Windows Adapter in your Device Manager and Apps & Features as a driver.

It is installed by default in C:/ Program Files/Tap-Windows folder. Depending on the operating system and VPN provider you’re using, TAP-Windows Adapter may vary its exact version.
So, if you are using the newer Windows product like Windows 7, Windows 8, or Windows 10, your TAP-Windows version should be NDIS 6 driver (TAP-Windows Version 9.21.x). With Windows XP, NDIS 5 driver (TAP-Windows Version 9.9.x) will certainly work for you.
When to Remove or Reinstall TAP-Windows Adapter 9.21.9?
There are many reasons why some VPN users uninstall their VPN. So, whatever reason you might consider why you are uninstalling your VPN, you can remove or reinstall TAP-Windows Adapter from your computer or other devices, as well.
Leaving your TAP-Windows Adapter uninstalled when you have already removed your VPN client will become a useless driver and might interfere with your connection. Some users may think that it will not affect the driver files, but there is a strong possibility that your TAP-Windows Adapter driver might become corrupted in time.
Suppose you wish to uninstall the TAP-Windows Adapter. In that case, it is strongly advised that you need to uninstall your VPN first. It will be useless to remove the TAP-Windows Adapter because it will reappear the next time you reboot your computer if your VPN is still working actively on your device. Because VPN requires TAP-Windows Adapter every time, it will detect that the driver is missing and attempt to install it.
If you wish to remove TAP-Windows Adapter entirely on your computer or other devices, you need to uninstall your VPN applications first.
- Press both Windows key + R on your keyboard to launch the Run utility.
- Key-in appwiz.cpl to open Programs and Features window.

- Then locate the VPN client you are currently using.
- Right-click on the VPN client, then select Uninstall from the dropdown menu.
- Follow the on-screen instructions then you can proceed to uninstall your TAP-Windows Adapter.
Reinstalling TAP Windows Adapter 9.21.9
One of the reasons why there is a need to uninstall and reinstall your TAP-Windows Adapter is to make sure that it is not corrupted. Follow the easy steps below to reinstall the TAP-Windows Adapter safely on your device.
- Close and end your VPN software and VPN connection.
- Press Windows + R to open a Run window.
- Type in “devmgmt.msc”, ignoring the quotation marks, then click the OK button to launch Device Manager in a separate window.
- Scroll down to locate the Network Adapter V9.21.2 driver in the Device Manager, then expand the drop-down menu.
- Locate the TAP-Windows Adapter. You will find that there is an exclamation mark next to the icon of the driver, which requires you to reinstall it.
- Right-click on the driver, then select Uninstall device from the context menu option.
- So, if you have just uninstalled it successfully, open your VPN client again.
- A prompt will require you to install the missing Network Driver (TAP-Windows Adapter) or reinstall it automatically.

- After completing the installation, check if your connection problem has been resolved.
Does this help you?
We hope this article has provided you with the information you need about TAP-Windows Adapter 9.21.2. Should you want to read more about troubleshooting issues and other Microsoft-related issues, please head to our blog page, where you can find helpful information to solve your computer-related queries.
If you have other problems, such as where to buy legit Microsoft products and keys, please don’t hesitate to head to our site where you can find our products at reasonable prices.
Do you want to know how to fix the error? TAP — Windows Adapter V9? The TAP-Windows Adapter V9 is a network controller that VPN required to establish secure connections.
From time to time, the TAP adapter driver may not work as it should. Here we will show you how to fix it in no time.
TAP-Windows Adapter V9 What is it?
The TAP — Windows Adapter V9 is a network driver that is essential for VPN connections. Most of the time, this network driver is automatically installed along with VPN clients. Typically, the default path for the driver is: C:/Program Files/Tap-Windows.
You may also be interested in learning about: No Bootable Device: Error 3f0 (Boot Device Not Found)
However, sometimes you may notice that your Internet connections will not always work as the adapter driver TAP — Windows Adapter V9 is enabled.
What’s even stranger is that even disabling it wouldn’t work, as the TAP network driver would be re-enabled shortly after.
Therefore, you will not be able to establish a connection. If that ever happens to you, we invite you to check out these easy-to-follow tips that might fix your TAP-Windows Adapter V9 error.
How to fix TAP-Windows Adapter v9 error?
Now, let’s look at some feasible solutions that will help you resolve the TAP-Windows Adapter v9 error:
Option 1: Use the Internet Connections Troubleshooter
The easiest solution would be to use the built-in Internet Connections troubleshooter. Windows. This tool can usually fix a number of connectivity issues, so it might be worth using. Here’s what you need to do:
- Step 1:: Press the key
- Step 2:: Writes: solve problems.
- Step 3:: Choose Problem solving recommended available.
- Step 4:: Click on the hyperlink of the troubleshooter available.
- Step 5:: Choose Internet connections and click Run the troubleshooter.
- Step 6:: Choose Troubleshooting my Internet connection.
- Step 7:: Follow the steps in the troubleshooting wizard.
If this option does not help you resolve the TAP-Windows Adapter v9 error issue, try the following solution:
Option 2: Reset the TAP-Windows Adapter v9 connection
Disabling and re-enabling the TAP-Windows Adapter v9 driver will (or better yet should) reset your networking capabilities. Additionally, you can also fix the TAP-Windows Adapter V9 error and it is a really simple task. All you have to do is the following:
- Step 1:: Press the Win key on your keyboard
- Step 2:: Choose Network type
- Step 3:: Select the network status
- Step 4:: Click the button Center network and sharing.
- Step 5:: Select option Change adapter settings.
- Step 6:: Right click on TAP-Windows Adapter V9.
- Step 7:: Choose Deactivate
- Step 8:: Right-click on the TAP-Windows adapter once again.
- Step 9:: Choose Enable
- Step 10:: Restart your PC and check for any improvement.
If this option does not help you resolve the TAP-Windows Adapter v9 error issue, try the following solution:
Option 3: Reinstall the TAP-Windows Adapter v9 and the VPN client
The best solution for the TAP-Windows Adapter V9 error might be to reinstall the driver completely. However, considering that most TAP adapter drivers depend on VPN clients, most VPN providers come with their own version.
Therefore, it would be easier to simply uninstall the TAP driver and the VPN client, and perform a clean install of both services once you’re done.
Here is how you should reinstall your TAP driver and VPN client:
- Step 1:: Right click on the Home button.
- Step 2:: Choose Device administrator.
- Step 3: Expand the category network adapters.
- Step 4: Right click on TAP-Windows Adapter V9.
- Step 5: Click on Uninstall device.
- Step 6: Choose uninstall to confirm.
- Step 7: Press the key combination Windows + R.
- Step 8: Write the following: Cpl and press Get in.
- Step 8: Select your VPN software in the window.
- Step 10: Press the button uninstall to remove it.
- Step 11: Continue with the uninstallation.
- Step 12: Restart your PC shortly after uninstalling both services.
- Step 13: Reinstall VPN software + TAP adapter driver
NOTE: : If you find that reinstalling your VPN client and TAP adapter driver doesn’t work, you may want to consider switching to a better alternative. Private Internet Access, for example, is an excellent VPN service that comes with its own TAP driver. Plus, even if it stops working at some point, you can easily reinstall it right from the VPN client’s configuration screen.
If this option does not help you resolve the TAP-Windows Adapter v9 error issue, try the following solution:
Option 4: Reset Windows 10
Apparently, resetting Windows 10 fixes the TAP-Windows Adapter V9 error in most cases. You can reset Windows 10 and keep your files as well. However, you will need to reinstall all apps and drivers as they will be erased from your PC.
Also, you will lose any settings you made before resetting your PC. Of course, this method is one of the most drastic, but it also gets the job done most of the time. Follow these steps to reset your Windows 10 PC:
- Step 1:: Press the Win key on your keyboard.
- Step 2:: type the action command Reset PC.
- Step 3: Click on the option Reset this PC.
- Step 4: Select option
- Step 5: Press the button Conserve my files
- Step 7: Click on the Next.
- Step 8: Select option Resetting to continue.
- Step 9: Wait for the process to complete.
Here you can read about: Net::err_cert_authority_invalid: Error in Google Chrome. 9 Solutions
Conclusion
Finally, if you notice that your TAP-Windows Adapter V9 triggers several connectivity errors, there are a few things you can try. Most of the time, reinstall TAP driver and VPN client will fix the problem.
However, you may need to go as far as resetting your PC completely. We advise you to follow the instructions to the letter or go to a professional technician to resolve this error. We hope we have helped you.
My name is Javier Chirinos and I am passionate about technology. Ever since I can remember, I have been interested in computers and video games, and that passion has turned into a job.
I have been publishing about technology and gadgets on the Internet for over 15 years, especially in mundobytes.com
I am also an expert in online marketing and communication and have knowledge in WordPress development.
Ошибка Ошибка «Нет доступного адаптера TAP» Вкл. OpenVPN or Все TAP-Windows адаптеры в этой системе в настоящее время используются обычно бывает, когда OpenVPN TAP (сетевой адаптер) был отключен вами (по ошибке) или вашей системой.
Чтобы решить эту проблему, выполните следующие действия, попробуйте обходное решение, указанное ниже.

Прежде всего, нажмите на OK кнопку, когда вы видите Подключение к (Ваш VPN) не удалось ошибка.

В поле поиска слева внизу введите Панель управления и откройте его.

В меню панели управления нажмите на Сеть и Интернет.

Теперь нажмите Центр управления сетями и общим доступом

Затем нажмите Изменение параметров адаптера в левой части экрана.

Найдите тот, который называется ‘Подключение по локальной сети XX или Ethernet XX (XX обозначает число) и в котором есть описание НАЖМИТЕ-Windows Адаптер V9.
Если он отключен, щелкните его правой кнопкой мыши и выберите Включите и теперь вы можете использовать OpenVPN снова.

Добавление OpenVPN Адаптер TAP вручную
Если вы не видите НАЖМИТЕ-Windows Адаптер V9, он мог быть удален, и вам нужно будет снова добавить его вручную.
Для этого выполните следующие действия:
Windows XP, Vista и 7: Идти к Пуск — Все программы — Тап-Windows
Windows 8, 8.1 и 10: Windows + Qи ищите Добавить новый кран
Щелкните правой кнопкой мыши по Добавление нового адаптера Tap Virtual Ethernet и Запуск от имени администратора.
Если у вас нет параметра Запуск от имени администратора (Windows 8, 8.1 и 10), выберите Открыть расположение файла, щелкните правой кнопкой мыши Добавление нового адаптера Tap Virtual Ethernet и Запуск от имени администратора.
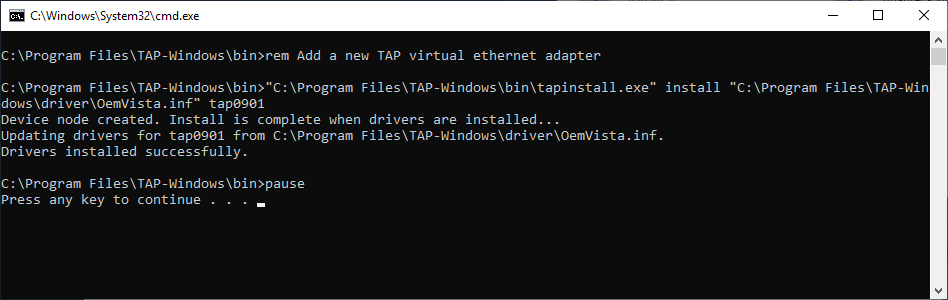
Следуйте инструкциям, и вы получите следующий экран:

Теперь нажмите любую клавишу на клавиатуре, чтобы продолжить, и дайте VPN еще одна попытка.
Внимание: Если вы все еще используете более старую версию OpenVPN приложение, вы можете найти инструмент в расположении ниже:
Пуск — Все программы — OpenVPN — Утилиты
Не удается настроить сетевой адаптер TAP?
Если вы не можете найти возможность добавить OpenVPN Адаптер TAP или установка не удалась из-за ошибки ниже, пожалуйста, переустановите OpenVPN до последней версии.

Повторная установка OpenVPN
Мы предлагаем вам скачать бесплатный инструмент для удаления приложений под названием Revo Uninstaller. Это отличный инструмент для удаления приложений, оставшихся файлов и сломанных ключей реестра.
Как только OpenVPN был удален, проверьте наличие оставшихся файлов и ключей реестра. Удалите их и перезагрузите компьютер.
Наконец, загрузите последнюю версию OpenVPN из Официальном сайте и установить его на своем компьютере.
Лучшие бесплатные VPN Поставщик
Если вы ищете надежный и надежный VPN провайдер, мы рекомендуем вам попробовать бесплатно hide.me VPN
hide.me VPN клиентское приложение поддерживает OpenVPN в их приложении, поэтому вам не нужно настраивать VPN подключение вручную, и их приложение настолько простое в использовании.
Бесплатный сервис обеспечивает тот же уровень защиты, что и платный. Они не ведут журналы своих пользовательских действий, и нет рекламы!
Заключение
Добавление/повторное включение OpenVPN Адаптер TAP должен быть довольно простым, но часто VPN провайдеры не обновляют OpenVPN client на своем сайте, что может привести к таким проблемам.
В этом посте рассказывается о адаптерах TAP-Windows , о том, что они собой представляют, зачем они нужны для VPN и где можно скачать драйверы TAP. Мы также покажем вам, как установить, обновить или удалить драйвер TAP.
Если вы откроете Настройки в Windows 10, вы увидите программу под названием TAP-Windows.

Пользователи Windows 10/8/7/Vista увидят его на панели управления .

Если вы откроете Диспетчер устройств и развернете Адаптеры, вы также увидите его там.
Читать . Где скачать драйверы для Windows 10.
Содержание
- Что такое адаптеры TAP-Windows
- Адаптеры TAP-Windows в этой системе в настоящее время используются
- В этой системе нет адаптеров TAP-Windows
- Скачать драйвер адаптера TAP-Windows
Что такое адаптеры TAP-Windows
TAP-Windows обеспечивает функциональность виртуального устройства TAP в ОС Windows. Он устанавливается в папку C: Program Files TAP-Windows и требуется для работы программного обеспечения VPN.
Устройства TAP – это устройства ядра виртуальной сети, полностью поддерживаемые программным обеспечением и не поддерживаемые аппаратными сетевыми адаптерами. Драйверы TAP используются для работы устройств TAP и имеют низкоуровневую поддержку ядра для туннелирования Ethernet.
Вам не нужно устанавливать TAP-окна отдельно, так как ваши установщики VPN включают их и устанавливают автоматически вместе с программным обеспечением VPN.
Драйвер TAP-Windows бывает двух типов:
- NDIS 6 (TAP-windows6, версия 9.21.x) для Windows 10/8/7/Vista.
- Драйвер NDIS 5 (TAP-windows, версия 9.9.x) для Windows XP.
Иногда вы можете столкнуться с проблемами , вызванными этим драйвером. Давайте посмотрим на некоторые из них.
Адаптеры TAP-Windows в этой системе в настоящее время используются
Если вы видите это сообщение или у вашего программного обеспечения VPN возникают проблемы с запуском, вы можете перезапустить адаптер TAP и посмотреть, поможет ли это. Для этого откройте Панель управления> Центр управления сетями и общим доступом> Нажмите «Изменить параметры адаптера», чтобы открыть «Сетевые подключения».

Вы увидите, что одно из локальных подключений будет иметь имя TAP-Windows Adapter . Щелкните правой кнопкой мыши по нему и выберите Отключить . Через несколько секунд снова щелкните его правой кнопкой мыши и выберите Включить . Теперь попробуйте подключиться снова и посмотреть, работает ли он.
Если у вас возникают другие проблемы с запуском вашего программного обеспечения VPN, я предлагаю вам открыть панель управления и оттуда либо восстановить , либо удалить и переустановить программное обеспечение VPN и посмотреть. Во время ремонта/установки будут установлены драйверы TAP.
Если вы хотите удалить, отключить или обновить TAP-Windows, из меню WinX Windows 10, откройте Диспетчер устройств и разверните Адаптеры, вы увидите Адаптер TAP-Windows v9.

Щелкните правой кнопкой мыши на нем, и вам предложат варианты обновить, отключить или удалить драйвер.
В этой системе нет адаптеров TAP-Windows
Если ваше программное обеспечение VPN не находит этот драйвер установленным на вашем компьютере, вы можете получить сообщение «В этом системном сообщении об ошибке отсутствуют адаптеры TAP-Windows». Затем вам нужно будет загрузить его настройки и установить драйвер.
Скачать драйвер адаптера TAP-Windows
Чтобы загрузить файл драйвера TAP-Windows, посетите openvpn.net. Прокрутите вниз, и вы увидите их ссылки для скачивания.

Запустите его установщик. После завершения установки драйвера перезагрузите компьютер и проверьте.
Если ваше Интернет-соединение перестает работать, вы можете удалить этот адаптер и посмотреть, поможет ли это вам. Если это не так, возможно, вам нужно удалить и переустановить последнюю версию этого драйвера заново .
Читать дальше : VPN не работает в Windows 10.
Главная » ИТ » Tap Windows Adapter V9: что это такое, как подключить сетевой кабель и проверить цифровую подпись драйверов
19.04.2020
1,642 Просмотры
Пользователи устройств, функционирующих на базе платформы Windows, которым приходилось заходить в Диспетчер устройств, могут заметить целый список сетевых адаптеров. Большинство из них относятся к физическим компонентам ОС. В числе общеизвестных – сетевая карта, или модуль Wi-fi.
О виртуальных большинство знает мало, и потому пользователи не могут ответить на вопросы об их функциях и задачах. Есть владельцы, которые сомневаются в необходимости присутствия компонента Tap Windows Adapter V9, и они утверждают, что никогда его не устанавливали.

Что это?
Tap Windows Adapter V9 (TAP-WIN32 Adapter V9) – виртуальный сетевой адаптер. Работает совместно с системой Windows. Объект применяется в решении различных задач с учетом особенностей программного обеспечения. Установка объекта сопряжена с настройками VPN, а также установкой продуктов для корректировки сетевых настроек.
Как подключить и проверить цифровую подпись
Ряд пользователей, которые под Windows задействуют openvpn, сталкиваются с ограничением, когда возможен доступ исключительно к одному серверу. Такой принцип связан с «лимитом» 1 openvpn = 1 tap адаптер = 1 vpn соединение.

Попытка установки соединения по новому серверу выдает стандартную ошибку (WSAEADDRINUSE). Причина возникшей проблемы – сетевой интерфейс уже занят. Единственный доступный выход – разорвать настоящее подключение и повторить процесс установки нового.
Механизм, позволяющий обойти существующее ограничение, уже отработан. Завершив установку клиентского openvpn на ОС Windows, владелец устройства создает папку на главном диске, где уже есть addtap.bat:C:Program FilesTAP-Windowsbin.
Единственное условие: для реализации данного скрипта потребуются права администратора + задача включить новый TAP адаптер в систему. Один клик – и в сетевых подключениях отображается TAP-Windows Adapter V9 #2.

Отдельная папка с сертификатами снимает все лимиты, поэтому при необходимости множества подключений автоматически требует добавить в список соответствующее количество сетевых адаптеров openvpn.
Не имея должного представления о функциях и задачах виртуального устройства адаптера, обеспечивающего подключение VPN, не стоит пренебрежительно относиться к TAP-Windows Adapter V9.
Решение о целесообразности присутствия этого объекта в арсенале установленного ПО на базе ОС, необходимости изменения настроек, установке/удалении этого элемента принимают с учетом всех нюансов, поскольку адаптер может участвовать в подключении интернета.
Загрузка…
TAP-Windows Adapter V9 — это сетевой драйвер, необходимый для VPN-подключений. Таким образом, этот сетевой драйвер автоматически устанавливается вместе с программным обеспечением VPN. Путь к папке по умолчанию для драйвера TAP-Windows Adapter V9: C: / Program Files / Tap-Windows.
Однако некоторые пользователи заявляют на форумах, что их интернет-соединения не работают с включенным адаптером TAP-Windows. Даже если они отключают сетевой драйвер TAP, он автоматически включается сам. Таким образом, пользователи по-прежнему не могут подключиться. Вот некоторые решения для этой ошибки адаптера TAP-Windows V9.
Как исправить ошибку отключения сетевого кабеля TAP-Windows Adapter v9?
- Откройте средство устранения неполадок с подключением к Интернету
- Сброс подключения адаптера TAP-Windows
- Удалите адаптер TAP-Windows и программное обеспечение VPN
- Сбросить Windows 10
1. Откройте средство устранения неполадок с подключением к Интернету.
Во-первых, пользователи могут проверить средства устранения неполадок подключений к Интернету в Windows. Это средство устранения неполадок, которое может исправить все виды проблем с подключением. Таким образом, возможно, стоит проверить, может ли средство устранения неполадок предоставить какие-либо разрешения для ошибки подключения адаптера TAP-Windows V9.
Следуйте приведенным ниже инструкциям, чтобы открыть средство устранения неполадок подключений к Интернету в Windows 10.
- Нажмите клавишу Windows + горячую клавишу Q , которая открывает Cortana .
- Введите ключевое слово для устранения неполадок в Cortana и откройте « Устранение неполадок» .

- Выберите «Подключения к Интернету» и нажмите « Запустить средство устранения неполадок», чтобы открыть окно, расположенное ниже.

- Выберите вариант Устранить неполадки моего подключения к Интернету .
- Затем просмотрите разрешения, которые предоставляет средство устранения неполадок.


2. Сброс подключения адаптера TAP-Windows
Сброс адаптера TAP путем его отключения и повторного включения приведет к сбросу его сетевых функций. Таким образом, это также может исправить ошибку TAP-Windows Adapter V9.
Пользователи могут сбросить адаптер TAP следующим образом.
- Откройте окно поиска Кортаны.
- Введите сеть в текстовом поле Cortana и выберите « Состояние сети», чтобы открыть окно, показанное ниже.
- Нажмите Центр управления сетями и общим доступом, чтобы открыть окно на снимке экрана ниже.

- Затем нажмите « Изменить настройки адаптера», чтобы открыть аплет панели управления, показанный ниже.
- Щелкните правой кнопкой мыши адаптер TAP-Windows и выберите « Отключить» .
- Подождите минуту, а затем щелкните правой кнопкой мыши Адаптер TAP-Windows и выберите Включить .


3. Удалите адаптер TAP-Windows и программное обеспечение VPN.
Наилучшим решением для ошибки TAP-Windows Adapter V9 может быть удаление адаптера TAP, который в конечном итоге является источником проблемы с подключением. Однако не всегда достаточно просто удалить этот адаптер, поскольку установленное программное обеспечение VPN может переустановить отсутствующий сетевой драйвер, в котором он нуждается.
Таким образом, пользователям также необходимо удалить программное обеспечение VPN. Таким образом пользователи могут удалить адаптер TAP и программное обеспечение VPN.
- Щелкните правой кнопкой мыши кнопку «Пуск» и выберите « Диспетчер устройств» .

- Дважды щелкните Сетевые адаптеры, чтобы развернуть эту категорию.
- Щелкните правой кнопкой мыши TAP-Windows Adapter V9 и выберите «Удалить устройство».
- Затем нажмите кнопку Удалить , чтобы удалить устройство.
- Чтобы удалить программное обеспечение VPN, нажмите горячую клавишу Windows + R.
- Введите appwiz.cpl в Run и нажмите клавишу Return .

- Затем выберите программное обеспечение VPN, указанное в апплете «Панель управления программами и функциями» .
- Нажмите кнопку Удалить , чтобы удалить выбранное программное обеспечение VPN.
- Нажмите Да для дальнейшего подтверждения.
- Затем перезапустите Windows после удаления адаптера TAP и программного обеспечения VPN.


Пользователи, которые предпочли бы сохранить программное обеспечение VPN, могут попробовать переустановить его. Переустановка программного обеспечения также может устранить ошибку подключения. Для этого загрузите самую последнюю версию программного обеспечения VPN-клиента и установите его. Это также переустановит адаптер TAP.
Если ваш VPN-клиент доставляет вам неприятности, возможно, вам следует удалить его и переключиться на другой. CyberGhost VPN — это быстрый и надежный VPN-клиент, поэтому, если вам нужен новый VPN-клиент, обязательно попробуйте его.
Почему стоит выбрать CyberGhost?
- 256-битное шифрование AES
- Более 5600 серверов по всему миру
- Отличные ценовые планы
- Отличная поддержка
4. Сбросить Windows 10
Некоторые пользователи также подтвердили, что сброс Windows 10 исправляет ошибку адаптера TAP-Windows V9. Пользователи могут сбросить Windows 10 и сохранить свои файлы. Тем не менее, они должны будут переустановить приложения и программное обеспечение, которые не были предварительно установлены.
Кроме того, вам может понадобиться снова установить подключение к Интернету по умолчанию. Пользователи могут сбросить Windows 10 следующим образом.
- Откройте приложение Cortana и введите сброс в качестве ключевого слова для поиска.
- Нажмите Reset this PC, чтобы открыть окно, показанное ниже.
- Нажмите « Начать», чтобы открыть окно «Сбросить этот компьютер».

- Нажмите кнопку Сохранить мои файлы .
- Нажмите кнопку « Далее» и выберите пункт « Сброс» .


Таким образом, пользователи могут исправить ошибку TAP-Windows Adapter V9 для восстановления своих соединений. Удаление адаптера TAP и программного обеспечения VPN обычно решает проблему. Затем пользователи могут попытаться переустановить либо оригинальный пакет VPN, либо альтернативный клиент VPN .
СВЯЗАННЫЕ СТАТЬИ, ЧТОБЫ ПРОВЕРИТЬ:
- Исправлено: ошибка VPN в Windows 10
- Исправлено: проблемы с VPN
Установим и настроим OpenVPN сервер. На сервере используется операционная система Windows Server 2019.
OpenVPN — бесплатная реализация технологии виртуальной частной сети (VPN) для создания зашифрованных каналов связи между компьютерами типа точка-точка или сервер-клиенты за NAT и Firewall.
Установка OpenVPN Server
Скачиваем дистрибутив для установки OpenVPN:
Community Downloads
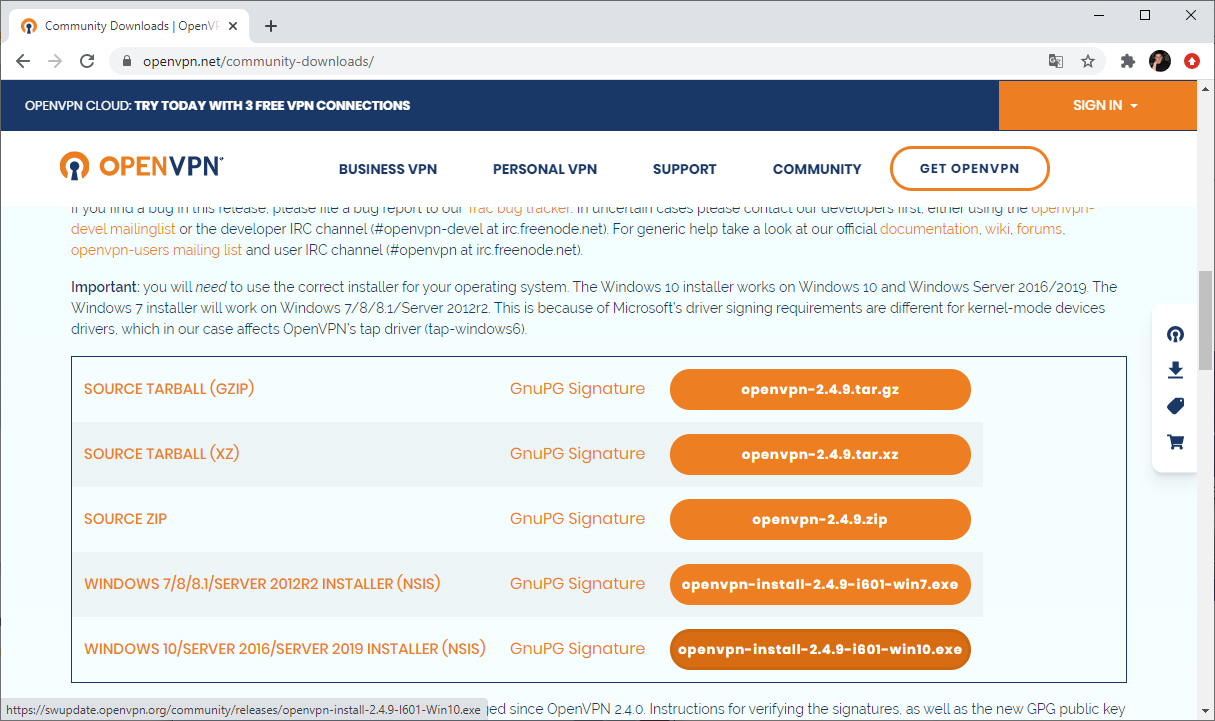
Прокручиваем вниз, выбираем стабильную версию. Я буду использовать версию 2.4.9.
Для операционной системы Windows доступны два пакета:
- WINDOWS 7/8/8.1/SERVER 2012R2 INSTALLER (NSIS)
- WINDOWS 10/SERVER 2016/SERVER 2019 INSTALLER (NSIS)
Для Windows Server 2019 подходит второй вариант, скачиваю.
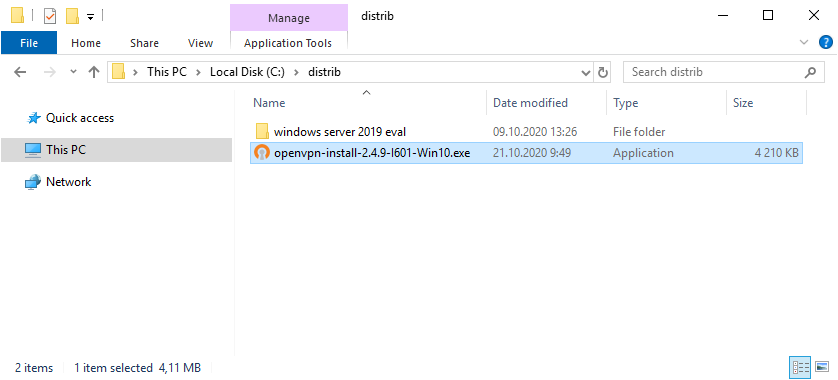
Запускаем инсталлятор OpenVPN.
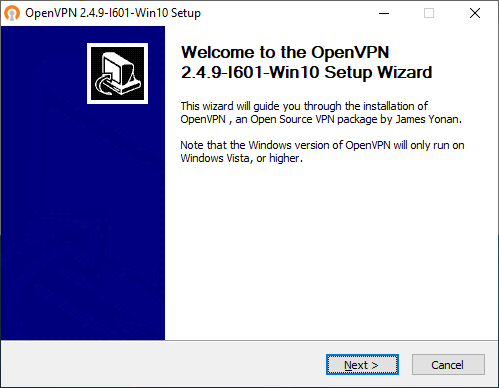
Открывается мастер установки. Next.
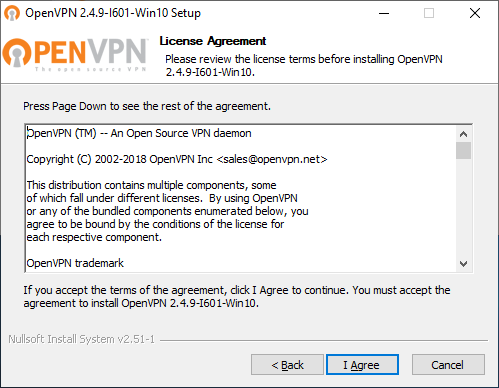
Принимаем лицензионное соглашение. I Agree.
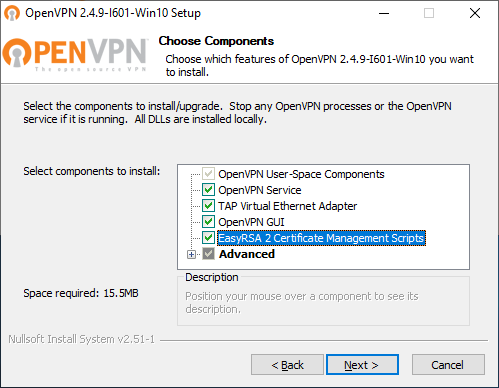
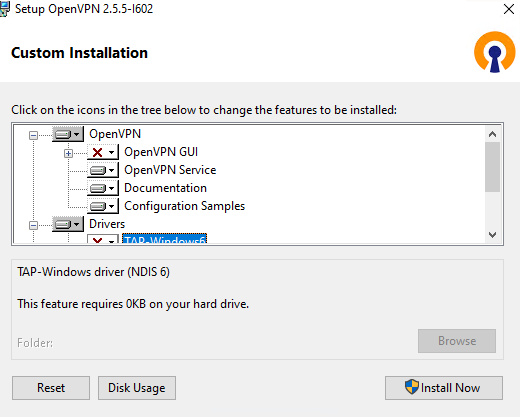
Выбираем компоненты. Выделите EasyRSA 2 Certificate Management Scripts. Для сервера OpenVPN GUI можно не устанавливать, если вы планируете запускать OpenVPN в качестве службы. Next.
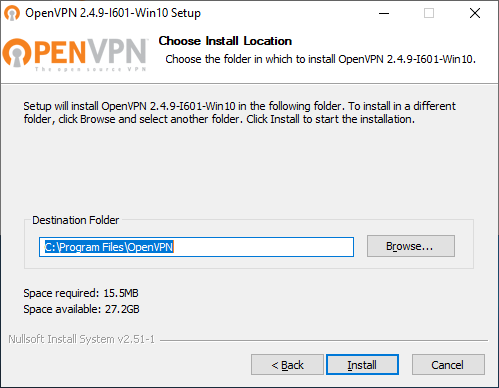
Выбираем путь установки, я оставляю по умолчанию C:Program FilesOpenVPN. Install.
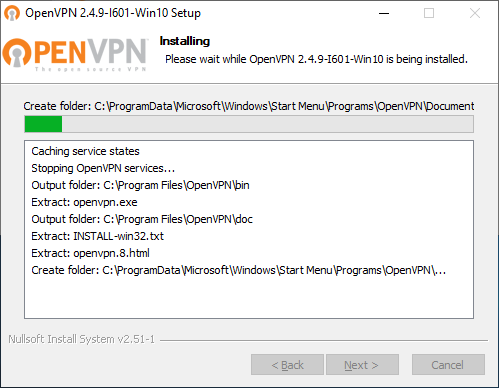
Начинается процесс установки OpenVPN.
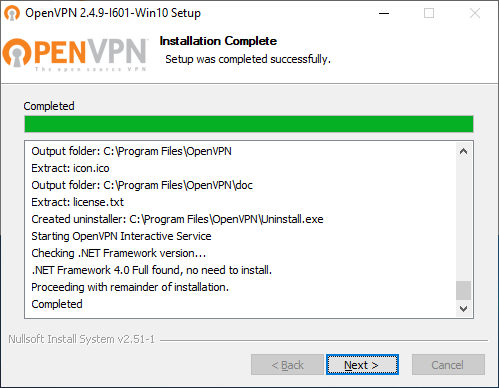
Установка успешно завершена. Next.
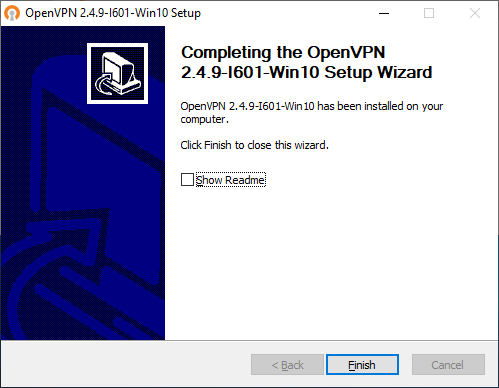
Finish.
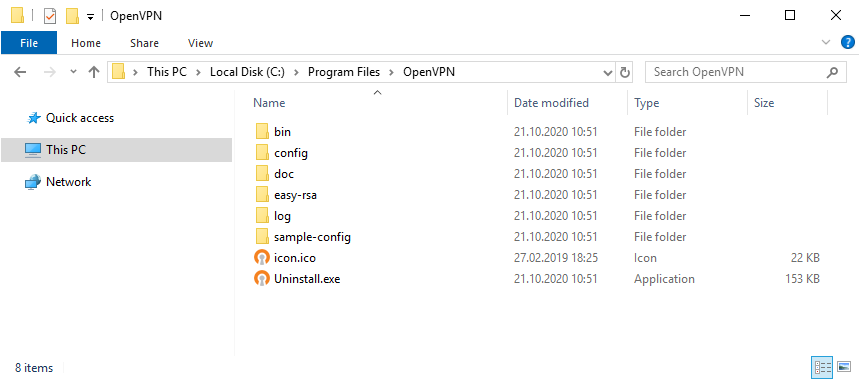
Установка выполнена в директорию C:Program FilesOpenVPN.

После установки у нас появляется новый сетевой адаптер TAP-Windows Adapter V9.
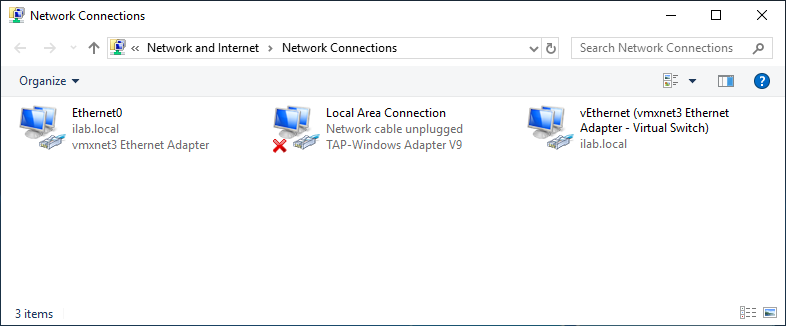
Адаптер отключён. Если по каким-то причинам нужно добавить несколько таких адаптеров, то загляните в папку C:Program FilesTAP-Windowsbin.
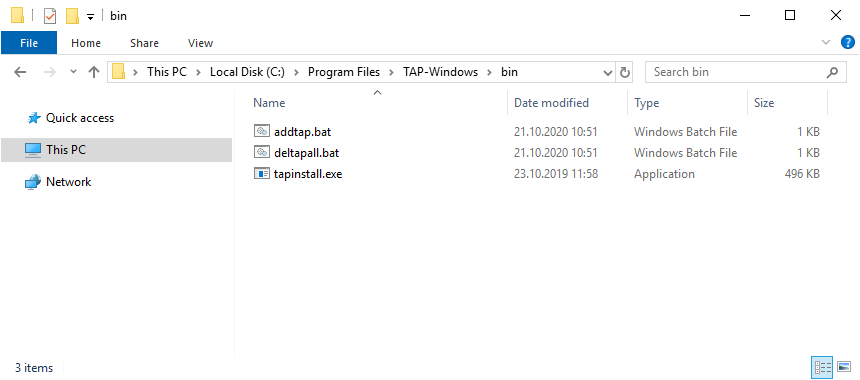
Здесь есть скрипты для установки адаптера, добавления адаптера и удаления всех адаптеров.
Пример установки адаптера. В командной строке под администратором:
cd "C:Program FilesTAP-Windowsbin"
"C:Program FilesTAP-Windowsbintapinstall.exe" install "C:Program FilesTAP-WindowsdriverOemVista.inf" tap0901
В большинстве случаев дополнительно настраивать сетевой адаптер не требуется.
Создание ключей и сертификатов
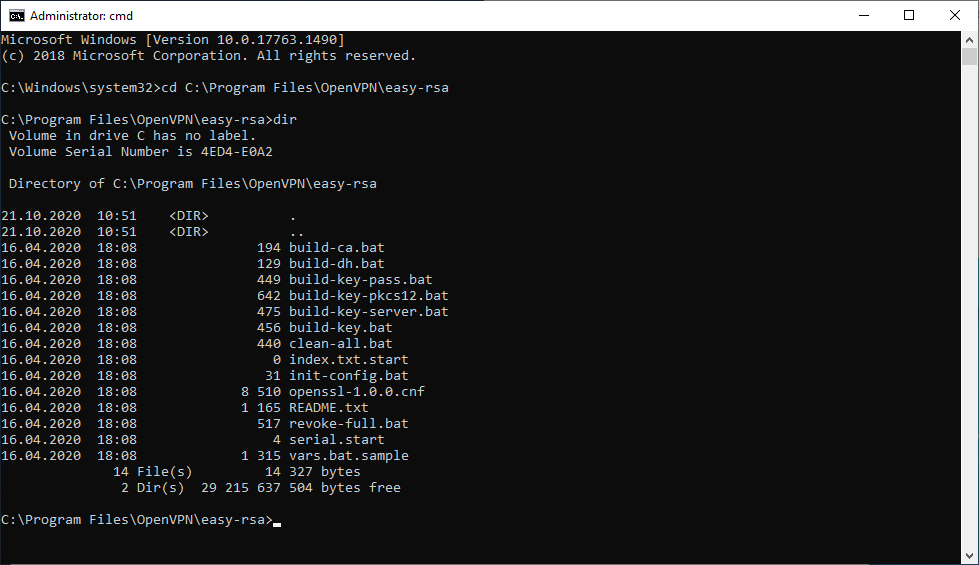
Запускаем командную строку под администратором и переходим в рабочую директорию C:Program FilesOpenVPNeasy-rsa.
cd C:Program FilesOpenVPNeasy-rsaВ этой папке есть всё необходимое для генерации сертификатов.
Выполняем:
init-config.bat
copy vars.bat.sample vars.bat
Создаётся файл vars.bat с настройками и примером готовых параметров для создания CSR запроса сертификатов. Заполним его. Открываем vars.bat блокнотом.
notepad vars.bat
Открывается vars.bat.
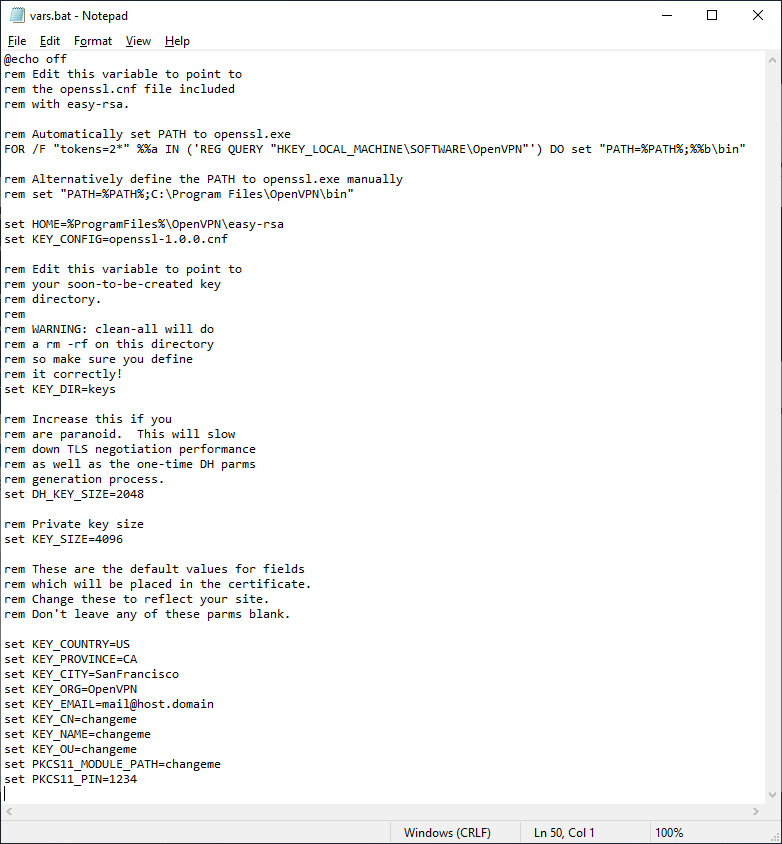
Здесь стоит обратить внимание на пути к рабочим директориям. Например, вы можете указать свой путь к openssl.exe, если установили OpenVPN в другую директорию. Здесь же можно изменить длину ключей шифрования.
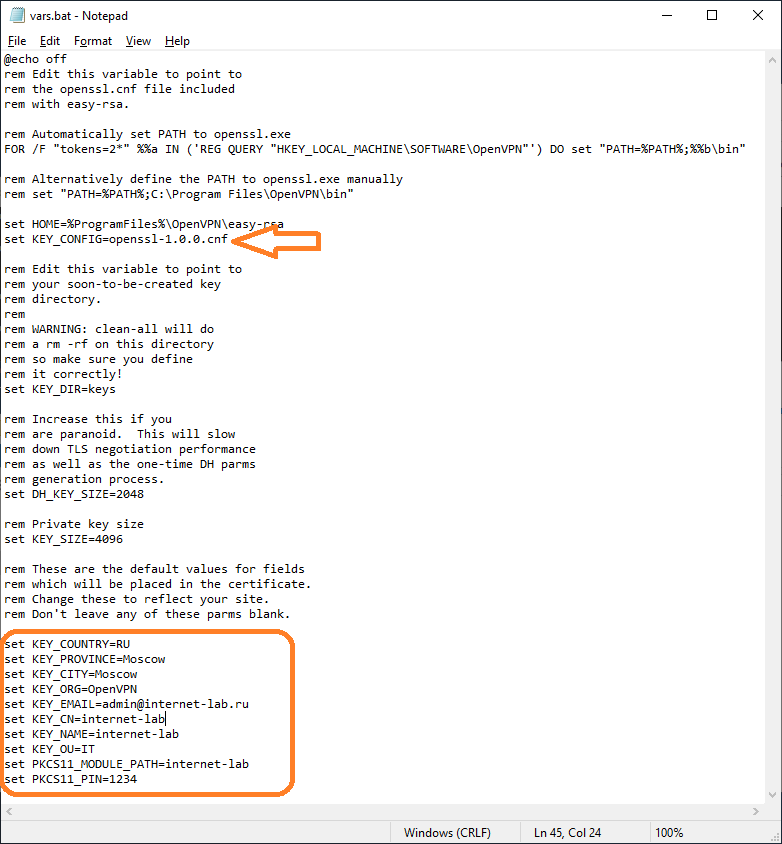
Заполняем переменные в нижней части файла, указываем:
- KEY_COUNTRY — страна
- KEY_PROVINCE — область
- KEY_CITY — город
- KEY_ORG — организация
- KEY_EMAIL — e-mail
- KEY_CN — (Common Name) имя сервера
- KEY_NAME — (Name) имя сервера
- KEY_OU — (Organization Unit) отдел
- PKCS11_MODULE_PATH — для токенов двухфакторной аутентификации, нам не требуется, укажу имя сервера
- PKC11_PIN — ПИН для токенов двухфакторной аутентификации, нам не требуется, укажу 1234
Для каждого сертификата нужно будет указывать свои NAME и COMMON NAME, можно их не указывать в vars.bat, потому как при генерации все параметры будут запрашивать.
Обращаем внимание на строку:
set KEY_KONFIG=openssl-1.0.0.cnf
Это имя конфигурационного файла. Находим его в рабочей директории.
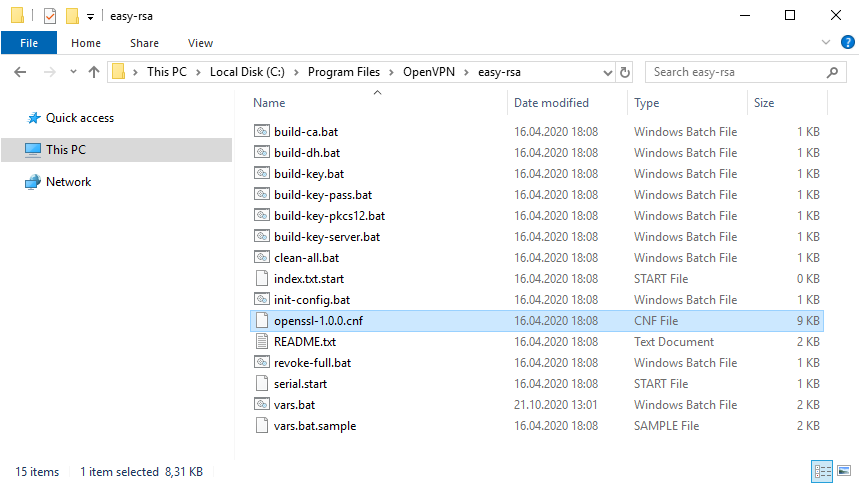
Откроем блокнотом.

Внутри есть параметр default_days, в котором можно указать срок действия будущих сертификатов. По умолчанию у меня стоит 3650 дней, это 10 лет. Меня устраивает. Вероятно, кому-то при генерации клиентских сертификатов может понадобиться уменьшить этот срок.
Сохраняем все изменения и возвращаемся к командной строке. Подгружаем утверждённые нами переменные:
vars.bat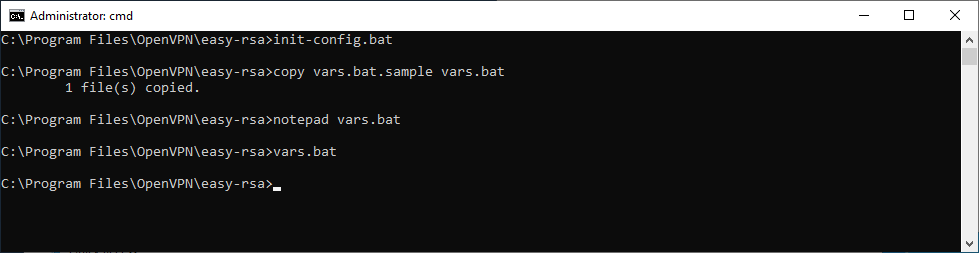
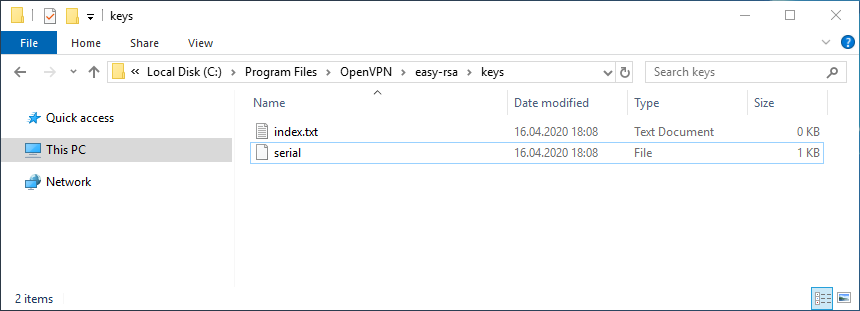
Очищаем директорию с ключами:
clean-all.bat
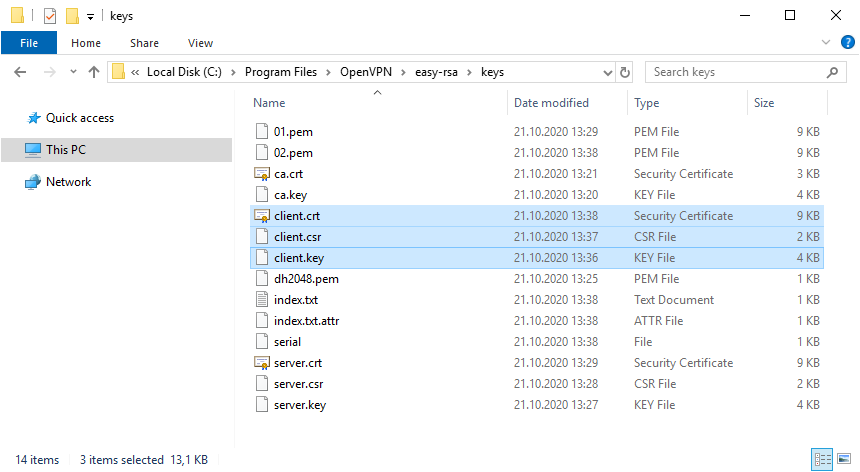
Сертификаты, которые мы будем создавать, появятся в папке C:Program FilesOpenVPNeasy-rsakeys. Сейчас эта папка очистилась, в ней два файла: index.txt и serial.
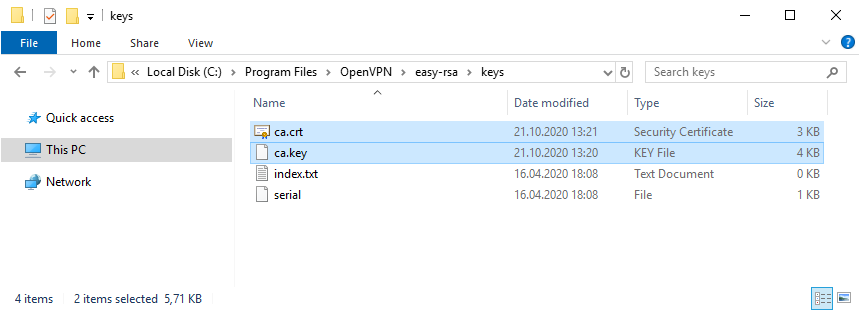
Генерируем ключ и сертификат центра сертификации:
build-ca.bat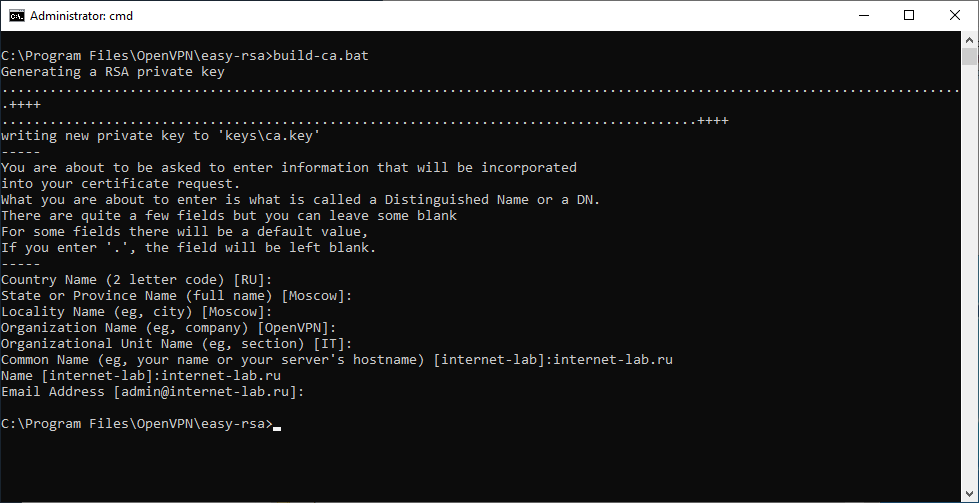
В процессе генерации сертификата нас будут спрашивать все те же параметры, которые мы указали в vars.bat. Если параметр нас устраивает (а он нас устраивает), просто нажимаем ввод и переходим к следующему вопросу. После завершения работы скрипта в папке C:Program FilesOpenVPNeasy-rsakeys появляется два файла:
- ca.crt — сертификат центра сертификации
- ca.key — ключ центра сертификации
Ключ секретный, никому не передавайте, он будет храниться на сервере.
Генерируем ключ Диффи-Хеллмана:
build-dh.bat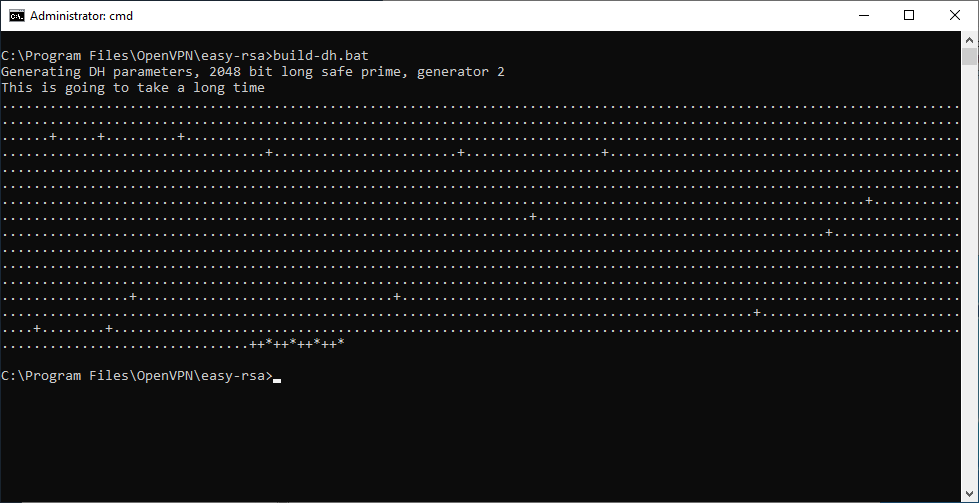
В папке C:Program FilesOpenVPNeasy-rsakeys появляется файл:
- dh2048.pem

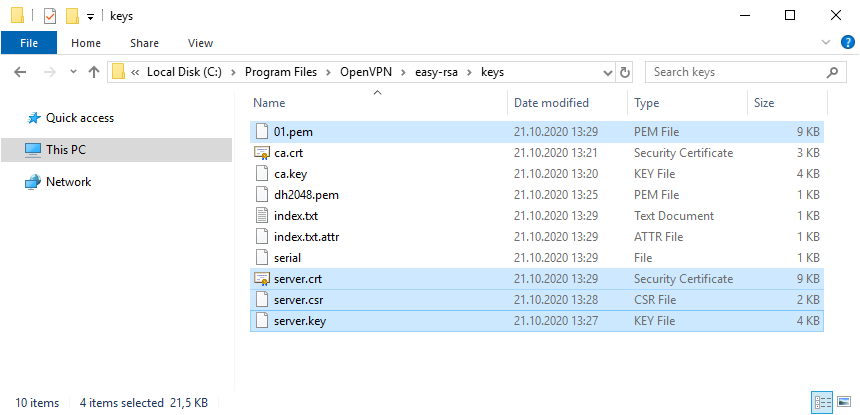
Генерируем ключ и сертификат сервера, назовём сервер именем «server«:
build-key-server.bat server
В процессе генерации серверного сертификата нас будут спрашивать те же параметры, которые мы указали в vars.bat. Если параметр нас устраивает (а он нас снова устраивает), просто нажимаем ввод и переходим к следующему вопросу. На вопрос Sign the certificate отвечаем y. На вопрос 1 out of 1 certificate requests certified, commit отвечаем y.
После завершения работы скрипта в папке C:Program FilesOpenVPNeasy-rsakeys появляется четыре файла:
- 01.pem — не понадобится
- server.crt — сертификат сервера
- server.csr — запрос сертификата сервера, не понадобится
- server.key — ключ сервера
Ключ секретный, никому не передавайте, он будет храниться на сервере.
Генерируем ключ и сертификат первого клиента. Для каждого клиента нужно указывать своё имя файла, Name и Common Name. Назовём первого клиента именем «client«:
build-key.bat client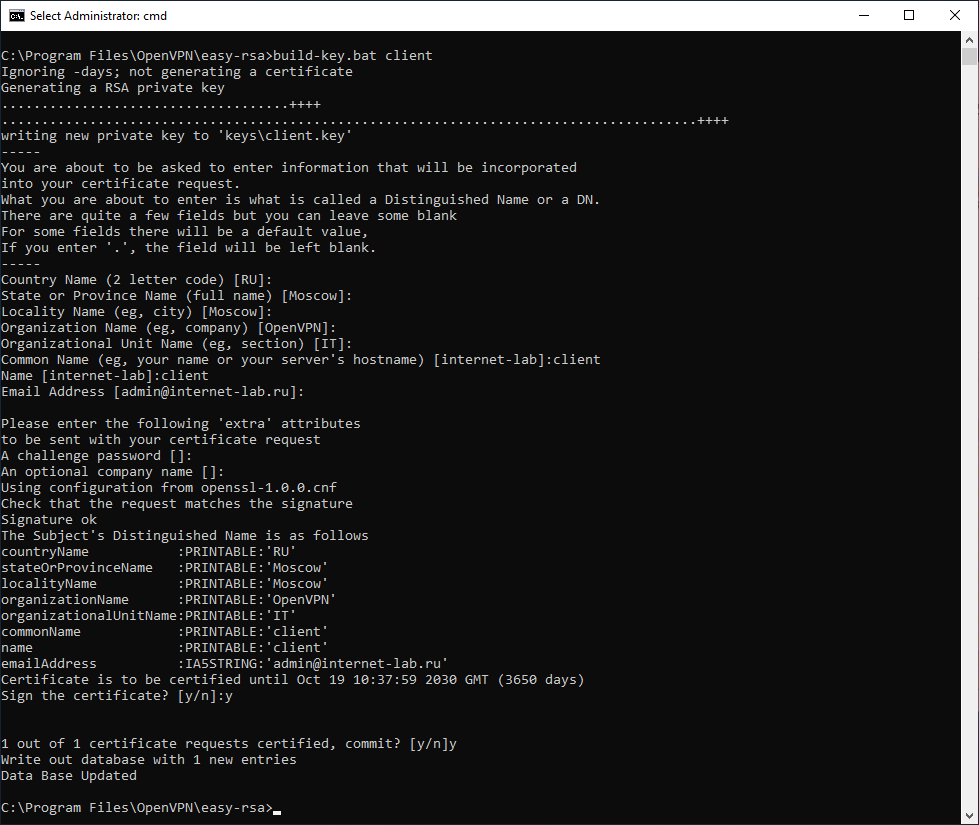
В процессе генерации клиентского сертификата нас будут спрашивать те же параметры, которые мы указали в vars.bat. Нас устраивают все параметры кроме NAME и COMMON NAME, на них отвечаем client. Помним, что для другого клиента имя должно быть другим. На вопрос Sign the certificate отвечаем y. На вопрос 1 out of 1 certificate requests certified, commit отвечаем y.
После завершения работы скрипта в папке C:Program FilesOpenVPNeasy-rsakeys появляется четыре файла:
- 02.pem — не понадобится
- client.crt — сертификат первого клиента
- client.csr — запрос сертификата первого клиента, не понадобится
- client.key — ключ первого клиента
Для каждого нового клиента, который будет подключаться к серверу OpenVPN необходимо сгенерировать свой клиентский сертификат. Но это можно сделать позже, пока добьёмся подключения хотя бы одного клиента.
В настройках сервера можно потом включить настройку duplicate-cn, которая позволяет подключаться всем клиентам по одному общему сертификату, но это небезопасно и не рекомендуется. Используйте только в тестовых целях.
# Uncomment this directive if multiple clients
# might connect with the same certificate/key
# files or common names. This is recommended
# only for testing purposes. For production use,
# each client should have its own certificate/key
# pair.
#
# IF YOU HAVE NOT GENERATED INDIVIDUAL
# CERTIFICATE/KEY PAIRS FOR EACH CLIENT,
# EACH HAVING ITS OWN UNIQUE «COMMON NAME»,
# UNCOMMENT THIS LINE OUT.
;duplicate-cn
Я на сервере собираюсь использовать tls-auth для дополнительной проверки целостности, это обеспечит дополнительный уровень безопасности протокола SSL/TLS при создании соединения:
- Сканирование прослушиваемых VPN-сервером портов
- Инициация SSL/TLS-соединения несанкционированной машиной на раннем этапе
- DoS-атаки и флуд на порты OpenVPN
- Переполнение буфера SSL/TLS
При использовании tls-auth на клиенте не понадобится ключ Диффи-Хеллмана, но пусть будет. Генерируем ключ tls-auth:
openvpn --genkey --secret keys/ta.key
В папке C:Program FilesOpenVPNeasy-rsakeys появляется файл:
- ta.key
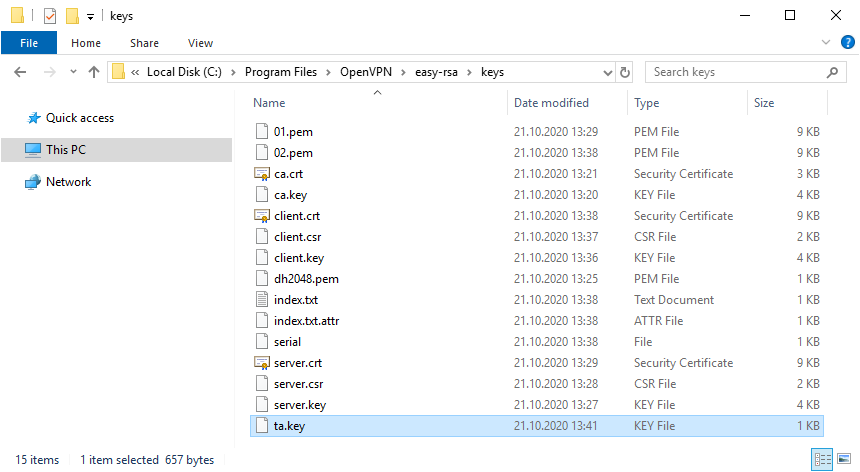
Минимальный набор сертификатов сгенерирован.
Настройка OpenVPN сервера
Чтобы случайно всё не удалить, создадим папку C:Program FilesOpenVPNssl и скопируем в неё сертификаты. Это будет рабочая папка сервера.
mkdir "C:Program FilesOpenVPNssl"
copy "C:Program FilesOpenVPNeasy-rsakeys" "C:Program FilesOpenVPNssl"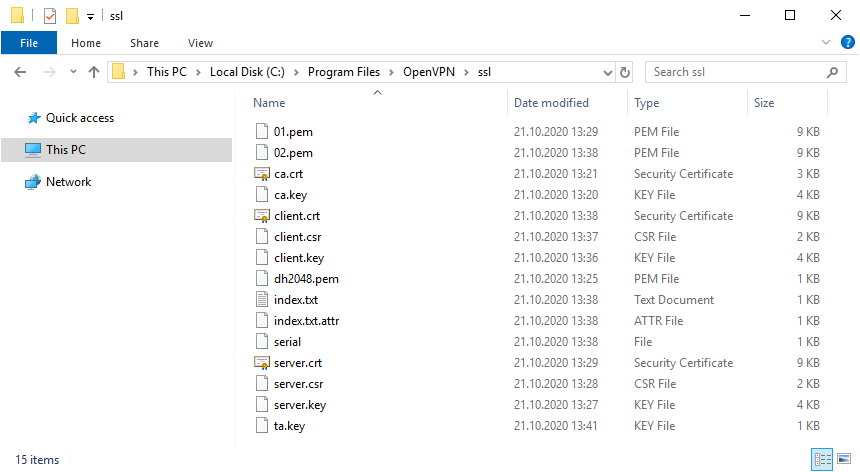
Создадим конфигурационный файл сервера C:Program FilesOpenVPNconfigserver.ovpn:
copy "C:Program FilesOpenVPNsample-configserver.ovpn" "C:Program FilesOpenVPNconfigserver.ovpn"Открываем блокнотом и редактируем:
notepad "C:Program FilesOpenVPNconfigserver.ovpn"Лучше изучить конфигурационный файл, я предлагаю свой вариант конфига:
port 1194
proto udp
dev tun
ca "C:\Program Files\OpenVPN\ssl\ca.crt"
cert "C:\Program Files\OpenVPN\ssl\server.crt"
key "C:\Program Files\OpenVPN\ssl\server.key"  # This file should be kept secret
dh "C:\Program Files\OpenVPN\ssl\dh2048.pem"
server 10.8.0.0 255.255.255.0
tls-auth "C:\Program Files\OpenVPN\ssl\ta.key" 0 # This file is secret
keepalive 10 120
comp-lzo
persist-key
persist-tun
cipher AES-256-CBC
status "C:\Program Files\OpenVPN\log\status.log"
log "C:\Program Files\OpenVPN\log\openvpn.log"
verb 4
mute 20
Указываем параметры сервера, пути к ключам и сертификатам. Здесь же пути к логам. Для тестирования можно использовать tcp протокол:
proto tcpПереходим к службам:
services.msc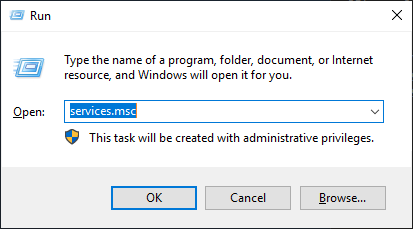
Находим службу OpenVPNService.
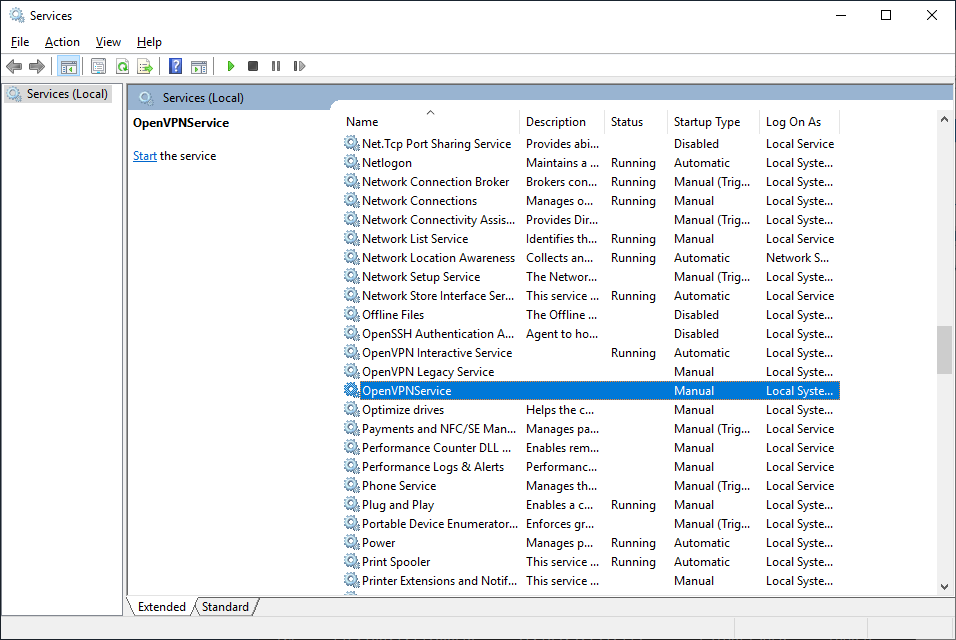
Настраиваем на автоматический запуск при загрузке сервера.
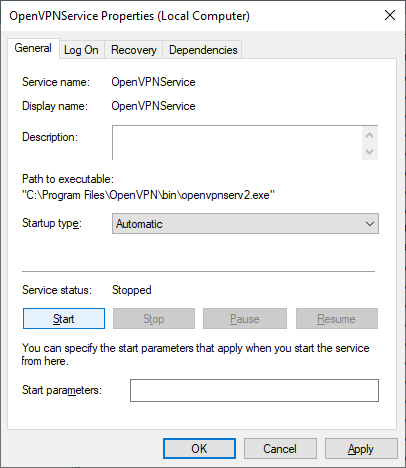
Запускаем службу.

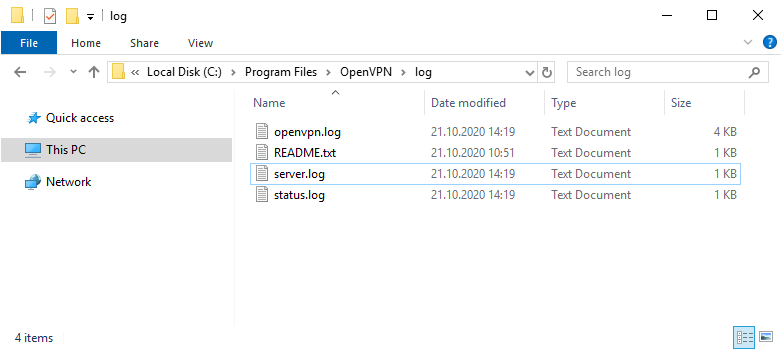
Согласно настройкам сервера в папке C:Program FilesOpenVPNlog должны появиться логи. Это один из инструментов администратора OpenVPN сервера.
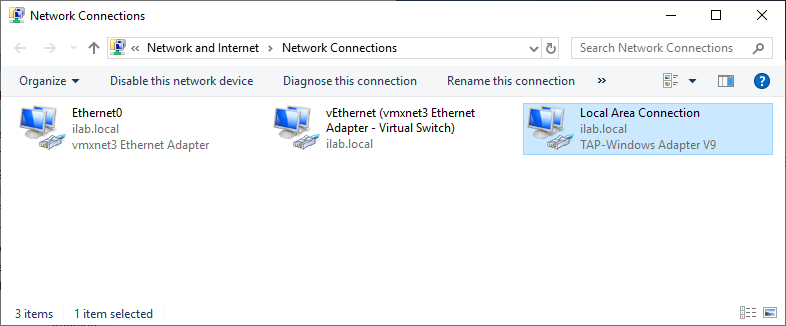
Активировался сетевой адаптер TAP-Windows Adapter V9.
Согласно настройкам сервера IP адрес 10.8.0.1.
Проверяем поднялся ли порт tcp 1194:
netstat -tan | find "1194"Порт должен прослушиваться.

Теперь нужно настроить firewall. Открываем Windows Defender Firewall with Advanced Security.
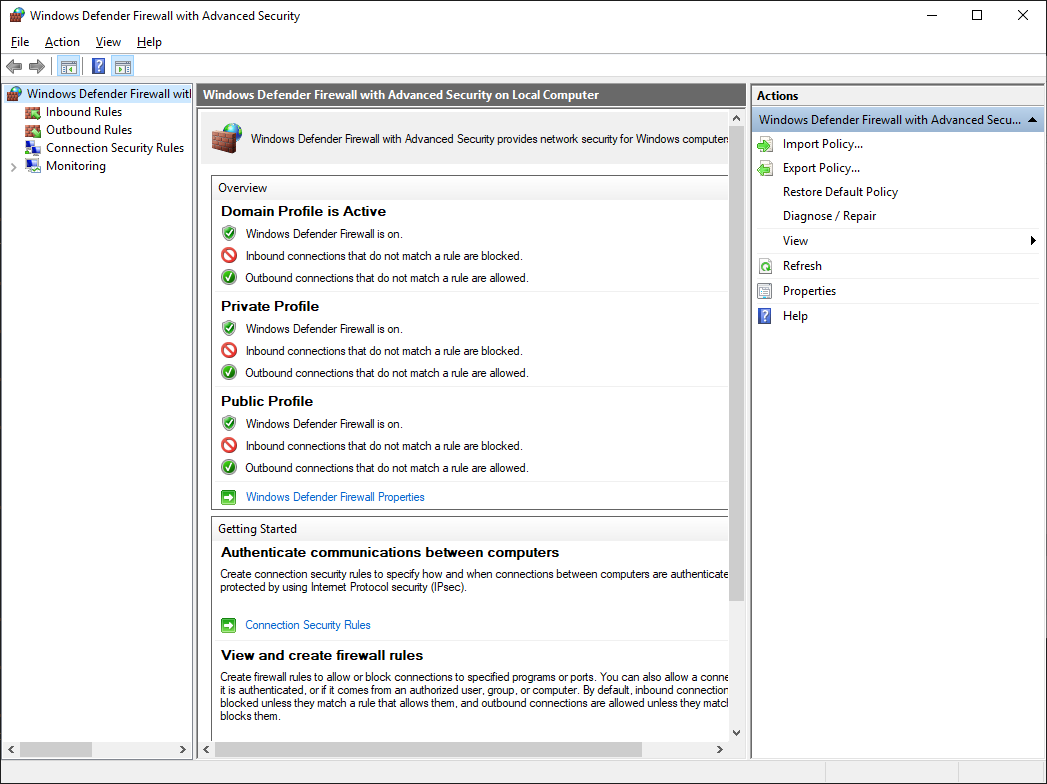
Переходим в Inbound Rules.
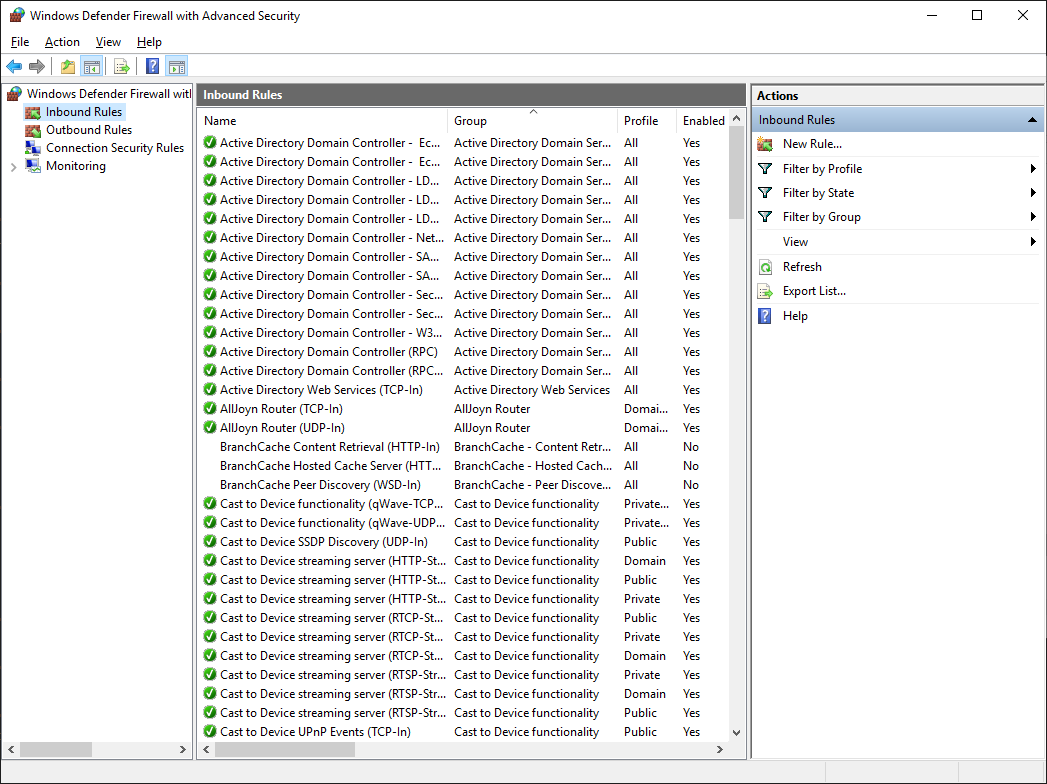
Создаём правило — New Rule…
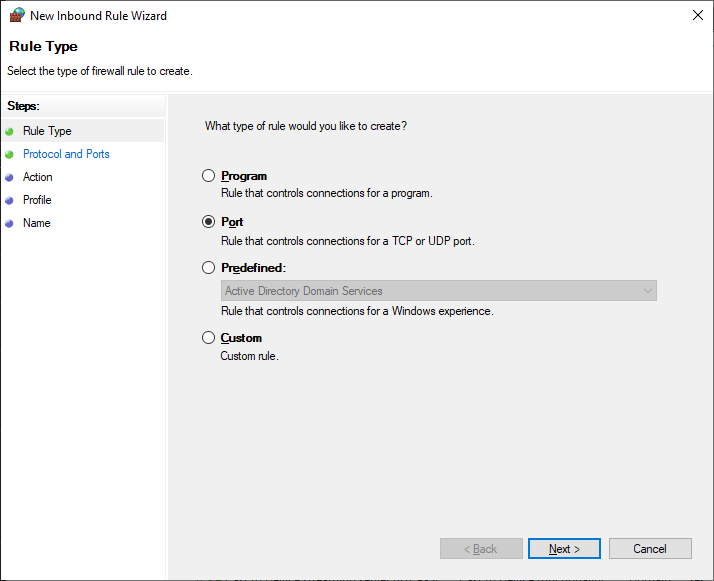
Тип правила — Port. Next.
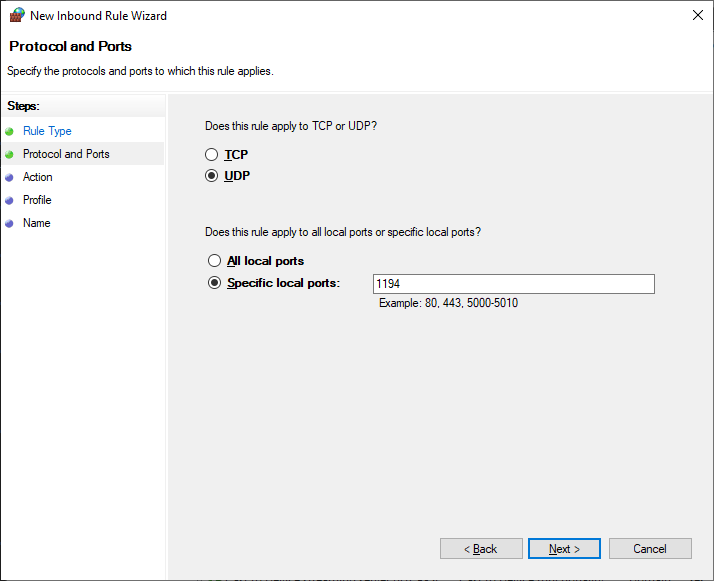
Протоколы и порты — UDP 1194. Как в настройках сервера. Next.
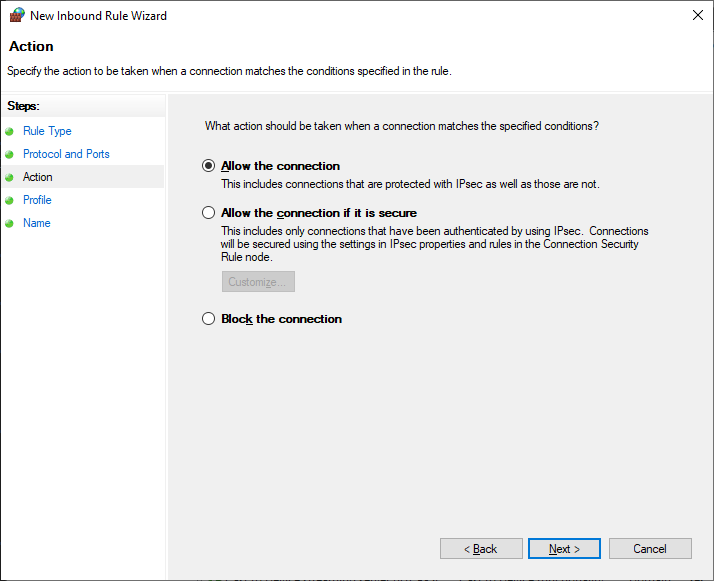
Действия — Allow the connection. Next.
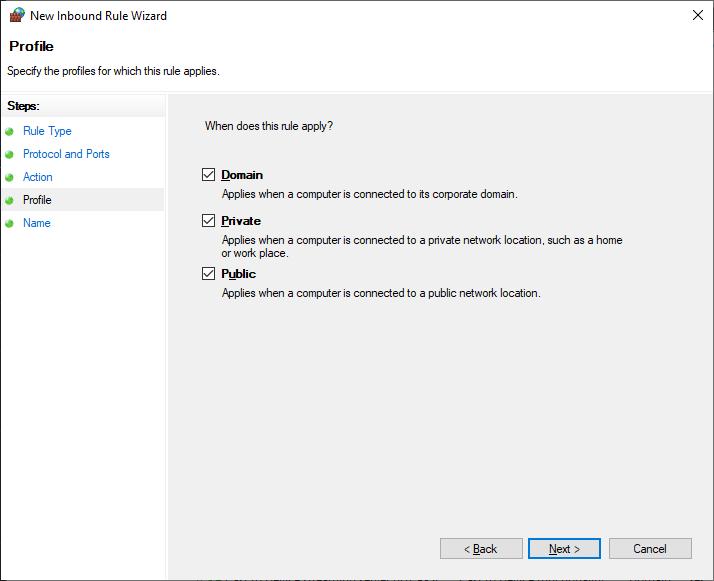
Для всех сетей. Next.
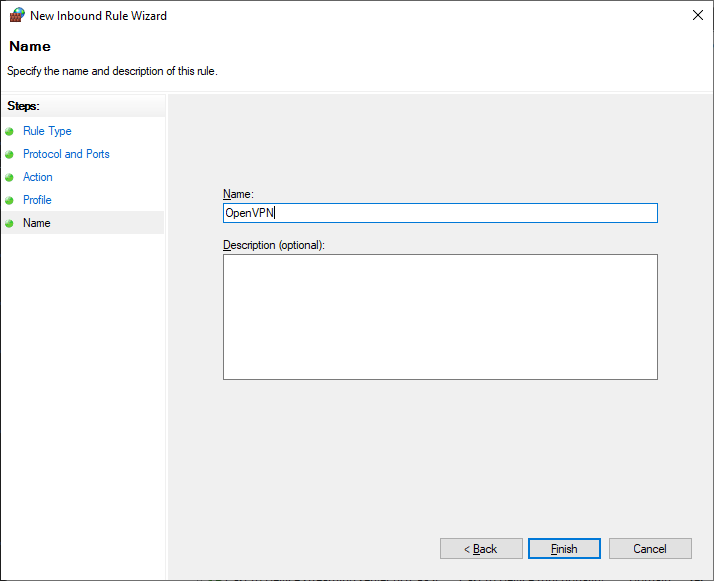
Указываем название правила — OpenVPN. Next.
Правило создано, теперь firewall не блокирует входящие UDP соединения на 1194 порту.
Настройка OpenVPN клиента
На компьютере клиента устанавливаем OpenVPN точно также как на сервер. Галку EasyRSA 2 Certificate Management Scripts не указываем. Галку OpenVPN GUI указываем.
Я устанавливаю OpenVPN на клиенте в папку по умолчанию. C:Program FilesOpenVPN.
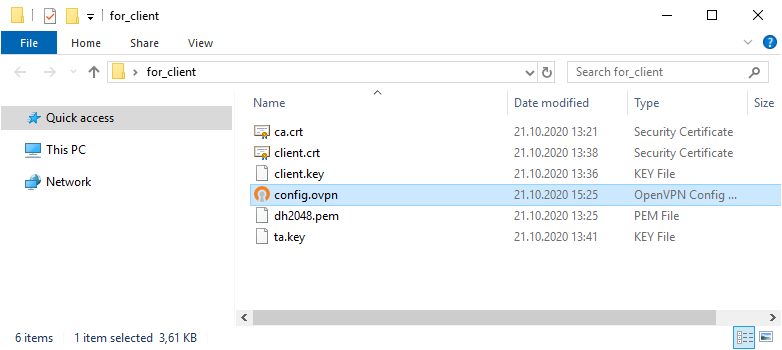
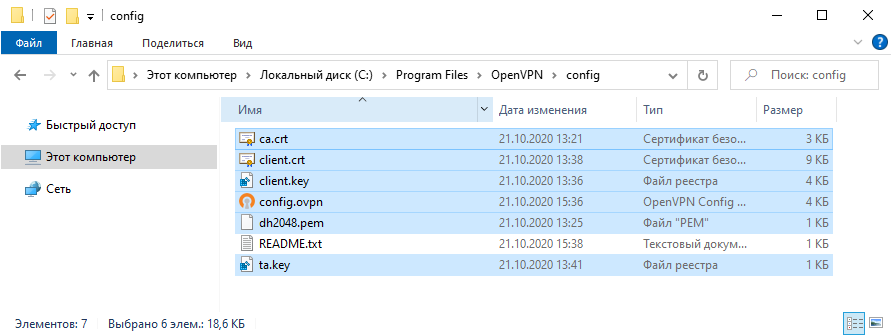
Копируем в отдельную папку for_client (её содержимое отправим потом на компьютер клиента) на сервере файлы для клиента:
- ca.crt
- client.crt
- client.key
- dh2048.pem
- ta.key

Туда же из папки C:Program FilesOpenVPNsample-config копируем client.ovpn

Переименовываю client.ovpn в config.ovpn. Можно использовать любое имя, лучше созвучное с названием организации. Вот такой получился набор.
Редактируем файл config.ovpn.
client
dev tun
proto udp
remote internet-lab.ru 1194
resolv-retry infinite
nobind
persist-key
persist-tun
ca "C:\Program Files\OpenVPN\config\ca.crt"
cert "C:\Program Files\OpenVPN\config\client.crt"
key "C:\Program Files\OpenVPN\config\client.key"
tls-auth "C:\Program Files\OpenVPN\config\ta.key" 1
#dh "C:\Program Files\OpenVPN\config\dh2048.pem"
cipher AES-256-CBC
comp-lzo
verb 0
connect-retry-max 25
Здесь указываем пути к ключам и сертификатам клиента. Не забываем про адрес и порт сервера, куда подключаться, для примера я указал internet-lab.ru UDP 1194.
Отправляем подготовленные файлы на компьютер клиента и копируем в C:Program FilesOpenVPNconfig.
На клиента запускаем OpenVPN GUI.
В трее появляется значок OpenVPN.
Правой кнопкой — подключиться.
Устанавливается соединение.
Значок позеленел, назначен адрес 10.8.0.6.
Можно подключаться к серверу, если есть доступы.
Для второго и последующего клиента генерируем свой набор клиентских сертификатов.

Отзыв сертификата
Иногда нужно отозвать сертификат, выданный клиенту. Кто-то увольняется, кто-то палит сертификаты.
cd "C:Program FilesOpenVPNeasy-rsa"
vars.bat
revoke-full client
Где client — это имя клиента.
В папке C:Program FilesOpenVPNkeys появляется файл:
- crl.pem
Копируем его с заменой в рабочую директорию сервера C:Program FilesOpenVPNssl.
Добавляем строчку в конфигурационный файл сервера:
crl-verify "C:\Program Files\OpenVPN\keys\crl.pem" Перезапускаем службу OpenVPN сервера.
net stop OpenVPNService
net start OpenVPNService
Если в конфигурационном файле уже был ранее указан путь к crl.pem, то службу можно не перезапускать, OpenVPN перечитывает CRL один раз в час. Но в течении этого часа клиенты с отозванными сертификатами смогут продолжать подключаться и работать.
Для клиента с отозванным сертификатом процесс подключения будет «зависать». В логе можно увидеть:
TLS Error: TLS key negotiation failed to occur within 60 seconds (check your network connectivity)
TLS Error: TLS handshake failed
Чтобы клиент не стучался постоянно на сервер, у него в конфиге есть опция:
connect-retry-max 25Передать эту опцию при отзыве сертификата нельзя, поэтому указывайте её всем клиентам заранее.
Ссылки
OpenVPN 2.5.1 сервер на Windows
OpenVPN – это набор open source программ, который заслуженно является одним из самых популярных и легких решений для реализации защищенной VPN сети. OpenVPN позволяет объединить в единую сеть сервер и клиентов (даже находящиеся за NAT или файерволами), или объединить сети удаленных офисов. Серверную часть OpenVPN можно развернуть практически на всех доступных операционных системах (пример настройки OpenVPN на Linux). Вы можете установить OpenVPN сервер даже на обычный компьютер с десктопной редакцией Windows 10.
В этой статье, мы покажем, как установить OpenVPN сервер на компьютер с Windows 10, настроить OpenVPN клиент на другом Windows хосте и установить защищенное VPN подключение.
Содержание:
- Установка службы OpenVPN сервера в Windows
- Создаем ключи шифрования и сертификаты для OpenVPN
- Конфигурационный файл OpenVPN сервера в Windows
- Настройка OpenVPN клиента в Windows
Установка службы OpenVPN сервера в Windows
Скачайте MSI установщик OpenVPN для вашей версии Windows с официального сайта (https://openvpn.net/community-downloads/). В нашем случае это OpenVPN-2.5.5-I602-amd64.msi (https://swupdate.openvpn.org/community/releases/OpenVPN-2.5.5-I602-amd64.msi).
Запустите установку.
Если вы планируете, OpenVPN сервер работал в автоматическом режиме, можно не устанавливать OpenVPN GUI. Обязательно установите OpenVPN Services.
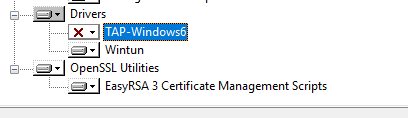
Начиная с версии OpenVPN 2.5, поддерживается драйвер WinTun от разработчиков WireGuard. Считается, что этот драйвер работает быстрее чем классический OpenVPN драйвер TAP. Установите драйвер Wintun, откажитесь от установки TAP-Windows6.
Установите OpenSSL утилиту EasyRSA Certificate Management Scripts.
Запустите установку.
По умолчанию OpenVPN устаналивается в каталог C:Program FilesOpenVPN.
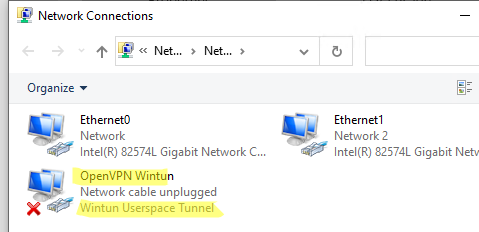
После окончания установки появится новый сетевой адаптер типа Wintun Userspace Tunnel. Этот адаптер отключен, если служба OpenVPN не запущена.
Создаем ключи шифрования и сертификаты для OpenVPN
OpenVPN основан на шифровании OpenSSL. Это означает, что для обмена трафиком между клиентом и серверов VPN нужно сгенерировать ключи и сертификаты с использованием RSA3.
Откройте командную строку и перейдите в каталог easy-rsa:
cd C:Program FilesOpenVPNeasy-rsa
Создайте копию файла:
copy vars.example vars
Откройте файл vars с помощью любого текстового редактора. Проверьте пути к рабочим директориям.
Обязательно поправьте переменную EASYRSA_TEMP_DIR следующим образом:
set_var EASYRSA_TEMP_DIR "$EASYRSA_PKI/temp"

Можете заполнить поля для сертификатов (опционально)
set_var EASYRSA_REQ_COUNTRY "RU"
set_var EASYRSA_REQ_PROVINCE "MSK"
set_var EASYRSA_REQ_CITY "MSK"
set_var EASYRSA_REQ_ORG "IT-Company"
set_var EASYRSA_REQ_EMAIL " [email protected] "
set_var EASYRSA_REQ_OU " IT department "

Срок действия сертификатов задается с помощью:
#set_var EASYRSA_CA_EXPIRE 3650
#set_var EASYRSA_CERT_EXPIRE 825
Сохраните файл и выполните команду:
EasyRSA-Start.bat
Следующие команды выполняются в среде EasyRSA Shell:
Инициализация PKI:
./easyrsa init-pki
Должна появится надпись:
init-pki complete; you may now create a CA or requests.
Your newly created PKI dir is: C:/Program Files/OpenVPN/easy-rsa/pki
Теперь нужно сгенерировать корневой CA:
./easyrsa build-ca
Задайте дважды пароль для CA:
CA creation complete and you may now import and sign cert requests.
Данная команда сформировала:
- Корневой сертификат центра сертификации: «C:Program FilesOpenVPNeasy-rsapkica.crt»
- Ключ центра сертификации «C:Program FilesOpenVPNeasy-rsapkiprivateca.key»
Теперь нужно сгенерировать запрос сертификата и ключ для вашего сервера OpenVPN:
./easyrsa gen-req server nopass
Утилита сгенерирует два файла:
req: C:/Program Files/OpenVPN/easy-rsa/pki/reqs/server.req
key: C:/Program Files/OpenVPN/easy-rsa/pki/private/server.key
Подпишем запрос на выпуск сертификата сервера с помощью нашего CA:
./easyrsa sign-req server server
Подтвердите правильность данных, набрав yes.
Затем введите пароль CA от корневого CA.
В каталоге issued появится сертификат сервера («C:Program FilesOpenVPNeasy-rsapkiissuedserver.crt»)

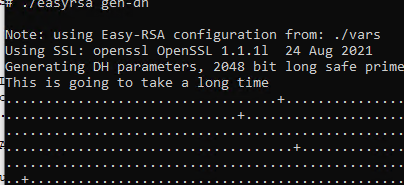
Теперь можно создать ключи Диффи-Хеллмана (займет длительное время):
./easyrsa gen-dh
Для дополнительной защиты VPN сервера желательно включить tls-auth. Данная технология позволяет использовать подписи HMAC к handshake-пакетам SSL/TLS, инициируя дополнительную проверку целостности. Пакеты без такой подписи будут отбрасываться VPN сервером. Это защитит вас от сканирования порта VPN сервера, DoS атак, переполнения буфера SSL/TLS.
Сгенерируйте ключ tls-auth:
cd C:Program FilesOpenVPNbin
openvpn --genkey secret ta.key
Должен появиться файл «C:Program FilesOpenVPNbinta.key». Переместите его в каталог C:Program FilesOpenVPNeasy-rsapki
Теперь можно сформировать ключи для клиентов OpenVPN. Для каждого клиента, который будет подключаться к вашему серверу нужно создать собственные ключи.
Есть несколько способов генерации ключей и передачи их клиентам. В следующем примере, мы создадим на сервере ключ клиента и защитим его паролем:
./easyrsa gen-req kbuldogov
./easyrsa sign-req client kbuldogov
Данный ключ («C:Program FilesOpenVPNeasy-rsapkiprivatekbuldogov.key») нужно передать клиенту и сообщить пароль. Клиент может снять защиту паролем для ключа:
openssl rsa -in "C:Program FilesOpenVPNeasy-rsapkiprivatekbuldogov.key"-out "C:Program FilesOpenVPNeasy-rsapkiprivatekbuldogov_use.key"

Если вы хотите сгенерировать ключ, не защищенный паролем, нужно выполнить команду:
./easyrsa gen-req имяклиента nopass
На сервере с OpenVPN вы можете создать неограниченное количество ключей и сертификатов для пользователей. Аналогичным образом сформируйте ключи и сертфикаты для других клиентов.
Вы можете отохвать скомпрометированные сертификаты клиентов:
cd C:Program FilesOpenVPNeasy-rsa
EasyRSA-Start.bat
./easyrsa revoke kbuldogov
Итак, мы сгенерировали набор ключей и сертификатов для OpenVPN сервера. Теперь можно настроить и запустить службу OpenVPN.
Конфигурационный файл OpenVPN сервера в Windows
Скопируйте типовой конфигурационный файл OpenVPN сервера:
copy "C:Program FilesOpenVPNsample-configserver.ovpn" "C:Program FilesOpenVPNconfig-autoserver.ovpn"
Откройте файл server.ovpn в любом текстовом редакторе и внесите свои настройки. Я использую следующий конфиг для OpenVPN:
# Указываем порт, протокол и устройство
port 1194
proto udp
dev tun
# Указываем пути к сертификатам сервера
ca "C:\Program Files\OpenVPN\easy-rsa\pki\ca.crt"
cert "C:\Program Files\OpenVPN\easy-rsa\pki\issued\server.crt"
key "C:\Program Files\OpenVPN\easy-rsa\pki\private\server.key"
dh "C:\Program Files\OpenVPN\easy-rsa\pki\dh.pem"
# Указываем настройки IP сети, адреса из которой будет будут получать VPN клиенты
server 10.24.1.0 255.255.255.0
#если нужно разрешить клиентам подключаться под одним ключом, нужвно включить опцию duplicate-cn (не рекомендуется)
#duplicate-cn
# TLS защита
tls-auth "C:\Program Files\OpenVPN\easy-rsa\pki\ta.key" 0
cipher AES-256-GCM
# Другая параметры
keepalive 20 60
persist-key
persist-tun
status "C:\Program Files\OpenVPN\log\status.log"
log "C:\Program Files\OpenVPN\log\openvpn.log"
verb 3
mute 20
windows-driver wintun
Сохраните файл.
OpenVPN позволяет использовать как TCP, так и UDP для подключения. В этом примере я запустил OpenVPN на 1194 UDP. Рекомендуется использовать протокол UDP, это оптимально как с точки зрения производительности, так и безопасности.
Не забудьте открыть на файерволе порты для указанного вами порта OpenVPN на клиенте и на сервере. Можно открыть порты в Windows Defender с помощью PowerShell.
Правило для сервера:
New-NetFirewallRule -DisplayName "AllowOpenVPN-In" -Direction Inbound -Protocol UDP –LocalPort 1194 -Action Allow
Правило для клиента:
New-NetFirewallRule -DisplayName "AllowOpenVPN-Out" -Direction Outbound -Protocol UDP –LocalPort 1194 -Action Allow
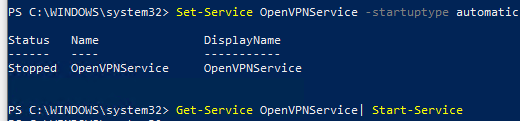
Теперь нужно запустить службу OpenVPN и изменить тип ее запуска на автоматический. Воспользуйтесь таким командами PowerShell, чтобы включить службу:
Set-Service OpenVPNService –startuptype automatic –passthru
Get-Service OpenVPNService| Start-Service
Откройте панель управления, и убедитесь, что виртуальный сетевой адаптер OpenVPN Wintun теперь активен. Если нет, смотрите лог «C:Program FilesOpenVPNlogserver.log»
Если при запуске OpenVPN вы видите в логе ошибку:
Options error: In C:Program FilesOpenVPNconfig-autoserver.ovpn:1: Maximum option line length (256) exceeded, line starts with..
Смените в файле server.ovpn символы переноса строки на Windows CRLF (в notepad++ нужно выбрать Edit -> EOL Conversion -> Windows CR LF). Сохраните файл, перезапустите службу OpevVPNService.
Данный конфиг позволит удаленным клиентам получить доступ только к серверу, но другие компьютеры и сервисы в локальной сети сервера для них недоступны. Чтобы разрешить клиентам OpenVPN получить доступ к внутренней сети нужно:
Включить опцию IPEnableRouter в реестре (включает IP маршрутизацию в Windows, в том числе включает маршрутизацию меду сетями Hyper-V): reg add «HKLMSYSTEMCurrentControlSetServicesTcpipParameters» /v IPEnableRouter /t REG_DWORD /d 1 /f
Добавьте в конфгурационный файл сервера OpenVPN маршруты до внутренней IP сети:
push "route 10.24.1.0 255.255.255.0"
push "route 192.168.100.0 255.255.255.0"
Если нужно, назначьте клиенту адреса DNS серверов:
push "dhcp-option DNS 192.168.100.11"
push "dhcp-option DNS 192.168.100.12"
Если нужно завернуть все запросы клиента (в том числе Интернет трафик) на ваш OpenVPN сервер, добавьте опцию:
push "redirect-gateway def1"
Настройка OpenVPN клиента в Windows
Создайте на сервере шаблонный конфигурационный файла для клиента VPN (на базе iшаблона client.ovpn) со следующими параметрами (имя файла kbuldovov.ovpn)
client
dev tun
proto udp
remote your_vpn_server_address 1194
resolv-retry infinite
nobind
persist-key
persist-tun
ca ca.crt
cert kbuldogov.crt
key kbuldogov.key
remote-cert-tls server
tls-auth ta.key 1
cipher AES-256-GCM
connect-retry-max 25
verb 3
В директиве remote указывается публичный IP адрес или DNS имя вашего сервера OpenVPN.
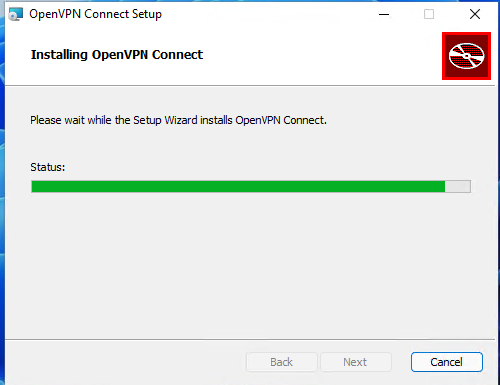
Скачайте и установите клиент OpenVPN Connect для Windows (https://openvpn.net/downloads/openvpn-connect-v3-windows.msi).
Теперь на компьютер с клиентом OpenVPN нужно с сервера скопировать файлы:
- ca.crt
- kbuldogov.crt
- kbuldogov.key
- dh.pem
- ta.key
- kbuldogov.ovpn
Теперь импортируйте файл с профилем *.ovpn и попробуйте подключиться к вашему VPN серверу.
Если все настроено правильно, появится такая картинка.
Проверьте теперь лог OpenVPN на клиенте «C:Program FilesOpenVPN Connectagent.log»
Mon Dec 27 08:09:30 2021 proxy_auto_config_url
Mon Dec 27 08:09:31 2021 TUN SETUP
TAP ADAPTERS:
guid='{25EE4A55-BE90-45A0-88A1-8FA8FEF24C42}' index=22 name='Local Area Connection'
Open TAP device "Local Area Connection" PATH="\.Global{25EE4A55-BE90-45A0-88A1-8FA8FEF24C42}.tap" SUCCEEDED
TAP-Windows Driver Version 9.24
ActionDeleteAllRoutesOnInterface iface_index=22
netsh interface ip set interface 22 metric=1
Ok.
netsh interface ip set address 22 static 10.24.1.6 255.255.255.252 gateway=10.24.1.5 store=active
IPHelper: add route 10.24.1.1/32 22 10.24.1.5 metric=-1
Клиент успешно подключится к OpenVPN серверу и получил IP адрес 10.24.1.6.
Проверьте теперь лог на сервере («C:Program FilesOpenVPNlogopenvpn.log»). Здесь также видно, что клиент с сертификатом kbuldogov успешно подключится к вашему серверу.
2021-12-27 08:09:35 192.168.13.202:55648 [kbuldogov] Peer Connection Initiated with [AF_INET6]::ffff:192.168.13.202:55648
2021-12-27 08:09:35 kbuldogov/192.168.13.202:55648 MULTI_sva: pool returned IPv4=10.24.1.6, IPv6=(Not enabled)
2021-12-27 08:09:35 kbuldogov/192.168.13.202:55648 MULTI: Learn: 10.24.1.6 -> kbuldogov/192.168.13.202:55648
2021-12-27 08:09:35 kbuldogov/192.168.13.202:55648 MULTI: primary virtual IP for kbuldogov/192.168.13.202:55648: 10.24.1.6
by Vlad Constantinescu
Vlad might have a degree in Animal Husbandry and Livestock Management, but he’s currently rocking anything software related, ranging from testing programs to writing in-depth reviews about them…. read more
Updated on January 18, 2022
- The TAP-Windows Adapter V9 is a network driver that VPNs require in order to establish secure connections.
- From time to time, the TAP adapter driver may fail to work as it should. We’ll teach you how to fix it in no time.
- Visit our VPN Troubleshooting section to discover more user-friendly VPN tutorials.
- Check out our Network Hub for more tips on fixing common network issues.

The TAP-Windows Adapter V9 is a network driver that’s essential for VPN connections.
More often than not, this network driver gets automatically installed along with VPN clients.
Usually, the driver’s default path is: C:/Program Files/Tap-Windows
However, certain users noticed that their internet connections don’t always work while the TAP-Windows Adapter driver is enabled.
What’s even more strange is that even disabling it wouldn’t work, as the TAP network driver would re-enable itself shortly after.
Therefore, users were still unable to establish a connection.
If that ever happened to you, check out some easy-to-follow suggestions that could fix your TAP-Windows Adapter V9 error.
How can I fix the TAP-Windows Adapter v9 error?
Use the Internet Connections Troubleshooter
The easiest fix would be using Windows’ built-in Internet Connections troubleshooter.
This tool can usually fix various connectivity issues, so it might be worth checking out.
Here’s what you need to do:
- Press the Win key
- Type troubleshoot
- Select Available Recommended troubleshooting
- Click the Available troubleshooters hyperlink
- Select Internet Connections and click Run the troubleshooter
- Select Troubleshoot my connection to the internet
- Go through the troubleshooting wizard’s steps


Reset the TAP-Windows Adapter Connection

Disabling and re-enabling the TAP adapter driver will (or better yet should) reset its network functions.
Furthermore, it may also fix the TAP-Windows Adapter V9 error and it’s a really simple task.
All you have to do is:
- Press the Win key on your keyboard
- Type network
- Select Network status
- Click on the Network and Sharing Center button
- Select the Change adapter settings option
- Right-click the TAP-Windows Adapter
- Select Disable
- Right-click the TAP-Windows Adapter once more
- Select Enable
- Restart your PC and check if there’s any improvement


Reinstall TAP-Windows Adapter and VPN client

The best resolution for the TAP-Windows Adapter V9 error might be to reinstall the driver altogether.
However, considering that most TAP adapter drivers are a dependency for VPN clients, most VPN providers come with their own version.
Getting the All TAP-Windows adapters are currently in use error? Check our guide and learn how you can fix it.
Thus, it would be easier to just uninstall the TAP driver and your VPN client, and perform a clean install of both services after you’re done.
This is how you should reinstall your TAP driver and VPN client:
- Right-click the Start button
- Select Device Manager
- Expand the Network adapters category
- Right-click the TAP-Windows Adapter V9
- Click on Uninstall device
- Select Uninstall to confirm
- Press the Windows key + R key combination
- Type appwiz.cpl and press Enter
- Select your VPN software in the window
- Press the Uninstall button to remove it
- Proceed with the uninstallation
- Restart your PC shortly after uninstalling both services
- Reinstall your VPN software + TAP adapter driver


If you notice that reinstalling your VPN client and TAP adapter driver didn’t work, you might consider switching to a better alternative.
Private Internet Access, for instance, is an excellent VPN service that comes with its own TAP driver.
Furthermore, even if it stops working at some point, you can easily reinstall it directly from the VPN client’s configuration screen.
Private Internet Access
Did your TAP adapter driver stop working? Try using PIA as an alternative.
Reset Windows 10

Apparently, resetting Windows 10 fixes the TAP-Windows Adapter V9 error in most cases.
You can reset Windows 10 and also keep your files. However, you’ll need to reinstall all the apps and drivers, as those will be swept clean from your PC.
Additionally, you’ll lose any configuration you did before resetting your PC.
Granted, this method is one of the most drastic ones, but it also gets the job done most of the time.
Follow these steps to reset your Windows 10 PC:
- Press the Win key on your keyboard
- Type Reset PC
- Click on the Reset this PC option
- Select Get started
- Press the Keep my files button
- Click the Next button
- Select the Reset option to proceed
- Wait for the process to complete


Conclusion
To wrap things up, if you notice that your TAP-Windows Adapter V9 triggers various connectivity errors, there are some things you could try.
More often than not, reinstalling the TAP driver and VPN client will fix the issue.
However, you may need to go as far as resetting your PC altogether, so buckle up and don’t lose hope.
Newsletter
by Vlad Constantinescu
Vlad might have a degree in Animal Husbandry and Livestock Management, but he’s currently rocking anything software related, ranging from testing programs to writing in-depth reviews about them…. read more
Updated on January 18, 2022
- The TAP-Windows Adapter V9 is a network driver that VPNs require in order to establish secure connections.
- From time to time, the TAP adapter driver may fail to work as it should. We’ll teach you how to fix it in no time.
- Visit our VPN Troubleshooting section to discover more user-friendly VPN tutorials.
- Check out our Network Hub for more tips on fixing common network issues.
The TAP-Windows Adapter V9 is a network driver that’s essential for VPN connections.
More often than not, this network driver gets automatically installed along with VPN clients.
Usually, the driver’s default path is: C:/Program Files/Tap-Windows
However, certain users noticed that their internet connections don’t always work while the TAP-Windows Adapter driver is enabled.
What’s even more strange is that even disabling it wouldn’t work, as the TAP network driver would re-enable itself shortly after.
Therefore, users were still unable to establish a connection.
If that ever happened to you, check out some easy-to-follow suggestions that could fix your TAP-Windows Adapter V9 error.
How can I fix the TAP-Windows Adapter v9 error?
Use the Internet Connections Troubleshooter
The easiest fix would be using Windows’ built-in Internet Connections troubleshooter.
This tool can usually fix various connectivity issues, so it might be worth checking out.
Here’s what you need to do:
- Press the Win key
- Type troubleshoot
- Select Available Recommended troubleshooting
- Click the Available troubleshooters hyperlink
- Select Internet Connections and click Run the troubleshooter
- Select Troubleshoot my connection to the internet
- Go through the troubleshooting wizard’s steps
Reset the TAP-Windows Adapter Connection
Disabling and re-enabling the TAP adapter driver will (or better yet should) reset its network functions.
Furthermore, it may also fix the TAP-Windows Adapter V9 error and it’s a really simple task.
All you have to do is:
- Press the Win key on your keyboard
- Type network
- Select Network status
- Click on the Network and Sharing Center button
- Select the Change adapter settings option
- Right-click the TAP-Windows Adapter
- Select Disable
- Right-click the TAP-Windows Adapter once more
- Select Enable
- Restart your PC and check if there’s any improvement
Reinstall TAP-Windows Adapter and VPN client
The best resolution for the TAP-Windows Adapter V9 error might be to reinstall the driver altogether.
However, considering that most TAP adapter drivers are a dependency for VPN clients, most VPN providers come with their own version.
Getting the All TAP-Windows adapters are currently in use error? Check our guide and learn how you can fix it.
Thus, it would be easier to just uninstall the TAP driver and your VPN client, and perform a clean install of both services after you’re done.
This is how you should reinstall your TAP driver and VPN client:
- Right-click the Start button
- Select Device Manager
- Expand the Network adapters category
- Right-click the TAP-Windows Adapter V9
- Click on Uninstall device
- Select Uninstall to confirm
- Press the Windows key + R key combination
- Type appwiz.cpl and press Enter
- Select your VPN software in the window
- Press the Uninstall button to remove it
- Proceed with the uninstallation
- Restart your PC shortly after uninstalling both services
- Reinstall your VPN software + TAP adapter driver
If you notice that reinstalling your VPN client and TAP adapter driver didn’t work, you might consider switching to a better alternative.
Private Internet Access, for instance, is an excellent VPN service that comes with its own TAP driver.
Furthermore, even if it stops working at some point, you can easily reinstall it directly from the VPN client’s configuration screen.
Private Internet Access
Did your TAP adapter driver stop working? Try using PIA as an alternative.
Reset Windows 10
Apparently, resetting Windows 10 fixes the TAP-Windows Adapter V9 error in most cases.
You can reset Windows 10 and also keep your files. However, you’ll need to reinstall all the apps and drivers, as those will be swept clean from your PC.
Additionally, you’ll lose any configuration you did before resetting your PC.
Granted, this method is one of the most drastic ones, but it also gets the job done most of the time.
Follow these steps to reset your Windows 10 PC:
- Press the Win key on your keyboard
- Type Reset PC
- Click on the Reset this PC option
- Select Get started
- Press the Keep my files button
- Click the Next button
- Select the Reset option to proceed
- Wait for the process to complete
Conclusion
To wrap things up, if you notice that your TAP-Windows Adapter V9 triggers various connectivity errors, there are some things you could try.
More often than not, reinstalling the TAP driver and VPN client will fix the issue.
However, you may need to go as far as resetting your PC altogether, so buckle up and don’t lose hope.
Newsletter
Every VPN user needs to know what TAP-Windows is, as the issues associated with TAP-Windows 9.21.2 Adapter can be a bit worrisome.
Many users have reported trouble connecting to the internet while the TAP-Windows Adapter was enabled.
You need not worry anymore as we will tell you how to manage the TAP-Windows Adapter in this article.
What is TAP-Windows Adapter?
If you have been using the Windows VPN to safeguard the personal data stored on the PC, you must be aware of the role of the TAP-Windows Adapter V9.
Essentially, the Adapter acts as a virtual network interface that lets the VPN clients fetch the desired VPN connection by making all the necessary functionalities available.
The TAP-Windows 9.21.2 Adapter can be found as an installed program at the location C:\Program Files\Tap-Windows.

Many VPN software runs only after installing a specific network driver, known as TAP-Windows. You can find this Adapter mainly in the Device Manager once installed by any VPN client like SoftEther, Cyberghost, Hamachi, etc.
The VPN suites mostly use it as a helping medium for establishing a private connection to any internet network nearby.
You will find two different types of driver versions of TAP-Windows that operate only on the specific Windows OS version running on the PC. The two types are:
- The Windows XP version uses the NDIS 5 driver for TAP-Windows and version 9.9.x
- The Windows 10/ 8/ 7/ Vista versions use the NDIS 6 driver for TAP-Windows and version 9.21.x

Note: An amazing VPN facilitating software for your Windows PC or laptop would be PureVPN. This software is compatible with Windows 8, 8.1, and 10. It has a very simple-to-use interface, and the streaming speed is blazing fast. PureVPN will be your best bet for making your PC a VPN hotspot with high-security features like IPv6 Leak protection and DNS.
PS: Learn more about the full TigerVPN review.
Why would you need to remove TAP-Windows?
Whether you use TAP-Windows 9.21.2 or the other version, there are chances of an error in the drivers. Suppose you use the VPN with the help of the internet frequently, and you experience connectivity problems during that process when the VPN connection is running.
In that case, there is a possibility that the driver associated with the TAP-Windows might have gone corrupted. You should better start with an investigation of the problem.
The major and best solution to help you in this scenario would be reinstalling the TAP-Windows Adapter. Another situation might be where you have been using a VPN connection for a long time but have discontinued the usage in the present for a while.
In this case, the leftover data from the TAP-Windows Adapter might be the potential culprit behind the internet connectivity issues. It may have gone corrupted in the time being and started causing trouble.

In both the cases mentioned above, removing the particular Adapter is the best fix. A thing to note here is that if you decide not to uninstall the VPN software from the PC or laptop, then there are chances that the TAP-Windows Adapter will get reinstalled automatically.
If you see the following error message – “All TAP-Windows adapters on this system are currently in use,” then it is time for you to restart the TAP-Windows fox adapter to fix such issues.
Now that the air is clear on the possible issue that might happen. Let us take you through the methods for removing, restarting, and reinstalling the TAP-Windows adapter.
Method for removing the TAP-Windows 9.21.2 Adapter V9
As we have already discussed, removing the TAP-Windows Adapter is not as easy as it may seem once you have uninstalled it from the Device Manager. You may find the Adapter reinstalled into the Device manager as per the VPN software installed on the system.
This will happen every time you boot the system. The main reason behind this is the startup service that is associated with some of the VPN programs. This service looks for the missing drivers and automatically installs the required ones.
Once you decide to remove the driver associated with the TAP-Windows Adapter V9, follow the given steps:
Open the window of Program Files.
Navigate through and find the option of TAP-Windows.
Hit double-click over the option uninstall.exe. Now keep following the instructions as they appear on the screen for finally deleting the driver from the system.
If you decide to terminate the process at this stage, remember that the next time you start the device, the driver will return once again and reinstall upon opening the VPN software.
You have to fully shut the software off the system to ensure that the driver is barred from getting reinstalled on the PC.
Follow the steps below to do so:
Press the keys Windows + R together to launch the Run window. Enter the command appwiz.cpl into the box. Hit OK now. This will open the window of Programs and Features.

Find the relevant VPN client from the given list and then uninstall it.

Note that if you have previously been a user of more than one VPN solution, ensure that you d the same removal process with every other client on the list.
Make sure that there is no such software left that can cause trouble again, and reinstall the TAP-Windows Adapter.
Method for restarting the TAP-Windows 9.21.2 Adapter V9
Suppose you don’t wish to remove the Adapter altogether and think there is a possible chance of its recovery by removing any minor issue. In that case, you may try it by just performing a restart of the Adapter.
As we know that when the error message tells you that every Adapter is currently being used, restarting the TAP-Windows is a good option to try.
We will tell you how to do so in the steps given below:
Open the Control Panel of the PC.
Click the option of Network and Internet.

At this stage, hit the tab Change Adapter options.

In the next Network Connections window, hit a right-click on the local area connection associated with your TAP-Windows Adapter V9. Then click on the tab Disable.

Wait for some time. Hit a right-click again on the same option and then click Enable.
Try running your VPN client once again and see if the error is resolved.
Method for reinstalling the TAP-Windows 9.21.2 Adapter V9
Suppose you face difficulties establishing a connection with any VPN network (it doesn’t matter which program you are using).
In that case, you may have to first start your troubleshooting operation by running a check on the TAP-Windows Adapter primarily.
If installed correctly, reinstall the adapter from scratch if you encounter any incorrect settings.
The steps given below are going to be your guide to do so:
It would be best if you first terminated your VPN connection and shut down the related program of the VPN client simultaneously.
Now press the keys Windows + R together to launch the Run window. Enter the command devmgmt.msc into the box. Hit Enter now. This will open the window of Device Manager.

In this window, navigate the options and select the Network Adapters tab. Open the menu that drops down.
Now, find the option TAP-Windows Adapter V9. Look for an exclamation mark that might appear over the icon adjacent to the option.
If the exclamation mark is there, your next move would be to reinstall the particular driver that will fix the problem. To do that, right-click over the icon and click the tab Uninstall device.
Once you successfully remove the TAP-Windows 9.21.2 Adapter V9 from the Device Manager, open the VPN client again. Now keeping in mind the VPN software you use, you may have to face two situations over here.
Either a prompt will emerge asking you to install the missing Network Driver, or the Client will automatically install the driver again without asking for permission.
Note: If you see a “missing driver error” message on the VPN software when it has not automatically reinstalled the driver, you may have to remove the VPN Client. All the installation kits associated with the VPN client come with the TAP-Windows Adapter.
If you do not wish to reinstall the VPN client, then visit the website of OpenVPN. Scroll down and stop at TAP-Windows. Now download the right installer as per the windows version of the PC.
Go back and open Device Manager. Check if the exclamation mark is gone from the icon. If it is still there, you may resort to expert support from the VPN client or go for another VPN provider.
FAQs
Q1: Can I fix TAP-Windows 9.21.2 Adapter errors without technical knowledge? Yes, the solutions provided in this article are designed to be user-friendly and can be followed by individuals with varying technical expertise.
Q2: Is it necessary to update the TAP-Windows driver? Yes, updating the driver is an important step as outdated drivers can cause compatibility issues and lead to TAP-Windows 9.21.2 Adapter errors.
Q3: Can I reinstall the TAP-Windows Adapter manually? Yes, you can manually uninstall and reinstall the TAP-Windows Adapter by following the steps provided in this article.
Q4: What should I do if none of the solutions work? If none of the solutions work, it is recommended to seek technical support from the VPN software provider or consult an IT professional for further assistance.
Q5: How can I ensure a smooth VPN connection after resolving the errors? After resolving the TAP-Windows 9.21.2 Adapter errors, it is advisable to restart your computer and test the VPN connection to ensure it is functioning properly.
Conclusion
We hope this article dealt with all your queries related to TAP-Windows and the TAP-Windows 9.21.2 Adapter.
We gave you a thorough guide to help you better manage the adapter and prevent it from hindering your internet connection.