,
Windows 10 comes with Windows Defender, which is a built-in antivirus and in which Microsoft has introduced a new security feature called «Tamper Protection» in Windows 10 build 1909 and later versions. When Tamper Protection is enabled in the system, a malware can’t change the settings of the Windows Defender Antivirus. As real-time protection cannot be tampered with, this adds an extra degree of security to the system.
By default, Tamper protection is enabled in Windows 10. If you want to disable tamper protection, this guide covers two different ways to do so.
How to Enable or Disable Tamper Protection on Windows 10.*
- Method 1. Manage Tamper Protection via Defender Settings.
- Method 2. Manage Tamper Protection via Registry.
* Notes:
1. The methods mentioned below can be used to turn on or off the Tamper Protection security on an individual Windows 10 system. If you are an organization using Microsoft Defender for Endpoint, you should be able to manage tamper protection in Intune similar to how you manage other endpoint protection features. For instructions read the corresponding section of the following Microsoft article:
- Manage tamper protection using Intune.
- Manage tamper protection using Configuration Manager, version 2006.
- Manage tamper protection using the Microsoft 365 Defender portal.
2. To see if the Tamper Protection is enabled on your system from PowerShell, open PowerShell as Administrator and type «Get-MpComputerStatus«. Then look if the IsTamperPrtotected status is True.

3. The below methods can be used only to enable or disable Tamper Protection within Windows Defender Firewall. For any third-party antivirus that you are using, you have to enable or disable the tamper protection separately.
Method 1: How to Turn Off/On Tamper Protection Security through Windows Defender Settings.
The first method to disable or enable the Tamper Protection security is via Defender settings.
1. Open the Run command box by holding the Win and R keys at the same time.
2. Type windowsdefender: and hit Enter:
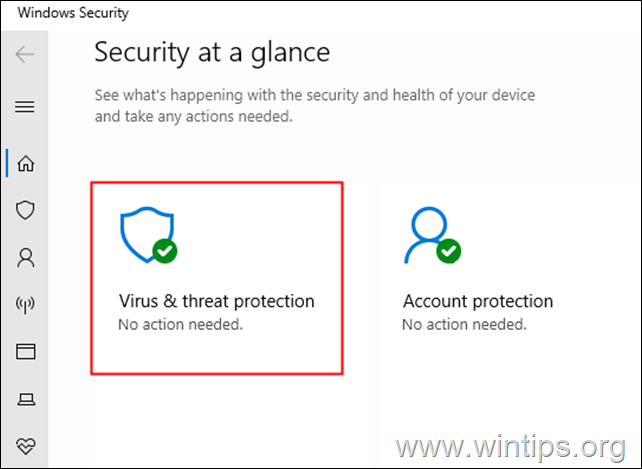
3. In the windows security window, click on the Virus & threat protection tile.
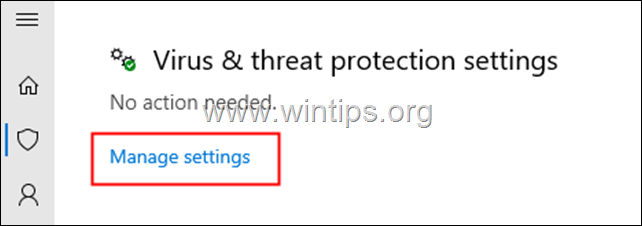
4. Scroll down and locate Virus & threat protection settings and click on Manage Settings.
5. Scroll down and locate Tamper Protection.
6a. In order to Enable Tamper Protection, toggle the switch to On, or…

6b. …toggle the switch to Off to Disable Tamper Protection Security.*
* Note: If you see a UAC popping up asking for permissions, click on Yes.

Method 2: How to Disable or Enable Tamper Protection using Registry Editor.
1. Open the Registry Editor: To do that:
-
- Open the Run command box by holding the Win and R keys at the same time.
- Type regedit and hit Enter: *
* Note: If you see a User Access Control (UAC) warning window asking for permission, click on Yes.
2. In the search bar at the top, delete any previous values and copy-paste the below registry location and hit Enter. *
- HKEY_LOCAL_MACHINE\SOFTWARE\Microsoft\Windows Defender\Features
* Note: If you are facing any issues, navigate to the above mentioned registry location from the left-hand side panel.

3. Select the Features key at the left and at the right double-click at the TamperProtection REG_DWORD value. *
* Note: If the «TamperProtection» value doesn’t exist, right-click anywhere at the right pane and select New > DWORD(32-bit) Value. Name the new value «TamperProtection» and proceed reading below.

4. In the Edit DWORD window that opens:*
- To Disable Tamper Protection, set the value data to 0 and click on the OK button.*
- To Enable Tamper Protection, set the value to 5 and click OK. *
* Note: If after pressing OK, you receive the error: «Error Editing Value. Cannot edit TamperProtection. Error writing the value’s new contents.», proceed below to take the ownership of the «Features» registry key and then repeat the above step.
To take the ownership of Features registry key:
Step 1. Backup Registry.
Since making changes to your Registry settings can be dangerous because even a minor mistake can result in system harm, it’s important to make a backup of the Registry Key you’re about to update before you start. To do that:
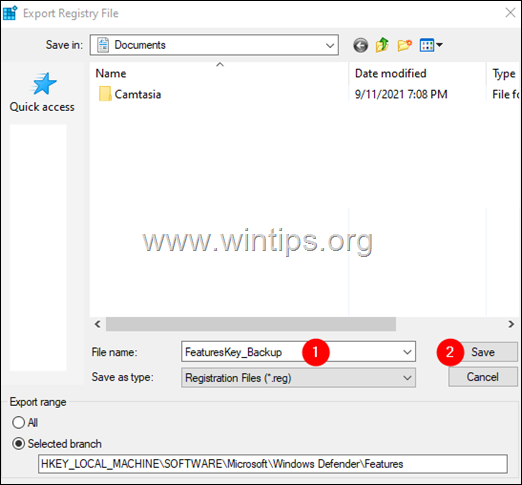
1. Right-Click on the Features key at the left-hand side panel and choose Export.
2. Give a suitable name (e.g. FeaturesKey_Backup), and save the REG file to your desktop. *
* Note: If something goes wrong after editing the registry, you can simply undo the changes by double-clicking the extracted registry key (REG file) on your desktop.
Step 2. Take Ownership of the Registry key.
1. Right-click on the Features key and choose Permissions.
2. In the ‘Permissions for Features’ window, click on the Advanced button.
3. In the ‘Advanced Security Settings for features’ window, click on Change.
4. In the ‘Select User or Group’ window, under Enter the object name to select section, type Administrators, and click on the OK button.
![clip_image004[5] clip_image004[5]](https://www.wintips.org/wp-content/uploads/2021/09/clip_image0045_thumb.png)
5. Tick the Replace owner on subcontainers or objects option, and click on the Apply button.

6. Now, double-click on the Administrators entry as shown below.

7. In the appearing window, check the Full control box and click on OK.

8. In the ‘Advanced Settings’ window, click on OK.
9. In the ‘Permissions for Features’ window, click on OK.
10. Now that you have the necessary permissions, proceed and modify the «TamperProtection» REG value as instructed in method-2 above.
That’s it! Which method worked for you?
Let me know if this guide has helped you by leaving your comment about your experience. Please like and share this guide to help others.
If this article was useful for you, please consider supporting us by making a donation. Even $1 can a make a huge difference for us in our effort to continue to help others while keeping this site free:
- Author
- Recent Posts
Konstantinos is the founder and administrator of Wintips.org. Since 1995 he works and provides IT support as a computer and network expert to individuals and large companies. He is specialized in solving problems related to Windows or other Microsoft products (Windows Server, Office, Microsoft 365, etc.).
Protecting your devices from malicious software helps prevent data breaches and minimizes business disruptions. Protection that’s built into your device, like tamper protection for Windows 10, provides an additional layer of security to safeguard your endpoints.
What is tamper protection in Windows 10?
Part of Windows Security, tamper protection for Windows 10 helps protect your system against unauthorized changes and modifications by preventing malicious software or users from tampering with critical system settings, files and processes. Enabling tamper protection adds extra security to your Windows 10 system, making it more resistant to attacks and unauthorized access.
Enforce and mandate tamper protection for your Windows endpoints with NinjaOne, a comprehensive RMM solution that streamlines security management.
Learn more about NinjaOne Endpoint Management
The importance of tamper protection for Windows 10 system security
An important security feature in Windows 10, tamper protection prevents critical system files and settings from being changed without your permission. This helps keep your computer safe from viruses, hackers and other cyber threats. It also protects your privacy by reducing the risk of your sensitive information being stolen or misused.
The program also makes it harder for harmful programs to mess with critical system components like your antivirus software, firewall and user account settings. By keeping them working properly, tamper protection creates a safer environment for your Windows 10 computer.
Tamper protection also prevents unauthorized access to your private information by stopping malicious software from changing settings and files that could expose your personal data. It locks down core security components of your Windows 10 system and blocks unauthorized changes that could open vulnerabilities and expose your computer to security threats or privacy breaches.
How to enable tamper protection: step-by-step
Tamper protection for Windows 10 is enabled by default but may be turned off at some point by an administrator. If you need to enable tamper protection in Windows 10, it’s a straightforward process with these step-by-step instructions:
- Open the Windows Security app by clicking on the Start menu and typing “Windows Security.”
- Select “Windows Security” from the search results to open the app.
- In the Windows Security app, click on the “Virus & threat protection” tab.
- Under the “Virus & threat protection settings,” click on “Manage settings.”
- Scroll down to the “Tamper Protection” section and toggle the switch to enable it.
- Once enabled, tamper protection will provide an additional layer of security.
Enabling tamper protection and leaving it on enhances the security of your Windows 10 system.
Should I turn off tamper protection in Windows 10?
While tamper protection is an important security feature, there are times when you need to disable it temporarily. For example, you’ll need to disable tamper protection for Windows 10 when installing or updating third-party security software, troubleshooting or changing security settings or uninstalling security components.
Although you should turn off tamper protection in Windows 10 for certain operations, remember that leaving it disabled can make your system vulnerable to attacks. If you need to temporarily disable tamper protection, make sure to enable it again as soon as you finish.
How to disable tamper protection
If you want to disable tamper protection on your Windows 10 system, there are multiple methods you can use. Here are three ways to disable tamper protection:
Through Windows Security
One way to disable tamper protection in Windows 10 is through the Windows Security app:
- Open the Windows Security app by clicking on the Start menu and typing “Windows Security.”
- Select “Windows Security” from the search results to open the app.
- In the Windows Security app, click on the “Virus & threat protection” tab.
- Under the “Virus & threat protection settings,” click on “Manage settings.”
- Scroll down to the “Tamper Protection” section and toggle the switch to disable it.
Remember to enable tamper protection again once you have finished the tasks that require it to be turned off.
Re-enabling tamper protection
When you no longer need tamper protection disabled, re-enable it promptly by following the same steps outlined in the section on how to enable tamper protection step-by-step. Turning tamper protection on helps keep your Windows 10 system secure and protected against unauthorized changes or modifications.
Managing tamper protection for your company with Microsoft InTune
If you’re changing tamper protection, you probably need to manage it across several devices in your organization. To manage several devices at once, rather than touching each device, you can use Microsoft Intune. Microsoft InTune is a cloud-based endpoint management platform that allows you to manage and secure devices, applications and data across many devices from a central console. Microsoft InTune lets you enforce tamper protection policies, ensuring that all devices adhere to the organization’s security standards and improving your overall security posture.
NinjaOne integrates with robust endpoint security tools. This, along with tamper protection helps strengthen your endpoints’ security posture.
See how NinjaOne keeps your endpoints secure
Manage all of your endpoints with ease
Tamper protection in Windows 10 protects not only your Windows Security features and settings but also helps you maintain consistent security configurations in a large IT environment. The most efficient way to manage tamper protection across all your devices is with an endpoint management tool that allows you to monitor and secure all devices in your organization, including desktop computers, laptops, smartphones and tablets.
A comprehensive endpoint management solution like NinjaOne provides advanced endpoint management capabilities, allowing you to centrally manage, secure and monitor all your devices from a single platform.
With NinjaOne, you can ensure that all your endpoints are up-to-date with the latest security patches, have the necessary antivirus protection and adhere to your organization’s security policies. NinjaOne also helps you manage your antivirus solution, with granular control over schedules and scans, encrypt your endpoint drives, back up device data and prevent remote attacks by identifying and removing rogue endpoints.
NinjaOne’s endpoint management solution helps increase security and efficiency in managing your organization’s endpoints. Ready to take your endpoint management to the next level? Experience increased security and efficiency with NinjaOne’s comprehensive endpoint management solution. Learn more about how you can increase security with NinjaOne’s endpoint management today.
Download Windows Speedup Tool to fix errors and make PC run faster
Windows Security Team has rolled out Tamper Protection for all Windows users. In this post, we will share how you can enable or disable Tamper Protection in Windows Security or Windows Defender via UI, Registry, or InTune. While you can turn it off it, we highly recommend you keep it enabled at all times for your protection.
What is Tamper Protection in Windows 11/10
In simple English, it makes sure nobody can tamper with the Protection system, aka Windows Security. The onboard software is good enough to handle most of the security threats, including Ransomware. But if it is turned off by third-party software or malware that sneaks in, then you can get into trouble.
Tamper Protection feature in Windows Security prevents malicious apps from changing relevant Windows Defender Antivirus settings. Features like Real-time protection cloud protection are essential to keep you safe from emerging threats. The feature also makes sure that nobody can change or modify the settings via Registry or Group Policy.
Here is what Microsoft says about it:
- To help ensure that Tamper Protection doesn’t interfere with third-party security products or enterprise installation scripts that modify these settings, go to Windows Security and update security intelligence to version 1.287.60.0 or later. Once you’ve made this update, Tamper Protection will continue to protect your registry settings and will log attempts to modify them without returning errors.
- If the Tamper Protection setting is On, you won’t be able to turn off the Windows Defender Antivirus service by using the DisableAntiSpyware group policy key.
Tamper Protection is enabled by default for Home users. Keeping Tamper Protection On doesn’t mean that you cannot install third-party antivirus. It only means no other software can change the settings of Windows Security. Third-party antivirus will continue to register with the Windows Security application.
While third parties are blocked from making any changes, you, as an administrator, can make the changes. Even though you can, we will highly recommend you to keep it enabled all the time. You can configure it in three ways:
- Windows Security UI
- Registry changes
- InTune or Microsoft 365 Device Management portal
There is no Group Policy Object to change this setting.
1] Using Windows Security UI to disable or enable Tamper Protection
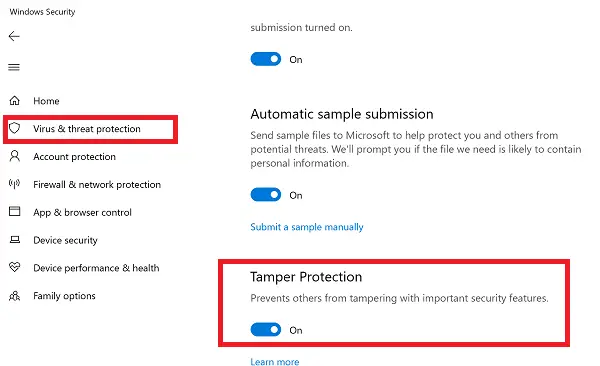
- Click on the Start button, and from the app list, locate Windows Security. Click to launch when you find it.
- Switch to Virus and Threat protection > Manage Settings
- Scroll a bit to find Tamper Protection. Make sure its toggled On.
- If there is a particular need, you may turn it off, but make sure to turn it on again when work is done.
2] Registry changes to disable or enable Tamper protection
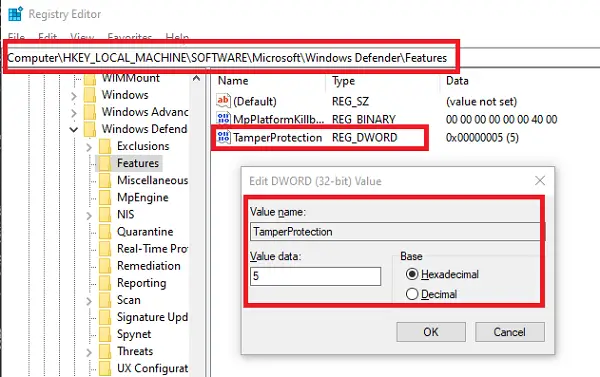
- Open Registry Editor by typing Regedit in the Run Prompt followed by the Enter key
- Navigate to HKEY_LOCAL_MACHINE\SOFTWARE\Microsoft\Windows Defender\Features
- Double-click on DWORD
TamperProtectionto edit the value. - Set it to “0” to disable Tamper Protection or “5” to enable Tamper Protection
3] Turn Tamper Protection on or off for your organization using Intune
If you are using InTune, i.e. Microsoft 365 Device Management portal, you can use it to Turn Tamper Protection on or off. Apart from having appropriate permissions, you need to have the following:
If you are part of your organization’s security team, you can turn Tamper Protection on (or off) for your organization in the Microsoft 365 Device Management portal (Intune), assuming your organization has Microsoft Defender Advanced Threat Protection (Microsoft Defender ATP):
- Your organization must have Microsoft Defender ATP E5, Managed by Intune, and running Windows OS 1903 or later.
- Windows security with security intelligence updated to version 1.287.60.0 (or above)
- Your machines must be using anti-malware platform version 4.18.1906.3 (or above) and anti-malware engine version 1.1.15500.X (or above)
Now follow the steps to enable or disable Tamper Protection:
- Go to the Microsoft 365 Device Management portal and sign in with your work or school account.
- Select Device configuration > Profiles
- Create a profile that includes the following settings:
- Platform: Windows 10 and later
- ProfileType: Endpoint protection
- Settings > Windows Defender Security Center > Tamper Protection. Configure it on or off
- Assign the profile to one or more groups
If you do not see this option right away, it is still being rolled out.
Whenever a change occurs, an alert will be displayed on the Security Center. The security team can filter from the logs by following the text below:
AlertEvents | where Title == "Tamper Protection bypass"
No Group Policy Object for Tamper Protection
Lastly, there is no Group Policy available to manage multiple computers. A note by Microsoft clearly says:
Your regular group policy doesn’t apply to Tamper Protection, and changes to Windows Defender Antivirus settings will be ignored when Tamper Protection is on.
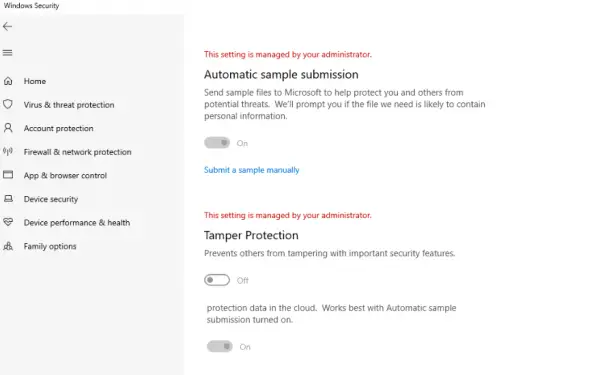
You can use the Registry method for multiple computers by remotely connecting to that computer and deploying the change. Once done, this is how it will look in users individual settings:
We hope the steps were easy to follow and that you could enable or disable Tamper Protection as required.
Tamper Protection, This setting is managed by your administrator
If you see This setting is managed by your administrator message for Tamper Protection, you could enable Tamper Protection using Registry, remove the DisableAntiSpyware Registry entry, or use Microsoft Intune to resolve the issue. Contact your system administrator if this does not help.
Anand Khanse is the Admin of TheWindowsClub.com, a 10-year Microsoft MVP (2006-16) & a Windows Insider MVP (2016-2022). Please read the entire post & the comments first, create a System Restore Point before making any changes to your system & be careful about any 3rd-party offers while installing freeware.
One of the greatest threats to enterprise PCs is malware — or even innocuous applications — that tamper with system configuration settings and potentially create new vulnerabilities and weaken the system against future attacks.
With the Windows 10 1903 release, Microsoft introduced Tamper Protection to the Windows Security application, which enables IT admins to make it more difficult for other applications to alter sensitive security settings on the PC. There are some caveats to using Tamper Protection in Windows 10, however, so IT admins should understand how it works.
What is Tamper Protection in Windows 10?
When enabled, Tamper Protection prevents changes to important system security configuration settings — especially changes that are not made directly through the Windows Security application. The goal is to prevent malicious software — or even third-party applications — from changing important security settings in Windows Defender Antivirus and other tools. Tamper Protection is available for both Home and Enterprise versions of Windows 10.
When Tamper Protection is enabled, outside applications will no longer be able to change settings for real-time protection, which is part of the antimalware scanning feature of Microsoft Defender ATP; settings for Microsoft’s Windows Defender Antivirus cloud-based malware protection services; settings for IOfficeAntiVirus, which affects how suspicious files such as internet downloads are handled; settings for behavior monitoring in real-time protection, which can stop suspicious or malicious system processes; and it prevents deleting security intelligence updates or turning off Windows Defender antimalware protection entirely.
There are several important considerations with Tamper Protection. First, Tamper Protection does not prevent administrators from making changes to important security settings directly through the Windows Security application; Tamper Protection simply prevents third-party applications from changing those Windows settings. Second, Tamper Protection does not prevent or control how third-party antivirus or antimalware applications interoperate with the Windows Security application.
Enabling and disabling Tamper Protection on an individual machine
Users with Windows 10 computers not managed by the organization»s IT staff can use the Windows Security application to turn Tamper Protection on or off as needed. This is a common scenario in remote or BYOD (bring your own device) environments.
Users will still need admin-level permissions on the system to change security settings, but computer owners usually possess admin-level access. Once logged into the computer, users can quickly access Tamper Protection with the following steps:
- Access the Taskbar and type defender into the search bar on the Taskbar.
- Select the Windows Security app from the search results.
- Select Virus and threat protection.
- Choose Virus and threat protection settings.
- Locate the Tamper Protection toggle and choose On or Off as desired.
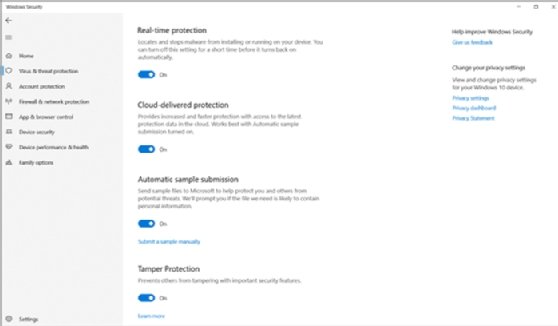
The Tamper Protection toggle should be visible, and administrators should be able to click on the toggle to turn it off or on. If the toggle is not visible, IT may need to update Windows 10. If Tamper Protection is turned off, users will see a small yellow warning symbol in the Windows Security application by the Virus & Threat Protection entry.
Enabling and disabling Tamper Protection for your whole organization
There is generally no need to disable Tamper Protection in Windows 10 unless it affects other validated tools.
When an IT organization is responsible for managing a fleet of Windows 10 user endpoints, IT admins can use Microsoft Intune to turn Tamper Protection on or off for all those managed computers through the Microsoft Endpoint Manager admin center portal. Administrators will need the correct permissions, such as global or security admin, to make changes to Tamper Protection.
Before accessing Tamper Protection, the organization must meet the following requirements:
- It must have the appropriate Intune licenses, such as Microsoft 365 E5.
- Windows 10 computers must be running versions 1709, 1803, 1809 or later.
- Organizations must use Windows security with security intelligence updated to version 1.287.60.0 or later.
- All machines must be using antimalware platform version 4.18.1906.3 and antimalware engine version 1.1.15500.X (or later).
With all requirements met, the actual process of accessing Tamper Protection is similar to accessing it for individual users:
- Access the Microsoft Endpoint Manager admin center and sign in with the appropriate credentials.
- Select Devices and choose Configuration Profiles.
- Create a profile with the following characteristics:
Platform: Windows 10 and later
Profile type: Endpoint protection
Category: Microsoft Defender Security Center
Tamper Protection: Enabled (or Disabled)

There is generally no need to disable Tamper Protection in Windows 10 unless it affects other validated tools. For example, Tamper Protection might block a known third-party tool such as ConfigureDefender from making changes to Windows Defender. Similarly, enterprise PCs that IT manages with comprehensive software installation policies may not require Tamper Protection.
Using PowerShell to check Tamper Protection
Windows PowerShell isn’t just a powerful and versatile scripting platform; it’s also a management console capable of changing and checking vital settings within a system or environment. PowerShell uses a vast array of command scripts (called cmdlets) to execute commands and retrieve details. PowerShell can quickly report on the status of Tamper Protection with these steps:
- Launch the PowerShell application.
- Enter the Get-MpComputerStatus PowerShell cmdlet.
- Review the list of results. If the value for IsTamperProtected is true, then Tamper Protection is enabled. If the result is false, Tamper Protection is disabled.
Viewing tampering attempts
Security has little value if tamper attempts or other attacks are left unseen and unreported. Administrators must have some means of monitoring or reviewing the presence of potential attacks such as tampering.
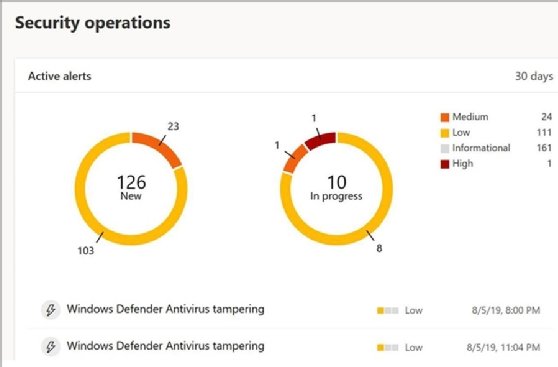
The Microsoft Defender Security Center offers protection though a cloud subscription service called Microsoft Defender for Endpoint. It’s a dashboard that displays security issues that include tamper attempts that are flagged with details logged for further investigation. Organizations will need to subscribe to the Microsoft Defender for Endpoint service.
Does Tamper Protection work with third-party security tools?
Tamper Protection prevents unauthorized changes to Windows Defender Antivirus settings through the system Registry. For example, when Tamper Protection is on, the DisableAntiSpyware group policy key in the Registry cannot disable Windows Defender Antivirus.
Some third-party security products, however, can make valid changes to security settings. Tamper Protection does work with third-party security products, and should ideally allow those validated third-party products to modify the settings guarded by Tamper Protection.
Tamper Protection uses real-time threat information to determine the potential risks of software and suspicious activities. IT can prevent «false positives» from Tamper Protection by accessing the Windows Security dialog and updating security intelligence to version 1.287.60.0 or later. Once IT admins update the system, Tamper Protection should continue to protect the system security settings in the Registry and log any attempts to modify those settings without generating errors.
Does Tamper Protection work with endpoint management tools?
Tamper Protection does work with endpoint management tools, but there are limits. The entire point of Tamper Protection is to prevent outside tools from changing Windows Security protection settings. With Tamper Protection on, administrators can potentially establish a centralized setting for Tamper Protection using management tools, but those other tools and platforms cannot change settings protected by Tamper Protection. Admins would need to manage those protection settings through Windows Security.
Unified endpoint management platforms such as Microsoft Intune, enterprise configuration management applications such as System Center Configuration Manager, command-line instructions or scripts, the Windows System Image Manager configuration, Group Policy, and any other Windows Management Instrumentation tools and administrative roles cannot override Tamper Protection.
An organization with a Windows enterprise-class license, such as a Microsoft Defender ATP license, or computers running Windows 10 Enterprise E5 must opt in to global Tamper Protection. IT can only manage the feature through an Intune management console, which prevents local users from overriding Tamper Protection on managed systems.
Today, in this blog post, we illustrate two different ways to either enable or disable Tamper Protection on Windows 10 PC. This is a new attribute developed by Microsoft on the Windows Security app for system protection purposes. Similar to Real-time and cloud protection, Tamper protection works as an anti-malware app to safeguard the system from malicious attacks.
If somehow this tool is turned off, the system might fail into trouble and error appears while running different applications. Enabling Tamper protection may solve these types of bugs. You may try either Windows security UI or Registry Tweaks to enable or disable the same manually on your system.
Note: The Tamper Protection tool is available only for Windows 10 Home users. If you are running the pro version of OS, you can’t avail of this feature on your PC.
Here is a detailed description of how to enable or Disable Temper protection in Windows 10-
1} Turn Tamper Protection On or off using Windows Security UI
Windows Security is the by-default app of Windows 10 that can activate or dismiss the Tamper protection feature very easily. To perform this, follow the below steps-
Step-1: Go to the navigation pane of the Taskbar and hit the Windows Security option.
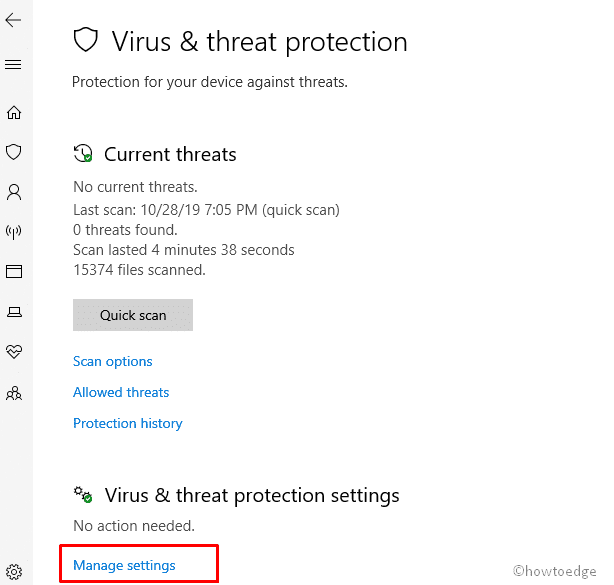
Step-2: When new window lands, select Virus & Threat Protection followed by the Manage settings.
Step-3: On the succeeding screen, scroll down to locate Tamper Protection and make sure that the toggle switch is turned On.
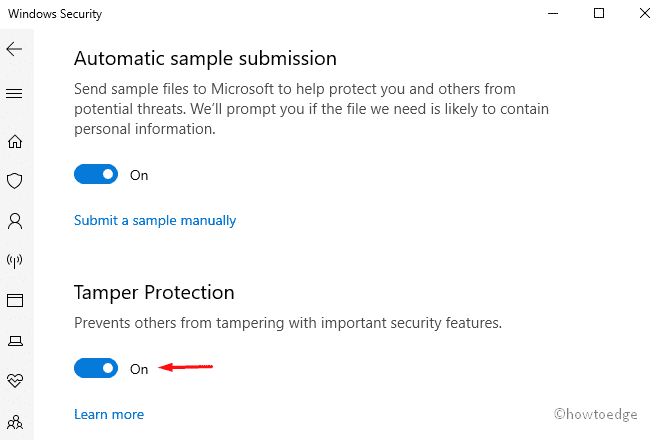
Note: If you want to turn this characteristic off, proceed similar to the above steps and turn off the toggle switch.
2} Enable or Disable Temper Protection via a Registry tweak
The Registry editor provides you an alternate way to turn on and off the Tamper Protection feature on Windows 10 PC. To do this task, you have to alter the following changes-
- Type Regedit in the text box after citing Search and hit Enter key on the well-suited result.
- The User Account Control window appears immediately after, select Yes.
- Navigate to the following location using its address bar.
HKEY_LOCAL_MACHINE\SOFTWARE\Microsoft\Windows Defender\Features
- Henceforth, switch to the right pane and do the right-click on the Tamper Protection DWORD.
- On the new pop up, set the key-value 5 to enable and 0 for disable.
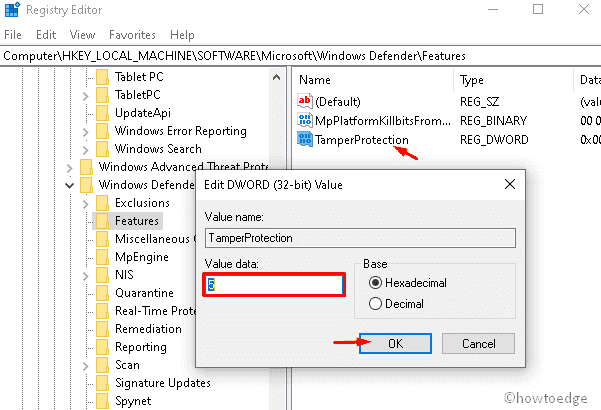
- Once over, close the running registry window and Restart your computer.
Note: Once the Tamper Protection is enabled, it doesn’t mean you don’t require an anti-malware app to protect your PC. You should continuously update your Windows Security app and register the third party antivirus to protect the system from malicious attack.
Advantages of enabling Tamper Protection
- After you set this feature as “Enabled”, you don’t require to install third-party security applications on your Windows 10 device.
- If you Update the Windows Defender intelligence to 1.287.60.0 or advanced version, this will also safeguard the Registry editor and provides interruption-free PC usage.
- When the Tamper protection is turned on, you can’t disable Windows Security services using the DisableAntiSpyware group policy.
