
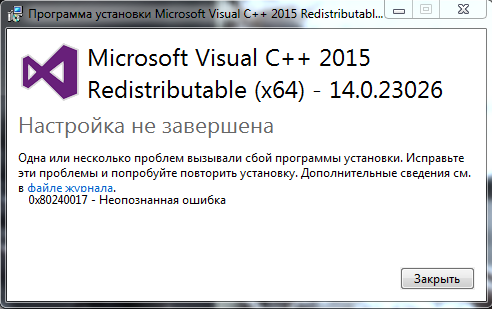
Очень распространенная проблема при установке Распространяемого пакета Visual C++ 2015 и 2017 в Windows 7 и 8.1 — неопознанная ошибка 0x80240017 после запуска файла установки vc_redist.x64.exe или vc_redist.x86.exe с сообщением «Настройка не завершена», причем разобраться, в чем именно дело и как исправить ситуацию подчас бывает сложно. Примечание: если
В этой инструкции подробно о том, чем может быть вызвана такая ситуация, как исправить ошибку 0x80240017 и установить Visual C++ Redistributable в Windows 7 или 8.1. Примечание: если вы уже всё испробовали, но ничего не помогает, можно использовать неофициальный способ установки библиотек, который описан в конце инструкции Как скачать и установить Visual C++ 2008-2017 Redistributable, с большой вероятностью установка пройдет без ошибок.
Исправление ошибки 0x80240017 при установке компонентов Visual C++ 2015 и 2017
Чаще всего причиной неопознанной ошибки 0x80240017 при установке распространяемых компонентов Visual C++ 2015 (2017) являются те или иные неполадки Центра Обновлений Windows 7 или Windows 8.1.

Если вы каким-то образом блокировали или отключали центр обновлений Windows, использовали «активаторы» — всё это может привести к рассматриваемой проблеме.
В том случае, если ничто из указанного не делалось, а на компьютере или ноутбуке установлена чистая лицензионная Windows, сначала попробуйте следующие простые методы решения проблемы:
- При наличии стороннего антивируса или файрволла временно отключите его и попробуйте временно его отключить и повторить установку.
- Попробуйте использовать встроенное устранение неполадок: Панель управления — Устранение неполадок — Устранение неполадок Центра обновления Windows, в разделе «Система и безопасность» или «Просмотр всех категорий».

- Установите обновление KB2999226 для вашей системы. Если при установке обновления возникнут проблемы, далее будет описан возможный путь решения. Скачать KB2999226 можно с официального сайта:
- https://www.microsoft.com/ru-RU/download/details.aspx?id=49077 — Windows 7 x86 (32 бита)
- https://www.microsoft.com/ru-ru/download/details.aspx?id=49093 — Windows 7 x64
- https://www.microsoft.com/ru-ru/download/details.aspx?id=49071 — Windows 8.1 32-бит
- https://www.microsoft.com/ru-RU/download/details.aspx?id=49081 — Windows 8.1 64-бит

Если ничто из этого не сработало, либо не удалось исправить ошибки Центра управления и установить обновление KB2999226, попробуйте следующие варианты.
Дополнительные способы исправить ошибку
Если при устранении неполадок были выявлены ошибки центра обновления, но они не были исправлены, попробуйте такой метод: запустите командную строку от имени администратора, а затем по порядку введите следующие команды, нажимая Enter после каждой из них:
net stop wuauserv
net stop cryptSvc
net stop bits
net stop msiserver
ren C:\Windows\SoftwareDistribution SoftwareDistribution.old
ren C:\Windows\System32\catroot2 catroot2.old
net start wuauserv
net start cryptSvc
net start bits
net start msiserver
Затем вновь попробуйте выполнить установку компонентов Visual C++ нужной версии. Подробнее про исправление ошибок центра обновления Windows вручную.
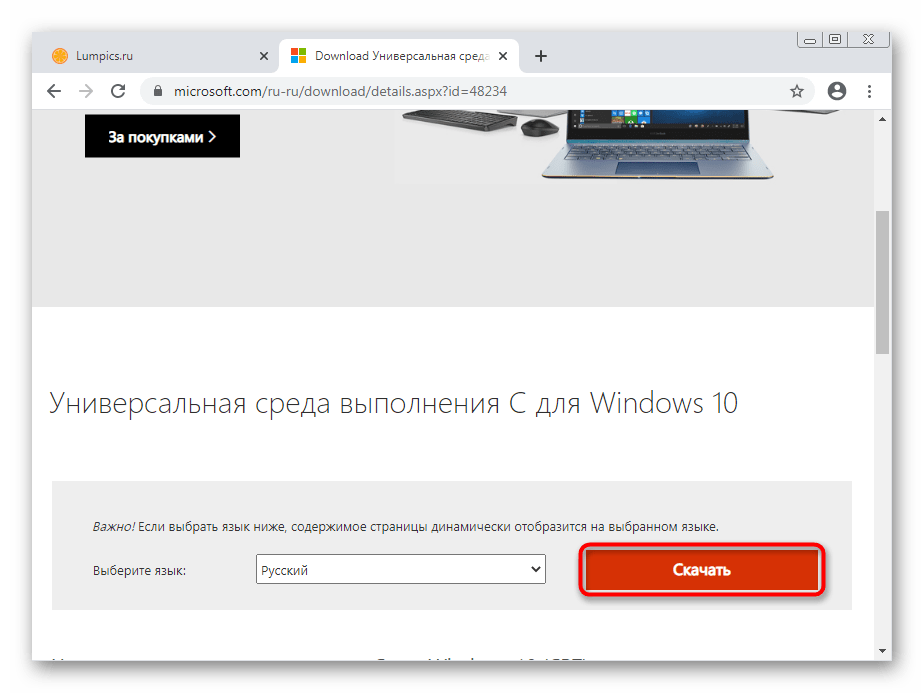
На некоторых системах с Windows 7 и 8.1 вы можете получить сообщение о том, что обновление KB2999226 не применимо к вашему компьютеру. В этом случае попробуйте сначала установить компоненты «Универсальная среда выполнения C для Windows 10» (не обращайте внимание на название, сам файл предназначен именно для 7-ки, 8 и 8.1) с официального сайта https://www.microsoft.com/ru-ru/download/details.aspx?id=48234, затем перезагрузить компьютер и повторить попытку установки обновления.
Если и это не помогло, для установки обновления KB2999226, можно использовать такие шаги:
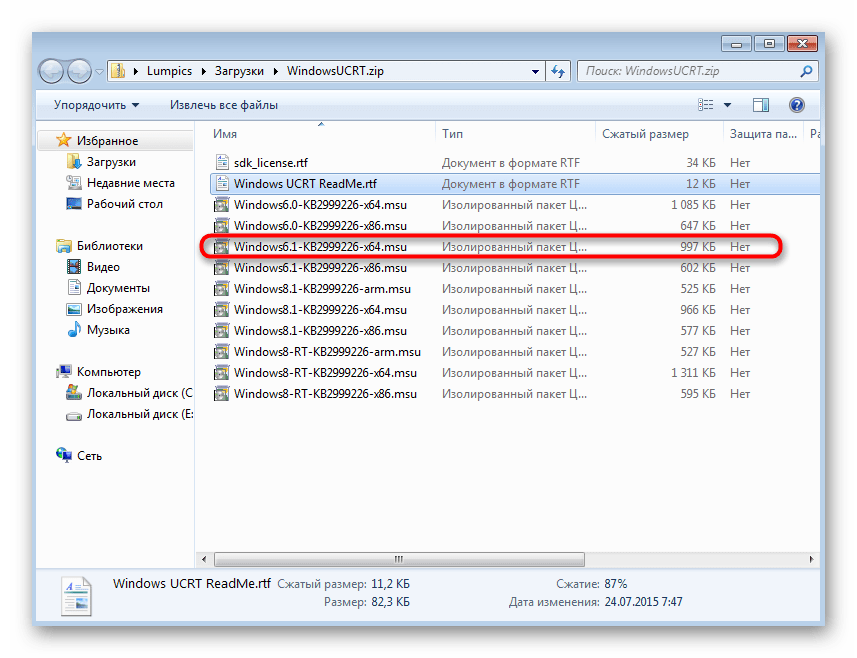
- Скачайте файл обновления с расширением .msu с официального сайта.
- Распакуйте этот файл: его можно открыть с помощью обычного архиватора, например, 7-Zip успешно это делает. Внутри вы увидите несколько файлов, один из них — файл .CAB с указанием номера обновления, например, Windows6.1-KB2999226-x64.cab (для Windows 7 x64) или Windows8.1-KB2999226-x64.cab (для Windows 8.1 x64). Скопируйте этот файл в удобное расположение (лучше не на рабочий стол, а, например, в корень диска C:, так будет проще вводить путь в следующей команде).

- Запустите командную строку от имени администратора, введите команду (используя свой путь к файлу .cab с обновлением): DISM.exe /Online /Add-Package /PackagePath:C:\Windows6.1-KB2999226-x64.cab и нажмите Enter.
- Похожий путь, но без предварительной распаковки файла .msu — команда wusa.exe путь_к_файлу_обновления.msu в командной строке, запущенной от имени администратора и без каких либо параметров.

И наконец, если всё пройдет успешно, то обновление будет установлено. Перезагрузите компьютер и проверьте, появляется ли неопознанная ошибка 0x80240017 «Настройка не завершена» при установке Visual C++ 2015 (2017) в этот раз.
Все способы:
- Способ 1: Использование средства устранения неполадок
- Способ 2: Временное отключение антивируса и стороннего межсетевого экрана
- Способ 3: Настройка безопасной загрузки
- Способ 4: Сброс настроек Центра обновления Windows
- Способ 5: Установка обновления KB2999226
- Вопросы и ответы: 0
Способ 1: Использование средства устранения неполадок
Наиболее простой метод решения возникшей проблемы с ошибкой 0x80240017, которая чаще всплывает при установке пакетов Visual C++ в Windows 7, — использование встроенного в операционную систему средства устранения неполадок. Он не самый эффективный, но пользователю не придется выполнять практически никаких действий, поэтому и стоит рассмотреть его в первую очередь.
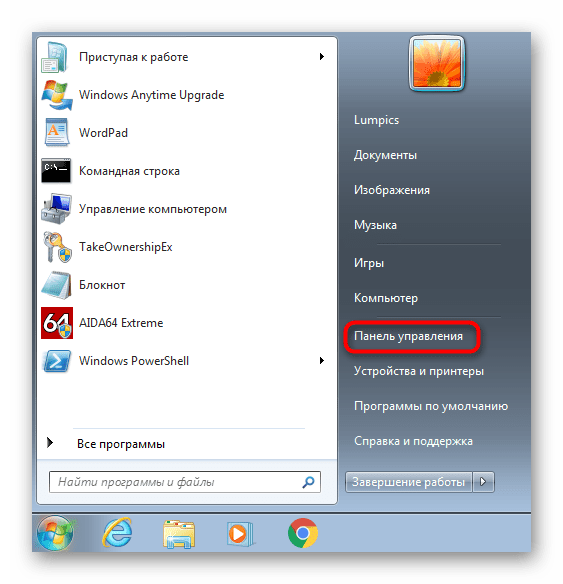
- Откройте меню «Пуск» и оттуда вызовите «Панель управления».
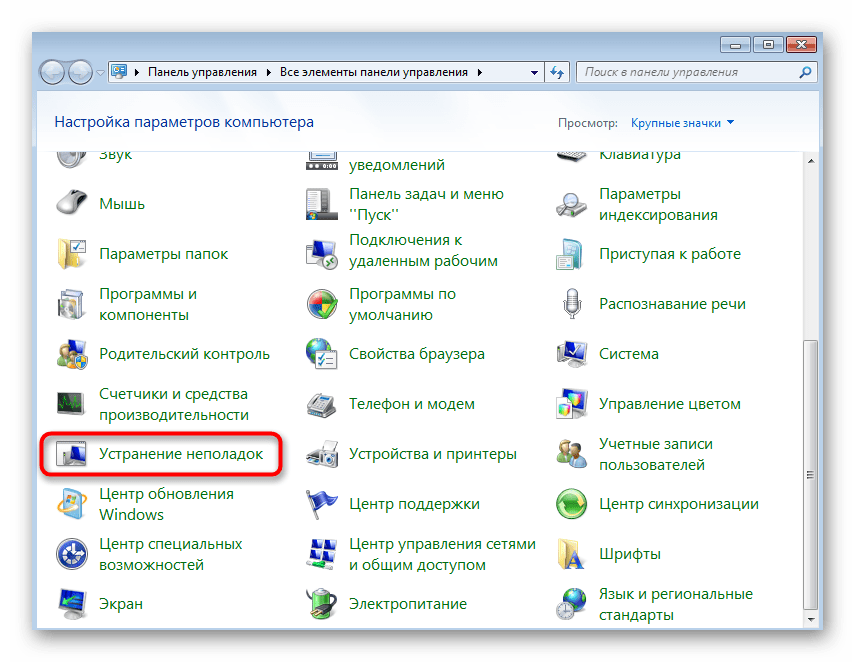
- Среди списка категорий найдите «Устранение неполадок» и нажмите по ней левой кнопкой мыши, чтобы перейти.
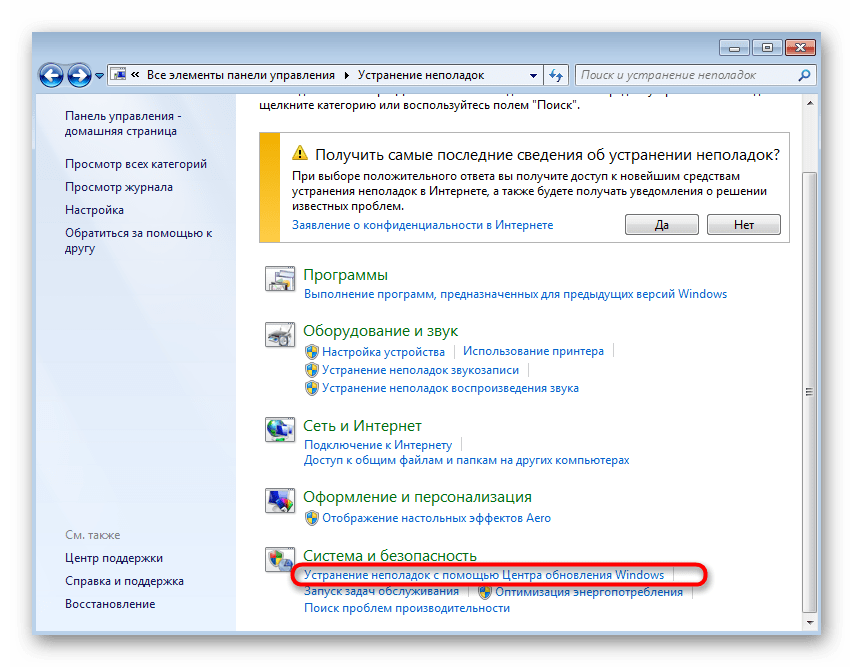
- Там вас интересует раздел «Система и безопасность», а в нем кликабельная надпись «Устранение неполадок с помощью Центра обновления Windows».
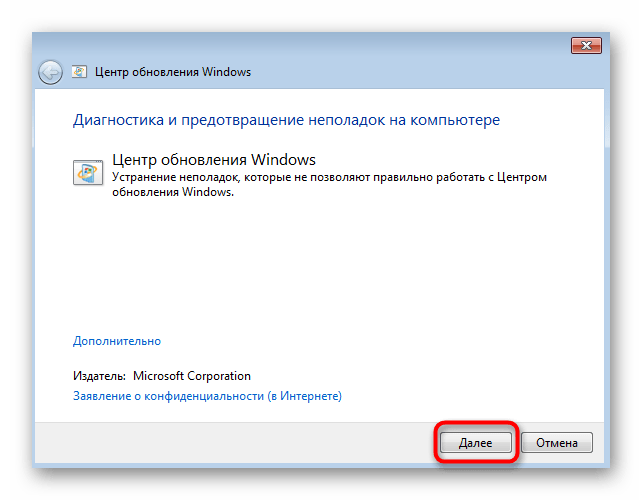
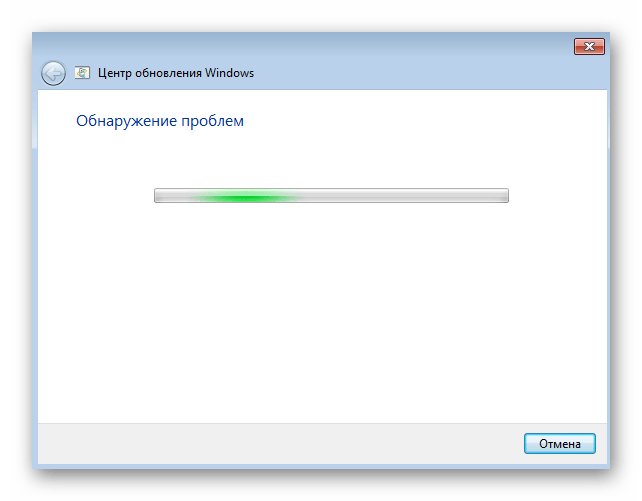
- Ознакомьтесь с приветственным окном и запустите поиск неполадок, нажав на «Далее».
- Остается только дождаться окончания обнаружения проблем. Если какие-то из них будут найдены, запустится автоматическое устранение или отобразится инструкция с действиями, которые требуется произвести юзеру.
В случае, когда какие-то параметры были изменены, советуем перезагрузить компьютер и только потом повторить попытку инсталляции Visual C++ для проверки того, была ли решена рассматриваемая трудность.
Способ 2: Временное отключение антивируса и стороннего межсетевого экрана
Стандартное средство защиты, встроенное в Windows 7, не может оказывать негативное влияние на поведение рассматриваемого компонента, поскольку он официальный, однако это не относится к сторонним антивирусам и брандмауэрам. Их потребуется отключить через графическое меню, а вспомогательную инструкцию по этой теме вы найдете в статье по ссылке ниже.
Подробнее: Отключение антивируса
Если этот вариант оказался действенным, сразу после инсталляции можно снова включить антивирус и межсетевой экран. То же самое осуществите и в той ситуации, когда никакого результата добиться не удалось.
Способ 3: Настройка безопасной загрузки
Возможно, на компьютере находятся другие сторонние компоненты, которые мешают установке Visual C++. К сожалению, вручную будет трудно определить, какая именно программа это делает, поэтому проще запустить компьютер в безопасном режиме, оставив активным только интернет-соединение, что осуществляется так:
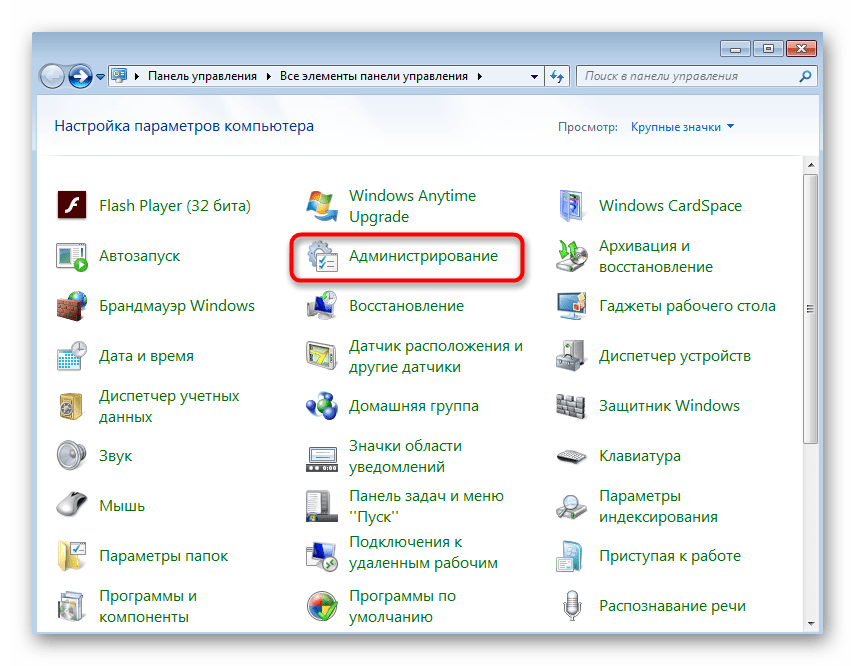
- Через то же меню «Панель управления» перейдите в категорию «Администрирование».
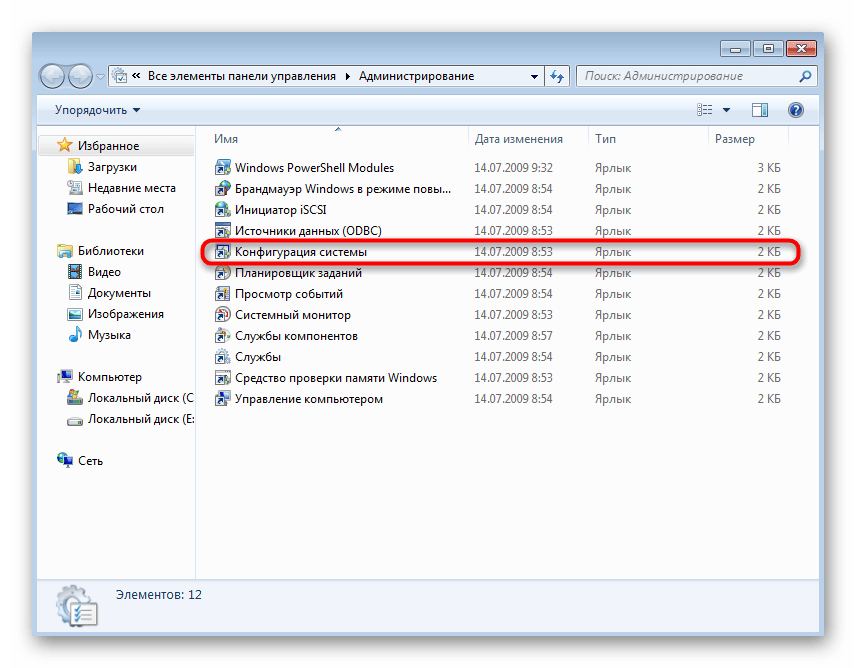
- Щелкните по пункту «Конфигурация системы».
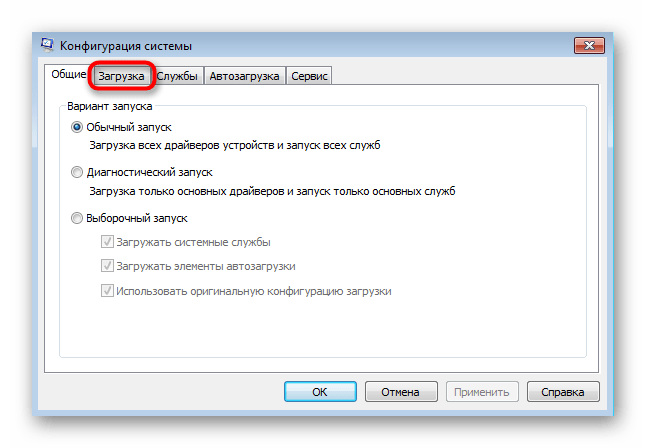
- Зайдите на вкладку «Загрузка».
- Отметьте галочкой «Безопасный режим» и установите маркер возле активированного пункта «Сеть». Остается только нажать «Применить» и отправить компьютер на перезагрузку.
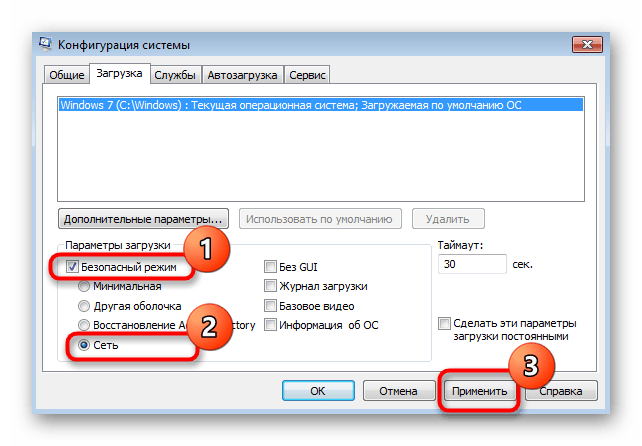
Сразу же после загрузки операционной системы в безопасном режиме можно повторить инсталляцию дополнительного компонента, а как только она завершится успехом, откройте то же меню, отключите безопасный режим и перезагрузите ПК.
Способ 4: Сброс настроек Центра обновления Windows
Иногда стандартное средство устранения неполадок не справляется со своей задачей, поскольку не может полностью сбросить настройки Центра обновления Windows. Однако ничего не мешает сделать это самостоятельно, вписав несколько простых команд в консоль, что осуществляется так:
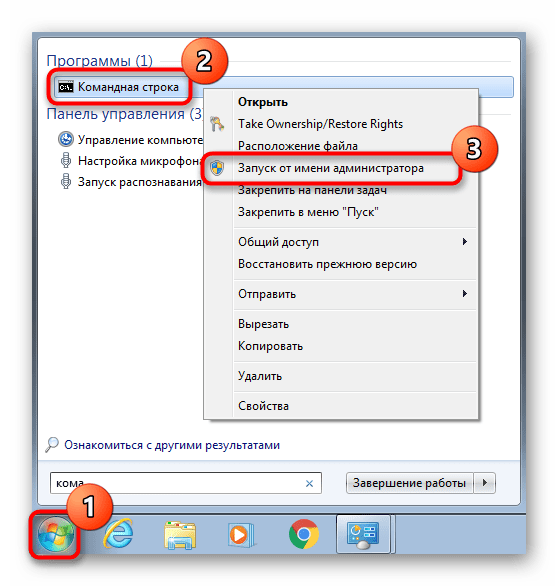
- Откройте «Пуск», отыщите там «Командную строку», кликните по ней правой кнопкой мыши и выберите «Запуск от имени администратора».
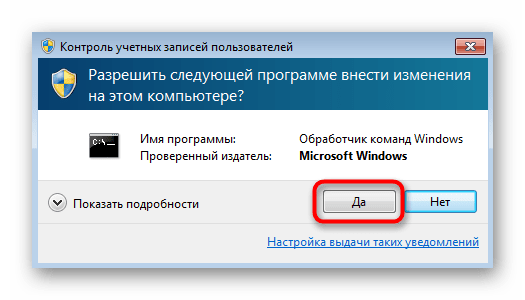
- При появлении кона контроля учетных записей подтвердите действие.
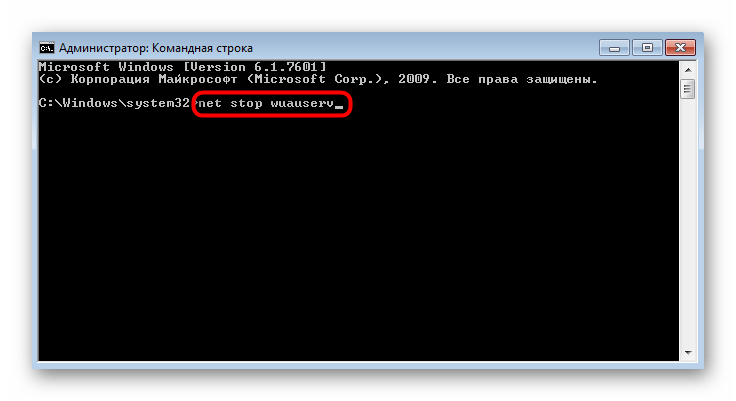
- Поочередно введите и при помощи нажатия на клавишу Enter активируйте следующие команды:
net stop wuauserv

net stop cryptSvc

net stop bits

net stop msiserver

ren C:\Windows\SoftwareDistribution SoftwareDistribution.old

ren C:\Windows\System32\catroot2 catroot2.old

net start wuauserv

net start cryptSvc

net start bits

net start msiserver
После успешной активации последней команды оптимальным решением будет перезагрузка компьютера, после которой запускайте повторную установку Visual C++.
Способ 5: Установка обновления KB2999226
Последний возможный вариант решения рассматриваемой сегодня проблемы — установка недостающего апдейта с кодом KB2999226. Этот процесс осуществляется полностью вручную, поскольку по каким-то причинам Центр обновления Windows проигнорировал эти файлы. Сама задача выполняется буквально за несколько минут.
Скачать обновление KB2999226 с официального сайта Microsoft
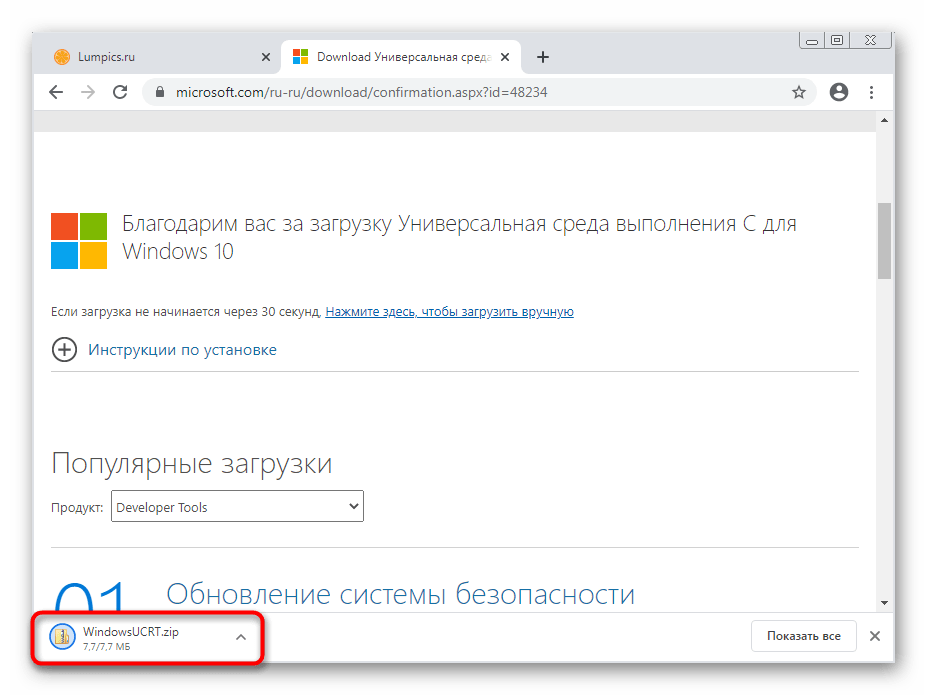
- Кликните по ссылке выше, чтобы попасть на официальную страницу загрузки апдейта и нажмите «Скачать».
- После загрузки запустите полученный архив.
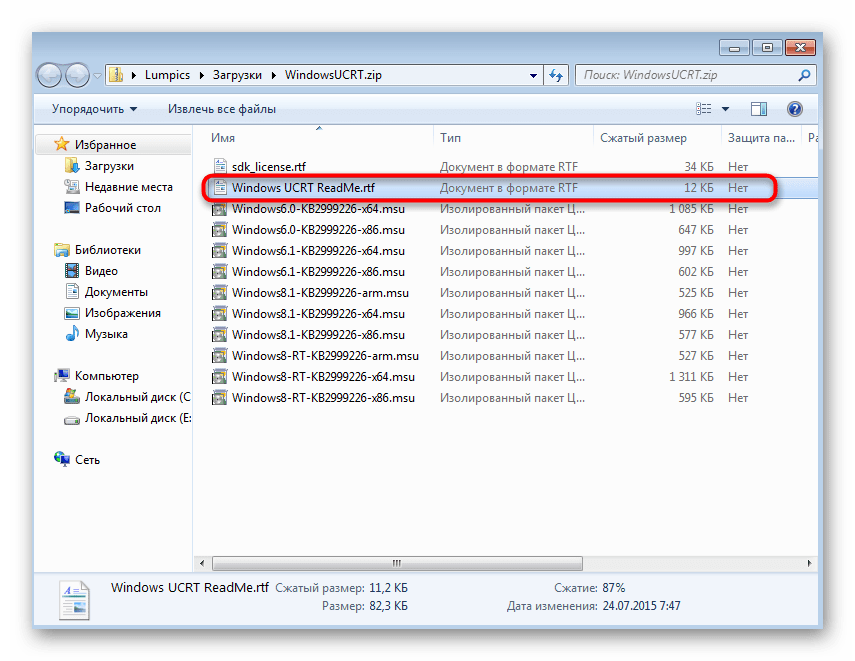
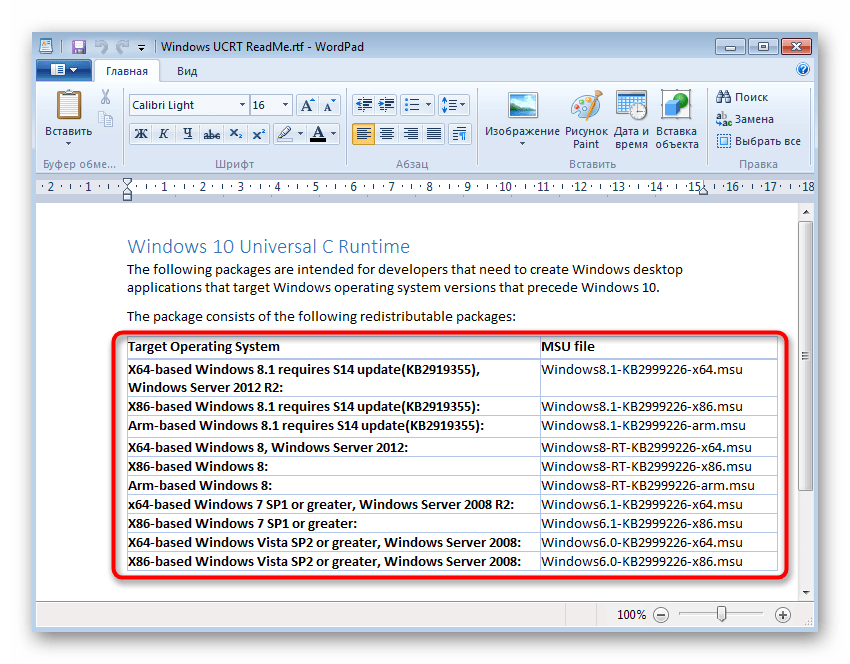
- В нем найдите файл «ReadMe» и откройте его через любой удобный текстовый редактор.
- Ознакомьтесь с соотношением операционных систем и названием файлов. Запомните то, которое подходит для вас.
- Вернитесь к архиву и дважды кликните по подходящему изолированному пакету.
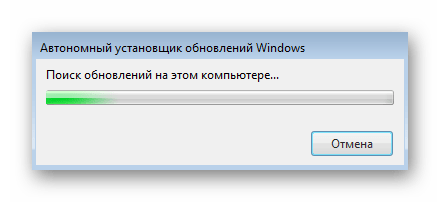
- Ожидайте окончания поиска обновлений на этом компьютере.
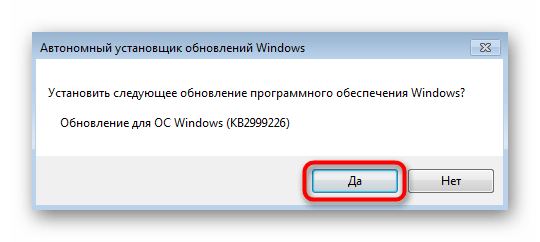
- Подтвердите добавление апдейта.
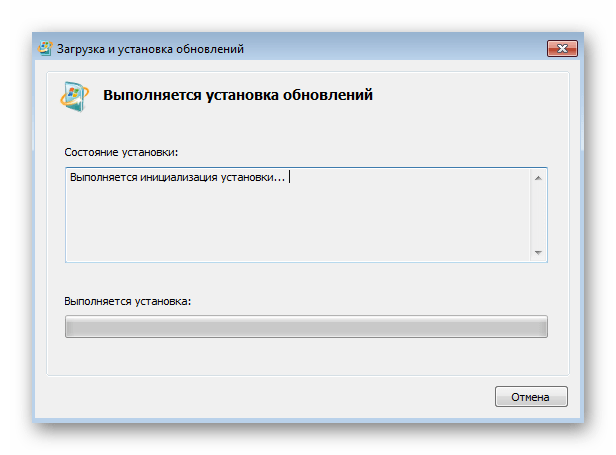
- Теперь остается только дождаться завершения операции.
В обязательном порядке нужно перезагрузить компьютер, поскольку только тогда новые обновления вступают в силу.
Дополнительно отметим, что иногда помогает полное восстановление операционной системы или банальная проверка целостности системных файлов. Переходите к этим радикальным вариантам только в том случае, если ни один из приведенных выше не помог, а инструкции по их реализации ищите в отдельной статье на нашем сайте по ссылке ниже.
Подробнее: Восстановление системы в Windows 7
Наша группа в TelegramПолезные советы и помощь
Ошибка 0x80240017 встречается во время установки Visual C++, из-за чего многие пользователи испытывают затруднения при запуске приложений, требующих эту версию. Вышеуказанная программа служит инструментом запуска большинства игр и приложений Windows и является практически обязательной для всех обладателей данной операционной системы.
Неопознанная ошибка 0x80240017 – причины возникновения
Проблема кроется в наличии ошибок и несоответствий в операционной системе, либо противоречий версий установщика и системы. Разработчики исправляют их по мере поступления и выпускают в виде обновлений Windows. Установка относительно новой версии Visual C++ может не подойти под текущую версию OS. В большинстве случаев проблема исчезает при обновлении системы, так что причина достоверна, а предлагаемые решения имеют основания.

Вторая возможная причина – битый файл установки. Для предупреждения всевозможных ошибок достаточно скачать установочный файл программы с официального сайта Microsoft, чтобы была уверенность в том, что файл нормальный, и чтобы исключить этот фактор, который влечет ошибки установки не только этой программы.
Далее идет причина, которая заключается в возможных противоречиях установленных дистрибутивов Microsoft Visual C. В данном случае стоит удалить все версии библиотек через «Установку и удаление программ», которая находится в «Панели управления», и установить заново.
Error 0x80240017 failed to execute msu package – методы решения
Есть несколько рабочих способов устранить неполадку. Два метода получили подтверждение на практике. Их и рассмотрим.
Метод1
Нужно скачать проверенную версию Microsoft Visual C ++, от официального источника. Возможно, вы устанавливаете файл сомнительного происхождения, скаченный не понятно где. Все проверенные ссылки на Microsoft Visual C ++ здесь http://dlltop.ru/soft/46-microsoft-visual-c
Метод 2
Следует установить последние обновления. Сделать это можно двумя способами: автообновлением или ручным обновлением.
Первый — использовать штатные инструменты автоматического обновления, если установлена официальная ОС. Включить его можно в «Центре обновления Windows» — «Панель управления». После чего система сама проверит, нужны ли обновления, скачает все необходимые файлы и предложит установить их. Установка завершится перезагрузкой системы, чтобы обновленная система приняла все изменения. Далее, нужно заново запустить установщик Visual C++, дождаться окончания, перезапустить компьютер еще раз.
Второй – скачать и установить единичный пакет с официального сайта Виндовс. Для этого нужно:
- Перейти по ссылке https://support.microsoft.com/ru-ru/help/14162/windows-service-pack-and-update-center .
- Скачать пакет обновлений, нажав на кнопку «Скачать». Открывается дополнительное окно сайта, предлагается много вариантов для различных версий ОС. Выбирайте тот, который соответствует вашей системе. Эти сведения можно посмотреть в «Панель управления» — «Система».
Для установки обновления нужно выполнить следующий алгоритм действий:
- Отключить интернет (выдернуть сетевой шнур или отключить Wi-Fi).
- Запустить скачанный ранее файл.
- Дождаться окончания процедуры установки.
- Перезагрузить компьютер.
- Заново запустить установщик Visual C++.
- Перезагрузить компьютер и подключиться к сети.
Ошибка исчезает благодаря исправлениям, которые вносятся в систему. Они устраняют конфликт, вызванный различиями версии Виндоус и Visual 2015 года.
Метод 3
Есть еще один метод, который помогает с решением ошибки. Для этого, скачать официальное обновление следует по второй ссылке https://support.microsoft.com/ru-ru/help/2999226/update-for-universal-c-runtime-in-windows . 0x80240017 неопознанная ошибка Visual C Windows 7 успешно завершается, и установка проводится успешно.
Алгоритм действий тот же, что и в первом методе:
- Перейти по ссылке https://support.microsoft.com/ru-ru/help/2999226/update-for-universal-c-runtime-in-windows .
- Выбрать файл установки обновлений в зависимости от версии Виндовс («Панель управления» — «Система» покажет версию ОС).
- Скачать, кликнув по надписи «Скачать пакет» напротив нужной версии.
- Прервать подключение к интернету (отключение Wi-fi или отсоединение сетевого шнура).
- Установить скачанный пакет обновлений.
- Перезагрузить компьютер.
- Запустить установку Visual C++.
- Дождаться успешного завершения и перезагрузить компьютер.
- Включить интернет.
Заключение
При подготовке материала не пострадала ни одна система. Используя Метод 1, Метод 2, и Метод 3 было исправлено несколько ошибок с кодом 0x80240017, что подтверждает их состоятельность. После чего был проведен анализ и поиск возможных причин.
Будем рады услышать от Вас отзыв, также поможем при установки компонентов, и в исправлении ошибок. Пишите всё в комментариях, чуть ниже
Видео: Неопознанная ошибка 0x80240017 в Visual c++ как исправить?
Windows Update is a great service developed by Microsoft that lets you update the service pack and the patches for the operating system on a regular basis. But it also can’t be denied that users often encounter error codes while updating their Windows devices. Today in this blog post we are going to explain a similar type of common error that is known as Update Error 0x80240017.
This error usually occurs after a failed update performed by Windows Update. It can also appear if you install a third-party tool and in return, your system files get corrupted or damaged. If you’re currently facing this particular problem, the methods below might help you to deal with it.
Solution for Windows Update Error 0x80240017
To fix Windows Update Error 0x80240017, follow the below steps –
Solutions List
- Run Windows Update Troubleshooter
- Reset Windows Update Components
- Run SFC and DISM Tools
- Manually Install Pending Windows updates
- Reset your PC
1] Run Windows Update Troubleshooter
Windows 10 Update errors are a common problem that sometimes occurs temporarily. Therefore we suggest you run the Update troubleshooter and check if your Windows version is capable of fixing it automatically. Here is a quick guide that will help you to run the Windows Update Troubleshooter –
- Click on the Start button and select the Settings (gear icon) option.
- Select the Update & Security category > Troubleshoot tab.
- Switch to the right pane and select “Additional troubleshooters“.
- Next, go to the “Get up and running” section, and locate Windows Update.
- Once you find it, select it and then hit Run the troubleshooter.

- This will start scanning to detect any problem in your device.
- Once it completes the process, follow the on-screen instructions to finish the steps.
- Now restart your computer and check if the problem still exists.
If you are getting this error code on Windows 11, you may find the Windows update troubleshooter’s link at the following path –
Win + I > System > Troubleshoot > Other troubleshooters > Windows update > Run.
2] Reset Windows Update Components
If the problem is not solved, try to reset Windows Update components manually. This method is known to have a higher degree of success in fixing the Update error code. So, let’s give it a try.
- Right-click on the Start menu and select the Run option from the menu list.
- In the dialog box, type “cmd” and press Ctrl+Shift+Enter to open the elevated Command Prompt.
- At this time, UAC prompts on the screen, tap Yes to give your consent.
- Now type the following codes one after another and press Enter after each one.
 net stop wuauserv
 net stop cryptSvc
 net stop bits
 net stop msiserver
- Doing so will execute the above command and as a result, it stops certain basic services.
- Next, rename the SoftwareDistribution and Catroot2 folders using the below two codes –
Ren C:\Windows\SoftwareDistribution SoftwareDistribution.old
Ren C:\Windows\System32\catroot2 Catroot2.old
- Now you need to restart the services that you stopped earlier. To do that, type the following codes and hit Enter separately –
net start wuauserv
net start cryptSvc
net start bits
net start msiserver
- Here you need to restart your Windows to apply the changes.
- Once your device starts up, go to Settings > Update & Security > Windows Update.
- From here, move to the right pane and Check for Updates.
- If there you find any pending updates then download and install them.
In case resetting Windows components didn’t resolve the problem, then move down to the next potential method.
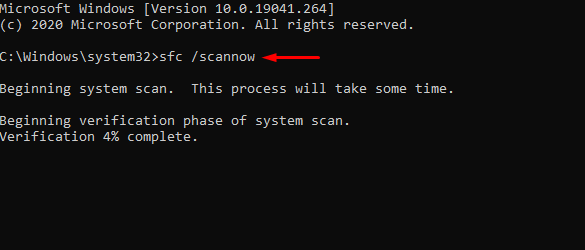
3] Run SFC and DISM Tools
If some system files get damaged or corrupted, this may be the reason for update issues and errors. Thanks to the System File Checker and DISM tool using which you may quickly get out of this problem. These tools will scan your system and detect the corrupted files that will be replaced or repaired after executing some commands. Here is how to do it:
- Go to your taskbar, then right-click on the Start button.
- Choose Run from the menu list.
- Type “cmd” in the text area and then press Ctrl + Shift + Enter shortcut key.
- In the elevated command prompt, type “
sfc /scannow” and then hit Enter. It will scan all protected system files.
- Once it completes, close the command prompt window and restart your PC.
Now try to download and install the updates to see if the update error is fixed now. If you’re still seeing the error code 0x80240017, then run the DISM tool so that it will replace the corrupted system files.
It requires an internet connection to download healthy files from the internet. So, make sure your internet connection is working properly, and then execute the below codes on the elevated command prompt.
DISM /Online /Cleanup-Image /ScanHealthNote
DISM.exe /Online /Cleanup-image /RestorehealthNote
Now hit enter to complete the process. After that, close the window > restart your computer, and see if the error still persists.
4] Manually Install Pending Windows updates
Resetting update components should resolve errors of any kind. However, if you are still struggling to update your operating system, you may get the pending standalone package from Microsoft Update Catalog. After downloading the setup file, double-click on it to begin its installation.
If you don’t know how to work on this aspect, read this tutorial.
5] Reset your PC
If none of the above methods help you resolve this issue then our last resort is to reset your Windows device. This will remove all the applications you have installed while retaining all the data intact. Therefore I would recommend you backup your important files and folders before you begin the process. In case you created it already then start the procedure by following the below steps –
- Right-click on the Start menu and select Settings > Update & Security.
- Select the Recovery feature and move to the right pane of the screen.
- Under Reset this PC, click on the Get started button.
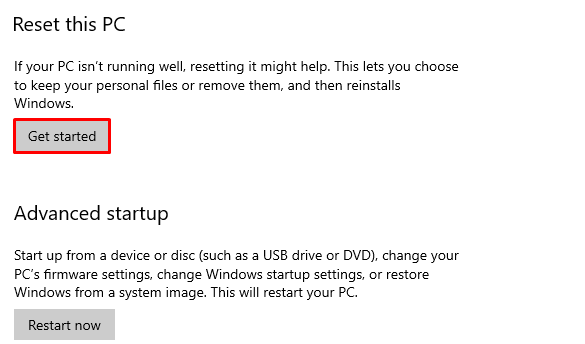
- Then follow the on-screen instructions to finish the Reset process.
- Once it completes, restart your Windows 10 device.
- Check again if this method fixed the problem.
That’s it, I hope this article helps you to fix the Update Error 0x80240017. If you have any queries or suggestions, let us know in the comment section.
Microsoft Visual C++ programs are one of the critical components of your Windows device. These packages ensure that the system operates smoothly without any issues.
So, it’s advisable to update these packages whenever you run into various system-related problems. However, you might often bump into the error code 0x80240017 while trying to update or install the Microsoft Visual C++ programs.
Now, let’s check out how you can tackle the error code 0x80240017.
1. Quick Fixes for the Microsoft Visual C++ Install Error 0x80240017

Here are a few quick fixes for this issue:
- Restart your device: One of the easiest solutions is to restart your PC immediately when you bump into this error.
- Update your apps: Some apps on your device might be responsible for the Microsoft Visual C++ Install Error 0x80240017. So, updating those software programs could help resolve this issue.
- Clean your PC: Sometimes, performing a simple disk clean-up could help remove the system issues that are causing this error.
If neither of those work, it’s time to go more in-depth.
2. Enable the Windows Installer Service
Since this is an installation error, the main issue might be coming from the Windows Installer service. For example, the Windows Installer service could be disabled. So, let’s check out how you can enable this service to tackle this problem:
- Press Win + R to open the Run command dialog box.
- Type services.msc and click Enter to open the Services window.
- Locate the Windows Installer option and double-click on it.
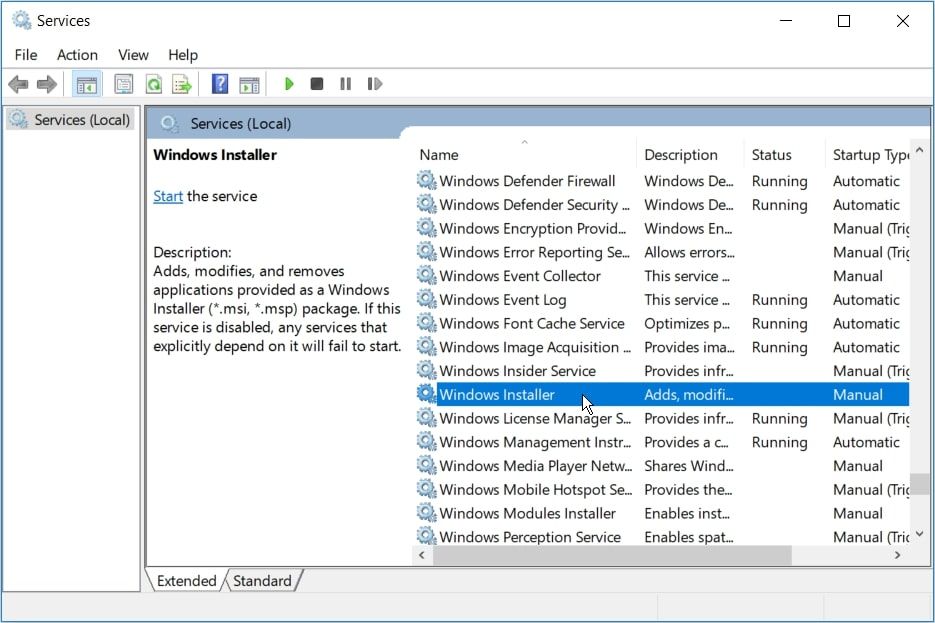
Next, follow these steps to finalize the process:
- Click the Startup type drop-down menu and select Manual.
- Press the Start button to enable the service.
- Finally, press Apply, press OK, and then restart your device to save these changes.
3. Re-Register the Windows Installer Service
Re-registering the Windows Installer service could also help resolve the problem. So, let’s check out how you can re-register the Windows Installer Service via the Command Prompt:
- Press Win + R to open the Run command dialog box.
- Type CMD and press Ctrl + Shift + Enter to open an elevated Command Prompt.
- Type the following command and press Enter to temporarily disable the Windows Installer service:
msiexec /unreg
When the process is complete, re-register the Windows Installer service by following these steps:
- Open the Command Prompt as per the previous steps.
- Type the following command and press Enter to re-register the Windows Installer service:
msiexec /regserver
Wait for the process to complete and then restart your device to save these changes.
4. Install the Microsoft Visual C++ Programs in Safe Mode
You could also tackle this problem by installing the Microsoft Visual C++ Programs in safe mode. Here’s how:
- Press Win + I to open the System Settings.
- Select Update & Security from the options.
- Next, select the Recovery option on the left-hand side pane.
- Click the Restart Now button under the Advanced Startup option.
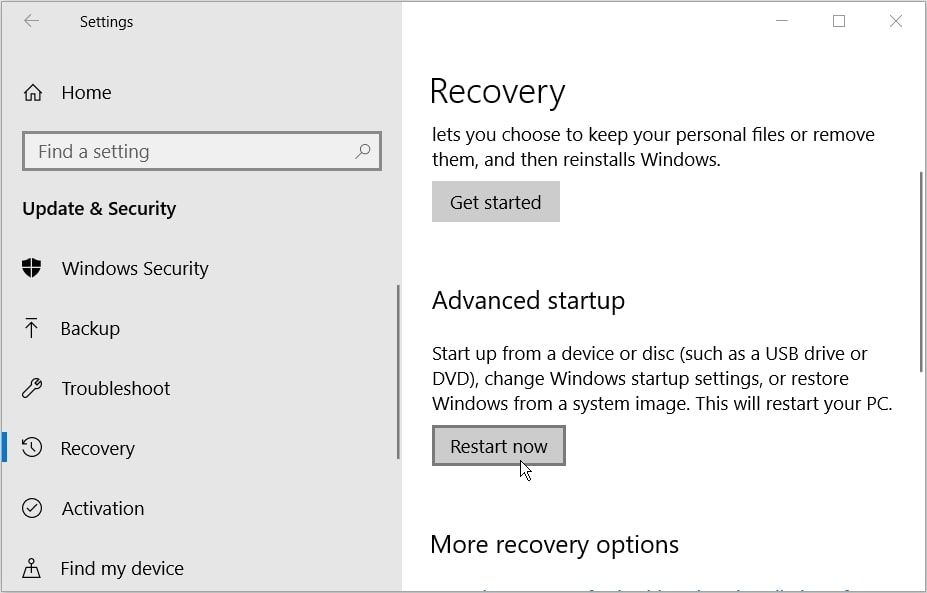
On the Recovery Environment window, navigate to Advanced options > Startup Settings and then press Restart. Finally, click the F4 key to boot your device in Safe Mode. From there, try installing the Microsoft Visual C++ Programs and see if this resolves the problem.
5. Use the Microsoft Program Install and Uninstall Troubleshooter
The Microsoft Visual C++ installation error might be caused by corrupted registry keys. In this case, the Microsoft Program Install and Uninstall troubleshooter could resolve the issue.
The Microsoft Program Install and Uninstall Troubleshooter will scan and repair corrupted registry keys. Additionally, the tool will also help get rid of other issues that could disrupt your installations.
So, here’s how you can use the Microsoft Program Install and Uninstall Troubleshooter to tackle this issue:
- Download the Program Install and Uninstall troubleshooter from the Microsoft website.
- Open the troubleshooter and click the Next button to proceed.
- Select the Installing option.
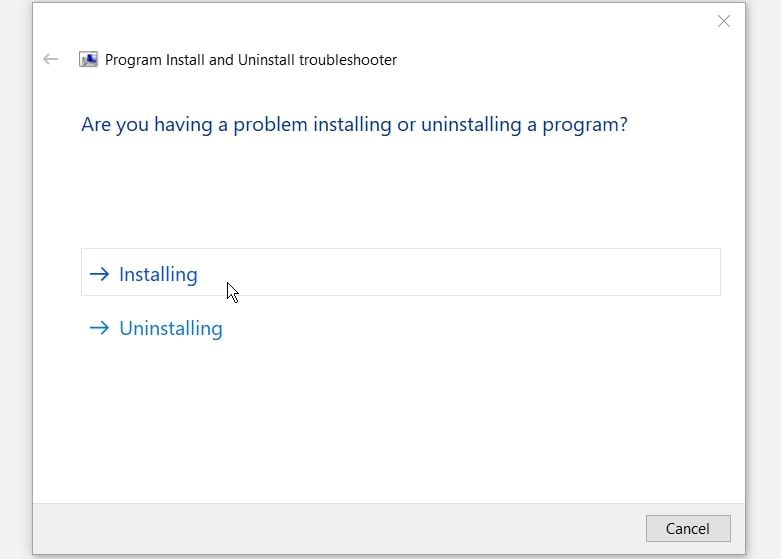
Next, select the Microsoft Visual C++ programs from the apps list and then click Next. If you can’t find these programs on the list, click the Not listed option and then search for the programs manually. Follow the on-screen steps to complete the process.
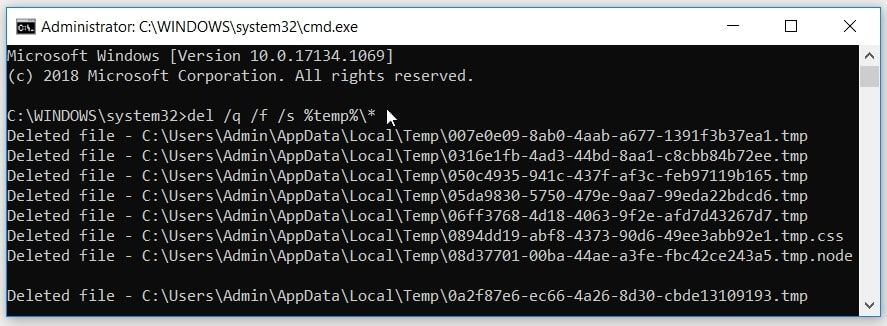
6. Delete Redundant Files in the Temp Folder
When you use your Windows device, the system regularly creates temp (temporary) files that hold information for certain tasks. When those tasks are complete, the temp files become redundant and consume disk space. Additionally, these temp files might cause various system issues like the one you’re currently facing.
So, you could resolve this problem by deleting the temp files. Here’s how:
- Press Win + R to open the Run command dialog box.
- Type CMD and press Shift + Ctrl + Enter to open an elevated Command Prompt.
- Type the following command and press Enter to remove the temp files:
del /q /f /s %temp%\*
7. Fix Corrupted System Files
In most cases, an installation error like this one is caused by faulty system files. To resolve the problem, you could repair or replace corrupted system files with the DISM and SFC tools.
Let’s take a look at how you can use the DISM tool to resolve this problem:
- Press Ctrl + Shift + Esc to open the Task Manager.
- Click the File tab and select Run new task.
- Type CMD in the search box and then check the Create this task with administrative privileges box.
- Press OK to run an elevated Command Prompt.
- Next, type the following command and press Enter to run a DISM scan:
DISM /Online /Cleanup-Image /ScanHealth
When the process is complete, type the following command and press Enter:
DISM /Online /Cleanup-Image /RestoreHealth
Wait for the process to complete and then restart your device. Finally, run an SFC scan through these steps:
- Open an elevated Command Prompt by following the previous steps.
- Type the following command and press Enter:
sfc /scannow
Wait for the process to complete and then close the Command Prompt. From there, restart your device to save these changes.
8. Restore Your Device

You can tackle most system issues by using the Windows restore point tool. This feature handles Windows errors by undoing the recent changes on your PC. So, the tool could get rid of the bugs that are currently preventing you from installing the Microsoft Visual C++ programs.
If you’ve created a restore point on your device, here’s how you can use it to get rid of this issue:
- Type Control Panel in the Start Menu search bar and select the Best match.
- Click the View by drop-down menu and select Small icons.
- Select System from the Control Panel menu items.
- Next, click the System protection option on the right-hand side pane.
- Navigate to the System Protection tab, click the System Restore button, and then press Next.
- Select a restore point from the list and click Next. Follow the on-screen steps to finalize the process.
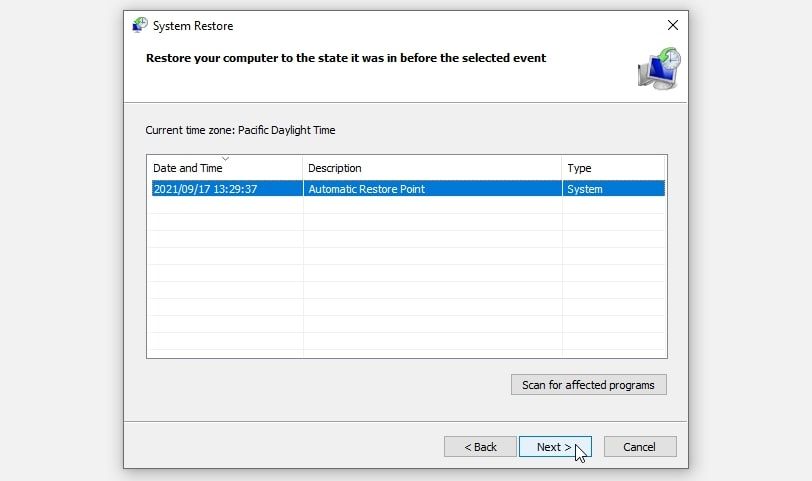
From there, go ahead and try downloading the Microsoft Visual C++ programs again.
Easily Update or Install Microsoft Visual C++ Programs Again
When the Microsoft Visual C++ programs are missing or corrupted, you’d need to update or reinstall these packages. Doing this will ensure that your device operates smoothly. But if you’re encountering issues while installing these programs, then try any of the solutions we’ve covered.