
By running TACACS.netTM on your Domain Controllers, you can simplify your deployment, speed up authentication, and eliminate service-affecting points of failure.
Demo Version
Version 2.1.2 released February 2016
Limited to 5 Devices & 3 Users without a license
The latest version with more Devices & Users is available with a Support Contract.
The TACACS.net TACACS+ Server includes the following components
- Windows installation wizard
- Full featured TACACS+ Server
- Google Authenticator for Multi-Factor Authentication
- Google Authenticator Shared Secret Manager
- TACTest testing utility
- TACDES password encryption tool
- TACVerify configuration syntax checker
- Microsoft .NET framework
Download Installer
Complete the below form to download the installer. Please provide accurate information so we can tailor future development to your needs. A valid email address is needed to receive a link to download the software. We do not share user contact info with third parties. For more information, see our Privacy Policy.
Terminal Access Controller Access-Control System (TACACS, usually pronounced like tack-axe) is a security application that provides centralized validation of users attempting to gain access to a router or network access server. TACACS allows a remote access server to communicate with an authentication server in order to determine if the user has access to the network.
TACACS+, administered through the AAA security services, provides following services:
Authentication—Prompts user for username and password in order to allow access to the router
Authorization—Provides fine-grained control what user can/can’t perorm during the session, including but not limited to setting autocommands, access control,etc.We can also restrict user to what commands he may execute with the TACACS+ authorization feature.
Accounting-Audit user activity.Accounting records include user identities, start and stop times, executed commands,number of packets, and number of bytes.
I used free TACACS+ server http://www.tacacs.net/download.asp
Topology used in this example:

I installed TACACS+ server on Windows server 2012 with IP address 192.168.5.3
During installation you are asked for secret,we will change it a little bit later

When installation is done,we must first remove read-only atributes from config files,otherwise,we won’t be able to edit it!
From powershell prompt type:
Set-ItemProperty "C:\ProgramData\TACACS.net\config\authentication.xml" -name isreadonly $false
Set-ItemProperty "C:\ProgramData\TACACS.net\config\clients.xml" -name isreadonly $false
Set-ItemProperty "C:\ProgramData\TACACS.net\config\authorization.xml" -name isreadonly $false
Set-ItemProperty "C:\ProgramData\TACACS.net\config\tacplus.xml" -name isreadonly $false
Integrating TACACS server with Active Directory
We will create AD user and allow him access to CISCO router
First,create security group in which our user will be stored:
new-adgroup -name "tacacs" -groupscope "Global" -Groupcategory "Security"
Create user named domain_user:
new-aduser -name "domain_user" -userpincipalname "domain_user@bigfirm.biz" -samaccountname "domain_user" -accountpassword (convertto-secure string "Zemun2013" -asplaintxt -force) -changepasswordatlogon $false -enabled $true
Add newly created user in Local Admin group,(this is very important!!!),and to tacacs AD group:
Add-ADGroupMember Administrators domain_user
Add-ADGroupMember tacacs domain_user
First,obtain data for user from AD (bolded will be used in authentication.xml):
PS C:\Users\Administrator> Get-ADUser -Identity "domain_user"  -Properties memberof | select *

DistinguishedName  : CN=domain_user,CN=Users,DC=bigfirm,DC=biz
Enabled            : True
GivenName          : domain_user
MemberOf           : {CN=tacacs,CN=Users,DC=bigfirm,DC=biz, CN=Administrators,CN=Builtin,DC=bigfirm,DC=biz}
Name               : domain_user
ObjectClass        : user
ObjectGUID         : 4ff83aff-0e83-4032-8c59-e82f2f5fc488
SamAccountName     : domain_user
SID                : S-1-5-21-2862681942-1448928181-3724733179-1105
Surname            :
UserPrincipalName  : domain_user@bigfirm.biz
PropertyNames      : {DistinguishedName, Enabled, GivenName, MemberOf...}
AddedProperties    : {}
RemovedProperties  : {}
ModifiedProperties : {}
PropertyCount      : 11
Create encrypted password:
C:\Program Files (x86)\TACACS.net>tacdes.exe Zemun2013
Encrypted Zemun2013 is uTWkimSCBH1j8ZJB/5LPKA==
Now edit C:\ProgramData\TACACS.net\config\authentication.xml file:
<!-- ACTIVE DIRECTORY EXAMPLE -->

<!--This is an example is of a Windows Active Directory group.
This group will authenticate using a Windows Domain Controller.
LDAPUserDirectorySubtree is the distinguished name of the subtree that contains all users.
The LDAPGroupName should point to the name of the AD group.
LDAPAccessUserName and LDAPAccessUserPassword are optional elements and should be specified if the active directory server
does not allow anonymous access to the active directory for authentication.
This username must have read/write access to Active Directory.

To see the user directory subtree name, you can execute the following dsquery command on windows server:
Note: The command DSQUERY is only available on Windows Server.
C:\>dsquery user -samid USERNAME

To see the list of AD groups the user belongs to, use:
C:\>dsquery user -samid USERNAME | dsget user -memberof -expand
You can use the complete DN of the group or just the AD name of the group in the LDAPGroupName configuration parameter.

-->
<!--
<UserGroup>
<Name>tacacs</Name>
<AuthenticationType>Windows_Domain</AuthenticationType>
<LDAPServer>192.168.5.1:389</LDAPServer>
<LDAPUserDirectorySubtree>CN=Users,DC=bigfirm,DC=biz</LDAPUserDirectorySubtree>
<LDAPGroupName>tacacs</LDAPGroupName>
<LDAPAccessUserName>domain_user</LDAPAccessUserName>
<LDAPAccessUserPassword ClearText="" DES="uTWkimSCBH1j8ZJB/5LPKA=="></LDAPAccessUserPassword>
</UserGroup>
-->
<!-- / ACTIVE DIRECTORY EXAMPLE -->
<LDAPServer>192.168.5.1:389</LDAPServer> is IP address of Domain controller on which Tacacs server is installed,port 389 (the best practice is to install Tacacs server on domain member server,but for demonstration purpose this will be just fine),so Tacacs can query
AD for specific user
<LDAPUserDirectorySubtree>CN=Users,DC=bigfirm,DC=biz</LDAPUserDirectorySubtree> distinguished name of the subtree that contains domain_user acount.
<LDAPGroupName>tacacs</LDAPGroupName> -AD group we’ve just created and put domain_user in
<LDAPAccessUserName>domain_user</LDAPAccessUserName> the name of the AD user which will have access to router
uTWkimSCBH1j8ZJB/5LPKA==
is encrypted password created by tacdes tool
If you wish to change shared secret set during install,edit C:\ProgramData\TACACS.net\config\clients.xml file:
<!-- INTERNAL GROUP

The INTERNAL Group is added by default. This group will
enable all non-routeable IP addresses to be TACACS+
clients without having to explicitly define them.
This is useful in an internal NAT or lab network.-->
<ClientGroup Name="INTERNAL">
<Secret ClearText="sharedsecret" DES=""> </Secret>
<Clients>
<Client>10.0.0.0/8</Client>
<Client>172.16.0.0/12</Client>
<Client>192.168.*</Client>
</Clients>
</ClientGroup>
<!-- DEFAULT GROUP
In this section you can also define network range for clients which can “negotiate” with Tacacs server using defined secret
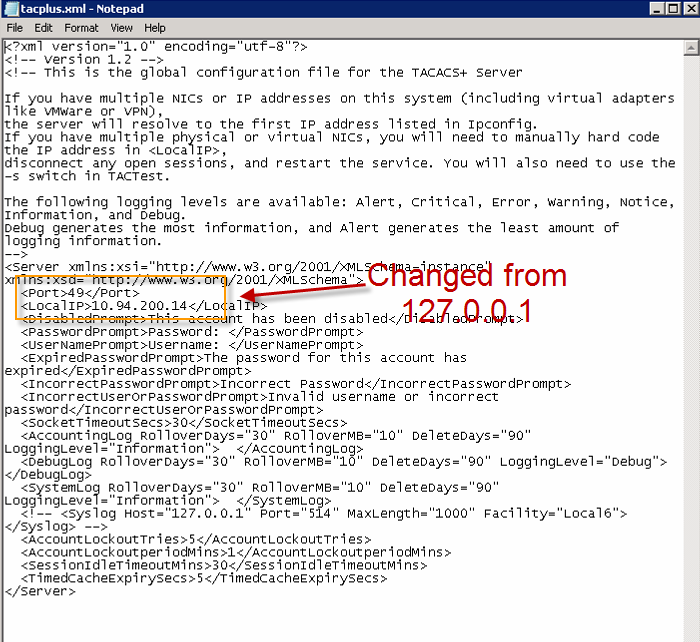
To configure port and IP address on which Tacacs server will listen on,we need to edit C:\ProgramData\TACACS.net\config\tacplus.xml file.
Here we can set logging (name, location, logging level, and rollover settings for the logs.Available logging levels: Alert, Critical, Error, Warning, Notice, Information, and Debug. Debug generates the most information, and Alert generates the least amount of info.
RolloverDays specifies how many days to keep logs before starting a new log. RolloverMB specifies the maximum size the log file can get before rolling over, and DeleteDays specifies how many days to keep files before automatically deleting them. ).Syslog is used if you need to log to an external Syslog server.
<!– Version 1.2 –><!– This is the global configuration file for the TACACS+ Server
–><Server><Port>49</Port>
<LocalIP>192.168.5.3</LocalIP>
<DisabledPrompt>This account has been disabled</DisabledPrompt>
<PasswordPrompt>Password: </PasswordPrompt>
<UserNamePrompt>Username: </UserNamePrompt>
<ExpiredPasswordPrompt>The password for this account has expired</ExpiredPasswordPrompt>
<IncorrectPasswordPrompt>Incorrect Password</IncorrectPasswordPrompt>
<IncorrectUserOrPasswordPrompt>Invalid username or incorrect password</IncorrectUserOrPasswordPrompt><SocketTimeoutSecs>30</SocketTimeoutSecs>
<AccountingLog RolloverDays=”30″ RolloverMB=”10″ DeleteDays=”90″ LoggingLevel=”Information”> </AccountingLog>
<DebugLog RolloverDays=”30″ RolloverMB=”10″ DeleteDays=”90″ LoggingLevel=”Debug”> </DebugLog>
<SystemLog RolloverDays=”30″ RolloverMB=”10″ DeleteDays=”90″ LoggingLevel=”Information”> </SystemLog>
<!– <Syslog Host=”127.0.0.1″ Port=”514″ MaxLength=”1000″ Facility=”Local6″> </Syslog> -><AccountLockoutTries>6</AccountLockoutTries>
<AccountLockoutperiodMins>30</AccountLockoutperiodMins>
<SessionIdleTimeoutMins>15</SessionIdleTimeoutMins>
<TimedCacheExpirySecs>5</TimedCacheExpirySecs>
<OTPSeparator>*</OTPSeparator></Server>
It’s now time to check config files for typo or syntax errors using tacverify tools (C:\Program Files (x86)\TACACS.net folder if you installed on X64 OS version):

Restart tacacs.net service:
net stop tacacs.net && net start tacacs.net
The TACACS.net service was stopped successfully.
The TACACS.net service is starting.
The TACACS.net service was started successfully.
Open port 49 in Windows firewall:
netsh advfirewall firewall add rule name="Open port 49" dir=in action=allow protocol=tcp localport=49
From Tacacs server,test access:
C:\Program Files (x86)\TACACS.net>tactest.exe -k sharedsecret -u domain_user -s
192.168.5.3 -p Zemun2013


Total Commands  .....................  1
Successes  ..........................  1
Failures  ...........................  0
No Results  .........................  0
Time Taken for commands  ............  0.132 secs
Avg Possible Transactions/Second  ...  7
Network Time per command  ...........  0.076 secs
Total Network time  .................  0.076 secs
<87> 2015-07-24 00:29:12 Sent Transactions/Second  ...........  6.3
Setting Authorization
To determine level of access we need to edit C:\ProgramData\TACACS.net\config\authorization.xml file.
For users in AD group tacacs (domain_user), we’ll set privilege level 7 and allow him to run telnet,show and enable commands and deny others:
<?xml version=”1.0″ encoding=”utf-8″?>
<!– Version 1.2 –>
<Authorizations xmlns:xsi=”http://www.w3.org/2001/XMLSchema-instance” xmlns:xsd=”http://www.w3.org/2001/XMLSchema”>
<Authorizations>
<Authorization>
<!–This entry will only be processed in the times given below–>
<!–<Time>MTWRFSN,04:00-21:00</Time>–>
<!–This authorization section applies to the following user groups. In case of conflicting authorization entries for the same group, the entry which appears first in the file is used.–>
<UserGroups>
<UserGroup>Network Engineering</UserGroup>
</UserGroups>
<!–This authorization section applies to the following client groups. In case of conflicting authorization entries for the same client group, the entry which appears first in the file is used.–>
<!–If no client groups are specified then the settings are applied to the specified usergroups irrespective of the clients they come from–>
<ClientGroups>
<ClientGroup>LOCALHOST</ClientGroup>
<ClientGroup>INTERNAL</ClientGroup>
</ClientGroups>
<AutoExec>
<!–<Set>priv-lvl=15</Set>–>
</AutoExec>
<Shell>
<Permit>.*show.*</Permit> <!–This will allow all show commands –>
</Shell>
<Services>
<!– <Service>
<Set>service=ppp</Set>
<Set>protocol=ip </Set> –>
<!–these groups can run IP over PPP only if they use one of the following mandatory addresses. If they supply no address, the first one here will be mandated–>
<!–<Set>addr=10.1.1.1</Set>–> <!–mandatory argument–>
<!–Their mandatory input access list number is 5–>
<!–<Set>inacl=5</Set>–>
<!–We will suggest an output access list of 10 but the NAS may choose to ignore or override it–>
<!–<SetOptional>outacl=10</SetOptional>–>
<!–These are examples of vendor specific attributes(VSAs)–>
<!–<Set>foundry-privlvl=5</Set>–>
<!– </Service> –>
</Services>
</Authorization>
<Authorization>
<UserGroup>
<Name>tacacs</Name>
</UserGroup>
<!–No client group provided so this authorization section applies to the above user groups from all the clients –>
<!–this group is allowed to telnet everywhere except from addresses beginning with 161.–>
<AutoExec>
<Set>priv-lvl=7</Set> <!–Set a privilege of 7 –>
</AutoExec>
<Shell>
<Permit>telnet .*</Permit> <!–Allows telnet –>
<Permit>.*show.*</Permit> <!–Allows ‘show’ commands –>
<Permit>enable</Permit> <!–Allows ‘enable’ command –>
<Deny>.*</Deny> <!–All other commands are prohibited —>
</Shell>
</Authorization>
<!– DEFAULT PROFILE –>
<!– The DEFAULT Authorization Profile is added by default with the Server
installation and is used to enable ALL Users full access to ALL Clients.
This group should be removed or commented out before deploying the Server
in a production environment.
–>
<Authorization>
<Shell>
<Permit>.*show.*</Permit> <!–This will allow all show commands –>
<Deny>.*</Deny> <!–This will deny all other commands –>
</Shell>
</Authorization>
</Authorizations>
</Authorizations>
Restart again Tacasc.net service
Configuring CISCO Router
First create local user in case if Tacacs server is unavailable,enter in config mode (config t):
username admin privilege 15 secret cisco
Enable AAA (Authorization,Authentication,Accounting)
aaa new-model
Now configure router that,for authentication,first check Tacacs server for credentials,if Tacacs is unvailable then search local database (user admin).so we need to create AAA Method list.The method list defines the types of authentication to be performed and the sequence in which they will be performed (Tacacs server and local database in our example)
aaa authentication login default group tacacs+ local
For (AAA) to determine if a user can access the privileged command level (enable command),we need to use the aaa authentication enable default command
aaa authentication enable default group tacacs+ enable
As in previous example,router will first contact Tacacs server,if it’s unavailable,then use local database:
aaa authorization exec default group tacacs+ local
Because in this example we will implement AAA in console level,we need to configure console to use AAA authorization
aaa authorization console
Allows user to start a CLI session (a command shell). Without it, command prompt isn’t available:
aaa authorization exec default group tacacs+ local
Runs authorization for all commands at the privilege level 1 and 15
aaa authorization commands 1 default group tacacs+ local
aaa authorization commands 15 default group tacacs+ local
Configures accounting for EXEC shell session:
aaa accounting exec default start-stop group tacacs+
Set tatacas server and key.
tacacs-server host 192.168.5.3 !Our tacacs server
tacacs-server key sharedsecret !(We set a key in clients.xml file)
Testing
Before testing enable debuging for authentication and authorization
debug aaa accounting
debug aaa authorization
debug tacacs+
Log off from router and try to log on as domain_user:

We can see that credentials for domain_users are accepted and that privilege level 7 was set:

You wan’t be able to execute commands not allowed in authorization.xml file:
R1#config t
^
% Invalid input detected at '^' marker.
Пришлось как-то раз заняться довольно абсурдным занятием — установка на Windows сервиса Tacacs+. Связано это с тем, что в конторе отродясь не было серверов на Linux, а сетевого оборудования развелось довольно много + штат сотрудников IT отдела составлял 9 человек.
Присутпим. На tacacs.net скачиваем дистраибутив и выполняем установку по-умолчанию. При установке, возможно, инсталятор предложит ввести ключ для шифрования соединения между сервером авторизации и сетевым устройством. Можно не указывать, а потом ввести вручную через файл конфигурации. Всё, можно лезть в конфигу. Все ссылки на конфижные файлы есть на меню «Пуск» в соответствующих разделах.
- tacplus.xml — основной файл конфигурации.
В этом файле только два параметра которые я поменял:
<Port>49</Port> #порт на котором будет работать Tacacs+.
<LocalIP>192.168.4.6</LocalIP> #IP адрес сервера который будет слушать запросы.
<AccountingLog RolloverDays="30" RolloverMB="10" DeleteDays="90" LoggingLevel="Information">  </AccountingLog> #параметры логирования. Оставил только логи входа на оборудование и вводимые команды.
- Далее правим файл clients.xml.
Смысл в том, что бы в нужных группах указать пароль для шифрования соединения между сервером авторизации и сетевыми устройствами и разрешённые сети для авторизации.
У меня это выглядит так:
LOCALHOST GROUP
<ClientGroup Name=»LOCALHOST»>
<Secret ClearText=»Nc2f22p44jo4(*#» DES=»»></Secret> — пароль можно указывать в зашифрованном виде в параметре DES=»», но я отнёсся к этому без фанатизма.
<Clients>
<Client>127.0.0.1</Client>
</Clients>
</ClientGroup>
INTERNAL GROUP
<ClientGroup Name=»INTERNAL»>
<Secret ClearText=»Nc2f22p44jo4(*#» DES=»»></Secret>
<Clients>
<Client>10.0.0.0/8</Client>
<Client>172.16.0.0/12</Client>
<Client>192.168.0.0/16</Client> — сети из которых принимаются запросы на авторизацию от сетевых устройств.
</Clients>
</ClientGroup>
DEFAULT GROUP
<ClientGroup Name=»DEFAULT»>
<Secret ClearText=»Nc2f22p44jo4(*#» DES=»»></Secret>
<Clients>
<Client>.*</Client>
</Clients>
</ClientGroup>
</ClientGroups>
</Clients>
- Плывём дальше — authentication.xml
В этом файле мы правим настройки для обмена информации с контроллером домена. Т.е. от какого пользователя (служебного) будет запрашиваться принадлежность пользователей к той или иной группе. Пользователи здесь подразумеваются те, которые будут пытаться авторизоваться на сетевое оборудование.
<UserGroup>
<Name>operator</Name>
<AuthenticationType>Windows_Domain</AuthenticationType>
<LDAPServer>192.168.4.6:389</LDAPServer>
<LDAPUserDirectorySubtree>OU=IT,OU=Office,OU=PCS,DC=pcs,DC=local</LDAPUserDirectorySubtree>
<LDAPGroupName>operator</LDAPGroupName>
<LDAPAccessUserName>ssv</LDAPAccessUserName>
<LDAPAccessUserPassword ClearText=»» DES=»GuuHJQ/11AT1En3kcYmc6mrg==»></LDAPAccessUserPassword>
</UserGroup>
<UserGroup>
<Name>adm</Name>
<AuthenticationType>Windows_Domain</AuthenticationType>
<LDAPServer>192.168.4.6:389</LDAPServer>
<LDAPUserDirectorySubtree>OU=IT,OU=Office,OU=PCS,DC=pcs,DC=local</LDAPUserDirectorySubtree>
<LDAPGroupName>adm</LDAPGroupName>
<LDAPAccessUserName>ssv</LDAPAccessUserName>
<LDAPAccessUserPassword ClearText=»» DES=»GuuHJQ/11AT1En3kcYmc6mrg==»></LDAPAccessUserPassword>
</UserGroup>
<UserGroup>
<Name>monitoring</Name>
<AuthenticationType>Windows_Domain</AuthenticationType>
<LDAPServer>192.168.4.6:389</LDAPServer>
<LDAPUserDirectorySubtree>OU=IT,OU=Office,OU=PCS,DC=pcs,DC=local</LDAPUserDirectorySubtree>
<LDAPGroupName>monitoring</LDAPGroupName>
<LDAPAccessUserName>ssv</LDAPAccessUserName>
<LDAPAccessUserPassword ClearText=»» DES=»GuuHJQ/11AT1En3kcYmc6mrg==»></LDAPAccessUserPassword>
</UserGroup>
В отдельном блоке прописываются настройки для каждой группы доступа. В примере это группы operator, adm и monitoring. К настройкам относятся IP адрес и порт на котором работает контроллер домена, путь к служебной учётке, группа доступа и, собственно, сама учётка с паролем. Пароль, кстати, тут указан в зашифрованном виде. В наборе приложений Tacacs+ есть утилитка для шифрования:
cd /d "C:\Program Files\TACACS.net"\
C:\Program Files\TACACS.net>tacdes.exe password
Encrypted password is HCv368BmiLGqNYfQNF74mA==
Или из соответствующего пункта меню в меню «Пуск».
- Финишная прямая — authorization.xml
Тут прописываются правила использования команд для уже получивших доступ на сетевое оборудование пользователей.
<?xml version=»1.0″ encoding=»utf-8″?>
<!— Version 1.2 —>
<Authorizations xmlns:xsi=»http://www.w3.org/2001/XMLSchema-instance» xmlns:xsd=»http://www.w3.org/2001/XMLSchema»>
<Authorizations>
<Authorization>
<UserGroups>
<UserGroup>Network Engineering</UserGroup>
</UserGroups>
<ClientGroups>
<ClientGroup>LOCALHOST</ClientGroup>
<ClientGroup>INTERNAL</ClientGroup>
</ClientGroups>
<AutoExec>
</AutoExec>
<Shell>
<Permit>.*show.*</Permit> <!—This will allow all show commands —>
<Deny>.*</Deny> <!—This will deny all other commands —>
</Shell>
<Services>
</Services>
</Authorization>
<Authorization>
<UserGroups>
<UserGroup>adm</UserGroup>
</UserGroups>
<Shell>
<Permit>write.*</Permit>
<Permit>.*</Permit> <!—This will allow all commands —>
<!—<Deny>.*</Deny> This will deny all other commands —>
</Shell>
<AutoExec>
<Set>priv-lvl=15</Set>
</AutoExec>
</Authorization>
<Authorization>
<UserGroups>
<UserGroup>operator</UserGroup>
</UserGroups>
<Shell>
<Permit>show.*</Permit>
<Permit>ping.*</Permit>
<Permit>traceroute.*</Permit>
<Permit>clear.*</Permit>
<Permit>configure terminal</Permit>
<Permit>ip route.*</Permit>
<Deny>.*</Deny> <!—This will deny all other commands —>
</Shell>
<AutoExec>
<Set>priv-lvl=15</Set>
</AutoExec>
</Authorization>
<Authorization>
<UserGroups>
<UserGroup>monitoring</UserGroup>
</UserGroups>
<Shell>
<Permit>.*</Permit>
<!— <Deny>.*</Deny> —>
</Shell>
<AutoExec>
<Set>priv-lvl=1</Set>
</AutoExec>
</Authorization>
<!— DEFAULT PROFILE —>
<Authorization>
<Shell>
<Permit>.*</Permit> <!—This will allow all show commands —>
<!—<Deny>.*</Deny> This will deny all other commands —>
</Shell>
</Authorization>
</Authorizations>
</Authorizations>
В xml прописаны правила с примерами, которые можно оставить без изменений. Добавил только свои группы и настройки к ним.
Прежде чем запускать процесс имеет смысл проверить работает ли связность с контроллером домена:
C:\Program Files\TACACS.net>tactest.exe -s 192.168.4.6 -k <ключ из clients.xml> -u ssv -p <пароль для служебного пользователя>.
Если всё нормально, то в конце отчёта увидите Success 1. И на по следок проверяем конфигурационные файлы:
C:\Program Files\TACACS.net\tacverify.exe
Сообщит о файле и строке в которой найдены ошибки.
Ну, и:
C:\>net stop tacacs.net
C:\>net start tacacs.net
Вся оригинальная документация по настройке находится на tacacs.net
В разделе сетевого оборудования смотрите настройки Tacacs+ для коммутаторов D-Link DES 30xx серии и маршрутизатора Cisco.
(v2.01) TACACS — Tacacs+ Server for Windows
Authentication server supporting TACACS,
XTACACS and TACACS+. Supports AAA —
authentication, authorization and accounting.
Provides audit trial for all logins/logouts.
Includes accounting utility and source code
for custom report generation.
Shareware (US$ 75 — check or credit card)
Peter Mak, unet@mailhub.hkstar.com
- Addeddate
- 2019-10-25 18:57:38
- Identifier
- TACACS20_ZIP
- Scanner
- Internet Archive Python library 1.8.5
- Year
-
1996
comment
Reviews
There are no reviews yet. Be the first one to
write a review.
Both RADIUS and TACACS+ provides centralized validation of users attempting to gain access to a both protocols supported network devices, which provides Authentication, Authorization, and Accounting (AAA) services on network devices.
RADIUS stands for Remote Access Dial-In User Service, and TACACS+ stands for Terminal Access Controller Access Control Service Plus. The primary functional difference between RADIUS and TACACS+ is that TACACS+ separates out the Authorization functionality, where RADIUS combines both Authentication and Authorization. RADIUS was designed for subscriber AAA, and TACACS+ is designed for administrator AAA. RADIUS can still be used for small network administrator AAA, but only if authorization is not required, or if it is a homogeneous network (all one vendor). In any scenario where there is a heterogeneous environment or authorization policies are required for network devices, TACACS+ is the best option.
The following figure and table show their difference more instinctively:

This post and next one will show the basic Tacacs+ configuration steps on a cisco 2960 switch to work with Free Tacacs+ Software for Windows from tacacs.net:
- Basic Cisco Tacacs+ Configuration With Free Tacacs+ Software for Windows – Part 1
- Basic Cisco Tacacs+ Configuration With Free Tacacs+ Software for Windows – Part 2
1. Software Installation and Verify Configuration
1.1 Download Software
Please download Version 1.3.2, which is from their website http://www.tacacs.net/
1.2 Installation
Double click downloaded file TACACSSetup_v1.3.2.zip and simply click next to follow the wizard to complete the installation.
After installation, TACACS.net service will automatically start. Localhost (127.0.0.1) and RFC 1918 IP address ranges (172.16.0.0/12, 192.168.0.0/16, 10.0.0.0/8) are already added as clients by default. Any user in the Administrators group on the local machine will be authorized as the fallback method.
1.3 Configuration Tacacs+ server
The wizard will install the configuration and log files to different locations depending on your OS. Start Menu TACACS.net program group has a configuration shortcut to point to the configuration folder. In my case, all configuration files was installed at this directory: C:ProgramDataTACACS.netconfig
Check tacplus.xml to make sure server ip is not 127.0.0.1.
You do not need to restart/reload the server when you modify the configuration files. The server
monitors for changes to the configuration files and reloads them automatically.
1.4 Verify Tacacs service
telnet 127.0.0.1 49
tactest -s 10.9.200.14 -u test1 -p test1
(test1 is the local administrator account in my Tacacs windows server)
2. Configure Cisco Switch to Use Tacacs server
Router(config)# aaa new-model
Router(config)# tacacs-server host 10.9.200.14 key mysharedsecret
Router(config)# aaa authentication login default group tacacs+ local
Router(config)# aaa authorization exec default group tacacs+ local
Router(config)# line console 0
Router(config-line)# login authentication default
Router(config)# line vty 0 15
Router(config-line)# login authentication default
Based on above configuration steps 1 and step 2, the switch will be authenticated with Tacacs server’s account in the local administrators group.
Notes:
Fallback group includes all local administrators on the server. It should be commented out before it is deployed in production.
Reference:
- http://www.tacacs.net/docs/TACACS_Advantages.pdf