
В Windows вы можете управлять настройками сетевых адаптеров не только из графического интерфейса, но из командной строки PowerShell. В этой статье мы рассмотрим основные командлеты, которые позволяют узнать текущий адрес сетевого адаптера, назначить статический IP адрес, DNS сервера, или настроить сетевой интерфейс на получение конфигурации IP от DHCP сервера. Вы можете использовать эти командлеты для настройки сети как в Windows 10/11, так и в Windows Server (или версии Sever Core), в Hyper-V Server, для изменения настроек IP сетевых адаптеров на удаленных компьютерах, и в PowerShell скриптах.
Содержание:
- Управление сетевыми адаптерами в Windows из PowerShell
- Вывести настройки IP сетевого подключения с PowerShell
- PowerShell: задать статический IP адрес в Windows
- Set-DnsClientServerAddress: настроить адреса DNS серверов
- Управление таблицей маршрутизации с помощью PowerShell
- PowerShell: получить IP адрес в Windows от DHCP сервера
- Изменить параметры IP и DNS на удаленном компьютере Windows
В предыдущих версиях в Windows для управления сетевыми настройками из cmd использовалась из CLI использовалась команда netsh. В PowerShell 3.0 и выше для управления сетевыми настройками Windows можно использовать встроенный PowerShell модуль NetTCPIP.
Чтобы получить список командлетов в этом модуле, выполните:
get-command -module NetTCPIP
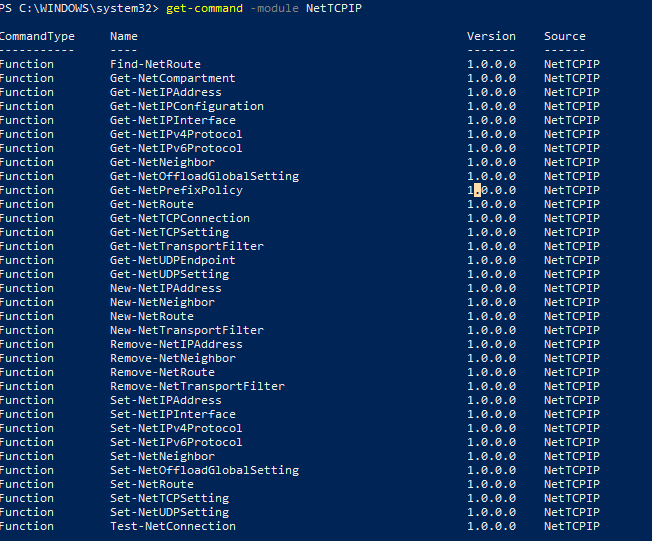
В этот модуль также входит командлет Test-NetConnection, который можно использовать для проверки доступности TCP портов на удаленных компьютерах.
Управление сетевыми адаптерами в Windows из PowerShell
Выведите список доступных сетевых интерфейсов в Windows:
Get-NetAdapter
Командлет возвращает имя интерфейса, состояние (Up/Down), MAC адрес, скорость на порту.
В этом примере у меня на компьютере несколько сетевых адаптеров (кроме физического подключения Ethernet и WiFi есть несколько сетевых интерфейсов от Hyper-V и VMWare Player).
Чтобы вывести только активные физические сетевые интерфейсы:
Get-NetAdapter -Physical | ? {$_.Status -eq "Up"}

Можно вывести только определенные параметры сетевых адаптеров, например: имя, скорость, состояние и MAC адрес:
Get-NetAdapter |Select-Object name,LinkSpeed,InterfaceOperationalStatus,MacAddress

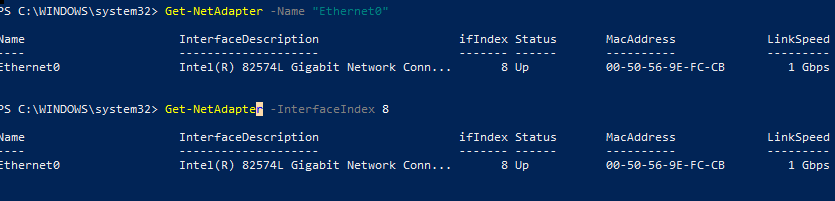
Вы можете обращаться к сетевым интерфейсам по их именам или индексам (столбец ifIndex). В нашем примере, чтобы выбрать физический LAN адаптер Intel 82574L нужно набрать команду:
Get-NetAdapter -Name Ethernet0
или
Get-NetAdapter -InterfaceIndex 8
Можно изменить имя адаптера:
Rename-NetAdapter -Name Ethernet0 -NewName LAN
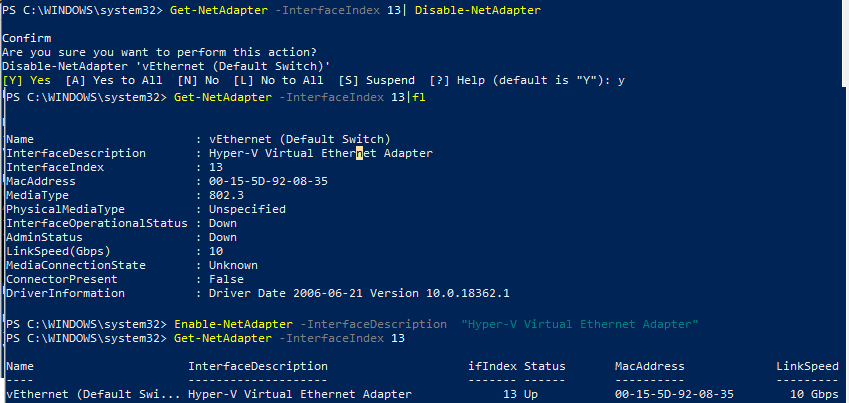
Чтобы выключить сетевой интерфейс, используйте команды:
Get-NetAdapter -InterfaceIndex 13| Disable-NetAdapter
При включении интерфейса нельзя указать его индекс, т.к. он не присвоен. Включите адаптер по его имени:
Enable-NetAdapter -InterfaceDescription “Hyper-V Virtual Ethernet Adapter"
Если для сетевого адаптера настроен номер VLAN, можно вывести его так:
Get-NetAdapter | ft Name, Status, Linkspeed, VlanID
Получить информацию об драйвере сетевого адаптера:
Get-NetAdapter | ft Name, DriverName, DriverVersion, DriverInformation, DriverFileName

Информация о физических параметров подключения сетевых адаптерах (PCI слот, шина и т.д.).
Get-NetAdapterHardwareInfo
Вывести настройки IP сетевого подключения с PowerShell
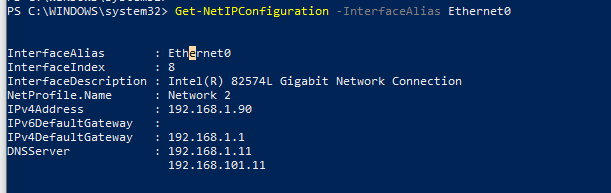
Получить текущие настройки сетевого интерфейса (IP адрес, DNS, шлюз):
Get-NetIPConfiguration -InterfaceAlias Ethernet0
Чтобы вывести более подробную информацию о конфигурации сетевого интерфейса, используйте команду:
Get-NetIPConfiguration -InterfaceAlias Ethernet0 -Detailed
В этом случае выводится назначенный профиль сети интерфейса (NetProfile.NetworkCategory), настройки MTU (NetIPv4Interface.NlMTU), включено ли получение адреса от DHCP (NetIPv4Interface.DHCP) и ряд другой полезной информации.

Вывести все IPv4 адреса интерфейсов Windows:
Get-NetIPAddress -AddressFamily ipv4|ft
Получить значение только IP адрес интерфейса:
(Get-NetAdapter -Name ethernet0 | Get-NetIPAddress).IPv4Address
Получить текущие настройки стека TCP на компьютере можно с помощью команды:
Get-NetTCPSetting
Многие администраторы замечают, в Windows Server 2019 с ролью Hyper-V скорость копирования файлов на ВМ очень низкая. В этом случае решить проблемы помогает возврат параметров стека TCP, к настройкам которые использовались в Windows Server 2016:
Set-NetTCPSetting -SettingName DatacenterCustom,Datacenter -CongestionProvider DCTCP
Set-NetTCPSetting -SettingName DatacenterCustom,Datacenter -CwndRestart True
Set-NetTCPSetting -SettingName DatacenterCustom,Datacenter -ForceWS Disabled
Вывести список сетевых протоколов, которые можно включить/отключить для сетевого адаптера:
Get-NetAdapterBinding -Name ethernet -IncludeHidden -AllBindings
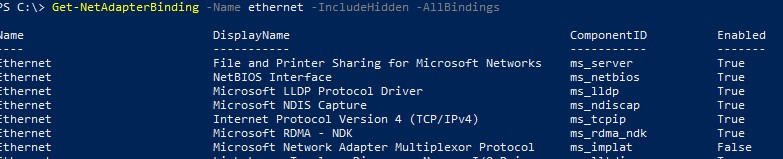
Name                           DisplayName                                        ComponentID          Enabled
----                           -----------                                        -----------          -------
Ethernet                       File and Printer Sharing for Microsoft Networks    ms_server            True
Ethernet                       NetBIOS Interface                                  ms_netbios           True
Ethernet                       Microsoft LLDP Protocol Driver                     ms_lldp              True
Ethernet                       Microsoft NDIS Capture                             ms_ndiscap           True
Ethernet                       Internet Protocol Version 4 (TCP/IPv4)             ms_tcpip             True
Ethernet                       Microsoft RDMA - NDK                               ms_rdma_ndk          True
Ethernet                       Microsoft Network Adapter Multiplexor Protocol     ms_implat            False
Ethernet                       Link-Layer Topology Discovery Mapper I/O Driver    ms_lltdio            True
Ethernet                       NDIS Usermode I/O Protocol                         ms_ndisuio           True
Ethernet                       Point to Point Protocol Over Ethernet              ms_pppoe             True
Ethernet                       Link-Layer Topology Discovery Responder            ms_rspndr            True
Ethernet                       Internet Protocol Version 6 (TCP/IPv6)             ms_tcpip6            True
Ethernet                       Hyper-V Extensible Virtual Switch                  vms_pp               False
Ethernet                       WFP Native MAC Layer LightWeight Filter            ms_wfplwf_lower      True
Ethernet                       Client for Microsoft Networks                      ms_msclient          True
Ethernet                       Npcap Packet Driver (NPCAP)                        INSECURE_NPCAP       True
Ethernet                       WINS Client(TCP/IP) Protocol                       ms_netbt             True
Ethernet                       Bridge Driver                                      ms_l2bridge          True
Ethernet                       WFP 802.3 MAC Layer LightWeight Filter             ms_wfplwf_upper      True
Ethernet                       QoS Packet Scheduler                               ms_pacer             True
PowerShell: задать статический IP адрес в Windows
С помощью PowerShell вы можете задать статический IP адрес для сетевого интерфейса. Чтобы изменить IP адрес, маску подсети и шлюз для сетевого интерфейса, выполните:
Get-NetAdapter -Name Ethernet0| New-NetIPAddress –IPAddress 192.168.1.80 -DefaultGateway 192.168.1.1 -PrefixLength 24
Можно задать IP адрес, представив его в виде массива (более наглядно):
$ipParams = @{
InterfaceIndex = 8
IPAddress = "192.168.1.22"
PrefixLength = 24
AddressFamily = "IPv4"
}
New-NetIPAddress @ipParams
Если статический IP адрес уже настроен и нужно изменить его, используется командлет Set-NetIPAddress:
Set-NetIPAddress -InterfaceIndex 8 -IPAddress 192.168.1.90
Чтобы отключить получение IP адреса от DHCP для сетевого интерфейса, выполните:
Set-NetIPInterface -InterfaceAlias Ethernet0 -Dhcp Disabled
Удалить статический IP адрес:
Remove-NetIPAddress -IPAddress "xxx.xxx.xxx.xxx"
Отключить протокол IPv6 для сетевого интерфейса:
Get-NetAdapterBinding -InterfaceAlias Ethernet0 | Set-NetAdapterBinding -Enabled $false -ComponentID ms_tcpip6
Отключить протокол NetBIOS для интерфейса:
Set-NetAdapterBinding -Name Ethernet0 -ComponentID ms_netbios -AllBindings -Enabled $True
Set-DnsClientServerAddress: настроить адреса DNS серверов
Чтобы задать адреса первичного и вторичного DNS серверов в Windows, используется командлет Set-DNSClientServerAddress. Например:
Set-DNSClientServerAddress –InterfaceIndex 8 –ServerAddresses 192.168.1.11,10.1.1.11
Первый IP адрес адрес выставляется в качестве Preffered DNS, а второй в Alternate DNS.
Можно также задать DNS сервера через массив:
$dnsParams = @{
InterfaceIndex = 8
ServerAddresses = ("8.8.8.8","8.8.4.4")
}
Set-DnsClientServerAddress @dnsParams
После изменения настроек DNS, можно очистить DNS кэш (эквивалент
ipconfig /flushdns
):
Clear-DnsClientCache
Вывести содержимое DNS кэша в Windows:
Get-DnsClientCache
Управление таблицей маршрутизации с помощью PowerShell
Для просмотра таблицы маршрутизации используется командлет Get-NetRoute.
Вывести маршрут по умолчанию для физического сетевого интерфейса в Windows:
Get-NetAdapter -Physical | ? {$_.Status -eq "Up"}| Get-netroute| where DestinationPrefix -eq "0.0.0.0/0"

Чтобы добавить новый маршрут, используется New-NetRoute:
New-NetRoute -DestinationPrefix "0.0.0.0/0" -NextHop "192.168.0.1" -InterfaceIndex 8
Эта команда добавит постоянный маршрут в таблицу маршрутизации (аналог route -p add). Если вы хотите добавить временный маршрут, добавьте опцию
-PolicyStore "ActiveStore"
. Такой маршрут будет удален после перезагрузки Windows.
Удалить маршрут из таблицы маршрутизации:
Remove-NetRoute -NextHop 192.168.0.1 -Confirm:$False
PowerShell: получить IP адрес в Windows от DHCP сервера
Чтобы сетевой интерфейс компьютера получал динамический IP адрес от DHCP сервера, выполните команду:
Set-NetIPInterface -InterfaceAlias Ethernet0 -Dhcp Enabled
Очистите настройки DNS серверов:
Set-DnsClientServerAddress –InterfaceIndex 8 -ResetServerAddresses
И перезапустите интерфейс для получения IP адреса:
Restart-NetAdapter -InterfaceAlias Ethernet0
Если ранее у вас был настроен шлюз, удалите его:
Set-NetIPInterface -InterfaceAlias Ethernet0| Remove-NetRoute -Confirm:$false
Если нужно сбросить все настройки IPv4 для сетевых интерфейсов компьютера и переключить их на получение адреса от DHCP, используйте такой скрипт:
$IPType = "IPv4"
$adapter = Get-NetAdapter | ? {$_.Status -eq "up"}
$interface = $adapter | Get-NetIPInterface -AddressFamily $IPType
If ($interface.Dhcp -eq "Disabled") {
If (($interface | Get-NetIPConfiguration).Ipv4DefaultGateway) {
$interface | Remove-NetRoute -Confirm:$false
}
$interface | Set-NetIPInterface -DHCP Enabled
$interface | Set-DnsClientServerAddress -ResetServerAddresses
}
Изменить параметры IP и DNS на удаленном компьютере Windows
Вы можете использовать PowerShell чтобы удаленно изменить настройки IP адреса или DNS серверов на нескольких удаленных компьютерах. Допустим, ваша задача – изменить настройки DNS для всех серверов в указанном Organization Unit (OU) в Active Directory. Для получения списка компьютеров в скрипте ниже примере используется командлет Get-ADComputer, а удаленное подключение к компьютерам выполняется через WinRM (командлет Invoke-Command):
$Servers = Get-ADComputer -SearchBase ‘OU=Moscow,DC=winitpro,DC=loc’ -Filter '(OperatingSystem -like "Windows Server*")' | Sort-Object Name
ForEach ($Server in $Servers) {
Write-Host "Server $($Server.Name)"
Invoke-Command -ComputerName $Server.Name -ScriptBlock {
$NewDnsServerSearchOrder = "192.168.1.11","8.8.4.4"
$Adapters = Get-WmiObject Win32_NetworkAdapterConfiguration | Where-Object {$_.DHCPEnabled -ne 'True' -and $_.DNSServerSearchOrder -ne $null}
Write-Host "Old DNS settings: "
$Adapters | ForEach-Object {$_.DNSServerSearchOrder}
$Adapters | ForEach-Object {$_.SetDNSServerSearchOrder($NewDnsServerSearchOrder)} | Out-Null
$Adapters = Get-WmiObject Win32_NetworkAdapterConfiguration | Where-Object {$_.DHCPEnabled -ne 'True' -and $_.DNSServerSearchOrder -ne $null}
Write-Host "New DNS settings: "
$Adapters | ForEach-Object {$_.DNSServerSearchOrder}
}
}
One of the features of Windows PowerShell is Route management, which is performed by the Get-NetRoute and New-NetRoute commands. Routing management in the CMD environment is with the Route command. In this article, we will teach you routing tutorial with PowerShell so that you can use PowerShell for routing in Windows.
Table of Contents
PowerShell’s application for routing has many capabilities, and its many parameters will help you to easily get comprehensive information by personalizing the search.
Learn how to work with the Get-NetRoute command
This application is one of the routing commands in PowerShell that allows you to get complete information about the status of the routers written in your Windows. Here are some examples to teach you how to do this.
Get a list of routes associated with a network interface
Get-NetRoute -Protocol local -InterfaceAlias Ethernet Get routes that point to network address 192.168.0.0
Get-NetRoute -DestinationPrefix 192.168* Note: The network address must be entered as above. If you use an address such as 192.168.0.0, you will encounter an error.
List of routes added with a specific protocol
Get-NetRoute -Protocol Local -DestinationPrefix 192.168.* In this command, you can use protocols such as Rip, bgp, Eigrp, etc. instead of Local.
Get a list of active routes
Get-NetRoute -State Alive With the above command, you can get complete information from the written routines. You can use the Get-Help Get-NetRoute command for more information on other parameters.
Route writing tutorial with PowerShell
You can use the New-NetRoute command to write a Route manually. This command has the same structure as the Get-NetRoute command. In the following, we will give an example of how to write rout in PowerShell and explain the types of parameters on it.
Note: To write a route, you need to open PowerShell with Administrator access.
New-NetRoute -DestinationPrefix "10.0.0.0/24" -InterfaceAlias "Ethernet" -NextHop 192.168.1.1 -RouteMetric 1 -Protocol Local -Publish Yes In the example above, a route for routing the network 10.0.0.0 is written along with some parameters, which we will explain below.
– DestionationPrefix: The desired network address along with its perfix for routing
– InterfaceAlias: The name of the interface you want to write route for
– NextHop: Gateway address to access the imported network
– RouteMetric: The priority of sending packets to the desired Gateway
– Protocol: The type of routing protocol
– Publish: Route running and activating
Now you will be able to write your desired rout.
Note: In the above command, you will need the 3 main parameters DestinationPrefix, InterfaceAlias and NextHop, and if other parameters are not written, Windows will set them by default.
Conclusion
Since PowerShell is the most powerful command line tool, most of the Windows Server management commands are done through this lovely blue environment. In this article, we tried to teach you how to get Get-NetRoute command, Get a list of routes associated with a network interface, List of routes added with a specific protocol, and so on.
Have you ever wondered how data travels from one source to the other? There are several nodes in a network, so how do you think your data manages to reach the chosen destination in a short time? Well! Networks employ a system called routing that helps find the best path to transfer your data from one device on your network to another.
Routing is a hub around which all IP connections resolve. Each Windows operating system has a built-in routing protocol that aids in making the right routing decision for transferring data packets. It establishes basic internetwork communications and examines every possible path that the data packet can take across a network to reach the final destination.
Overall, routing procedures can improve your performance and ensure that the network runs efficiently.
Here we will talk about routing in detail – how it works, why choose static routing, what is routing table then show you how to add a static route using a Powershell.
What is Routing?
Routing is the process of choosing a pathway to deliver a message to a recipient. The practice applies to any network right from telephone networks to public transportation. It can be done through different methods, such as it can be manually set up or updated automatically, i.e., routing changes over time.
In computer networking, a device named a router connects computing devices and networks to several networks. It helps perform the job by choosing the best path for data packets to reach the final node. The role of a router is to read the heading of the received data packet stating its final destination, cross-check the details with the routing table entries, and determine the best path to transfer the message to the recipient.
Static, Dynamic, and Default routing are the three different types of the routing table. Under the static routing table, only the administrator can manually set up or update any changes. In the case of a dynamic routing table, it requires more computing power and updates automatically. They usually choose the shortest and fastest path to transfer data packets to the final node.
The routing process usually forwards the messages based on the routing tables and using some predetermined rules.
Routing provides faster access to data, prevents bandwidth overload, and immediately looks for another pathway for data to take if a node is unavailable. There are various benefits of routing that can create a good impact on your network’s performance.
Why Should We Add Static Routes?
In most cases, small networks prefer static routing over dynamic routing for the administrator to manually update them. While medium and large-sized networks often choose the dynamic routing process because they find it more efficient.
Here we have listed a few situations under which it is best to implement static routes for your network.
- There are cases when routes cannot be added to a default gateway device. Generally, the condition occurs due to security considerations, and you need to switch to other routing devices to transfer the data packet to the final node. The best solution is to configure a local Windows computer and continue performing the necessary routing functions.
- Static routes are highly useful when you want to direct traffic to a particular subnet or set up multiple subnets or VLANs on your network.
- In case you want to use two different internet routers for sending traffic. For instance, the primary router for sending all other traffic and the secondary for sending social media or video streaming services traffic.
- To get better control of the routing table or traffic workflow when using a Windows PC as a router.
In simple terms, static routes are best for cases when you have multiple routers or multiple IP subnets on your network.
Static Routes help route packets from an interface to a destination address and are best applied where the routing protocol cannot be used, and traffic must be routed manually. For example, when a link goes down between two routers or when a router fails, Static Routes can be configured on the router that has the link with the failed router so that it will know which interface to use next in order to reach its destination.
How Does Routing Work?
Routing is the process of establishing a path to transfer messages from one point to another. It may be necessary when there is more than one possible path between two devices, or when the network topology changes and an alternate route is needed.
Routing is used in networks with dynamic topologies, where nodes may come and go over time. In these networks, it’s not always possible for every node to know every other node in the network. It means that routing protocols must exist in order for nodes within a network to communicate with each other and find paths through the network that allows them to connect with their desired destination node.
Routing can be done in two ways:
- Static routing, where the routing is predetermined and does not change over time. To be more precise, only the administrator can manually set up or update any changes.
- Dynamic routing, where the routing changes over time. It requires more computing power and updates automatically.
What is a Routing Table?
A routing table, also called a routing protocol, is a data structure used to find out routes for IP packets in a TCP/IP packet. Organizations use these tables, which are often stored on routers, to understand how sites are plugged together and how traffic moves through them.
Routing tables are responsible for determining the best path for the data packet when sent from a device. They are a set of rules that act like a map and direct the right path over an Internet Protocol network. It carries information related to the arrangement of a communication network that aids in delivering a message to the recipient.
Each device has a routing table that manages and controls packet paths with the router, firewalls, and layer 3 switches. The communication network arrangements provided by the routing table help in discovering the next hop or the best path to transfer a data packet to the final node.
Users can maintain a routing table manually or dynamically based on different occasions. It is important to know where to send data before dispatching the data packet.
If the network device finds it difficult to connect directly to the destination device, it uses other devices along a route to the destination device. To track each way and choose the best path to deliver various packets of data, it uses a routing table.
View Routing Table in Windows
In the Windows system, you can view the routing table using the PowerShell.
To view a routing table:
- Go to the Windows search bar and type ‘Powershell’.
- Open the app and run it as administrator.
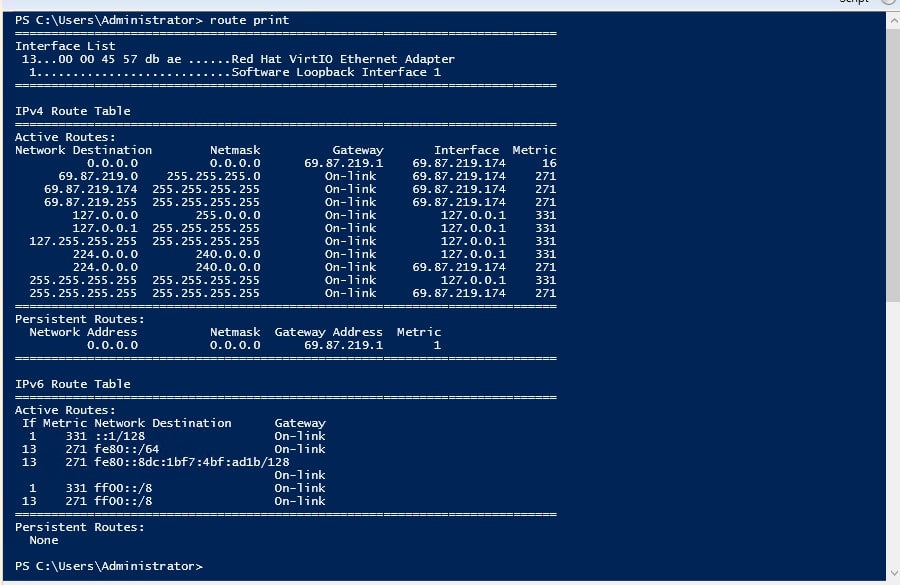
- Once the command prompt opens, enter the route print command to view the routing table.
route print
You should see the routing table in the following screen:
The basic syntax to add a static route to a routing table in a Windows-based routing device as shown below:
route /f /p [command] [destination] [mask <netmask>] [gateway] [metric <metric>]] [if <interface>]
A brief explanation of each option is given below:
- /f – Clear an existing routing table.
- /p – Add the new routing table permanently.
- command – Here, you can use add, change, and delete commands as per your need.
- destination – Define destination network.
- mask netmask – Define the subnet mask of the destination network.
- gateway – Define the gateway IP address.
- metric – Identify an integer cost metric.
- if interface – Define the network interface name.
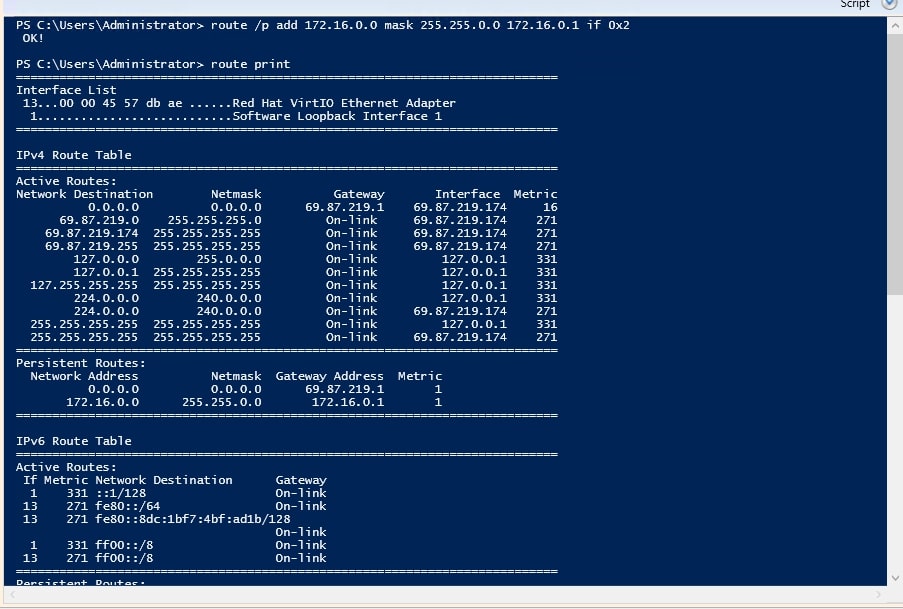
If you want to add a static route to the destination 172.16.0.0 with the subnet mask of 255.255.0.0 and the following hop address of 172.16.0.1, open your PowerShell and run the following command:
route /p add 172.16.0.0 mask 255.255.0.0 172.16.0.1 if 0x2
You can now run the following command to verify the newly added static route:
route print
Delete a Static Route
You can also delete a specific route or all routes using the route command.
For example, to remove all static routes, run the following command:
route -f
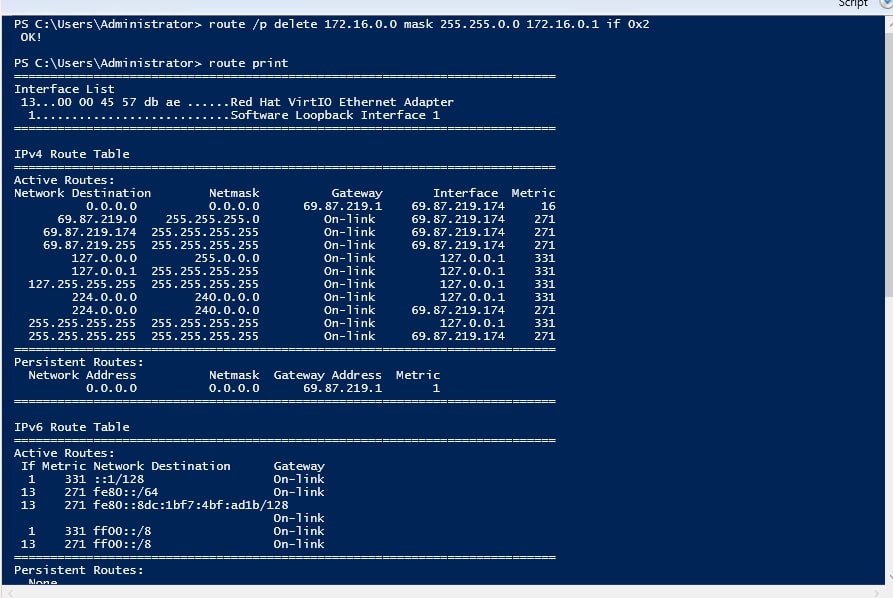
If you want to remove a specific route, run the following command followed by route IP:
route /p delete 172.16.0.0 mask 255.255.0.0 172.16.0.1 if 0x2
Conclusion
In this guide, we introduced static routing, routing table, then explained how to add and remove a static route using the PowerShell CMDLET. We also showed you how to see the added route using the route print command. I hope this post will help you better understand the concept of the static route and how to set it up in Windows systems.
Provide feedback
Saved searches
Use saved searches to filter your results more quickly
Sign up
Appearance settings
We show you how to add static routes and its associated parameters to a routing table in Windows using PowerShell cmdlets
Technology Advisor | Cybersecurity Evangelist
Updated: November 21, 2024
One of the seldom-known facts about a Windows machine is that it can be configured to perform the functions of a primary router.
In modern networking, routing plays a crucial role in determining how data packets travel from one network to another. Typically, dedicated devices such as routers handle this task. However, with the right configuration, a Windows machine can also perform routing functions, enabling it to direct traffic between different networks. This capability can be particularly useful in small office environments, labs, or for troubleshooting network configurations.
What is a Static Route?
One of the fundamental tasks in routing is adding static routes. A static route is a manually configured network route that specifies a fixed path for traffic to take when communicating with a particular destination. Unlike dynamic routing, where routes are learned and updated automatically, static routes provide greater control and predictability, making them ideal for specific use cases such as connecting to remote subnets or ensuring traffic flows through a particular gateway.
Configuring Windows to function as a router requires enabling the Routing and Remote Access Service (RRAS) or using Internet Connection Sharing (ICS). Once set up, the system can route traffic between multiple network interfaces, making static routes critical for defining the exact behavior of this routing.
PowerShell for Routing
In Windows, you can manage static routes using several tools, including the command line (route command) and graphical interfaces. However, PowerShell, with its powerful scripting capabilities and dedicated networking cmdlets, has become the preferred tool for many administrators. By leveraging PowerShell, you can not only add static routes but also automate and script these configurations for large-scale deployments or repetitive tasks.
Windows offers the New-NetRoute PowerShell cmdlet (available through the NetTCPIP module) to simplify the process of adding routes. This cmdlet allows administrators to specify key details such as the destination network, subnet mask, gateway, and interface. Additionally, PowerShell provides useful error handling and logging features, making it easier to troubleshoot and ensure successful route configuration.
In this guide, you’ll learn how to use PowerShell to add static routes effectively. Whether you’re configuring a Windows machine to act as a router or simply managing routes for specific networking tasks, PowerShell offers a straightforward and efficient approach. Let’s dive into the steps required to configure static routes and explore their impact on network traffic flow.
Why add Static Routes?
Most routers—including the one built into your Windows PC—use some form of dynamic routing. However, there are occasions where static routing may be used; in that case, the network administrator is responsible for manually updating all changes and adding static routes to the routing device. Here are a few occasions where you may need to implement static routes:
- Due to security considerations, specific routes can’t be added to the default gateway device, and you require another routing device to perform certain functions. In that case, a local Windows computer can be configured to perform the required routing functions.
- You have set up multiple subnets or VLANs on your network and need to direct traffic to a particular subnet. Static routes can be particularly useful in testing these types of environments.
- You have two internet routers (primary and secondary) on the network, and you want to use the secondary router for sending social media and audio/video streaming services traffic (Facebook, Instagram, Twitter, YouTube, Netflix, Spotify, etc.), and the primary router for sending all other traffic.
- You’re currently using a Windows PC as a router for your network, and you want to have better control of the routing table and the flow of traffic in and out of your network.
What is a Routing Table?
Whenever a network device needs to send data to another device on a network, it must first know where to send it. If the network device cannot directly connect to the destination device, it has to send it via other devices along a route to the destination device. Each device needs to keep track of which way to deliver various packets of data, and for this, it uses what we call a routing table.
A routing table is analogous to a distribution map in package delivery. It is a database that keeps track of paths, like a map, and uses these to determine which way to forward traffic or when the traffic leaves a routing device—whether it’s a physical router or a PC. Therefore, it’s essential to look at your existing routing table before making changes to it. Follow the steps below to view the routing table on your Windows machine:
- Type “cmd” or “powershell” in the Windows search bar to locate the app.
- Right-click on the app and click “Run as administrator”.
- Once the PowerShell or Command Prompt opens, type the following command to view the routing table:
route print.

As you can see from the screenshot above, the IPv4 routing table consists of the following fields:
- Network Destination: This field lists all of the network segments that the router is attached to.
- Netmask: The Netmask column provides the subnet mask not of the network interface attached to the segment but of the segment itself. This allows the router to determine the address class for the destination network.
- Gateway: Once the router has determined which destination network it needs to send the packet to, it looks at the gateway listing, which tells the router which IP address the packet should be forwarded through to reach the destination network.
- Interface: The Interface column tells the router which NIC is connected to the appropriate destination network.
- Metric: The routing metric of the path through which the packet is to be sent. The route will go in the direction of the gateway with the lowest metric.
- Persistent Routes: Persistent routes helps to preserve the routes from being removed from the Windows operating system once it is rebooted. This contrasts to non-persistent (active) routes, which are temporary and will be erased after the system is rebooted.
| Network Destination | Netmask | Gateway | Interface | Metric |
|---|---|---|---|---|
| 0.0.0.0 | 0.0.0.0 | 192.168.44.37 | 192.168.43.57 | 10 |
| 127.0.0.0 | 255.0.0.0 | 127.0.0.1 | 127.0.0.1 | 1 |
| 192.168.0.0 | 255.255.255.0 | 192.168.0.100 | 192.168.0.100 | 25 |
| 192.168.0.100 | 255.255.255.255 | 127.0.0.1 | 127.0.0.1 | 25 |
How do you add a Static Route to the Windows Routing Table?
The syntax for adding static route to a routing table in a Windows-based routing device using a PowerShell cmdlet is a follows:
New-NetRoute -DestinationPrefix <destination_network> -InterfaceIndex <interface_index> -NextHop <next_hop_ip>
The main parameters and optional parameters for the add static route syntax are described as follows:
- DestinationPrefix: This parameter specifies the network address or IP address range of the destination network for which you want to create the static route. It can be specified in CIDR notation (e.g., 192.168.0.0/24) or as a single IP address (e.g., 10.0.0.1).
- InterfaceIndex: This parameter specifies the index number of the network interface through which you want to route traffic for the specified destination network. You can obtain the interface index by using the Get-NetAdapter cmdlet or the Get-NetIPInterface cmdlet.
- NextHop: This parameter specifies the IP address of the next hop or gateway for the destination network. It defines the next network hop that should be used to reach the destination network. The next hop can be a router or another device responsible for forwarding the traffic.
- RouteMetric: This optional parameter specifies the metric value for the route. The metric is used to determine the priority of the route when multiple routes are available. Routes with lower metric values are preferred. If not specified, the metric is automatically determined based on the interface metric and other factors.
- Publish: This optional switch parameter indicates whether the route should be published in the routing table. By default, if you do not specify this parameter, the route is automatically published. If you want to create a hidden route that is not published in the routing table, you can use -Publish:$false.
- PolicyStore: This optional parameter specifies the network location profile in which to store the route. Valid values are ActiveStore (active network profile), PersistentStore (persistent network profile), or BootStore (boot network profile). By default, the route is added to the active network profile.
Now, to show a practical example using the above Powershell syntax, follow the steps below to create a static route to the destination 10.51.0.0 with the subnet mask of 255.255.0.0 (/16) and the interface index number 12 and a hop address of 10.23.0.1:
- Type ‘powershell’ in the Windows search bar to locate the PowerShell app.
- Right-click on the app and click Run as administrator.
- Once the PowerShell command prompt opens, type the following command to add the static route.
New-NetRoute -DestinationPrefix 10.51.0.0/16 -InterfaceIndex 12 -NextHop 10.23.0.1
Static route with persistent: As stated earlier, this route will only stay in the routing table until Windows is rebooted. Once that happens, the contents of the routing table will be erased. Therefore, if you want the entry to persist, you need to append -PolicyStore PersistentStore to the above Powershell command. For example, to add a persistent route to the destination 10.51.0.0 with the subnet mask of 255.255.0.0 and the next hop address of 10.23.0.1, type the following command:
New-NetRoute -DestinationPrefix 10.51.0.0/16 -InterfaceIndex 12 -NextHop 10.23.0.1 -PolicyStore PersistentStore
Static route with metric: If you want to include a metric value for the route, you need to append --RouteMetric <metric_value> to the above Powershell command. Replace <metric_value> with the desired metric value for the route. Lower metric values indicate a higher priority for the route. For example, to add a route to the destination 10.51.0.0 with the subnet mask of 255.255.0.0, the next hop address of 10.23.0.1, and the cost metric of 10, type the following command:
New-NetRoute -DestinationPrefix 10.51.0.0/16 -InterfaceIndex 12 -NextHop 10.23.0.1 -RouteMetric 10
Static route with an interface: To add a static route using a PowerShell cmdlet with a specific network interface, you can use the -InterfaceAlias <interface_alias> parameter of the New-NetRoute cmdlet. Replace <interface_alias> with the alias or name of the network interface through which you want to route traffic. For example, if the interface you want to use has an alias of “Ethernet1”, the command would be:
New-NetRoute -DestinationPrefix 10.51.0.0/16 -InterfaceAlias "Ethernet1" -NextHop 10.23.0.1


Conclusion
This article explained how to add a static route and other vital parameters to a routing table using Powershell. If you want to see the contents of your entries, use the Get-NetRoute command to view the routing table, and you’ll see all your static route entries.
We hope this simple tutorial helps you better understand the concept of the static route and how to implement it in Windows operating systems. Once again, remember to run PowerShell as administrator when executing these commands. If you need more help, refer to the PowerShell documentation or run Get-Help New-NetRoute -Detailed in PowerShell for more detailed information and additional parameters that may be available based on your PowerShell version.