
автор: Джон, Обновлено: 28 августа 2024 г.
Если на системном диске вашего сервера есть только диск C, вам лучше сжать его и создать больше томов, по крайней мере, отдельный раздел для программ. Не устанавливайте все программы и не сохраняйте все на диск C. Если диск C или разделы для обмена, базы данных заполняются, вам лучше сжать другой большой диск и перенести свободное место на эти разделы. Многие спрашивают, можно ли сжать раздел в Server 2019/2022 без потери данных. Ответ положительный. В этой статье я расскажу, как уменьшить объем в Windows Server 2019/2022 с собственным инструментом и безопасным программным обеспечением для разделов.
Содержание:
- Как уменьшить размер диска Server 2019/2022 без программного обеспечения
- Нехватка объема усадки в Windows Server 2019/2022
- Лучший способ уменьшить раздел в Server 2019/ 2022
Как сжать раздел в Server 2019/2022 без программного обеспечения
То же самое с предыдущими версиями, Windows Server 2019 а в 2022 году Управление дисками инструмент для управления разделами диска. Оно имеет Сжать том Функция для сжатия раздела NTFS без потери данных. Однако, сравнивая с программное обеспечение серверного раздела, этот собственный инструмент имеет много ограничений. На самом деле, Управление дисками не на 100% безопасно для сжатия раздела, потому что оно несколько раз повреждало мои разделы. Обратите больше внимания, если есть как первичный, так и логический разделы на диске.
Шаги, чтобы уменьшить объем в Windows Server 2019/2022 с управлением дисками:
- Press Windows + X на клавиатуре и нажмите «Управление дисками» в списке.
- Щелкните правой кнопкой мыши раздел NTFS и выберите Сжать том.
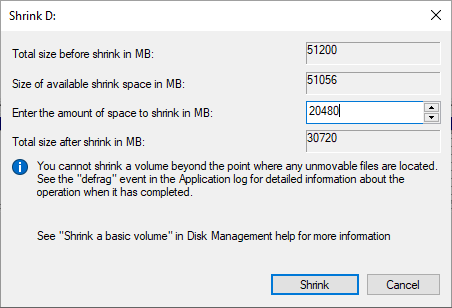
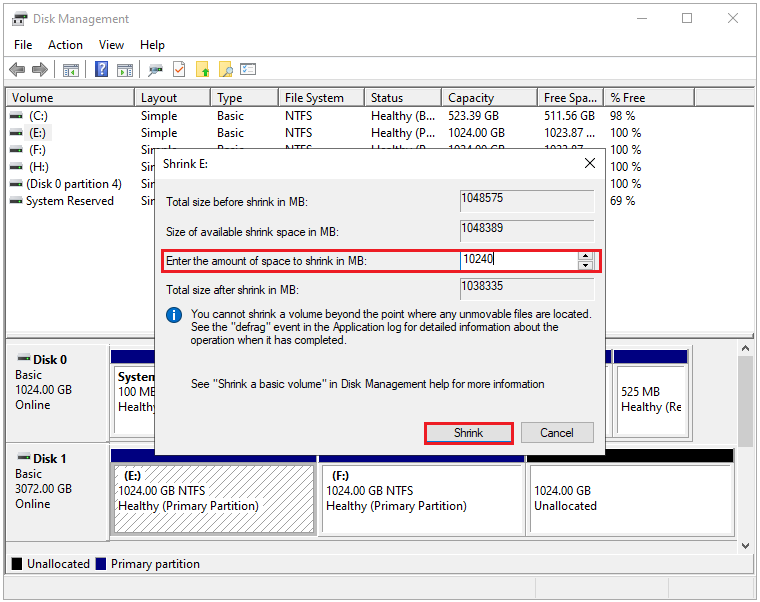
- Введите количество места и нажмите Сжиматься. Если вы не введете сумму, максимальный доступное свободное пространство будет использовано по умолчанию.
Через некоторое время этот раздел будет уменьшен, и справа от него появится нераспределенное пространство.
Нехватка «Уменьшить объем» в Windows Server 2019/2022
Как я уже сказал выше, «Управление дисками» — не лучший инструмент для уменьшения размера раздела. Server 2019/2022, потому что у него есть некоторые недостатки.
1. Поддерживается только раздел NTFS
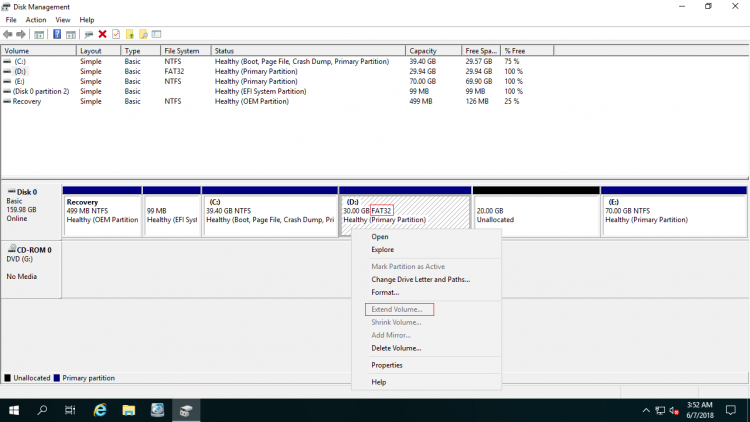
Управление дисками может только сжиматься NTFS разделы, FAT32 и другие типы разделов не поддерживаются. Когда вы щелкните правой кнопкой мыши раздел FAT32, Shrink Volume выделен серым цветом.
2. Сжимать перегородку можно только влево.
Когда вы уменьшаете объем в Server 2019/2022 с помощью управления дисками вы можете только сжать этот том влево и сделать нераспределенное пространство справа этого тома. Управление дисками не дает вам никаких других вариантов, кроме ввода объема пространства.
3. Он не может сжимать объем за пределы неперемещаемых файлов.
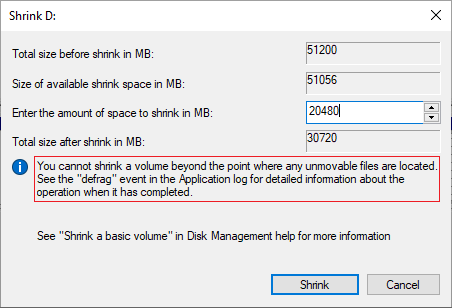
В уменьшающемся окне есть уведомление — «Вы не можете сжать том за пределы места, где находятся неподвижные файлы.»
Например: в области данных диска C есть 4 блока. Если неперемещаемые файлы находятся в блоке 3, вы не может уменьшить объем заблокировать 2 или 1, даже если есть свободное место.
Это причина, почему многие люди говорят, что они не может уменьшить объем за половину предела. Они могут только сжимать небольшое пространство, хотя на этом диске много свободного места. Эти «неподвижные» файлы включают файл подкачки, гибернацию и другие большие файлы.
Лучший способ уменьшить раздел в Server 2019/ 2022
По сравнению с инструментом управления дисками, NIUBI Partition Editor поддерживает разделы NTFS и FAT32. Он может сделать нераспределенное пространство слева или справа при сжатии раздела. Кроме того, он может перемещать эти «неперемещаемые» файлы, поэтому при желании он может сжать диск до минимального размера. Он также может двигаться и объединить нераспределенное пространство в непрерывный или несмежный раздел на том же диске.
Как уменьшить объем в Server 2019/2022 с NIUBI Partition Editor:
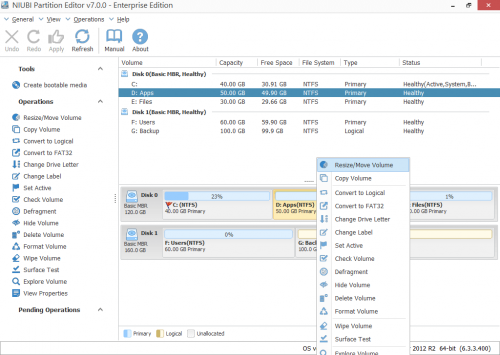
Скачать В серверной версии вы увидите раздел диска со структурой и другой информацией справа, доступные операции с выбранным диском или разделом перечислены слева и при щелчке правой кнопкой мыши.

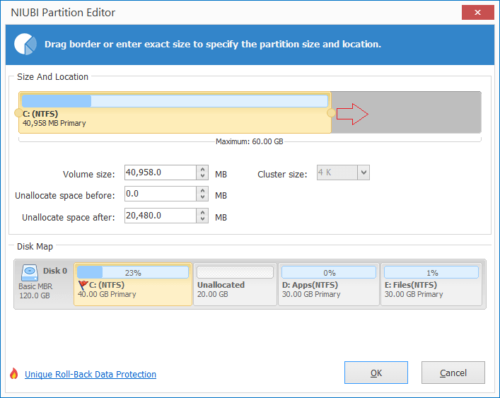
Щелкните правой кнопкой мыши на диске, который вы хотите сжать (здесь D) и выберите «Изменить размер/переместить объем», Во всплывающем окне у вас есть два варианта.
Если вы перетащите левая граница вправо или введите сумму в поле Unallocated space before:
Затем производится Нераспределенное пространство налево этого раздела.

Если вы перетащите правая граница влево или введите сумму в поле Unallocated space after:
Затем производится Нераспределенное пространство справа.

Посмотрите видео как уменьшить объем в Windows Server 2019/2022 без потери данных:

Если вы хотите создать новый том, щелкните правой кнопкой мыши нераспределенное пространство и выберите «Создать том». Если ты хочешь расширить раздел с этим нераспределенным пространством щелкните правой кнопкой мыши этот раздел в NIUBI и выберите опцию «Изменить размер/Переместить том». Во всплывающем окне перетащите границу на другую сторону, чтобы объединить это нераспределенное пространство.
Помимо сжатия и расширения раздела диска в Windows Server 2019/2022/2025 и предыдущие Server 2003/2008/ 2012/2016 NIUBI Partition Editor поможет вам выполнять многие другие операции, такие как перемещение, объединение, копирование, преобразование, дефрагментация, оптимизация, скрытие, стирание разделов и сканирование поврежденных секторов и т. д.
Скачать
Обновлено 30 октября 2024 г. в 3:25| Рекомендуемые
Windows Server 2012 унаследовал то же самое».Сжать том” функция из предыдущей версии Server 2008. Если вы забыли создать больше разделов при установке Windows Server 2012, вы можете сжать большой раздел, чтобы получить нераспределенное пространство без потери данных. Однако не все диски можно сжать с помощью этого собственного инструмента. Если вы хотите расширить раздел, сжав другой, Disk Management не сможет вам помочь. В этой статье я расскажу, как сжать том в Windows Server 2012 r2 с помощью встроенного Disk Management и лучшего способа сжать раздел Server 2012 с помощью программного обеспечения для безопасных разделов.
Обзор:
- Уменьшение объема с помощью управления дисками Server 2012
- Ограничение управления дисками для сокращения раздела
- Уменьшите громкость с помощью редактора разделов
- Сократите раздел, чтобы создать новый
- Сжать раздел, чтобы расширить другой диск
Как уменьшить объем в Server 2012 r2 Disk Management:
Шаг 1: Нажмите Windows + X вместе на клавиатуре и выберите Управление дисками в списке.
Шаг 2: щелкните правой кнопкой мыши диск NTFS, который вы хотите уменьшить, и выберите «Сжать том».
Шаг 3: сумма по умолчанию — это весь доступный размер, вам лучше ввести меньшую сумму, а затем нажать Сжиматься продолжать. Как правило, размер этого раздела будет уменьшен за короткое время.
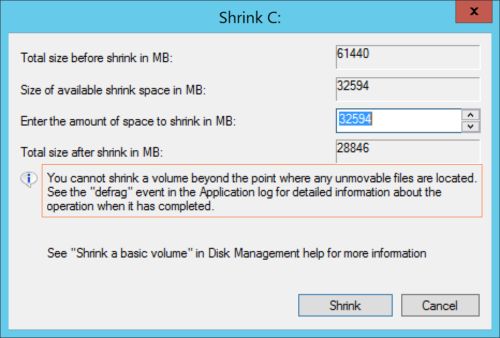
В некоторых случаях можно лишь немного уменьшить пространство, как сказано в примечании: «Вы не можете сжать том за пределы места, где находятся неподвижные файлы«.
Ограничения «Сжать том» в Windows Server 2012 r2
от Справочный документ Microsoft, при сжатии раздела некоторые файлы (например, файл подкачки или область хранения теневых копий) не могут быть автоматически перемещены. Управление дисками не может сжать раздел за пределы точки, где расположены неперемещаемые файлы. Если операция сжатия не удалась, проверьте журнал приложений на наличие события 259, которое идентифицирует неперемещаемые файлы.
- Только NTFS раздел можно уменьшить, FAT32 и любые другие типы разделов не поддерживаются.
- Предположим, что диск, который вы хотите сжать, состоит из 4 блоков — 1, 2, 3 и 4, неперемещаемые файлы расположены в блоке 3. Вы не можете сжать том до блока 1 или 2, даже если они пусты и доступны для записи.
- Disk Management может только сжать раздел и создать нераспределенное пространство справа. Это не проблема, если вы просто хотите создать новый том с нераспределенным пространством. Но если вы хотите объединить это нераспределенное пространство с другим разделом, Disk Management не сможет вам помочь.
Лучше, чем управление дисками, NIUBI Partition Editor имеет больше параметров при сжатии раздела в Windows Server 2012:
- Он может сжимать и расширять разделы NTFS и FAT32.
- Он может перемещать «неподвижные» файлы, поэтому он может сжать раздел до минимального размера.
- Он может сжимать раздел влево или вправо и создавать нераспределенное пространство с любой стороны.
- Он может перемещать и объединять нераспределенное пространство в смежные или любые несмежные разделы на том же диске.
Как уменьшить объем с NIUBI Partition Editor
Чтобы уменьшить объем в Windows Server 2012 r2 с помощью NIUBI, вам просто нужно перетащить его на карту диска. Следуйте инструкциям ниже.
1. Уменьшите раздел, чтобы создать новый том
Step1: Скачать NIUBI Partition Editor, щелкните правой кнопкой мыши диск C: (или другой раздел) и выберите «Изменить размер / переместить объем».
Step2: Во всплывающем окне перетащите правую граница влево.
Нераспределенное пространство будет сделано на правую сторона C: привод. Если вы перетащите левая граница вправо на предыдущем шаге будет создано нераспределенное пространство на левая сторона.
Шаг 3: Щелкните правой кнопкой мыши незанятое пространство и выберите «Создать том».

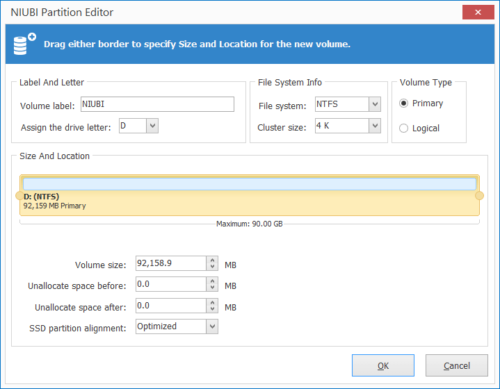
Шаг 4: Во всплывающем окне нажмите OK для создания раздела с настройками по умолчанию. Или измените каждую настройку самостоятельно, доступные операции, в том числе:
- Добавить ярлык (имя) в этот новый том
- Выберите букву диска
- Выберите Файловую систему и размер кластера.
- Выберите, чтобы создать этот диск как логический или основной
- Перетащите любую границу, чтобы изменить размер раздела.
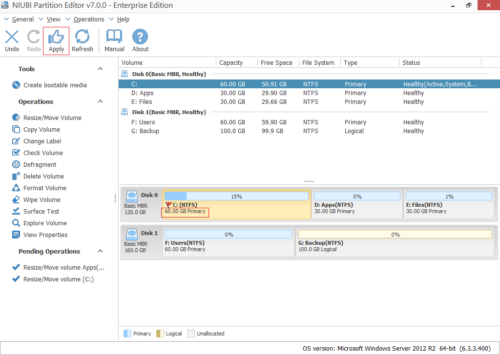
Шаг 5: Нажмите OK и вернитесь в главное окно, нажмите Применить вверху слева выполнить, готово.
2. Уменьшите том Server 2012, чтобы расширить другой диск.
Шаг 1: Щелкните правой кнопкой мыши D: диск и выберите «Изменить размер / переместить объем».
Шаг 2: Во всплывающем окне перетащите оставил граница правота чтобы уменьшить D и создать нераспределенное пространство слева.

Если вам нужна точная сумма, введите значение в поле «Нераспределенное пространство до».
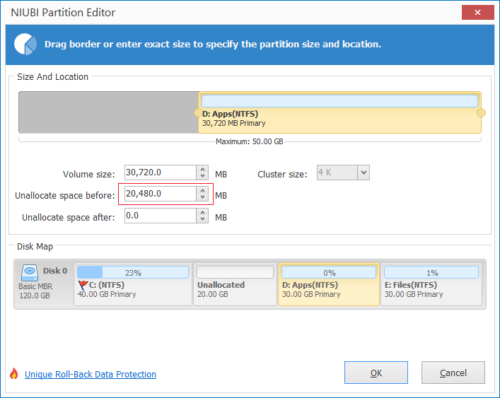
Нажмите OK и обратно в главное окно, ожидающая операция добавляется в нижнем левом углу.
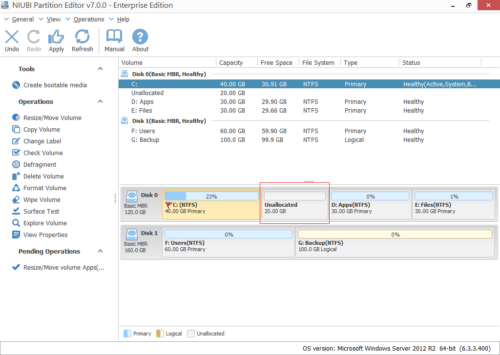
Шаг 3: Щелкните правой кнопкой мыши диск C и выберите «Изменить размер/Переместить том», перетащите правую граница правота для объединения этого нераспределенного пространства.
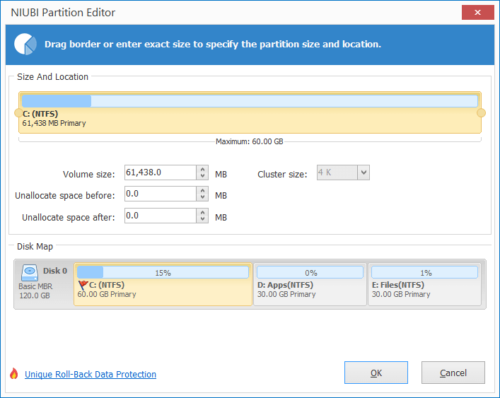
Шаг 4: Нажмите OK и вернитесь в главное окно, нажмите Применить вверху слева, чтобы вступить в силу, готово!
Если вы хотите расширить диск E, сократите диск D и сделайте нераспределенное пространство справа. Если вы хотите сжать E, чтобы расширить диск C, сделайте нераспределенное пространство слева при сжатии диска E. Перед добавлением этого нераспределенного пространства на диск C вам нужно переместить раздел D вправо с помощью той же функции «Изменить размер/Переместить том».
Как уменьшить и увеличить том в Server 2012 R2
Помимо сжатия и расширения раздела в Windows Server 2012/2016/2019/2022 и предыдущих версиях Server 2008/2003, NIUBI Partition Editor помогает выполнять множество других операций по управлению дисками/разделами, таких как объединение, перемещение, копирование, конвертация, дефрагментация, очистка, скрытие разделов, сканирование поврежденных секторов.
Подробнее Скачать, чтобы попробовать
Due to some reasons, users sometimes need to shrink volume in Windows Server. What should you do? To reduce the size of partitions easily, here from this MiniTool post, we strongly recommend you use the professional partition manager MiniTool Partition Wizard.
Sometimes, for some reason, you need to shrink volume to make room for other uses. Some users choose Disk Management to shrink the size of a volume, while others choose third-party software to shrink the size of a volume.
Let’s learn how to shrink volume in Windows Server 2012/2016/2019/2022, and how to solve the problem of being unable to shrink volume in Windows Server.
In this section, we will show you how to reduce the size of a volume in Windows Server. For more details on how to do this step by step, please continue reading.
#1. Use Disk Management
Disk Management is a built-in tool in Windows that helps you perform basic operations such as creating, deleting, and formatting volumes. However, this tool has some limitations. For versions before Windows Server 2008 (including Server 2000 and Server 2003), Disk Management does not provide the Extend Volume and Shrink Volume options.
In addition, other conditions should be met to shrink the volume using Disk Management. Otherwise, the Extend Volume will be grayed out. Here are the reasons:
- Microsoft stipulates that the Extend Volume feature in Disk Management is only applicable to RAW partitions or NTFS partitions.
- The Extend Volume feature of Disk Management only extends the volume to the unallocated/free space to the right of the target partition.
It can be seen that there are certain limitations to using Disk Management to shrink volume in Windows Server. Let’s take a look at how to shrink a volume in Disk Management when the shrink volume is not grayed out. Here are the detailed steps:
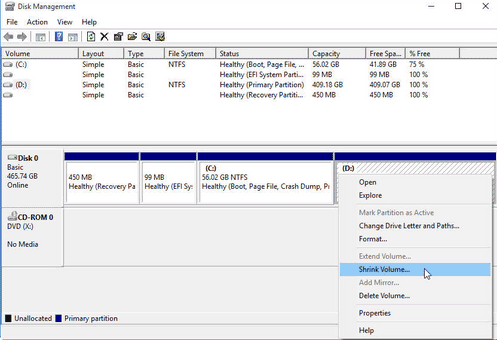
Step 1: Right-click the Windows Start menu and choose Disk Management to open.
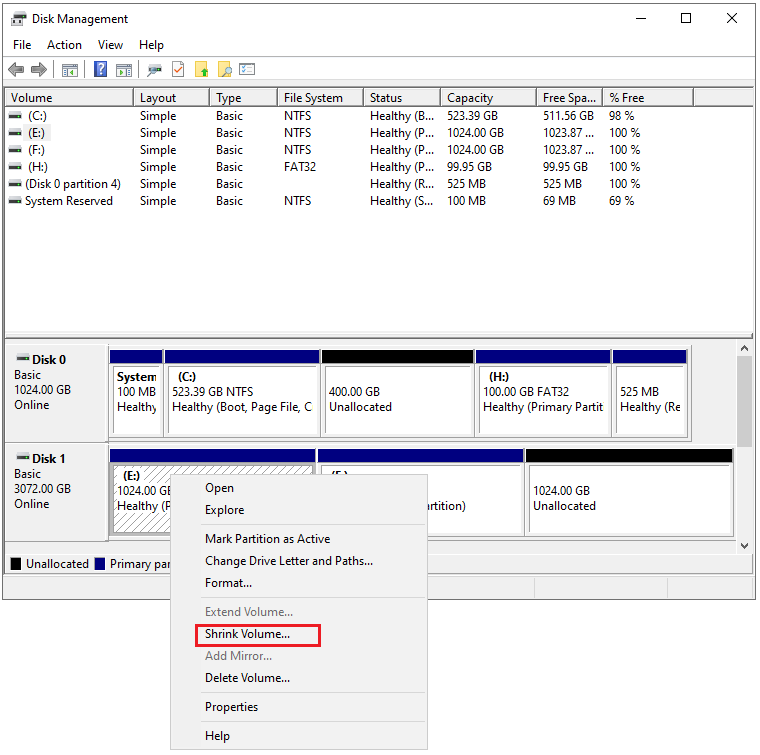
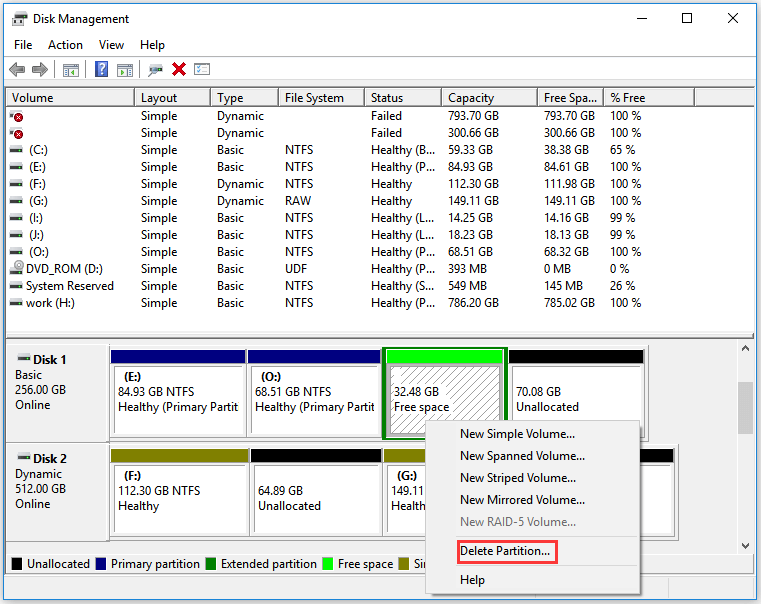
Step 2: Right-click the partition you want to shrink and choose the Shrink Volume option to reduce the partition size.
Step 3: Enter the amount of space that you want to shrink in MB. Then click Shrink.
#2. Use Command Prompt
Command Prompt is a command line interpreter that can help you reduce the size of a volume in Windows Server, delete a partition, etc. through special command characters.
Here are the detailed steps to shrink volume.
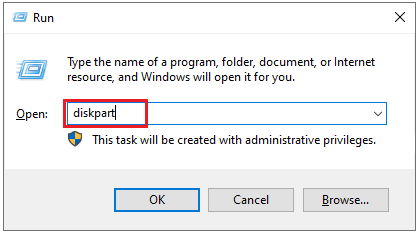
Step 1: Press the Windows logo key + R to open the Run box. Type diskpart and press Enter.
Step 2: In the Command Prompt window, input the following commands one by one and press Enter after each to execute them:
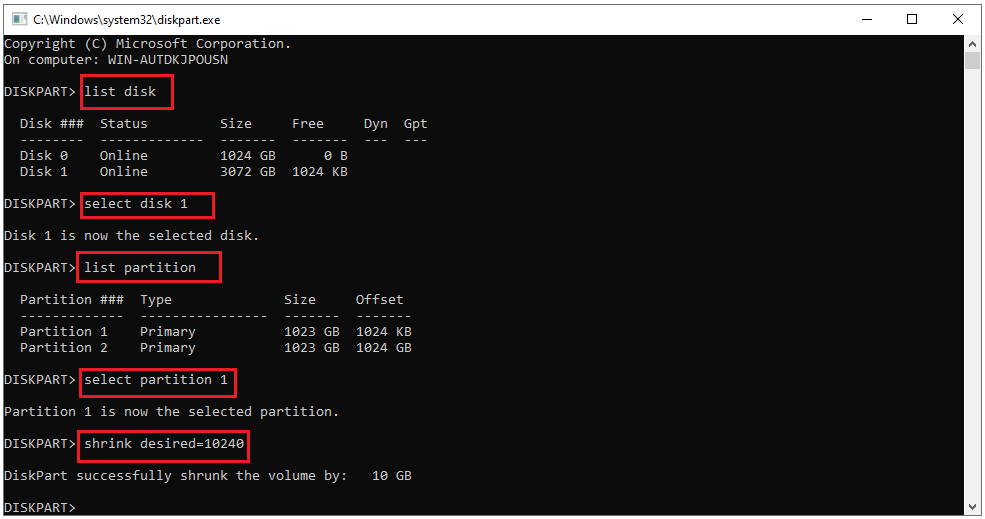
- list disk
- select disk * (replace * with the disk number which you want to shrink)
- list partition
- select partition * (replace * with the partition number which you want to shrink)
- shrink desired=* (* is the size you want to shrink in MB)
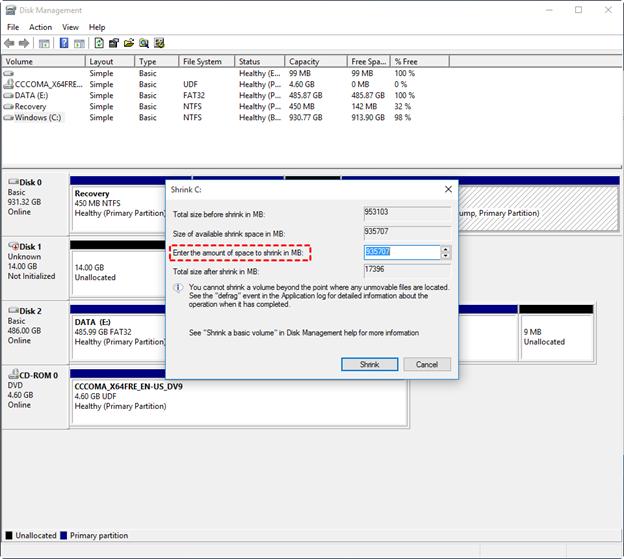
Sometimes when you encounter unmovable files on your hard drive, you may not be able to shrink the partition using the above methods. Just like what happened to this forum user.
My c drive is 1 TB I want to shrink it different volumes but it will get and it will show «You can’t shrink a volume beyond the point where any unremovable files are located see the defrag event in application log for detailed information about the operation when it has completed.»https://answers.microsoft.com/en-us/windows/forum/all/my-disk-drive-is-not-shrink-beyond-the-point/b2108d53-fc52-420a-bf8c-33594372660c
So how do you solve the “Unable to shrink volume in Windows Server” problem? Here are two methods to help you overcome all difficulties and successfully shrink the volume in Windows Server 2012/2016/2019/2022.
How to Solve Unable to Shrink Volume in Windows Server
To address the issue, you can either disable unremovable files or utilize a different partition shrinking tool.
Method 1: Disable Unremovable Files
Unremovable files are files such as page files, hibernation files, etc. If you are unable to shrink the volume in the Windows Server due to unremovable files, you can try disabling unremovable files. Here are the steps below:
#1. Disable Hibernation Mode
1. Press the Win + R key to open the Run box.
2. Input cmd and hit Enter to open the Command Prompt window.
3. At the Command Prompt window, type powercfg.exe /hibernate off, and then press Enter.
#2. Disable Page File
1. Click the File Explorer icon to open and right-click This PC to select Properties.
2. Click on Advanced system settings under Related settings from the right panel.
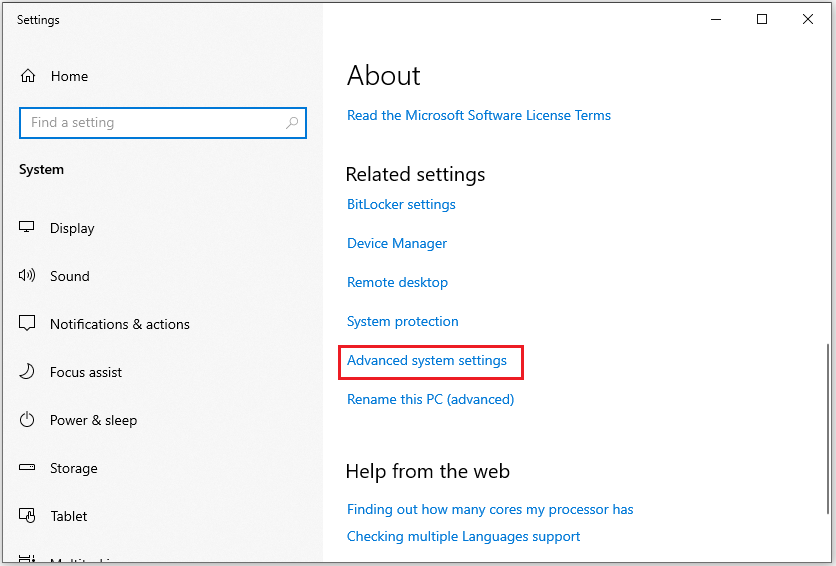
3. In the Advanced tab, click on the Settings button under Performance.
4. Select Advanced tab from the top and click on Change button under Virtual memory.
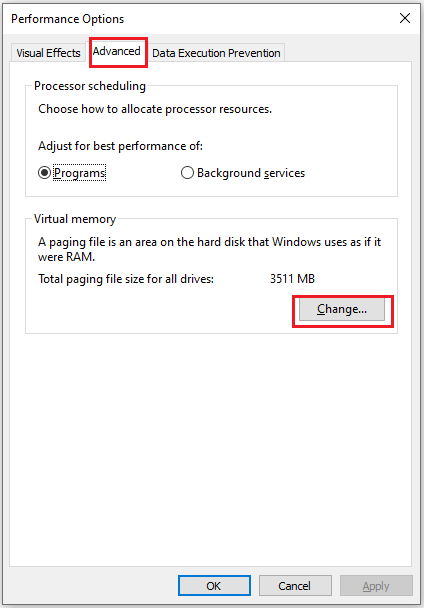
5. Uncheck the Automatically manage paging file size for all drives.
6. Check the No paging file option and click Set. Then, click on Yes to confirm.
7. Click on the OK button to save the changes.
#3. Disable System Protection
1. Type system restore in the Search box. Then, click Create a restore point from the results to open it.
2. In the System Protection tab, click Configure.
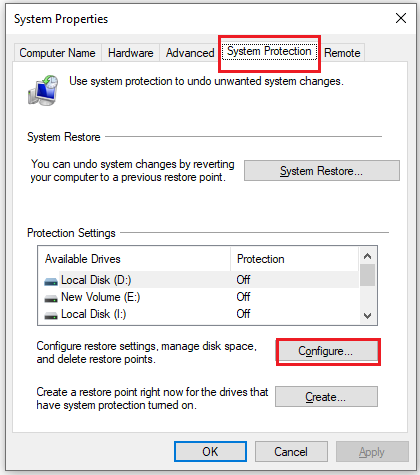
3. Under Restore Settings, check the Disable system protection option and click Apply.
Note:
After you have disabled the page file, hibernation, and system protection, you can now try to shrink the volume again. After the volume shrink is complete, you will need to enable hibernation and the page file.
Method 2: Use Alternative Volume Shrink Tool — MiniTool Partition Wizard (Recommend)
MiniTool Partition Wizard is developed by MiniTool Software Ltd. It is a simple and easy-to-use partition manager. With this powerful partition manager, you can complete many complex disk or partition operations.
With this tool, you can manage your disks well. It not only can help you create/format/split/wipe/delete/merge partitions but also can help you clone a hard drive, hard drive recovery, convert MBR to GPT, etc.
Many users use this partition manager to resize partitions to get more disk space. Now let’s see how to use the Move/Resize Partition feature of this partition manager to help you shrink volume in Windows Server 2012/2016/2019/2022 without losing any data.
Step 1: Click the button below to download MiniTool Partition Wizard Free Edition. Install it on your computer and launch it to get the main interface.
MiniTool Partition Wizard DemoClick to Download100%Clean & Safe
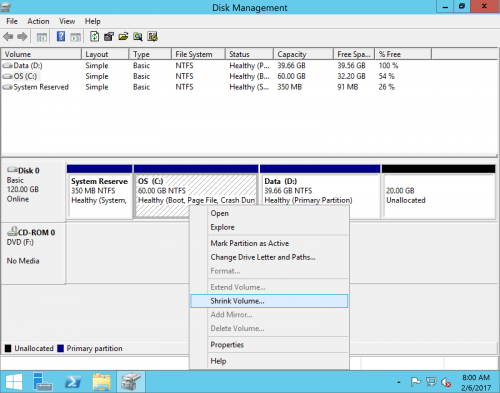
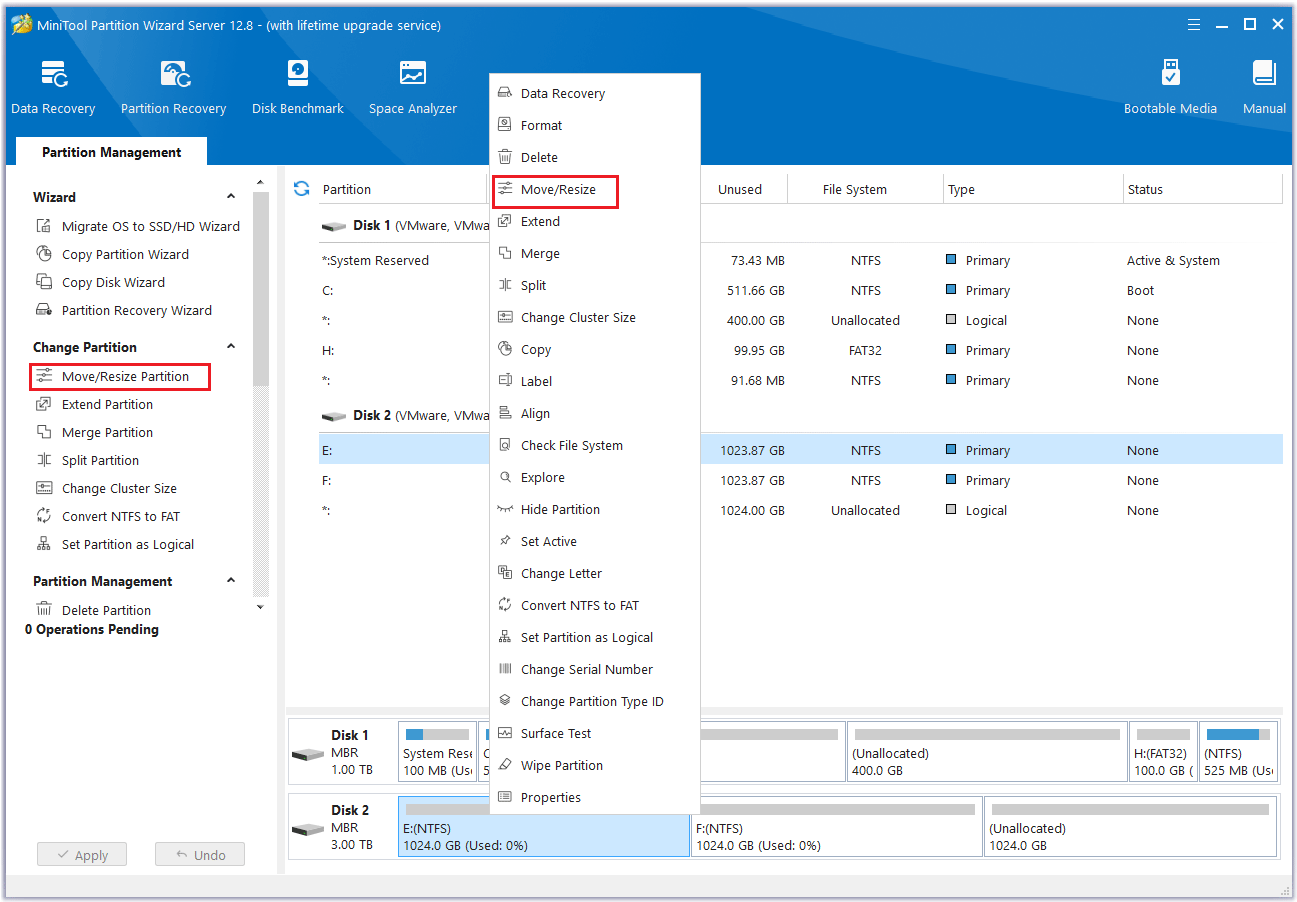
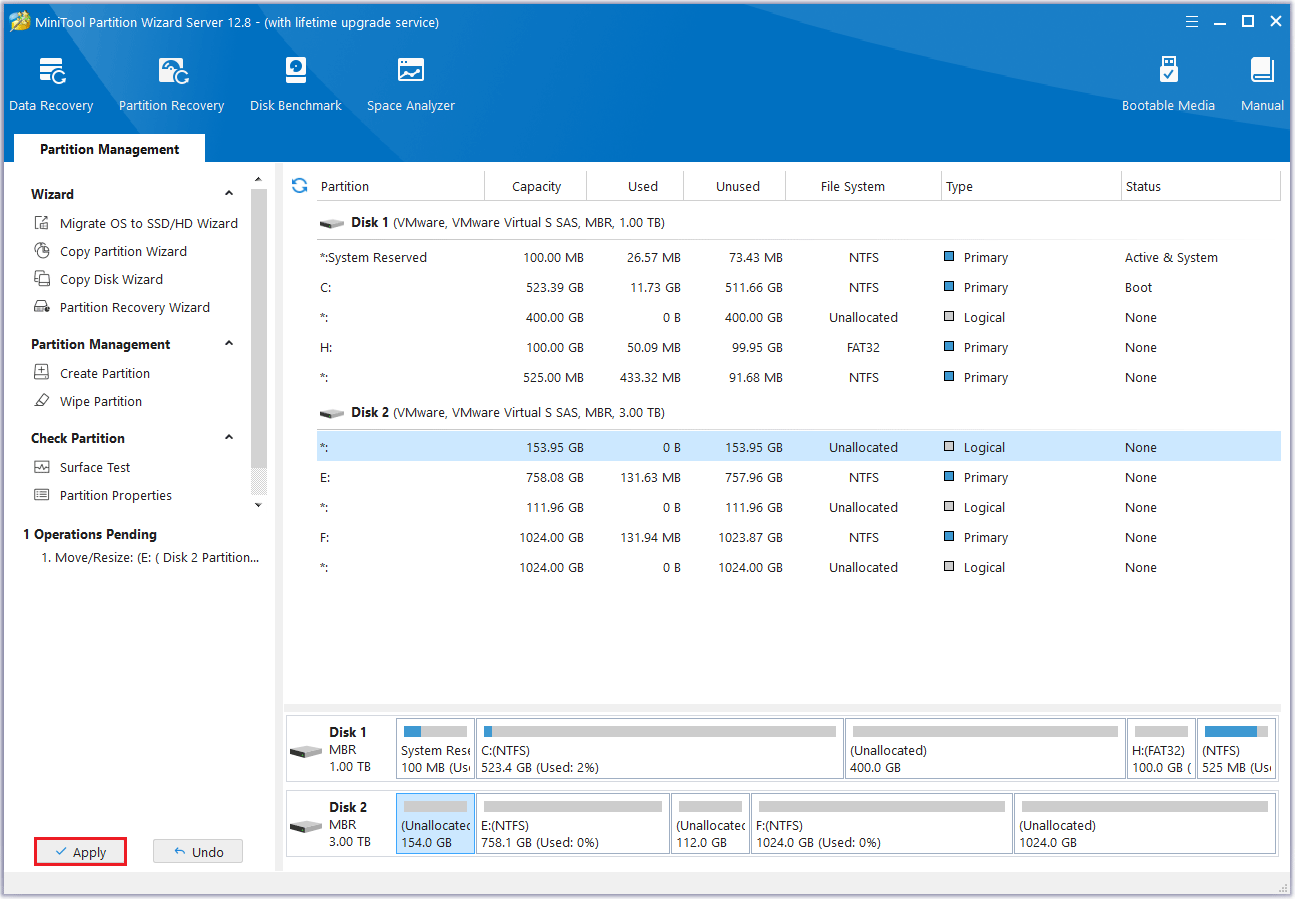
Step 2: In the main interface, you can view the disk and partition distribution on your computer. Select the desired partition, then choose one of the options below to begin the shrinking process.
- Choose Move/Resize Partition from the left action panel.
- Choose Move/Resize from the pop-up menu after right-clicking on the target partition.
Step 3: On the Move/Resize Partition window, you should drag the left triangle rightward or drag the right triangle leftward to free up space for the target partition in this window. Alternatively, you can manually specify the size you want to reduce. Then click OK.
Tips:
Please keep the Using Enhanced Data Protecting Mode option ticked.
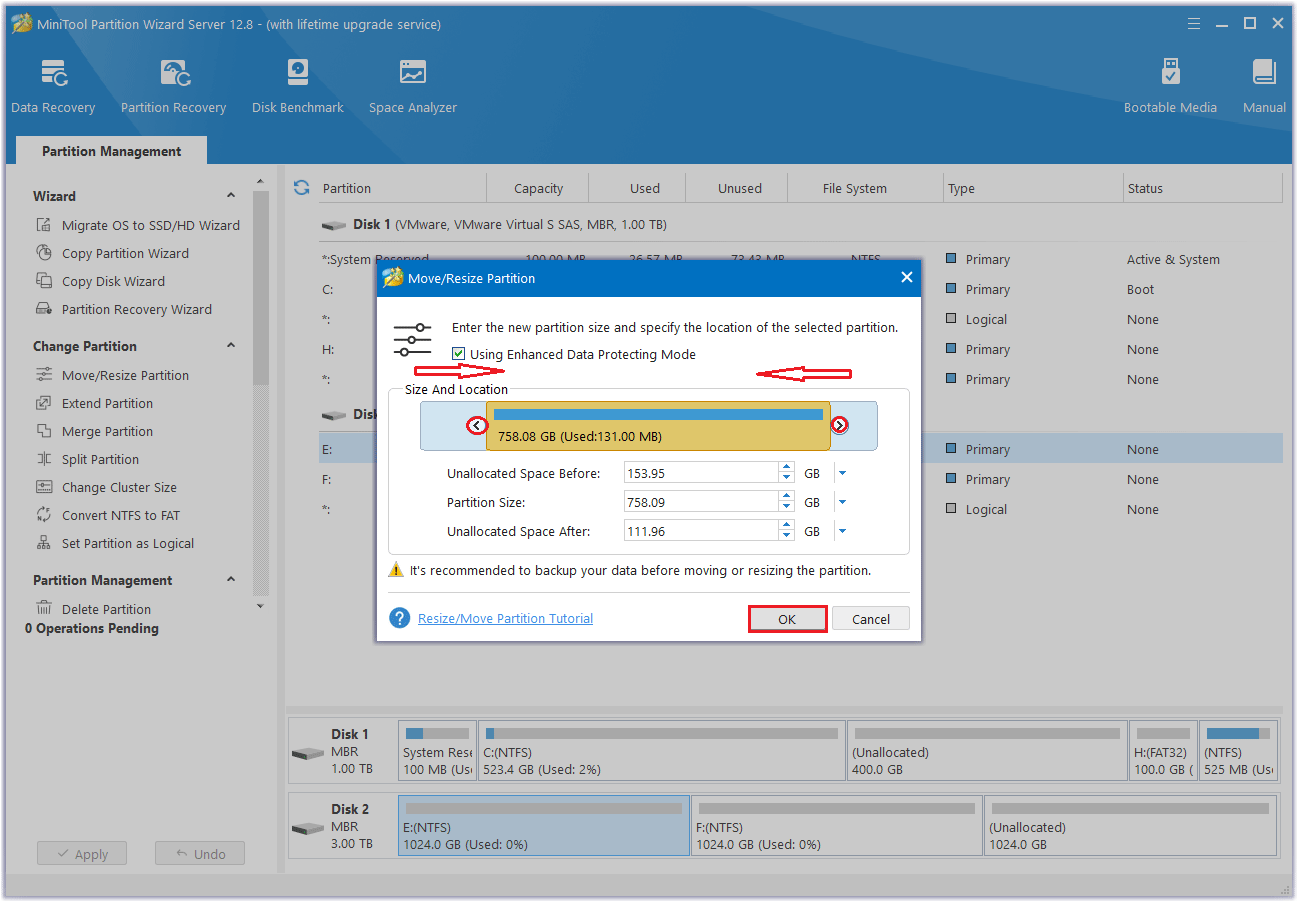
Step 4: The software will return to its main interface, showing that the size of the selected partition has changed. Consequently, there will be unallocated space both before and after the target partition. However, this is just a preview, you need to click Apply to execute these changes and actually complete the partition shrinking process.
What to Do After Shrinking Volume in Windows Server
After shrinking the volume, you will get new unallocated space. What can you do with this unallocated space?
Actually, you can use this unallocated space to create a new partition or extend a partition. It only takes a few steps to do this with MiniTool Partition Wizard. Below we will provide you with the detailed steps for this operation.
MiniTool Partition Wizard DemoClick to Download100%Clean & Safe
#1. Extend Partition
This Extend Partition feature directly uses free space from any existing partitions or unallocated space on the same disk to expand a partition.
Step 1: Launch MiniTool Partition Wizard to its main interface. Then right-click the partition to be extended and select Extend. And you can also select Extend Partition from the left action panel.
Step 2: Click the down arrow from “Take Free Space From” and select the partition to get expansion space. You can drag the sliding handle to decide how much of the available space it takes up. Then click OK to return to the main interface.
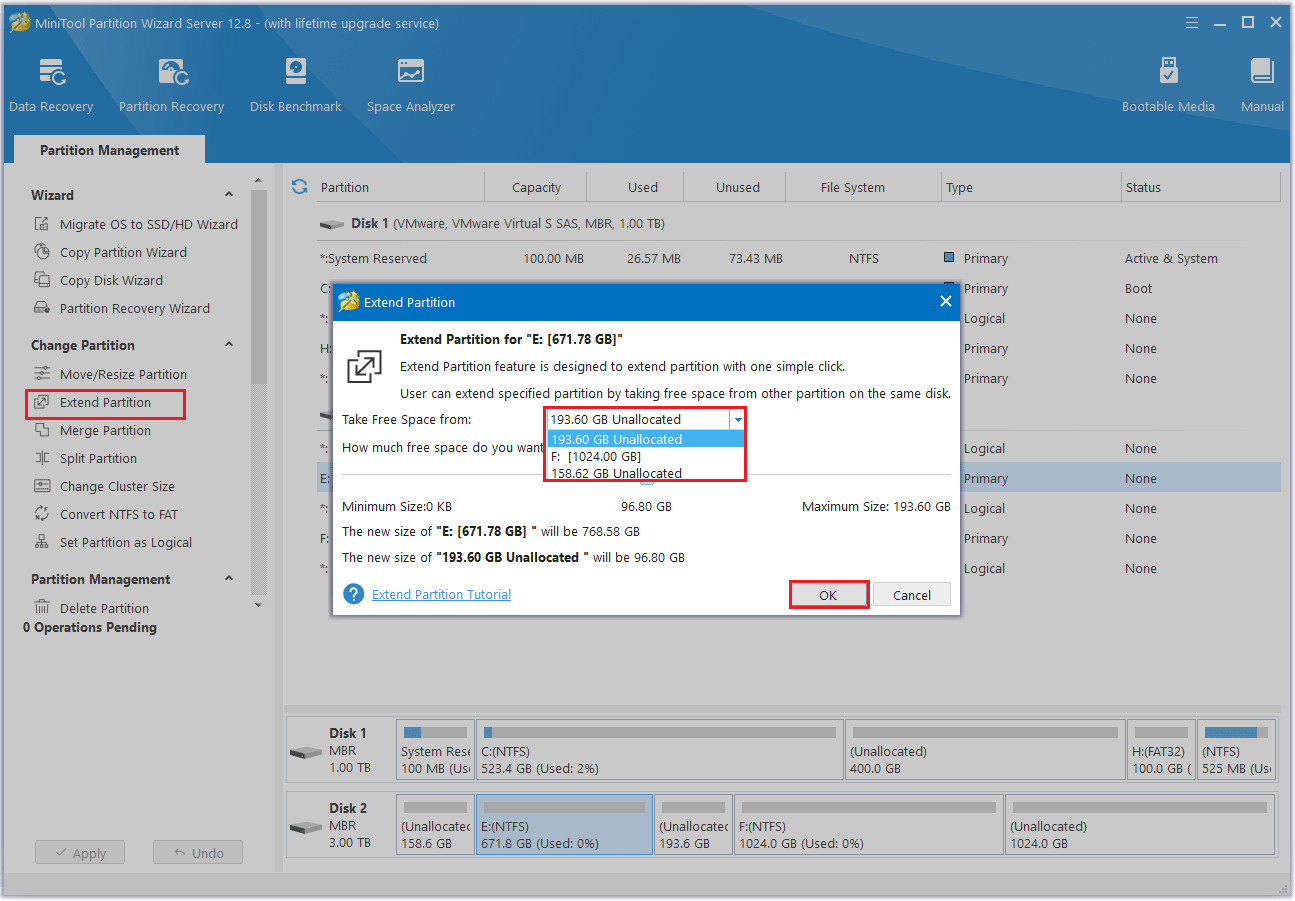
Step 3: You can see that the partition has been enlarged, but it has not been applied to the computer yet. Then you need to click the Apply button to perform all changes.
#2. Create Partition
The Create Partition feature allows users to create a new volume with specified unallocated space. Sometimes you want to create a new partition to manage your data, such as a partition for movie resources, file data, etc. In this case, this feature can easily manage various data by category.
Creating partitions in Windows Server is relatively easy, but there are some conventional rules that you need to understand to avoid errors in the process of creating partitions.
The detailed rules are as follows:
- On an MBR disk, you can create up to four primary partitions or three primary partitions and one extended partition. Multiple logical partitions can be created in an extended partition.
- On a GPT disk, you can create up to 128 partitions. Disks larger than 2TB are generally initialized as GPT disks.
Therefore, before creating a partition, you need to check whether you have a GPT disk or an MBR disk. If it is an MBR disk and more than 4 primary partitions are created, an error message “There are no MBR slots on the disk” will appear.
Below are the detailed steps to create partitions using MiniTool Partition Wizard:
Step 1: On the MiniTool software’s interface, select the unallocated space and then choose the Create Partition option from the left side. Or you can right-click on the unallocated space and choose the Create option from the drop-down menu.
Step 2: On the Create New Partition window, confirm the parameters including drive letter, file system, cluster size (optional), and partition size. After that, click the OK button.

Step 3: Review the creation results and then click the Apply button.
This article describes how to shrink volume in Windows Server and how to use the reduced space. I used MiniTool Partition Wizard for all these operations, and I recommend you use this software if you need it.Click to Tweet
Bottom Line
After reading this article, you will get several free ways to shrink volume in Windows Server. We also introduced the problems you may encounter and how to solve them. You will find that MiniTool Partition Wizard is a relatively better choice.
In addition, we also introduced how to use unallocated space to improve space utilization after shrinking the partition. For example, create a new partition or extend the partition. Based on this, you can try it.
If you have any questions or suggestions while using the MiniTool Partition Wizard, you can contact us via [email protected] to get a quick reply.
Summary
Safely shrinking volumes on Windows Server 2008 2012 2016 2019 2022 computers without losing data with safe tool provided by Windows or 3rd party software.
Table of Contents
- How to shrink partition with Disk Management (NTFS)
- Shrink volume without data loss on Server 2022/2019/2016 (No data loss, ntfs/fat32)
- FAQs
- Shrink volume and extend c drive (shrink D/E/F/H/G and extend c)
- How to shrink c drive without losing data
| Disk Management | Diskpart (No UI) |
Partition Resizer (Easy UI) |
|
| Shrink Partition | |||
| Shrink FAT32 Partition | NO | NO | |
| Move partition/unallocated space | NO | NO | |
| Extend FAT32 partition | YES if unallocated space is on the right | ||
| Extend FAT32 C Drive | NO | NO | |
| Extend NTFS C Drive with Adjacent Unallocated Space | |||
| Backup Disk/Partition | NO | NO | |
| Add Space from Another Disk | RAID REQUIRED (Cannot move partition) |
RAID REQUIRED (Cannot move partition) |
RAID REQUIRED |
| Move Recovery Partition | NO | NO | |
| Migrate OS to Larger Disk | NO | NO | |
| Download for Server |
Shrink Partition on Server 2022/2019/2016 with Disk Management
Shrinking volume varies in Disk Management. Here are some can and can’t tips.
- Shrinking NTFS volumes with Disk Management: YES
- Shrinking FAT32 volumes with Disk Management: NO ( Shrink fat32 drive with Partition Resizer)
- Add unallocated space to other drives wth Disk Management: NO (Move in-between partitions with Partition Resizer to move unallocated spaces safely)
Shrinking an NTFS volume is possible in Disk Management, and it only allows creating a new drive with the produced unallocated space after shrinking NTFS volume with Windows built-in tools (Disk Management or Diskpart, same story.)
Here are the steps for shrinking a volume in Disk Management when it’s ntfs. (For shrinking fat32 partitions, be free to use tool Partition Resizer Server.)
Step 1 — Open Disk Management in your computer, you may click the Start icon -> Run, and type Diskmgmt.msc
Step 2 — Right click the drive, click Shrink Volume option in the pop up box to go ahead.
Step 3 — Enter the size that you want to shrink, eg, if you want to shrink 10GB, you may enter 10240, which is the result of 1024*10, if you want to shrink 100GB, you may enter 102400, which is 1024*100.
Step 4 — Click Shrink button in the box and confirm the changes.
And then the disk partitions will have some Free space available on the disk map like this.
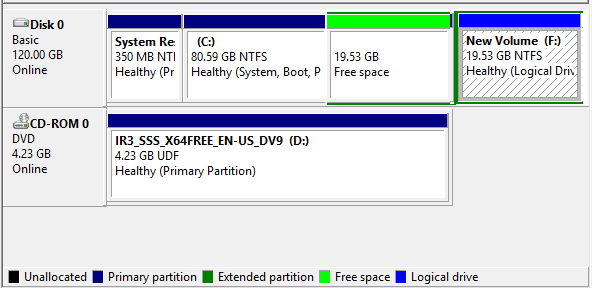
Step 5 — Right click the Free space to delete volume since deleting free space will make it unallocated space in Disk Management.
What can you do with the free space or unallocated space?
- 1, Add the unallocated space to closeby partition
- 2, Copy partition to unallocated space as bakcup
- 3, Create a new drive
- 4, Move unallocated space to other drives (Partition Resizer Server can do the job when Disk Management or Diskpart couldn’t)
- 5, Other partition functions…
Note: how to change free space to unallcoated space, or how to shrink fat32 partition
Tutorial: Shrink Volume with Partition Resizer Server (100% Safe, No data loss)
Partition Resizer Server can help change disk volume sizes without losing data. It can help protect OS and data even from a sudden power failure during the changing processes.
Follow these simple steps to shrink volume on server 2022/2019:
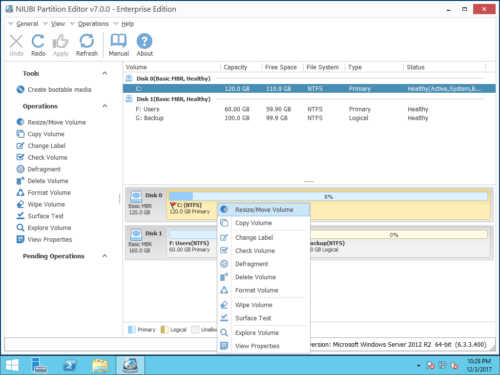
1. Right click drive and select Resize/Move Partition:
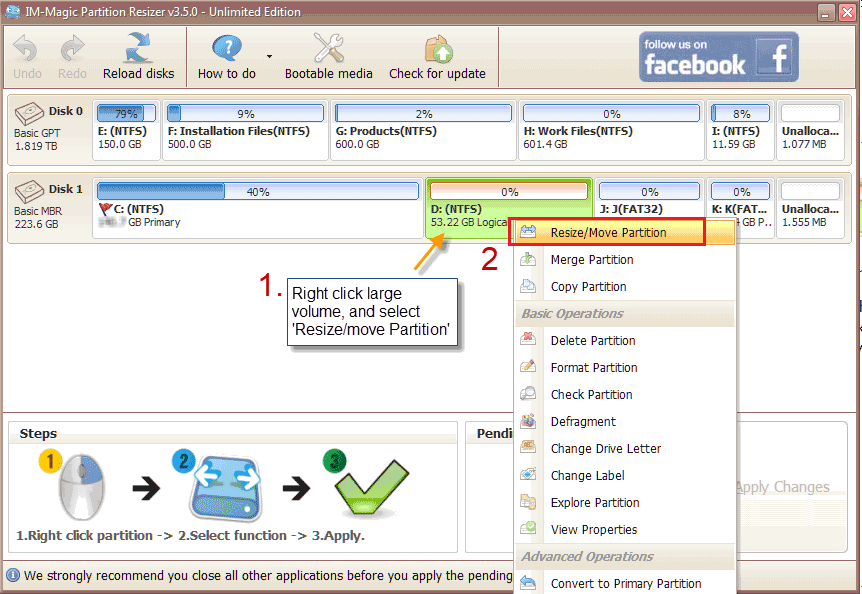
Resize partition without partition tool.
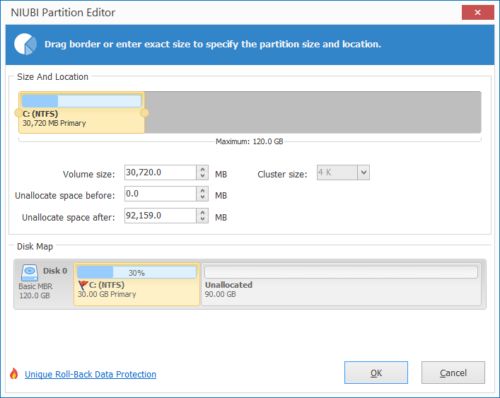
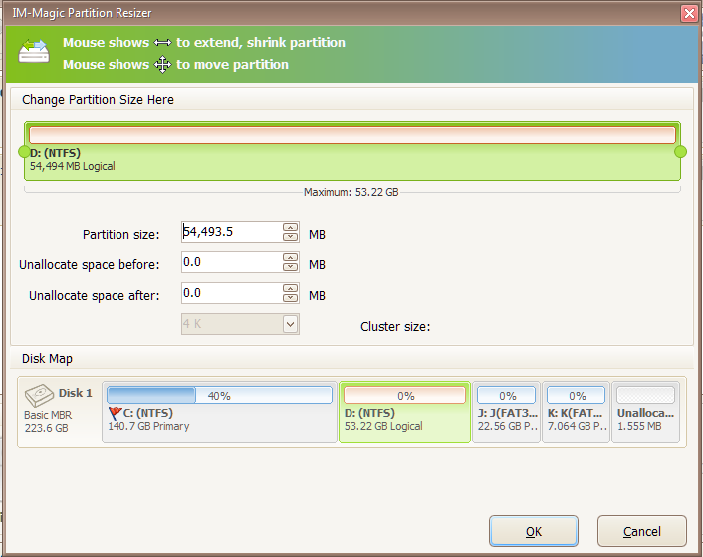
2. In the next step, drag the the border from left side or right side to shrink the free space and make it unallocated after the shrinking.
Steps to resize your partition

Steps to resize your partition
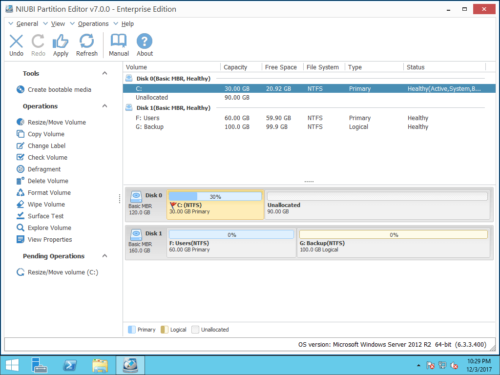
3. You will see your drive size is reduced and also an unallocated space is created as shown below.
Create a new drive: Right click the unallocated space and select Create Volume to start making a new drive on your machine.
Moving the unallocated space to an unadjacent drive: You need to move the in-between partitions by right clicking a drive and go to RESIZE/MOVE PARTITION and then move the whole drive left or right forward to change the location of the unallocated space with IM-Magic Partition Resizer Server.

Also read: how to move unallocated space
4. Click APPLY button in the software to get every step applied.
Video — This following image shows how to move a partition safely in Partition Resizer Server
Also read: how to move unallocated space to c drive or targeted drive
How to shrink volume using diskpart cmd in server 2022/2019/2016/2012
To shrink a volume using Diskpart cmd in Windows Server 2022, you can follow these steps:
- Open an elevated command prompt by pressing Win+X and selecting «Command Prompt (Admin)» or «Windows PowerShell (Admin)».
- Type «diskpart» and press Enter to open the Diskpart command-line utility.
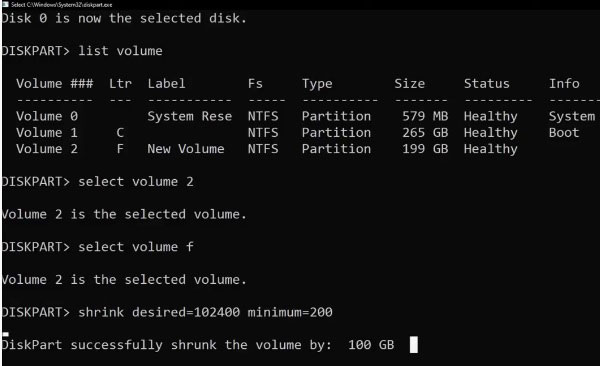
- Type «list volume» and press Enter to see a list of all volumes on your system. Identify the volume you want to shrink.
- Type «select volume X» (where «X» is the number of the volume you want to shrink) and press Enter.
- Type «shrink desired=SIZE» (where «SIZE» is the amount of space you want to shrink the volume by, in megabytes) and press Enter. For example, if you want to shrink the volume by 10 GB, you would type «shrink desired=10240».
-
Wait for Diskpart to complete the operation. This may take several minutes depending on the size of the volume and the amount you’re shrinking it by.
-
Once Diskpart has finished, you can exit the utility by typing «exit» and pressing Enter.
Note that shrinking a volume can cause data loss or corruption if there are files located in the space that you’re shrinking, so be sure to back up any important data before proceeding.
Also read: how to shrink volume with diskpart
Shrink volume and extend c drive (shrink D/E/F/H/G and extend c)
You need to use 3rd party tool Partition Resizer Server to shrink a volume and add the space to extend c drive since Disk Management can only delete volume(c drive right side volume) to make unallocated space and extend c drive.
Disk Management cannot extend volume even after deleting drive D when:
- The c drive is fat32 file system
- The c drive is ntfs drive but unallocated space is a logical drive, not primary drive
- The c drive is ntfs drive but there is recovery partition or something that stands in between the c drive and the unallocated space
- The c drive disk has MBR disk limits under 2TB (When the disk is 4TB for instance, the c drive cannot be extended when there are partitions already taking 2TB disk capacities.)
Also read: how to shrink drive and extend c
How to shrink c drive without losing data
When the c drive is NTFS file system, you can use Disk Management or Diskpart to shrink it safely. When the c drive has FAT32 file system, Partition Resizer Server can help shrink c drive safely when Disk Management and diskpart failed.
Для уменьшения размера диска виртуальной машины Windows Server 2012:
1. В оснастке «Управление компьютером» выберите «Управление дисками». Правой кнопкой мыши нажмите на нужном логическом томе и выберите «Сжать том…». Уменьшите размер тома с небольшим запасом, следуя инструкциям мастера.

2. В Панели управления облаком добавьте диск под резервную копию образа системы, в операционной системе отформатируйте и назначьте букву новому логическому тому. При необходимости установите компоненту «Система архивации данных Windows Server» и выполните резервное копирование командой wbadmin по аналогии с рисунком.

3. Выключите машину. Удалите рабочий диск. Добавьте диск для восстановления системы из образа. Смонтируйте дистрибутив Windows Server и включите машину, на первом шаге «Windows Setup» нажмите «Next», на втором шаге — «Repair your computer».

4. В появившемся окне выберите «Troubleshoot», в следующем «System Image Recovery», далее используйте мастер для восстановления системы.

5. Выключите машину и удалите диск с образом системы. Расширьте системный том на неразмеченную область рабочего диска.
Вы уже работаете с сервисами Cloud4Y?
Перейти на вебсайт
Попробовать бесплатно