
Skip to content
After installing and removing a lot of apps and updates, you may notice that your Registry has become quite bloated. Your Registry files may have become quite large. Large Registry files can cause slowdowns and performance issues in Windows 10. Here is how you can compress them.
Registry consists of several files, which form the registry database. You can see which files represent your registry database if you open the following Registry key:
HKEY_LOCAL_MACHINE\SYSTEM\CurrentControlSet\Control\hivelist
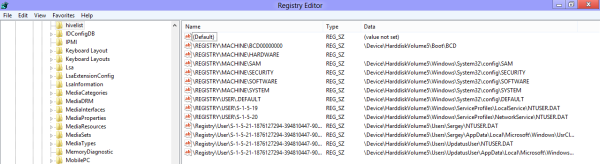
Here you can see the list of files on your disk drive where the Registry files are stored. The data inside them, has a hierarchical structure. Registry Editor shows it as a tree view: there are «root» (parent) keys, and several sub-keys (child objects). The root keys shown in Regedit for the most part, represent the specific file, or in other words, the registry files correspond to keys’ hierarchy. However, there are also some virtual root keys shown in Regedit which exist for backward compatibility. For example, HKEY_CURRENT_CONFIG is a virtual view, and HKEY_CLASSES_ROOT is also a virtual view of the current user’s key + system keys.
Note that some parts of the Registry database are never shown in Registry editor. For example, you will never see SAM (Security Accounts Manager) inside Regedit.
You can compress the Registry in Windows 10 without using third party software. However, you need to have a bootable media with Windows 10. It can be a USB stick or a UEFI bootable flash drive.
- Insert your bootable media and boot your PC from USB. (You may need to press some keys or change BIOS options to boot from USB.)
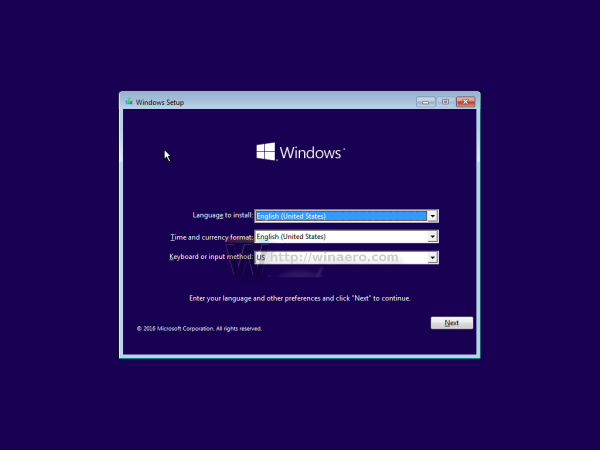
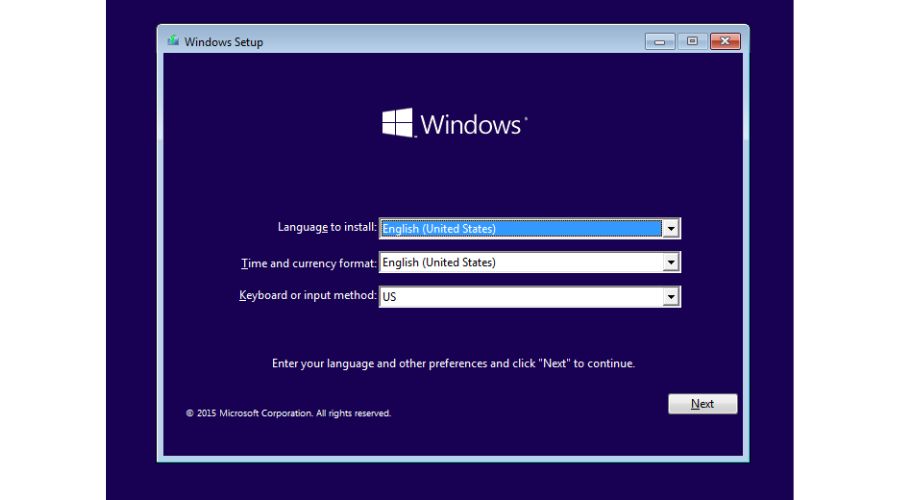
- When the «Windows Setup» screen appears, press Shift + F10 keys together.

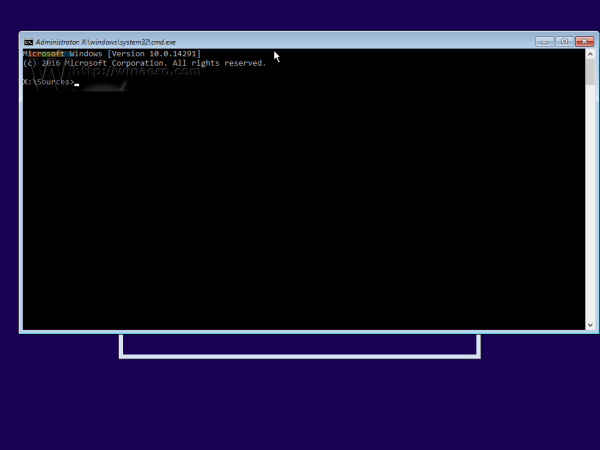
This will open the command prompt.
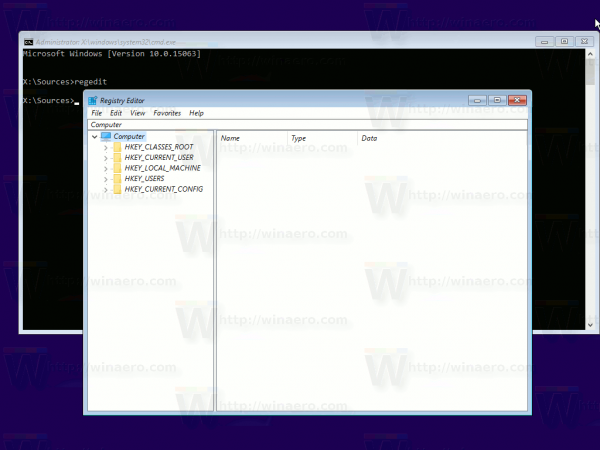
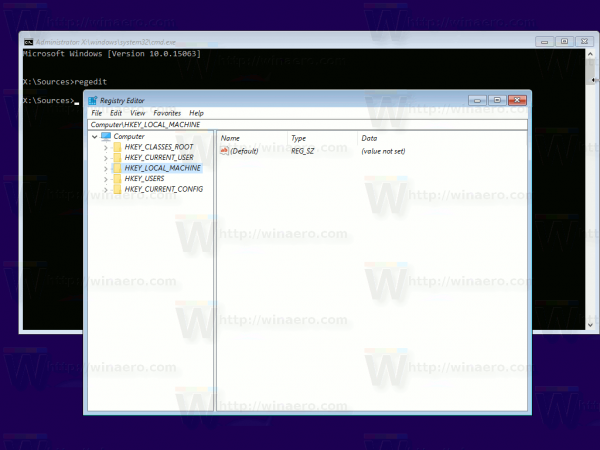
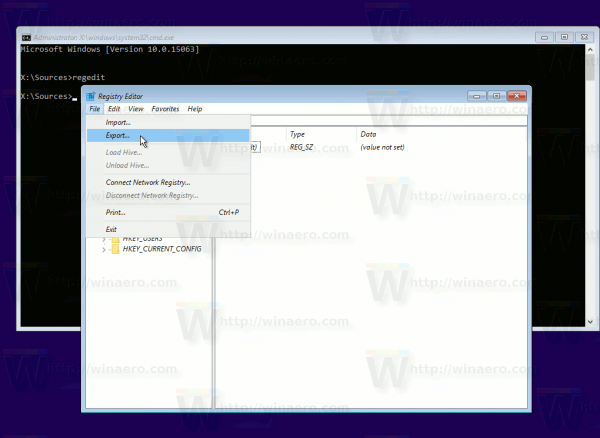
- Type regedit and press Enter. Do not close the command prompt window.
- In Regedit, load the large Registry file (hive) from the target file system (e.g. your C: drive where the Windows folder is).
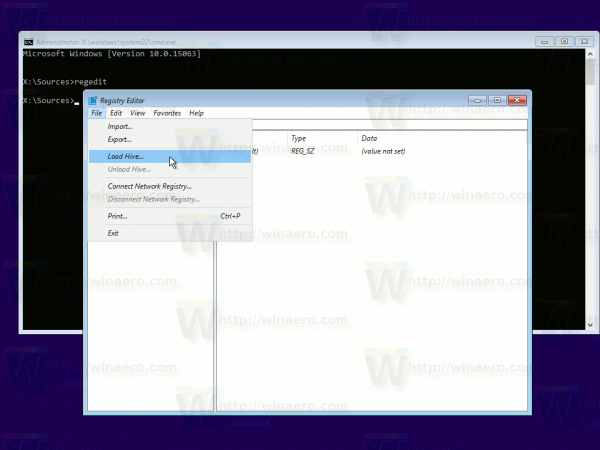
Select HKEY_LOCAL_MACHINE on the left and select File — Load hive… in the menu.
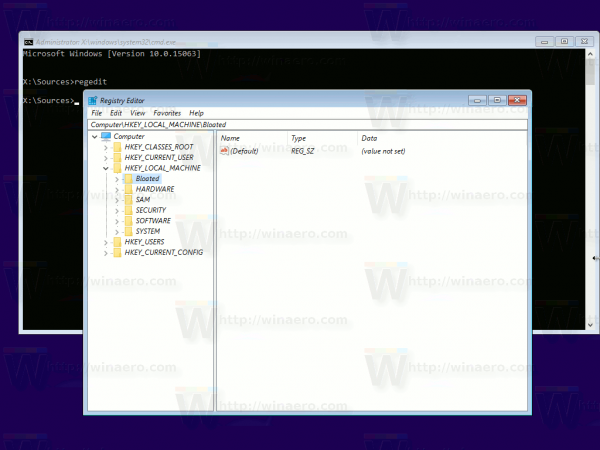
When prompted for a name, use any name to serve as the mount point under the HKLM branch. e.g. if you enter Bloated, the selected Registry file will be mounted under HKLM\Bloated.
Please refer to the following article to learn more about hive loading: How to access the Registry of another user or another OS
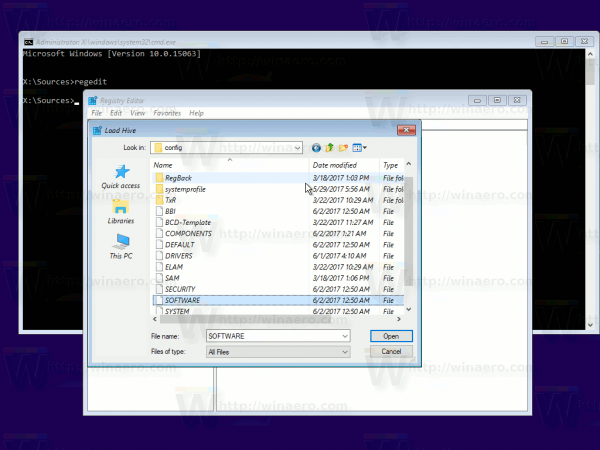
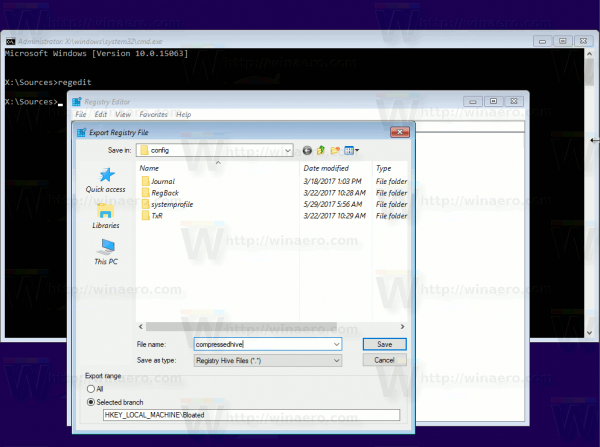
- Once the huge file has been loaded, export it as a «Registry Hive» file with a unique name, e.g. C:\windows\system32\config\compressedhive, where the folder C:\windows is your Windows directory on your computer’s hard drive. Select the loaded hive on the left and select File — Export as.


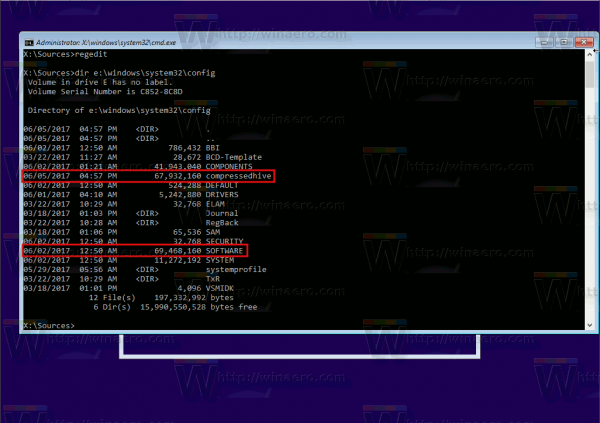
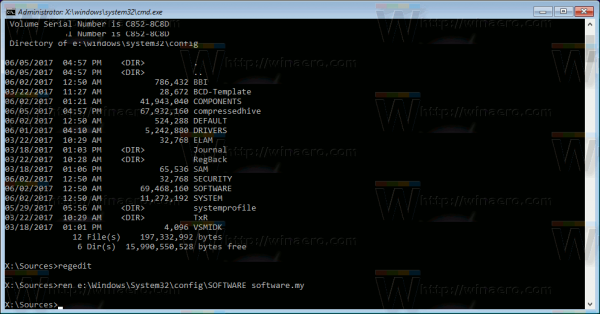
- Tip: You can use the dir command at the command prompt to verify the old and new sizes of the registry files.

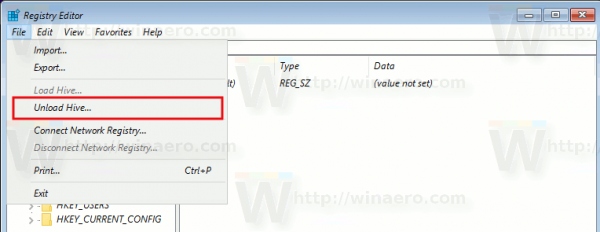
- Now, unload the file from Regedit by selecting the ‘Bloated’ key and selecting Unload hive from File menu of Registry Editor. If you get an «Access denied» error here, close the Registry editor. Then reopen the Registry editor and try again.

- Rename the original Registry file, for example, you can use the following command:
ren d:\windows\system32\config\software software.my

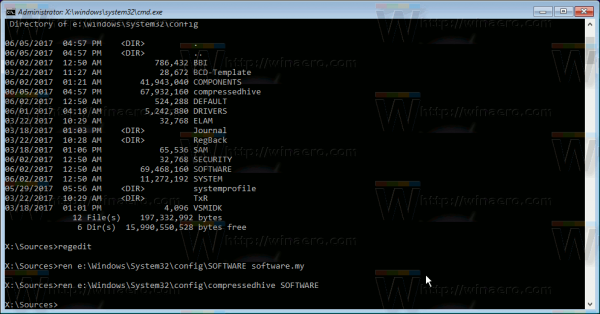
- Place the new file you exported instead of the old one.
ren d:\windows\system32\config\compressedhive software
- Close the command prompt and the setup program. This will restart your computer.
That’s it. This way, you can compress all your Registry files. This trick should work in Windows 8 and Windows 7 too.
Support us
Winaero greatly relies on your support. You can help the site keep bringing you interesting and useful content and software by using these options:
If you like this article, please share it using the buttons below. It won’t take a lot from you, but it will help us grow. Thanks for your support!
If you want to learn how to compress the Windows Registry, that is because, over time, after installing and uninstalling various apps and updates, the Registry has become bloated, and its files have become quite large. This can cause your Windows OS to slow down and cause you to experience performance issues.
I want to note that this process should be carried out cautiously, as improper Registry handling can lead to system instability or failure. But don’t fret because, in this article, I will show you how to compress your Windows Registry quickly and safely.
What is the Windows Registry?
Windows Registry is important to your computer’s OS. It’s a big database of settings that help your computer run smoothly. The Registry has major sections called Registry Hives, which contain different settings like registry keys, subkeys, and values like:
- HKEY_CLASSES_ROOT
- HKEY_CURRENT_USER
HKEY_LOCAL_MACHINE - HKEY_USERS
- HKEY_CURRENT_CONFIG
You can access and modify these hives using the Windows Registry Editor. This tool lets you create new keys, modify existing ones, and change access permissions. Using the Registry Editor can help improve your PC’s performance, increase security, or change access permissions.
Can I shrink my Windows Registry?
I want to point out that shrinking or compressing the Windows Registry is not something that you need to worry about. Instead, I recommend focusing on keeping your system healthy to function better. For example, if you experience slow performance, it is often due to other factors such as insufficient disk space, too many startup programs or background processes, or the operation of malicious software.
You should know that modern versions of Windows are pretty good at managing the size and health of the Registry. However, if you still feel that your Registry is causing performance issues or is too large, you can manually shrink it or use a third-party tool.
How to compress Windows Registry?
Before you start any operations with the Windows Registry, I strongly recommend the following preparatory work:
- Perform a full system scan using reliable antivirus software to eliminate any security issues.
- Ensure your Windows OS has the latest updates.
- Use the SFC and DISM tools to check the health of system files and registry components.
- Make a backup copy of your Registry.
- Create a Restore Point in case something goes wrong.
Now that you’re sure you’ve done all the previous steps, you can shrink your Windows Registry in the following ways:
- Manually compress Windows Registry
- Use the Registry Compressor tool
1. Manually compress the Windows Registry
First, I’ll show you how to manually compress the Registry in Windows 10. For this procedure, you need a bootable Windows 10 media (USB stick or bootable DVD.) In case you have USB boot media, do the following:
1. To start, insert your bootable media and boot your PC from USB. Before booting from USB, you may need to access BIOS settings and change the boot order.
2. Press the Shift + F10 keys simultaneously when the Windows Setup screen appears to open the Command Prompt.
3. In the Command Prompt, type ‘regedit‘ and press Enter to open Registry Editor. Do not close the command prompt window.
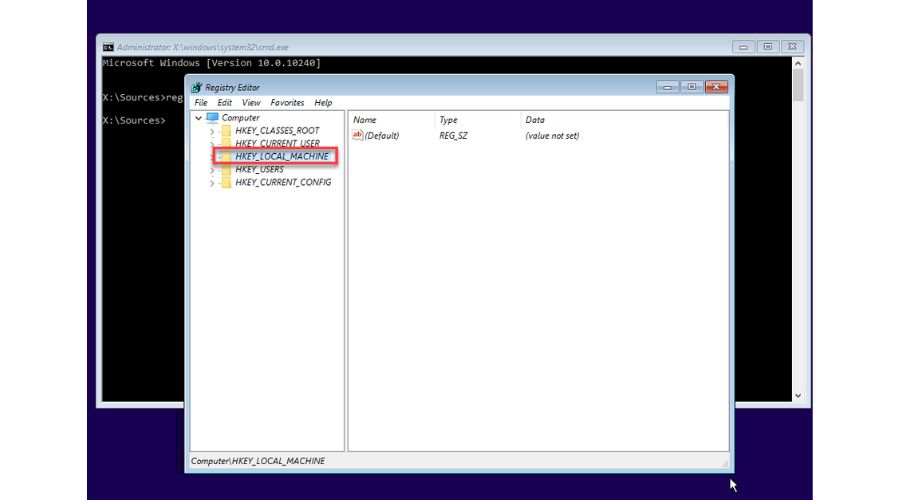
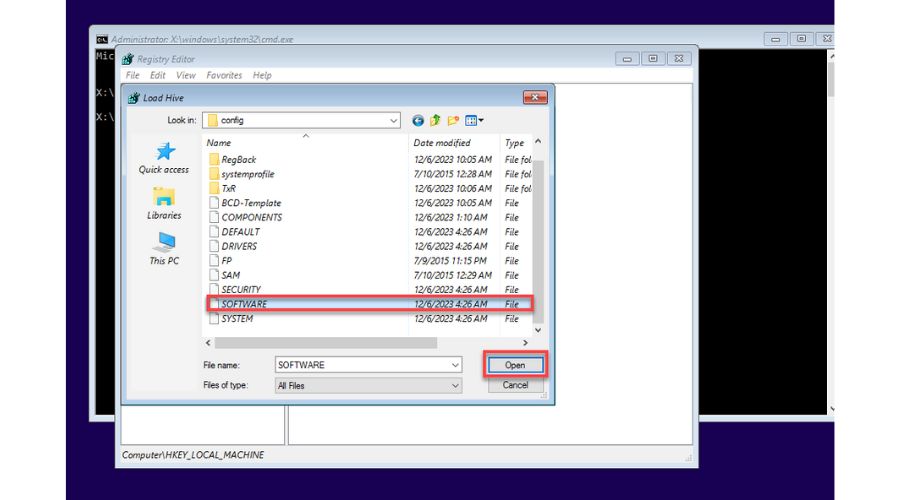
4. In Regedit, load the large Registry file (hive) from the target file system. For example, select the ‘HKEY_LOCAL_MACHINE‘ and select ‘File > Load hive‘ in the menu.
5. Select’ SOFTWARE’ From the target file system (C:\Windows\System32\config) and click ‘Open.’
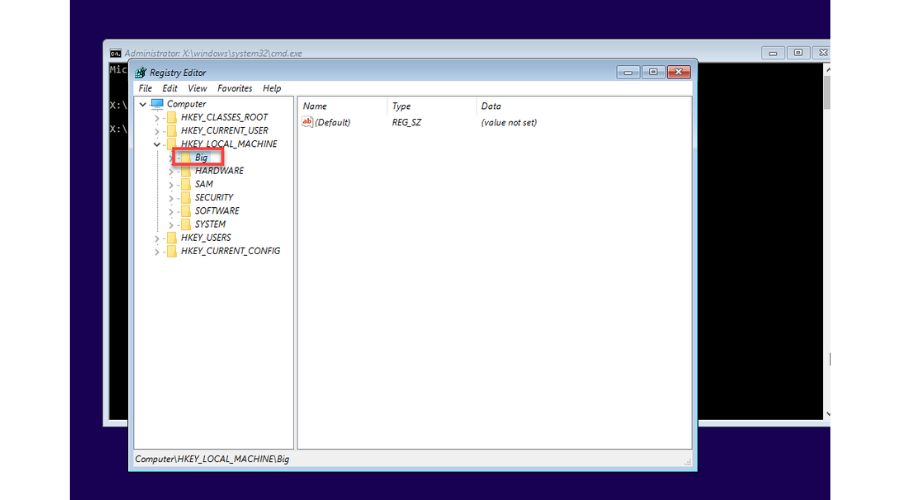
6. When prompted for a name, choose any name to serve as the mount point under HKEY_LOCAL_MACHINE. For instance, if I choose ‘Big,’ the file will be mounted under ‘HKEY_LOCAL_MACHINE\Big.’
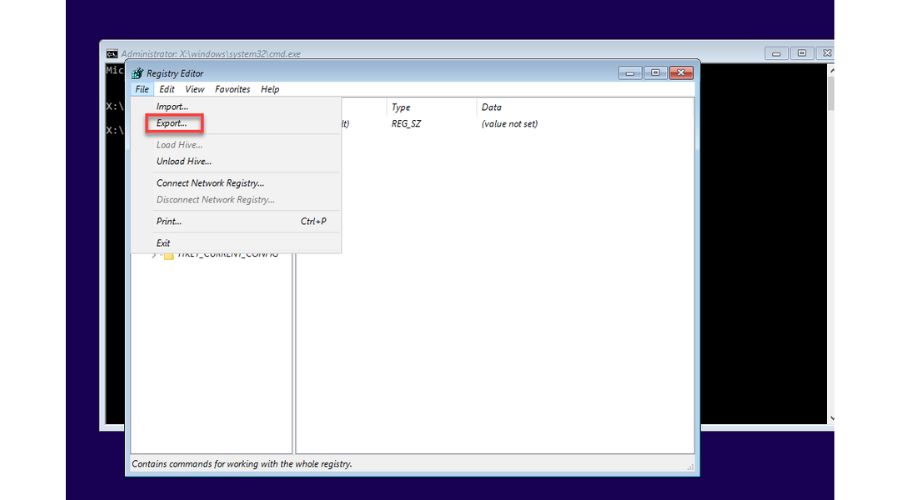
7. Select the loaded hive (Big) on the left and select File > Export.
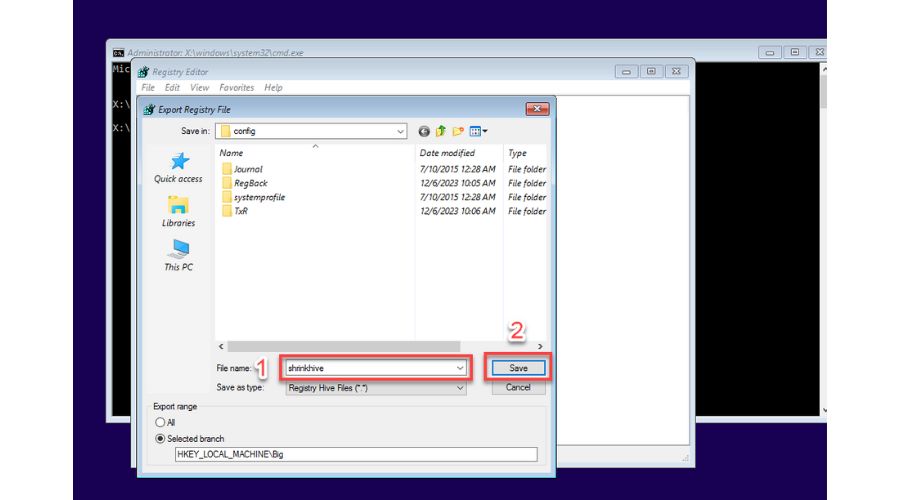
8. Export it as a ‘Registry Hive‘ file type with a unique name, like in my example, ‘C:\windows\system32\config\shrinkhive.’ Click on ‘Save.‘
9. Now, it’s time to compare the old and new registry file sizes. In the Command Prompt, type; ‘dir c:\windows\system32\config‘ and press Enter.
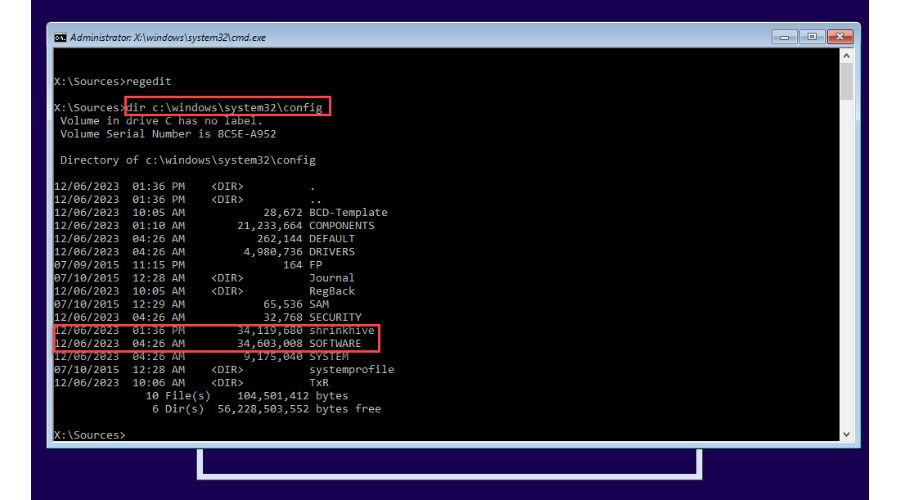
In my case, it is a recent installation of Windows. There is a slight difference in size, but there will be a noticeable difference for older Windows installations.
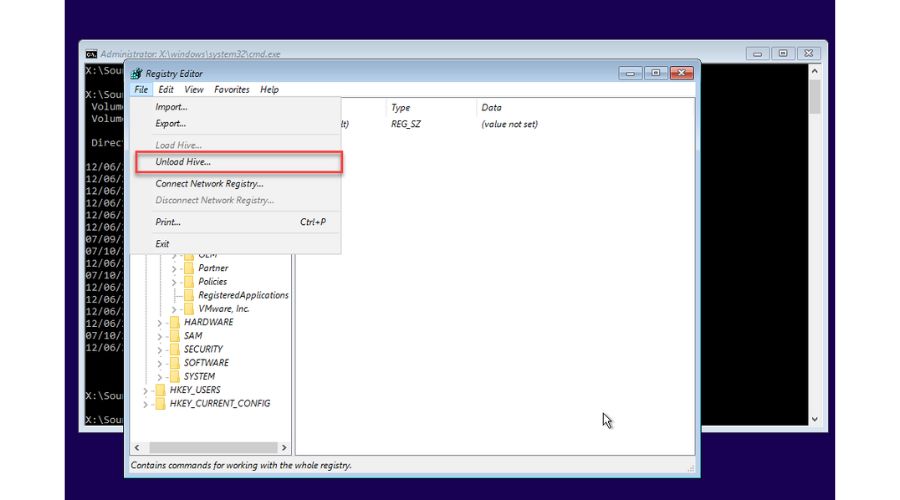
10. To unload the file from Regedit, choose the ‘Big‘ key and select ‘Unload Hive‘ from the File menu.
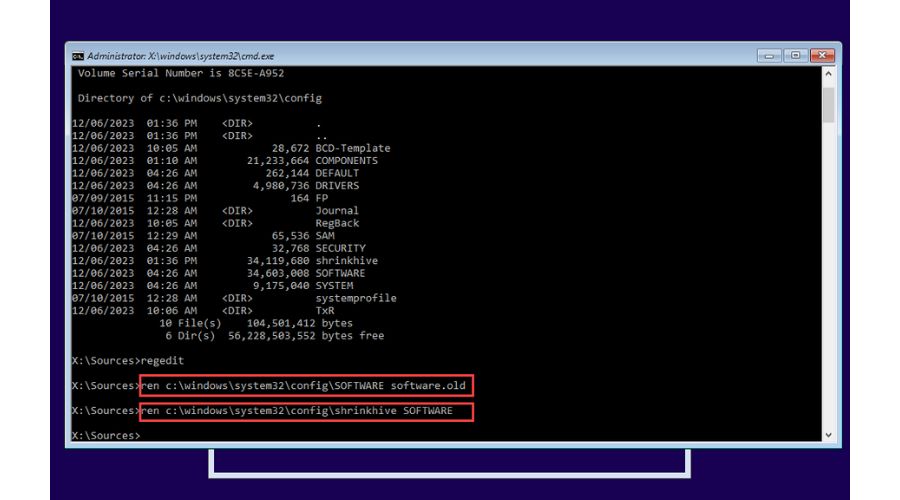
11. Rename the original Registry file. In my example, I use the following command in Command Prompt:
ren c:\windows\system32\config\SOFTWARE software.old
12. Rename the new file you exported (‘shrinkhive‘) instead of the old one (‘SOFTWARE‘):
ren c:\windows\system32\config\shrinkhive SOFTWARE
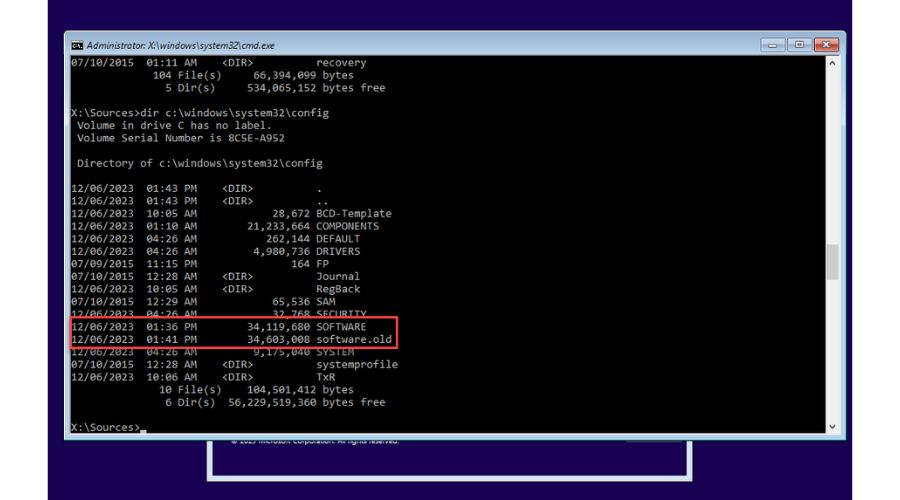
13. In the Command Prompt, type; ‘dir c:\windows\system32\config‘ and press Enter to check if the previous action is successful (to check the old and new registry hive sizes),
14. Finally, close the Command Prompt and Windows setup programs. After that, your computer will restart.
15. Boot in your Windows OS.
2. Use the Registry Compressor tool
Previously, I showed you how to compress the Windows Registry using built-in tools, but I also suggest using third-party tools for a more straightforward process. One tool that I highly recommend is Registry Compressor by Tweaking.com. I will guide you on how to use it to compress the Windows Registry quickly and easily. Do following:
1. Download, install, and open the Registry Compressor tool.
2. The System Registry and its current size are on the left pane. Depending on your Windows operating system, choose the compression type. For newer versions, select ‘Normal.’
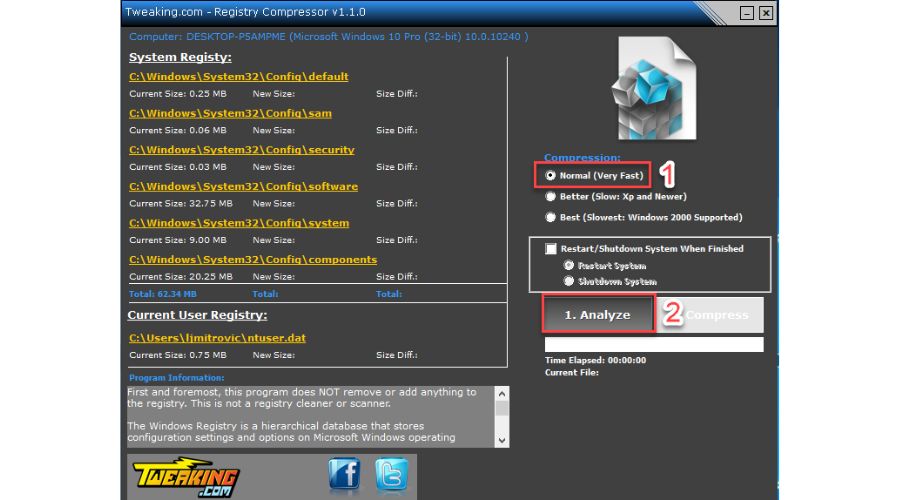
3. Click the ‘Analyze‘ button.
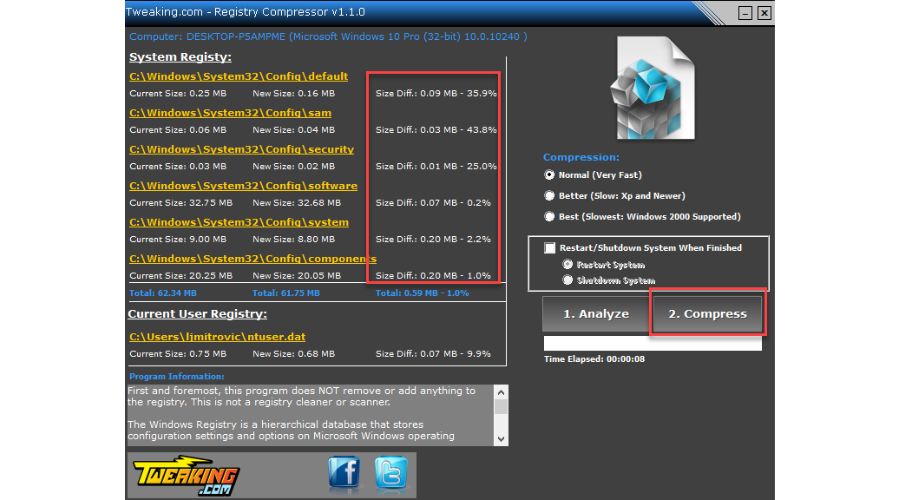
4. After a few seconds of analyzing your Registry, you will see how much you can reduce its size.
5. The next step is to press the ‘Compress’ button.
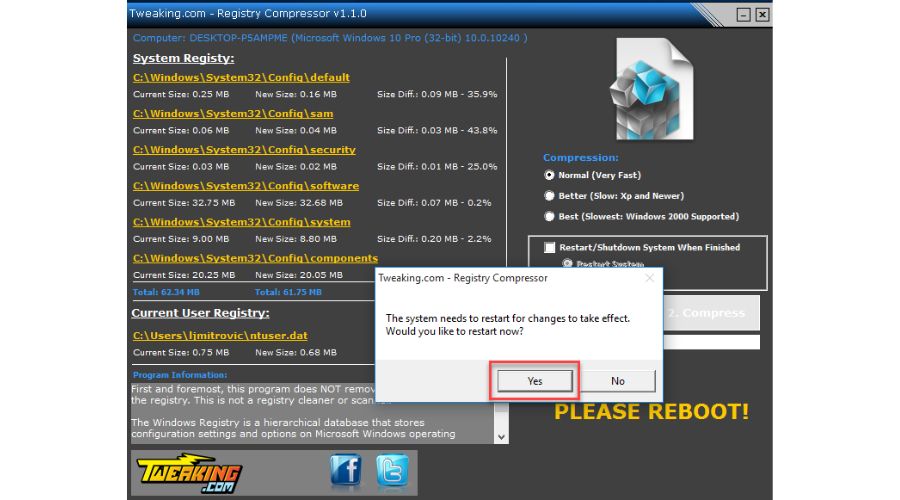
6. Finally, the tool will ask you to reset your Windows PC for the new optimized Registry to take effect.
The Registry Compressor program does not add or remove any data from the Registry. It is not designed to act as a registry cleaner or scanner. Its sole purpose is to rebuild the Registry to new files, reducing bloated sizes. As a result of this process, the Registry becomes smaller and faster, improving the overall performance of your system.
Summary
In this guide, I have provided instructions on compressing a bloated registry in Windows OS. You can use the manual compression method to have complete control over the process or opt for one of the alternative third-party tools that can do the job faster. It is important to note that registry compression can enhance your system’s performance and stability.
Still, I highly recommend taking complete backups of all your important data before proceeding with such operations. I hope this solution will be helpful for you, and if you have any additional questions or suggestions, leave a comment below.
Why You Need to Defrag the Windows Registry
Windows registry, a set of discrete files called hives, primarily located in the system32 folder, contacts information for all the hardware and software, along with user preferences. If your registry is fragmented, it directly affects the performance of your PC and slows it down. That’s why it is important for you to defrag and compact registry regularly to speed up your PC and maintain it at its peak performance.
Check the Best Registry Defragmenter You May Use
There is no tool available in your Windows system that you can use to defrag the registry. Therefore, the only way to defrag it is by using a reliable third-party registry defragmenter – Tenorshare Windows Care Genius.
This registry defrag utility is easy-to-use and enable you can defrag the registry easily in just a few mouse clicks. It scans and optimizes Windows registry by removing gaps and wasted space, thereby helping to improve computer speed on Windows 10, 8.1, 8, 7 and etc.
Before you start defragmenting registry, download the registry defrag software on your PC and then follow the steps below.
How to Defrag and Compact Windows Registry on Windows 10/8.1/8/7 PC
1.Run the windows registry defragment tool after installation, tap “System Cleanup” and then click “Registry Defrag”. Click on “Analyze”.
Note:The system will be temporarily unresponsive while analyzing, so you are suggested to save all your work before that.
2.After the analyzing is finished, you can perform registry defrag by clicking on “Defragment” and “Yes” to confirm.
After the registry defrag is done, you will speed up your computer and improve its performance.
Know More: Registry Clean or Defrag?
“Should I choose to clean or defrag my registry?” you may have this doubt.
Unlike registry cleaner, which leaves behind empty spaces after removing the invalid registry entries, registry defragmenter helps in removing bloated registry hive and empty spaces, and compacting the registry.
Generally, after you clean the Windows registry, you would also need to defrag it to keep your PC at best performance.
What is Windows Registry?
Have you ever experienced your PC running slower than usual, after some time?
This is because of fragmentation on the registry. Most computer users do not know what a registry is. The Windows Registry stores settings for most of the applications and user preferences on a personal computer that runs the Microsoft Windows operating system. It contains information and settings for all hardware, software, users, and preferences. While normally necessary for operation, problems with the registry are responsible for an estimated 85% of all crashes in Microsoft Windows systems. Defragmentation of the registry improves application responsiveness by reducing disk head movement during the reading of this database file – it does so by reorganizing portions of the registry to store related items closer together or eliminated gaps between items where they are stored at different physical locations on disk.
Defragmentation of the registry is necessary to maintain its performance, however, the process itself is not without risk – incorrectly executed defragging can delete or overwrite keys and values required for the operation of application programs. As a consequence, Microsoft recommends against running third-party registry cleaners or defragmenters unless they are known to do so safely. It also warns against attempting manual defragging as most computer users are unaware of how the registry works internally and are prone to making serious mistakes that damage Windows. System Restore feature in Windows offers similar functionality without requiring any changes to the registry. Therefore it’s recommended you use this instead whenever possible if restoring an earlier version of the system becomes necessary due to corruption of your operating system files by any of the various malware sometimes discussed on various forums.
While it is beneficial to defrag your registry – it is quite complicated and a bit tricky. Please note, while it may be possible to edit the registry yourself – bear in mind doing so incorrectly could render your system unusable (bricked). If unsure about making registry edits please do not proceed. It could cause severe damage to your PC hence requiring repairs.
Rather, let’s see how to defrag the data on your hard drive
Windows 8, Windows 7, Windows Vista®, and Windows 10 have a new Disk Defragmenter program that runs automatically on a regular basis. If no one needs to perform a manual defrag, you may simply leave it alone; it will run automatically!
Steps to run the Disk Defragmenter tool manually
On Windows 8, Windows 7, or Windows Vista:
1. Click Start and type Disk Defragmenter in the search field.
2. Now click on “Disk Defragmenter” from the list of results.
3. Once open, select a drive by clicking on it and choose Analyze disk from the top toolbar
4. Not that this step will take a few minutes as the program will now scan your hard drive for fragmented files. Now you can view details about what is being done with this app
5. Once completed, click Defragment disk from the top toolbar to start running a defrag on your drive.
Here’s how to keep the Disk defragmenting process as a task scheduler
1. Within the start menu, simply type “cmd” into the search bar and hit enter
2. Now that the command line is open, you’ll need to determine which disk number represents your hard drive by typing in this command followed by Enter, replacing C with the appropriate letter if yours is not C:\>wmic logicaldisk where name=”C:” get Name Volume
3. This will show a list of drives currently attached to your machine
4. This step is done for informational purposes only as it is not necessary but can be helpful when running multiple commands at once. To do click File >> New >> Text document, and open it up in notepad.
5. Once there type ” tasklist /FI “path==C:\Windows\System32” >> defrag.txt (if your drive letter is C:, you can simply type “tasklist /FI “path==C:\Windows\System32″ >defrag2.txt”) This will give you a list of applications running on your computer along with their process ID’s which you’ll need when entering the next step in the command line
6. Now to set up the scheduled task create another text file, this time rename it to taskscheduler_10_basic.xml with .xml at the end being replaced with .TXT if you are using Sheer or Notepad++)
The defrag options will allow you to choose how often the program runs, as well as whether to run defrag automatically when your computer starts up, or not at all. I would suggest that unless you have a small hard drive that isn’t used much then it is okay to have automatic defrag running on startup. However, if you have a very large hard drive and many programs installed on startup, this might slow down your computer so keeping it turned off during start-up might be best for those users. This step is entirely up to personal preference!
That being said, the Disk Defragmenter application is not perfect. It might miss certain files that can cause it to become fragmented or to not defrag at all. This article will cover how to defrag your hard drives quickly and manually using a third-party app. If you are on Windows 7 Pro/Ultimate or Windows 8/8.1 Pro/Enterprise, I highly recommend Diskeeper Home for PC for this job. If you are on Windows 8 or 10 Home, an alternative product called Auslogics Disk Defrag Free works well too!
Do you need to defrag your SSD?
The question everyone really wants to know is: can I defrag a solid-state drive? The answer is a little more difficult. If you have an SSD, the Disk Defragmenter application in Windows will tell you that it’s not recommended to defrag a solid-state drive because “defragmentation is not necessary for an SSD”. This has been true for all previous versions of Windows since XP, but Windows 7 and 8 added a new feature called Optimize Drives. In short, its job is to attempt to optimize your hard drives by doing what defragging does- moving files around so they are contiguous. So if this option exists in the OS, why even bother defragging your SSD at all?
There are a lot of miscellaneous files on your drive that the OS needs to have easy access to at any time. This means they need to be laid out linearly and thus fragmented- a very slow process for SSDs. While many people will argue that solid-state drives already operate in a fast linear fashion, defragging can still help with performance under certain circumstances. The keyword here is “can”. In most cases, there probably won’t be much of an effect if any at all from doing this on an SSD because Windows takes care of things automatically behind the scenes.
It’s possible for an SSD to get slower from defragging, though- mostly when you start moving system files and other crucial things because Windows won’t be able to do it automatically anymore. – so do not attempt unless you are sure!
So if it’s not defrag, what keeps up the performance of SSDs?
TRIM
TRIM is a command which was introduced with Windows 7, and it tells the SSDs what areas of the drive are no longer in use. When you delete a file from an SSD, Windows doesn’t actually free up those blocks to be used again- instead, any remaining data that has been overwritten is now considered invalid or broken. TRIM tells the SSD that those blocks can be reused for whatever they feel like as opposed to having to overwrite whatever new data is being written as well as freeing up space before using it.

What’s interesting about this process, however, is how often it happens under normal circumstances. Most modern operating systems and drives should already take care of TRIM behind the scenes so there’s nothing different between defragmentation and TRIM. However, if you are using an older drive or one that the TRIM function hasn’t been enabled for then it could be beneficial to run a defrag on the SSD once in a while to free up space that might have accumulated garbage data.
SO, the first thing we want to do is make sure your operating system has a system file like TRIM enabled for SSDs . TRIM helps the OS know which areas of the drive are no longer in use and can be wiped, speeding up performance as a result.
For those who don’t have an SSD but still want faster computer performance, you should check out our article on how to speed up your laptop by increasing its RAM.
Пожалуйста, включите JavaScript для доступа к полному функционалу страницы.Узнайте как.
Самый безопасный и быстрый способ уменьшить размер реестра Windows и обеспечить стабильную и бесперебойную работу компьютера.
Версия 15.0.1.0 | 18.5MB | Дата выхода: 2025.05.05.
Вы используете Windows 7. Registry Defrag полностью совместим с ней и с Windows 8, 8.1, 10, 11.
Для чего нужен Registry Defrag?
Скачайте
Registry Defrag
сегодня
Auslogics Registry Defrag — продукт Auslogics, партнера Microsoft® в разработке приложений. Данный статус Microsoft предоставляет партнерам, демонстрирующим приверженность созданию качественного ПО.
Версия 15.0.1.0 | 18.5MB | Дата выхода: 2025.05.05.
Вы используете Windows 7. Registry Defrag полностью совместим с ней и с Windows 8, 8.1, 10, 11.
Почему именно Registry Defrag?
Признание на рынке ПО
Auslogics software рекомендуется ведущими IT-журналами и сайтами
«Этот набор инструментов для оптимизации ПК использует подход «абсолютно все и еще немного» к очистке, оптимизации и потенциальному ускорению вашего ПК. Auslogics BoostSpeed включает модули и инструменты для выполнения практически любой задачи по настройке и оптимизации, о какой вы только можете подумать…»
«Практически невозможно удалить все ненужные файлы и исправить ошибки реестра вручную, но существуют полезные программы, которые могут сделать это за вас. Одна из них — Aulsogics BoostSpeed. С этой программой вы можете сохранять максимальную производительность вашего компьютера с помощью всего одного клика раз в неделю.»
«Для предотвращения замедления работы системы рекомендуется регулярная дефрагментация вашего диска и реестра. Вы можете дефрагментировать диск с помощью встроенного дефрагментатора от Microsoft, но мы советуем использовать более быстрый и совершенный дефрагментатор в составе программы Auslogics BoostSpeed.»
«Удаление мусорных файлов вручную может быть весьма утомительным. Программа Auslogics BoostSpeed может сделать это за вас автоматически. Она удалит ненужные файлы и оптимизирует все настройки Windows под ваше оборудование. Для дополнительного улучшения быстродействия системы, программа устранит ошибки реестра и оптимизирует настройки Интернет-соединения.»
«Из всех утилит, которые я протестировал за последние несколько лет, без сомнений Auslogics BoostSpeed — одна из наиболее функциональных и легких в использовании. Настоятельно рекомендую.»
«BoostSpeed — это эффективный всеобъемлющий набор утилит, включающий в себя ряд популярных бесплатных утилит Auslogics, а также множество других сервисов, которые эксклюзивно представлены только в данном продукте… Без сомнений, BoostSpeed стоит своих денег.»
«Еще одной целью для злоумышленников являются файлы, содержащие личную информацию. Простое их удаление небезопасно, поскольку эту информацию довольно просто восстановить. Но если удалить файл или папку с помощью утилиты Auslogics File Shredder, Вы можете быть уверены, что восстановить их будет уже невозможно.»
«Это дотошно написанное приложение идеально подходит для тех, кто хочет добиться максимальной производительности своего компьютера, не прибегая к дорогостоящему обновлению железа. BoostSpeed дает вам возможность использовать 15 великолепных модулей, чтобы очистить и дефрагментировать диски вашего компьютера, исправить ошибки реестра и ускорить все, что только возможно.»
«Придумайте идеальную утилиту для оптимизации и ускорения ПК. И добавьте еще чуть чуть. Чуть больше инструментов. Еще немного функций. Больше глубины и интеллекта. Вот это и даст вам понятие, что такое представляет из себя эта великолепная программа…»
«Всё для оптимизации ПК в одной программе. Удобство и простота.»
«Auslogics BoostSpeed предоставит вам идеальное решение для обеспечения бесперебойной и быстрой работы вашего компьютера.»
«Auslogics BoostSpeed может защитить Вас от кражи личной информации. Будучи полезным инструментом оптимизации, программа содержит большое количество необходимых функций по защите безопасности компьютера. Программа предлагает всеобъемлющую защиту, которую не могут обеспечить антивирусы.»
«Вы можете очистить, оптимизировать и дефрагментировать ваш компьютер с помощью OneButton Checkup от Auslogics. Тесты показали внушительные изменения в производительности 4-летнего ноутбука, при этом технологии оптимизации подойдут и для компьютера намного новее.»
«Auslogics BoostSpeed — надежная утилита, способная оптимизировать Windows 10 в один клик. Программа удаляет файловый мусор, чистит реестр, дефрагментирует файлы, отключает ненужные приложения.»
«… Любая задача по обслуживанию или оптимизации легко поддается этому мощному и эффективному набору программных инструментов. Добавьте к этому защиту личной информации, восстановление данных и более дюжины других утилит, и вам уже не придется искать никакую другую программу для поддержания вашего ПК в отличной форме.»
Скачайте
BoostSpeed 14
сегодня
и устраните сбои работы ПК
Версия 14.0.1.0 | 44.1MB | Дата выхода: 2025.05.05.
Вы используете Windows 7. BoostSpeed 14 полностью совместим с ней и с Windows 8, 8.1, 10, 11.
Auslogics использует файлы cookie для улучшения содержания и обеспечения вашего удобства при посещении сайта.
Оставаясь на сайте, вы соглашаетесь с нашей Политикой конфиденциальности.
ПРИНЯТЬ