Sends the specified message to the active editor.
Namespace: DevExpress.XtraEditors
Assembly:
DevExpress.XtraEditors.v24.2.dll
NuGet Package:
DevExpress.Win.Navigation
Declaration
- C#
- VB.NET
public virtual void SendKey(
    object message,
    KeyPressEventArgs e
)
Parameters
| Name | Type | Description |
|---|---|---|
| message | Object |
A Message to be sent. |
| e | KeyPressEventArgs |
A KeyPressEventArgs object that will be passed to the editor’s KeyPress event. |
This member supports the internal infrastructure and is not intended to be used directly from your code.
See Also
For most users, Windows 10 will stop receiving security updates and other official support from Microsoft on October 14, 2025, about five months from today. Until recently, Microsoft had also said that users running the Microsoft Office apps on Windows 10 would also lose support on that date, whether they were using the continually updated Microsoft 365 versions of those apps or the buy-once-own-forever versions included in Office 2021 or Office 2024.
Microsoft has recently tweaked this policy, however (as seen by The Verge). Now, Windows 10 users of the Microsoft 365 apps will still be eligible to receive software updates and support through October of 2028, «in the interest of maintaining your security while you upgrade to Windows 11.» Microsoft is taking a similar approach to Windows Defender malware definitions, which will be offered to Windows 10 users «through at least October 2028.»
The policy is a change from a few months ago, when Microsoft insisted that Office apps running on Windows 10 would become officially unsupported on October 14. The perpetually licensed versions of Office will be supported in accordance with Microsoft’s «Fixed Lifecycle Policy,» which guarantees support and security updates for a fixed number of years after a software product’s initial release. For Office 2021, this means Windows 10 users will get support through October of 2026; for Office 2024, this should extend to October of 2029.
Last Updated :
17 Apr, 2023
In Windows forms, TextBox plays an important role. With the help of TextBox, the user can enter data in the application, it can be of a single line or of multiple lines. In TextBox, you are allowed to set the text associated with the TextBox by using the Text property of the TextBox. In Windows form, you can set this property in two different ways: 1. Design-Time: It is the simplest way to set the Text property of the TextBox as shown in the following steps:
2. Run-Time: It is a little bit tricky than the above method. In this method, you can set the Text property of the TextBox programmatically with the help of given syntax:
public override string Text { get; set; }
Here, the text is represented in the form of String. Following steps are used to set the Text property of the TextBox:
- Step 1 : Create a textbox using the TextBox() constructor provided by the TextBox class.
// Creating textbox
TextBox Mytextbox = new TextBox();
- Step 2 : After creating TextBox set the Text property of the TextBox provided by the TextBox class.
// Set Text property
Mytextbox.Text = "Enter City Name...";
- Step 3 : And last add this textbox control to form using Add() method.
// Add this textbox to form
this.Controls.Add(Mytextbox);
- Example:
CSharp
using System;
using System.Collections.Generic;
using System.ComponentModel;
using System.Data;
using System.Drawing;
using System.Linq;
using System.Text;
using System.Threading.Tasks;
using System.Windows.Forms;
namespace my {
public partial class Form1 : Form {
public Form1()
{
InitializeComponent();
}
private void Form1_Load(object sender, EventArgs e)
{
Label Mylablel = new Label();
Mylablel.Location = new Point(96, 54);
Mylablel.Text = "City";
Mylablel.AutoSize = true;
Mylablel.BackColor = Color.LightGray;
this.Controls.Add(Mylablel);
TextBox Mytextbox = new TextBox();
Mytextbox.Location = new Point(187, 51);
Mytextbox.BackColor = Color.LightGray;
Mytextbox.ForeColor = Color.DarkOliveGreen;
Mytextbox.AutoSize = true;
Mytextbox.Name = "text_box1";
Mytextbox.Text = "Enter City Name...";
this.Controls.Add(Mytextbox);
}
}
}
- Output:

(Image credit: Plugable)
Plugable has a new laptop docking station available to buy now, and it’s setting a new industry standard in terms of display support.
The UD-7400PD, as the dock is named, was actually announced at CES 2025. I initially missed it in the chaos of new tech products, but it’s certainly worth a look now that it’s on the market.
The big news? It can handle up to four external 4K displays at 60Hz each and an 8K display simultaneously (or five 4K@60Hz displays), besting the usual maximum quad-display setup available in even the best Thunderbolt docking stations today.
What’s even more impressive is that the dock only requires a host connection via USB-C 3.2 (Gen 2). Thunderbolt, while compatible, isn’t required. The same goes for USB4.
I honestly didn’t know this was even a possibility, and indeed it wasn’t until Synaptics created a new DL-7400 chipset for docking stations (set to be highlighted at Computex 2025, according to Plugable’s press release).
The combination of the new DL-7400 chipset and USB-C DisplayLink tech is what makes it all possible.
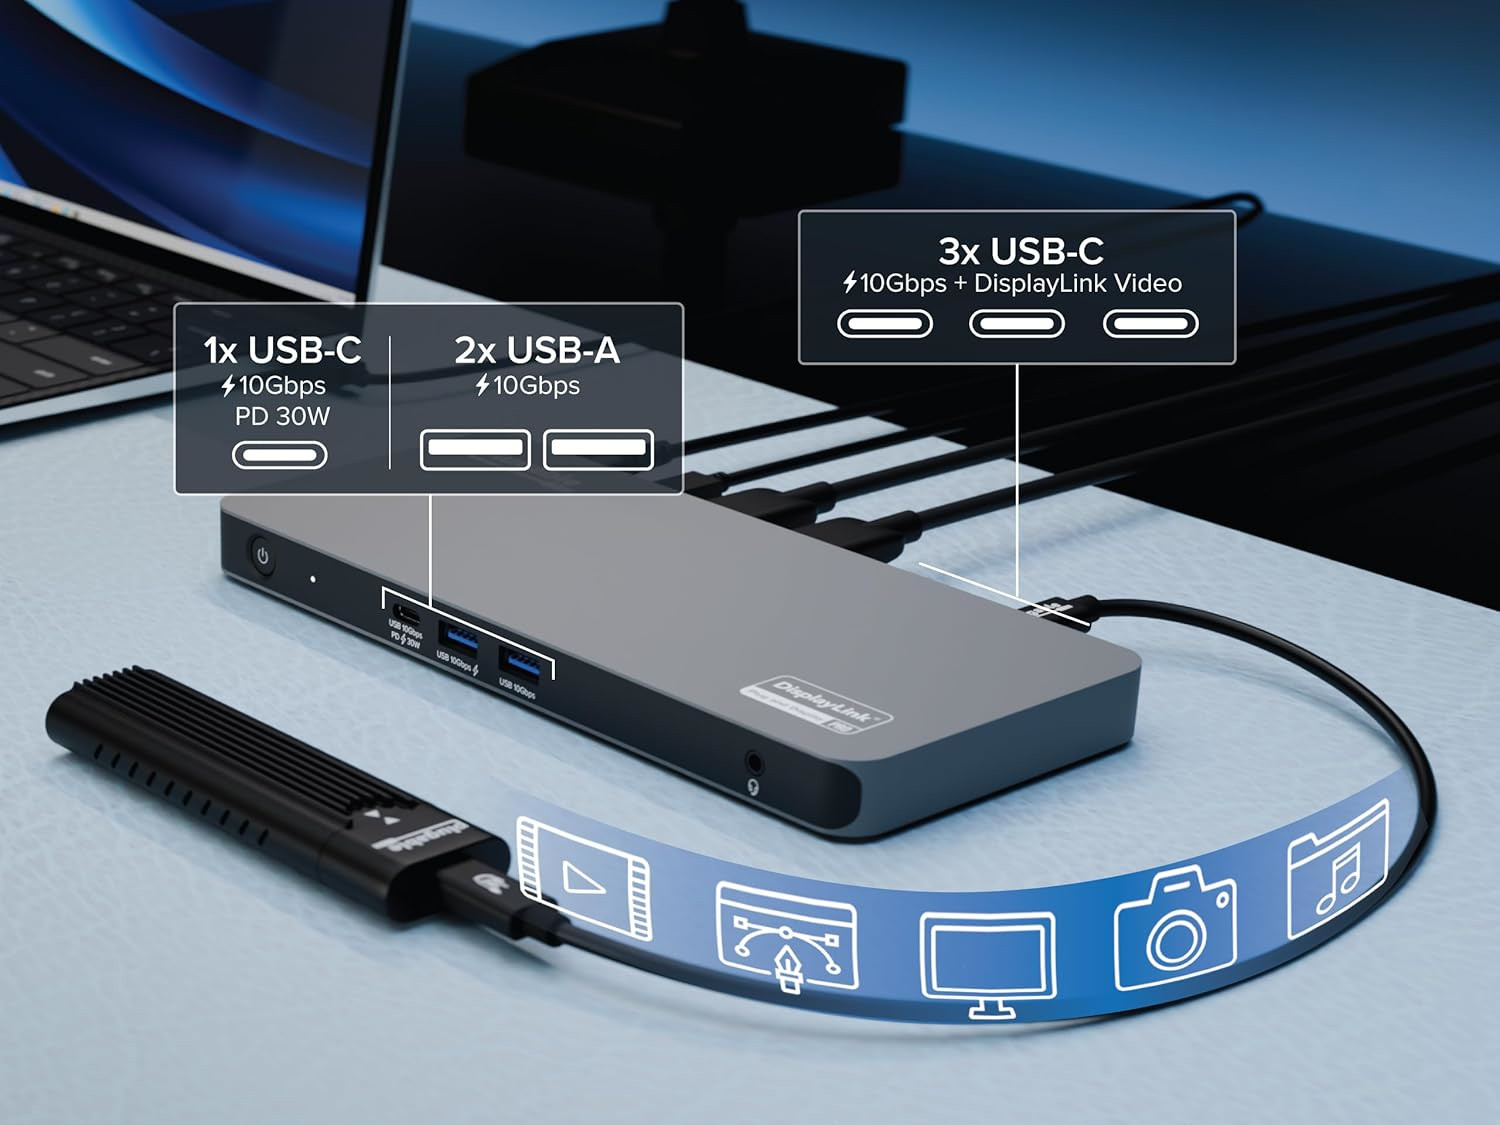
The dock relies on three USB-C 3.2 (Gen 2) ports with DisplayLink and two HDMI 2.1 ports for external displays, but that’s far from the only connectivity on the dock.
All the latest news, reviews, and guides for Windows and Xbox diehards.
It also features a single USB-C 3.2 port on the front with 30W of power delivery and 10Gbps bandwidth, two USB-A ports each with 10Gbps bandwidth, and a 3.5mm audio jack.
Topping things off is a 2.5Gbps Ethernet port and the host USB-C connection (which thankfully doesn’t have a fixed cable).
The dock is compatible with Windows 10/11 laptops with USB-C 3.2 (Gen 2), Thunderbolt 4/5, or USB4. It’s also compatible with macOS 11+.
Plugable’s new UD-7400PD isn’t just a great dock for display support
Laptop docking stations aren’t always the most exciting subject, but this represents a major step forward in docking capabilities. I’m not just talking about the impressive external display support.
Plugable’s UD-7400PD pushes past the usual maximum host laptop charging power of around 90-99W, allowing for up to 140W of power to make it back to the host.
That opens up charging for more power-hungry laptops, including those with entry-level discrete GPUs.
Because the UD-7400PD is made for regular consumers and professionals, it includes some enterprise features.
Most notable is the new DockTag, Plugable’s proprietary solution for IT departments.
According to Plugable, it’s «designed to lessen the load on the IT department by displaying real-time dock status and asset details through a dynamic splash screen and QR code, enabling improved remote support and user self-diagnosis.»
Plugable is one of the leading names when it comes to laptop docking stations, competing directly with other big names like CalDigit and Kensington.
Needless to say, I’m very excited to test out the UD-7400PD’s capabilities first-hand to see if they measure up to what’s being advertised.
If you’d like to forego reviews and check it out yourself, you can pick it up now for $279.95 at Amazon. A 20% coupon is currently available on the product page, knocking the price down to $223.96.
Considering many of the high-end laptop docks I rate the highest climb well beyond $300, Plugable’s pricing seems very reasonable.
Cale Hunt brings to Windows Central more than eight years of experience writing about laptops, PCs, accessories, games, and beyond. If it runs Windows or in some way complements the hardware, there’s a good chance he knows about it, has written about it, or is already busy testing it.

Today, we often reach for complex frameworks and toolchains to create interactive forms—but what if we told you that you can build smart, dynamic forms without writing a single line of traditional JavaScript logic?
In this article, we’ll show you how to create a fully functioning form that submits asynchronously using HMPL, a lightweight templating engine that simplifies client-server interactions.
Let’s start!

🗄️ Project Structure
We’ll use a simple folder layout:
📁 smart-form
├── 📁 components
│   └── 📁 Register
│       └── index.html
├── 📁 src
│   ├── global.css
│   ├── global.js
│   └── index.html
├── app.js
└── routes
    └── post.js
Enter fullscreen mode
Exit fullscreen mode
- Server: Pure HTML, CSS, and HMPL templates.
- Client: Node.js + Express to receive form data.
No frameworks like React, Vue, or even jQuery. Just clean web APIs and declarative logic.
🖋️ Styling the Form
Let’s start with our basic styles.
src/global.css
body {
  font-family: Arial, sans-serif;
  background: #f4f4f4;
  padding: 50px;
}

form {
  background: white;
  padding: 20px;
  border-radius: 6px;
  box-shadow: 0 4px 10px rgba(0,0,0,0.1);
  max-width: 400px;
  margin: auto;
}

.form-example {
  margin-bottom: 15px;
}

label {
  display: block;
  margin-bottom: 5px;
}

input[type="text"],
input[type="password"] {
  width: 100%;
  padding: 8px;
  box-sizing: border-box;
}

input[type="submit"] {
  background-color: #649606;
  color: white;
  border-radius: 5px;
  padding: 10px 15px;
  cursor: pointer;
}
Enter fullscreen mode
Exit fullscreen mode
📡 Creating the Server
We’ll set up a simple Express server with one POST route to handle our form submission.
app.js
const express = require("express");
const path = require("path");
const cors = require("cors");

const app = express();
const PORT = 8000;

app.use(cors());
app.use(express.urlencoded({ extended: true }));
app.use(express.json());

app.use(express.static(path.join(__dirname, "src")));

const postRoutes = require("./routes/post");
app.use("/api", postRoutes);

app.get("/", (_, res) => {
  res.sendFile(path.join(__dirname, "src/index.html"));
});

app.listen(PORT, () => {
  console.log(`Server running on http://localhost:${PORT}`);
});
Enter fullscreen mode
Exit fullscreen mode
routes/post.js
const express = require("express");
const router = express.Router();

router.post("/register", (req, res) => {
  const { login, password } = req.body;

  if (!login || !password) {
    return res.status(400).send("<p style='color: red;'>Missing fields!</p>");
  }

  console.log("User Registered:", login);
  res.send(`<p style='color: green;'>Welcome, ${login}!</p>`);
});

module.exports = router;
Enter fullscreen mode
Exit fullscreen mode
🧠 The Smart Form Component
Here’s where the magic happens. This form will submit data using HMPL’s request block, without you writing any JavaScript event listeners.
components/Register/index.html
<div>
  <form onsubmit="function prevent(e){e.preventDefault();};return prevent(event);" id="form">
    <div class="form-example">
      <label for="login">Login:</label>
      <input type="text" name="login" id="login" required />
      <br/>
      <label for="password">Password:</label>
      <input type="password" name="password" id="password" required />
    </div>
    <div class="form-example">
      <input type="submit" value="Register!" />
    </div>
  </form>
  <p>
    {{#request
      src="/api/register"
      after="submit:#form"
      repeat=false
      indicators=[
        {
          trigger: "pending",
          content: "<p>Loading...</p>"
        }
      ]
    }}
    {{/request}}
  </p>
</div>
Enter fullscreen mode
Exit fullscreen mode
What’s happening here?
-
onsubmitprevents default behavior. -
{{#request}}captures the form submit event. -
after="submit:#form"defines when the request should fire. -
indicatorsshow loading states or feedback.
No manual fetch, no async/await. Everything is declared.
⚙️ Loading the Component with HMPL
Now, let’s render this component dynamically on our page using HMPL.
src/index.html
<!DOCTYPE html>
<html lang="en">
  <head>
    <meta charset="UTF-8" />
    <meta name="viewport" content="width=device-width, initial-scale=1.0"/>
    <title>Smart Form</title>
    <link rel="stylesheet" href="global.css" />
  </head>
  <body>
    <div id="wrapper"></div>

    <script src="https://unpkg.com/json5/dist/index.min.js"></script>
    <script src="https://unpkg.com/dompurify/dist/purify.min.js"></script>
    <script src="https://unpkg.com/hmpl-js/dist/hmpl.min.js"></script>
    <script>
      import { compile } from "hmpl-js";

      const templateFn = compile(`
        {{#request src="/components/Register/index.html"}}{{/request}}
      `);

      const obj = templateFn();
      document.getElementById("wrapper").append(obj.response);
    </script>
  </body>
</html>
Enter fullscreen mode
Exit fullscreen mode
Optionally, you can break this logic out into a separate
global.jsfile if you prefer modularity.
✅ Result
Here’s what you get:
- A clean, styled form
- Asynchronous submission using just HTML + HMPL
- Validation and feedback—all without custom JS logic

👀 Why Use This Approach?
- No JavaScript Framework Needed: No React, no Angular.
- Declarative Logic: You describe what should happen, not how.
- Simple and Scalable: Great for landing pages, admin tools, and MVPs.
You can even expand this pattern to support multi-step forms, loaders, error handling, or auto-saving with
repeatintervals.
💬 Final Thoughts
Building interactive web forms no longer requires JavaScript bloat or massive toolchains. With HMPL, you keep your code clean, semantic, and powerful—perfect for developers who love declarative logic and simplicity.
If you liked the article, consider giving HMPL a star! ❤️
💎 Star HMPL on GitHub
Thank you for reading, and happy coding!