
In a previous article, you learned how to create a prompt inside of PowerShell by recreating the action prompt for the Remove-Item cmdlet. PowerShell can also create a graphical or GUI input prompt using .NET Framework form-building features available since PowerShell v3. In this tutorial, learn how to create a simple yes/no GUI input prompt to delete a file.
The Code
This time around, I’m going to display the entire code sample, then I’ll walk through each part and explain what is happening. Here I decided to split the PowerShell code out into two functions: the code for Remove-MyItem is its own function and calls the New-YesNoPrompt function that actually creates the GUI input prompt.
Creating the Form Window
Let’s start with the New-YesNoPrompt function. The function takes in two parameters: PromptTitle and PromptMessage. The title is displayed at the top of the window in the title bar, and the message is displayed in the box to the user, ideally what action is about to be approved or denied. First, outside of my two functions at the top of my .ps1 file, I need to import two .NET Framework classes using Add-Type in order to create my form:
- System.Windows.Forms
- System.Drawing
Back inside the function, I need to create the $form object to start adding controls to:
# Create the form title, size, and starting position
$form = New-Object System.Windows.Forms.Form
$form.Text = $PromptTitle
$form.Size = New-Object System.Drawing.Size(300, 200)
$form.StartPosition = 'CenterScreen'
The PowerShell code contains the basic information on displaying the GUI input form using different properties, such as:
– Text: the title goes here and is displayed in the title bar of the window
– Size: creates a new object using the System.Drawing.Size namespace; this is defined in an (x, y) format, or (width, height). The box created here is 300 pixels wide by 200 pixels tall.
– StartPosition: this determines where the window is displayed; currently set to CenterScreen to display in the middle, but other options include:
- CenterParent: the form is centered within its parent form
- Manual: position is determined by the Location property, which is the of the upper-left corner of the window
- WindowsDefaultBounds: the form is positioned at the Windows default location and has the bounds determined by Windows default
- WindowDefaultLocation: the form is positioned at the Windows default location and has the dimensions specified in the form’s size
With the basic windows form created, let’s move onto create action buttons for the user to respond to.
Creating the Buttons
For our form, I need options for the user to select from. These options will be presented as Yes and No buttons to indicate if I want to delete the file or not:
# Create the Yes button and its properties
$yesButton = New-Object System.Windows.Forms.Button
$yesButton.Location = New-Object System.Drawing.Point(60, 120)
$yesButton.Size = New-Object System.Drawing.Size(75, 23)
$yesButton.Text = 'Yes'
$yesButton.DialogResult = [System.Windows.Forms.DialogResult]::Yes
$form.AcceptButton = $yesButton
$form.Controls.Add($yesButton)
# Create the No button and its properties
$noButton = New-Object System.Windows.Forms.Button
$noButton.Location = New-Object System.Drawing.Point(165, 120)
$noButton.Size = New-Object System.Drawing.Size(75, 23)
$noButton.Text = 'No'
$noButton.DialogResult = [System.Windows.Forms.DialogResult]::No
$form.CancelButton = $noButton
$form.Controls.Add($noButton)
First, I create an object based on the Button class of the Forms namespace. I then set the Location of the button within the form using (x,y) coordinates, or the distance from the upper left of the form window in pixels. This is the same idea as setting the Location of the form itself on the monitor. This will probably take some experimentation to get it just right.
Next, I set the Size of the button just like setting the size of the windows form using (width, height) in pixels. After the size is setting the Text of what will appear on the button, here the words Yes and No to indicate if I want to delete the file or not.
Notice the difference in each button’s Location property. The Y values are both the same at 120, meaning they will be horizontally aligned, but the X values are not. The Yes button is 60 pixels from the left while the No button is 165 pixels from the left, meaning they will be next to each other. You’ll see this later in our final screenshot.
The DialogResult property gets or sets the returned value when the button is clicked. The DialogResult property is set to an identifier that indicates the return value of the dialog box, and for each of our buttons this is Yes or No. Other options for DialogResults include: Abort, Cancel, Ignore, None, OK, and Retry.
Along with each button, I set the AcceptButton to $yesButton and CancelButton to $noButton for the form itself. The AcceptButton is activated when the user presses the Enter key on the form, and the CancelButton is activated when the user presses the Escape key. So for my form, if the user presses Enter to the prompt, this is the same as clicking the Yes button, and pressing Escape is the same as pressing the No button. Finally, I add the button to the form itself under the Controls property.
Finalizing the Form
At last, I need to display the value of the $PromptMessage parameter onto the form. This is going to be the question I ask the user to respond to, and this takes shape using a Label. Like our other objects so far, it has a Location, Size, and Text property to create how it looks.
Also, like the buttons, I add it to the Controls property of the form. The last property I set is TopMost, which just puts the form on top of all others when it is displayed. With the form created, I return the form object back to whatever called my form function.
Remove-MyItem Function
By separating the logic to create the graphical prompt out of the Remove-MyItem function, the code here is greatly reduced. First I create a $params object with the window title and message that I want to display in the graphical prompt window. I pass this object to my prompt function using splatting (I always forget splatting exists, so I wanted to use it here) along with using the ShowDialog() method on my form. This will display the form to the user, and the result of which button is selected is saved to $response.
Just like the examples from last week, I use a switch statement to perform different actions based on the option the user has chosen. The condition is to use the System.Windows.Forms.DialogResult type we specified for each button in the other function. For this example, I just outputted text to show whether the action would remove the file or leave it alone.
Final Results
Here is the final result of creating my GUI input prompt to remove a file when calling my PowerShell function Remove-MyFile and selecting the Yes button in the prompt:


Final Thoughts
The method above is not intended to replace other options for confirming changes or testing commands using ShouldProcess, which adds -WhatIf and -Confirm functionality to a function. I received some valid criticism from the previous post on creating console prompts. The article here is to simple show how it is possible to create a graphical prompt, not to replace this other important functionality. Please check out my repository for this on GitHub for the code used in this post plus any additional examples I come up with in the future.
Questions or comments? If so, drop me a note below or find me on Twitter or LinkedIn to discuss further.
Do you have a PowerShell GUI that needs to accept text input? Maybe you want to be able to copy and paste a list of computers, ip addresses, user names or some other data. I will show you how to add a text box into your PowerShell GUI to handle that input. If you haven’t created a PowerShell GUI yet but are interested in doing so, check out my previous post on how to make a simple GUI.
Code
Let’s start breaking down the sections of code needed to make this happen. I like to put the input box code inside of a function, but you may decide you don’t want to do that. To see the entire code, look at my GitHub.
The first thing we need to do is create the form via the .NET windows forms namespace. Here we specify the text that we want in the title of the window, as well as what size we want it to be. Some optional settings are to have the window start in the center of the screen, preventing resize of the window and putting the window on top of other open windows.
    ### Creating the form with the Windows forms namespace
    Add-Type -AssemblyName System.Windows.Forms
    Add-Type -AssemblyName System.Drawing
    $form = New-Object System.Windows.Forms.Form
    $form.Text = 'Enter the appropriate information' ### Text to be displayed in the title
    $form.Size = New-Object System.Drawing.Size(310,625) ### Size of the window
    $form.StartPosition = 'CenterScreen'  ### Optional - specifies where the window should start
    $form.FormBorderStyle = [System.Windows.Forms.FormBorderStyle]::FixedToolWindow  ### Optional - prevents resize of the window
    $form.Topmost = $true  ### Optional - Opens on top of other windows
Next, we will add an OK button to the bottom of the window. Once the data has been inputted, the user will hit the OK button to pass the input into the next step of the GUI.
    ### Adding an OK button to the text box window
    $OKButton = New-Object System.Windows.Forms.Button
    $OKButton.Location = New-Object System.Drawing.Point(155,550) ### Location of where the button will be
    $OKButton.Size = New-Object System.Drawing.Size(75,23) ### Size of the button
    $OKButton.Text = 'OK' ### Text inside the button
    $OKButton.DialogResult = [System.Windows.Forms.DialogResult]::OK
    $form.AcceptButton = $OKButton
    $form.Controls.Add($OKButton)
Then we will add a cancel button in case the user decides against running the GUI.
    ### Adding a Cancel button to the text box window
    $CancelButton = New-Object System.Windows.Forms.Button
    $CancelButton.Location = New-Object System.Drawing.Point(70,550) ### Location of where the button will be
    $CancelButton.Size = New-Object System.Drawing.Size(75,23) ### Size of the button
    $CancelButton.Text = 'Cancel' ### Text inside the button
    $CancelButton.DialogResult = [System.Windows.Forms.DialogResult]::Cancel
    $form.CancelButton = $CancelButton
    $form.Controls.Add($CancelButton)
In order to avoid confusion and help the user understand what type of data to input, we are going to add a label. This label will be defined by the parameter used when the function is called. If you want to hard code the label text, just replace the $Input_Type with the text that you want displayed.
    ### Putting a label above the text box
    $label = New-Object System.Windows.Forms.Label
    $label.Location = New-Object System.Drawing.Point(10,10) ### Location of where the label will be
    $label.AutoSize = $True
    $Font = New-Object System.Drawing.Font("Arial",12,[System.Drawing.FontStyle]::Bold) ### Formatting text for the label
    $label.Font = $Font
    $label.Text = $Input_Type ### Text of label, defined by the parameter that was used when the function is called
    $label.ForeColor = 'Red' ### Color of the label text
    $form.Controls.Add($label)
The last piece of the GUI window is the text box that will be used to accept inputted text.
    ### Inserting the text box that will accept input
    $textBox = New-Object System.Windows.Forms.TextBox
    $textBox.Location = New-Object System.Drawing.Point(10,40) ### Location of the text box
    $textBox.Size = New-Object System.Drawing.Size(275,500) ### Size of the text box
    $textBox.Multiline = $true ### Allows multiple lines of data
    $textbox.AcceptsReturn = $true ### By hitting enter it creates a new line
    $textBox.ScrollBars = "Vertical" ### Allows for a vertical scroll bar if the list of text is too big for the window
    $form.Controls.Add($textBox)
Putting together the finishing touches so that it all works together and cleans up the inputted data.
    $form.Add_Shown({$textBox.Select()}) ### Activates the form and sets the focus on it
    $result = $form.ShowDialog() ### Displays the form

    ### If the OK button is selected do the following
    if ($result -eq [System.Windows.Forms.DialogResult]::OK)
    {
        ### Removing all the spaces and extra lines
        $x = $textBox.Lines | Where{$_} | ForEach{ $_.Trim() }
        ### Putting the array together
        $array = @()
        ### Putting each entry into array as individual objects
        $array = $x -split "`r`n"
        ### Sending back the results while taking out empty objects
        Return $array | Where-Object {$_ -ne ''}
    }

    ### If the cancel button is selected do the following
    if ($result -eq [System.Windows.Forms.DialogResult]::Cancel)
    {
        Write-Host "User Canceled" -BackgroundColor Red -ForegroundColor White
        Write-Host "Press any key to exit..."
        $Host.UI.RawUI.ReadKey("NoEcho,IncludeKeyDown")
        Exit
    }
Calling the Text Box
Now that the code to create the GUI text box is finished, we need to call the text box and return the inputted data. I will share a few examples of how to utilize the text box we just created. The below examples are assuming that you’ve put the text box inside of a function with the use of a parameter.
Function GUI_TextBox ($Input_Type){...}
Here is an example of how to use the text box to accept a list of computer names. This example will just output the list of computer names inputted to screen. In order to make this useful, you will need to add your code to have the script take action on those computer names. Maybe you need to conduct power actions on a list of computers or any number of admin actions.
###############################################################################
### Computer Name(s) example of how to utilize the GUI_TextBox function
###############################################################################
$Computers = GUI_TextBox "Computer Names(s):" ### Calls the text box function with a parameter and puts returned input in variable
$Computer_Count = $Computers | Measure-Object | % {$_.Count} ### Measures how many objects were inputted

If ($Computer_Count -eq 0){ ### If the count returns 0 it will throw and error
    Write-Host "Nothing was inputed..." -BackgroundColor Red -ForegroundColor White
    Return
}
Else { ### If there was actual data returned in the input, the script will continue
    Write-Host "Number of computers entered:" $Computer_Count -BackgroundColor Cyan -ForegroundColor Black
    $Computers
    ### Here is where you would put your specific code to take action on those computers inputted
}
Here is an example of how to use the text box to accept a list of users. This example will just output the list of users inputted to screen. In order to make this useful you will need to add your code to have the script take action on those user. Maybe you need to disable their Active Directory accounts or any number of admin actions.
###############################################################################
### User Name(s) example of how to utilize the GUI_TextBox function
###############################################################################
$Users = GUI_TextBox "User Names(s):" ### Calls the text box function with a parameter and puts returned input in variable
$User_Count = $Users | Measure-Object | % {$_.Count} ### Measures how many objects were inputted

If ($User_Count -eq 0){ ### If the count returns 0 it will throw and error
    Write-Host "Nothing was inputed..." -BackgroundColor Red -ForegroundColor White
    Return
}
Else { ### If there was actual data returned in the input, the script will continue
    Write-Host "Number of users entered:" $User_Count -BackgroundColor Cyan -ForegroundColor Black
    $Users
    ### Here is where you would put your specific code to take action on those users inputted
}
Text Box in Action
When you are done, you should have something that looks like this:
That’s it for now, thanks for reading!
Check out my other blog posts:
Media Sync: Organize Your Photos and Videos with PowerShell
Do you have photos and videos that you have taken over the years that are scattered all over the place? Do you want to have all your photos and videos organized? Do you want all your photos and videos to have a standardized naming scheme? If you answered YES to these questions, then this is…
NetNeighbor Watch: The PowerShell Alternative To Arpwatch
In this post, we are going to setup NetNeighbor Watch on a Raspberry Pi. NetNeighbor Watch can keep an eye on your network and send you an email when a new host is discovered. NetNeighbor Watch is done completely in PowerShell. The results are very similar to those of arpwatch. NetNeighbor Watch is for anyone…
Generate a Citrix Desktop Report Based on Active Directory Users
In this post, we are going to merge data from two different sources to generate a report that can provide insight into your Citrix environment. I will show you how to combine Active Directory data for the users in your domain with Citrix data. This report will provide you with the following knowledge: Users that…
Creating a PowerShell Module to Improve Your Code
Do you have PowerShell code that you reuse in your scripts over and over? Do you have server names hard coded in variables? Are you using a text file or CSV file to import server names? Do you find yourself only utilizing one server out of a cluster of servers to make your PowerShell commands?…
Generate a DHCP Report Via PowerShell
Today we are going to look at how to generate a DHCP scope statistics HTML report by using PowerShell. This report will give you one location to see all of your DHCP scope statistics across all of your Windows DHCP servers. It will dynamically pull the DHCP servers and associated DHCP scopes within your Active…
Increase VMware VM Disk Size with PowerShell
In this post, I will cover how to use PowerShell to increase the disk size of a Windows 10 VM running in a VMware vCenter environment. Automating simple but time consuming tasks like this can save precious time for your support staff or yourself. There are two parts to accomplishing this task; first we need…
Manage Citrix Tags with PowerShell
In this post, we are going to cover how to manage Citrix tags with PowerShell. Citrix Studio is a great tool, but it can be very time consuming especially if you have to do bulk tag actions. Citrix tags can be used in several methods, but this post is focused on desktop tagging. This post…
Utilizing PowerShell Out-GridView as a GUI Alternative
In my previous post, I showed how you can build a simple menu driven PowerShell GUI; check it out here. To further improve upon that simple GUI, we will go over how to use Out-GridView. Out-GridView is a built-in powershell cmdlet that sends the output from a given command to an interactive window. This post…
How to Create a Simple PowerShell GUI
Have you ever wanted to create a menu driven PowerShell GUI to conduct a series of automated tasks? You are in luck, because that is exactly what we are going to cover in this post. This very simple PowerShell GUI will help you easily distribute your code to other team members or maybe you just…
PowerShell is an advanced shell with integration of .NET objects. It’s more than just a replacement for the older cmd.exe. It can work with .NET assemblies, process large datasets and even interact with web services.
Because of the .NET assemblies support, it can work with WinForms (or even WPF), making it possible to create scripts with GUIs.
Requirements
This has been tested to work with Windows PowerShell verion 5.1. It’s likely going to work with older versions as well, but it’s not going to work with the new cross-platform PowerShell (there are no WinForms on Linux/macOS). You can check the version with
Get-Host | Select-Object version
Enter fullscreen mode
Exit fullscreen mode
Setting up the environment
Before we can start, let’s check a few things.
The first one is the script execution policy. It controls which scripts can be run. By default, Windows blocks execution of all scripts (more on that here). We have to allow it to run local scripts that are not digitally signed. It’s possible to do this this either by going through Windows Settings > Updates & Security > For developers, checking the Change execution policy… checkbox and clicking Apply, or just executing
Set-ExecutionPolicy RemoteSigned
Enter fullscreen mode
Exit fullscreen mode
from administrator PowerShell.
Another (less important) thing is the code editor. Even though we could just write the entire script directly in PowerShell, it’s easier to use a full-featured editor with error checking and syntax highlighting. Windows already comes with PowerShell ISE (Integrated Scripting Environment), but you can use Visual Studio Code with the PowerShell extension.
Writing our script
Let’s start!
Importing the assemblies
We have to import both System.Windows.Forms and System.Drawing assemblies. It’s possible to only include the first one but we also need the 2nd to specify control sizes.
Add-Type -AssemblyName System.Windows.Forms
Add-Type -AssemblyName System.Drawing
Enter fullscreen mode
Exit fullscreen mode
You can test it by creating a blank form:
$form = New-Object System.Windows.Forms.Form
$form.ShowDialog()
Enter fullscreen mode
Exit fullscreen mode

Adding controls
Let’s make a «Hello World» form. First, we create a top-level Form object:
$form = New-Object System.Windows.Forms.Form
$form.Text = "Some form"
$form.Size = New-Object System.Drawing.Size(150, 145)
$form.AutoSize = $true
Enter fullscreen mode
Exit fullscreen mode
In PowerShell, objects are created using New-Object. You can also pass parameters to constructors, similar to the new keyword in C#. Values are assigned to properties directly. Another difference is using $true instead of just true.
Let’s add a label and a button:
$lbl1 = New-Object System.Windows.Forms.Label
$lbl1.Text = "Hello World!"
$lbl1.Location = New-Object System.Drawing.Point(30, 20);

$btn = New-Object System.Windows.Forms.Button
$btn.Text = "Close"
$btn.location = New-Object System.Drawing.Point(30, 60);
$btn.DialogResult = [System.Windows.Forms.DialogResult]::OK
Enter fullscreen mode
Exit fullscreen mode
The $btn.DialogResult line tells the form what to return when the button is clicked. You can use this to figure out whether the user clicked OK or Cancel. We also make $btn the default button and lay controls onto the form:
$form.AcceptButton = $btn
$form.controls.Add($lbl1)
$form.controls.Add($btn)
Enter fullscreen mode
Exit fullscreen mode
All that’s left is showing the form itself:
$form.ShowDialog()
Enter fullscreen mode
Exit fullscreen mode
Event handlers
In our form, $btn is the default OK button which just terminates the form. But we can use non-terminating event handlers as well. For example, let’s make it possible to click on the label:
$lbl1.Add_Click({
    [System.Windows.Forms.MessageBox]::Show("Hey!")
})
Enter fullscreen mode
Exit fullscreen mode
You can call functions from event handlers as you normally would.
Visual Styles
Something I’ve noticed with these GUI scripts is that different control styles are used when the script is run from the PowerShell console instead of VSCode. The console uses legacy rendering which falls back to using Windows 95-style controls. We need to enable Visual Styles to fix that:
[System.Windows.Forms.Application]::EnableVisualStyles()
Enter fullscreen mode
Exit fullscreen mode
From here on, you can add more controls and event handlers. If you’ve used C#/VB.NET before you can reuse large parts of that knowledge to create nicer and more powerful scripts.
That’s it for now 😉
The full script:
Add-Type -AssemblyName System.Windows.Forms
Add-Type -AssemblyName System.Drawing

[System.Windows.Forms.Application]::EnableVisualStyles()

$form = New-Object System.Windows.Forms.Form
$form.Text = "Some form"
$form.Size = New-Object System.Drawing.Size(150, 145)
$form.AutoSize = $true

$lbl1 = New-Object System.Windows.Forms.Label
$lbl1.Text = "Hello World!"
$lbl1.Location = New-Object System.Drawing.Point(30, 20);

$lbl1.Add_Click({
    [System.Windows.Forms.MessageBox]::Show("Hey!")
})

$btn = New-Object System.Windows.Forms.Button
$btn.Text = "Close"
$btn.location = New-Object System.Drawing.Point(30, 60);
$btn.DialogResult = [System.Windows.Forms.DialogResult]::OK

$form.AcceptButton = $btn
$form.controls.Add($lbl1)
$form.controls.Add($btn)

$Null = $form.ShowDialog()
Enter fullscreen mode
Exit fullscreen mode
- Details
- Written by June Blender
- Last Updated: 09 October 2019
- Created: 23 December 2015
- Hits: 21352
This article discusses the DialogResult property of buttons, which often confuses beginning PowerShell GUI app designers.
When I first started learning how to write PowerShell GUI applications, I thought of the DialogResult property of buttons as the “evil property.”
What else would I think? If the DialogResult property of a button is set to any value other than None, when you click the button, the GUI app closes immediately after running the commands in my event handler.
In this little app, when you click OK, it pipes a Get-Service command to Out-GridView — um, very briefly.
Your browser does not support HTML5 video.
After banging my head against the wall (and then searching the SAPIEN Information Center), I realized that my app closes immediately because the DialogResult property of the OK button is set to OK.
The app also closes immediately when the DialogResult value is Cancel, Abort, Retry, Ignore, Yes, or No. When the value of the DialogResult property of a button is None, the app works perfectly.
So DialogResult is evil, right?
The First Use of DialogResult
I’m new to GUI apps, but the science and art of user experience and computer-based user interfaces is decades old. When I design my PowerShell GUI apps, I’m standing on the shoulders of people who’ve studied user experience as a discipline. I want to learn from them.
And, they’ve learned that uniformity and predictability make buttons usable. If my OK button does the same thing as your OK button, and almost every other OK button, our users learn how the OK button works. If, instead, my OK button opens a box and your OK button finds a file, the user needs more guidance before clicking OK.
You might rely on each developer to do the right thing. It’s easy enough to write a Click event handler for the button that closes the form.
$buttonOK_Click={
    form1.Close()
}
But, it’s much easier to standardize button behavior. That’s what DialogResult tries to do.
$buttonOK.DialogResult = OK
And, if the behavior of OK buttons changed, the .NET folks would only have to change what the OK value does. Developers worldwide wouldn’t have to rewrite the Click event handlers of their buttons.
It reminds me of all of the things we do in PowerShell to create a more predictable experience, including using approved verbs and common parameters. It might frustrate developers at times, but it’s really much better for users.
The Second Use of DialogResult
Actually, the DialogResult values do a lot more than just close the form. Their primary job is to tell a parent form which user action closed its child form.
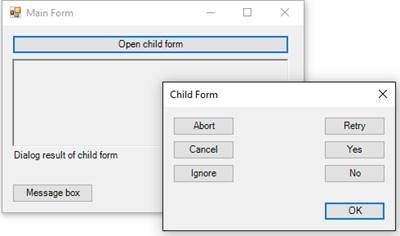
Here’s the model. You start with a parent form (Main Form). When you click a button (like “Open child form”) on the parent form, the child form opens. When you close the child form, the system returns the DialogResult value of the closing action to the parent form.
(Want to learn how to create a parent and child form? Passing and returning values using forms)
In this example, the text on each of the buttons matches its DialogResult value. For example, the Retry button has a DialogResult value of Retry.
>
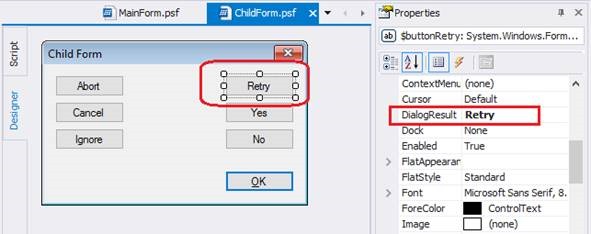
When the user clicks the ‘Retry’ button, the system returns a value of ‘Retry’ to the parent form. The parent form can use the DialogResult value.
For example, here is the Click event handler for the Open child form button. The Call-ChildForm_psf function opens the child form. When the child form closes, the system returns the DialogResult value as output. You can ignore the DialogResult value or you can capture the DialogResult value and use it. For example, this event handler assigns the DialogResult value to the Text property of the RichTextbox, so the value is displayed in the RichTextbox.
$buttonOpenChildForm_Click = {
    $richtextbox1.Text = Call-ChildForm_psf
}
Now, when you click a button that closes the child form, the DialogResult value appears in the RichTextbox.
Your browser does not support HTML5 video.
There are many practical uses of this functionality. For example, this the app reacts differently to each DialogResult value. The button’s Click event handler opens the child form (Call-ChildForm_psf) and saves the DialogResult in the $dr variable. Then, it uses a Switch statement to respond to the DialogResult value in the $dr variable.
$buttonOpenChildForm_Click = {
    do
    {
        $dr = Call-ChildForm_psf
        $retry = $false

        switch ($dr)
        {
            OK { $richtextbox1.ForeColor = 'Green'; break; }
            Cancel { $richtextbox1.ForeColor = 'Red'; break; }
            No { $formMain.Close() }
            Retry { $richtextbox1.ForeColor = 'Red'; $retry = $true; break; }
            default { $richtextbox1.ForeColor = 'Black'; break; }
        }
        $richtextbox1.Text = $dr
    }
    while ($retry -eq $true)
}
Here’s the result:
Your browser does not support HTML5 video.
DialogResult in a Message Box
You might not work with parent and child forms, but you can use DialogResult in a message box, too. The MessageBox control is a child of its parent form.
I often use message boxes to display errors to users. For example, in the Click event handler for a Start button, I run a Get-Service command, but if it fails, I use a Try-Catch block to catch errors and display them in a message box. To create the message box, I use the msgbox preset snippet in PowerShell Studio.
$buttonStart = {
    Try {
        Get-Service -ComputerName $textboxCn.Text.Trim() | Out-GridView
    }
    Catch {
        [void][System.Windows.Forms.MessageBox]::Show('Cannot get services from the specified computer', 'Computer name error')
    }
}
Notice that the output type on the MessageBox snippet is [void], which means $null or “nothing.” It’s like piping the output of a command to the Out-Null cmdlet. But, if you don’t void out the output, the system returns the DialogResult value of the control that closed the message box.
In this code, I save the DialogResult output in the $dr variable. Also, I selected an argument list (“overload”) for the Show method that creates a message box with Yes and No buttons that return a DialogResult of Yes and No, respectively. In the Catch block, the error message asks the user if they want to get services on the local machine. If they say ‘Yes’, it runs a Get-Service command locally. Otherwise, it just displays the parent form again.
$buttonStart = {
    Try {
        Get-Service -ComputerName $textboxCn.Text.Trim() | Out-GridView
    }
    Catch {
        $dr = [System.Windows.Forms.MessageBox]::Show('Failed. Get services on local computer?', 'Computer name error', 'YesNo')
        if ($dr -eq 'Yes') { Get-Service | Out-GridView }
    }
}
This is just one of many possible uses of DialogResult in a message box.
Fixing DialogResult Errors: Add a button
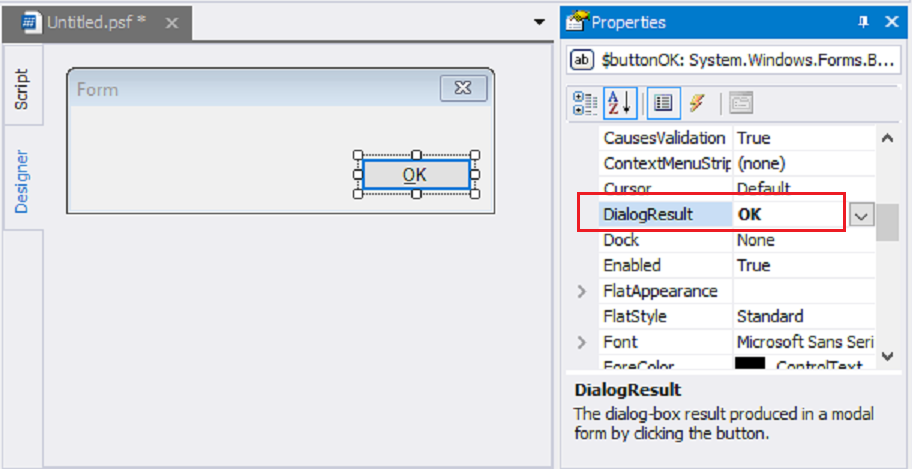
Most PowerShell Studio users first encounter the DialogResult property when they use the Dialog Style Template.
The Dialog Style Template is awesome because it creates a fixed-size (not resizable) GUI app with no minimize or maximize buttons, so you don’t have to worry about controls floating around on your form when the end-user resizes the box.
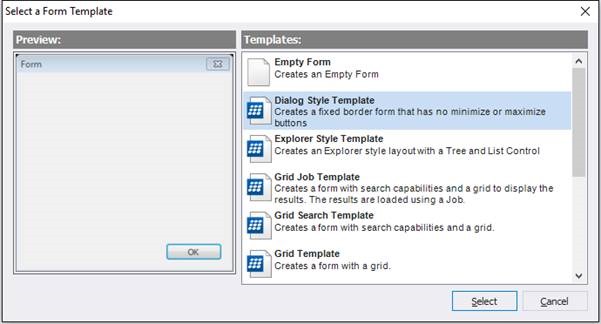
But, because it follows best-practice standards, the OK button in the Dialog Style Template has a DialogResult value of OK.
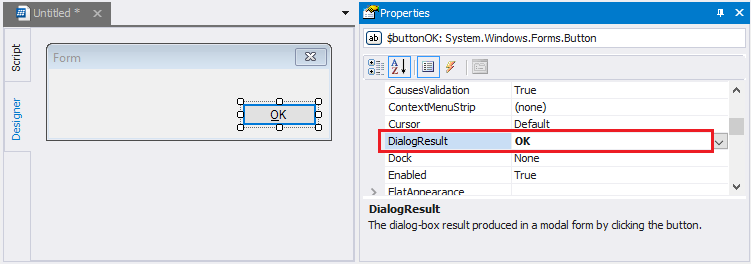
If you try to re-purpose the OK button by writing an event handler for it, it runs the event handler and then closes immediately — and rather abruptly.
$buttonOK_Click={
    Get-Service | Out-GridView
}
To fix the problem, you can set the DialogResult property of the OK button to None. That fixes your app, but it breaks the best practice expectation of how OK buttons work.
Instead, add a button that doesn’t have an expected purpose (not one of the DialogResult values), like this Start button, and set its DialogResult property to None.
Then, move the feature code to the Click event handler for the Start button. To make sure that I don’t misuse the OK button, I add a comment reminding me about the DialogResult value.
$buttonOK_Click={
    #DialogResult = OK
}

$buttonStart_Click={
    Get-Service | Out-GridView
}
Now that I understand DialogResult, I realize that it’s not really evil. It’s helps to enforce best practice standards and I can even use productively. I can’t quite say I love it, but I certainly have a crush on it.
June Blender is a technology evangelist at SAPIEN Technologies, Inc. You can reach her at This email address is being protected from spambots. You need JavaScript enabled to view it. or follow her on Twitter at @juneb_get_help.
Sometimes while a powershell script is running you want to show a MessageBox with a information or warning to the user. In Windows Powershell no Commandlet exists to show a Message Box.
Nevertheless it is possible by using the .NET Windows.Forms.MessageBox class:-).
First of all load the assembly.
# Load assembly
[System.Reflection.Assembly]::LoadWithPartialName("System.Windows.Forms")
To show the messagebox call the static function show(“Message Text”)
$oReturn=[System.Windows.Forms.Messagebox]::Show("This is the Message text")
The function returned a value of enum System.Windows.Forms.DialogResult, that indicates which Button was pressed.
Possible Returncodes, depending on which button was pressed, are:
[system.enum]::getValues($oReturn.GetType())
None
OK
Cancel
Abort
Retry
Ignore
Yes
No
The default Button is the OK Button, there are further 5 combinations, see below.
[system.enum]::getNames([System.Windows.Forms.MessageBoxButtons])|foreach{[console]::Writeline("{0,20} {1,-40:D}",$_,[System.Windows.Forms.MessageBoxButtons]::$_.value__)}
                  OK 0
            OKCancel 1
    AbortRetryIgnore 2
         YesNoCancel 3
               YesNo 4
         RetryCancel 5
An Example, a Message box with an Ok and a Cancel button and a check which button was pressed:
$oReturn=[System.Windows.Forms.MessageBox]::Show("Message Text","Title",[System.Windows.Forms.MessageBoxButtons]::OKCancel)
switch ($oReturn){
	"OK" {
		write-host "You pressed OK"
		# Enter some code
	}
	"Cancel" {
		write-host "You pressed Cancel"
		# Enter some code
	}
}
Some examples
you can also use the number instead of the numeric constants to specify the buttons
[System.Windows.Forms.MessageBox]::Show("Message Text","Title",1)
This oneliner shows all possible Button combinations consecutively
[system.enum]::getValues([System.Windows.Forms.MessageBoxButtons])|foreach {[System.Windows.Forms.MessageBox]::Show("["+$_.GetType()+"]::"+$_.ToString(),"Message box Buttons",$_)}
You can style the message box with an icon, 4 are available
[system.enum]::getNames([System.Windows.Forms.MessageBoxIcon])|foreach{[console]::Writeline("{0,20} {1,-40:D}",$_,[System.Windows.Forms.MessageBoxIcon]::$_.value__)}
                None 0
                Hand 16
               Error 16
                Stop 16
            Question 32
         Exclamation 48
             Warning 48
            Asterisk 64
         Information 64
Example:
[System.Windows.Forms.MessageBox]::Show("Message Text","Title",[System.Windows.Forms.MessageBoxButtons]::OKCancel,[System.Windows.Forms.MessageBoxIcon]::Warning)
Same with numbers instead of numeric constants
[System.Windows.Forms.MessageBox]::Show("Message Text","Title",1,48)
the remaining…
All available icons consecutively
[system.enum]::getValues([System.Windows.Forms.MessageBoxIcon])|foreach {[System.Windows.Forms.Messagebox]::Show("["+$_.GetType()+"]::"+$_.ToString(),"Message box Icons",[System.Windows.Forms.MessageBoxButtons]::OK,$_)}
Michael