
Данный API — часть .NET Framework 3.0
Windows Forms — интерфейс программирования приложений (API), отвечающий за графический интерфейс пользователя и являющийся частью Microsoft .NET Framework. Данный интерфейс упрощает доступ к элементам интерфейса Microsoft Windows за счет создания обёртки для существующего Win32 API в управляемом коде. Причём управляемый код — классы, реализующие API для Windows Forms, не зависят от языка разработки. То есть программист одинаково может использовать Windows Forms как при написании ПО на C#, С++, так и на VB.Net, J# и др.
С одной стороны, Windows Forms рассматривается как замена более старой и сложной библиотеке MFC, изначально написанной на языке C++. С другой стороны, WF не предлагает парадигму, сравнимую с MVC. Для исправления этой ситуации и реализации данной функциональности в WF существуют сторонние библиотеки. Одной из наиболее используемых подобных библиотек является User Interface Process Application Block, выпущенная специальной группой Microsoft, занимающейся примерами и рекомендациями, для бесплатного скачивания. Эта библиотека также содержит исходный код и обучающие примеры для ускорения обучения.
Внутри .NET Framework, Windows Forms реализуется в рамках пространства имён System.Windows.Forms.
История и развитие[]
Как и Abstract Window Toolkit (AWT) (схожий API для языка Java), библиотека Windows Forms была разработана как часть .NET Framework для упрощения разработки компонентов графического интерфейса пользователя. Windows Forms построена на основе устаревающего Windows API и представляет собой, по сути, обертку низкоуровневых компонентов Windows.
Windows Forms предоставляет возможность разработки кроссплатформенного графического пользовательского интерфейса. Однако, Windows Forms фактически является лишь оберткой Windows API-компонентов, и ряд её методов осуществляют прямой доступ к Win32-функциям обратного вызова, которые недоступны на других платформах.
В .NET Framework версии 2.0 библиотека Windows Forms получила более богатый инструментарий разработки интерфейсов, toolstrip-элементы интерфейса в стиле Office 2003, поддержку многопоточности, расширенные возможности проектирования и привязки к данным, а также поддержку технологии ClickOnce для развертывания веб-приложений.
С выходом .NET Framework 3.0 Microsoft выпустила новый API для рисования пользовательских интерфейсов: Windows Presentation Foundation, который базировался на DirectX 11 и декларативном языке описания интерфейсов XAML. Однако, даже несмотря на все это, Windows Forms и WPF всё ещё предлагают схожую функциональность, и поэтому Windows Forms не был упразднен в пользу WPF, а продолжает использоваться как альтернативная технология построения интерфейсов наряду с WPF.
Отвечая на вопросы на конференции Build 2014, Майкрософт пояснила, что Windows Forms будет поддерживаться, ошибки будут исправляться, но новые функции добавляться не будут. Позже, улучшенная поддержка высокого разрешения для различных элементов интерфейса Windows Forms все же была анонсирована в релизе .NET Framework 4.5.
Архитектура[]
Приложение Windows Forms представляет собой событийно-ориентированное приложение, поддерживаемое Microsoft .NET Framework. В отличие от пакетных программ, большая часть времени тратится на ожидание от пользователя каких-либо действий, как, например, ввод текста в текстовое поле или клика мышкой по кнопке.
Альтернативные реализации[]
Mono — проект, финансируемый Novell (ранее — Ximian), одна из задач которого — создать стандарт Ecma, совместимый с набором инструментов .NET.
13 мая 2008 года API Mono System.Windows.Forms 2.0 была завершена (содержала 100 % классов, методов и т. д. из Microsoft System.Windows.Forms 2.0); также System.Windows.Forms 2.0 естественным образом работает и на Mac OS X.
См. также[]
- Microsoft Visual Studio
- ClickOnce
- Abstract Window Toolkit
- Visual Component Library, Borland VCL
- Visual Test, инструмент автоматизации тестирования ГПИ
Примечания[]
Ссылки[]
- MSDN: Building Windows Forms applications Шаблон:Ref-en
- MSDN: Windows.Forms reference documentation Шаблон:Ref-en
- MSDN: Windows Forms Technical Articles — Automating Windows Form with Visual Test Шаблон:Ref-en
- Official community site Шаблон:Ref-en
- Jeff Prosise: «Windows Forms: Современная модель программирования для создания GUI приложений»
Шаблон:Compu-soft-stub
Шаблон:Windows-stub
Шаблон:DotNET
Шаблон:Инструментарии виджетов
When developing applications in C#, Windows Forms remains a popular choice for creating desktop applications due to its ease of use and rich controls. Integrating a Web API into a C# Windows Forms application can enhance its functionality by enabling data exchange with a server. In this tutorial, we will explore how to build a C# Windows Forms application that interacts with a Web API.
Setting Up the Project
To begin, open Visual Studio and create a new C# Windows Forms project. Ensure you have the necessary NuGet packages installed to make HTTP requests to the Web API. You can use libraries like HttpClient for making API calls.
using System;
using System.Net.Http;
using System.Threading.Tasks;

namespace WindowsFormsApp
{
    public partial class MainForm : Form
    {
        private readonly HttpClient _client;

        public MainForm()
        {
            InitializeComponent();
            _client = new HttpClient();
        }

        private async Task<string> GetApiResponse(string url)
        {
            HttpResponseMessage response = await _client.GetAsync(url);
            response.EnsureSuccessStatusCode();
            return await response.Content.ReadAsStringAsync();
        }
    }
}
Making API Requests
In your Windows Forms application, you can create methods to make GET, POST, PUT, or DELETE requests to the Web API. Here’s an example of a method that retrieves data from a Web API:
private async void FetchDataButton_Click(object sender, EventArgs e)
{
    string apiUrl = "https://api.example.com/data";
    string responseData = await GetApiResponse(apiUrl);
    // Process the response data
}
Displaying API Data
Once you have fetched data from the Web API, you can display it in your Windows Forms application. You can populate controls like DataGridView, ListBox, or TextBox with the retrieved data.
private async void FetchDataButton_Click(object sender, EventArgs e)
{
    string apiUrl = "https://api.example.com/data";
    string responseData = await GetApiResponse(apiUrl);

    // Display the data in a control
    textBox1.Text = responseData;
}
Conclusion
Integrating a Web API into a C# Windows Forms application can open up a world of possibilities for data exchange and functionality. By following the steps outlined in this tutorial, you can create a robust desktop application that communicates seamlessly with a server. Experiment with different API endpoints and data formats to enhance the capabilities of your Windows Forms application.
Happy coding!
Материал из Викиучебника — открытых книг для открытого мира
|
Содержание |
|
Windows Forms — фреймворк для работы с формами.
Любая программа, использующая Windows Forms может иметь следующий вид:
{$apptype windows}
{$reference 'System.Windows.Forms.dll'}
{$reference 'System.Drawing.dll'}

uses
  System.Windows.Forms,
  System.Drawing;

var
  MainForm: System.Windows.Forms.Form;

begin
  MainForm := new Form;
  Application.Run(MainForm);
end.
MainForm — главная форма.
Windows Forms содержит следующие классы:
- System.Windows.Forms.Button или Button (кнопка)
- System.Windows.Forms.Label или Label (метка)
- System.Windows.Forms.CheckBox или CheckBox (флажок)
- System.Windows.Forms.RadioButton или RadioButton (радио-кнопка)
- System.Windows.Forms.TrackBar или TrackBar (ползунок)
- System.Windows.Forms.ListBox или ListBox (список)
- System.Windows.Forms.ComboBox или ComboBox (выпадающий список)
- System.Windows.Forms.Form или Form (форма)
- System.Windows.Forms.GroupBox или GroupBox (фрейм)
- System.Windows.Forms.SplitContainer или SplitContainer (элемент разделения окна)
- System.Windows.Forms.MenuStrip или MenuStrip (главное меню)
- System.Windows.Forms.ToolStripMenuItem или ToolStripMenuItem (подменю)
System.Windows.Forms.Button — класс кнопки. Синтаксис ее создания:
name — имя кнопки.
| Свойство | Значение |
|---|---|
| Width | Ширина кнопки. |
| Height | Высота кнопки. |
| Text | Текст на кнопке. |
| BackColor | Цвет фона кнопки. |
| ForeColor | Цвет текста кнопки. |
| Location | Позиция кнопки на форме.
В качестве значения должна быть точка System.Drawing.Point. |
| AutoSize | Будет ли меняться размер кнопки, подгоняясь под размер содержимого, или будет отображаться лишь та часть содержимого, умещающаяся на кнопке. |
| Parent | Родительский виджет. |
| Visible | Видна ли кнопка. |
| Событие | Значение |
|---|---|
| Click | Хранит ссылку на процедуру, которая выполниться при нажатии на кнопку.
Для установки его значения используйте вместо := +=. |
System.Windows.Forms.Label — класс метки. Синтаксис ее создания:
name — имя метки.
| Свойство | Значение |
|---|---|
| Width | Ширина метки. |
| Height | Высота метки. |
| Text | Текст на метки. |
| BackColor | Цвет фона метки. |
| ForeColor | Цвет текста метки. |
| Location | Позиция метки на форме. |
| AutoSize | Будет ли меняться размер метки, подгоняясь под размер содержимого, или будет отображаться лишь та часть содержимого, умещающаяся на метке. |
| Parent | Родительский виджет. |
| Visible | Видна ли метка. |
System.Windows.Forms.CheckBox — класс флажка. Синтаксис его создания:
name — имя флажка.
| Свойство | Значение |
|---|---|
| Width | Ширина флажка. |
| Height | Высота флажка. |
| Text | Текст на флажка. |
| BackColor | Цвет фона флажка. |
| ForeColor | Цвет текста флажка. |
| Location | Позиция флажка форме. |
| AutoSize | Будет ли меняться размер флажка, подгоняясь под размер содержимого, или будет отображаться лишь та часть содержимого, умещающаяся на флажка. |
| Parent | Родительский виджет. |
| Visible | Виден ли флажок. |
| Checked | Определяет установлен ли флажок или нет. |
System.Windows.Forms.RadioBox- класс радио-кнопки. Синтаксис ее создания:
name — имя радио-кнопки.
| Свойство | Значение |
|---|---|
| Width | Ширина радио-кнопки. |
| Height | Высота радио-кнопки. |
| Text | Текст на радио-кнопки. |
| BackColor | Цвет фона радио-кнопки. |
| ForeColor | Цвет текста радио-кнопки. |
| Location | Позиция радио-кнопки форме. |
| AutoSize | Будет ли меняться размер радио-кнопки, подгоняясь под размер содержимого, или будет отображаться лишь та часть содержимого, умещающаяся на радио-кнопке. |
| Parent | Родительский виджет. |
| Visible | Видна ли радио-кнопка. |
| Checked | Определяет установлена ли радио-кнопка или нет. |
System.Windows.Forms.TrackBar — класс ползунка. Синтаксис его создания:
name — имя ползунка.
| Свойство | Значение |
|---|---|
| Width | Ширина ползунка. |
| Height | Ширина ползунка. |
| Location | Позиция ползунка на форме. |
| Parent | Родительский виджет. |
| Visible | Виден ли ползунок. |
| Minimum | Минимальное значение ползунка. |
| Maximum | Максимальное значение ползунка. |
| Value | Текущее значение ползунка. |
| Orientation | Ориентация ползунка.
|
| TickStyle | Контролирует как отображаются деления.
|
| TickFrequency | Расстояние между делениями. |
System.Windows.Forms.ListBox- класс списка. Синтаксис его создания:
name — имя списка.
| Свойство | Значение |
|---|---|
| Width | Ширина списка. |
| Height | Высота списка. |
| Location | Позиция списка на форме. |
| Parent | Родительский виджет. |
| Visible | Виден ли список. |
| ItemHeight | Высота элемента списка. |
| Items.Count | Количество элементов списка. |
| Items.Item[k] | K-ый элемент списка. |
| IntegralHeight | Указывает будет ли подгоняться размер списка под размер элементов, чтобы был видны названия всех элементов полностью. |
| Событие | Описание |
|---|---|
| Click | Хранит ссылку на процедуру, которая выполнится при щелчке по списку. |
| SelectedIndexChanged | Хранит ссылку на процедуру, которая выполнится при смене выбранного элемента списка. |
Ниже a — список.
| Процедура | Значение |
|---|---|
| a.Items.Add(t) | Добавляет в список элемент с текстом t. |
| a.Items.Clear | Очищает список. |
System.Windows.Forms.ComboBox — класс выпадающего списка. Для его создания пишите:
name — имя выпадающего списка.
| Свойство | Значение |
|---|---|
| Width | Ширина выпадающего списка. |
| Height | Высота выпадающего списка. |
| Parent | Родительский виджет. |
| Visible | Виден ли выпадающий список. |
| Count | Количество элементов в выпадающем списке. |
| SelectedIndex | Индекс выбранного элемента выпадающего списка. |
| SelectedItem | Выбранный элемент выпадающего списка. |
| Items.Item[k] | K-ый элемент выпадающего списка. |
| IntegralHeight | Указывает будет ли подгоняться размер выпадающего списка под размер элементов, чтобы был видны названия всех элементов полностью. |
| Событие | Описание |
|---|---|
| Click | Хранит ссылку на процедуру, которая выполнится при щелчке по выпадающему списку. |
| SelectedIndexChanged | Хранит ссылку на процедуру, которая выполнится при смене выбранного элемента выпадающего списка. |
Ниже a — выпадающий список.
| Функция | Описание |
|---|---|
| a.Items.Add | Добавляет в выпадающий список элемент. |
| a.Items.Clear | Удаляет все элементы выпадающего списка. |
System.Windows.Forms.GroupBox- класс фрейма. Синтаксис его создания:
name — имя кнопки.
| Свойство | Значение |
|---|---|
| Width | Ширина фрейма. |
| Height | Высота фрейма. |
| Text | Текст на в заголовке фрейма. |
| Location | Позиция фрейма на форме.
В качестве значения должна быть точка System.Drawing.Point. |
| AutoSize | Будет ли меняться размер фрейма, подгоняясь под размер содержимого, или будет отображаться лишь та часть содержимого, умещающаяся на кнопке. |
| Parent | Родительский виджет. |
| Visible | Виден ли фрейм. |
System.Windows.Forms.SplitContainer — класс элемента разделения окна. Синтаксис его создания:
name := new SplitContainer();
name — имя элемента разделения окна.
| Свойство | Значение |
|---|---|
| Width | Ширина элемента разделения окна. |
| Height | Высота элемента разделения окна. |
| Location | Позиция элемента разделения окна на форме.
В качестве значения должна быть точка System.Drawing.Point. |
| AutoSize | Будет ли меняться размер элемента разделения окна, подгоняясь под размер содержимого, или будет отображаться лишь та часть содержимого, умещающаяся на элементе разделения окна. |
| Visible | Виден ли элемент разделения окна. |
| Orientation | Ориентация элемента разделения окна.
|
| Parent | Родительский виджет. |
| Panel1 | Имя виджета, входящего в левую или верхнюю часть элемента разделения окна. |
| Panel2 | Имя виджета, входящего в правую или нижнюю часть элемента разделения окна. |
System.Windows.Forms.MenuStrip — класс главного меню. Синтаксис его создания:
name := new MenuStrip ();
name — имя главного меню.
| Свойство | Значение |
|---|---|
| BackColor | Цвет фона главного меню. |
| ForeColor | Цвет текста меню. |
| GripStyle | Видим ли объект для перемещения меню, находящийся слева.
|
Ниже a — главное меню.
| Процедура | Значение |
|---|---|
| a.Items.Add(k) | Добавляет подменю k в главное меню. |
System.Windows.Forms.ToolStripMenuItem — класс подменю. Синтаксис его создания:
name := new ToolStripMenuItem ();
name — имя подменю.
| Свойство | Значение |
|---|---|
| BackColor | Цвет фона заголовка подменю. |
| ForeColor | Цвет текста заголовка подменю. |
Ниже b — подменю.
| Процедура | Значение |
|---|---|
| b.DropDownItems.Add(t,i,act) | Добавляет пункт в подменю b.
|
System.Windows.Forms.Form — класс формы. Общий синтаксис ее создания:
| Свойство | Описане |
|---|---|
| Text | Заголовок формы. |
Ниже a — форма.
| Свойство | Описане |
|---|---|
| a.Controls.Add(виджет) | Добавляет виджет на форму. |
Cursor — объект курсора в Windows Forms.
| Свойство | Значение |
|---|---|
| System.Windows.Forms.Cursor.Position.X | Позиция курсора по X. |
| System.Windows.Forms.Cursor.Position.Y | Позиция курсора по Y. |
Любая процедура, являющаяся обработчиком события должна иметь вид:
procedure p(sender:object; args:System.EventArgs);
begin
   //тело процедуры
end;
p — имя процедуры.
Подключить визуальные стили для более красивого отображения виджетов можно так:
Application.EnableVisualStyles;
- Вывод сообщения по нажатию кнопки:
{$reference 'System.Windows.Forms.dll'}
{$reference 'System.Drawing.dll'}

uses System, System.Windows.Forms;

var
  f : Form;
  btn : Button;

procedure ButtonClick(sender: object; e: EventArgs);
begin
  MessageBox.Show('Hello world!');
end;

begin
  f := new Form;
  btn := new Button;
  btn.Text := 'Click me';
  btn.Click += ButtonClick;
  f.Controls.Add(btn);
  Application.Run(f);
end.
Windows Forms
Windows Forms (WinForms) is a UI framework for building Windows desktop applications. It is a .NET wrapper over Windows user interface libraries, such as User32 and GDI+. It also offers controls and other functionality that is unique to Windows Forms.
Windows Forms also provides one of the most productive ways to create desktop applications based on the visual designer provided in Visual Studio. It enables drag-and-drop of visual controls and other similar functionality that make it easy to build desktop applications.
Windows Forms Out-Of-Process Designer
For information about the WinForms Designer supporting the .NET runtime and the changes between the .NET Framework Designer (supporting .NET Framework up to version 4.8.1) vs. the .NET Designer (supporting .NET 6, 7, 8, 9+), please see Windows Forms Designer Documentation.
Important: As a Third Party Control Vendor, when you migrate controls from .NET Framework to .NET, your control libraries at runtime are expected to work as before in the context of the respective new TFM (special modernization or security changes in the TFM kept aside, but those are rare breaking changes). Depending on the richness of your control’s design-time support, the migration of control designers from .NET Framework to .NET might need to take a series of areas with breaking changes into account. The provided link points out additional resources which help in that migration process.
Relationship to .NET Framework
This codebase is a fork of the Windows Forms code in the .NET Framework 4.8.
We started the migration process by targeting .NET Core 3.0, when we’ve strived to bring the two runtimes to a parity. Since then, we’ve done a number of changes, including breaking changes, which diverged the two. For more information about breaking changes, see the Porting guide.
The bar for innovation and new features
WinForms is a technology which was originally introduced as a part of .NET Framework 1.0 on February 13th, 2002. It’s primary focus was and is to be a Rapid Application Tool for Windows based Apps, and that principal sentiment has not changed over the years. WinForms at the time addressed developer’s requests for
- A framework for stable, monolithic Line of Business Apps, even with extremely complicated and complex domain-specific workflows
- The ability to easily provide rich user interfaces
- A safe and — over the first 3 versions of .NET Framework — increasingly performant way to communicate across process boundaries via various Windows Communication Services, or access on-site databases via ADO.NET providers.
- A very easy to use, visual what-you-see-is-what-you-get designer, which requires little ramp-up time, and was primarily focused to support 96 DPI resolution-based, pixel-coordinated drag & drop design strategies.
- A flexible, .NET reflection-based Designer extensibility model, utilizing the .NET Component Model.
- Visual Controls and Components, which provide their own design-time functionality through Control Designers
Over time, and with a growing need to address working scenarios with multi-monitor, high resolution monitors, significantly more powerful hardware, and much more, WinForms has continued to be modernized.
And then there is the evolution of Windows: When new versions of Windows introduce new or change existing APIs or technologies — WinForms needs to keep up and adjust their APIs accordingly.
And exactly that is still the primary motivation for once to modernize and innovate, but also the bar to reach for potential innovation areas we either need or want to consider:
- Areas, where for example for security concerns, the Windows team needed to take an depending area out-of-proc, and we see and extreme performance hit in WinForms Apps running under a new Service Pack or a new Windows Version
- New features to comply with updated industry standards for accessibility.
- HighDPI and per Monitor V2-Scenarios.
- Picking up changed or extended Win32 Control functionality, to keep controls in WinForms working the way the Windows team wants them to be used.
- Addressing Performance and Security issues
- Introducing ways to support asynchronous calls interatively, to enable apps to pick up migration paths via Windows APIs projection/Windows Desktop Bridge, enable scenarios for async WebAPI, SignalR, Azure Function, etc. calls, so WinForms backends can modernized and even migrated to the cloud.
What would not make the bar:
- New functionality which modern Desktop UIs like WPF or WinUI clearly have already
- Functionality, which would «stretch» a Windows Desktop App to be a mobile, Multi-Media or IoT app.
- Domain-specific custom controls, which are already provided by the vast variety of third party control vendors
A note about Visual Basic: Visual Basic .NET developers make up about 20% of WinForms developers. We welcome changes that are specific to VB if they address a bug in a customer-facing scenario. Issues and PRs should describe the customer-facing scenario and, if possible, include images showing the problem before and after the proposed changes. Due to limited bandwidth, we cannot prioritize VB-specific changes that are solely for correctness or code cleanliness. However, VB remains important to us, and we aim to fix any critical issues that arise.
Please note
⚠️ This repository contains only implementations for Windows Forms for .NET platform.
It does not contain either:
- The .NET Framework variant of Windows Forms. Issues with .NET Framework, including Windows Forms, should be filed on the Developer Community or Product Support websites. They should not be filed on this repository.
- The Windows Forms Designer implementations. Issues with the Designer can be filed via VS Feedback tool (top right-hand side icon in Visual Studio) or be filed in this repo using the Windows Forms out-of-process designer issue template.
How can I contribute?
We welcome contributions! Many people all over the world have helped make this project better.
- Contributing explains what kinds of changes we welcome
- Developer Guide explains how to build and test
- Get Up and Running with Windows Forms .NET explains how to get started building Windows Forms applications.
How to Engage, Contribute, and Provide Feedback
Some of the best ways to contribute are to try things out, file bugs, join in design conversations, and fix issues.
- The contributing guidelines and the more general .NET contributing guide define contributing rules.
- The Developer Guide defines the setup and workflow for working on this repository.
- If you have a question or have found a bug, file an issue.
- Use daily builds if you want to contribute and stay up to date with the team.
Reporting security issues
Security issues and bugs should be reported privately via email to the Microsoft Security Response Center (MSRC) secure@microsoft.com. You should receive a response within 24 hours. If for some reason you do not, please follow up via email to ensure we received your original message. Further information, including the MSRC PGP key, can be found in the Security TechCenter. Also see info about related Microsoft .NET Core and ASP.NET Core Bug Bounty Program.
Code of Conduct
This project uses the .NET Foundation Code of Conduct to define expected conduct in our community. Instances of abusive, harassing, or otherwise unacceptable behavior may be reported by contacting a project maintainer at conduct@dotnetfoundation.org.
License
.NET (including the Windows Forms repository) is licensed under the MIT license.
.NET Foundation
.NET Windows Forms is a .NET Foundation project.
See the .NET home repository to find other .NET-related projects.
In this article I will explain with an example, how to call (consume) MVC Web API in Windows Forms (WinForms) Application using C#.
The Web API 2 Controller method will fetch records from database using Entity Framework in ASP.Net MVC.
The Web API 2 Controller method will be called using
WebClient
class in Windows Forms Application to populate DataGridView control.
Database
Here I am making use of Microsoft’s Northwind Database. You can download it from here.
Entity Framework Model
Once the Entity Framework is configured and connected to the database table, the Model will look as shown below.
Model
The
CustomerModel
class consists of the following property.
public class CustomerModel
{
///<summary>
/// Gets or sets Name.
///</summary>
public string Name { get; set; }
}
Web API Controller
In order to add a Web API Controller you will need to Right Click the
Controllers
folder in the
Solution Explorer
and click on
Add
and then
Controller
.
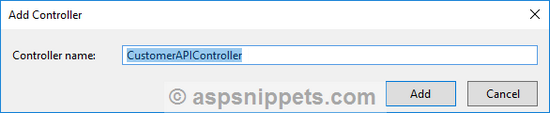
Now from the
Add Scaffold
window, choose the
Web API 2 Controller – Empty
option as shown below.
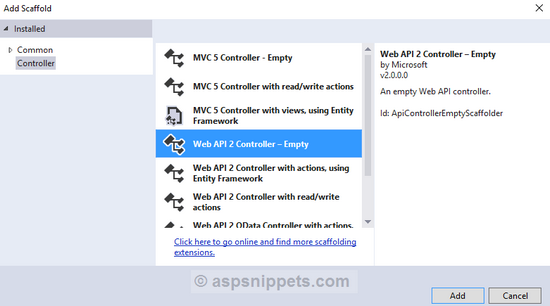
Then give it a suitable name and click OK.
The next task is to register the Configuration for Web API in the
Global.asax
file so that the Web API is available for accessing on Web.
In order to do so open
Global.asax
file and add the following line.
System.Web.Http.GlobalConfiguration.Configure(WebApiConfig.Register);
Make sure you add it in the same order as shown below.
public class MvcApplication : System.Web.HttpApplication
{
protected void Application_Start()
{
AreaRegistration.RegisterAllAreas();
System.Web.Http.GlobalConfiguration.Configure(WebApiConfig.Register);
RouteConfig.RegisterRoutes(RouteTable.Routes);
}
}
The next step is to code the Web API Controller. The Web API Controller consists of a method named
GetCustomers
which accepts an object of
CustomerModel
.
The records of the Customers are fetched using Entity Framework and are filtered using the
StartsWith
function based on the value of the
Name
property.
Finally the records are returned as Generic List Collection.
This method is decorated with
Route
attribute which defines its Route for calling the Web API method and
HttpPost
attribute which signifies that the method will accept Http Post requests.
public class CustomerAPIController : ApiController
{
[Route(«api/CustomerAPI/GetCustomers»)]
[HttpPost]
public List<Customer> GetCustomers(CustomerModel customer)
{
NorthwindEntities entities = new NorthwindEntities();
return (from c in entities.Customers.Take(10)
where c.ContactName.StartsWith(customer.Name) || string.IsNullOrEmpty(customer.Name)
select c).ToList();
}
}
Form Design
The Form consists of a TextBox, a Button and a DataGridView control.
Namespaces
You will need to import the following namespaces.
using System.Net;
using System.Text;
using System.Web.Script.Serialization;
Note: In order to use the
System.Web.Script.Serialization
namespace, you will need to add reference of
System.Web.Extensions
assembly to your project, for more details refer here.
Calling the Web API using WebClient class and populating the DataGridView
The
PopulateDataGridView
method is called inside the
Form Load
event handler and on the
Click
event handler of the
Search
button.
Inside the
PopulateDataGridView
method, the value of the
Name
TextBox is wrapped into a JSON object which is then serialized into a JSON string.
The URL of the Web API along with its Controller method and the serialized JSON string is passed to the
UploadString
method of the
WebClient
class.
The
UploadString
method of the
WebClient
class calls the Web API’s Controller method i.e. the
GetCustomers
method and returns the JSON string which is then de-serialized to Generic List of
Customer
class objects.
Finally the Generic List of
Customer
class objects is used to populate the DataGridView.
private void Form1_Load(object sender, EventArgs e)
{
this.PopulateDataGridView();
}
private void btnSearch_Click(object sender, EventArgs e)
{
this.PopulateDataGridView();
}
private void PopulateDataGridView()
{
string apiUrl = «http://localhost:26404/api/CustomerAPI»;
object input = new
{
Name = txtName.Text.Trim(),
};
string inputJson = (new JavaScriptSerializer()).Serialize(input);
WebClient client = new WebClient();
client.Headers[«Content-type»] = «application/json»;
client.Encoding = Encoding.UTF8;
string json = client.UploadString(apiUrl + «/GetCustomers», inputJson);
dataGridView1.DataSource = (new JavaScriptSerializer()).Deserialize<List<Customer>>(json);
}
public class Customer
{
public string CustomerID { get; set; }
public string ContactName { get; set; }
public string City { get; set; }
}
Screenshot
Downloads