
last updated16 years ago
viewed47.7k times
I wanted to try out some of the automation stuff available through BugSlayer, but am having problems with the references.
I’m trying to figure out how to reference the System.Windows.Automation library in visual studio. I have the .NET Framework v3.5 installed, and VS 2008, but neither the UIAutomationClient nor System.Windows.Automation appear as a reference option in either the .NET or COM tabs for the references.
I can see the dll if I navigate to C:\WINDOWS\assembly\GAC_MSIL\UIAutomationClient\3.0.0.0__31bf3856ad364e35 through the command prompt, but if I browse to the assembly in Visual Studio, I can’t actually get to the dlls.
Have I overlooked a simple way to include this in my project?
12 Answers

accepted
The UIAutomationClient.dll is located in this folder:
C:\Program Files\Reference Assemblies\Microsoft\Framework\v3.0
If you can’t find in your Add Reference->.Net tab, then you have to use the Browse tab to go to the given path, and add the assembly (Right Click on the References, choose add reference, click browse tab).
gemini-flash
You need to add a reference to the UIAutomationClient.dll assembly. Here’s how:
- Right-click on your project in the Solution Explorer window.
- Select Add Reference.
- In the Browse tab, navigate to
C:\WINDOWS\assembly\GAC_MSIL\UIAutomationClient\3.0.0.0__31bf3856ad364e35. - Select
UIAutomationClient.dlland click OK.
mistral
I’m here to help you with your question related to referencing the System.Windows.Automation library in Visual Studio using .NET Framework 3.5 and VS 2008.
The UIAutomationClient and System.Windows.Automation namespaces might not appear directly as a reference option in your project because they are part of the Managed Extensibility Framework (MEF) which is implemented as a dynamic assembly, meaning it doesn’t require a traditional .dll file or strong references to be added to the project.
However, you can still use them in your code by adding the following lines in your project’s app.config file under the <system.runtime.loader> section:
<probing xmlns="urn:schemas-microsoft-com:asm.v1">
  <assembly domain="auto" name="System.Windows.Automation" codebase="C:\WINDOWS\assembly\GAC_MSIL\UIAutomationClient\3.0.0.0\UIAutomationClient.dll" />
</probing>
Now, in your C# or VB.NET code, you can use the UIAutomationClient and System.Windows.Automation namespaces as usual:
using System.Windows.Automation;
using Microsoft.VisualStudio.TestTools.UnitTesting;

[TestClass]
public class AutomationExample
{
    [TestMethod]
    public void AutomateUIExample()
    {
        var automation = AutomationFactory.CreateAutomation();

        // Your automated tests and interactions here
    }
}
Keep in mind that you’ll need to make sure that the referenced path in the app.config is pointing to your correct installation of Visual Studio and the GAC_MSIL directory with the UIAutomationClient.dll file.
codellama
It looks like you have not yet added a reference to the System.Windows.Automation library in your project. To add the reference, follow these steps:
- In Visual Studio, right-click on the References folder for your project and select «Add Reference…» from the context menu.
- Select the «.NET» tab on the left side of the Add Reference dialog box.
- Type «UIAutomationClient» in the search bar at the top of the dialog box, and then press Enter.
- In the search results list, select the UIAutomationClient assembly and click «Add.» This will add a reference to the library in your project.
- Repeat steps 3-4 for the System.Windows.Automation assembly if necessary.
- Once both assemblies have been added, you should see them listed under the References folder in your project’s solution explorer.
- Include the namespace declarations at the top of any file where you want to use the Automation classes, as follows:
using System.Windows.Automation;
using UIAutomationClient;
These steps will allow you to use the System.Windows.Automation library and its related types in your project.

mixtral
It seems like you’re having trouble adding a reference to the System.Windows.Automation library in your Visual Studio project. I can guide you through the process of adding a reference using the «Add Reference» dialog in Visual Studio. Here are the steps:
- In Visual Studio, right-click on your project in the Solution Explorer and select «Add» > «Reference» from the context menu. This will open the «Add Reference» dialog.
- In the «Add Reference» dialog, change the «Reference Manager» view from «Solution» to «.NET» by selecting the dropdown at the top of the dialog.
- In the «.NET» tab, search for «UIAutomationClient» in the search box at the top right corner of the dialog.
- Select the «UIAutomationClient» assembly from the list and click on the «Add» button to add it as a reference to your project.
If you can’t find the «UIAutomationClient» assembly in the «.NET» tab, you can still add the reference manually using the «Browse» tab:
- Change the «Reference Manager» view from «.NET» to «Browse» by selecting the dropdown at the top of the dialog.
- Click on the «Browse» button and navigate to the following directory:
C:\Program Files\Reference Assemblies\Microsoft\Framework\.NETFramework\v3.5 - In the «v3.5» directory, look for the «UIAutomationClient.dll» file and select it.
- Click on the «Add» button to add the reference to your project.
After completing these steps, you should be able to use the System.Windows.Automation namespace in your project.
If you still encounter issues, make sure your Visual Studio project is targeting the correct version of the .NET Framework. You can check this by right-clicking on your project in the Solution Explorer, selecting «Properties», and then selecting the «Application» tab. In the «Application» tab, check the «Target Framework» dropdown to ensure it’s set to «.NET Framework 3.5».

most-voted
The UIAutomationClient.dll is located in this folder:
C:\Program Files\Reference Assemblies\Microsoft\Framework\v3.0
If you can’t find in your Add Reference->.Net tab, then you have to use the Browse tab to go to the given path, and add the assembly (Right Click on the References, choose add reference, click browse tab).

deepseek-coder
It appears that there is no direct UIAutomationClient or System.Windows.Automation reference in Visual Studio 2008 for .NET framework version 3.5. These functionalities are part of later versions of the framework i.e., starting from .Net 4.0 and onwards, which comes with Windows SDK that also includes UI Automation client API headers and libraries.
However, there is a third-party tool named ‘UI automation spyd’ (www.uispysoftware.com/UISpy) to interact with the System.Windows.Automation classes but it is not freeware.
For non commercial use you can refer:
http://msdn.microsoft.com/en-us/library/hh847926.aspx
It shows how to programmatically capture UI Automation trees and also how to perform simple actions like setting focus, entering text, etc.
As a workaround you might consider upgrading your Visual Studio or .NET framework version which would include these functionalities out of the box if they are present in newer versions.
In other scenarios where third-party toolkits can help then Microsoft’s UI Automation library is definitely worth exploring: https://www.nuget.org/packages/Microsoft.UIAutomation.dll. But remember that these libraries, like many others, are a layer above the Windows API and may not fully cover all functionality you might need to automate the user interface of applications in certain situations or on certain platforms.
You can also use automation libraries for .net such as :
- AutoIt (http://www.autoitscript.com/site/)
- C# — User Access Control and Desktop Automation Libraries for Win32 (http://www.codeproject.com/Articles/18990/C-User-Access-Control-and-Desktop-Automation)
but these will likely be more heavyweight than the inbuilt system libraries. It largely depends upon what exactly you need to automate.
qwen-4b
To reference the UIAutomationClient library in Visual Studio 2008, you will need to include a System.Configuration.ClientAppSettingsSection in your configuration file (app.config). The UIAutomationClient library is located within the \Windows\assembly\GAC_MSIL directory. To include the UIAutomationClient library in your project, you can reference it by using the fully qualified name (FQDN) of the library in your code. For example, to reference the UIAutomationClient library in C#, you can use the following code: namespace Test { class Program { static void Main(string[] args)) { AutomationUIClient ui = new AutomationUIClient(); AutomationElement element = ui.OpenWebBrowserDialog(«http://www.microsoft.com/WindowsLive/default.asp?oc=wnl», «WindowsLive»));
element.BringIntoView();
if (element.Find(«.ctl0_WndLL.Wtnll_0_0_ctl0»).Count > 0))
{
Debug.WriteLine(element.GetAttributeValue(«class»)).ToLower());
Debug.WriteLine(element.GetAttribute(«id»)).ToString());
Debug.WriteLine(element.GetAttribute(«name»)).ToString());
Debug.WriteLine(element.GetAttribute(«role»)).ToString()));
}
else
{
Debug.WriteLine(«The element could not be located on the page.»));
}
// This method is used to close an open web browser dialog.
public void CloseOpenWebBrowserDialog()
{
if (element != null && !element.IsClosed))
{
AutomationUIClient ui = new AutomationUIClient(); AutomationElement element = ui.OpenWebBrowserDialog(«http://www.microsoft.com/WindowsLive/default.asp?oc=wnl», «WindowsLive»)));
element.BringIntoView();
// The element will not be closed if the
// page is being refreshed. In order to close an open web browser dialog, you should ensure that the page being refreshed does not include any open web browser dialogs.
gemma
Response:
The System.Windows.Automation library is part of the Windows SDK, which is a separate download from the .NET Framework. To reference this library in your Visual Studio project, you need to install the Windows SDK and follow these steps:
1. Install the Windows SDK:
- Download and install the latest version of the Windows SDK from the Microsoft website.
- Make sure to install the necessary components, such as the Desktop Development tools and the Platform SDKs.
2. Add references to the library:
- Open your Visual Studio project.
- In the Solution Explorer, right-click on the project and select Add Reference.
- In the Reference Manager window, click on the Browse button.
- Navigate to the following location:
C:\Windows\Microsoft.Windows.SDK\v10.0\Bin - Select the following assemblies:
UIAutomationClient.dll,System.Windows.Automation.dll, andSystem.Windows.Automation.Controls.dll. - Click OK to add the references.
3. Use the library:
- Once the references are added, you can start using the System.Windows.Automation library in your code.
- For example, you can use the AutomationElement class to interact with elements on a Windows form.
Additional notes:
- If you have VS 2008, you may need to install the Windows SDK v7.1.
- You may also need to add a reference to the System.Drawing library, which is required by the System.Windows.Automation library.
- If you have any problems adding the references or using the library, you can find more information on the Microsoft documentation website.
Here are some additional resources that you may find helpful:
- System.Windows.Automation Namespace
- How to Use the System.Windows.Automation Library
phi
System.Windows.Automation is indeed available for use in your Visual Studio project. To reference it in code, you will need to add the following line at the top of the file where you want to import it:
using System;
using System.Net;
using System.Windows.Automation.Framework.ExecutionOptions;
This tells Visual Studio that you want to use System.Net and its components, including the System.Windows.Automation library.
Alternatively, you can simply import the System.Windows.Automation Library using the following line:
using System.Windows.Automation;
This will import the library into your project without any need for additional syntax.
Once you have added or included these lines in your code, you should be able to reference System.Windows.Automation and its components in your Visual Studio projects as needed. Let me know if you need any further assistance with this.
gemini-pro
The System.Windows.Automation library is not available in the .NET Framework 3.5, and therefore not in Visual Studio 2008. It was introduced in the .NET Framework 4.0, which is available with Visual Studio 2010.
If you want to use the System.Windows.Automation library, you will need to upgrade to Visual Studio 2010 and the .NET Framework 4.0.
gemma-2b
Sure, here’s how you can include the UIAutomationClient library in your Visual Studio project:
1. Install the UIAutomationClient NuGet Package:
- Open Visual Studio.
- Select «Project» -> «Install NuGet Package».
- In the search bar, enter «UIAutomationClient».
- Select the «System.Windows.Automation.UIAutomationClient, Version=3.0» package from the results.
- Click «Install».
2. Reference the Library:
Once the NuGet package is installed, you can reference the UIAutomationClient library in your code.
- Add the following code to your project file:
using UIAutomationClient;
3. Use the UIAutomationClient Class:
Now you can use the UIAutomationClient class to interact with the UI elements.
For example, the following code gets all the UI windows:
var automation = new UIAutomationClient();
var windows = automation.GetChildren();
Additional Notes:
- Make sure your project targets .NET Framework 3.5 or higher.
- You may need to restart Visual Studio after installing the NuGet package.
- The assembly file you mentioned is a Windows metadata file (dll) that contains the UIAutomationClient class implementation. You can view it using the Assembly Explorer in the VS project.
By following these steps, you should be able to successfully reference the UIAutomationClient library and use its functionalities in your Visual Studio project.
Файл System.Management.Automation.dll считается разновидностью DLL-файла. DLL-файлы, такие как System.Management.Automation.dll, по сути являются справочником, хранящим информацию и инструкции для исполняемых файлов (EXE-файлов), например appidpolicyconverter.exe. Данные файлы были созданы для того, чтобы различные программы (например, Microsoft Office Access 2010) имели общий доступ к файлу System.Management.Automation.dll для более эффективного распределения памяти, что в свою очередь способствует повышению быстродействия компьютера.
К сожалению, то, что делает файлы DLL настолько удобными и эффективными, также делает их крайне уязвимыми к различного рода проблемам. Если что-то происходит с общим файлом DLL, то он либо пропадает, либо каким-то образом повреждается, вследствие чего может возникать сообщение об ошибке выполнения. Термин «выполнение» говорит сам за себя; имеется в виду, что данные ошибки возникают в момент, когда происходит попытка загрузки файла System.Management.Automation.dll — либо при запуске приложения Microsoft Office Access 2010, либо, в некоторых случаях, во время его работы. К числу наиболее распространенных ошибок System.Management.Automation.dll относятся:
- Нарушение прав доступа по адресу — System.Management.Automation.dll.
- Не удается найти System.Management.Automation.dll.
- Не удается найти C:\Windows\Microsoft.NET\assembly\GAC_MSIL\System.Management.Automation\v4.0_3.0.0.0__31bf3856ad364e35\System.Management.Automation.dll.
- Не удается зарегистрировать System.Management.Automation.dll.
- Не удается запустить Microsoft Office Access 2010. Отсутствует требуемый компонент: System.Management.Automation.dll. Повторите установку Microsoft Office Access 2010.
- Не удалось загрузить System.Management.Automation.dll.
- Не удалось запустить приложение, потому что не найден System.Management.Automation.dll.
- Файл System.Management.Automation.dll отсутствует или поврежден.
- Не удалось запустить это приложение, потому что не найден System.Management.Automation.dll. Попробуйте переустановить программу, чтобы устранить эту проблему.
Файл System.Management.Automation.dll может отсутствовать из-за случайного удаления, быть удаленным другой программой как общий файл (общий с Microsoft Office Access 2010) или быть удаленным в результате заражения вредоносным программным обеспечением. Кроме того, повреждение файла System.Management.Automation.dll может быть вызвано отключением питания при загрузке Microsoft Office Access 2010, сбоем системы при загрузке System.Management.Automation.dll, наличием плохих секторов на запоминающем устройстве (обычно это основной жесткий диск) или, как нередко бывает, заражением вредоносным программным обеспечением. Таким образом, крайне важно, чтобы антивирус постоянно поддерживался в актуальном состоянии и регулярно проводил сканирование системы.
Audio : Listen to This Blog.
In this blog we will discuss about how to empower GUI Automation and integrate it into Powershell framework. In general, Powershell scripts are mainly used for automating the middleware and backend system functionality.
But, in order to get end-to-end automation, we will have to integrate the frontend GUI Automation too. GUI Automation can be used as a validation point, soon after performing the middleware and backend system API execution.
This can be achieved by using binary module [Using C# .Net Automation Libraries] through which UI automation can be bridged with middleware and backend system automation.
Let’s take a look at “How binary module integration is done”
What is Powershell Binary Module?
Importing a dll [Using C# .Net libraries] into powershell is referred to as Binary Module. A binary module can be any assembly (.dll) that contains cmdlet classes. A dll which contains cmdlet classes can be imported into powershell. By default, all the cmdlets in the assembly are imported when the binary module is imported.
Binary Module integration is segregated into two divisions,
- Creating library file using C#.
- Loading the dll into powershell
1. Creating library file using C#.
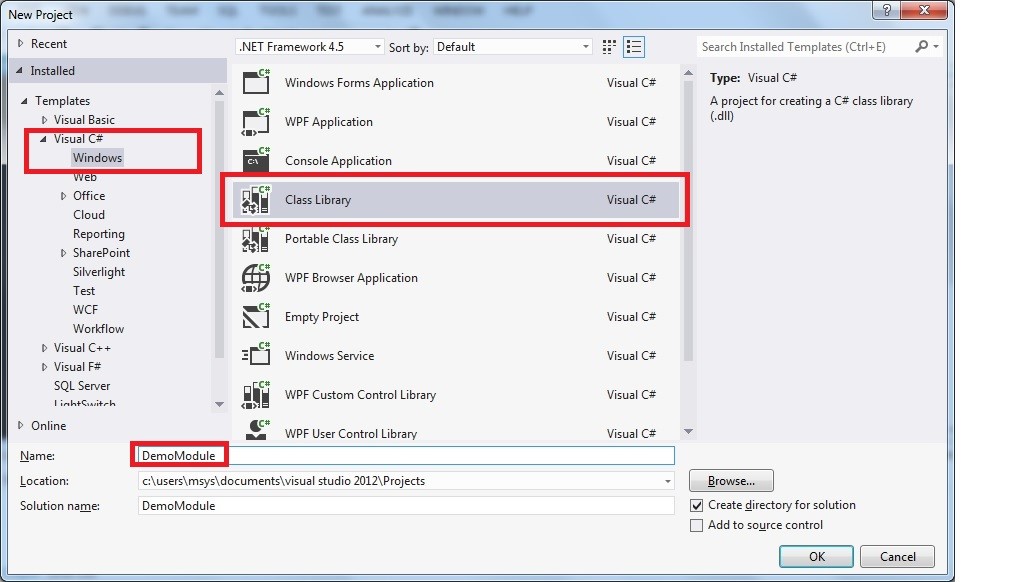
STEP 1 : Creating a New Project
Select the Visual C# from the installed Templates list and then pick Class Library since compiled modules in PowerShell are in DLL format. Let’s name this project as DemoModule.
STEP 2 : Navigate to Properties
Select the Debug option in the menu and select DemoModule Properties.
STEP 3 : Choose .NET framework
Go to Application and choose the appropriate (suitable for powershell version) .NET framework version under “Target framework”.
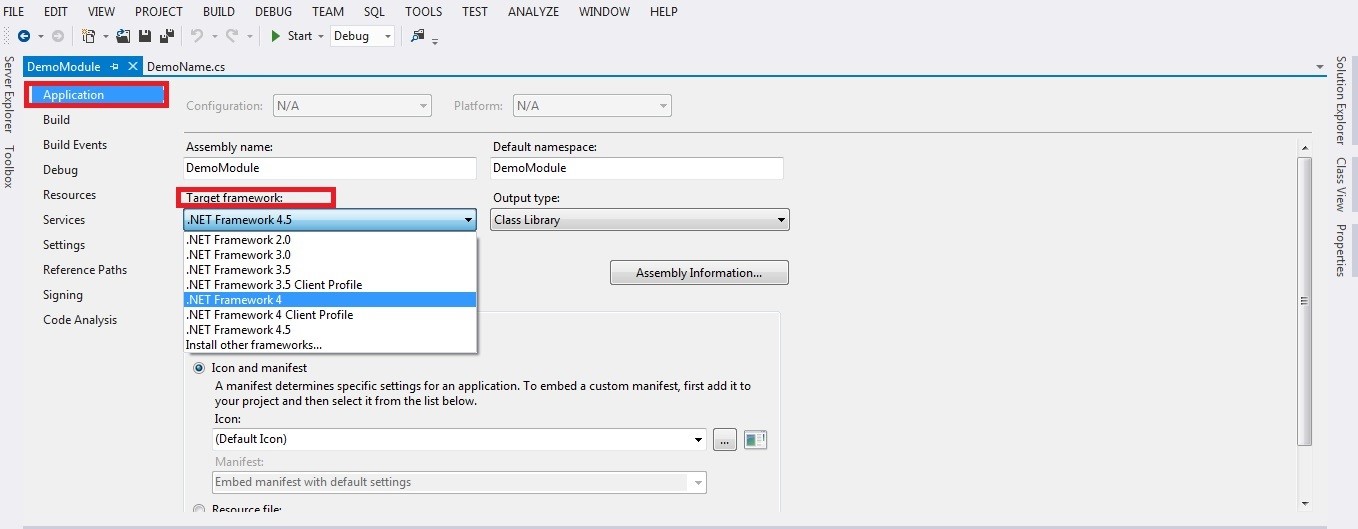
In Visual Studio 2012 the assembly will be built using .NET 4.5, but you’ll need to switch it to use the older framework, so that Powershell can load the assembly.
Note : Select the .NET Framework depending on the lowest version of PowerShell to support. You can use the following as reference:
PowerShell 2.0 – .NET Framework 3.5
PowerShell 3.0 – .NET Framework 4
PowerShell 4.0 – .NET Framework 4.5
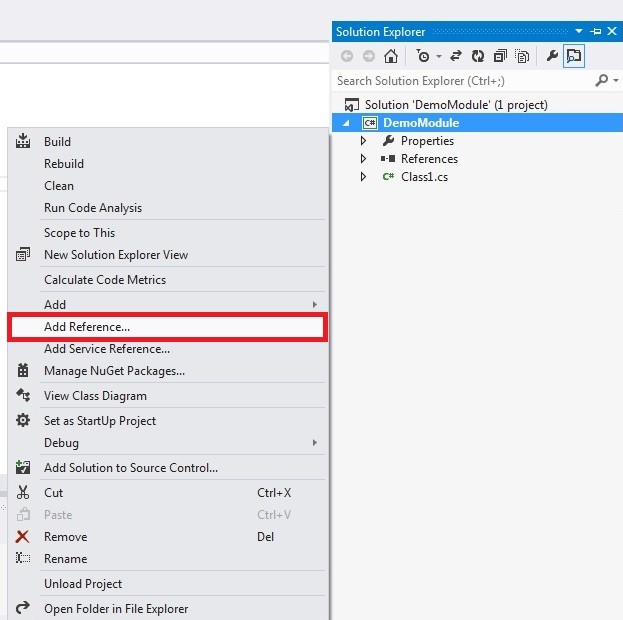
STEP 4: Adding reference.
Right click on Reference in the Solution Explorer and select Add Reference.
Loading the following UI Automation library as reference
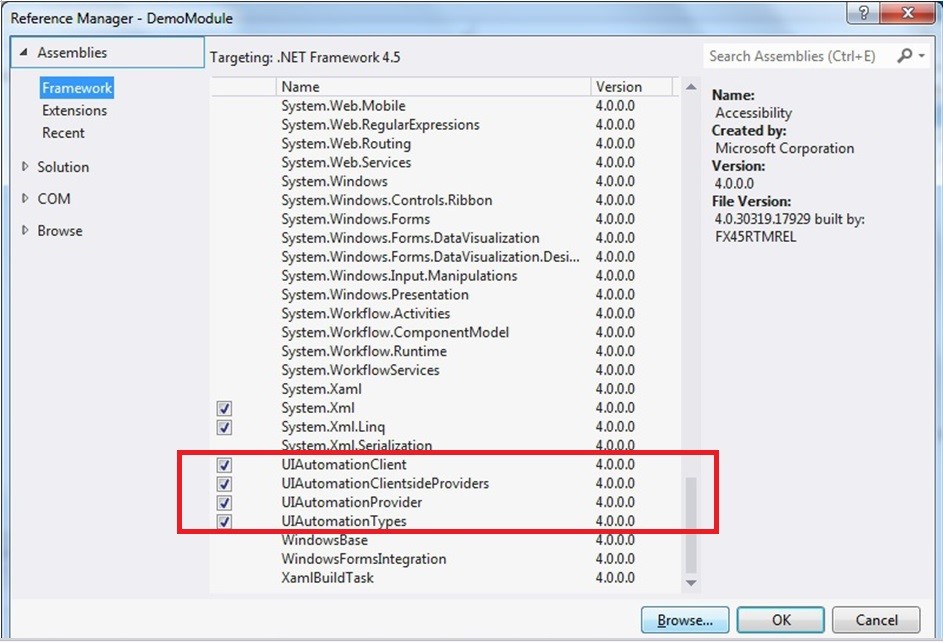
Need to load the System.Management.Automation library as a reference to our project to make the PowerShell API calls available.
Select browse under Reference manager.
Navigate to location
C:\Windows\assembly\GAC_MSIL\System.Management.Automation\1.0.0.0__31bf3856ad364e35 and select the file System.Management.Automation.dll
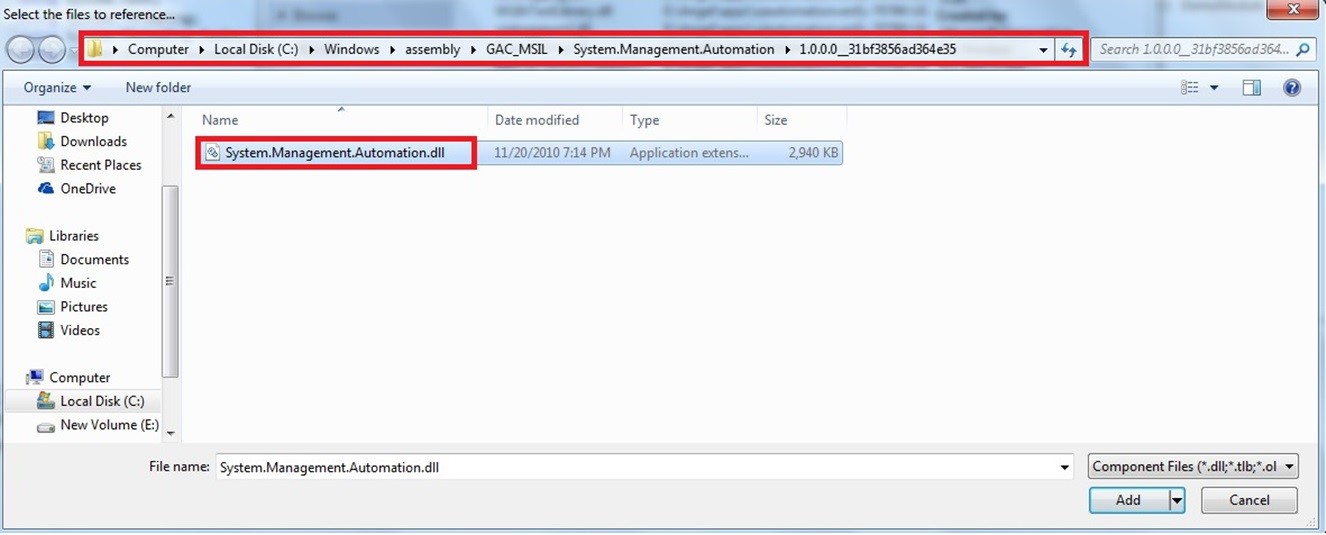
After adding the following library in references.
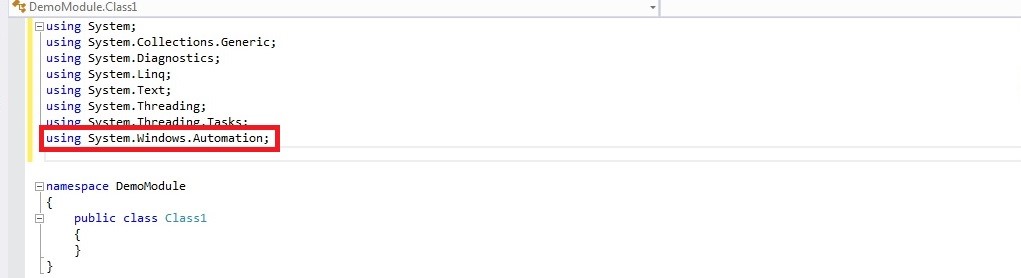
STEP 5 : Import “System.Windows.Automation” library
Include the “System.Windows.Automation” reference to the class to get access to API calls in order to build a PowerShell module.
STEP 6 : Converting the class into a single Powershell cmdlet
Creating Powershell cmdlet using dataanotation. “[System.Management.Automation.Cmdlet(System.Management.Automation.VerbsCommon.Get, ”DemoName”)]”

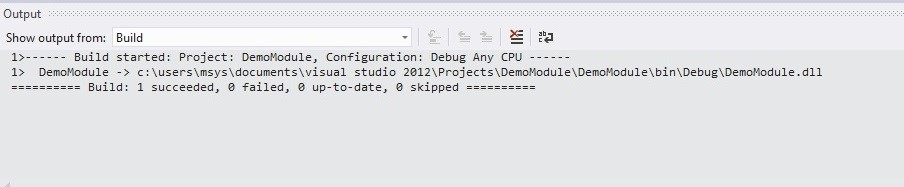
STEP 7 : Build the Project to dll
Build solution is done either by hitting F7 or selecting “Build Solution” from the BUILD menu. After build succeeds, collect the dll from the path displayed in Output pane.
2. Loading the dll into powershell :
STEP 1: Navigate the location of dll with Import-Module along with -Verbose to load the module and give output. It shows that Get-DemoName is loaded.
DLL received from .Net environment is been loaded into Windows powershell prompt using cmdlet “Import-Module”
STEP 2: Get-Module displays the module information which in turn implies that DLL gets loaded successfully.
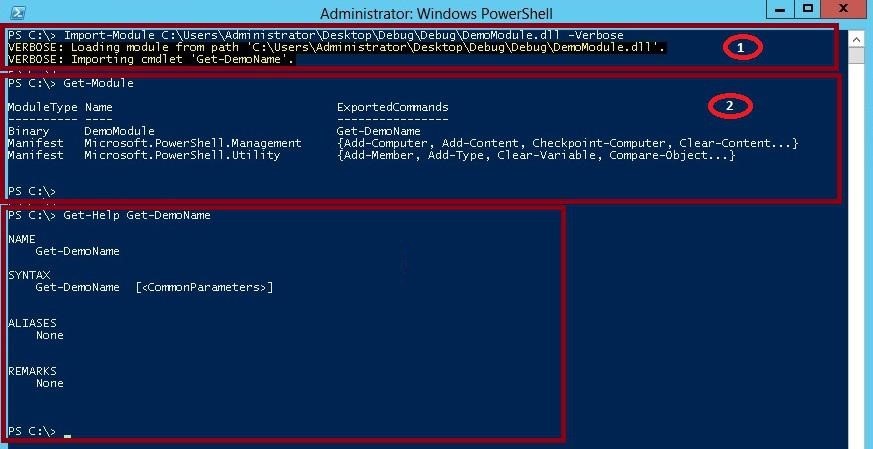
Powershell cmdlet “Get-help Get-DemoName” shows the detailed information of the cmdlet
Conclusion
Importing binary modules written in C# helps achieve GUI automation through Powershell.
Sometimes Windows system displays error messages regarding corrupted or missing System.Management.Automation.dll files. Situations like that can occur, for example, during a software installation process. Each software program requires certain resources, libraries, and source data to work properly. Corrupted or nonexistent System.Management.Automation.dll file can therefore effect in failed execution of the started process.
System.Management.Automation.dll file Dynamic Link Library. The file was developed by Microsoft for use with Windows software. Here you will find detailed information about the file and instructions how to proceed in the event of System.Management.Automation.dll related errors on your device. You can also download System.Management.Automation.dll file compatible with Windows 10, Windows 10, Windows 8.1, Windows 8, Windows 7 devices which will (most probably) allow you to solve the problem.
Compatible with: Windows 10, Windows 10, Windows 8.1, Windows 8, Windows 7
User popularity
Fix System.Management.Automation.dll errors
- 1 Information about System.Management.Automation.dll file
- 2 Errors related to System.Management.Automation.dll file
- 3 How to fix System.Management.Automation.dll related errors?
- 3.1 Scanning for malicious software
- 3.2 System and driver update
- 3.3 System File Checker tool
- 3.4 System recovery
- 4 Download System.Management.Automation.dll
- 4.1 List of System.Management.Automation.dll file versions
File info
| General information | |
|---|---|
| Filename | System.Management.Automation.dll |
| File extension | DLL |
| Type | Dynamic Link Library |
| Description | Dynamic Link Library |
| Software | |
|---|---|
| Program | Windows 10 |
| Software | Windows |
| Author | Microsoft |
| Software version | 10 |
| Details | |
|---|---|
| File size | 6432768 |
| Oldest file | 2010-11-21 |
| Latest file | 2017-03-18 |

There are various types of errors related to System.Management.Automation.dll file. System.Management.Automation.dll file may be located in wrong file directory on your device, may not be present in the system, or may be infected with malicious software and therefore not work correctly. Below is a list of most common error messages related to System.Management.Automation.dll file. If you encounter one listed below (or similar), please consider the following suggestions.
- System.Management.Automation.dll is corrupted
- System.Management.Automation.dll cannot be located
- Runtime Error — System.Management.Automation.dll
- System.Management.Automation.dll file error
- System.Management.Automation.dll file cannot be loaded. Module was not found
- cannot register System.Management.Automation.dll file:
- System.Management.Automation.dll file could not be loaded
- System.Management.Automation.dll file doesn’t exist
System.Management.Automation.dll
Application could not be started because System.Management.Automation.dll file is missing. Reinstall the application to solve the problem.
OK
Problems related to System.Management.Automation.dll can be addressed in various ways. Some methods are meant only for advanced users. If you don’t have confidence in your skills, we suggest consulting a specialist. Fixing System.Management.Automation.dll file errors should be approached with utmost caution for any mistakes can result in unstable or unproperly working system. If you have the necassary skills, please proceed.
System.Management.Automation.dll file errors can be caused by various factors, so its is beneficial to try to fix them using various methods.
Step 1: Scan your computer for any malicious software
Windows files are commonly attacked by malicious software that prevents them from working properly. First step in addressing problems with System.Management.Automation.dll file or any other Windows system files should be scanning the system for malicious software using an antivirus tool.
If by any chance you don’t have any antivirus software installed on your system yet, you should do it immediately. Unprotected system is not only a source of file errors, but, more importantly, makes your system vulnerable to many dangers. If you don’t know which antivirus tool to choose, consult this Wikipedia article – comparison of antivirus software.
Step 2: Update your system and drivers.
Installing relevant Microsoft Windows patches and updates may solve your problems related to System.Management.Automation.dll file. Use dedicated Windows tool to perform the update.
- Go to the Windows «Start» menu
- Type «Windows Update» in the search field
- Choose the appropriate software program (name may vary depending on your system version)
- Check if your system is up to date. If any unapplied updates are listed, install them immediately.
- After the update has been done,restart your computer in order to complete the process.
Beside updating the system, it is recommended that you install latest device drivers, as drivers can influence proper working of System.Management.Automation.dll or other system files. In order to do so, go to your computer or device producer’s website where you will find information regarding latest driver updates.
Step 4: Restoring Windows system
Another approach is to restore system to previous state, before the System.Management.Automation.dll file error occured. In order to restore your system, follow the instructions below
- Go to the Windows «Start» menu
- Type «System Restore» in the search field
- Start the system restore tool – it’s name may differ depending on version of the system
- The application will guide you through the process – read the messages carefully
- After the process has finished, restart your computer.
If all the above-mentioned methods failed and the System.Management.Automation.dll file problem has not been resolved, proceed to the next step. Remember that the following steps are intended only for advanced users.
Download and replace System.Management.Automation.dll file
The last solution is to manually download and replace System.Management.Automation.dll file in appropriate folder on the disk. Select file version compatible with your operating system and click the «Download» button. Next, go to your web browser’s «Downloaded» folder and copy the downloaded System.Management.Automation.dll file.
Go to the folder where the file should be located and paste the downloaded file. Below is the list of System.Management.Automation.dll file example directory paths.
- Windows 10: C:\Windows\Microsoft.NET\assembly\GAC_MSIL\System.Management.Automation\v4.0_3.0.0.0__31bf3856ad364e35\
- Windows 10: C:\Windows\Microsoft.NET\assembly\GAC_MSIL\System.Management.Automation\v4.0_3.0.0.0__31bf3856ad364e35\
- Windows 8.1: —
- Windows 8: —
- Windows 7: —
If the steps did not solve your System.Management.Automation.dll file problem, you should consult a professional. A probability exists that the error(s) might be device-related and therefore should be resolved at the hardware level. A fresh operating system installation might be necessary – a faulty system installation process can result in data loss.
File versions list
Filename
System.Management.Automation.dll
System
Windows 10
File size
6432768 bytes
Date
-0001-11-30
| File details | ||
|---|---|---|
| MD5 | 1a3e9402fdd08073fe327cd97225dcd9 | |
| SHA1 | b7f4b60f797b8bc496476cea8eeb5d69bf858c17 | |
| SHA256 | 69d384d9163e9c6a1d7649f32ef694cfee5a6983eb54afdd3b8ab57f886d1821 | |
| CRC32 | db37f445 | |
| Example file location | C:\Windows\Microsoft.NET\assembly\GAC_MSIL\System.Management.Automation\v4.0_3.0.0.0__31bf3856ad364e35\ |
Filename
System.Management.Automation.dll
System
Windows 10
File size
3010560 bytes
Date
2012-06-02
| File details | ||
|---|---|---|
| MD5 | a86ce73d49b58bdf2d5dd1ae1f99131d | |
| SHA1 | df15ef97f28468de70aae45802284f30bd0238d4 | |
| SHA256 | e1050af3ba7be5817c8170d6e2e3da2eaf1442128c1718e10b080d354fc48ad4 | |
| CRC32 | 385ff0b5 | |
| Example file location | C:\Windows\Microsoft.NET\assembly\GAC_MSIL\System.Management.Automation\v4.0_3.0.0.0__31bf3856ad364e35\ |
Filename
System.Management.Automation.dll
System
Windows 8.1
File size
6028288 bytes
Date
-0001-11-30
| File details | ||
|---|---|---|
| MD5 | d1baf2b0c3b0bd2a251e085661cd7a94 | |
| SHA1 | f4b04abe04fd8a582519ab1d765c7a6122a0f65c | |
| SHA256 | 863031d572163ea9e7738ac6608690744ee6c843bba7b8bf190e1a0311209307 | |
| CRC32 | fb876f04 | |
| Example file location | — |
Filename
System.Management.Automation.dll
System
Windows 8
File size
5194240 bytes
Date
-0001-11-30
| File details | ||
|---|---|---|
| MD5 | a3afe574f546c65d1d414bcb7e7318c5 | |
| SHA1 | c57b22c96448c2ebf4d61e1387ff86a3c1a485e6 | |
| SHA256 | 505d2b78671e662ede9ef4c68fd7d3866f9120ff883252817932ce6f93918289 | |
| CRC32 | 507b9485 | |
| Example file location | — |
Filename
System.Management.Automation.dll
System
Windows 7
File size
3010560 bytes
Date
-0001-11-30
| File details | ||
|---|---|---|
| MD5 | 54ecf49d6a42b61aa582216aaeb9657d | |
| SHA1 | 3fd66026278b060753d15127f0dece9cb5bb7edd | |
| SHA256 | ac76d6ab7c2bb8139489e912b59705c4c741ac3e3d7b82dc9ff77098231bb01b | |
| CRC32 | bbee6b08 | |
| Example file location | — |
A few weeks ago I published an article about White, an open-source framework to automate Windows applications. Now I found out that the Windows Presentation Foundation (WPF) also provides a new Accessibility API called Microsoft UI Automation.
- http://msdn.microsoft.com/en-us/library/ms753388.aspx
- http://msdn.microsoft.com/en-us/library/system.windows.automation.aspx
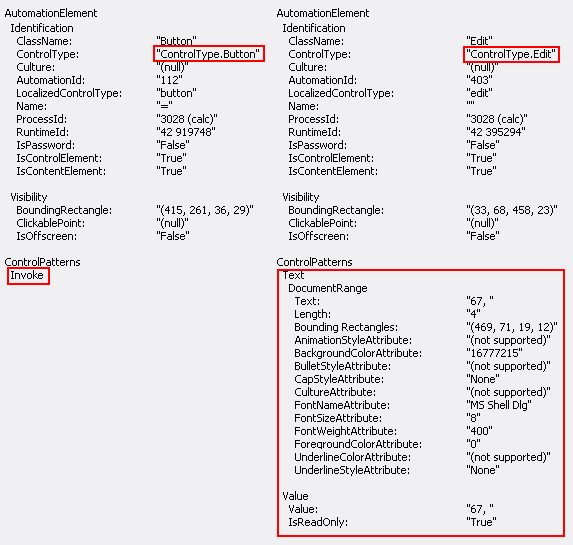
AutomationElements and control patterns
The UI Automation framework enables you to automate Win32, Windows Forms and WPF applications. Every part of a UI (window, button, menu, …) is represented as an AutomationElement. An AutomationElement is not really a control; it is an object that represents the accessible properties of a control. Elements are contained in a tree structure, with the desktop as the root element.
By passing conditions to the FindFirst() method you can access all controls in another Windows application. You still need tools like UI Spy or WinSpector to find the AutomationId of controls.
AutomationElements also expose control patterns which provide properties for specific control types (window, button, menu, …). These patterns can also be used to call methods. There are several interesting patterns like InvokePattern (click), ExpandCollapsePattern, WindowPattern (close), TextPattern (manipulate text), … When using UI Spy you will see that all available patterns will be listed in the Properties window.
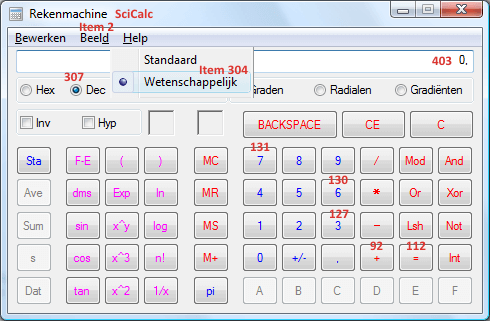
Automate Windows Calculator
To compare the features and performance of WPF UIAutomation to White, I have implemented the same example as in my previous article. So the demo application will start the Windows Calculator, calculate a sum and display the decimal and binary result in a WPF window. Because this example will demonstrate several techniques, not everything is optimal. There will probably be better and shorter ways to accomplish the same.
I have created a small WPF application but the UIAutomation libraries are not restricted to WPF. You could also use them in a WinForms or Console application.
First you need to add a reference to the UIAutomationClient.dll, UIAutomationTypes.dll and UIAutomationProviders.dll assemblies.
<Window x:Class="ScipBe.Demo.UIAutomation.WindowUIAutomation"
    xmlns="http://schemas.microsoft.com/winfx/2006/xaml/presentation"
    xmlns:x="http://schemas.microsoft.com/winfx/2006/xaml"
    Title="UI Automation" Height="400" Width="400">
    <DockPanel LastChildFill="True">
        <Button DockPanel.Dock="Top" Click="ButtonAutomate_Click">Automate Calculator</Button>
        <Button DockPanel.Dock="Top" Click="ButtonAutomateHelper_Click">Automate Calculator (helper class)</Button>
        <TextBox DockPanel.Dock="Top" Name="textBoxResult1"></TextBox>
        <TextBox DockPanel.Dock="Top" Name="textBoxResult2"></TextBox>
        <Button DockPanel.Dock="Top" Click="ButtonEvents_Click">Subscribe to events</Button>
        <ListBox DockPanel.Dock="Top" Name="listBoxEventLog"></ListBox>
    </DockPanel>
</Window>
using System.Windows;
using System.Windows.Automation;
using System.Windows.Forms;
using System.Diagnostics;
using System.Threading;
using System.Windows.Threading;
namespace ScipBe.Demo.UIAutomation
{
public partial class WindowUIAutomation : Window
{
public WindowUIAutomation()
{
InitializeComponent();
}
private void ButtonAutomate_Click(object sender, RoutedEventArgs e)
{
// Launch Windows Calculator (calc.exe) and find the main window
Process.Start("calc");
Thread.Sleep(500);
PropertyCondition findWindow = new PropertyCondition(AutomationElement.ClassNameProperty, "SciCalc");
AutomationElement window = AutomationElement.RootElement.FindFirst(TreeScope.Children, findWindow);
// Get a reference to the Edit TextBox (AutomationId = "403")
PropertyCondition findTextBox = new PropertyCondition(AutomationElement.AutomationIdProperty, "403");
AutomationElement textBox = window.FindFirst(TreeScope.Descendants, findTextBox);
// Get a reference to the RadioButton "Dec" (AutomationId = "307")
PropertyCondition findRadioButtonDecimal = new PropertyCondition(AutomationElement.AutomationIdProperty, "307");
AutomationElement radioButtonDecimal = window.FindFirst(TreeScope.Descendants, findRadioButtonDecimal);
// If this RadioButton can not be found, the calculator uses the Standard view
// Call the Scientfic/Wetenschappelijk menu to make more options visible
if (radioButtonDecimal == null)
{
AutomationElement menuItemView = window.FindFirst(TreeScope.Descendants,
new PropertyCondition(AutomationElement.AutomationIdProperty, "Item 2"));
if (menuItemView != null)
{
ExpandCollapsePattern pattern = menuItemView.GetCurrentPattern(ExpandCollapsePattern.Pattern) as ExpandCollapsePattern;
pattern.Expand();
}
AutomationElement menuItemScientific = window.FindFirst(TreeScope.Descendants,
new PropertyCondition(AutomationElement.AutomationIdProperty, "Item 304"));
if (menuItemScientific != null)
{
InvokePattern pattern = menuItemScientific.GetCurrentPattern(InvokePattern.Pattern) as InvokePattern;
pattern.Invoke();
}
}
// Press F6 to make sure we are using the decimal numerical system
SendKeys.SendWait("{F6}");
// Focus the Edit TextBox and enter the text 54
textBox.SetFocus();
Thread.Sleep(100);
SendKeys.SendWait("45");
// Press button "3" (AutomationId = "127") so the value will be 543
AutomationElement button3 = window.FindFirst(TreeScope.Descendants,
new PropertyCondition(AutomationElement.AutomationIdProperty, "127"));
if (button3 != null)
{
InvokePattern pattern = button3.GetCurrentPattern(InvokePattern.Pattern) as InvokePattern;
pattern.Invoke();
}
// Press the "+" button (AutomationId = "92")
AutomationElement buttonPlus = window.FindFirst(TreeScope.Descendants,
new PropertyCondition(AutomationElement.AutomationIdProperty, "92"));
if (buttonPlus != null)
{
InvokePattern pattern = buttonPlus.GetCurrentPattern(InvokePattern.Pattern) as InvokePattern;
pattern.Invoke();
}
// Enter the second value. Press button "6" (AutomationId = "130")
AutomationElement button6 = window.FindFirst(TreeScope.Descendants,
new PropertyCondition(AutomationElement.AutomationIdProperty, "130"));
(button6.GetCurrentPattern(InvokePattern.Pattern) as InvokePattern).Invoke();
// Enter the second value. Press button "7" (AutomationId = "131")
AutomationElement button7 = window.FindFirst(TreeScope.Descendants,
new PropertyCondition(AutomationElement.AutomationIdProperty, "131"));
(button7.GetCurrentPattern(InvokePattern.Pattern) as InvokePattern).Invoke();
// Press the "=" button to calculate the result (AutomationId = "112")
AutomationElement buttonEquals = window.FindFirst(TreeScope.Descendants,
new PropertyCondition(AutomationElement.NameProperty, "="));
(buttonEquals.GetCurrentPattern(InvokePattern.Pattern) as InvokePattern).Invoke();
// Focus the Edit TextBox again and copy the result to the clipboard
// by sending the keyboard combination CTRL+C
textBox.SetFocus();
Thread.Sleep(100);
SendKeys.SendWait("^C");
// Press F8 to change the numerical system from decimal to binary
SendKeys.SendWait("{F8}");
// Show the decimal result via the text on the clipboard
// and the corresponding binary value by accessing the text of the Edit TextBox
textBoxResult1.Text = "543 + 67 = " + System.Windows.Forms.Clipboard.GetText() + " (dec)";
textBoxResult2.Text = "543 + 67 = " + (textBox.GetCurrentPattern(TextPattern.Pattern) as TextPattern).DocumentRange.GetText(-1) + " (bin)";
// Close the Calculator application
(window.GetCurrentPattern(WindowPattern.Pattern) as WindowPattern).Close();
}
}
}The UI Automation framework does not support sending keystrokes, but it still can be done by calling the Send() or SendWait() methods of the SendKeys class which is a part of the System.Windows.Forms namespace.
UIAutomationHelper
As you have noticed, a lot of code is repeated when accessing controls. I’m not a big fan of helper classes but in this case it looks interesting to create a helper class with static methods to isolate some code.

public static class UIAutomationHelper
{
  public static AutomationElement LaunchApplication(string fileName)
  {
    return LaunchApplication(fileName, "");
  }

  public static AutomationElement LaunchApplication(string fileName, string arguments)
  {
    Process process = new Process();
    process.StartInfo.FileName = fileName;
    process.StartInfo.Arguments = arguments;
    process.Start();
    process.WaitForInputIdle(1000);
    return (AutomationElement.FromHandle(process.MainWindowHandle));
  }

  public static AutomationElement GetElementByName(AutomationElement window, string name)
  {
    if (window == null)
      return null;

    return window.FindFirst(TreeScope.Descendants,
      new PropertyCondition(AutomationElement.NameProperty, name));
  }

  public static AutomationElement GetElementById(AutomationElement window, string id)
  {
    if (window == null)
      return null;

    return window.FindFirst(TreeScope.Descendants,
      new PropertyCondition(AutomationElement.AutomationIdProperty, id));
  }

  public static bool InvokeElementByName(AutomationElement window, string name)
  {
    return InvokeElement(window, new PropertyCondition(AutomationElement.NameProperty, name));
  }

  public static bool InvokeElementById(AutomationElement window, string id)
  {
    return InvokeElement(window, new PropertyCondition(AutomationElement.AutomationIdProperty, id));
  }

  public static bool InvokeElement(AutomationElement window, System.Windows.Automation.Condition condition)
  {
    if (window == null)
      return false;

    AutomationElement element = window.FindFirst(TreeScope.Descendants, condition);
    if (element != null)
    {
      InvokePattern pattern = element.GetCurrentPattern(InvokePattern.Pattern) as InvokePattern;
      pattern.Invoke();
      return true;
    }

    return false;
  }
}
The next example shows the source code when using my UIAutomationHelper class. The code is more compact and more readable. Of course the final result is still the same.
private void ButtonAutomateHelper_Click(object sender, RoutedEventArgs e)
{
// Launch Windows Calculator (calc.exe) and find the main window
AutomationElement window = UIAutomationHelper.LaunchApplication("calc");
// Get a reference to the Edit TextBox (AutomationId = "403")
AutomationElement textBox = UIAutomationHelper.GetElementById(window, "403");
// Get a reference to the RadioButton "Dec" (AutomationId = "307")
AutomationElement radioButtonDecimal = UIAutomationHelper.GetElementById(window, "307");
// If this RadioButton can not be found, the calculator uses the Standard view
// Call the Scientfic/Wetenschappelijk menu to make more options visible
if (radioButtonDecimal == null)
{
AutomationElement menuItemView = UIAutomationHelper.GetElementById(window, "Item 2");
if (menuItemView != null)
{
ExpandCollapsePattern pattern = menuItemView.GetCurrentPattern(ExpandCollapsePattern.Pattern) as ExpandCollapsePattern;
pattern.Expand();
}
UIAutomationHelper.InvokeElementById(window, "Item 304");
}
// Press F6 to make sure we are using the decimal numerical system
SendKeys.SendWait("{F6}");
// Focus the Edit TextBox and enter the text 54
textBox.SetFocus();
Thread.Sleep(100);
SendKeys.SendWait("45");
// Press button "3" (AutomationId = "127") so the value will be 543
UIAutomationHelper.InvokeElementById(window, "127");
// Press the "+" button (AutomationId = "92")
UIAutomationHelper.InvokeElementById(window, "92");
// Enter the second value. Press button "6" (AutomationId = "130")
UIAutomationHelper.InvokeElementById(window, "130");
// Enter the second value. Press button "7" (AutomationId = "131")
UIAutomationHelper.InvokeElementById(window, "131");
// Press the "=" button to calculate the result (AutomationId = "112")
UIAutomationHelper.InvokeElementByName(window, "=");
// Focus the Edit TextBox again and copy the result to the clipboard
// by sending the keyboard combination CTRL+C
textBox.SetFocus();
Thread.Sleep(100);
SendKeys.SendWait("^C");
// Press F8 to change the numerical system from decimal to binary
SendKeys.SendWait("{F8}");
// Show the decimal result via the text on the clipboard
// and the corresponding binary value by accessing the text of the Edit TextBox
textBoxResult1.Text = "543 + 67 = " + System.Windows.Forms.Clipboard.GetText() + " (dec)";
textBoxResult2.Text = "543 + 67 = " + (textBox.GetCurrentPattern(TextPattern.Pattern) as TextPattern).DocumentRange.GetText(-1) + " (bin)";
// Close the Calculator application
(window.GetCurrentPattern(WindowPattern.Pattern) as WindowPattern).Close();
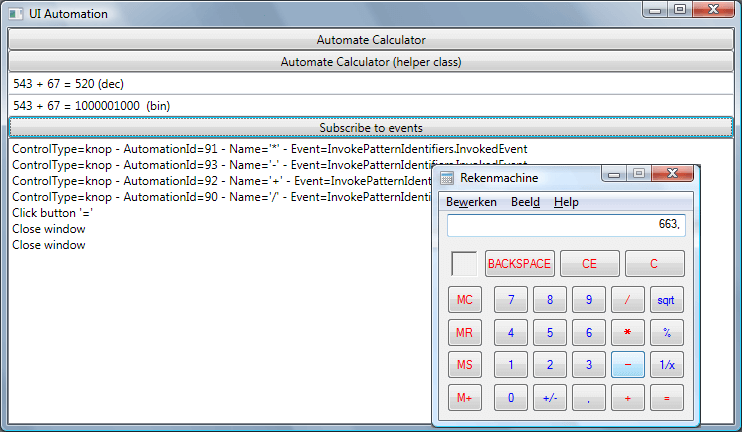
}Compared to the White example, this application is a lot faster. The UI Automation framework is more complex but also more advanced. Furthermore it supports some very nice features like subscribing to events.
Subscribing to events
The AddAutomationEventHandler() and RemoveAutomationEventHandler() methods of the static Automation class can be used to subscribe or unsubscribe to events like InvokePattern.InvokedEvent, AutomationElement.MenuOpenedEvent, TextPattern.TextChangedEvent, WindowPattern.WindowOpenedEvent, WindowPattern.WindowClosedEvent, …
The next example will demonstrate how to subscribe to events of the Calculator. The log in our WPF Window will be updated when clicking the operator buttons (+, -, /, *, =) or when closing the Calculator application.
private void ButtonEvents_Click(object sender, RoutedEventArgs e)
{
  listBoxEventLog.Items.Clear();

  AutomationElement window = UIAutomationHelper.LaunchApplication("calc");

  // Subscribe to WindowClosedEvent. OnApplicationClose will be triggered
  Automation.AddAutomationEventHandler(WindowPattern.WindowClosedEvent,
    window, TreeScope.Element, OnApplicationClose);

  // Subscribe to InvokedEvent of '=' button. OnEqualsClick will be triggered
  Automation.AddAutomationEventHandler(InvokePattern.InvokedEvent,
    UIAutomationHelper.GetElementByName(window, "="), TreeScope.Element, OnEqualsClick);

  // Subscribe to InvokedEvent of operator buttons. OnUIAutomationEvent will be triggered
  Automation.AddAutomationEventHandler(InvokePattern.InvokedEvent,
    UIAutomationHelper.GetElementByName(window, "+"), TreeScope.Element, OnUIAutomationEvent);
  Automation.AddAutomationEventHandler(InvokePattern.InvokedEvent,
    UIAutomationHelper.GetElementByName(window, "-"), TreeScope.Element, OnUIAutomationEvent);
  Automation.AddAutomationEventHandler(InvokePattern.InvokedEvent,
    UIAutomationHelper.GetElementByName(window, "*"), TreeScope.Element, OnUIAutomationEvent);
  Automation.AddAutomationEventHandler(InvokePattern.InvokedEvent,
    UIAutomationHelper.GetElementByName(window, "/"), TreeScope.Element, OnUIAutomationEvent);
}

private void OnApplicationClose(object sender, AutomationEventArgs e)
{
  // Use the Dispatcher Invoke method to access the UI thread.
  // If you don't use this, a System.InvalidOperationException
  // (The calling thread cannot access this object because a different thread owns it)
  // will be raised
  this.Dispatcher.Invoke(DispatcherPriority.Normal, (MethodInvoker)(() =>
  {
    listBoxEventLog.Items.Add("Close window");
  }));
}

private void OnEqualsClick(object sender, AutomationEventArgs e)
{
  this.Dispatcher.Invoke(DispatcherPriority.Normal, (MethodInvoker)(() =>
  {
    listBoxEventLog.Items.Add("Click button '=' ");
  }));
}

private void OnUIAutomationEvent(object sender, AutomationEventArgs e)
{
  // Get source element
  AutomationElement sourceElement = sender as AutomationElement;

  if (e.EventId == InvokePattern.InvokedEvent)
  {
    this.Dispatcher.Invoke(DispatcherPriority.Normal, (MethodInvoker)(() =>
    {
      // Log some info like ControlType, AutomationId, Name and Event
      listBoxEventLog.Items.Add(string.Format("ControlType={0} - AutomationId={1} - Name='{2}' - Event={3}",
        sourceElement.Current.ControlType.LocalizedControlType,
        sourceElement.Current.AutomationId,
        sourceElement.Current.Name,
        e.EventId.ProgrammaticName));
    }));
  }
}
I hope you like these examples and that this will encourage you to take a closer look at WPF UIAutomation. The UI Automation framework can be very useful when integrating your application with other applications which do no have a COM interface.
It is also used a lot in automated test frameworks. If you’re interested in UI testing, then you have to take a look at the open-source UI Automation Verify (UIA Verify) Test Automation Framework
Remarks or ideas, just let me know.