
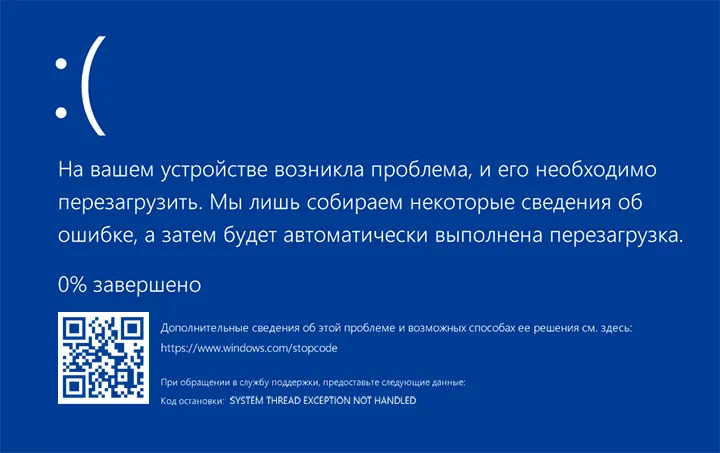
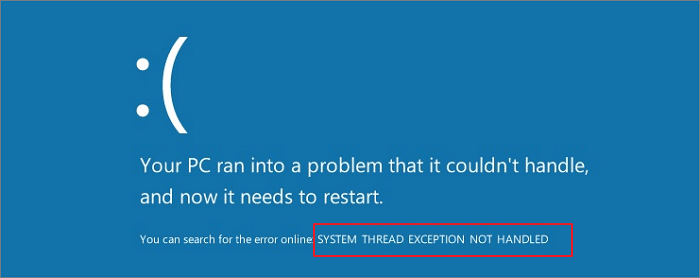
“System Thread Exception not Handled Nvlddmkm.sys” bug checking is a general problem for Windows computers having Nvidia graphics cards installed. This fatal error suddenly appears causing system crash when using an application that involves a large extent of GPU. Nvlddmkm.sys refers to the kernel mode driver (a small program) directly associated with NVIDIA Graphics that allows your computer to establish communication with hardware. When system thread generated an exception that the error handler didn’t catch, this BSOD occurs leading to system crash and unexpected restart of computer.
Nvlddmkm.sys System Thread Exception not Handled Nvlddmkm.sys is generally triggered because of obsolete or incompatible NVIDIA graphics card driver. Furthermore, conflicts with third-party applications, corrupt system files, malware, and Windows update bugs are potential reasons behind this BSOD. However, you can easily solve this stop error with the help of solutions in the coming part of this post. What failed: nvlddmkm.sys is commonly accompanied by VIDEO_TDR_FAILURE, PAGE_FAULT_IN_NONPAGED_AREA, DRIVER_IRQL_NOT_LESS_OR_EQUAL, and more.
Nvlddmkm.sys System Thread Exception not Handled Error in Windows 11 or 10
Here is how to fix System Thread Exception not Handled Nvlddmkm.sys Error in Windows 11 or 10 –
Ways-1: Update NVIDIA Graphics Driver
Since this Blue Screen Error has a direct relation with NVIDIA Graphics, the outdated driver version might be the most authentic reason. The driver may be incompatible, buggy, corrupt, underdeveloped, or unable to compete with the running big or high-resolution running game or application.
As a result, when Windows calls nvlddmkm.sys and does not find it in return, System thread creates an exception and the bug check is triggered. Therefore, updating the driver is the most prior solution to fix the BSOD –
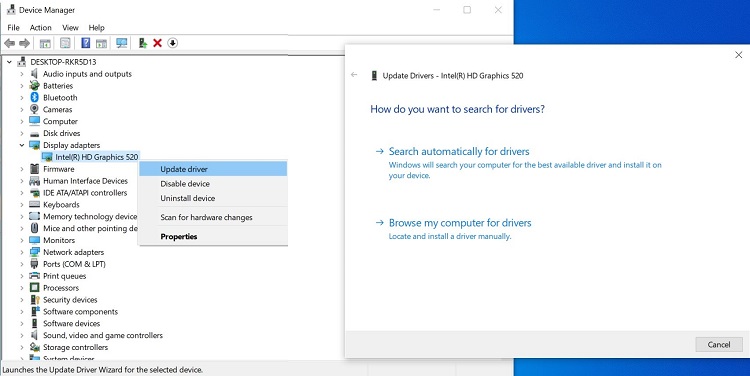
- Press Windows and R keys.
- Type devmgmt.msc.
- Click on OK.
- When Device Manager appears, double-click on Display adapters.
- Right click on NVIDIA GeForce (the existing version).
- Select Update driver.
- When another window prompts; click on Search automatically for drivers option.
- Restart your computer and check if the error is resolved.
- In case, the BSOD still persists, navigate to – https://www.nvidia.com/en-us/geforce/drivers/.
- Search the latest version using the dropdown on the web page and download the driver.
- Launch the setup file and follow the onscreen instructions to complete installation.
- Reboot the device and the error should be fixed.
Way-2: Roll Back the driver
If the previous method fails to solve System Thread Exception not Handled Nvlddmkm.sys blue screen problem then it indicates that there are any bugs in the latest version. Therefore, rolling back the driver to an earlier version may help to withdraw the BSOD occurring. Follow the steps for the same –
- Right-click on the Start button and select “Device Manager”.
- Go to the “NVIDIA GeForce” Display adapter.
- Then, right click on it and select – Properties.
- Click on the Drivers tab.
- Select – Roll Back Driver.
- Click Yes on the confirmation dialog box.
- Restart the device and check if the issue is corrected.
- Sometimes, Rol Back Driver is greyed out (presently also on my laptop). In this case, there is a manual way to downgrade the driver; follow –
- Right-click on the NVIDIA GeForce and choose “Update driver”.
- On the ‘Update drivers’ wizard, select Browse my computer for drivers.
- Click on – Let me pick from a list of available drivers on my computer.
- Uncheck the box – Show compatible hardware.
- This will show multiple older driver versions in a list under Models. Note: on my computer, AMD driver is installed so the screenshot is showing AMD’s older version of drivers. On yours, you will see NVIDIA drivers.
- Select the previous version and click on Next.
- Follow the guide on the screen and finish the rollback.
- Finally, restart the PC and ensure that the error doesn’t show up.
Way-3: Uninstall and then reinstall the driver
Both the methods are not working or supporting getting rid of the bug check means the driver is corrupted or involved in any conflict. This may be the consequence of any third party program which has been recently installed or updated or buggy Windows update. Furthermore, malware or virus can cause this annoyance which we will address in the later part of this article.
Whatever the reason be, to deal with What failed: nvlddmkm.sys blue screen you need to uninstall and reinstall the NVIDIA driver. This process is likely to properly install the software, so, proceed with the steps:
- Click on Start.
- Type – “devmgmt.msc” (without quotes).
- Press Enter.
- On Device Manager, right-click on the NVIDIA display adapter and select – Uninstall device.
- Click on “Uninstall” when a popup shows.
- Restart the computer which will automatically reinstall the application.
Or,
- Click on Search and type appwiz.cpl.
- Press Enter in order to launch the Programs and Features window.
- Locate NVIDIA in the list and click on it.
- Click on ‘Uninstall’.
- Choose Yes on the confirmation pop-up.
- Go with the Uninstallation wizard if appears to conclude the procedure.
- Then, install the driver you have downloaded during following the Way-1.
Follow the guide – How to Reinstall NVIDIA Drivers in Windows 11 or 10
Way-4: Run System File Checker and DISM successively
Corruption in the system files and Windows image format may cause to generate the nvlddmkm.sys system_thread_exception_not_handled. Windows built-in tools (that exclude the risk of less trustworthy software) can help you to repair the Blue Screen error Nvlddmkm.sys.
These are SFC and DISM that can work on both glitches and help you come out, hence, deploy them one by one by moving forward with the instructions –
- Press – Winkey+R.
- Type – cmd.exe.
- Then, press – Ctrl+Shift+Enter.
- Select the Yes option on the User account control pop-up.
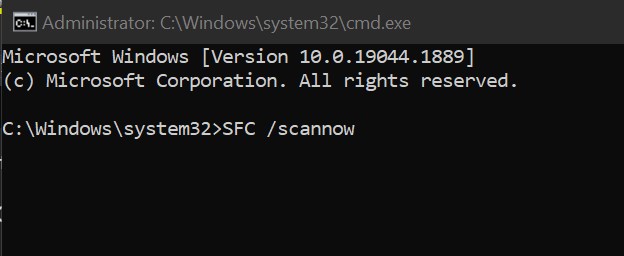
- Once the Command prompt appears, type the syntax
Sfc /Scannowand hit Enter. - After the execution is completed reboot the computer and see if the bug checking does not initiate.
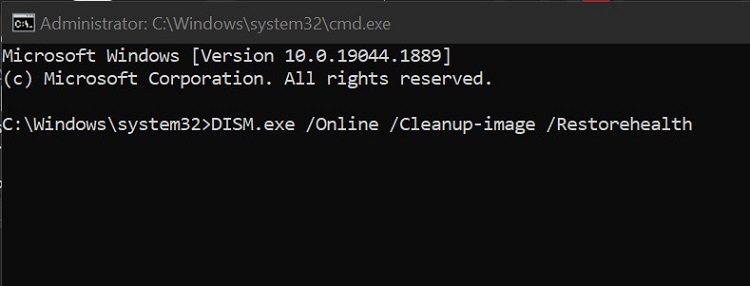
- But if nvlddmkm.sys error still persists then open the Command prompt once again and run the below codes one line at a time –
Dism /Online /cleanup-image /checkhealth
Dism /Online /cleanup-image /scanhealth
Dism /Online /cleanup-image /restorehealth- When these 3 commands finish running then reboot the device.
These are 4 basic solutions so the BSOD should be fixed after following the above-mentioned methods. If the error still continues then there is possibility of more factors forcing this bug check so we recommend following How to Use BlueScreenView to Detect the Cause of Blue Screen and WhoCrashed: A Tool to analyze Dump and reveal culprit driver on Windows to explore more files that are causing the system break. Now, have a look at some more solutions –
Way-5: Use Microsoft Defender Offline scan or Full Scan
Malware and virus are other factors that create messes that end up with nvlddmkm.sys error windows 11 error. However, no room for frustration is here because Windows provides strong tools to completely and quickly remove or quarantine them. You only need to use them –
- Press Winkey and type Windows Security.
- Click on “Windows Security” app from the result.
- Select Virus & threat protection.
- Then, click the Scan options link.
- Save your work because the system will restart and close all the running tasks when using this option.
- Check the option – Microsoft Defender Offline scan.
- Click on “Scan now”.
- When a pop-up is prompted, click on “Scan”.
- Wait until the computer restarts and detects threats thoroughly.
- Now go to Windows Security > Virus & threat protection > Protection History.
- Select the found threats and remove them using Action dropdown.
- To use full scan, check the option “Full scan” and click on “Scan now”.
Way-6: Disable Hardware acceleration in browser
Enabled Hardware acceleration setting in web browsers causes compatibility issues with the graphics card driver, leading to the “System Thread Exception not Handled Nvlddmkm.sys” error on the cost of PC performance improvement. To solve this, disable the setting. Here’s how:
1] In Google Chrome or Microsoft Edge
- Launch the browser.
- Click on 3-dots icon (ellipsis) from the top right corner and select Settings.
- In the Search box, type Hardware Acceleration.
- Turn off “Use hardware acceleration when available” from the result.
- Click on Relaunch.
2] In Firefox
- Click on “hamburger menu (3-lines) icon “and select “Settings”.
- Type – hardware.
- Uncheck the option Use recommended performance settings.
- And then remove the tick from Use hardware acceleration when available.
Way-7: Install pending Windows Updates
System Thread Exception not Handled Nvlddmkm.sys BSOD or Blue Screen error, when triggered due to bugs in Windows update, this method will give you relief. Redmond is known to push patches to kill the bugs and issues when informed. Therefore, head to the steps:
- Press Windows+S.
- Type – updates.
- Hit – Enter.
- On the Settings page that appears, click on – Check for updates.
- Wait for some time and allow the system to scan and download the update (if found).
- When asked, click on Restart now.
- Run Windows Update
Way-8: Disable Nvidia ShadowPlay
Sometimes, Nvlddmkm.sys error may show due to Nvidia ShadowPlay, a graphics card (GPU) integrated feature, that allows users to record and share gameplay footage. Although, you have the privilege to disable this using a few quick steps –
- Right-click on Desktop.
- Select – NVIDIA Control Panel.
- Click on the Preferences tab
- Then select – GeForce Experience.
- Click on the Settings cog icon.
- In the General tab, scroll down and disable the In-Game Overlay.
- Restart your computer and check if the error is resolved.
Way-9: Enable Clean boot
Nvlddmkm.sys blue screen error can go to a dead end after enabling Clean boot because this feature has the capability to run the system with a minimal set of drivers and applications. Thus, the programs interfering with the normal functionalities of the system are disabled and the Blue screen is fixed. Follow the steps:
- Click on the Search and type – msconfig.
- Press “Enter” to launch System Configuration window.
- Switch to the Services tab.
- Check the box for – Hide all Microsoft Services.
- Click on – Disable all.
- Then, go to the Startup tab.
- Click on Open Task Manager.
- Go to the “Task Manager”, right click on the apps one by one, and select Disable each time.
- Close the tool and come back to the System Configuration window.
- Click on Apply and OK.
Way-10: Perform Clean install
This is a foolproof method that provides immunity to Windows 11 against any BSOD bugcheck or any other issue. System Thread Exception not Handled Nvlddmkm.sys will have no trace after you clean install the software on your device. Hence, go with the guide –
- Navigate to – https://www.microsoft.com/software-download/windows11
- Scroll down to the “Create Windows 11 Installation Media” section and click on Download now.
- Launch the setup file and follow the instructions to complete the installation.
- For a step-by-step method, follow How to Use Rufus to Install ‘Windows 10 or 11’.
Methods:
Ways-1: Update NVIDIA Graphics Driver
Way-2: Roll Back the driver
Way-3: Uninstall and then reinstall the driver
Way-4: Run System File Checker and DISM successively
Way-5: Use Microsoft Defender Offline scan or Full Scan
Way-6: Disable Hardware acceleration in browser
Way-7: Install pending Windows Updates
Way-8: Disable Nvidia ShadowPlay
Way-9: Enable Clean boot
Way-10: Perform Clean install
That’s all!!
При загрузке системы, во время работы или при запуске определенных игр и программ некоторые пользователи могут столкнуться с синим экраном с кодом остановки SYSTEM THREAD EXCEPTION NOT HANDLED. Причины могут быть разными и не всегда их легко определить, но в некоторых случаях решить проблему удается.
В этой инструкции подробно о возможных причинах синего экрана SYSTEM THREAD EXCEPTION NOT HANDLED в Windows 11 и Windows 10, а также о возможных способах исправить ошибку в зависимости от конкретной ситуации.
Драйверы и обновления системы как причина ошибки SYSTEM THREAD EXCEPTION NOT HANDLED
Одна из самых частых причин рассматриваемой ошибки — неправильная работа оборудования с установленными драйверами. Если проблема возникла после установки драйверов, в том числе автоматической, или синий экран стал появляться сразу после установки обновлений Windows, вы можете использовать следующие способы решения проблемы:
- Если после синего экрана SYSTEM THREAD EXCEPTION NOT HANDLED и перезагрузки появляется экран с сообщением о попытке восстановления и кнопками для перезагрузки или дополнительных параметров восстановления, нажмите «Дополнительные параметры восстановления».

- Запустится среда восстановления, в ней, в разделе (путь может отличаться) «Поиск и устранение неисправностей» — «Дополнительные параметры» вы можете использовать пункт «Восстановление системы» для запуска восстановления из точки восстановления, при наличии таковых.

- Пункт «Удалить обновления» позволит удалить последние обновления Windows.
- Используя пункт «Параметры загрузки» с последующей перезагрузкой, вы сможете выбрать загрузку в безопасном режиме, где проблема может не проявиться и уже там выполнить действия по отмене последних действий, которые привели к ошибке. Также можно попробовать выполнить загрузку с отключенной проверкой цифровой подписи драйверов.

- Если попасть в среду восстановления описанным способом не получается, вы можете использовать загрузочную флешку Windows 11 или 10: загрузитесь с неё и на втором экране внизу слева выберите пункт «Восстановление системы». Также средства восстановления системы можно использовать с загрузочного WinPE.


Перечисленные ваше подходы приведены на случай, если Windows не запускается и вход в систему невозможен. Если вход в Windows возможен, но во время работы появляется синий экран SYSTEM THREAD EXCEPTION NOT HANDLED, вы можете:
- Использовать точки восстановления системы на дату, когда проблема не наблюдалась
- Удалить обновления Windows (если предполагается, что проблема возникла после их установки)
В случае, если наиболее вероятная причина — драйвер какого-либо устройства, прежде всего попробуйте выяснить, какой драйвер или процесс стал причиной ошибки, здесь помогут программы для анализа дампов памяти Windows, на скриншоте ниже анализ дампа другого синего экрана, представлен для демонстрации.

Если вы увидите, что причина в каком-то стороннем файле драйвера .sys, по имени этого файла в Интернете можно найти, к какому устройству он относится: например, имя nvlddmkm.sys будет говорить о драйвере видеокарты NVIDIA, amdkmdag.sys — AMD, но не обязательно это будет именно драйвер видеокарты.
Определив, драйвер какого устройства приводит к сбою, вы можете скачать с официального сайта и установить для него оригинальные драйверы от производителя, либо, если именно после их установки стала появляться ошибка — установить стандартные драйверы Windows.
Для установки стандартных драйверов для известного вам устройства можно использовать следующие шаги:
- Нажмите правой кнопкой мыши по кнопке «Пуск» и выберите пункт «Диспетчер устройств».
- В диспетчере устройств нажмите правой кнопкой мыши по устройству и выберите пункт «Обновить драйвер».
- Нажмите «Найти драйверы на этом компьютере».

- Нажмите «Выбрать драйвер из списка доступных драйверов на компьютере».
- Посмотрите, какие совместимые драйверы для этого устройства уже присутствуют на компьютере. Обычно достаточно выбрать не тот, который установлен в данный момент времени.


Синий экран из-за неправильной работы памяти или других аппаратных компонентов
Если синий экран SYSTEM THREAD EXCEPTION NOT HANDLED стал появляться на новом компьютере или после того, как вы установили новые модули памяти, SSD, видеокарту или другие компоненты для старого ПК или ноутбука, попробуйте следующие варианты решения:
- Выполните сброс настроек БИОС/UEFI на настройки по умолчанию, либо — оптимизированные настройки. Обычно сделать это можно на вкладке выхода из БИОС, а пункт может называться Load Defaults, Load Optimized Defaults или аналогичным образом. Обратите внимание: при сбросе могут сброситься и настройки устройства загрузки, в этом случае порядок загрузки потребуется перенастроить.
- Выполните проверку оперативной памяти на ошибки: это можно сделать и с загрузочной флешки, если Windows не удается запустить, подробнее: Как проверить оперативную память на ошибки.

- Если ошибка возникла именно после обновления модулей памяти, убедитесь, что ваша материнская плата или ноутбук поддерживает установленные модули и конфигурацию RAM — для этого можно попробовать найти официальное руководство к вашей модели материнской платы или ноутбука в Интернете.
- Если ошибка появилась после подключения накопителей SATA, убедитесь, что кабели подключения в порядке, попробуйте другие кабели SATA.

По возможности проверьте работу оборудования на другом компьютере. Иногда причина не вашем ПК, а в браке вновь установленного оборудования.
Некоторые дополнительные варианты, которые могут помочь при ошибке SYSTEM THREAD EXCEPTION NOT HANDLED:
- Если ошибка появляется только после завершения работы, спящего режима или гибернации, но исчезает после перезагрузки, попробуйте отключить быстрый запуск Windows.
- При появлении синего экрана после разгона памяти, процессора или видеокарты — отключите разгон.
- Выполните восстановление целостности системных файлов Windows, подробнее: Как восстановить системные файлы Windows 11 (подойдет и для Windows 10).
- При наличии новых версий БИОС на официальном сайте производителя ноутбука или материнской платы, попробуйте установить обновление, строго следуя инструкциям производителя по его установке, поскольку сбой в процессе может привести к неработоспособности устройства.
- Установите оригинальные драйверы чипсета и управления электропитанием (при наличии) с сайта производителя, даже если Windows установила более новые. Для Intel-устройств также попробуйте установить оригинальные драйверы Intel ME (Management Engine) с сайта поддержки именно вашей модели устройства.
- Иногда причиной оказывается статическое электричество. Можно попробовать такой вариант: выключите ваш ноутбук или компьютер, с ноутбука снимите батарею, выключите устройства из розетки, нажмите и удерживайте кнопку питания около 10-15 секунд, отпустите её, снова включите устройство.
- Также имеет смысл проверить работу системы в режиме чистой загрузки — без сторонних служб и фоновых программ: если при чистой загрузке синий экран SYSTEM THREAD EXCEPTION NOT HANDLED не наблюдается, стоит вспомнить, какие программы устанавливались на компьютере в последнее время.
- Теоретически возможна ситуация, когда ошибку вызывает работа вирусов (или их «борьба» с установленным антивирусом). Можно попробовать использовать загрузочную антивирусную флешку для проверки установленной системы на наличие угроз и их удаления при обнаружении.
- Если ошибка появляется только при работе в браузере, например, при просмотре видео, можно попробовать отключить аппаратное ускорение в браузере.
- При появлении ошибки при запуске какой-то конкретной игры или программы, причина может быть в ней: можно попробовать запуск в режиме совместимости, для не очень лицензионных программ — добавить в исключения антивируса.
Подводя итог: чаще всего, причина ошибки в неправильно работающих драйверах или оборудовании (обычно речь об оперативной памяти). Однако в некоторых случаях обновления Windows (или сбои при их установке), сторонние программы, в том числе вредоносные, также могут приводить к появлению синего экрана SYSTEM THREAD EXCEPTION NOT HANDLED.
The Nvlddmkm.sys error saying the System Thread Exception Not Handled is a Blue Screen of Death (BSOD) error that is faced by many Windows users who are using an Nvidia GPU.
The exact cause of this error is different for individuals. So, if you are facing this error on your computer, you may not sure why is this error appeared on your screen and what to do now.
Don’t worry, we are here to help you fix this error with some easy steps. So, let’s solve this without wasting any time.

Factors That Cause the System_Thread_Exception_Not_Handled Nvlddmkm.sys error?
The Nvlddmkm.sys error occurs when the Windows display driver named Nvidia Windows Longhorn Display Driver Model Kernel Mode (NVLDDMKM) driver doesn’t respond due to some factors. The most common factors behind this error are described below:
1. Incompatible Graphics Drivers
Nvlddmkm.sys is directly connected to the graphics driver. So, if the graphics card’s driver is incompatible with your operating system, then you’ll be taken to the BSOD, and Nvlddmkm.sys error will occur.
2. Conflict Between Voltage and Memory Timing
If the voltage of your graphics card and the timing information don’t match, then the Nvlddmkm.sys error may occur.
3. Overheating
Excessive heat can damage and reduce the performance of your GPU and trigger Nvlddmkm.sys error on your computer.
4. Issues With the RAM
RAM is also responsible to create some memory issue that triggers the Nvlddmkm.sys error.
Upgrade to Quality RAM. No More Errors. Shop Now.
5. Restricted Features of GPU
It often happens that some features of your graphics card are restricted on your operating system and if you break the rules accidentally, then the Nvlddmkm.sys error may pop up on your screen.
Unlock Nvidia GPU Power! Avoid Errors, Experience Seamless Graphics. Upgrade Today.
6. GPU Overload
The process of a computer is normally handled by the CPU. But if you are running too many processes at a time, then the CPU may unable to handle all those processes, and transferred them to the GPU. If the GPU also fails to run those processes, then the Nvlddmkm.sys error occurs.
Methods To Fix the Nvlddmkm.sys Error
To fix the System_thread_exception_not_handled Nvlddmkm.sys error, you need to follow the methods below:
Method 1: Update the Graphics Drivers
As Nvlddmkm.sys error indicates the problem with the display adapter or the graphics driver, you need to update the driver to fix the issue. Here is to follow:
- Press Windows + X key and select Device Manager from the Power User Menu.
- On the Device Manager window, expand the display adapters and right-click on the graphics driver.
- Now, select update driver and click Automatically search for drivers.
After updating the driver successfully, check if the error is resolved or not. If not then try other methods below.
Method 2: Uninstall Corrupted Drivers
You uninstall any corrupted driver that is causing the mentioned error. To identify and delete the malfunctioning drivers, follow the steps below:
Note: Skip the first step if you can log in to Windows.
Step 1: Boot into Safe Mode
If you are stuck on the blue screen error and unable to access the windows then you need to boot into safe mode. Here is how you can boot into safe mode:
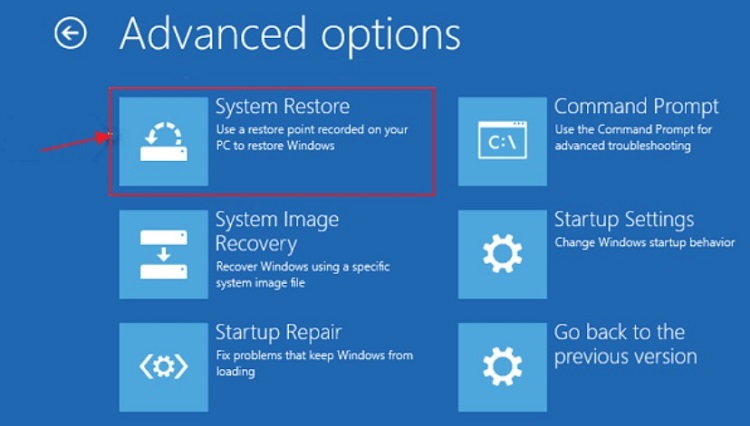
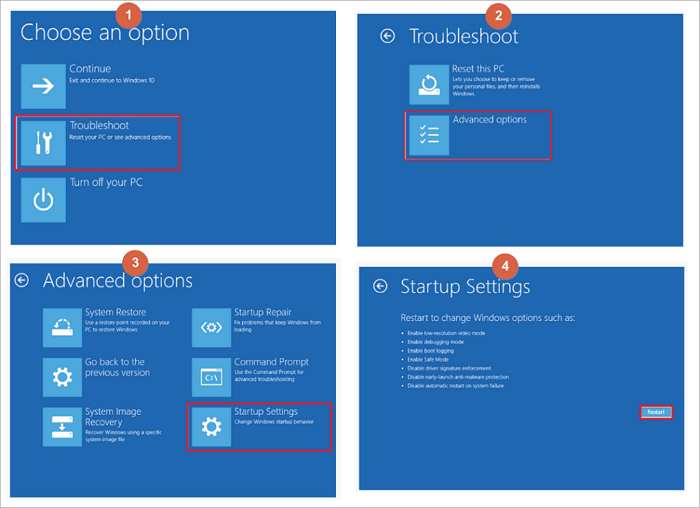
- Restart your PC and when it boots, press the F11 key.
- On the recovery menu, navigate to Troubleshoot > Advanced options > Startup Settings.
- Select “Enable Safe Mode” among the other options in the following window by pressing 4 or F4.
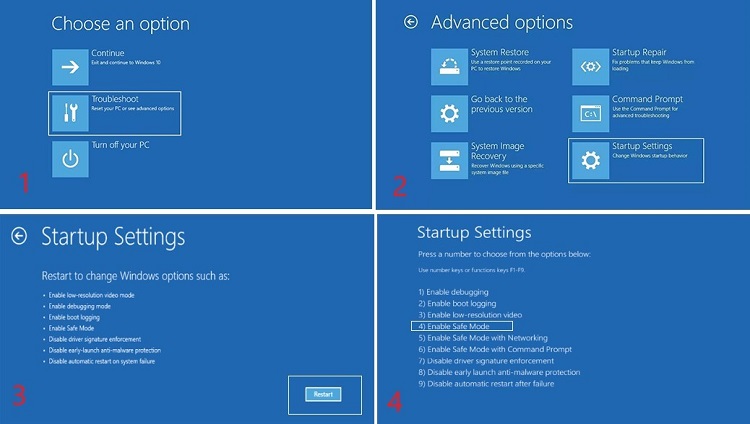
Now, your PC will reboot into Safe mode and you have to identify the culprit that causing the error. Follow the next step to do so.
Step 2: Identify the Corrupted Driver
- Press the Windows + R key to open the Run box.
- Then type “eventvwr” and hit Enter.
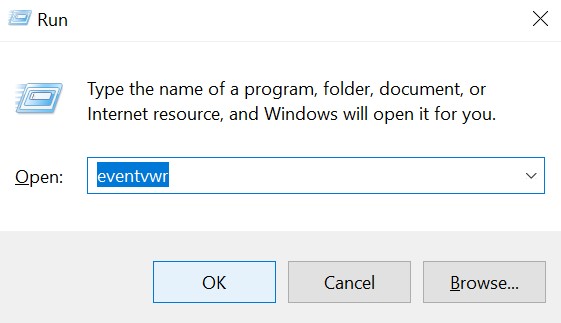
- On the Event Viewer, navigate to Windows Logs > System.
- Now, check the error log.
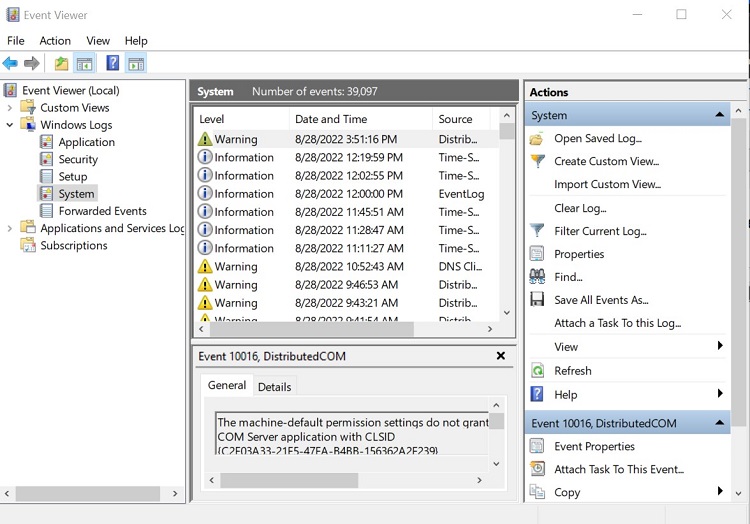
If you find the error SYSTEM_ THREAD_EXCEPTION_NOT_HANDLED is followed by nvlddmkm.sys, then it means that the display card driver is corrupted and you need to reinstall it.
Step 3: Reinstall the Corrupted Driver
Now you need to find and reinstall your corrupted display card driver. Here is how you can do it:
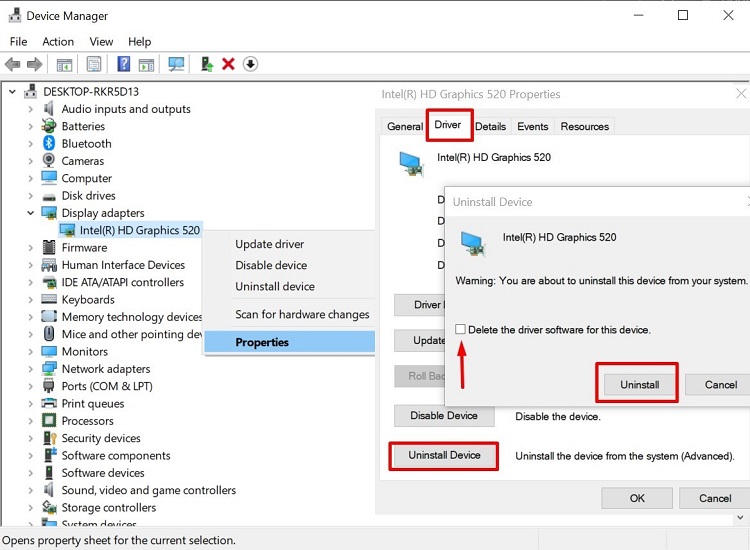
- Press the Windows + X keys and choose Device Manager from the menu.
- Now, expand the Display adapter and right-click on the driver.
- Then, select properties and go to the Driver tab.
- Now, click on Roll Back Driver, select a reason, and click Yes.
- If rollback doesn’t help you fix the error, click on Uninstall Device.
- Now, reinstall the display driver that is compatible with your device.
Method 3: Fix Damaged or Corrupted Files
You can fix damaged or corrupted files on your computer with three different tools to fix damaged files. All three ways to fix corrupted files are described below:
Fix 1: Using the CHKDSK tool
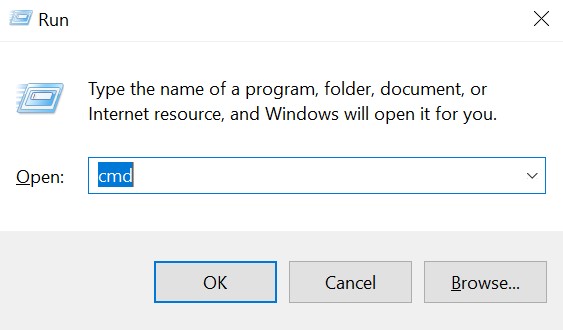
- Press the Win + R keys and type cmd on the Run box.
- Then hold down Ctrl + Shift and press Enter to open the Command prompt as Administrator.
- On the command prompt, type CHKDSK C: /F /R and press Enter.
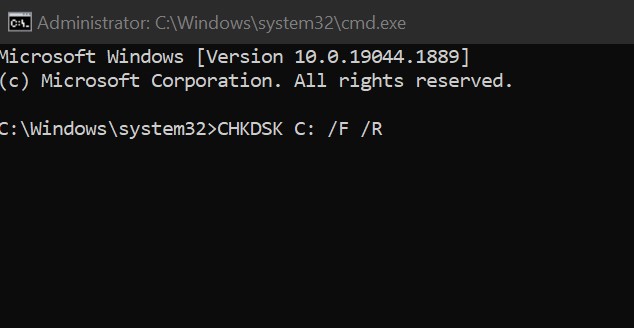
- Then, it will ask you to schedule a check disk the next time you restart your PC. Type Y and press Enter.
- Now, restart your PC.
- Your PC will boot up and perform a full system scan to find any corrupted files and will fix them automatically.
Fix 2: Using the System File Checker tool
- Run the Command Prompt with the administrator privileges as mentioned above.
- Then type SFC /scannow and press Enter.
- The system file checker will scan your computer and fix corrupted files automatically.
Fix 3: Using the DISM tool
- Open the Command Prompt as administrator.
- Then type the following command and press enter:
DISM.exe /Online /Cleanup-image /Restorehealth
- Now, wait patiently until the process finishes. It will resolve issues automatically.
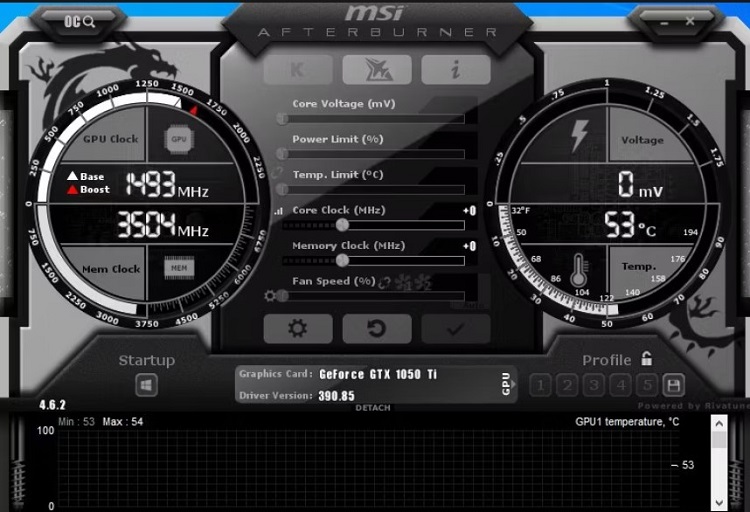
Method 4: Underclock the Settings of Your GPU
Many users have fixed the same issue by underclocking their GPU as it reduces the temperature and decreases the voltage. Here is the instruction on underclocking GPU settings:
- Launch the MSI Afterburner utility and look for a slider that reads Core Clock.
- Adjust the slider and move it towards the left until it’s at -50 or so.
- Apply the settings and restart your computer.
Method 5: Perform System Restore
If none of the above-mentioned methods work for you, you can try restoring the system by following steps:
- Navigate to “Settings” > “Updates & Security” > “Recovery”.
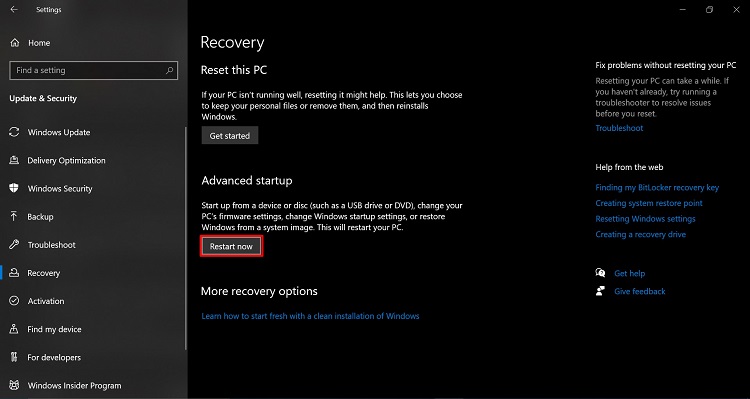
- You will be taken to the Advanced startup menu. Now, click “Restart now”.
- Then, select “System Restore”.
- Now provide your account name and password to perform the system restore.
Frequently Asked Questions
How Do I Fix Nvlddmkm.sys Error?
To fix the Nvlddmkm.sys error, you need to apply the following methods on your computer. You can find the detailed instruction in the above article.
- Update the graphics card drivers.
- Reinstall malfunctioning drivers.
- Fix damaged or corrupted files.
- Underclock GPU settings
- System Restore.
What Causes Nvlddmkm.sys Error?
There can be many factors that may cause the Nvlddmkm.sys error on your computer. The factors are:
- Corrupted display adapter or driver.
- Incorrect memory timing and voltage.
- Overheating.
- Running too many Processes at a time.
- Incompatible graphics card or driver.
Conclusion
Hopefully, you are now convinced that after reading this guide you can fix the System_thread_exception_not_handled Nvlddmkm.sys error that appeared as Blue Screen of Death (BSOD) on your computer. We are eagerly waiting for your comment on which method you will have applied to fix this error. You can save this guide if this error occurs again on your computer.
Subscribe to our newsletter
& plug into
the world of technology
Draft and Proofreader Literature buff. Working with words is right up my alley. Technology, gadgets and audio devices attract me. Hence I am with Tech Dimension. Books, and a cup of coffee, are the ideal winter night for me.
Синий экран смерти Windows сообщает пользователю, что произошёл критический сбой в системе, после которого она не может больше нормально функционировать, и уходит на перезагрузку. Если такая ошибка не имеет постоянный характер, то особо волноваться по этому поводу не следует, однако если системный сбой происходит регулярно, то следует задуматься об устранении проблемы. В нашей статье мы подробно расскажем, из-за чего происходит ошибка в файле nvlddmkm.sys и как её устранить.
Варианты решения проблемы
Воспользовавшись поиском в интернете, по имени файла nvlddmkm.sys можно понять, что он принадлежит к драйверу видеокарты NVIDIA. Соответственно, чтобы устранить неполадку можно переустановить этот драйвер, обновить его или инсталлировать более старую версию, которая не вызывала ошибок в системе. Рассмотрим каждый из способов более подробно. См. также: как обновить драйверы на Windows 10.
Вариант №1: Переустановка или обновление драйвера
Самый простой способ избавиться от ошибки nvlddmkm.sys — это переустановить драйвер видеокарты. Для этого потребуется скачать соответствующее ПО с сайта NVidia и запустить обычную инсталляцию, при этом отметив вариант «Выполнить чистую установку».
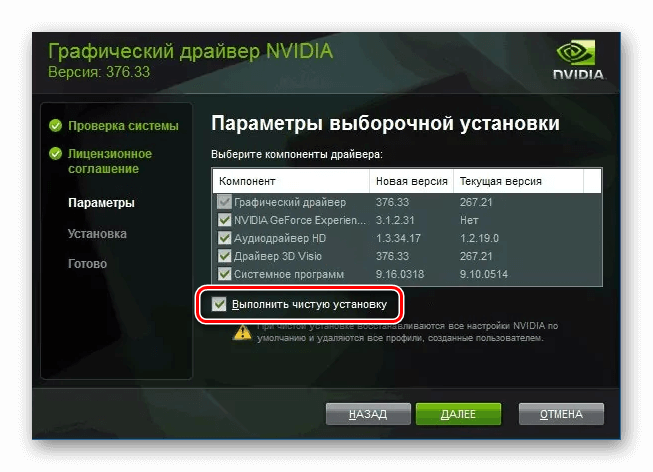
Чистая установка драйвера
Открыть страницу для загрузки драйверов с сайта NVIDIA
В таком случае старый драйвер устройства будет полностью удален, а на его место установится чистая новая версия.
Загрузка …
Вариант №2: Откат драйвера
Таким способом можно воспользоваться в том случае, если старый драйвер работал стабильно, а после его обновления появились неполадки. Чтобы откатить драйвер до предыдущей версии, потребуется пвыполнить следующие операции:
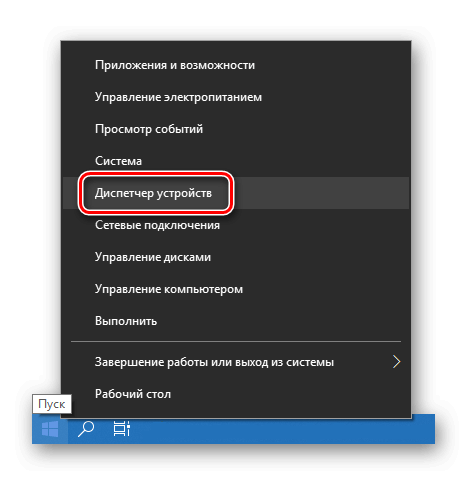
- Открываем «Диспетчер устройств» из контекстного меню кнопки «Пуск».

Запускаем «Диспетчер устройств» из меню пуска
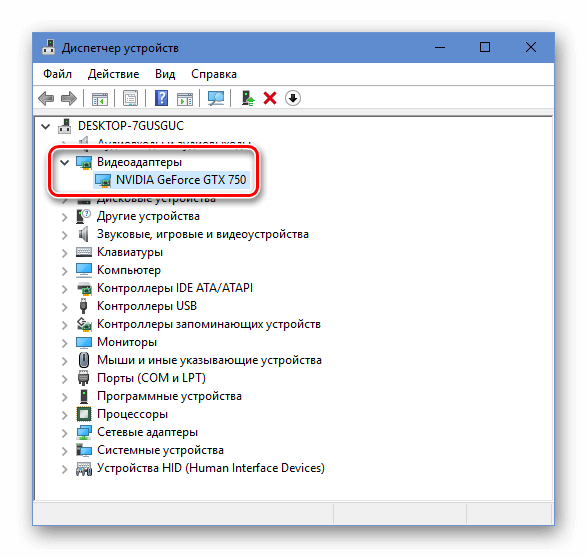
- Далее появится окно со всеми комплектующими компьютера. Выбираем видеокарту и кликаем по этому пункту дважды.

Выбираем видеокарту в диспетчере устройств
- В появившемся окне свойств переходим на вкладку «Драйвер».
- После этого нажимаем на кнопку «Откатить».

Откатываем драйвер до предыдущей версии
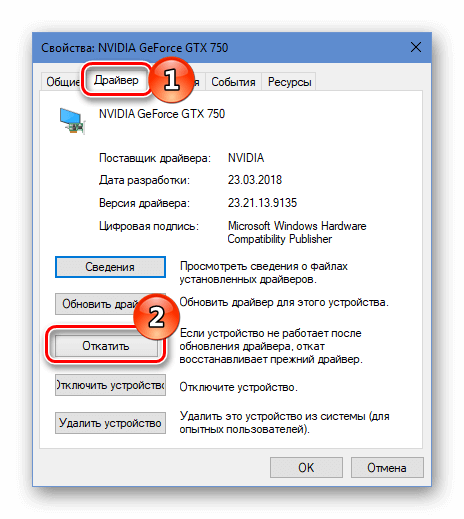
В результате проделанных операций произойдёт установка старой версии драйвера.
Загрузка …
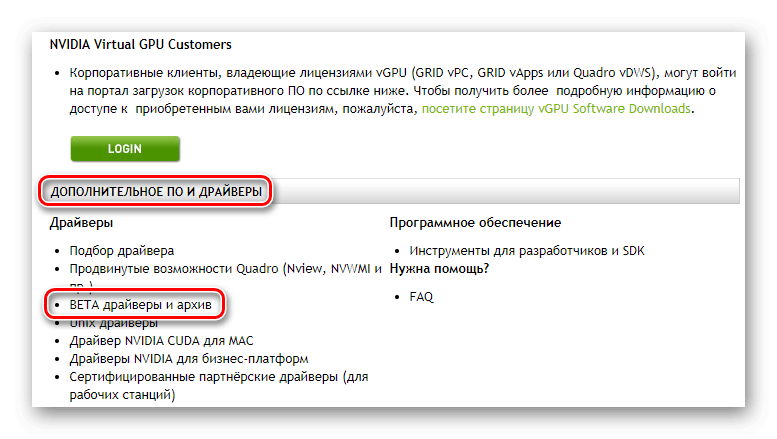
Вариант №3: Инсталляция предыдущей версии драйвера с официального сайта
Если процедуру отката по каким-либо причинам осуществить не удается, можно загрузить предыдущую версию ПО с официального сайта NVidia. Для этого выполним следующие действия:
Открыть страницу для скачивания драйверов
- Попав в раздел для загрузки, нажимаем по ссылке «BETA драйверы и архив» в группе «Дополнительное ПО и драйверы».

Открываем архив драйверов
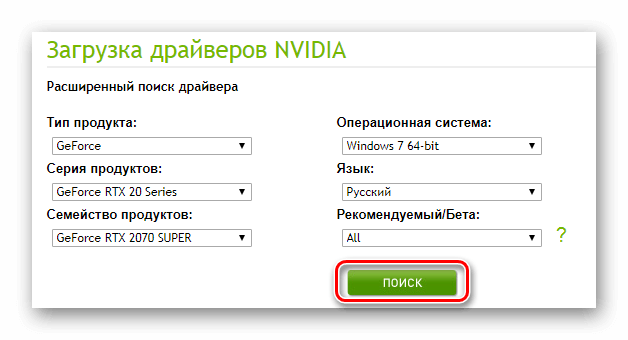
- Далее указываем модель видеокарты и кликаем по кнопке «Поиск».

Выбираем свою видеокарту
- Появится список доступных пакетов, которые будут отсортированы по дате выхода. Выбираем из списка предыдущий драйвер.

Выбираем предыдущую версию драйвера
- В новом окне нажимаем на кнопку «Загрузить сейчас».

Загружаем установочный пакет
- На следующей странице ещё раз нажимаем на ту же самую кнопку.

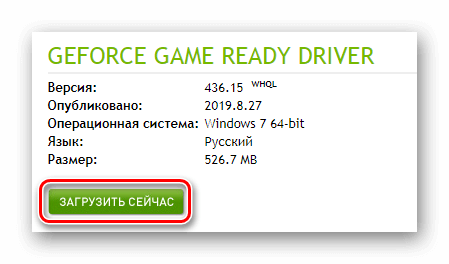
Начнется загрузка инсталляционного пакета, и, после того как она завершится, можно будет установить старую версию драйвера, предварительно удалив новую. В некоторых случаях придется перебрать несколько вариантов программного обеспечения для достижения положительного результата.
Загрузка …
Вариант №4: Сброс настроек BIOS
BIOS – это программное обеспечение материнской платы, которое отвечает за взаимодействие всех установленных компонентов в компьютере. В некоторых случаях его неправильное настройки также могут привести к появлению ошибок синего экрана. Чтобы восстановить параметры по умолчанию, проделаем следующие операции:
- Перезагрузим компьютер и при начале его загрузки нажимаем на кнопку «Del».
- Откроется окно БИОСа с настройками, где следует отыскать пункт «Load BIOS Defaults» или «Load Setup Defaults».

Сбрасываем настройки БИОСа на заводские
- Активировав его, загрузятся стандартные настройки программы.
- После этого нужно будет выйти из BIOS, сохранив изменения. Для этого выбираем соответствующий пункт в меню.
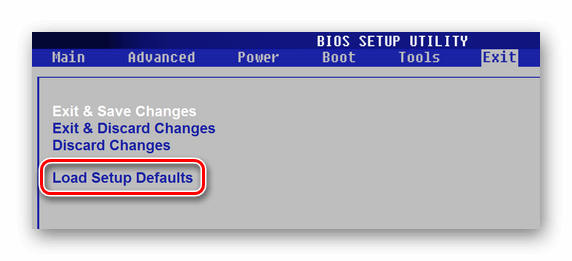
Примечание: существует достаточно большое количество разновидностей БИОСа, в которых те или иные параметры находятся на различных вкладках. Главное — это отыскать пункт «Load BIOS Defaults» и активировать его.
Загрузка …
Вариант №5: Проверка системы на наличие вирусов
Причиной ошибки nvlddmkm.sys также может быть попадание в компьютер вредоносного ПО. В таком случае следует проверить систему при помощи специальных портативных сканеров, таких как Kaspersky Virus Removal Tool
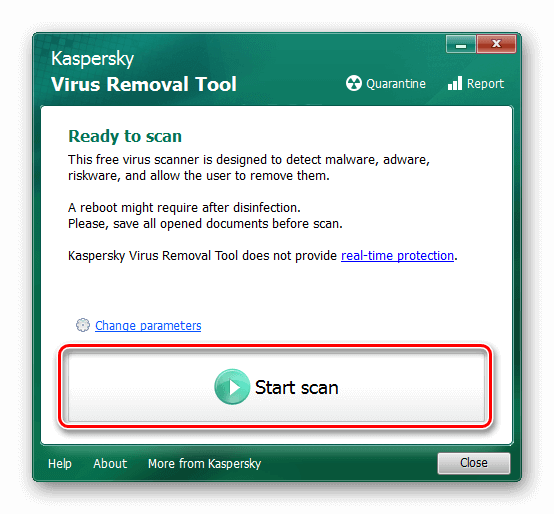
Запуск сканирования системы при помощи Kaspersky Virus Removal Tool
или Dr. Web CureIt.
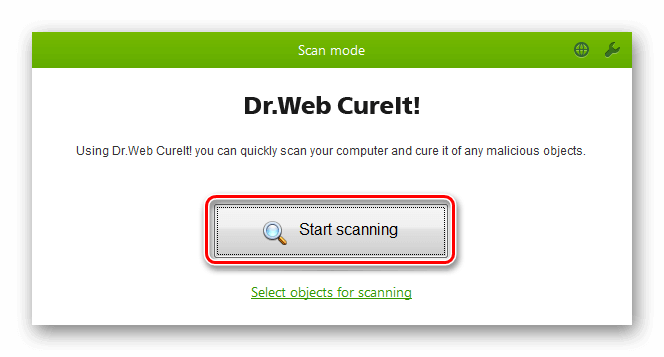
Проверка системы с использованием Dr. Web CureIt
Интерфейс этих программ интуитивно понятен, и проверить компьютер с их помощью не составит особого труда.
Загрузка …
Вариант №6: Проверка температуры видеокарты
Фатальная ошибка может быть вызвана повышенной температурой видеоадаптера. Обычно такое происходит при чрезмерной нагрузке в играх с продвинутой графикой. Чтобы узнать температуру видеокарты во время игры, можно воспользоваться специальной программой FPS Monitor.
Скачать приложение официального сайта
Запустив программу, нужно будет выбрать сцену с отображением температуры GPU (видеокарты) из одноименного меню.
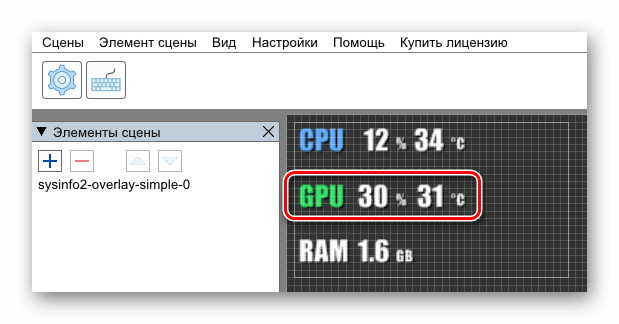
Отображение загрузки и температуры видеокарты в FPS Monitor
После этого не закрываем предложение и запускаем игру. Программа будет выводить показатель температуры непосредственно во время игрового процесса.
Допустимые температуры для видеокарты разнятся в зависимости от модели, однако в среднем не следует допускать нагрев свыше 80 градусов Цельсия.
Загрузка …
Вот такими способами можно избавиться от ошибки синего экрана nvlddmkm.sys в Windows 10. Надеемся, что при помощи нашей инструкции вам удастся устранить неполадку без особых затруднений.
Загрузка …
Post Views: 11 279
How to fix system_thread_exception_not_handled issue in 6 ways:
| Workable Solutions | Step-by-step Troubleshooting |
|---|---|
| Fix 1. Boot Into Safe Mode | Click on «Start». While pressing the Shift button on your keyboard, click on «Restart»…Full steps |
| Fix 2. Uninstall Incompatible Programs | Click on the start menu and go to «Settings». The above screen will appear. Go into «Apps»…Full steps |
| Fix 3. Uninstall or Upgrade Faulty Driver | Click on the Start menu and search for the «Device Manager». Once it appears, click on it…Full steps |
| Fix 4. Repair System Files | Launch the command prompt through the Start menu and run it as an administrator…Full steps |
| Fix 5. Perform Startup Repair | Click on «Troubleshoot» and «Advanced options». Click on «Startup Repair»…Full steps |
| Fix 6. Perform System Restore | Go to «Settings» and click on «Updates & Security». Now, click on the «Recovery» option…Full steps |
Often times windows users face the common error: system_thread_exception_not_handled (nviddmkm.sys or atikmpag.sys). This can happen with any Windows 10/11 user for a lot of reasons for example, because of outdated drivers.
This error can occur all of a sudden on your computer or laptop screen while using it. Also, the same «system_thread_exception_not_handled Windows 10» error can occur once you turn on your system. Some users even call it a death screen as they assume their Windows OS is all done.
In reality, there are some quick fixes to this solution. In this article, we will discuss how to fix system_thread_exception_not_handled nvlddmkm.sys error on Windows 10/11.
What Does System Thread Exception Not Handled Mean
This error means that an exception has been generated by the system thread, which the error handler is unable to handle.
A variety of factors cause this error, but the most frequent offender is a device driver. When a driver becomes outdated or damaged, it may cause difficulties with your system.
Another possible source of this problem is a faulty system file. System files are essential for Windows to function correctly, and if they become damaged, the result may be numerous problems. For example, this error might occur if there’s a problem with your Registry or Winsock files. You can fix this error with various methods.
System Thread Exception Not Handled Error Causes
Now, this system error can occur because of many reasons. Below are some of those reasons.
Corrupt Files
Your corrupt system files are the number one reason why such an error can ruin your experience. So, in this regard, it is best to fix those corrupt files (More on this later). With this approach, you can get rid of this blue death screen.
Issue with a Running Background Program
When you see the error message «system_thread_exception_not_handled,» a problem occurs with one of the programs running in the background. This program is responsible for tasks like drawing graphics and playing sound.
Malfunctioning Device Driver
The «system_thread_exception_not_handled» error is generally caused by a malfunctioning device driver. A device driver is a program that allows your computer to communicate with hardware devices. When there is an issue with a device driver, the system thread may fail, resulting in the error message.
Solutions to Solving System Thread Exception Not Handled in Windows 10/11
Now for the «system_thread_exception_not_handled Windows 10» error, there are some fixes that you can implement. Here we will be sharing a total of 6 solutions to this common error. You can opt for any of these to get rid of this error. So, let us take a look at these fixes.
Fix 1. Boot Into Safe Mode
So, one solution to this error is to get into your Pc’s safe mode. Now, before we dive into it, we have to understand the importance of this safe mode. The safe mode in your system is the mode that lets you find out the possible causes of any unexpected Windows error.
In this case, we are trying to fix the «system_thread_exception_not_handled Windows 10» error. So, first, we will have to boot our system into safe mode. Here is how you can do this.
Step 1. Click on «Start». While pressing the Shift button on your keyboard, click on «Restart» from the Start menu.
Step 2. The following screen should appear. It is the Windows RE (recovery environment screen). From here, you have to click on «Advanced options».
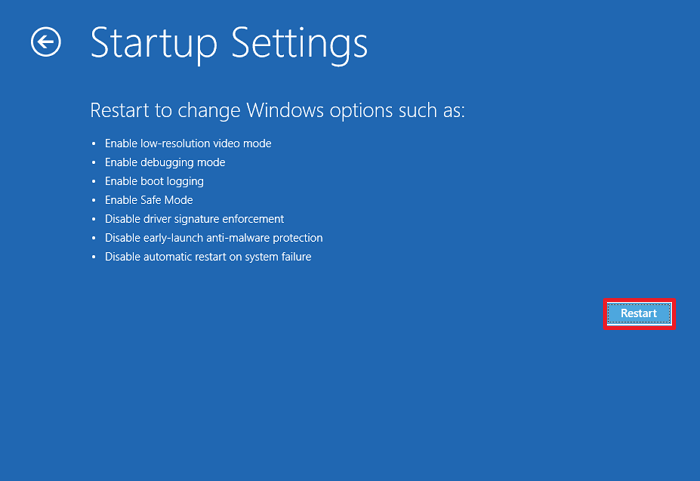
Step 3. Now click on the «Startup Settings» to view the available booting options.
Step 4. From here, click on «Restart».
Step 5. Once the Windows restart, it will give you the following options to boot the system. Click on option no 4, «Enable safe mode» to boot your system in safe mode.
This way, you can boot your system in safe mode. Note that some of the fixes require you to enable your Windows in Safe Mode. So, this step is a must to do for some of the fixes to the error we are trying to get rid of.
Fix 2. Uninstall Incompatible Programs
The system thread exception error also sometimes occurs because of an incompatible program installed. Now, in most cases, a user doesn’t have an idea that a certain program in their windows 10/11 can cause such unexpected errors.
So, you have to uninstall that particular program creating this issue. Usually, a recently installed software or an application is the culprit here. So, uninstall that specific application first. To do so, simply follow these steps.
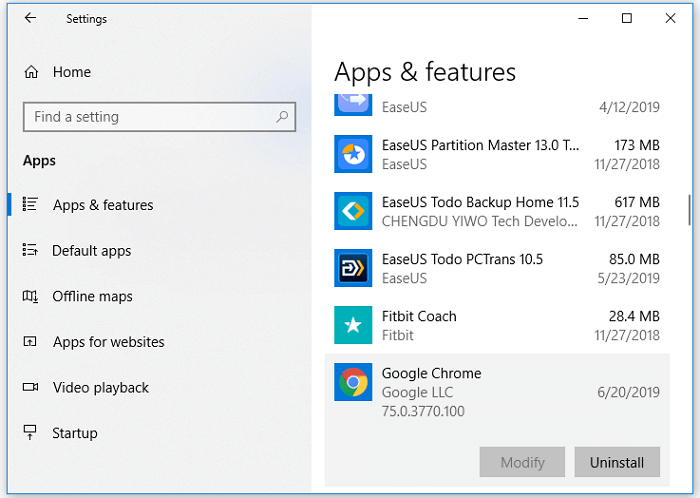
Step 1. Click on the start menu and go to «Settings». The above screen will appear. From here, you have to go into «Apps».
Step 2. From the list of installed apps, choose the program that you have recently installed. Click on it and choose «Uninstall».
So, this way, you can easily uninstall the recently installed program on your Windows 10/11.
Fix 3. Uninstall or Upgrade Faulty Driver
The recently updated or some faulty drivers can also cause the system_thread_exception_not_handled error in windows 10/11. As we discussed in the case of the recently installed program, the recently updated driver can also cause your windows to behave like this.
So, to fix this issue, you have to uninstall or upgrade that faulty driver.
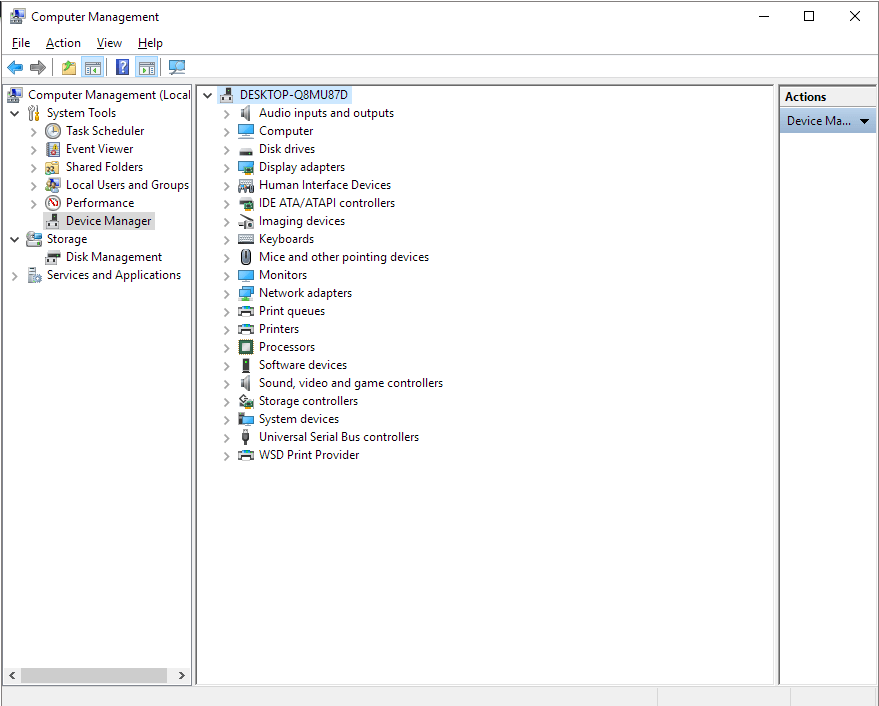
Step 1. Click on the Start menu and search for the «Device Manager». Once it appears, click on it.
Step 2. The Device Manager will show all the drivers installed in your Windows 10/11. From here, you have to figure out the faulty or recently installed driver.
Step 3. Right-click on the faulty driver, and you will get a few options. From this option, choose «Uninstall».

Step 4. And that’s it. Your faulty driver is no longer a part of your Windows OS.
Fix 4. Check and Repair Problematic System Files
We discussed how a faulty program and a driver could cause such errors. Now, let us explain to you another reason for such errors. Your system’s problematic files can also cause this issue. So, the best fix in this regard is to repair those faulty files.
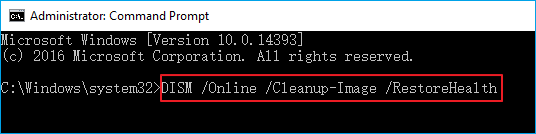
Step 1. Launch the Command Prompt through the Start menu and run it as an administrator.
Step 2. Now type DISM/ Online /Cleanup Image /ScanHealth. Press the enter button to run this command.
Step 3. Once you have entered this command, you have to wait a bit. During this time, Windows will automatically repair all those corrupted files.
Fix 5. Perform Startup Repair
Another way to solve this common error is to perform startup repair. This repair method is easy and will repair those broken, old, and malfunctioning files in your system. So, here is how to perform a startup repair.
Step 1. You have to go to your Windows Advanced Startup options to perform a startup repair. To enter into this mode, you just have to press F11 as soon as your system boots. Click on «Troubleshoot» to proceed further.
Step 2. When you have accessed the Advanced Startup options, you have to click on «Advanced options».
Step 3. From here, click on «Startup Repair». The windows will ask you to choose the account name and its password. Just enter that. The windows will start repairing those corrupted files for your ease.

Fix 6. Perform System Restore
If none of the above-mentioned methods work for you, you can opt for the system restoring option. Here are the steps to follow.
Step 1. Go to «Settings» and click on «Updates & Security». Now, click on the «Recovery» option.
Step 2. You will be directed to the Advanced startup of Windows. Click «Restart now».
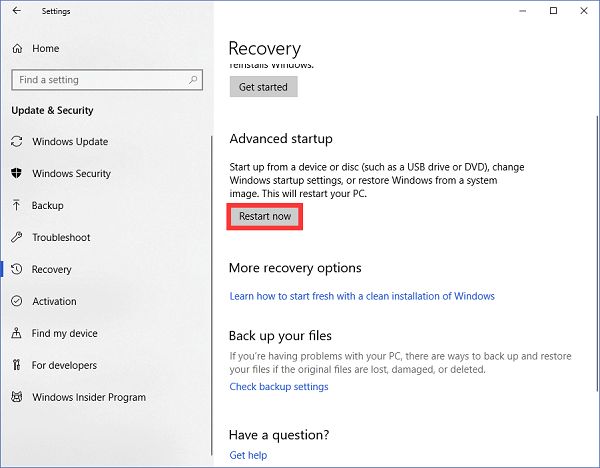
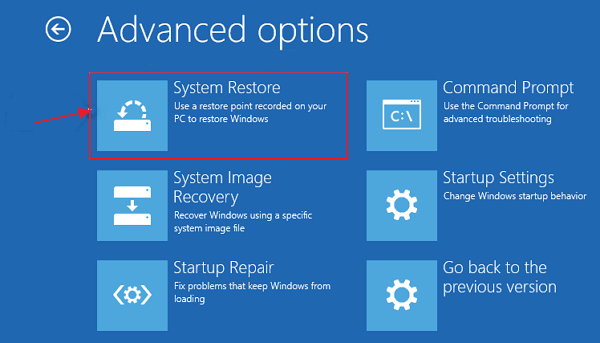
Step 3. Now, click on «System Restore». Again, the windows will ask you to choose the account name and its password. Just enter that. The system will start to restore.
How to Restore Data from a Computer That Cannot Boot Windows 10/11
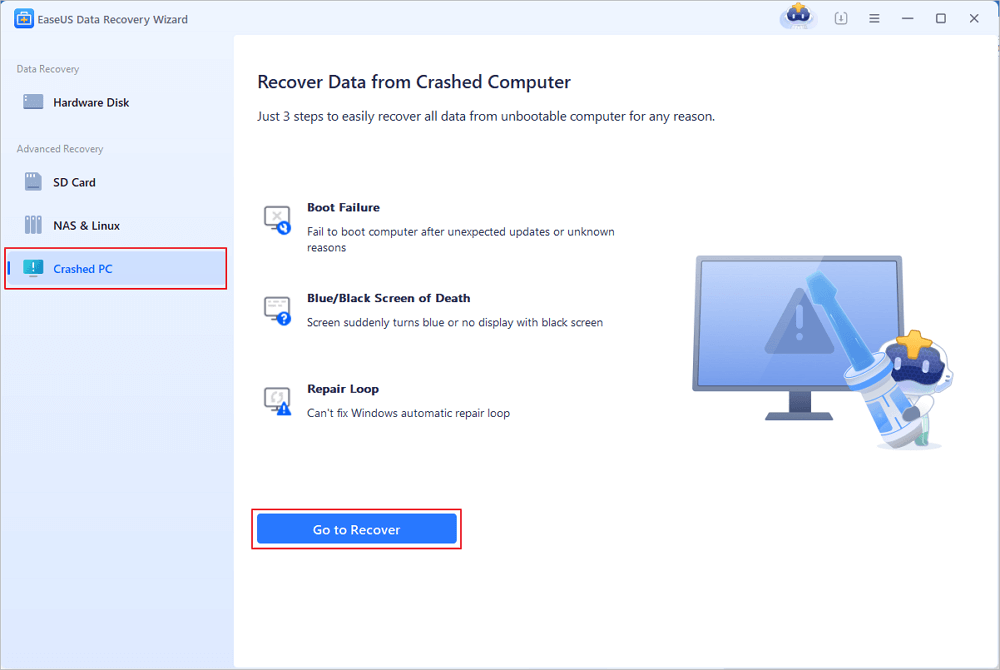
When the BSOD system_thread_exception_not_handled problem error occurs or other boot issues appear, you won’t be able to access your systems’ files and data stored in them. Do not worry, and you can get out of this situation as well. Reliable data recovery software such as EaseUS Data Recovery Wizard can help you solve this issue.
With this data recovery program, you can recover more than 100 file types from all the common storage devices with ease. It enables you to recover data from a PC/laptop hard drive that won’t boot in a WinPE environment. EaseUS advanced data recovery software also supports NAS data recovery and Linux data recovery.
Now, download this 100% safe and secure data recovery software to restore files efficiently.
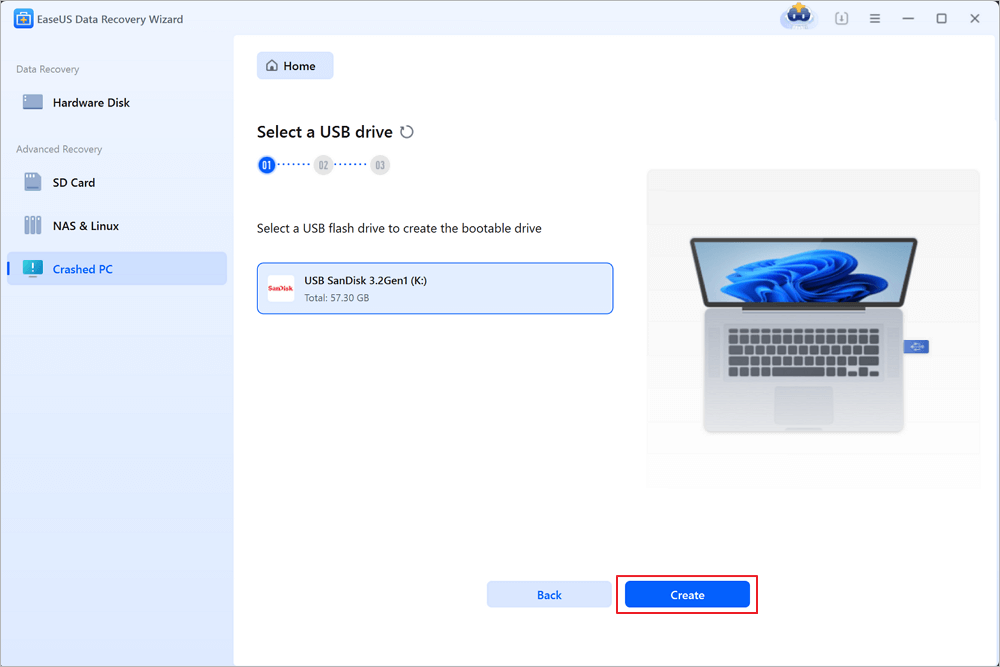
Step 1. Create a bootable disk
Launch EaseUS Data Recovery Wizard, choose «Crashed PC» and click «Go to Recover».
Select an empty USB to create the bootable drive and click «Create».
⚠️Warning: When you create a bootable disk, EaseUS Data Recovery Wizard will erase all data saved in the USB drive. Back up important data beforehand.
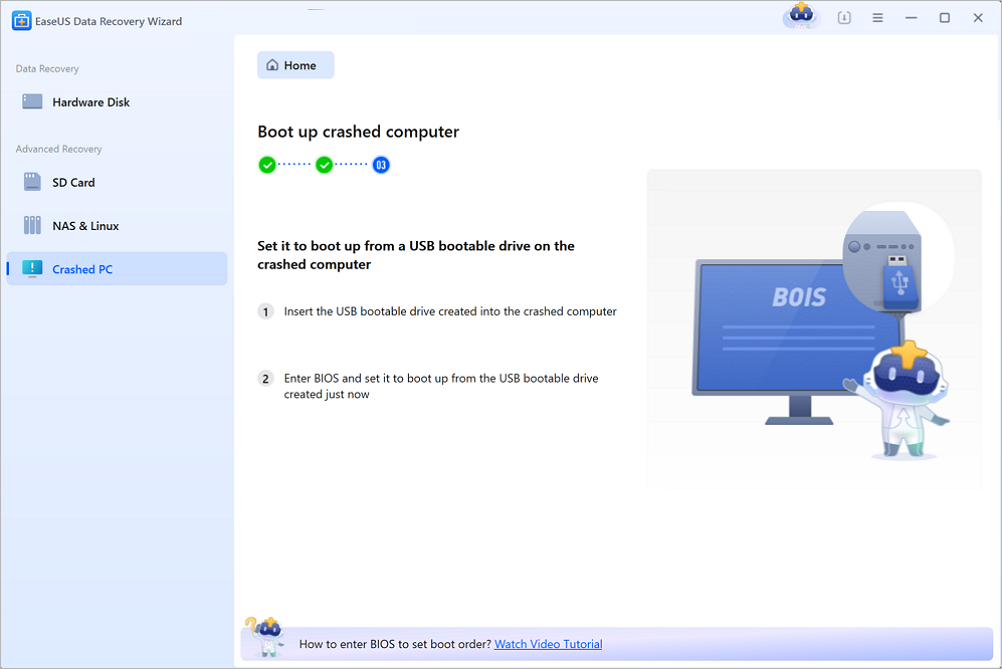
Step 2. Boot your computer from the bootable USB
Connect the bootable disk to the PC that won’t boot and change your computer boot sequence in BIOS. For most users, it works well when they restart their computer and press F2 simultaneously to enter BIOS.
Set to boot the PC from «Removable Devices» (bootable USB disk) beyond Hard Drive. Press «F10» to save and exit.
Step 3. Recover data from a crashed system/PC
After booting from EaseUS Data Recovery Wizard bootable disk, select the drive you want to scan to find all your lost files. Preview and recover the files you need to a safe location.
💡Tip: You can restore data on the local disks, external hard drives, and also the cloud storage.

Conclusion
With more than 5 fixes, you know now how to fix system_thread_exception_not_handled nvlddmkm.sys error on windows 10/11. The reasons why this error occurs can be many. If any of the above-highlighted methods doesn’t work for you, the Ease US Data Recovery Wizard is always there to rescue you.
It can help you recover your data files on a fast and hassle-freeway. Its user interface is clean and straightforward. So, Download EaseUS Data Recovery Wizard today!