

Рабочее решение для ОС Windows 7/8/8.1/10
Синий экран смерти (BSOD) с ошибкой:
PAGE_FAULT_IN_NONPAGED_AREA (ETD.SYS)
или
SYSTEM_THREAD_EXCEPTION_NOT_HANDLED (ETD.SYS)
Характерная ошибка в большинстве случаев для ноутбуков, возникает в связи со сбоем драйвера тачпада на ноутбуке. Проблема частая для ноутбуков с Elan и Synaptics драйверами на тачпад.
Частая проблема на старых моделях ноутбуков, которые обновились с ОС Windows 7 до ОС Windows 10. Основная причина возникновения ошибки, связанна с автоматической установкой драйвера через Центр обновления Windows. Если вы, обновили свою систему на новую, после активации системы, сделайте чистую установку системы, с полным форматированием системного раздела. При установке, отключите Интернет (читайте в самом низу данной заметки).
Многократно сталкивался с данной проблемой на ноутбуках lenovo b580c, где происходило поверхностное обновление системы с ОС Windows 7 на ОС Windows 10 и автоматом обновлялись драйвера для тачпада.
Ошибка с файлом ETD.sys может возникнуть и на тех устройствах, где была выполнена чистая установка системы, однако не отключалось автоматическое обновление драйверов через Центр обновления Windows. Для тачпада, устанавливайте драйвера с оф. сайта производителя своего устройства. Либо, откажитесь от установки данного драйвера (тачпад не будет работать), если нет официальной поддержки драйвера для ОС Windows 10.
Повторюсь, если у вас старый ноутбук, произведите чистую установку системы и при установке, отключите Интернет (не подключайтесь к Интернету. Далее, сразу после установки, отключите автоматическое обновление драйверов через Центр обновления Windows и установите драйвера для ноутбука с официального сайта (читайте в самом низу данной заметки).
Решение ошибки с файлом ETD.sys.
Если у вас ОС Windows 10, данная проблема возникла скорее всего по причине автоматического обновления драйверов на ноутбуке, через Центр обновлений Windows. При этом, прежде, чем приступать к решению проблемы, проанализируйте после чего возникла данная проблема. Возможно, будет достаточно восстановит систему через контрольные точки и отключить автоматическое обновление драйверов (смотрите ниже).
Универсального и 100% способа решить проблему нет. Ниже, способы решения проблемы, приведены в той последовательности, в которой лучше их выполнять. Данные способы, рассчитаны на опытных пользователей.
1. Удаление драйвера ETD.SYS.
Если невозможно загрузить систему (из-за постоянного экрана смерти BSOD), вам нужно несколько раз неудачно запустить ОС (нажать на выключение во время её загрузки) чтобы у вас открылось меню восстановления, и в нём через командную строку вам нужно выполнить удаление драйвера ETD.SYS.
В среде восстановления, выберите Командная строка

и выполните команду:
del C:\windows\system32\drivers\ETD.sys
Вместо С указываете ваш диск, где установлена ОС Windows.
Для проверки, на каком диске установлена система, можете перед выполнением вышеприведенной команды, выполнить в Командной строке, следующую команду:
notepad

И нажмите Enter. Откроется блокнот, в котором вам нужно будет выбрать Файл->Открыть…

Выбираем в открывшемся
окне «Этот компьютер» и в параметрах «Тип файлов»,
выбираем «Все».

Далее, находим свой диск, на котором установлена именно система. Он может быть не
под той буквой, которую вы видите при работе из загруженной системы Windows
(нередко, системные разделы в среде восстановления, бывают под буквами C, E, F,
D, A, Х). Запомните букву системного раздела и закройте блокнот.
Теперь, можете выполнить в Командной строке, команду удаления (смотрите выше) драйвера ETD.SYS.
После удаления драйвера ETD.SYS, система может загрузиться, а может и не загрузиться. Если вам данный способ помог, отключите временно или на постоянно обновления системы. Лучше, сделать это при помощи простой утилиты:
https://www.oo-software.com/en/shutup10
И запретите автоматически устанавливать обновления для драйверов.

Через данную утилиту, вы можете полностью отключить обновления, однако не рекомендую вам этого делать. Достаточно будет отключить установку обновлений для драйверов, через Центр обновлений Microsoft.
Обратите внимание, что у вас перестанет работать тачпад. Вы можете попробовать установить родные драйвера с официального сайта своего ноутбука. Не используйте программы для автоматического обновления драйверов.
2. Если способ выше — не помог.
Попробуйте отключить сбойный драйвер ETD.SYS.
Если у вас работает система и удается загрузится на Рабочий стол (как вариант, попробуйте через Безопасный режим), скачайте утилиту Autoruns.
Распакуйте архив и запустите утилиту. В открывшемся окне, перейдите во вкладку Драйвера (Drivers)

и найдите драйвер ETD. Отключите его:

Перезагрузите систему и понаблюдайте за работой.
Тачпад, как и в первом способе, перестанет работать. Параллельно, отключите автоматическое обновление драйверов через Центр обновления Windows. Инструкцию, как это сделать, смотрите выше. И можете попробовать установить драйвера для ноутбука с официального сайта.
3. Откат системы.
Если у вас начались проблемы после установки обновлений Windows или вы, обновили драйвера сторонним софтом (программой для поиска и установки драйверов), откатите систему, воспользовавшись точкой восстановления. После, отключите автообновление драйверов.
Как вариант, если удастся, загрузитесь в Безопасном режиме и воспользуйтесь утилитой
Autoruns. Либо, восстановите систему через контрольную точку восстановления.
4. Ничего не помогает (для опытных!).
Попробуйте восстановить ветку реестра из резервных копий, по данной инструкции. Данный способ актуален, если у вас ОС Windows 7 или ОС Windows 10, версии 1709 или старее (на новых версиях, начиная с версии 1803, данный способ не работает).
Заключение.
Попробуйте полностью переустановить систему и после установки, сразу отключите автообновление. Для удобства, вы можете перед установкой системы, отключить Интернет (или не подключатся по Wi-Fi). Скачайте официальный образ системы с оф. сайта Microsoft, при помощи данной утилиты. Обновляйте драйвера для ноутбука с официального сайта производителя ноутбука. Если у вас старая модель ноутбука и на официальном сайте, нет новых драйверов для ОС Windows 10, лучше отказаться от установки драйвера на тачпад (вы можете установить драйвер для тачпада, который не совместим с ОС Windows 10, однако не известно, как он себя поведет). Либо, оставаться на ОС Windows 7.
Если у вас возникает синий экран смерти на ноутбуке Lenovo, гляньте данную заметку.
The SYSTEM_THREAD_EXCEPTION_NOT_HANDLED is a STOP code of a blue screen of death (BSOD) error. You might typically see the blue screen as you start your PC, when launching a program like a game, or in the middle of a gaming session. It usually comes with a certain driver file name in SYS extension, such as nvlddmkm.sys, bcmwl63a.sys, ntfs.sys, atikmdag.sys, or dxgmms2.sys. In this guide, we will explain what this error actually means and how you can fix the problem.
Update: Recently, a lot of users have been seeing the “SYSTEM THREAD EXCEPTION NOT HANDLED” blue screen error when playing Fortnite or Valorant. It seems to be caused by a graphics card driver that doesn’t work compatibly with the games right now. To fix this, try to update your graphics card driver to see if there is already a hotfix for this problem.
What does the “SYSTEM THREAD EXCEPTION NOT HANDLED” blue screen error mean?
This blue screen STOP error in Windows 10 and 11 usually points to a driver problem. When a driver is broken, outdated, not installed properly, or messed with by malware, it can cause the BSOD error.
If a hardware part is failing or is already broken, it can also cause the blue screen error when you start up your PC. If the error only happens when you start a program, it might mean that the hardware’s driver doesn’t work compatibly with the program or is corrupted.
Also see: How to Fix Blue Screen With Sad Face on Windows 10/11
How to fix the BSOD error on Windows 10 or 11?
To fix the error, we need to find out which driver is the problem and update or fix that driver. To figure out which driver it is, check the driver’s file name next to the STOP error “System Thread Exception Not Handled” on the blue screen. It usually ends with a .sys file extension.
This file name can help you pinpoint which driver is actually causing the problem. You can then update or fix the driver. For instance, here are some common driver files that cause the blue screen error in Windows 10 and 11:
- Nvlddmkm.sys – Nvidia Windows kernel mode driver which is linked to Nvidia graphics card’s driver.
- Bcmwl63a.sys – Broadcom 802.11 Network Adapter wireless driver developed by Broadcom Corporation for the Windows Operating System.
- Ntfs.sys – Windows NT Server developed by Microsoft for the Windows Operating System.
- Atikmdag.sys – ATI Radeon Family developed by AMD for Windows OS which is linked to ATI video card’s driver.
- Dxgmms2.sys – DirectX Graphics MMS associated with Windows 10 and 11 Operating System which is linked to DirectX drivers.
If you find a different SYS file with the System Thread Exception Not Handled BSOD error and you don’t know what it is for, search the full driver file name on Google to find out which part of your hardware uses the file as its driver. Then, you can fix the problem accordingly.
If no SYS file was shown in the blue screen error, try updating all major drivers like your display driver, network LAN or Wireless adapter driver, sound and audio driver to see if it solves the blue screen problem. You can also use repair tools like SFC and DISM via command prompt in Windows Recovery to fix the issue.
Linked issue: Windows 11/10 Computer Blue Screen When Idle (Fix)
Updating the problem driver
There are several ways to update a device driver in Windows 10 and 11. The best way is to find and download the latest driver from your hardware’s manufacturer websites, like the Nvidia video driver from nvidia.com. This makes sure you get the latest driver for your device.
Since most users can’t boot into Windows to update any driver, you can force your Windows 10 or 11 to start in safe mode, skipping the blue screen. See: How to enter safe mode in Windows 11/10 if your Windows is corrupted.
When you’re in Windows 10 or 11 safe mode, follow these steps to update a device driver through Device Manager:
- Go to the start menu.
- Search for Device Manager and open it.
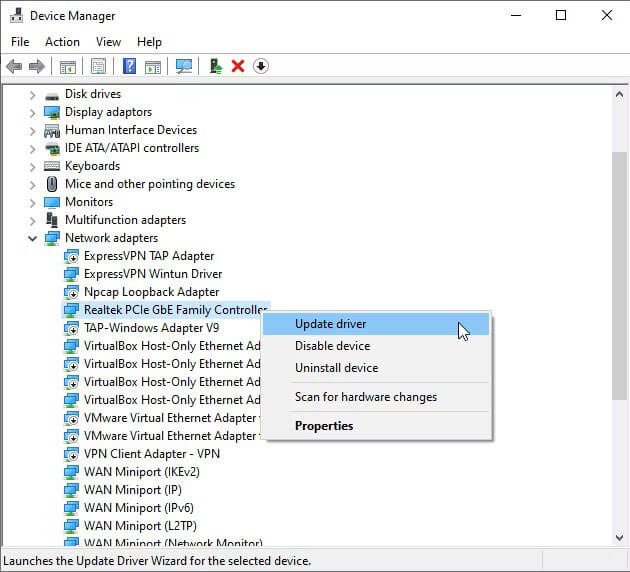
- Find the driver that caused the error in the blue screen.
- If the problem is with your graphics driver, in Device Manager, open Display adapters.
- Right-click on your main graphics card and choose Update driver.
- Click Next to let Windows 10 or 11 automatically search for and install the right driver for your video card.
Alternatively, you can choose Uninstall driver when you right-click on your device to uninstall its driver. If the driver is wrong or broken from the start, uninstalling it can help fix the “System Thread Exception Not Handled” issue. On the next restart, Windows will automatically find and install the best matched driver for that device from Microsoft’s driver repository.
You can also use another computer to manually download the driver installer from the device’s manufacturer website. Then, transfer the installer to an external storage like a USB flash drive and open it on your problem computer while it’s in Safe Mode.
About “SYSTEM THREAD EXCEPTION NOT HANDLED” Ntfs.sys or Dxgmms2.sys
If you’re getting an error with a SYS file that doesn’t relate to any of your hardware, it might be tied to your Windows system files.
If you see Ntfs.sys, for example, it could be because of missing or corrupted system files, or even disk errors on your Windows system drive. Running SFC, DISM, and chkdsk scans might help fix the issue. Check this guide here: “How to Startup Repair Windows 10/11 using Command Prompt” to learn how to use these tools if you can’t boot into Windows.
If you’re dealing with the blue screen error with Dxgmms2.sys error instead, try running Windows Update to update DirectX 12 in Windows 10 or 11 safe mode.
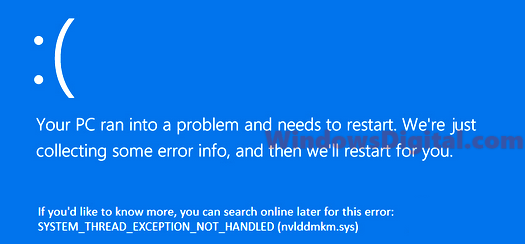
You turn on your PC, and instead of getting the usual welcome by Windows logo, you see a blue screen with the message ‘Your PC ran into a problem and needs to restart‘. When you look closely at the blue screen error information, you see SYSTEM_THREAD_EXCEPTION_NOT_HANDLED in front of the Stop Code info. It’s a classic case of BSOD (Blue Screen of Death) on Windows 10 /11.
What sets apart the ‘System thread exception not handled’ error from other BSOD errors is that this blue screen error may result from the malfunctioning or corruption of multiple drivers simultaneously. Moreover, it causes your PC to get stuck in a reboot loop that a normal reboot can’t resolve.
We’ll discuss the error in detail and then provide the fixes for this issue through this comprehensive blog.
What causes the System Thread Exception Not Handled error?
One or more corrupt drivers is the most common reason for the SYSTEM_THREAD_EXCEPTION_NOT_HANDLED Windows 10 error. However, here are some other probable reasons for the BSOD system thread exception not handled error.
- Corruption or failure in multiple drivers
- Outdated Graphics card
- Error in GPU or outdated GPU driver
- Incompatible hardware components
- Excessive load on the RAM causing delay in communication
Now, before you move on to the solutions, make sure that you’ve recovered the data stored on your PC.
You can use professional data recovery software with a bootable recovery option and get back your valuable data, as some methods might permanently remove any unsaved or corrupt data. That being said, let’s not delay the error fixing procedure.
Identify the faulty driver
To apply any of the fixes, you must identify the culprit driver. Once you’ve zeroed on the faulty driver, you can apply relevant fixes to resolve the problem. Here’s how you can check for corrupt or malfunctioning drivers.
Step 1: Click Windows + R to open the Run utility.
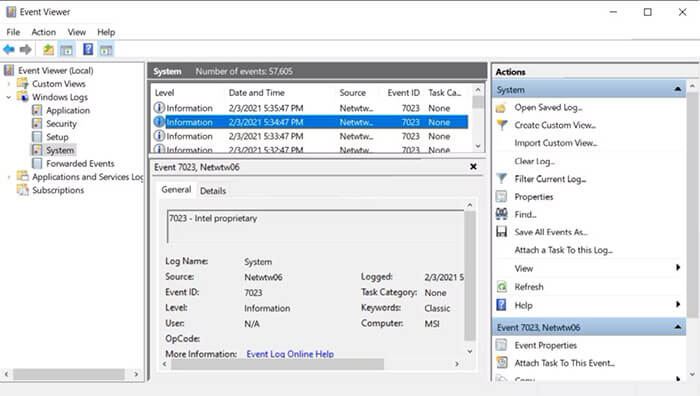
Step 2: Type eventvwr in the tab, press Enter,or click OK.
Step 3: Locate the Windows logs option and select System from the drop-down menu.
Step 4: Locate the SYSTEM_THREAD_EXCEPTION_NOT_HANDLED error and check which driver caused it.
There are 5 ways to fix system thread exception error, and we’ll discuss them with step-by-step directions. Each method is equally effective and addresses the probable reasons behind the Stop Code System Thread Exception Not Handled BSOD.
1. Boot your Windows 10 /11 PC into Safe Mode
Since the Stop Code system thread exception not handled on Windows 10 /11 results in a vicious loop where the system keeps rebooting, you first need to break this loop. For that, you should boot your PC into Safe Mode. Moreover, booting into Safe Mode would also minimize the chances of further damage to your system files and other data stored on your PC.
There are multiple ways to boot your Windows PC into Safe Mode. For example, you can use Settings, Command Prompt, Advanced Startup, or Recover Drive to access Safe Mode on a Windows 10/ 11 PC.
If you have successfully booted your PC into Safe Mode, there is a high probability that the BSOD issue will be resolved. Breaking the boot loop might allow the OS to fix system thread exception issue automatically.
2. Update or Roll Back drivers
Once you’ve identified the faulty driver, you need to either update/reinstall it or roll back the recently updated driver to a previous version.
A. Update/Reinstall the driver
Updating or reinstalling the drivers on a Windows PC is quite easy, and you can do it by following the steps below.
Step 1: Right-click the Windows Start button and open Device Manager.
Note: Alternatively, you can press Windows + R, type devmgmt.msc, and press Enter to open the Device Manager.
Step 2: Navigate to the faulty driver. You’ll generally find a parent option and need to expand it to find the driver. For example, if the issue is related to the graphics driver, click the arrowhead against the Display Adapter option.
Step 3: Right-click the driver and select the Update Driver option.
Note: To reinstall the driver, right-click the driver and select Uninstall device. Now, restart your PC, and Windows will reinstall the driver automatically.
Step 4: Click Search automatically for updated driver software in the new dialog box.
Windows will automatically search, download, and install the updated version of the driver.
B. Roll back to a previous driver version
If you have recently updated a driver and the Stop Code System Thread Exception Not Handled error started showing up after the update, there might be a big issue with the update. In such a case, you must roll back your driver to a previous version.
Step 1: Open Device Manager and locate the problematic driver.
Step 2: Right-click the driver and select Properties.
Step 3: Click the Roll back driver option under the Driver tab.
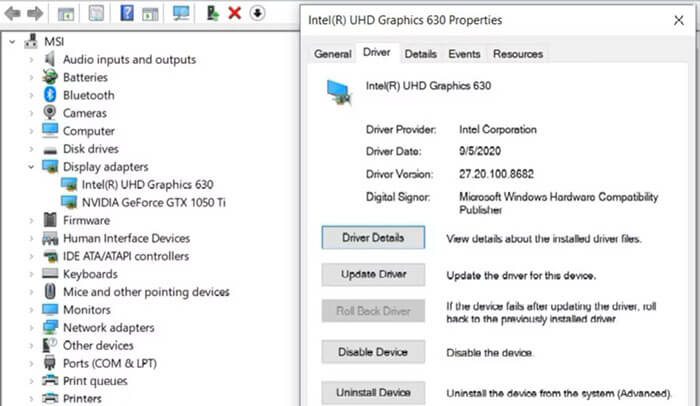
Windows will automatically roll back your driver to a previous stable version.
3. Rename the faulty driver
Sometimes a small tweak can fix the problem. In this case, if you’ve identified the problematic driver, you can change its name. Then, windows will automatically replace it with a fresh copy of the driver file located at C:\ Windows\ System32\ drivers. Here is how to do it.
Step 1: Type File Explorer and open the utility from search results.
Step 2: Follow the path C:\ Windows\ System32\ drivers to access the drivers installed on your Windows PC.
Step 3: Click on the affected driver and press F2.
Step 4: Replace the file extension with the .old extension and press Enter.
Restart your PC for the changes to take effect and check if the system thread exception not handled error appears again.
4. Use the DISM and SFC command combination
DISM and SFC are built-in command line utilities to search and fix system-related issues on your PC. You need to run the DISM command followed by SFC to find and repair the problem causing the stop code System_Thread_Exception_Not_Handled BSOD.
A. Run DISM command
Step 1: Open Command Prompt with Admin privilege on Windows 10 /11.
Step 2: Type DISM /Online /Cleanup-Image /ScanHealth in the command line and press Enter.
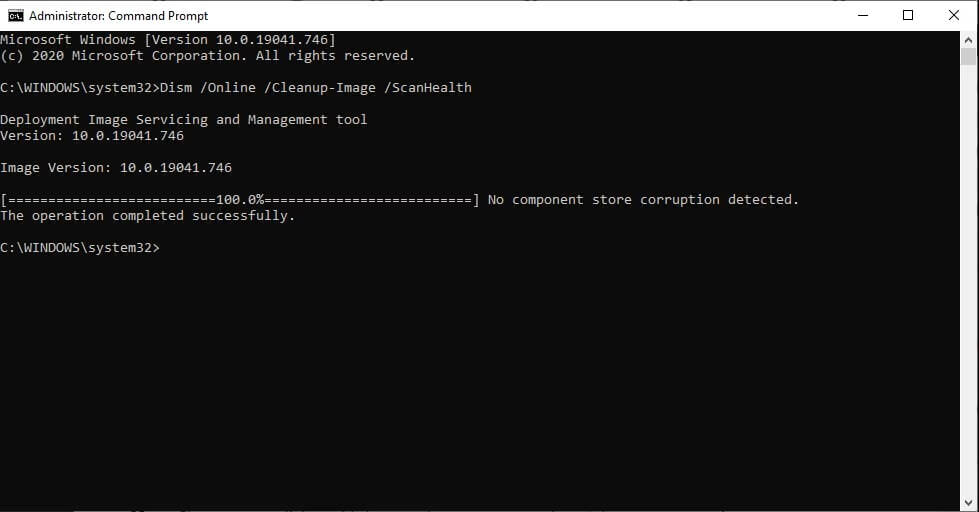
Step 3: Let the scanning complete. Now, insert the command DISM /Online /Cleanup-image /RestoreHealth and press Enter.
Your OS will automatically repair all the issues found during the scan.
B. Run SFC Scan
Step 1: Open Command Prompt by clicking the Run as Administrator option.
Step 2: Enter the command sfc /scannow in the command line and press Enter.
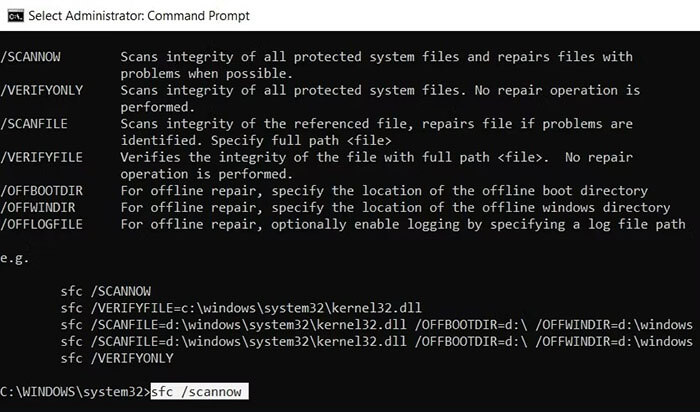
Be patient, as the process will take time. Windows will scan and replace all the problematic system files.
5. Restore your PC to a previous version
This is the last resort if nothing else has worked yet for you. Beware that applying this method will remove any data saved on your PC beyond the date of the restore point chosen.
You can restore your PC using the steps below.
Step 1: Type ctrl in the search bar and open Control Panel.
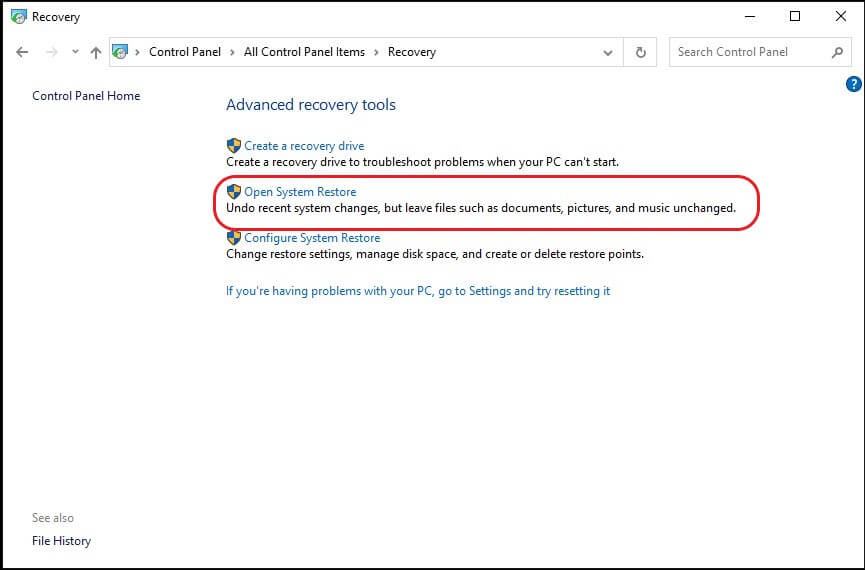
Step 2: Search for and open Recovery in the Control Panel.
Step 3: Click Open System Restore > Next.
Step 4: Select the appropriate restore point from the list and click Finish.
Bonus Tip: Recover lost data on Windows 10/11
You might have noticed that not only is there a possibility of data loss due to a BSOD error, but you can also lose data while trying to repair it. In such a situation, you might need to recover the data if it’s important for you. Retrieving data on a Windows 10/11 PC is quite easy if you know how to use Stellar Data Recovery Professional for Windows.
The software is a comprehensive solution with support for Windows 11 /10 and an added feature of a SMART drive monitor to keep an eye on the health and performance of your PC.
Whatever the data loss situation, you can always rely on powerful algorithms of Stellar Data Recovery Professional for Windows. It can retrieve your data in even the most complex situation. Moreover, it is one of the most trusted and 100% secure tools available at the most economical price.
Conclusion
It is always better to keep your system and drivers updated. Minor negligence may leave you wide open to severe issues like System_Thread_Exception_Not_Handled BSOD.
You can use the Drive Monitor utility Stellar Data Recovery Professional to constantly monitor the health, temperature, and other critical attributes of a drive.
FAQ
How do I fix system thread exception not handled in Windows 11?
You can easily resolve the system thread exception blue screen error on Windows 11 using the methods discussed above.
How do I boot into Safe Mode from BIOS?
Power on your PC and press the F8 key until the Windows logo appears. You’ll see a menu with Safe Mode as one of the options. Select it using the up-down keys and press Enter.
What is a thread exception?
Thread Exception is a run-time blue screen error generally occurring during a program’s execution. It occurs when the program is abruptly terminated and the complete code doesn’t get executed..
Was this article helpful?
YES0
NO
Try these troubleshooting methods to fix a Blue Screen of Death (BSOD) on your Windows 11/10 PC with the message “System Thread Exception Not Handled” error & restore your system stability on a Windows 11/10 PC.
The error message appears when something unexpected happens in the computer’s core operations, known as a system thread, and the PC cannot handle it. The BSOD stop code disrupts the usual flow of the program. Think of it like a glitch that the computer’s repair system can’t fix automatically. When this error appears, users may also start experiencing performance issues, data loss, or system instability problems.
What Causes The System Thread Exception Not Handled Windows 11 Error
Some of the most common causes of this error are listed below:
- If a system file is damaged, missing, corrupted, or modified by a virus, it may cause the PC to malfunction and generate an annoying error.
- Outdated, incompatible, or corrupted drivers can cause conflicts with the system and trigger this error message on your Windows 11/10 PC.
- Hardware issues like faulty RAM, hard disk errors, overheating, or an infrequent power supply can cause this error message, resulting in performance and instability issues.
- Virus, spyware, or ransomware attack can also result in this error. This further infects, deletes, or modifies the system files and drivers, causing the computer to crash or freeze completely.
Best Methods to Try…
The error message is usually accompanied by an error code and a file name associated with the cause of the error. For example, you may encounter something like:
SYSTEM THREAD EXCEPTION NOT HANDLED (0x1000007E) (nvlddmkm.sys)
This means the NVIDIA graphics driver causes this error message. So, how can you fix that? After meticulously testing dozens of solutions, we have listed the most effective methods.
How to initiate the troubleshooting methods?
Well, if you are seeing the System Thread Exception Not Handled error message, chances are you might not be able to boot into your Windows normally. If that’s the case, you first need to access the Advanced Startup Options, which will allow you to troubleshoot and fix the error further.
You can follow the steps below to access the advanced startup options:
STEP 1 = Press and hold the Power button on your device until it shuts down completely.
STEP 2 = Now, press the Power button again to turn on your device.
STEP 3 = As soon as you see the Windows logo, press and hold the Power button again to shut down your device. Repeat this process three times until you see the Preparing Automatic Repair screen.
Now, let the automatic repair process complete and click on Advanced options. This method forces your computer to enter the Windows Recovery Environment, where you can access various tools and settings to repair your computer.
Once you access the Advanced Startup Options, you can follow the methods below to fix this error message.
METHOD 1 = Run System File Checker
If corrupted system files cause the error message, you need to replace them with fresh copies. Fortunately, Windows has a built–in System File Checker (SFC) tool that comprehensively scans and repairs incompatible, corrupted, missing, and modified system files in a few clicks. To run an SFC scan, here’s what you need to do:
STEP 1 = Launch the Run dialog box on your PC. For this, you can press the shortcut keys – Windows + R.
STEP 2 = Type CMD and press CTRL + SHIFT + ENTER keys to launch the Command Prompt as an administrator.

STEP 3 = In the Command Prompt window, type sfc /scannow and hit Enter key to initiate the scanning process.

Keep patience and let Windows complete scanning and repairing potential errors. After that, you can restart your PC, and hopefully, you may no longer witness this error On Windows 10/11 PC. If the issue persists, try the following troubleshooting workaround.
METHOD 2 = Update All Your PC Drivers
Well, if the problem is caused by outdated and problematic drivers, updating them to the latest version can fix the error message in no time. Windows 11/10 users can try both manual and automatic methods to update the drivers. This will not only prevent common errors like SYSTEM_THREAD_EXCEPTION_NOT_HANDLED error but also improve the compatibility and performance of your hardware devices.
To update your drivers manually, here’s what you need to do:
STEP 1: Right-click on the Start menu icon and click on the Device Manager option.
STEP 2: On the Device Manager window, navigate to the category of device that you wish to update drivers for. For instance, if you want to update your graphics card driver, you can expand the Display adapters category.
STEP 3: When you find the driver that needs immediate attention, right-click on the same and select Update driver from the context menu.
STEP 4: A new window will appear on your screen where you need to click on the Search automatically for updated driver software and follow the on-screen instructions.
Repeat the same steps for all the devices you want to update drivers for. Restart the PC and check if the error message is resolved.
If you don’t have enough time or possess the necessary computer skills to update the right set of drivers, we advise our readers to take an automatic approach using dedicated Driver Updater Software.
You can try using Advanced Driver Updater for this purpose. It’s a highly reliable solution that lets users scan and list all problematic drivers that need immediate attention. The software hosts a large database of PC drivers so that users can update the old, corrupted, missing, damaged, and incompatible drivers with the latest and most compatible versions.
Advanced Driver Updater provides a free version (limited to scanning only) and a pro edition, making it easy to update to the latest driver versions with just a few clicks.
Here’s how you can use the tool:
STEP 1: Navigate to the official website of Advanced Driver Updater and install the latest version.
STEP 2: Click the Start Scan Now button on the main interface.

STEP 3: The program will list all the problematic drivers in a few seconds. Simply go through the list and click on the Update All button to replace the current faulty drivers with the most compatible and latest versions.
Now, restart your computer to ensure all the changes are implemented appropriately. Explore our blog post [here] for additional details on the top driver updater software for Windows.
METHOD 3 = Perform A System Restore
If the BSOD error is caused by a recent change that has been caused due to a software or hardware conflict, it’s recommended to perform a System Restore. It’s a Windows feature that enables users to revert their Operating System to a previous state when it works properly without hiccups. To perform a system restore, here’s what you need to do:
STEP 1: Navigate to the search bar and type Create a restore point.
STEP 2: Head towards the System Protection tab and click the System Restore button.

STEP 3: Now select a restore point created before the problem occurs and click on the Next button. Make sure you hit the Finish button to confirm the system restore process!
Wait for the system restore process to be completed, and your PC will restart to the selected restore point. Hopefully, this will fix your error!
Bottom Line | Were You Able To Fix The BSOD Error?
The “SYSTEM THREAD EXCEPTION NOT HANDLED” error is a common BSOD error that can occur on Windows 10/11 PCs for various reasons. Hopefully, the abovementioned methods will help you avoid the annoying error message. If none works, the last resort is to update your BIOS. This will help you improve the compatibility and performance of your OS and eventually fix the annoying error message. Remember, updating BIOS is a risk process that can damage your system if executed incorrectly. Hence, you should proceed only if you are confident.
If you have any questions or feedback, please feel free to comment below. We would love to hear from you and help you out. And do not forget to check out our other blog posts, where we share useful tips and tricks to clean and optimize PCs and fix common Windows errors!
Question
“Can I repair a Blue Screen of Death (BSOD) error system thread exception not handled in Windows 10?”
If you want to fix the system thread exception not handled, you’ve come to the proper place. This post will teach you “How to Fix ‘System Thread Exception Not Handled’ error in Windows 10.” Many people have mentioned this issue on various social media channels. One such instance is given above. System thread exception not handled is an error that shows on a BSOD when process threads performing critical Windows services fail. Users of Windows 8, 8.1, and 10 have mostly reported it. While some customers wait 10 to 15 seconds before receiving this problem, others have reported receiving it soon after their Windows starts. Then their systems reboot, becoming trapped in a cycle that makes it difficult for them to use any machine.
- Part 1: What Does It Mean System Thread Exception Not Handled?
- Part 2: Why Does System Thread Exception Not Handled Windows 10 Happen?
-
Part 3: How to Fix ‘System Thread Exception Not Handled’ Error in Windows 10?
- Fix 1: Boot Computer Into Safe Mode
- Fix 2: Run Memory Diagnosis
- Fix 3: Disable Fast Startup
- Fix 4: Check and Replace the Malfunctioning Driver
- Fix 5: Update or Reinstall the Drivers
- Fix 6: Update Firmware
- Fix 7: Rename the Faulty File
- Fix 8: Repair System Files Using SFC or DISM
- Fix 9: Use System Restore to Restore Your PC
- Fix 10: Reinstall OS
- Part 4: How to Recover Data from Unbootable PC due to System Thread Exception Not Handled Error?HOT
-
Exception Not Handled FAQs
- 1. Can system thread exception not handled?
- 2. Can RAM cause system thread exception not handled?
- 3. How do I fix interrupt exception not handled?
Video Tutorial on How to Fix System Thread Exception Not Handled
Part 1: What Does It Mean System Thread Exception Not Handled?
The “system thread exception not handled” error message is a typical Windows 10 issue caused by an old or incompatible driver.
It is more difficult to resolve than other BSODs because numerous drivers can cause the problem, and your computer may not recognize them all. As a result, the first action users should take when dealing with this error is to identify the precise driver causing the issue.
Part 2: Why Does System Thread Exception Not Handle Windows 10 Happen?
We must first comprehend what is causing the system thread exception not handled problem before we can repair it. When you boot up your computer, Windows 10 will load all the installed drivers. Sometimes a driver is incompatible with your Windows version, or the driver contains a problem.
This stops Windows 10 from booting correctly, resulting in a blue screen of death (BSOD) with the error system thread exception not handled by Windows 10. Sometimes difficulties appear out of one day, your computer is fabulous, and it won’t start the next day.
Most of the time, these unexpected difficulties are caused by Windows upgrades or automatic driver updates. They will automatically install fresh drivers loaded after a reboot.
Part 3: How to Fix ‘System Thread Exception Not Handled Error in Windows 10?
Here’s how to resolve the Windows 10 system thread exception not handled the problem.
Fix 1: Boot Computer Into Safe Mode
Before attempting to resolve this issue, users should first boot their machine into Safe Mode. Follow the steps below to know how to boot into Safe Mode via Settings.
Step 1: Select Settings after clicking the Start button.
Step 2: Go to Update & Security, then click Recovery.
Step 3: Click Restart now under Advanced startup.
Step 4: The Choose an option screen should show when your computer resumes.
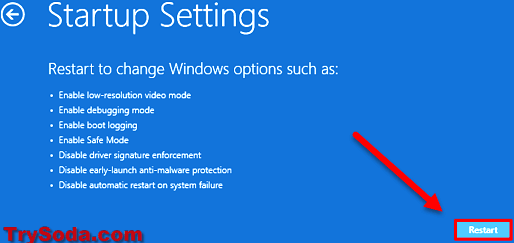
Step 5: Go to Troubleshoot > Advanced Options > Startup Settings from here. Then select Restart.
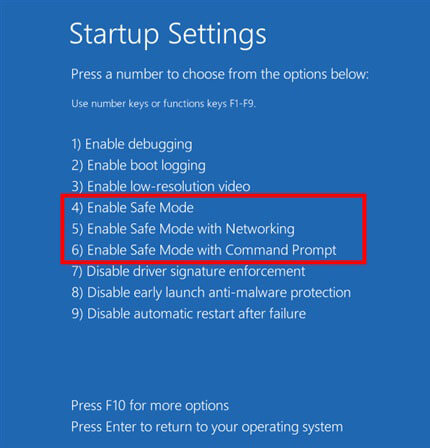
Step 6: When your computer restarts, press F5 to enter Safe Mode with Networking.
Fix 2: Run Memory Diagnosis
Memory diagnostics will check for and repair any discovered logical memory issues. Please follow the procedures below:
Step 1: Boot into Windows or Safe Mode.
Step 2: Conduct a memory evaluation.
- Press «Windows + R» in the run box and type «mdsched.exe.»
- Select «Restart now and check for problems when the Windows Memory Diagnostic software appears.»
- Wait for the computer to complete the memory diagnostics. This procedure typically takes a few minutes.
Step 3: Examine the outcome in Event Viewer.
Fix 3: Disable Fast Startup
Microsoft launched a fast startup feature with Windows 10 that decreases the startup time of the operating system. Some Windows users have reported The problem System Thread Exception Not Handled BSOD Error will be resolved once you disable the rapid startup feature.
Step 1: Open the control panel.
Step 2: Look for and choose power alternatives.
Step 3: Select the function of the power buttons.
Step 4: Change any settings that are presently inaccessible.
Step 5: Uncheck the «enable rapid startup» (recommended). To save your changes, click OK.
Step 6: After that, restart Windows and check. BSOD System Thread Exception Not Handled has been resolved.
Fix 4: Check and Replace the Malfunctioning Driver
There are numerous ways to accomplish this, but the simplest is to examine the system log, which records events. You’ll need to launch the event viewer to achieve this.
Step 1: To open the “run” dialogue box, press the Windows key + R on your keyboard.
Step 2: Enter “eventvwr” into the box and press OK.
Step 3: Scroll down to “Windows logs” and click to bring up the menu drop-down.
Step 4: Select «system» from the drop-down option to view all recent occurrences.
Step 5: Determine which driver is responsible for the “system thread exception not handled” problem.
Fix 5: Update or Reinstall the Drivers
The simplest way to resolve mismatched drivers is to update them, roll them back to a prior version, or reinstall them if you have the most recent version.
- To update your drivers, go through your device list, right-click on each piece of hardware with a driver, and select update. All included disk drives, audio devices, network adaptors, sound devices, and display adaptors. Select «update driver,» It will automatically look for the most recently updated version.
- To revert your drivers, navigate to your device list, right-click on each piece of hardware with a driver, and select «properties.» You should then go to the «driver» page and select the «rollback» option. Yes, make sure to click!
- To reinstall a driver, you must first uninstall the device. You must then browse the device manufacturer’s website, locate your device, and manually download and install the most recent driver.
Fix 6: Update Firmware
Existing problems and hardware incompatibility concerns can be resolved by upgrading the firmware. It has the potential to increase computer stability. Follow the steps below to know how to update Firmware.
Step 1: Determine the current BIOS version.
- Press the “Windows + R” keys at the same time.
- Type «MSConfig» into the run box and press the OK button to open System Configuration.
- Proceed to Tools.
- Select System Information and press the Launch button.
- Then, keep the BIOS Version/Date handy.
Step 2: Go to the manufacturer’s website and download the correct new BIOS version.
Step 3: Insert the USB with the latest BIOS version and boot into BIOS to upgrade the firmware.
The firmware update is more involved than the quick tutorial provided above. Before you upgrade the firmware, please look for more information about it.
Fix 7: Rename the Faulty File
Users should rename the file after receiving the file name associated with the system thread exception not handled the issue. Windows will build a new copy and reinstall it when you do this. Driver files are found at C:\ Windows\ System32\ drivers.
The exception does not handle the error when retrieving the file name associated with the system thread; users should rename the file. When you do this, Windows will create a new copy and reinstall it. Follow these steps to rename the file:
Step 1: Launch File Explorer and navigate to C: WindowsSystem32drivers.
Step 2: Locate the affected driver; click on it and press F2.
Step 3: Change the filename extension to old.
Step 4: Press Enter to restart your computer.
Fix 8: Repair System Files Using SFC or DISM
SFC and DISM are two vital utilities that every Windows user has at their disposal. When used together, they can detect and repair practically every system-related fault. They’re also relatively straightforward to put into action.
How to Use DISM?
Step 1: Start Command Prompt as Administrator.
Step 2: Enter DISM /Online /Cleanup-Image /ScanHealth into the terminal and hit Enter.
Step 3: Wait for Windows to complete the scanning process. Then put DISM /Online /Cleanup-image /RestoreHealth on the command line.
Step 4: Windows will correct any issues discovered during the check.
How to Use SFC?
Step 1: Type cmd into the Start menu search bar, right-click on Command Prompt, and select Run as administrator.
Step 2: Enter SFC /scannow into the terminal.
Step 3: Be patient while Windows scans and replaces corrupt system files.
Fix 9: Use System Restore to Restore Your PC
If the problem persists, you will have to resort to System Restore as a final resort. Follow the steps below to learn how to use System Restore.
Step 1: Type Control Panel into the Start menu search bar and press Enter.
Step 2: Enter Recovery in the Control Panel search bar and select it from the results.
Step 3: Open System Restore by clicking the button.
Step 4: Select a restore point from the list by clicking Next.
Step 5: Finally, press the Finish button.
Fix 10: Reinstall OS
If the above methods can’t solve Windows 10 system thread exception not handled, then to resolve the issue, you can do a clean reinstallation of the operating system. Some users indicate that using this strategy could determine the system thread exception, not handled error.
If you execute a clean reinstallation of the operating system, you must utilize dependable tools to back up or restore data beforehand. Installing Windows 10 on a new hard drive is an excellent place to start for clean install instructions. Finally, you can configure the BIOS startup sequence to boot the machine from the new System disc.
Part 4: How to Recover Data from Unbootable PC due to System Thread Exception Not Handled Error?
Tenorshare 4DDiG data recovery software can generate a bootable disc to recover data from a Windows PC that cannot boot due to a system thread error that has not been handled. Tenorshare 4DDiG can also assist in data recovery if users lost data after repairing system thread exceptions that were not addressed. The detailed steps for recovering data from an unbootable PC are as follows.
Your Windows PC may crash or cease working. This could occur as a result of thread exceptions not being handled. You go to a shop to have it fixed, and you need to recover your essential data from it. So, how can data be retrieved from a crashed system? Follow the steps below to recover data from a crashed PC using 4DDiG.
- Support data recovery both from laptop/PC and external devices, such as USB, SD card, external hard drive, etc.
- Support 1000+ data types including photos, videos, documents, and audio and more.
- Recover lost data due to accidental deletion, crashed system, lost partition, and virus attack and so on.
- It is 100% safe with easy steps.
- Prepare for Crash Recovery
- Connect USB Drive and Select Location
- Create a Bootable Drive
- Create Bootable USB Drive Successfully
- Boot Crashed Computer from USB/CD/DVD Drive
- Recover Data from Crashed Computer
Before you begin data recovery from a crashed computer, gather the following items: another functional computer, a blank USB drive larger than 1.5GB or a CD/DVD, and the 4DDiG Data Recovery tool installed on the working machine.
Start the 4DDiG software on your computer and attach your USB flash drive. Select Recover from Crash Computer from the home interface to proceed.
Select an external USB/DVD drive and then click Create to create a bootable drive. It is essential to know that your USB/DVD will be formatted to make a bootable drive. Also, please do not use the drive when developing.
After a while, the bootable disc will be successfully established, and you will be able to access your crashed computer to begin data recovery.
After inserting the USB flash drive or CD/DVD drive into the crashed computer, restart your device. Then, when you see the computer brand logo on the screen, hit the relevant key until you reach your device’s BIOS settings.
After entering the BIOS, use the arrow keys to navigate the boot tab and pick the boot device. Then your wrecked system will begin loading files, and please be patient while the configuration is completed. 4DDiG will now launch automatically, and you may choose a location to start data recovery. We strongly advise you to save your recovered data to an external device rather than local discs for data protection.
1. Can the system thread exception not handle?
The “system thread not handled” problem indicates that a system thread in your computer-generated an exception for an error that was missed by the handler. A blue screen of death has occurred due to it failing to detect and correct the error, leading the computer to attempt to gather information about the error.
2. Can RAM cause system thread exceptions not to be handled?
Memory corruption can sometimes cause the Windows system thread exception not to handle the issue. Boot into Windows or Safe Mode and check the RAM to resolve this issue. If the result indicates that everything is fine, you should double-check that the memory bank is appropriately installed.
3. How do I fix interrupt exceptions not handled?
You can resolve an interrupt exception that was not handled by running DISM, updating drivers, checking the hard drive, uninstalling antivirus software, restoring a system, and running the Blue Screen Troubleshooter.
Conclusion
In conclusion, we believe that the Tenorshare 4DDiG data recovery software is worth a go. You can use it to recover a wide range of files lost due to the Windows 10 system thread exception not being handled. It also allows you to preview files before restoring them, saving time and space by repairing only the data you need on the hard drive. Tenorshare 4DDiG is an excellent choice if you need a versatile tool to recover any data.