
Все способы:
- Способ 1: Удаление последних обновлений ОС
- Способ 2: Деинсталляция проблемных программ
- Способ 3: Восстановление поврежденных системных файлов
- Способ 4: Обновление драйверов
- Способ 5: Проверка на наличие вирусов
- Вопросы и ответы: 0
Способ 1: Удаление последних обновлений ОС
Ошибка Win32kfull.sys чаще всего провоцирует BSOD из-за сбоев в обновлении системы до следующей актуальной версии. Иногда избавиться от неполадки помогает удаление последних апдейтов ОС. Это можно сделать, используя возможности «Панели управления» или консоли «Командная строка». Об этом более детально написано в нашем отдельном материале по ссылке ниже.
Подробнее: Удаление обновлений в Windows 10
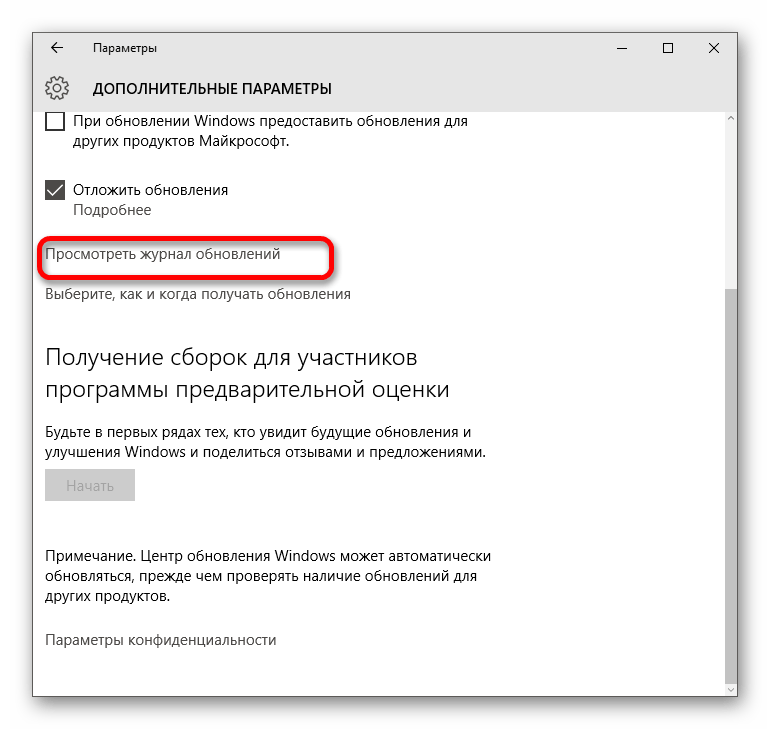
Если в последнее время никаких обновлений не устанавливалось, то ошибка, скорее всего, произошла по другим причинам, поэтому переходите к следующим способам.
Способ 2: Деинсталляция проблемных программ
В том случае, если проблема появилась после установки программы, то есть вероятность, что она начала конфликтовать с архитектурой операционной системы. Преимущественно рассматриваемая ошибка возникает после инсталляции софта, который вносит изменения в персонализацию Windows 10, например меняет вид панели задач, темы или системных значков, а также любые другие визуальные элементы.
Соответственно, любой такой проблемный софт понадобится деинсталлировать. Наш автор рассматривал все способы, позволяющие перейти к разделу Windows 10 с удалением программ.
Подробнее: Открытие меню удаления приложений в Windows 10
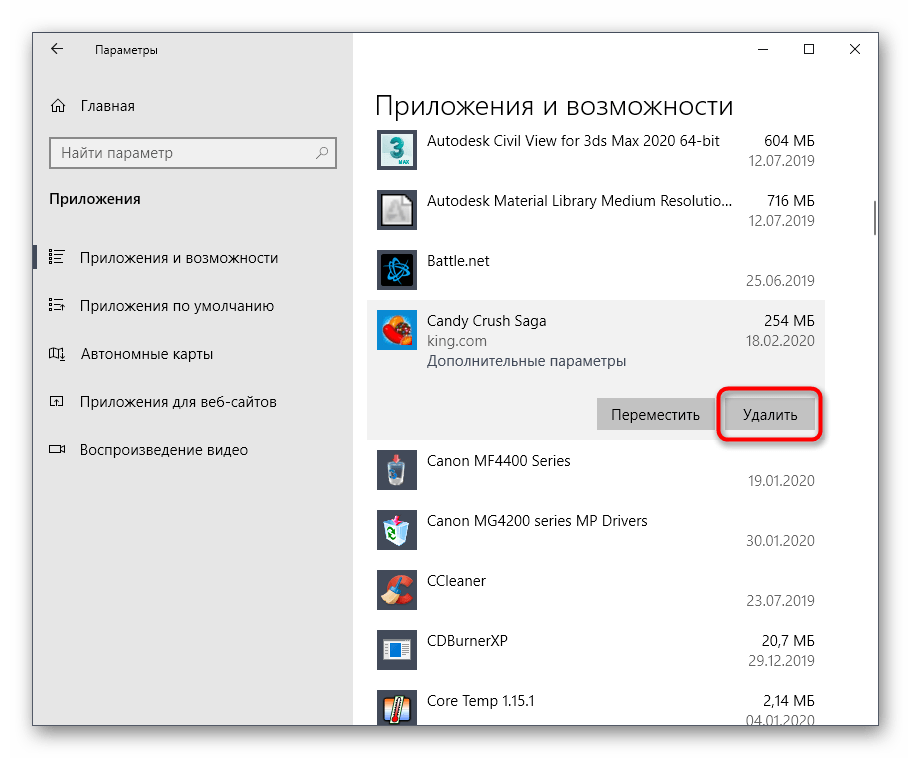
Читайте также: Методы принудительного удаления программ в Windows 10
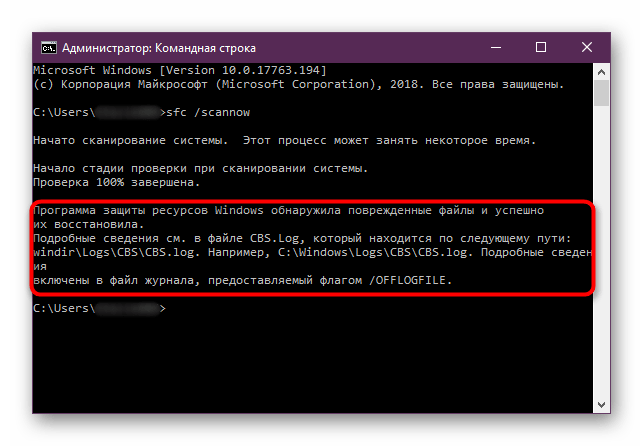
Способ 3: Восстановление поврежденных системных файлов
Большинство ошибок, вызывающих «синий экран», связано с тем, что происходят сбои в работе из-за повреждения системных файлов. Причин, почему они оказались в таком состоянии, может быть множество, но встроенные средства Windows позволяют их восстановить и вернуть корректную работоспособность ОС в целом.
Для проверки и восстановления целостности системных файлов предназначены специальные команды в консоли «Командная строка», запущенной с правами администратора. Также есть более радикальные способы: откат системы к предыдущему состоянию или сброс настроек до заводских. В нашем отдельном руководстве все варианты описаны более детально.
Подробнее: Восстановление системных файлов в Windows 10
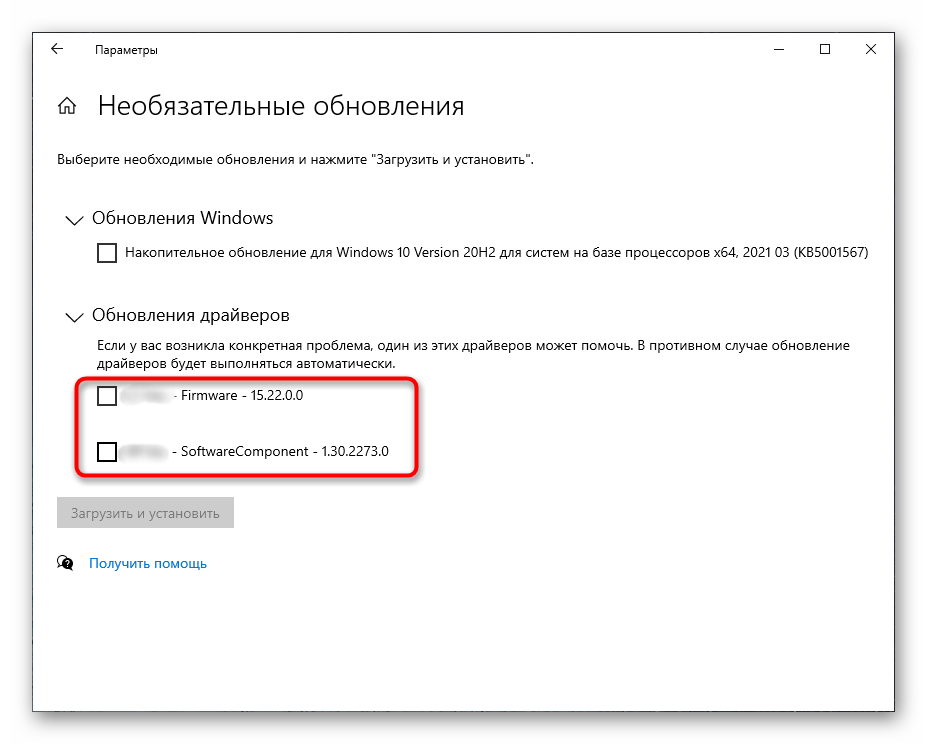
Способ 4: Обновление драйверов
Из-за программных конфликтов также появляются проблемы с установкой обновлений операционной системы, что может привести к BSOD с ошибкой Win32kfull.sys. Зачастую причиной становятся устаревшие или поврежденные драйверы используемых компонентов компьютера или ноутбука. С помощью инструкции на нашем сайте по проверке драйверов можно определить, какие компоненты нуждаются в обновлении, а для каких апдейты были установлены автоматически. Кроме того, используя описанные в руководстве методы, несложно узнать, какая версия уже стоит и когда она была загружена. Если нет возможности проверять каждое устройство, то существуют специальные программы для обновления программного обеспечения, позволяющие просканировать сразу всю систему и, при необходимости, установить недостающие апдейты.
Подробнее: Как проверить обновления драйверов в Windows 10
Способ 5: Проверка на наличие вирусов
Последний, но не по важности, метод исправления ошибки – сканирование системы на наличие вредоносного ПО, которое самым разным образом мешает комфортному использованию ПК. Из-за вирусов могут возникнуть абсолютно любые системные неполадки, поэтому не исключено, что ошибка Win32kfull.sys вызвана именно по этой причине.
Проверить компьютер на вирусы, а затем избавиться от них могут помочь портативные утилиты, не требующие установки, и, как правило, распространяющиеся бесплатно, а также полноценные многофункциональные инструменты для борьбы с вредоносным софтом и встроенные средства защиты ОС Windows 10. Обо всех методах можно узнать из нашей отдельной статьи, перейдя по ссылке ниже.
Подробнее: Методы удаления вируса с компьютера под управлением Windows 10
Наша группа в TelegramПолезные советы и помощь
Your PC has a set of two drivers, normal drivers are responsible for communication between your OS and hardware whereas, other kernel-mode drivers are necessary for booting the Operating System. The win32kfull.sys file is one of the kernel-mode drivers in your PC. Any problems in win32kfull.sys file happens when you have hardware issues in your computer. In some instances, you may face win32kfull.sys BSOD Windows 10 issue when you boot your PC. This is very frustrating since you cannot use your PC when needed. Hopefully to bring your PC back to normal when facing the Blue Screen of Death error, hold the power button for 5 to 10 seconds. Windows might automatically fix the problem and restart your computer. If not, we are here to help you with the best troubleshooting methods to fix win32kfull.sys Blue Screen error on Windows 10 PC.

Table of Contents
This is the full context of another common error:
“SYSTEM_SERVICE_EXCEPTION (win32kbase.sys)
APC_INDEX_MIXMATCH
PAGE_FAULT_IN_NONPAGED_AREA”
As discussed earlier, win32kfull.sys files are kernel-mode drivers responsible for booting your Windows. These drivers are responsible for establishing a connection between internal and external hardware devices like a printer. You may also face this error code in apps such as Blue Screen error in Edge.
You will receive one of the following messages when you face BSOD error due to win32kfull.sys files:
- STOP 0×00000050: PAGE_FAULT_IN_NONPAGED_AREA – win32kfull.sys
Whenever you face this error, this indicates that your PC has detected some error and it has been powered off to prevent any damages. This occurs due to heavy load and when corrupt system memory is referenced.
- STOP 0x0000001E: KMODE_EXCEPTION_NOT_HANDLED – win32kfull.sys
This error occurs due to misconfigured drivers. It often results in blue screen error which can be fixed by following the below-discussed troubleshooting methods.
- STOP 0x0000000A: IRQL_NOT_LESS_EQUAL – win32kfull.sys
This error occurs when your PC tries to break the never-ending loop of interrupts. All the interrupts are prioritized to prevent the deadlock of recurring requests. Running the hardware troubleshooter and reinstalling incompatible drivers will help you resolve the error.
Irrespective of all these errors and their varieties, you may use this troubleshooting guide to fix all types of issues from win32kfull.sys file.
What Causes win32kfull.sys Blue Screen Error?
Here are some common reasons that causes win32kfull.sys BSOD Windows 10 problem. Try to analyze the causes so that you can fix the problem according to them:
- Presence of outdated or incompatible drivers in your PC, will lead to win32kfull.sys BSOD.
- If the PC has any faulty registry keys while installing/uninstalling any incompatible program, the error is more likely to happen.
- Presence of malware in PC and any conflicts between hardware and devices.
- If there are any corrupt or missing program files, you will face win32kfull.sys BSOD Windows 10 error.
- Corrupt RAM and memory issues in PC.
Method 1: Run Printer Troubleshooter
Few of you might face win32kfull.sys BSOD error while printing documents. In this case, conflicts between the hardware and the OS contribute to the problem. You can solve this by running the corresponding troubleshooter as discussed below:
1. Press Windows + I keys simultaneously to open Settings.
2. Click pn Update & Security.

3. Click Troubleshoot. Then, select Printer and click on Run the troubleshooter.

4. Your system will undergo a screening process. Wait for the process to be complete, and if any issue is found in your system, click Apply this fix and follow the instructions given in the successive prompts.

5. Finally, restart your PC
Method 2: Repair System Files
The System File Checker tool is a helpful tool to repair any corrupt files in your computer. All the damaged system files are automatically sorted and repaired when you execute a simple command line. Also, you could restore the essential missing files by using the SFC command tool. To run SFC and DISM tools, follow the below-mentioned steps.
1. Hit the Windows key, type Command Prompt and click on Run as administrator.

2. Click on Yes in the User Account Control prompt.
3. Type chkdsk C: /f /r /x command and hit Enter key.

4. If you are prompted with a message, Chkdsk cannot run…the volume is… in use process, then, type Y and hit the Enter key.
5. Again, type the command: sfc /scannow and press Enter key to run the System File Checker scan.

Note: A system scan will be initiated and it will take a couple of minutes to finish. Meanwhile, you can continue performing other activities but be mindful of not accidentally closing the window.
After completing the scan, it will show either of these messages:
- Windows Resource Protection did not find any integrity violations.
- Windows Resource Protection could not perform the requested operation.
- Windows Resource Protection found corrupt files and successfully repaired them.
- Windows Resource Protection found corrupt files but was unable to fix some of them.
6. Once the scan is finished, restart your PC.
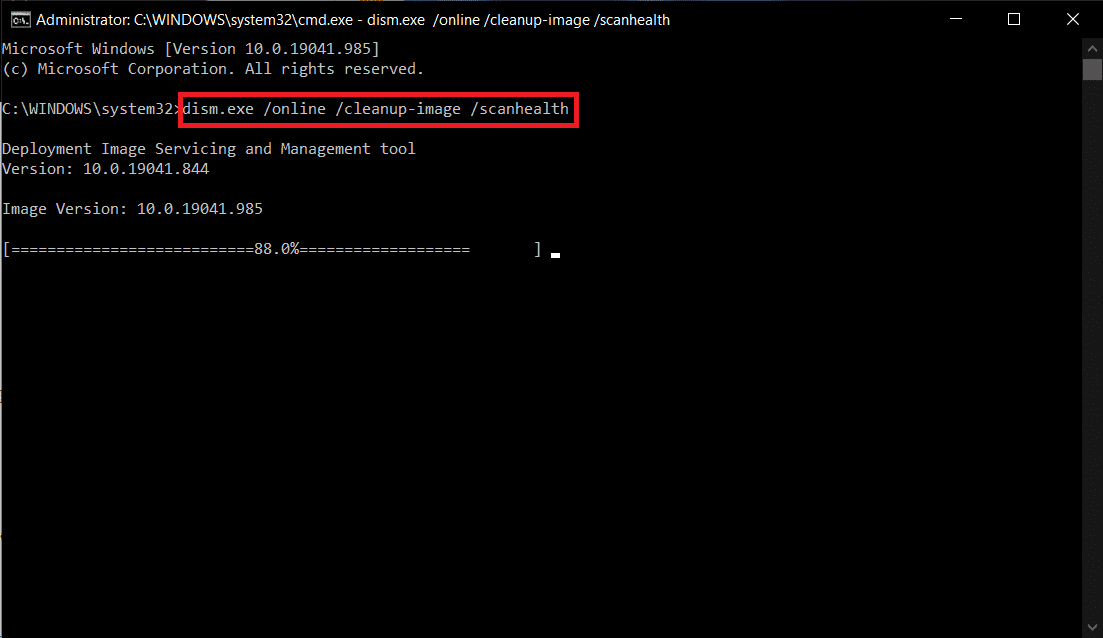
7. Again, launch Command Prompt as administrator and execute the given commands one after the other:
dism.exe /Online /cleanup-image /scanhealth
dism.exe /Online /cleanup-image /restorehealth
dism.exe /Online /cleanup-image /startcomponentcleanup
Note: You must have a working internet connection to execute DISM commands properly.
Also Read: Fix Windows 10 Netwtw04.sys Blue Screen Error
Method 3: Use Windows Memory Diagnostic Tool
The Windows Memory Diagnostic Tool is a free memory test program to ensure any issues with the system memory triggering win32kfull.sys BSOD. This tool is easy to use, and the system will be rebooted after sorting the errors. Follow the below-mentioned steps to use Windows Memory Diagnostic tool.
1. Hit your Windows key and type Windows Memory Diagnostic in the search bar and Open.

2. Click on Restart now and check for problems (recommended) option to scan your computer for memory problems.
Note: Save your work and close any open programs before restarting.

3. Now, after a restart, Windows Memory Diagnostics Tool will open up. Then, hit the F1 key to open Options.

4. Here, use the arrow keys to navigate to the Extended option and hit F10 to Apply.
Note: The Extended tests include all the standard tests plus MATS+ (cache disabled). Stride38, WSCHCKR, WStride-6. CHCKR4, WCHCKR3, ERAND, Stride6 (Cache disabled), and CHCKRS.
5. Wait until the memory test is completed (this might take several minutes) and check if any errors are reported. If any, note down the errors (troubleshoot them accordingly) and hit ESC to Exit the tool.

Also Read: Fix Windows 10 Blue Screen Error
Method 5: Run Malware Scan
The win32kfull.sys BSOD may occur due to malware attacks on your PC. The bugs that intruded in the PC might infect and corrupt the essential .sys files leading to the discussed error. Wondering How do I Run a Virus Scan on my Computer? Here’s How to Remove Malware from your PC in Windows 10.
Method 6: Update Drivers
The win32kfull.sys BSOD error might occur when you have outdated drivers. Often, incompatible drivers also lead to the same issue. To avoid any errors, update all the drivers in your PC as instructed below:
1. Hit the Windows key and type Device Manager, click on Open.

2. You will see the Network adapters on the main panel; double-click on it to expand it.

3. Right-click on the network driver (e.g. Intel(R) Dual Band Wireless-AC 3168) and click Update driver.

4. Now, click on Search automatically for drivers options to locate and install a driver automatically.

5A. Now, the drivers will be updated to the latest version if they are not updated.
5B. If they are already in an updated stage, the screen displays the following message, The best drivers for your device are already installed. Click on Close to exit the window.

Also Read: Fix Red Screen of Death Error (RSOD) on Windows 10
Method 7: Update Windows
Microsoft is trying it’s improving all of its versions of Windows to bring a PC without any errors. You can fix the bugs and patch-related problems in your Windows 10 computer by updating it as follows:
1. Press Windows + I keys simultaneously to launch Settings.
2. Click on the Update & Security tile, as shown.

3. In the Windows Update tab, click on Check for updates button.

4A. If a new update is available, then click Install now and follow the on-screen instructions. Restart your PC when done.

4B. Otherwise, it will show You’re up to date message as shown.

Method 8: Uninstall Recently Installed Programs
If you have installed a new program recently on your PC and then experiencing win32kfull.sys Blue Screen error, then it indicates that the program is incompatible with your PC. Here’s how to do so:
1. Follow our guide on How to Boot to Safe Mode in Windows 10 here.
2. Now hit the Windows key, type apps and features, and click on Open.

3. Click on the conflicting/suspicious app (e.g. Battle.net) and select Uninstall option, as depicted below.

4. Click on Uninstall again to confirm the same.
5. Finally, restart your PC.
Also Read: How to Fix Window 10 Laptop White Screen
Method 9: Uninstall Recent Updates
If you face the said problem after updating Windows OS, your internet surfing experience might be incompatible with the new update and, in this case, uninstall recent updates on PC. You will also get the stability of your PC after uninstalling a faulty update. Here is how to do it.
1. Press and hold Windows + R keys together to open Run dialog box.
2. Type appwiz.cpl as shown and hit Enter.

3. Click on View installed updates.

4. Select the most recent update and click on Uninstall.

5. Confirm the prompt, if any, and reboot your PC.
Method 10: Clean Boot PC
The issues concerning the win32kfull.sys BSOD Windows 10 can be fixed by a clean boot of all essential services and files in your Windows 10 system, as explained in this method.
Note: Make sure you login as an administrator to perform Windows clean boot.
1. Launch the Run dialog box, type the msconfig and click the OK button.

2. The System Configuration window appears. Next, switch to the Services tab.
3. Check the box next to Hide all Microsoft services, and click on Disable all button as shown highlighted.

4. Switch to the Startup tab and click the link to Open Task Manager.

5. Now, the Task Manager window will pop up. Switch to the Startup tab.
6. Select the startup tasks which are not required and click Disable displayed in the bottom right corner.

7. Exit the Task Manager and System Configuration window. Finally, restart your PC.
Also Read: Fix Windows 10 Yellow Screen of Death
Method 11: Perform System Restore
You may face the discussed issue after updating your Operating System. If so, then you could restore your Windows 10 system to its previous version.
Method 12: Reset PC
If you did not attain any fix by following all the above-discussed methods, then there is the last chance to reset your PC as follows:
1. Press the Windows + I keys together to open Settings in your system.
2. Select Update & Security.

3. Select the Recovery option and click on Get started.

4. Now, choose an option from the Reset this PC window.
- Keep my files option will remove apps and settings but keep your personal files.
- Remove everything option will remove all your personal files, apps, and settings.

5. Finally, follow the on-screen instructions to complete the reset process.
Recommended:
- Fix Taskbar Right Click Not Working
- Fix Windows 10 0xc004f075 Error
- Fix Bluetooth Driver Error in Windows 10
- Fix No WiFi Networks Found in Windows 10
We hope that this guide was helpful and you could fix win32kfull.sys BSOD in Windows 10. Let us know which method worked for you the best. Also, if you have any queries/suggestions regarding this article, then feel free to drop them in the comments section.
Файл win32kbase.sys может фигурировать в различных кодах BSOD, да и причины у ошибки могут быть разные. Проявляется она обычно не сразу, а при определенных условиях или просто время от времени, вызывая синий экран смерти в Windows 10. Практически во всех инструкциях указываются банальные действия по обновлению драйверов, как реальное решение проблемы. Однако наше расследование показало, что подобные действия редко помогают. Они все еще остаются полезными, но скорее в качестве профилактики других неполадок. В случае данного BSOD стоит использовать другие тактики.
Как часто выглядит ошибка (по ссылкам можете найти дополнительные исправления):
SYSTEM_SERVICE_EXCEPTION (win32kbase.sys)
APC_INDEX_MIXMATCH
PAGE_FAULT_IN_NONPAGED_AREA
KMODE_EXCEPTION_NOT_HANDLED – win32kfull.sys
IRQL_NOT_LESS_EQUAL – win32kfull.sys
Как исправить BSOD win32kfull.sys?
Хорошая новость в том, что нам удалось найти несколько настоящих виновников синего экрана смерти. Плохая новость – одна из этих причин аппаратная. Однако отчаиваться раньше времени не следует, так как с большой долей вероятности удастся исправить неполадку системным путем и даже без сброса Windows 10.
Что нужно сделать:
- Удалить или обновить Volume2. Программа очень у многих пользователей вызывала BSOD. В дальнейшем разработчики поправили проблему, поэтому можно приложение просто обновить.
- Откатить или установить обновления. Периодически случаются пики данной ошибки, все из-за несовместимости версии Windows с установленными драйверами. Их разработчики не успевают корректировать код, и он вступает в конфликт с системой.
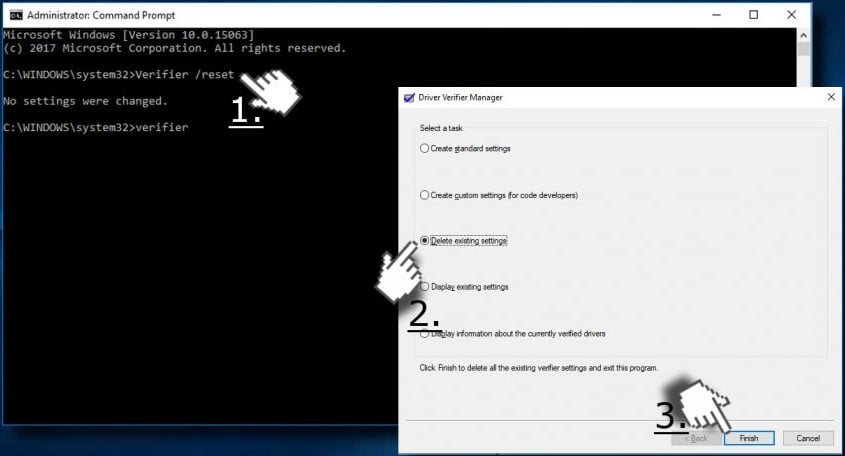
- Отключить проверку драйверов. Это действие является не совсем желанным решением, так как снижает защиту Windows. С другой стороны, вовсе не обязательно оставлять средство безопасности отключенным. Если процедура сработает, вы можете заняться поиском тех драйверов, которые вызывают сбой. Все, что нужно выполнить, это перезагрузить систему, войти в безопасный режим и ввести команду verifier /reset.
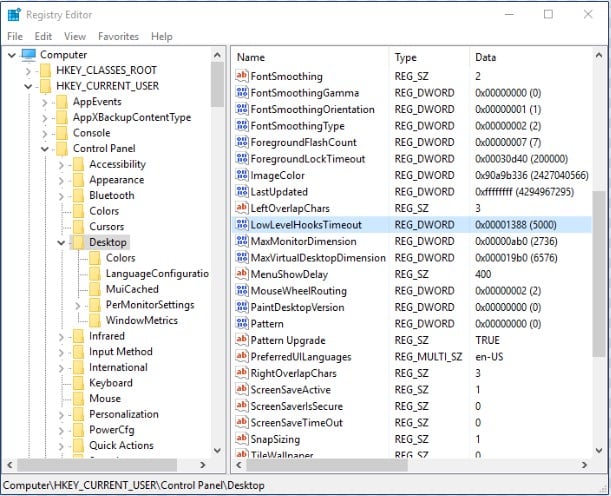
- Изменить реестр. Вот путь к нужному параметру HKCU\Control Panel\Desktop, который называется LowLevelHooksTimeout. Для данного элемента следует указать значение 5000, а BSOD обычно появляется у тех, у кого стоит 0. При отсутствии параметра, его можно создать вручную.
- Замена диска. Как минимум у нескольких пользователей проблема была с SSD. Накопитель был еще рабочий, но его состояние программами оценивается в 60-70%. Таким образом можно сделать вывод, что это первые звоночки о необходимости обновление накопителя. Стоит провести сканирование диска, на котором установлена операционная система.
Все перечисленные процедуры по исправлению синего экрана смерти со ссылкой на файл win32kfull.sys были взяты из форумов и видео. Здесь только те решения, которые пользователи пометили, как рабочие. Нет гарантии, что они сработают у всех, но шансы очень хорошие.
Результаты выполненных процедур, вопросы, уточнения и другую информацию просьба указывать в комментариях.
Win32kfull.sys Error in Windows 10, as well as similar errors, happen to occur during the phase of system boot. Sometimes it shows up while you attempt to use some specific functions and also when you start a program. As to define it in simple terms, Win32kfull.sys is generally a kind of SYS file linked with Windows 10. Microsoft Corporation came up with it as an aid to the operating system.
Issues in SYS files like win32kfull.sys Error in Windows 10 takes place because of the problematic hardware system. Sometimes, corruption in the device driver files can do the same. Win32kfull.sys bears a tremendous importance in the functionality of this latest OS. Therefore any SYS errors in Windows 10 can result in serious damage. Very often critical system issue like BSOD (Blue Screen of Death) appears. We will discuss how to fix win32kfull.sys Error in Windows 10 in the following discussion. So move ahead –
How to fix win32kfull.sys Error in Windows 10
Before going to deep, let’s know first about SYS files and the causes or the mess up.
What are SYS Files?
SYS files like win32kfull.sys are basically a third-party critical system file or device drivers. Microsoft Corporation is also included in third-party organizations. These files are actually parts of Windows operating system. The main function of these drivers is to allow the internal and external hardware system of a computer such as a printer.
Except for the win32kfull.sys, most of the critical files are kernel mode device drivers. These are necessary for powering up the Windows Operating system. Some files like CONFIG.SYS also contain configuration settings too.
Nature of Errors in SYS files
Win32kfull.sys Error in Windows 10 appears in computers usually with BSOD moreover Stop errors. It also shows following messages in different cases. The messages are:
1. STOP 0×00000050: PAGE_FAULT_IN_NONPAGED_AREA – win32kfull.sys.
2. A problem has been detected and Windows has been shut down to prevent damage to your computer. The problem seems to be caused by the following file: Win32kfull.sys.
3. STOP 0x0000001E: KMODE_EXCEPTION_NOT_HANDLED – win32kfull.sys.
4. 🙁 Your PC ran into a problem and needs to restart. We’re just collecting some info, and then we’ll restart for you. If you would like to know more, you can search online later for this error: win32kfull.sys.
5. STOP 0x0000000A: IRQL_NOT_LESS_EQUAL – win32kfull.sys.
Users generally confront Win32kfull.sys blue screen problem while installing new software or hardware and program. Additionally, you can experience them at Windows startup –shutdown and during the loading of Device drivers for Microsoft Corporation. STOP errors generally come into view in critical information pieces while troubleshooting the problem.
Causes Behind win32kfull.sys Error in Windows 10
Following are the causes responsible for this flaw –
1. Error occurs mostly via Windows 10 Operating System Driver when it is configured incorrectly or it is corrupted.
2. Any fault in the Registry while installing or uninstalling of win32kfull.sys-associated software.
3. Operating System corruption due to malicious attack.
4. A conflict between hardware relating to win32kfull.sys and Microsoft Corporation.
5. Removal or damage to program files of Windows 10 during installation.
6. Corrupted RAM is responsible for win32kfull.sys STOP error.
We will discuss 10 troubleshooting ways in order to fix the matter. These steps can be a bit time-consuming. We recommend you to follow the steps in proper to avoid making it complex. Here is the list of solutions.
Workaround 1: Update Drivers
Mostly outdated and corrupted device drivers are responsible for the Win32kfull.sys BSOD error. Even after working for a prolonged time, suddenly they can stop working due to so many reasons. Driver update can resolve the BSOD error.
While searching for an exact driver, you may find difficulties in the trustworthy sites like Microsoft Corporation or related manufacturer. Moreover, it is nagging and time-consuming even if you find the drivers to update manually. Again, installing these in the wrong way will cause additional damage to your computer
There are several tools that update all the drivers including the one ending up BSOD issue. They ensure the correct version in all cases. Besides, before making any transformations, some of them save a backup file of that one. Backing up is an amazing option as you know every time that you have something to drive back in case of a wrong move. You can also unlock new hardware features and make the computer superfast by updating all the drivers.
Go through our Tips to Update Driver Software on Windows 10 Step by Step.
Workaround 2: Install Windows Updates
Every now and then Microsoft is updating and improving Windows system files which also includes files win32kfull.sys. Most of the time, simple updating can also resolve this nagging problem. BSOD error is likely to be fixed by the latest service pack and patches released by Microsoft on a regular basis.
Step-1: Launch Settings program. The easiest way to access the application is to press Windows & I hotkeys.
Step-2: Go to Update & Security tab, the last one. On its corresponding right side, click Check for updates. If any are available, download and install the same.
Workaround 3: Scan Computer for Malware Presence
Win32kfull.sys STOP error is usually caused by the infection of malicious invaders. These bugs can corrupt, damage furthermore as delete the SYS related files from the computer. In order to avoid that, you need to use any Anti-malware software of your choice and scan the whole PC. The software solution eventually resolves the threats upon the completion of scan and thus fixes the win32kfull.sys Error in Windows 10.
Workaround 4: Uninstall Recently-Installed Program
If win32kfull.sys BSOD error is related to any specific program, reinstalling it is the way to fix.
Step-1: Go to the Start Menu and select Settings.
Step-2: On the following Setting page, select Apps tab.
Step-3: In the new window, you see an option Apps & features in the left pane. Click on this and it opens a list of options on the adjacent right side.
Step-4: From the apps on the right pane, locate win32kfull.sys associated program. Putting a click on this program will show additional options just below this. Select the option Uninstall and click Uninstall again in the pop-up in order to confirm.
Step-5: Later on, follow the on-screen instructions to complete the un-installation of the win32kfull.sys-associated application on your computer.
Once you have uninstalled it successfully, reinstall it again following the guidelines provided by the developers.
Workaround 5: Run Windows System File Checker
System File Checker is an efficient built-in utility that scans and restores any corruption in the system effortlessly. If the tool finds any error related to SYS or any other critical file system, it replaces them automatically.
Step-1: Go to the Cortana search field and type in cmd.
Step-2: Moving ahead, keep a hold on CTRL+Shift keys and hit Enter. Upon the prompt of permission dialog box, click Yes to proceed.
Step-3: You notice a black box with a blinking cursor, type or copy/paste sfc /scannow here and press Enter key.
Step-4: It starts scanning for dreadful files on the computer. This step will take a longer period of time and thus, be patient and wait until the scan ends.
Read more about this on SFC /Scannow, DISM.Exe, CHKDSK Windows 10.
Workaround 6: Scan for Hard drive Corruption (chkdsk/f):
As already mentioned, most of the storage-related and win32kfull.sys BSOD errors are caused by storage controllers and the problem associating to “hard disk drives“. But, in some cases, HDD corruption can also impute the same. Additionally, due to prolonged unintentional and repeated misuse can make various issues. Along with file system, the store can also be corrupted due to various issues. These are the incomplete and corrupt installation of software, shutting down wrongly, Hardware failure and the hard closing of a program. Microsoft bought utility chkdsk (viz. Check Disk) to scan including repair hard disc corruption.
Step-1: To begin with, launch an elevated Command Prompt to bypass win32kfull.sys Error in Windows 10. When you come across UAC prompt, click Yes.
Step-2: On the black panel, copy/paste or type chkdsk /f and press Enter button.
Step-3: This command starts scanning your hard disk. To know more about this procedure, explore our guide on How to Check Faulty Drives with Chkdsk in Windows 10.
Workaround 7: Check RAM for corruption
Many times, corruption in the RAM can lead to hardware related win32kfull.sys blue screen errors (BSOD). If you have similar problems, you will confront the issue like a random reboot, beep codes at the startup and the crash of the other computers. Experts say that about 10% of the application crashes occur only for memory corruption.
If you have newly installed a memory, remove it in the first place which will assist you to overcome the win32kfull.sys Error in Windows 10. If the message disappears, you can be sure that the RAM was corrupted. Change that one and get a new memory.
On the contrary, if the removal of memory doesn’t work, you need to perform a diagnosis on it. This memory test will look for the memory failure and an intermittent problem or anything else that is causing the error. “Windows Memory Diagnostic Tool” will be helpful in this regard.
Step-1: On the Cortana text field, type memory and press Enter when you notice Windows Memory Diagnostic as the Best match.
Step-2: On the following pop-up, you can see Restart Now and check for problems option. Click on it and the tool will automatically operate after a restart. Before doing so, make sure all of your ongoing works are saved already.
Step-3: There is another option in this popup. Click on Check for problems the next time I start my computer if you want to wait until the next startup.
Workaround 8: System Restore
Windows System Restore is an option that lets you go back in time with your computer in order to fix win32kfull.sys Error in Windows 10. Doing so will ultimately take your system to the situation when everything was working absolutely perfectly.
You can also Run System Restore Using Command Prompt (CMD) in Windows 10.
Workaround 9: Repairing Registry Entries
Certain incorrect entries in Windows Registry cause BSOD error. Besides, infections due to malware attack and third-party software can corrupt the entries related to Windows 10 operating system eventually causing STOP error to occur. Therefore, we need to fix the issue associated with registry entries first.
In order to repair manually, create a back up some part of registry associated to win32kfull.sys using Export option.
If you are not a Windows service pro, manual editing the Registry is not recommended. Any wrong entry here can damage your computer permanently from functioning moreover can destroy the operating system. Even a misplaced comma can restrict your PC from booting completely. Therefore, we suggest you use a trustworthy registry cleaner, such as Black Bird Registry Cleaner on Windows.
Workaround 10: Perform Clean Installation of Windows
This is the final solution that can resolve win32kfull.sys Error in Windows 10. Reinstalling Windows will surely delete everything from the hard disk drive and eventually start the whole system afresh. Additionally, clean install of Windows will remove all the leftover junk files after the prolonged use of the computer.
Conclusion
SYS files play a significant role in the Windows operating system. Any of the mess up in these files is immensely dangerous for a computer. Win32kfull.sys Error in Windows 10 is one of the issues in the same family. You need to resolve this soonest possible if you confront it. We have discussed several ways that are very effective in order to fix win32kfull.sys Error in Windows 10. Hope you can also fix your issue by pursuing any of the above solutions if you come across this.
The win32kfull.sys file is one of the kernel-mode device drivers in your Windows 10 operating system. In case you don’t know, there are two kinds of device drivers – the first ones are the normal drivers that communicate between your hardware and the operating system while the second ones are the kernel-mode drivers. The latter is necessary for booting your OS. And there are times when you encounter the win32kfull.sys error while booting your PC. Here’s the full context of the win32kfull.sys error:
“SYSTEM_SERVICE_EXCEPTION (win32kbase.sys)
APC_INDEX_MIXMATCH
PAGE_FAULT_IN_NONPAGED_AREA”
This error could be caused by corrupted or outdated drivers with incomplete files or it could be caused by some driver or software installed on your computer. To fix this error, here are some troubleshooting options you need to check out.
Option 1 – Try updating all the Drivers
As pointed out, the win32kfull.sys error can be due to outdated or corrupted drivers that are not compatible with your hardware. These drivers include but are not limited to display, network, sound, hard drive, and more. If you are not able to access the internet, you can just manually download the update using another PC.
To update your drivers, here’s what you need to do:
- Tap the Win + R keys to launch Run.
- Type in devmgmt.msc into the box and tap Enter or click OK to open the Device Manager.
- After that, a list of device drivers will be displayed. If you see a red or yellow sign that shows up against the driver, right-click on the driver’s name and select “Update Driver Software” or “Uninstall”. And if you find any “Unknown device”, you need to update it as well.
- Select the “Search automatically for updated driver software” option and then follow the instructions to complete the process.
- Restart your PC.
Note: You also have the option to go directly to the website of your graphics card manufacturer and check if there’s a new update – if there is, download it. After that, you could also check if there’s a new update of the game you’re getting the issue of the black bar.
Option 2 – Identify and uninstall problematic programs by putting your PC in a Clean Boot State
One of the main causes of BSOD errors like win32kfull.sys is a problematic program that could clash with your existing operating system as well as computer architecture. There are tons of programs that are either incompatible or conflict with the existing drivers or software in your system. To identify such programs, you need to put your PC in a Clean Boot state. How? Follow these steps:
- Log onto your PC as an administrator.
- Type in MSConfig in the Start Search to open the System Configuration utility.
- From there, go to the General tab and click “Selective startup”.
- Clear the “Load Startup items” checkbox and make sure that the “Load System Services” and “Use Original boot configuration” options are checked.
- Next, click the Services tab and select the “Hide All Microsoft Services” checkbox.
- Click Disable all.
- Click on Apply/OK and restart your PC. (This will put your PC into a Clean Boot State. And configure Windows to use the usual startup, just simply undo the changes.)
After putting your PC in a Clean Boot State, try creating a system restore point and see if the problem still occurs. Clean Boot troubleshooting is designed to help you isolate the problem. For you to execute a clean boot troubleshooting, you must do a couple of actions (the steps are given above) and then restart your PC after every action. You might have to disable one third-party app after the other to really isolate the issue. And once you’ve narrowed down the problem, you can either disable the third-party app that’s causing the problem or remove it. Note that you must switch your PC back into the Normal Startup mode after you’re done troubleshooting the problem. Here’s how you can do it:
- From the “Start” menu, go to System Configuration.
- After that, switch to the General tab and click the option for “Normal Startup”.
- Next, go to the Services tab and clear the checkbox for “Hide all Microsoft services”.
- Then find and click “Enable all” and if prompted, you have to confirm.
- Afterward, go to the Task Manager and enable all the Startup programs and confirm the action.
- Restart your PC when prompted.
Once you have identified the program causing the problem, uninstall it right away from your Control Panel.
Option 3 – Perform an SFC scan
The SFC or System File Checker scan could detect and automatically repair damaged system files that could be causing the win32kfull.sys error. SFC is a built-in command utility that helps in restoring corrupted files as well as missing files. It replaces bad and corrupted system files to good system files. To run the SFC command, follow the steps given below.
- Tap Win + R to launch Run.
- Type in cmd in the field and tap Enter.
- After opening Command Prompt, type in sfc /scannow
The command will start a system scan which will take a few whiles before it finishes. Once it’s done, you could get the following results:
- Windows Resource Protection did not find any integrity violations.
- Windows Resource Protection found corrupt files and successfully repaired them.
- Windows Resource Protection found corrupt files but was unable to fix some of them.
Do You Need Help with Your Device?
Our Team of Experts May Help
Troubleshoot.Tech Experts are There for You!
GET HELP
Troubleshoot.Tech experts work with all versions of Microsoft Windows including Windows 11, with Android, Mac, and more.
Share this article:
You might also like
Installing Windows updates, installing a new driver from the manufacturer, or even just installing an application or game can cause sometimes certain components of your computer to stop working properly or introduce issues that were not present just before mentioned installation.
Luckily for all of us, Microsoft seems aware of this potential issue and we have the option to roll back an older driver which performed well and had no issues at all.
In order to do this first press ⊞ WINDOWS + X to open the hidden start menu and click on Device Manager.

From the Device Manager choose the troublesome device and right-click on it, choose properties.

Device properties floating Window will appear.

Click on the top tab which says, Driver. From the Driver tab, click on Roll Back Driver.

Note that if the device is working properly, the Roll Back Driver button will be greyed out and you will not be able to click on it meaning that chosen device is not the issue. If the device is not working properly and you can click on Roll Back driver, do it, choose the previous version, and reboot your computer.
You can use this method to get back to the previous driver version for any device that is causing issues in your computer.
Read More
5 Windows 10 Upgrade Errors
The recently released Windows 10 captivated the mass but its rollout, polished as it might have been, proved everything but seamless. Surf the Internet and you’ll get the gist. People are complaining and they need assistance. Assistance with what you might ask? Many have attempted to make an upgrade but failed after encountering various strange combinations of letters and numbers. These are none other than error codes. If you’ve tried and failed, feast your visuals below as you might encounter one of these 5 Windows 10 Upgrade errors.
Error Code 0x80073712
Encountering error code 0x80073712 in no way implies that you need to throw out your computer system and acquire a new one. Not at all! This error code simply means that a very important file to Windows might have gone missing or corrupted. This file is crucial to Windows update so without obtaining this file, you won’t be able to proceed with the update.
Error Code 0x800F0923
Likely, there are many programs and drivers installed on your computer. They all play a vital role. However, if you’ve received error code 0x800F0923, it might be time to consider or turn your eyes to installed drivers on your system. Why? Error code 0x800F0923 means that there’s a driver or driver on your current Operating System that’s not compatible with Windows 10. There’s clearly a dilemma here.
“We couldn’t complete the updates. Undoing changes. Don’t turn off your computer.” Or “Failure configuring Windows Updates. Reverting changes”
That’s a pretty odd error but I will say it’s slick… That Windows 10 upgrade error is straightforward. Microsoft is just letting you know that they won’t be able to complete the update to Windows 10 and so they are putting your computer back to where it was. How nice of them.
The error messages above are pretty generic and will manifest when the upgrade fails for one reason or the other. To resolve this issue, you’ll most definitely have to decipher what error code was presented. Identifying that will provide a glimpse into exactly what steps you need to take.
The Update Isn’t Applicable to Your Computer
I don’t know about you but I strongly believe Microsoft is subtly letting you know that your computer system is old and needs to be thrown out. Also, this update could imply that your PC needs to install important updates to rev you up to the requirements. All relevant updates to your computer must be installed before you can get past this stage.
Error… “Something Happened”
This Windows 10 upgrade error has been the talk of the Internet. In fact, users of Windows OS have been making it a mockery. Clearly, not many have had success after encountering this error. Obviously, “something happened” but it’s just not easy to decipher what went wrong. Microsoft is still trying to figure it out.
Solution
Read More
As you know, you can encounter Blue Screen errors at any given point after your computer boots up and can just reboot it randomly which results in loss of unsaved work. One of these Blue Screen errors is the “REGISTRY_ERROR”. This kind of Stop error has a bug check value of 0x00000051 which indicates your computer’s registry has encountered a severe error. There could be a number of causes for this error but at the time of writing, it is quite difficult to narrow them down to one component. If you face this kind of Blue Screen error, worry not as this post will guide you in fixing it.
As mentioned, this error indicates that there is something wrong with the registry, particularly an I/O error while it tried to read one of its files. This may be caused by hardware issues or file system corruption. It could also be due to failure in a refresh operation which is only used by the security system and only when resource limits are encountered. To fix the Registry_Error Blue Screen, you can try to use the CHKDSK utility or the System File Checker, or the DISM tool or run the Blue Screen troubleshooter. You may also try to reset your computer or repair Windows by using installation media.
Option 1 – Run the Check Disk utility
The first thing you can do to fix the REGISTRY_ERROR Blue Screen error is to run the Check Disk utility. How? Follow these steps:
- In the Windows Search box, type “command prompt” and from the search results, right-click on Command Prompt and select “Run as administrator”.
- After opening Command Prompt, type this command and tap Enter: chkdsk <Drive Letter>: /f /r /x /b
- The command you entered will start to check for errors and fix them automatically. Else, it will throw an error message saying, “Chkdsk cannot run because the volume is in use by another process. Would you like the schedule this volume to be checked the next time the system restarts? (Y/N)”.
- Tap the Y key to schedule Disk Check the next time your computer restarts.
Option 2 – Run the Blue Screen Troubleshooter
The Blue Screen troubleshooter is a built-in tool in Windows 10 that helps users in fixing BSOD errors like REGISTRY_ERROR. It can be found in the Settings Troubleshooters page. To use it, refer to these steps:
- Tap the Win + I keys to open the Settings panel.
- Then go to Update & Security > Troubleshoot.
- From there, look for the option called “Blue Screen” on your right-hand side and then click the “Run the troubleshooter” button to run the Blue Screen Troubleshooter and then follow the next on-screen options. Note that you might have to boot your PC into Safe Mode.
Option 3 – Run System File Checker
- Open Command Prompt with admin privileges.
- After that, execute this command: sfc /scannow
- Once the scan is completed, restart your computer and then check if the REGISTRY_ERROR is now fixed.
Option 4 – Run the DISM tool
You can try running the Deployment Imaging and Servicing Management or DISM tool to fix the REGISTRY_ERROR Blue Screen error. Using this built-in tool, you have various options such as the “/ScanHealth”, “/CheckHealth”, and “/RestoreHealth”.
- Open the Command Prompt with admin privileges.
- Then type in the following commands and make sure to hit Enter right after you type each one of them:
- Dism /Online /Cleanup-Image /CheckHealth
- Dism /Online /Cleanup-Image /ScanHealth
- exe /Online /Cleanup-image /Restorehealth
- Do not close the window if the process takes a while as it will probably take a few minutes to finish. Once it’s done, restart your computer.
Option 5 – Reset your computer
- Tap the Win key or click on the Start button located in the Taskbar.
- Then click on the Power button at the bottom right portion of the screen.
- Next, press and hold the Shift key on your keyboard and then click on Restart. This will restart your Pc into the Advanced Startup options.
Note: Once you have access to the Advanced Startup options, you have to go to the setting which allows you to Reset your Windows 10 PC. All you have to do is select Troubleshoot > Reset this PC to reach the following screen
Afterward, select either the “Keep my files” option and then proceed to the next on-screen instructions that follow to reset your Windows 10 computer without losing your files.
Option 6 – Try to perform repair install by creating a Windows 10 installation media
- Click this link and then click the Download Tool Now button.
- Next, click the “Use the tool to create installation media (USB flash drive, DVD, or ISO file)…” option and follow the next given instructions on the screen.
- Now select the ISO file option in step 5.
- After that, you should now have an ISO file.
- Next, go to the location where you’ve downloaded the ISO file.
- Then right-click on the Windows 10 ISO file and select the Open with option and then select File Explorer.
- Now click on “setup.exe” and follow the next instructions that appear on the screen. When asked, you have to select either Nothing (clean install) or Keep personal files only option. Take note that you must not select the “Keep personal files, apps, and Windows settings”.
Read More
If you receive an error message saying, “Windows Update cannot currently check for updates because updates on this computer are controlled”, while trying to change the Windows Update preferences or manually update, then read on as this post will guide you in fixing it.
You can mostly encounter this error in managed systems where an Administrator controls the permission on the operating system. The reason why you are not able to modify the Windows Update preferences or manually update your system is that a group policy prevents you from doing so and that the only user who can do these things is none other than the administrator of the system.
Troubleshooting this kind of problem is the same as when you troubleshoot an error message that says, “Some settings are managed by your organization”. In such cases, you need to check both the Windows Update Group Policy and Registry settings.
If you’re just a standard user, you have to contact your system administrator regarding this issue and if you are the administrator, you can make adjustments to the system settings via the Registry Editor and the Group Policy Editor. Refer to the instructions given below for detailed instructions.
Option 1 – via the Registry Editor
If you are using the Home edition of Windows 10 and you want to change the policy for non-admin users on your local computer, then you can use the Registry Editor for that. Here’s how you can do it:
- Tap the Win + R keys to open the Run dialog box.
- Then type “Regedit” in the field and hit Enter to open the Registry Editor.
- After that, navigate to the following registry key:
HKEY_LOCAL_MACHINESOFTWAREPoliciesMicrosoftWindows
- From there, look for the key named “WindowsUpdate” in the Windows folder and if it does not exist, you can just right-click on the Windows folder and select New > Key.
- Now name the new key “WindowsUpdate” and create a new sub-key under the newly created key and input “AU” as its name.
- Keep AU selected and then right-click anywhere in the right pane and select New > DWORD (32-bit) Value.
- Then name the Value as “AUOptions” and right-click on AUOptions and select Modify.
- Next, change the value of the Value data to “5” and click OK to save the changes made to the settings. Note that the Value Data of 5 refers to the policy to allow the local admin to choose the setting.
- Now restart your computer once you’re done and check if non-admin users can now modify the Windows Update settings or update Windows.
Option 2 – via Group Policy Editor
- Tap the Win + R keys to open the Run dialog box and then type “gpedit.msc” and hit Enter to open the Group Policy Editor.
- Next, navigate to this folder: Computer Configuration > Administrative Templates > Windows Components > Windows Update.
- Now look for the “Configure Automatic Updates” policy on the right pane and double click on it to open its Properties.
- After that, shift the Radio button to “Enabled” and from the drop-down menu for Configure automatic updating, select option 5: Allow local admin to choose the setting.
- Then click on Apply and OK to save the changes made to the settings.
- Restart your computer and check if the problem’s fixed or not.
Read More
0X80070005 — What is it?
0x8007005 is a Windows Error Code. You may come across this error if you don’t have the appropriate permission to install a particular Windows update. It is prompted as ‘Access Denied’ error message.
Solution
Error Causes
The error code 0x80070005 usually triggered because of 2 reasons:
- Some updates require administrative permissions to be installed
- Due to malware and viruses
Further Information and Manual Repair
If you face this error while installing Windows updates on your PC, it is advisable to fix it immediately.
By taking timely actions, you can update your PC easily and in case if the cause of the error code 0x80070005 is malware or some virus, you can stop it from causing more and serious damage to your system. Sometimes malware and viruses can lead to data loss.
To avoid such damages here’s what you need to do:
Cause: Updates require administrative permission
Quick Fix: If the 0x8007005 error occurs on your system due to administrative permission issues, then the best way to fix this error right away is to log on as an administrator.
If there are many user accounts on your PC, then to resolve this error, make sure you log on using the user account that has administrator permissions on the computer.
Once you log on as an administrator, now try to install the updates again.
Cause: Malware and Viruses
Quick Fix: If the error 0x80070005 occurs because of malware infection, the best way to resolve this error would then be to open your antivirus software and run a scan to detect the malware.
However, if you don’t have antivirus software installed on your system, then it is advisable to download the software immediately.
Download antivirus software. To be on the safe side download Microsoft Safety Scanner.
Click on the run when prompted. Once the scanner is installed on your PC create a shortcut to Safety Scanner on your computer desktop so that it is easily accessible.
Now double click on the icon and click on the full scan tab to start scanning for malware and viruses on your system. After the scan is complete, you will see a list of viruses on your PC.
Now remove them all by hitting the delete tab and then repair. Now try installing the updates again.
By following these quick-fix techniques, you can easily resolve the error 0x80070005 on your system by yourself, without calling an IT professional.
Read More
I often switch between my desktop speakers and headphones and because of this I very often use the volume adjustment bar to adjust sound levels so it is not too loud and each time when I set it I get annoying BEEP at the end. Now personally this might not bother you and you might want to leave it since it can be a useful feature to tell you how much volume is loud but if you are adjusting multiple times volume during the say it can become really frustrating to hear it each time, especially when switching to headphones and it beeps into your ears.
In this guide, I will show you how to remove the beep so it is not heard anymore when you adjust the volume. Please know that beep is part of the Windows sound scheme and you can either remove specific sound with a completely silent wave or just turn off all windows alert sounds.
- Open Windows settings and go to system > sound
- in system sound, go to the right part of the screen and click on the sound control panel
- In the sound control panel click on the Sounds tab
- In the sounds, tab click on the drop-down menu under the sound scheme and choose no sounds.
There you go! You have successfully removed annoying BEEP each time you adjust the volume in Windows 10
Read More
If you always use the Google Chrome browser in browsing the internet, then you might have come across an error message saying, “He’s dead, Jim!” along with a funny looking face that’s peeking its tongue out and another detailed message saying, “Either Chrome Ran out of memory or process for the webpage has terminated for some other reason. To continue, reload the webpage or go to another page”.
This error message in Google Chrome is actually quite famous and it appears for various reasons but it may have something to do with a memory issue. The Google Chrome browser is known to consume a lot of memory and the more web pages you open and load, it takes up more resources. Thus, the first thing you need to do when you encounter this error is to simply click the Reload button to continue browsing the internet or close the browser and then open it again. On the other hand, if you keep seeing this error message, then that’s a whole different story as you have to take some action to prevent it from popping up again, for good. Follow the instructions given below to fix the error in Chrome.
Option 1 – Reduce Google Chrome’s memory usage
The first thing you can try is reducing the memory usage of the Chrome browser. However, this option has a bit of a disadvantage. If a website crashes, all the instances of that website will also crash although other open tabs and websites won’t be affected. This process is referred to as “Process-per-site” mode which you will have to launch Chrome within this parameter.
Option 2 – Run Google Chrome with Strict Site Isolation
Aside from reducing Chrome’s memory usage, you can also run the browser with the Strict Site Isolation which makes sure that the crashing of one tab in the browser won’t affect the entire Windows as this feature will run every website you open on its own isolated process.
Option 3 – Run the built-in Malware Scanner and Cleanup tool in Chrome
In case you don’t know, there is actually a built-in malware scanner and cleanup tool in Chrome that helps you get rid of any unwanted ads, pop-ups, and even malware, as well as unusual startup pages, toolbars, and other things that could affect the performance of the browser.
Option 4 – Reset Google Chrome
Resetting Chrome can also help you get rid of the “He’s dead, Jim!” error message for good. Resetting Chrome means restoring its default settings, disabling all the extensions, add-ons, and themes. Aside from that, the content settings will be reset as well and the cookies, cache, and site data will also be deleted. To reset Chrome, here’s what you have to do:
- Open Google Chrome, then tap the Alt + F keys.
- After that, click on Settings.
- Next, scroll down until you see the Advanced option, once you see it, click on it.
- After clicking the Advanced option, go to the “Restore and clean up the option and click on the “Restore settings to their original defaults” option to reset Google Chrome.
- Now restart Google Chrome.
Option 5 – Perform a clean reinstall on the Chrome browser
Although reinstalling any program is easy, not so much for Google Chrome as you need to make sure that the User Data folder is deleted before you reinstall it.
- Tap the Win + R keys to open the Run prompt.
- Then type %LOCALAPPDATA%GoogleChromeUser Data in the field and hit Enter.
- Next, rename the “Default” folder inside the path you were redirected to. For instance, you can rename it to “Default-old”.
- After that, install the Chrome browser again.
Option 6 – Try to flush the DNS and reset the TCP/IP
There are instances when a network goes into haywire because of a bad DNS. Thus, a bad DNS might be the one that’s causing this headache so it’s time for you to reset the entire network to resolve the issue. To reset the network, here’s what you have to do:
- Click the Start button and type in “command prompt” in the field.
- From the search results that appear, right-click on Command Prompt and select the “Run as administrator” option.
- After opening Command Prompt, you have to type each one of the commands listed below. Just make sure that after you type each command, you hit Enter
- ipconfig /release
- ipconfig /all
- ipconfig /flushdns
- ipconfig /renew
- netsh int ip set dns
- netsh winsock reset
After you key in the commands listed above, the DNS cache will be flushed and the Winsock, as well as the TCP/IP, will reset.
- Now restart your computer and open Google Chrome then try opening the website you were trying to open earlier.
Note: You can also try changing the DNS server to the Google Server, i.e. 8.8.8.8, and then see if it works for you or not.
Option 7 – Disable both the antivirus and firewall temporarily
As you know, both the firewall and antivirus programs are there to protect the operating system from any malicious threats. So if they find that there is some malicious content in a website you are visiting, they will block the site right away. Thus, it could also be the reason why you’re getting the “He’s dead, Jim!” error so you need to disable both the firewall and antivirus program temporarily and then try opening the website again. If you are able to open the website, you need to add this site as an exception and then enable the firewall and antivirus program back.
Read More
Error 400 — What is it?
Error 400 is a bad request error that displays in the internet browser like a web page. It pops up when the web page you’ve requested cannot be found. Error 400 may be displayed in one of the following formats on the computer screen:
- ‘400 Bad Request’
- Bad Request — Invalid URL»
- «HTTP Error 400 — Bad Request»
- «Bad Request. Your browser sent a request that this server could not understand.”
- «HTTP Error 400. The request hostname is invalid.»
- «400 — Bad request. The request could not be understood by the server due to malformed syntax. The client should not repeat the request without modifications.»
Solution
Error Causes
Error 400 can be generated due to multiple reasons. These include:
- Wrong URL
- Browser cookies
- Outdated DNS cache
Though this error code is not fatal like the blue screen of death and runtime errors nonetheless it is still advisable to fix it to access your desired website without any inconvenience.
Further Information and Manual Repair
Here are some of the best ways to fix error 400 on your PC without any professional help. Try these methods to resolve error 400:
Method 1
This might come to you by surprise that the most common cause for a 400 Bad Request error is because the URL of the website was typed wrong.
So, first things first make sure the URL you’ve inserted is correct. If the URL typed is correct, then try other methods illustrated below.
Method 2
Sometimes error 400 may pop up due to outdated DNS records. DNS cache stores the location (IP addresses) of web servers that contain pages that you’ve viewed recently.
You are unable to access the site if the location of the webserver changes before the entry in your DNS cache updates. If this is the error cause then simply clear your DNS cache to resolve.
Follow these steps to clear the DNS cache on Windows 8.
- Press Win+X to open the WinX menu.
- Now ‘right click’ on command prompt and select RUN as Administrator. Enter the following command:
- ipconfig /flushdns
If the command was successful, you will see the following message:
Windows IP configuration successfully flushed the DNS Resolver Cache.
This method will hopefully repair error 400 on your computer screen.
Method 3
Another reason for error 400 can be browser cookies. Many sites report error 400 when a cookie it reads is corrupt or too old. In such a situation it is advisable to clear your browser cookies.
You can do it manually but it can be time-consuming virtually because the steps involved in deleting cookies differ considerably depending on what web browser you’re using.
So, to avoid the hassle it is advisable to download Reimage to remove browser cookies immediately. This is a user-friendly PC Fixer deployed with a powerful registry cleaner.
It removes all obsolete and unnecessary files from your PC including junk files, internet history, and cookies in seconds.
Click here to download Restoro.
Read More
If you encounter the ERR_SSL_VERSION_INTERFERENCE error on your Google Chrome browser then this means that the browser is trying to load a website with SSL protocol but is not able to do so. This error can occur for many reasons and in this post, you will be given potential fixes that could help you in resolving the problem. But bear in mind that these potential fixes are not that straightforward forward so if you encounter an option you don’t understand much, just skip to the options you have the knowledge of.
There is no direct fault in the browser for the ERR_SSL_VERSION_INTERFERENCE error as there are issues with caching the website data locally on your computer. Moreover, this kind of error can also appear when a website is coded incorrectly or if there are conflicting browser extensions installed in the browser that prevents the website to function properly.
Refer to the suggestions given below to fix the ERR_SSL_VERSION_INTERFERENCE error in Chrome on Windows 10.
Option 1 – Try clearing browser data
There are times when some data in the browser is conflicting with the loading of the website and triggers errors like ERR_CACHE_MISS. And so you can try to clear your browser’s data. This might be a very basic solution but oftentimes it works in fixing this kind of error in Google Chrome. Follow the steps below to clear the data in your browser.
- Open your Google Chrome browser.
- After that, tap the Ctrl + H keys. Doing so will open a new panel that allows you to delete the browsing history and other data in your browser.
- Now select every checkbox that you see and click on the Clear browsing data button.
- Then restart your Chrome browser and check if you can now open any website or not.
Option 2 – Try disabling TSL 1.3
If clearing the browser data didn’t fix the problem, you can also try to disable TSL 1.3 in Chrome. To do so, refer to these steps:
- Open Google Chrome.
- Next, type in “chrome://flags/#tls13-variant” in the address bar and tap Enter.
- After that, you should see the experimental features page for Google Chrome where you can set TSL 1.3 to disabled.
- After disabling TSL 1.3, restart your computer and check if the problem is fixed or not.
Option 3 – Reset Winsock, TCP/IP & Flush DNS cache
Resetting Winsock, TCP/IP, and flushing DNS might help in resolving the ERR_SSL_VERSION_INTERFERENCE error just follow these steps:
- Right-click on the Start button and click on Command Prompt (administrator) so you can pull up an elevated Command Prompt.
- After that, execute each one of the commands listed below. And after you typed in one after the other, you have to hit Enter.
- netsh winsock reset – type in this command to reset Winsock
- netsh int ip reset resettcpip.txt – type in this command to reset TCP/IP
- ipconfig /flushdns – type in this command to flush the DNS cache
- Next, restart your PC and check if the problem’s fixed.
Option 4 – Get rid of any conflicting browser extensions
- Open Chrome and press Alt + F keys.
- Go to More tools and click Extensions to look for any suspicious browser extensions or toolbars.
- Click the Recycle bin and select Remove.
- Restart Chrome and press Alt + F keys again.
- Proceed to On Startup and mark Open a specific page or set of pages.
- To check if the browser hijacker is still active, click Set pages, if it is active, overwrite the URL.
Option 5 – Reset Google Chrome
Resetting Chrome can also help you get rid of the error. Resetting Chrome will restore its default settings, disabling all the extensions, add-ons, and themes. Aside from that, the content settings will be reset as well and the cookies, cache, and site data will also be deleted. To reset Chrome, here’s what you have to do:
- Open Google Chrome, then tap the Alt + F keys.
- After that, click on Settings.
- Next, scroll down until you see the Advanced option, once you see it, click on it.
- After clicking the Advanced option, go to the “Restore and clean up option and click on the “Restore settings to their original defaults” option to reset Google Chrome.
- Now restart Google Chrome.
Read More
Brave browser has gained popularity very rapidly and many websites have gone into the territory of recommending it. Sadly although the browser kind of offered better performance, it seems that so much advertised privacy and security was a lie.
Several months ago, Brave was involved in a “scandal”. Unfortunately, this incident did not get much media attention, and it’s hard to search for and discover as of today.
There is an article on the Android police website explaining this issue in detail, you can check it here: https://www.androidpolice.com/2020/06/07/brave-browser-caught-adding-its-own-referral-codes-to-some-cryptcurrency-trading-sites/
But to sum things up and keep them short if you do not want to go through the full article, Brave had been injecting their affiliate codes into popular crypto-currency websites. This means that they had been intercepting your traffic, which they promised was secure by the way, and modifying it.
This means Brave Software has access to all of your information on those crypto-currency sites as well. They can see your payments/purchases, and your activity on the websites (through affiliate statistics).
Now some people might point out that they are not interested in crypto or have been visiting some of the sites but the issue still remains and that is they did all of this, without telling the user. They intentionally didn’t tell the user because they knew it would cause backlash and disruption. They knew one hundred percent what they were doing, and they knew it was unethical.
And the point remains if something like this was already done, who knows what will come up in the future. Personal recommendation is to avoid Brave and go back to other browsers.
Read More
Copyright © 2023, ErrorTools. All Rights Reserved
Trademark: Microsoft Windows logos are registered trademarks of Microsoft. Disclaimer: ErrorTools.com is not affiliated with Microsoft, nor claims direct affiliation.
The information on this page is provided for information purposes only.