
SYSTEM_PTE_MISUSE is a Windows 10 BSOD error that occurs mainly at the time of starting a program or ending. Along with this stop code, the affected devices also receive a bug check code 0x000000DA. It specifies that a page table entry (PTE) routine has been used in the inappropriate method. In addition, the computer also faces random reboots in order to reduce the effect of damage to the OS.
Major causes behind SYSTEM PTE MISUSE blue screen error are actually outdated and incompatible drivers. Usually, that does not only end rather missing System resources play a bigger role. Furthermore, malware or virus attacks, presence of programs with the same purposes, memory issues, bad sector in hard disk and running in low disk space all together cause BSOD as well. Here, in this article, we will discuss the effective resolutions to fix blue screen Windows 10 error. For your easy navigating to them, they are listed below –
SYSTEM_PTE_MISUSE BSOD Error in Windows 10 Solutions
Here is how to fix SYSTEM_PTE_MISUSE BSOD Error in Windows 10 –
1] Turn Down Automatic Restarting of Device
People find difficulties to work along with a device affected with SYSTEM_PTE_MISUSE BSOD Error. The reason behind is, Windows tends to undergo restarting regularly without notice. Thus, resolving this issue seems too tough as you need time to deploy the workarounds. But, tweaking default settings a little, we can disable automatic restart in Windows 10. Here is how to do it –
Step-1: Go to the Desktop area making sure that all the ongoing processes are saved. You can press Win+D hotkeys together and head to the place immediately.
Step-2: Once in the ground, perform a right-click on This PC icon and select Properties option.
Step-3: When the System window opens up, select Advanced system settings from the left pane.
Step-4: In a moment, System Properties popup wizard will appear. You will be headed to its Advanced tab.
Step-5: Go little down in the tab and reach to Startup and Recovery region. Click Settings button from this place.
Step-6: Prior to opening a new wizard, move on to System failure part. Uncheck the box beside “Automatically restart” and hit the OK button to implement these changes.
After these changes effective, Windows will not go for automatic restarting onwards. Thus, you can have enough scope for deploying other workarounds smoothly.
2] Rollback drivers to resolve SYSTEM_PTE_MISUSE BSOD Error
Keeping drivers updated always is very necessary to maintain an Operating System flawlessly. However, sometimes a newly updated driver can cause BSOD error codes too. Therefore, we can roll back them to an earlier version as a resolution. The process is as follows –
- Invoke the Run Command pressing Win+R keyboard shortcuts.
- When the wizard appears, type devmgmt.msc in the text space.
- Press Enter key and Device Manager will open up.
- Find the problematic device and expand its drivers by clicking.
- Make a right-click on selective driver and choose Properties option.
- In the appearing window, shift into the Drivers tab.
- Move down and make a click on Roll back Driver option if available. Hit the Yes button finally.
With this, the faulty driver will be replaced with an earlier version. Thus, the SYSTEM PTE MISUSE error might resolve immediately.
3] Malware Check in Windows Security
We are no longer safe from Malware these days as the bugs and problems are present everywhere. People often visit malicious sites or clicks links containing them are the easiest prey. When the viruses enter a system, they attack the necessary files. In the process, deteriorates them and DLL files also go missing. A system with missing DLL files is a probe to get SYSTEM_PTE_MISUSE BSOD Error. Windows Security offers the best way to find them and dismiss eventually. To use the tool, the process is as below –
- Take the pointer to the rightmost bottom of Taskbar and do a click on Show hidden icons arrow.
- Select the Shield icon from there once menu unrolls.
- Windows Security once opens in a separate page, select option Virus & threat protection from the left side.
- Jump to the corresponding overlay, select Scan options to see all the available processes.
- Select the radio button for Full scan and finally hit Scan now button to let the process begin.
- Once scanning ends, the app will show the result in the display. Select Clean threats if any malware present.
- From the succeeding page, you will see three options available. Select Remove and later on Start actions button to start the removal.
4] Use Windows Blue Screen Troubleshooter
With BSOD error codes spreading at a very faster rate, Microsoft needed to step out. They have truly introduced a new default tool in Windows 10 for this. A utility named Blue Screen Troubleshooter made its way out Fall Creators Update version. While using any updated version of Windows 10, you can access it going through the Settings app. Here is how to apply the tool-
- Open the Start menu and click the Gear icon to launch the Settings app.
- From app UI, move on to Update & Security section and click it.
- After succeeding page loads, choose Troubleshoot from the left pane.
- Jump to the corresponding right side and find Blue Screen option here.
- Click the button Run the Troubleshooter from the extended pane.
Now, the tool will start to detect and fix the BSOD error in the system. In the end, you can get rid of SYSTEM_PTE_MISUSE BSOD in Windows 10.
5] Update all the drivers
Outdated device drivers are very much like to cause SYSTEM_PTE_MISUSE BSOD Error. Updating these will reduce the probability to have the issue. In Windows 10, usually, drivers are updated automatically. Yet some might leave along and cause vulnerabilities. Windows Device Manager is the right platform to update them. In the console, corrupt drivers are indicated with a yellow indication mark. Follow the below guidelines to accomplish the task –
- Do a combined press of Win+S hotkeys and invoke Windows search bar on display.
- Type Device Manager in the empty search box provided here.
- Select the same when appears in the result.
- Moving ahead to the console, look closely for a yellow exclamation mark in device manager.
- If there is any, select the same to expand and view the driver list.
- Make a right-click on the drivers one by one and choose Update driver option from the appearing menu.
- Follow the instructions shown in display afterward to update these drivers.
- Do the same with all defective drivers having a yellow indication.
6] Disable PIT security in BIOS
Users coming across SYSTEM PTE MISUSE BSOD Error in their Dell computers might have issues with PIT security in BIOS. The problem resolves when you disable it following the below guidelines –
- Open the Windows Settings app pressing “Windows key + I” hotkeys together.
- From the app window, move ahead to Update & Security and click on its tile.
- When the additional page loads, choose Recovery located at the left pane.
- Jump on the corresponding right and make a click on Restart now under Advanced startup section.
- On the subsequent Startup screen next, select the “Troubleshoot” option.
- From the consequent page, choose Advanced options.
- When the following page cuts your view, do a click on UEFI Firmware Settings.
- Alternatively, in case you don’t see this option, do a click on Startup Settings. When the Windows completes rebooting, press F2 to access BIOS directly.
- Now click Restart from the next page. When the system reboots, you will be guided to BIOS directly.
- When in the BIOS, move into the Security tab.
- Reach out to PIT Security section and remove the checkmark from PIT option to disable it.
- Finally, reboot the Windows and while returning back, check if there is any BSOD error codes in the system.
7] Update Windows by installing all latest patches
We all know that an outdated operating system can easily be affected by bugs and issues. To keep it safe, Microsoft releases cumulative updates quite regularly. All these files consist of bug fixes. Installing these will add strength to the system and you can avoid SYSTEM_PTE_MISUSE BSOD Error. Before proceeding, try connecting with high-speed internet to limit time consumption while downloading files. Disable Metered Connection, if you choose to do it from Mobile Hotspot. Once ready, move with below proceedings –
- Launch the Windows Settings app using the same guide as the last workaround.
- From the app UI, head to Update & Security and perform a click on it.
- After the succeeding page unrolls, select Windows Update located at the left-hand side.
- Move on the right and click the Check for updates button. If you see “You’re up to date” dialog, ignore that.
- When the available patches are up here, do a click on Download under them.
- Once files are already in the system, the installation will take place automatically.
- Keep the desktop manned to attend restarting when required.
8] Make free the Disk Space from Junk files
Windows create junk files for the execution of various tasks. These are usually temporary and stored in Hard Disk. Once they grow large, occupy huge space in it. As a result, the device runs on low storage. The immediate effect is a slow operational speed along with SYSTEM_PTE_MISUSE BSOD Error. Well, we can easily delete temporary files using the Disk Cleanup tool. On completion, you can recover some space as well. The process is as follows –
- Invoke Run Dialog box by pressing Windows key and R together.
- When the wizard shows up, write cleanmgr in the blank space.
- When you press the Enter key, a small dialog box will appear asking you to choose the drive where you want to carry out cleaning.
- Select C: by clicking on the dropdown menu and eventually press the Enter key.
- When the Disk Cleanup utility arrives, move down and click Clean up system files button.
- A same small popup dialog appears again, Choose C: and also select OK button.
- Once the Disk Cleanup for C: comes into your view, reach straightly to Files to delete section.
- Now, put a checkmark in all the boxes here only except Downloads.
- Moving ahead to the bottom, hit OK button to start the removing process.
9] Rectify corrupted Windows files using System File Checker
Through various means, System resources can get corrupted so as the DLL files go missing. The ultimate outcome is SYSTEM_PTE_MISUSE BSOD Error. As a part of recovering these components from corruption, System File Checker will be super handy. The utility is executed in the Elevated Command Prompt. To proceed, follow the below guidelines –
- Press Win+Q hotkeys to open the Taskbar Search.
- When it shows up, type cmd.exe in the box provided here.
- After results appear, make a right-click on Command Prompt and select Run as administrator.
- Once the UAC prompts for permission, give authentication by selecting Yes.
- Being in the black window, enter the following code at the winking cursor –
sfc /scannow
- Execute the duty of System File Checker by pressing Enter.
- Now, this utility will start working and fixes system file corruption automatically.
- Once the task finishes, Restart Windows 10 device to make this resolution effective.
- When the device powers up, check if there is any BSOD error present in the system.
10] Overclock or underclock the RAM to Resolve SYSTEM_PTE_MISUSE
BSOD error codes might prompt up if you are having problems with RAM modules. In that case, you need to check the unit and tweak settings. People sometimes get the issues while using RAM modules having a 1600MHz frequency as default. Out there are a few motherboards that fail to support this frequency and give away SYSTEM_PTE_MISUSE BSOD Error. As a fix, you need to change the frequency to 1333 MHz on the contrary, you can stay with the default frequency but need to increase the voltage used by RAM from 1.5V to 1.6V.
This is a gentle reminder that overclocking and underclocking can be dangerous potentially to the system. To some extent, it can damage permanently. So, carry out the task at own risk.
11] Roll back to the previous state performing System Restore
User can have SYSTEM_PTE_MISUSE BSOD Error after making changes in Windows by installing or uninstalling a program. Any changes make trace in Windows Registry which in most cases very sensitive. Well, to escape from the dangerous BSOD error, you can perform System Restore. This process usually guides you back in the earlier state. To use the method, the instructions are here –
Note – Without having a previously created Restore point, you cannot accomplish this task. If that is the situation with you, ignore this workaround and pass to the next resolution.
- Make a right-click on the Start menu icon and select Run from the Win+X menu.
- In the wizard appearing, type rstrui to its empty search box.
- When you press the Enter key, System Restore wizard will hit on the screen immediately.
- Click on Next from the bottom of this appearing wizard.
- On the succeeding page, choose Show more restore points to reveal all past points.
- Select the recent one in the list and hit the Next button again.
- From the window appearing next, select Finish to start the restoring process.
12] Resolve all Memory problems
Presence of incorrect allocating Memory and Bad RAM takes an active part in causing SYSTEM_PTE_MISUSE BSOD Error. Therefore, we have to resolve these existing issues without any delay. Windows Memory Diagnostic is a perfect utility to deal with these cases. Here is how you should move on –
Step#1: Press Windows key and I to invite Settings app.
Step#2: When the app unrolls, type memory in the empty search box located in UI.
Step#3: Choose “Diagnose your computer’s memory problems” when visible.
Step#4: When the tool launches, select “Restart now and check for problems (recommended)” option.
Step#5: Windows will prepare for rebooting and when it’s done, you will see tool detecting memory issues in the system.
Step#6: Device will restart automatically when it hits 100%.
Step#7: Once Desktop loads back, you can find the result of this diagnosis in the notification area of System Tray.
13] Uninstall Third-Party Antivirus to Fix SYSTEM_PTE_MISUSE
Antivirus applications deal with malware and you really need one beside. In the past, people used to access third-party antivirus programs quite a lot. But coming to this time, Windows Security has become the best ever utility in this case. Other Third-party antimalware programs usually unnecessary and can cause SYSTEM_PTE_MISUSE BSOD Error also. It’s wise to delete these programs to avoid the BSOD issue. To complete the task, instructions are as following –
- Open Run dialog using any of the above guidelines.
- Enter the command “appwiz.cpl” in the empty search box provided here.
- Choose OK button to unroll the Programs and Features window in display.
- Find out third-party antivirus application in the appearing list.
- Make a right-click on it and choose the Uninstall option.
- If User Account Control asks permission, hit Yes to proceed.
- Follow the further guidelines until the app uninstalls successfully.
14] Delete Problematic Windows Update files
Windows Updating process moving through Settings app is usually autonomous. There is a sleek chance of ending up in disruption or abnormal termination. When that happens, BSOD error may take place. To eliminate this risk, we need to uninstall these corrupted files immediately. Here is how to delete them –
- Open the Start menu and select the Settings cog.
- When the app arrives on display, head to Update & Security region.
- When the consequent page arrives, select Windows Update residing in the left pane.
- Jump on to the corresponding side and choose link saying View update history.
- From the following page, select Uninstall updates link available here.
- By default, “Installed Updates” will be visible in a separate window.
- Reach out to the latest received patch in the appearing list.
- Select it and also click Uninstall option showing in the top ribbon.
- Keep following the tasks shown in desktop until these are deleted completely.
15] Disconnect additional hard drive for some time
Some people have already come across SYSTEM_PTE_MISUSE BSOD Error in Windows 10 after started using an additional Hard Disk. Nowadays, we need these types of devices to carry loads of files and necessary data to distant places. Though the scenario is pathetic, the resolution is quite simple. Only disconnecting it for a while fixes the issue.
After disconnecting, restart the device and when it signs back, check for the issue again. If it comes out successful, reconnect the device. Finally, download and install the latest driver from its Official website loading in the default browser.
16] Fix up Windows Image files using DISM tool
Corrupted Windows image files call in SYSTEM_PTE_MISUSE BSOD Error mostly. We need to fix these files immediately and for that, the DISM tool can be deployed. To access the utility, proceed with the following –
- Open the Run dialog box pressing Windows key and R at once.
- Type cmd in the text box provided here.
- Now tap Ctrl+ Shift+ Enter combined to load Elevated Command Prompt directly.
- When in the black window appears, type following command-line tool at winking cursor –
DISM.exe /Online /Cleanup-image /Restorehealth
- Hit the Enter key to activate the DISM tool.
- The tool will thereafter start working and fixes all the defective Windows image files automatically.
- Once the task finishes, restart the Windows to make these resolutions effective.
17] Remove programs colliding with each other
Similar types of programs in a system cause collision between them. As a result, many important data go missing and altogether causes SYSTEM_PTE_MISUSE BSOD Error. However, we can stop this collision by removing one of this similar application. Here is how to uninstall an app from the system –
- Get access to the Settings app in Windows using any convenient method.
- Once the page loads, proceed to Apps tile and make a click on it.
- From succeeding page loads, move on to the alongside right and reach to programs colliding with each other.
- Select the culprit app once and hit Uninstall visible in the expanded pane.
- If UAC prompts for permission, choose Yes to continue.
- Once the uninstalling finishes, reboot the device.
- Prior to signing back, check if the error resolves successfully.
- Reinstall these apps if you feel necessary.
18] Deploy Disk Checking tool to rectify bad areas in HDD
Due to prolonged use, bad areas might form in the Hard Disk itself. As a result, SYSTEM_PTE_MISUSE BSOD Error evolves eventually. You can easily clean up this mess using Disk Checking tool. We need to enter into Elevated Command Prompt first to execute the utility. Later on, move with the below guidelines –
- Make a together press of Win + Alt + Del keys until a new page hits on display.
- Choose Task Manager from the appearing window.
- In the UI, select File option located at the top left corner.
- Choose Run a new task option from the appearing menu.
- A dialog will appear sharply and type “cmd” text in its typing box.
- Moving down, put checkmark before “Create this task with administrative privileges”.
- Now, hit the Enter key to get in the Elevated Command Prompt directly.
- When in the black window, type following command at the base of the blinking cursor-
chkdsk C: /f /r /x
- Once you press the Enter key, the Disk Checking Tool will start taking action against bad areas.
- This might be a lengthy process, hold the nerve until finishes.
- Restart the device when the process ends normally.
- Once return back, check if there is any BSOD error present.
19] Boot the device in Safe Mode to Resolve SYSTEM_PTE_MISUSE
Booting in the Safe mode is considered as the most common fixes for all problems evolving in Windows starting from ancient times. When accomplished the task, the affected device will load only the basic programs. This cures most of the errors including SYSTEM_PTE_MISUSE. To boot in Safe Mode, guidelines are as follows –
- Get access to the Settings app and navigate to the Update & Security tile.
- Choose Recovery subsection on the left sidebar.
- Move to the adjacent right, click Restart now located under the section “Advanced startup”.
- After Windows completes the first cycle of rebooting, you will be asked to select the next step. Click Troubleshoot from appearing screen.
- Moving ahead, hit Advanced options and then Startup Settings.
- Once Windows notifies that device can be restarted with the use of additional settings one of which is Enable Safe Mode, select Restart.
- At the startup coming next, press f4 in order to Enable Safe Mode.
By now, you have probably used all the workarounds and resolved SYSTEM_PTE_MISUSE BSOD Error in Windows 10. There are still sheer chances where you might fail to do so. In that case, we are presenting another last resort. You can perform a clean installation of Windows 10. If done accurately, there shall not be any more issues evolving next.
After coming to a decision to do the task, make sure to connect the device with the internet initially. But before that, backup important files to avoid losing them. In case of being nervous, seek help from skilled professionals.
Methods:
1] Turn Down Automatic Restarting of Device
2] Rollback drivers for resolving
3] Malware Check in Windows Security
4] Use Windows Blue Screen Troubleshooter
5] Update all the drivers
6] Disable PIT security in BIOS
7] Update Windows by installing all latest patches
8] Make free the Disk Space from Junk files
9] Rectify corrupted Windows files using System File Checker
10] Overclock or underclock the RAM
11] Roll back to the previous state performing System Restore
12] Resolve all Memory problems
13] Uninstall Third-Party Antivirus
14] Delete Problematic Windows Update files
15] Disconnect additional hard drive for some time
16] Fix up Windows Image files using DISM tool
17] Remove programs colliding with each other
18] Deploy Disk Checking tool to rectify bad areas in HDD
19] Boot the device in Safe Mode
That’s all!!
The problem of ‘system pte misuse’ is mostly caused due to issues with PTT and TPM security technology used by your system’s firmware. To resolve the system pte misuse error, you must rectify the BIOS settings. Let’s walk you through the methods to deal with the problem and recover any data lost due to BSOD.
How to resolve the SYSTEM PTE MISUSE error?
The SYSTEM PTE MISUSE error with the error code 0x000000DA, being a reason for BSOD, is potentially harmful to your system and the data stored on it. If the issue is caused due to logical reasons, you might lose any unsaved data as you will be forced to restart your Windows 10 PC. You won’t be allowed to save the unsaved data. Similarly, if the reason is hardware-related, your system will eventually give up unless you repair or replace the responsible component. Since you have reached this page, you need not worry, as the following methods will resolve the problem, and there is an additional tip to counter any data loss scenario.
Caution: There are chances of potential data loss if you interfere with the PTT, TPM, or BIOS. Tread very carefully, stick to the exact steps and keep Stellar Data Recovery Professional for Windows handy to deal with any data loss scenario.
Method 1: Disable PTT security technology in BIOS setup
PTT or Platform Trust Technology is responsible for implementing Trusted Platform Module (TPM) in the system firmware of your PC. PTT is a functionality used by Windows 11 and 10 for credential storage and key management. You can disable it in the BIOS setup to stop the frequent appearance of SYSTEM_PTE_MISUSE error. Here’s how to do it.
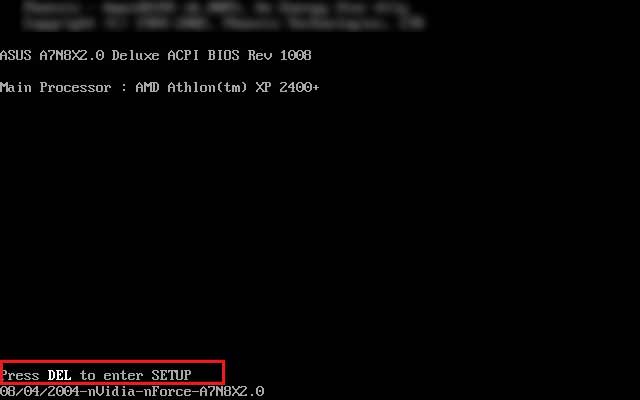
Step 1: Turn on your computer and enter the Setup by pressing the BIOS key.
Note: When you start your PC, you will find Press DEL to enter SETUP message written at the bottom of your screen. The DEL key (or any other key mentioned in its place like F1, F2, etc.) is the BIOS key for your PC.
Step 2: Click on the Security or Configuration or System Configuration tab in BIOS setup depending on your system’s manufacturer (Lenovo, HP, Dell, etc.).
Step 3: Select the Platform Trust Technology option and press Enter. Now use the up-down arrow keys to select the Disable option.
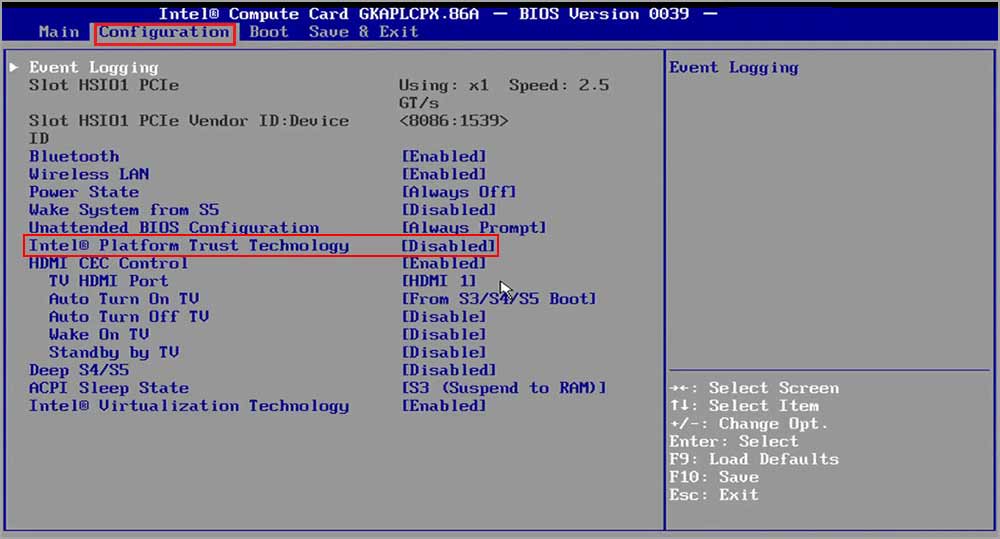
Step 4: Click F10 to save the changes and press Esc to exit.
Your system will proceed to the normal boot-up. Now, check if the error is resolved.
Method 2: Disable TPM or set it to Hidden in BIOS setup
Trusted Platform Module is an alternative to PTT. If you could not find PTT as described in the previous method, it might be because your system is using TPM instead. You can find the TPM placed in the same section as PTT. Here’s how you can disable/hide the TPM in the BIOS setup.
Step 1: Turn on your Windows 11/10 PC and press the BIOS key to enter setup.
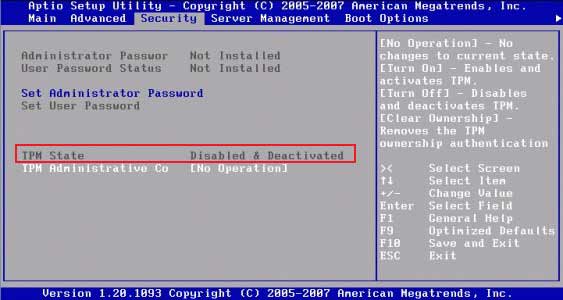
Step 2: Click the Security tab and locate Trusted Platform Module.
Step 3: Select the TPM option and hit Enter.
Step 4: Use the up-down arrow keys to select Hidden in the options. If there’s no Hidden option, select Disable.
Step 5: Click the Exit system setup after saving the changes or press F10, whichever is applicable on your system based on the make of your PC.
Your OS will proceed to a normal startup. Check and confirm if the error 0x000000DA is resolved.
Method 3: Run the Hardware Troubleshooter on your PC
If you could not fix the SYSTEM_PTE_MISUSE error using the above fixes, there might be an issue with some hardware components. Therefore, before updating the BIOS, it is witty to check and fix any hardware issue on your PC. This method will help you address any hardware-related problem, and your OS will resolve it if it’s not major and within its capabilities. Here’s how to do it.
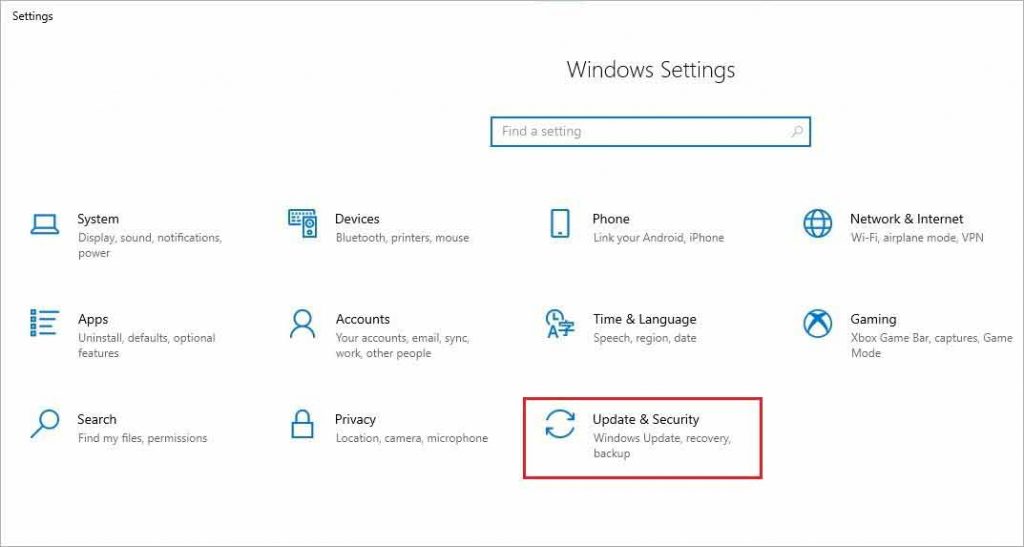
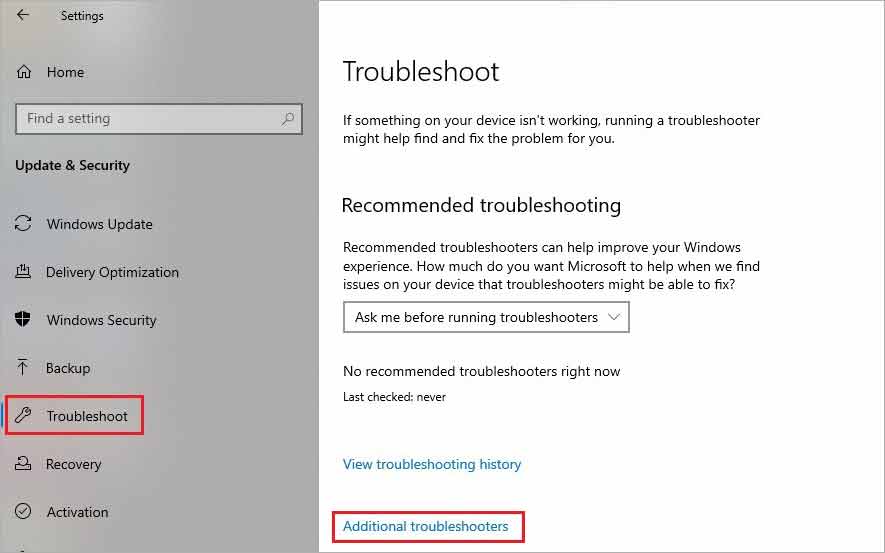
Step 1: Open Settings from the Windows Start menu and select Update & Security.
Step 2: Click on the Troubleshoot option in the left pane and select Additional troubleshooters.
Step 3: Select the hardware component from the list and click Run the troubleshooter option under each of them.
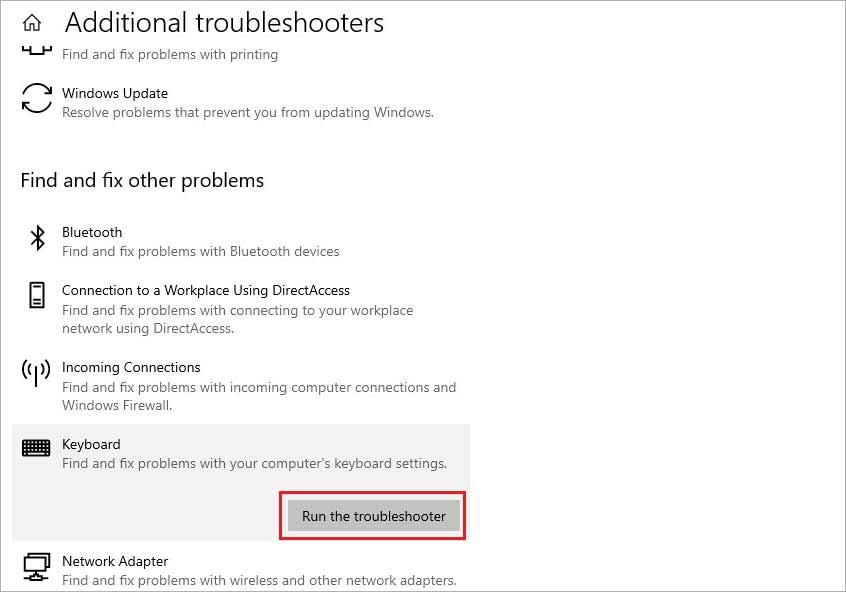
Note: If you are unsure which hardware component is causing the trouble, select the hardware components one by one and run troubleshoot for each.
Step 4: Follow the instructions on your screen to automatically resolve any existing hardware issue.
Method 4: Update BIOS on Windows 11/10 PC
If none of the methods above have resolved the problem of SYSTEM_PTE_MISUSE error and you are still facing the BSOD, you need to update the BIOS on your system. Your system’s microprocessor uses BIOS or Basic Input Output System to start your system when you turn it on. It helps in data flow between your Windows OS and connected components like a Hard drive, keyboard, printer, etc.
Updating BIOS is not a simple task, and you need an external USB drive or CD/DVD to assist you in doing it. However, we will provide the common steps, and you can use the links specific to your system’s make and manufacturer to proceed to updates. Here’s how to do it.
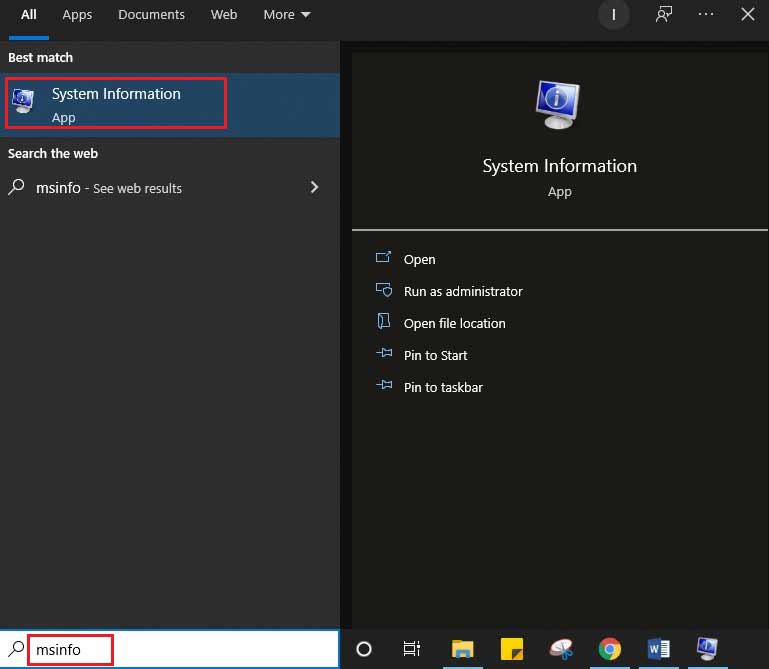
Step 1: Type msinfo in the search bar of your Windows PC and select System Information.
Step 2: In the System Information window, navigate the BIOS Version/Date below the Processor information and note it down.
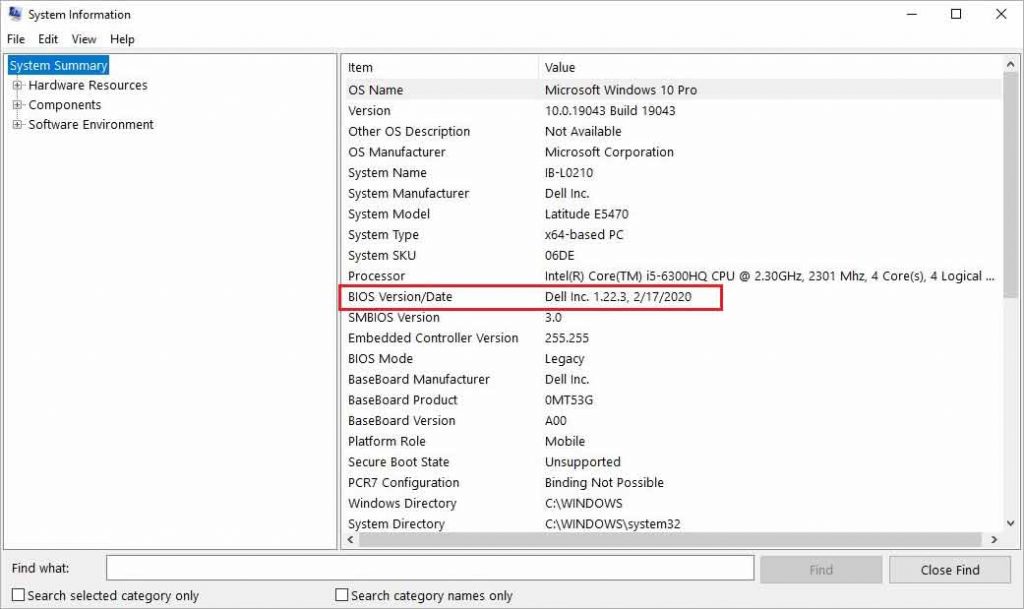
Step 3: Note down the System Manufacturer, System Model, and System Type information from the System Information window.
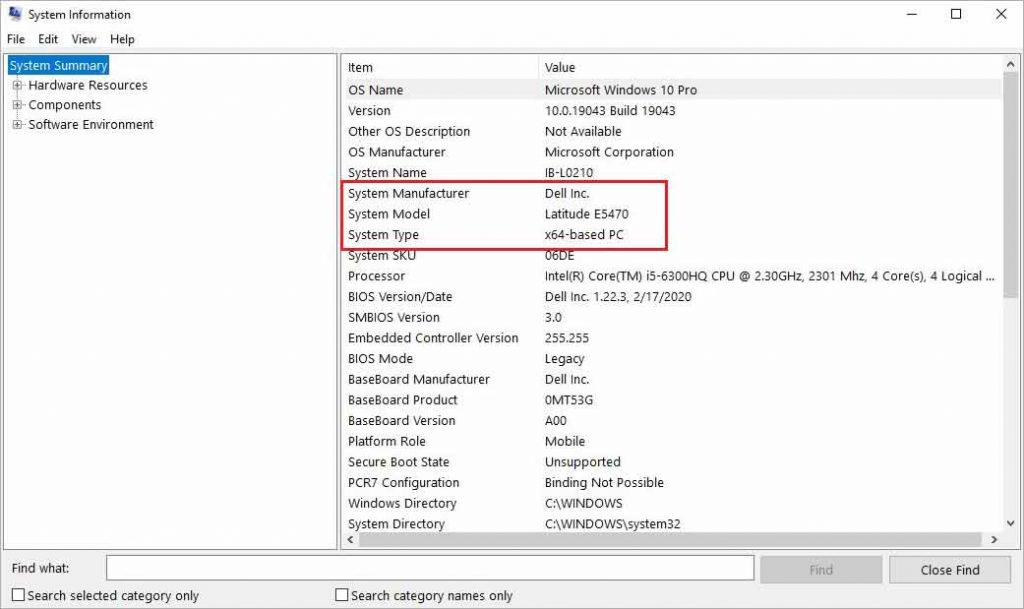
Note: In the System Type section, if you see x64-based PC, it reflects a 64-bit version of OS. Similarly, if you see an x86-based PC, you have a 32-bit version of Windows OS.
Step 4: Now, use the BIOS update link based on your system’s manufacturer from the list below.
- Dell BIOS update
- HP BIOS update
- Lenovo BIOS update
- Gateway BIOS update
- MSI BIOS update
Remedy for data loss due to SYSTEM_PTE_MISUSE error and BSOD
BIOS is a critical element of the operation of your Windows PC. There are chances of data loss if anything goes wrong while updating it. Similarly, you may lose the keys and other information collected by TPM if you disable it. Therefore, working with the system processes requires utmost caution as any glitches may jeopardize the entire data on the PC. However, as we assured you, you can easily get back any data lost during the encounter with the said error or BSOD using the secure Stellar Data Recovery Professional for Windows.
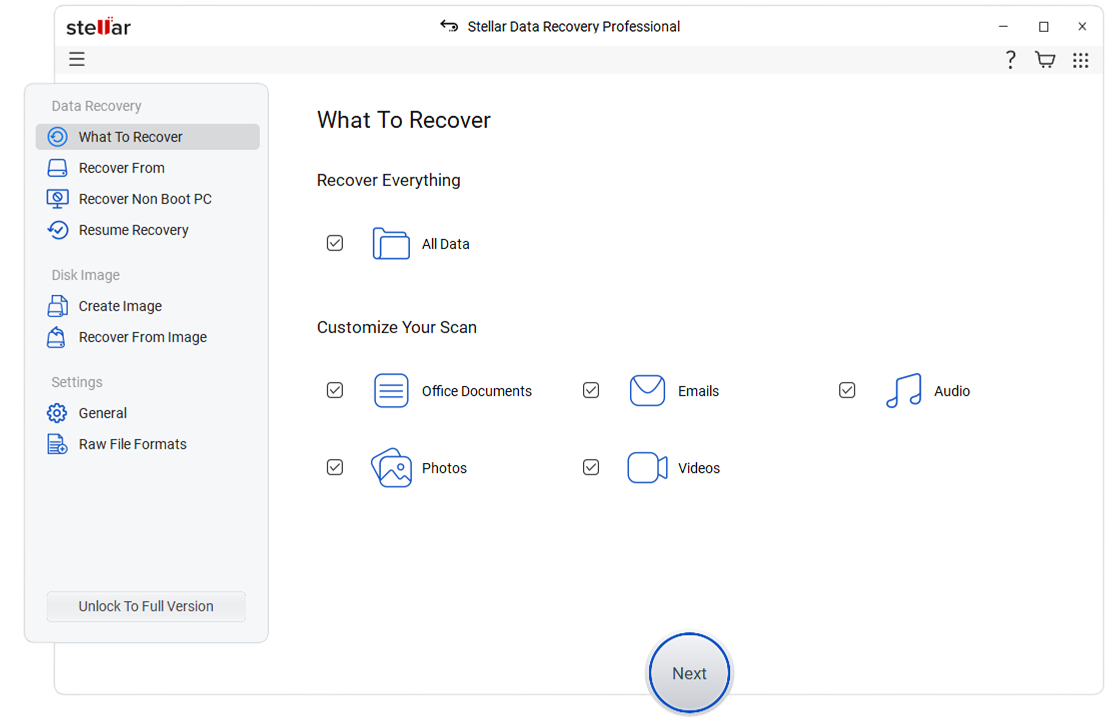
Even if you lose data due to any mishap while applying the fixes, you can recover it using the software. The software is equipped with multiple features to deal with any data loss scenario on Windows 11, 10, 8, and 7. For example, the bootable recovery option of the recovery software allows you to recover data from a crashed or non-booting Windows device. All you need to do is follow the step-by-step data recovery procedure prompted by the DIY software.
The problem of ‘system pte misuse’ is mostly caused due to issues with PTT and TPM security technology used by your system’s firmware. To resolve the system pte misuse error, you must rectify the BIOS settings. Let’s walk you through the methods to deal with the problem and recover any data lost due to BSOD.
Was this article helpful?
FAQs
Is my old MySpace gone?
No, your old MySpace account may not be gone yet. Try searching the old account with your old email address or name. If you find your old account, but forgot the log in details, contact MySpace for help by filling this form.
Why can’t I see all my photos on MySpace?
You won’t see old photos on MySpace, if your old account was not synced to the new Myspace. This means the photo from the old account are not transferred to the new MySpace account.
- Despite the terrifying name, BSODs are usually not fatal. But in case you’ve stumbled across the stop code SYSTEM_PTE_MISUSE Windows 10 error, check out these effective solutions to fix the problem.
- Rest assured that we want to help you & we try our best to tell you the most effective fixes for any Blue Screen Errors that come across your way.
- You can certainly learn everything about common Windows 10 errors here!
Since you are here, we can safely assume that you are stuck with “SYSTEM PTE MISUSE’ Error On Windows 10. It looks something like:
“Your PC Ran Into A Problem And Need To Restart. We Will Restart For You
Stop Code: SYSTEM_PTE_MISUSE”
According to Microsoft, the aforementioned Blue Screen Error is often generated due to damaged & incompatible drivers, Windows registry database corruption, Driver clash after recently installing new hardware or software. The Stop Code can further lead to frequent system crashes, file corruption, and even data loss. The Windows 10 BSOD Error is not very common, but it can certainly be very annoying. But no need to panic, follow the given methods to fix the error quickly!
Top 3 Recommended Quick Fixes To Resolve Stop Code SYSTEM_PTE_MISUSE
| Quick Workarounds | Resolve: SYSTEM_PTE_MISUSE | How To Fix? |
|---|---|---|
| METHOD 1 – Update Device Drivers |
Install Smart Driver Care > Start Scan > Update All.(Fastest & Easiest Way To Find & Download Right & Most Compatible Device Drivers) |

|
| METHOD 2- Run SFC Scan |
Launch Command Prompt > Type “sfc/scannow” > Hit Enter (It Will Check & Replace Corrupted System Files) |

|
| METHOD 3- Run The Troubleshooter |
Type & Enter ‘Troubleshooting’ in the Settings bar > Click ‘View All’ button > From the list of troubleshooters, click on Hardware and Devices & Run the Troubleshooter. |

|
To solve the constant appearance of the SYSTEM_PTE_MISUSE Windows 10 problem, you can further try these fixes:
How To Fix BSOD “SYSTEM PTE MISUSE” On Windows 10?
Follow the methods carefully:
METHOD 1 – Disable PTT Security In BIOS
For users unaware, PTT is a Platform Trust Technology that implements TPM (Trusted Platform Module) in System Firmware. Try disabling it in the BIOS settings to see if it fixes the SYSTEM_PTE_MISUSE.
Step 1- Switch On your PC & press the BIOS key while the system is in the booting process. Usually, the BIOS key appears on the boot screen, with Press_to enter SETUP. The keys are DEL, F1, F2, etc.
Step 2- Navigate to the Security tab & locate the option PTT, PTT Security or something similar.
Step 3- Now hit the Enter key while PTT or PTT Security option selected & choose Disable to deactivate in BIOS.
The process will be implemented while booting the computer. Check if the Windows 10 error persists.
METHOD 2- Check For Virus & Malware
Certain viruses or malware are also responsible for bringing this Windows 10 Blue Screen Error. So, go ahead running a deep virus scan on your system. Unfortunately Windows Defender is not strong enough to detect malicious content so it’s worth trying dedicated antivirus software such as Systweak Antivirus for PC. It also offers a free trial version, but with limited functionality.
Read This: A Guide To Choosing The Best Antivirus

Both security utilities for Windows are designed with advanced algorithms so that no existing or new virus can harm your system. Their database of viruses gets regularly updated so that users are protected from all kinds of potential threats. You can install the software using the button below. If any malware gets detected, follow the instructions provided by the Systweak Antivirus program to fix it. Restart your Windows system & see if you still witness the SYSTEM_PTE_MISUSE Windows 10 problem!
METHOD 3 – Rollback Drivers
Well, for most of the users updating to most compatible & recent device drivers solves all the major Blue Screen Windows 10 errors. But you can undoubtedly try going back to the previous versions of drivers. This helps when everything was stable before you attached or installed any new hardware or software. Follow the steps carefully to rollback drivers to previous versions.
Step 1- Click on the Start button & locate for Device Manager.
Step 2- Now expand the category with problems. If you aren’t sure which drivers are causing the SYSTEM_PTE_MISUSE Windows 10 error, then you probably have to repeat these steps for each device.
Step 3- Right-click on the category & go to its Properties.
Step 4- Navigate to the Driver tab & click on the Rollback Driver option.

Step 5- Hit the Yes button to complete the process.
If the aforementioned method sounds hectic, here’s a quick trick to rollback drivers, when needed in the future.
- Using Smart Driver Care is a clever choice when you want to backup all the old versions of device drivers.
- The driver updater utility not only helps users to find and install the right & most compatible versions. But you can undoubtedly back up previous versions, so that you can restore them as and when required.
- This Backup & Restore option is generally used when someone faces BSOD errors.
So, ensure you install Smart Driver Care on your Windows 10 system & have a backup of all your previous device drivers. Next time, you surely do not have to follow the lengthy manual process to rollback drivers for each device. Just One Click & Smart Driver Care will do the task for you!
SYSTEM PTE (Page Table Entries) MISUSE occurs when you try to change any security-based setting from the BIOS in Windows’s firmware.
This causes firmware issues or critical operating system failure. The resulting crash causes Windows to generate a stop code shown on a blue screen, generally known as a BSOD (Blue Screen of Death).
This error may happen if you have recently changed the status of Intel’s PTT (Platform Trust Technology) and Windows TPM (Trusted Platform Module) from the BIOS. You can fix PTE MISUSE errors by disabling PTT and TPM from the BIOS.
For more detailed fixes, this article will show you how you can solve this BSoD error.
Probable Causes for This Error
There could be several reasons why your computer has received this error. Some common causes are listed below:
- Changing TPM and PTT settings from the BIOS
- Out-of-date BIOS
- Corrupt system files
Fixes for SYSTEM PTE MISUSE Error
System PTEs are the data structure utilized by a computer OS’s virtual memory system to record the mapping between virtual and physical addresses. These are kernel resources that are required by the operating system to access data in the memory.
The following fixes have been proved to solve the SYSTEM PTE MISUSE BSOD error on your Windows device.
Run Windows Troubleshooter
If your device runs an earlier version of Windows 10 (v1809 or earlier), you can use the inbuilt troubleshooter to diagnose and solve the issue. To run the blue screen troubleshooter:
- Press Windows key + I to open Settings
- Go to the Update & Security tab

- Click on Troubleshoot
- In the Troubleshooter menu, search for the Blue Screen option

- Select it and then click on Run the troubleshooter button
- Follow the on-screen prompts


Wait for some time while the program runs and finds any issues. If the problems can be solved, the troubleshooter will attempt to fix them or suggest methods from which you can solve these issues.
If your device is running a later version of Windows, your device will not have the built-in troubleshooter. Instead, you can consult Windows’s online troubleshooter guide for blue screen errors.
On the website, select the problem you have encountered, and the guide will show you the necessary fixes for your device.
Run System File Checker and DISM Scan
If the troubleshooter did not find any solution for the BSOD error, you could use the system file checker from command to scan and repair missing or corrupt files. To run the SFC firstly:
- Open Run by pressing the Windows key + R
- In Run, type
cmdand press Ctrl + Shift + Enter keys together to open the command with administrator access - In the command, type
sfc /scannowand press the Enter key
- This command will run the system file checker and attempt to repair any corrupt or damaged files
- Again type
DISM /Online /Cleanup-Image /RestoreHealthand press the Enter key


The command will start a scan process and try to solve the issue regarding any missing or damaged Windows Image files.
After the scan, restart your computer and check if the issue is solved
Hide TPM and Disable PTT from BIOS
If you have recently made changes to the TPM and PTT in BIOS, this may be causing your system to crash and display the stop code error. TPM and PTT are built-in security features and interfaces made according to the specifications set by Microsoft and Intel, respectively.
They work by storing protected key information in a secure chip with an inbuilt unique Verification Key during manufacturing.
To solve this, firstly, enter the BIOS of your device. To do this:
- Press Windows key + I to open Settings
- Go to Update & Security
- Click on Recovery> Advanced Startup|
- Click on Restart now

In the advanced startup menu,
- Select Troubleshoot
- Go to Advanced Options > UEFI Firmware Settings
- Now, click on the Restart button

You will enter the BIOS of your device.
After entering the BIOS:
- Go to the Security tab
- Search for Intel Platform Trust Technology
- To the right, change the options until you find the Disable option
- Press the Enter key to disable PTT from the BIOS

Note: Changing TPM settings from the BIOS may cause data loss from your device if you do not have the BitLocker recovery key. It is generally not recommended to change TPM settings from the BIOS.
Again in the Security tab,
- Search for TPM or TPM Support
- Select Disable to disable it
- A prompt will appear asking for confirmation
- Select Yes to confirm
- Save your changes and restart your computer

The PTE MISUSE error should be solved.
If you wish to forgo changing TPM settings from the BIOS, you can do it from Windows after backing up all your important data. To access and clear TPM from Windows, firstly:
- Press Windows key + S to open Search
- Type Windows Security and press the Enter key
- In the Home tab, search for Device security and click it
- Select Security Processor Details under Security Processor
- Now, select Security Processor Troubleshooting
- In the next window, under Clear TPM, click on the Clear TPM button
- In the popup menu, follow as instructed and after you have prepared for everything, click Clear and Restart


Update the BIOS
System PTE Misuse error can also occur if you do not have an up-to-date BIOS. Fortunately, Windows allows their users to update the BIOS and its functionalities. Updating the BIOS can also help your system solve other performance and stability issues.
Note: Updating the BIOS is a delicate procedure. Thoroughly research before attempting to update or make changes in the BIOS. A failed update can potentially render your device unusable. Always backup any data and save any work before proceeding. If you have a laptop, connect it to the charger or wall outlet until the BIOS updating process finishes.
To update the BIOS, firstly, you will need to check what version of BIOS you have in your system and the model of your device. To do this:
- Press the Windows key + S button to open Search
- Type System information and press the Enter key
- Click on the System Summary tab

- Note down the following information
- System model
- BIOS Version/ Date
- System type

Note down the serial number of your device. To do this:
- Press Windows Key + R to open Run
- Type
cmdin the dialogue box and press Enter - In the command prompt, type the following
wmic baseboard get product,manufacturer,version,serialnumber

Now, go to your device’s support page and download the appropriate version for the device. The file usually is in a .zip format.
- Extract the file to an easy-to-access location
- If you have an executable (.exe) file, open it and follow the prompts.
- If you want to update your BIOS from the BIOS interface, copy the extracted files in a USB drive
- Restart your computer and enter the BIOS
- Search for EZ Flash, Q-flash or similar under the Tool menu.

- Select your USB device to update the BIOS

- Follow the instructions shown.


If you need more detailed instructions on how to update BIOS, you can check here.
Perform a System Restore
If the methods mentioned above do not solve your problem, you can try and perform a system restore to repair any missing or corrupt files. This process may also undo any recent changes made to your device. Save any important data or make a backup before proceeding.
Note: If you haven’t enabled system restore or have created a system restore point earlier, this method will not work. You first must enable and create a system restore point for this method.
To perform a system restore, firstly:
- Press Windows key + R to open Run
- Type
rstruiin the dialogue box and press the Enter key - Click on Next

- On the system restore menu, select your system restore point
- If you have multiple, select the one before you encounter the BSOD problem
- Click on Next and Finish to start the system restore process

Wait for a while and check if your device has encountered any problems.
These methods can help you solve the SYSTEM PTE MISUSE error. If none of the solutions work, take your device to an authorized technician for repairs.
If you suddenly encounter the SYSTEM_PTE_MISUSE – 0x000000DA Blue Screen error while using your Windows 10 computer, read on as this post will provide you some potential fixes to resolve this kind of Blue Screen of Death (BSOD) error.
There are many potential causes for the SYSTEM_PTE_MISUSE – 0x000000DA BSOD error. However, incompatible hardware detection and hardware recognition failure are some of the topmost culprits. Another thing that could trigger this kind of BSOD error is system file corruption which means that if a system driver for particular hardware ends up getting corrupted, it won’t be able to recognize the external device and will eventually crash the system with the SYSTEM_PTE_MISUSE – 0x000000DA Blue Screen error.
The SYSTEM_PTE_MISUSE bug check has a value of 0x000000DA which indicates that a page table entry or PTE routine has been improperly used. To fix this error, here are some suggestions that might help but before you get started troubleshooting the problem, make sure that you create a System Restore Point first.
Option 1 – Try to disable PIT Security in the BIOS
If you are using a Dell computer and it throws up this kind of Blue Screen error, you need to go to the BIOS and uncheck the PIT Security and see if it helps in fixing the problem.
- Tap the F2 key during the boot phase to enter the BIOS.
- Once you’re in the BIOS, go to the Security tab and to the PIT Security section.
- From there, uncheck the “PIT On” box to disable PIT Security.
- Now restart your computer and check if the Blue Screen error is fixed or not.
Option 2 – Check for any incompatible devices
The next thing you can do to troubleshoot the SYSTEM_PTE_MISUSE Stop error is to plug in and out each one of the different hardware that is connected to your computer. Doing so will help you determine which one of the hardware is the one that’s triggering the error to pop up. You will also know what hardware drivers or anything else that could be causing this error which includes external devices like mouse, keyboard, printer, as well as internally attached components like the Graphics card and so on.
Option 3 – Try to update, rollback or disable device drivers
To fix the SYSTEM_PTE_MISUSE Stop error, you can also try to roll back, or update, or disable device drivers. It is most likely that after you updated your Windows computer that your driver also needs a refresh. On the other hand, if you have just updated your device drivers then you need to roll back the drivers to their previous versions. Whichever applies to you, refer to the steps below.
- Open the Devices Manager from the Win X Menu.
- Then locate the device drivers and right-click on them to open the Properties.
- After that, switch to the Driver tab and click on the Uninstall Device button.
- Follow the screen option to completely uninstall it.
- Finally, restart your computer. It will just reinstall the device drivers automatically.
Note: You can install a dedicated driver on your computer in case you have it or you could also look for it directly from the website of the manufacturer.
Option 4 – Run the System File Checker Scan
System File Checker or SFC is a built-in command utility that helps in restoring corrupted files as well as missing files. It replaces bad and corrupted system files to good system files. Thus, you can try running it to resolve the SYSTEM_PTE_MISUSE Blue Screen error. To do so, follow the steps given below.
- Tap Win + R to launch Run.
- Type in cmd in the field and tap Enter.
- After opening Command Prompt, type in sfc /scannow
The command will start a system scan which will take a few whiles before it finishes. Once it’s done, you could get the following results:
- Windows Resource Protection did not find any integrity violations.
- Windows Resource Protection found corrupt files and successfully repaired them.
- Windows Resource Protection found corrupt files but was unable to fix some of them.
Restart your computer.
Option 5 – Run the Blue Screen Troubleshooter
The Blue Screen troubleshooter is a built-in tool in Windows 10 that helps users in fixing BSOD errors like SYSTEM_PTE_MISUSE – 0x000000DA. It can be found in the Settings Troubleshooters page. To use it, refer to these steps:
- Tap the Win + I keys to open the Settings panel.
- Then go to Update & Security > Troubleshoot.
- From there, look for the option called “Blue Screen” on your right-hand side and then click the “Run the troubleshooter” button to run the Blue Screen Troubleshooter and then follow the next on-screen options. Note that you might have to boot your PC into Safe Mode.
Do You Need Help with Your Device?
Our Team of Experts May Help
Troubleshoot.Tech Experts are There for You!
GET HELP
Troubleshoot.Tech experts work with all versions of Microsoft Windows including Windows 11, with Android, Mac, and more.
Share this article:
You might also like
After you fresh install Windows 10 on your computer, it allows you to set up a PIN just before you can start using it. However, a number of users reported that the Windows 10 installation gets stuck on the “Set up a Pin” phase. If you are one of the users who experience the same thing, then read on as this post will walk you through fixing the problem.
As users start to use their newly installed Windows 10 computer, they reported that the screen is still stuck even after they enter the correct PIN twice and there is no way for them to go forward or backward. Note that this is a part of the account setup and that your computer must stay connected to your internet connection before you finalize everything. And even though the PIN works when the computer is offline, the account setup still needs an internet connection, at least for a fresh installation.
The solution for this kind of issue is quite easy and there won’t be any problem even if your computer shuts down or restarts since the installation is already complete and all that’s left is the account setup. To fix this problem, follow the steps given below.
Step 1: The first thing you have to do is to turn off your internet connection or disable all connectivity from your computer.
Note: If you are using either an Ethernet cable or a Wi-Fi switch to connect to the internet, you have to disable or remove them. But if you don’t have any options, just completely turn off your internet connection.
Step 2: The next thing you have to do is to force your computer to shut down and then restart your computer. The setup process will eventually pick up exactly where it left off. The only difference is that there is no connection to the internet and your screen will no longer be stuck on the PIN setup screen so you now have the option to skip it and wait until you’re logged in for the first time.
Step 3: Once you’re done, you can then you can choose to Setup Pin later on and turn your internet connection back on or connect your computer with an internet connection.
Read More
If you are trying to install or upgrade your Windows 10 computer but suddenly encountered an error message saying, “Windows could not configure one or more system components”, read on as this post will show you how you can fix the problem.
You are not alone in experiencing this problem as other users also reported having the same scenario. Some of them reported getting the following error message:
“Windows could not configure one or more system components. To install Windows restart the computer with error code 0xc1900101-0x30018.”
When you check on the Windows 10 rollback log, you will see a part with the “iisetup.exe” that’s related to the abort. Usually, the upgrade process completes over 50% and gets stuck and then rolls back later on and generates the error logs. This kind of error, in most cases, appears during the upgrade of Windows 10 and is related with the Internet Information Services or IIS in Windows 10. For some unknown reason, it restricts the installation or the upgrade which causes the error to appear. To fix the “Windows could not configure one or more system components” error, you can try to remove the IIS from the Windows Features or rename the “inetsrv” folder. You could also move all the folders related to IIS to another drive. For more details, refer to the options provided below.
Option 1 – Try to remove the IIS from Windows Features
The IIS is installed from the Windows Features and you can find it at Control Panel > Programs. From there, uncheck the checkbox for the Internet Information Services. Once done, click on the OK button to save the changes. Note that this process will get rid of all the related programs, services, and folders from Windows 10. So if you want to, you can just install them later on or use an offline installer from the official site of Microsoft.
Option 2 – Try renaming the inetsrv folder
The next option you can check out to resolve the problem is to rename the “inetsrv” folder. If you have uninstalled IIS from the Windows Features, this should remove the folders as well, however, it didn’t remove the folder then you have to delete the folders that are related to the IIS by following these steps:
- First, you have to boot into the Advanced Recovery Mode and from there, open Command Prompt.
- Next, execute this command to rename the folder from this location, C:Windowssystem32inetsrv: rename C:/Windows/system32/inetsrv/inetsrv.old
- Once done, boot into your computer normally and try to upgrade Windows 10 again, and check if the problem is fixed or not.
Option 3 – Try to move the folders related to IIS to a different drive
- Tap the Win + R keys to launch the Run utility and type “services.msc” in the field and hit Enter to open the Windows Services Manager.
- Next, look for the Application Host Helper Service from the list of services and stop it.
- Once done, take ownership of the “WinSxS” folder and then move the *windows-iis*.*” folders to another drive. You can just search using the “*windows-iis*.*” keyword in the Start Search.
- Next, tap the Ctrl + X keys and paste the folders to another drive.
- After that, start the update process for Windows 10 again.
Read More
System restore is usually the go-to tool when something goes bad in Windows, we fire it up and roll back Windows in the state when everything was working fine. But what if Windows does not want to boot? Can we use system restore in that case?
The answer to that question would be yes, yes we can.
- Boot interrupt Windows 10 by starting your PC and as soon as you see the Windows logo; press and hold the power button to force a shutdown.
- Repeat this 2-4 times and Windows will open up the Advanced Startup Options menu for you.
- At the Advanced Startup Options screen, select Advanced Options.
- Select Troubleshoot.
- Under the Advanced options screen, select System Restore.
or if you prefer, use Windows USB installation.
- Boot the faulty PC using the Windows 10 installation media.
- The Windows Setup dialog box will appear.
- Set the Time and currency format, Keyboard or input method, and the language to install.
- Click Next.
- Click on Repair your computer from the lower-left corner.
- From the Choose an option screen, click on Troubleshoot.
- Click Advanced Options in the Troubleshoot screen.
- In the Advanced Options screen, click System Restore.
- Windows will take some time to prepare System Restore. It may even restart your computer or device.
- When System Restore is ready, you will be prompted to choose a user account to continue.
- Select an account that is set as administrator on your Windows 10 computer or device.
- At the next screen, change the keyboard layout if you want and then input the password for that account.
- Click the Continue button.
Read More
Windows Updates are checked for their validity every time they are downloaded from Microsoft servers just like how browsers check websites for a valid certificate. And so if you got an error message saying, “ Some update files aren’t signed correctly, error code 0x800b0109 ” while trying to update your computer, it indicates that the Windows service was unable to verify the validity of the Windows Update. To fix this error, you can try out the options prepared in this post.
Option 1 – Reboot your computer and try again
Save your work and reboot your computer and then try checking for updates again. In some cases, all you need is a restart to fix errors like error code 0x800b0109.
Option 2 – Try to update Windows after an hour or so
There are times when the issue is from Microsoft’s end. It could be that there’s some issue with Microsoft’s server so it would be better if you give it an hour or so before trying to run Windows Update again.
Option 3 – Try running the Windows Update Troubleshooter
Running the built-in Windows Update troubleshooter is one of the things you can first check out as it is known to automatically resolve any Windows Update errors like Error 0x8007001E. To run it, go to Settings and then select Troubleshoot from the options. From there, click on Windows Update and then click the “Run the troubleshooter” button. After that, follow the next on-screen instructions and you should be good to go.
Option 4 – Delete the contents in the Temporary folder
You can also try deleting the contents in the Temporary folder – all the downloaded, pending, or failed Windows 10 updates. You can do that using the simple and easy steps below.
- Tap the Win + R keys to open the Run dialog box.
- Then type “%temp%” in the field and press Enter to open the Temporary folder.
- After that, select all the folders and files within the Temp folder and delete all of them.
Option 5 – Clear the contents in the Software distribution and Catroot2 folders
- Open the WinX Menu.
- From there, open Command Prompt as admin.
- Then type in the following command – don’t forget to hit Enter right after typing each one of them.
net stop wuauserv
net start cryptSvc
net start bits
net start msiserver
- After entering these commands, it will stop the Windows Update Service, Background Intelligent Transfer Service (BITS), Cryptographic, and the MSI Installer
- Next, go to the C:/Windows/SoftwareDistribution folder and get rid of all the folders and files thereby tapping the Ctrl + A keys to select them all and then click on Delete. Note that if the files are in use, you won’t be able to delete them.
After resetting the SoftwareDistribution folder, you need to reset the Catroot2 folder to restart the services you just stopped. To do that, follow these steps:
- Type each one of the following commands.
net start wuauserv
net start cryptSvc
net start bits
net start msiserver
- After that, exit Command Prompt and restart your computer, and then try to run Windows Update once more.
Option 6 – Install the updates in a Clean Boot State
You might want to try putting your computer in a Clean Boot state and then install Windows Updates again without any trouble. During this state, you can start the system with a minimum number of drivers and startup programs that will surely help you in isolating the root cause of the issue.
- Log onto your PC as an administrator.
- Type in MSConfig in the Start Search to open the System Configuration utility.
- From there, go to the General tab and click “Selective startup”.
- Clear the “Load Startup items” check box and make sure that the “Load System Services” and “Use Original boot configuration” options are checked.
- Next, click the Services tab and select the “Hide All Microsoft Services” check box.
- Click Disable all.
- Click on Apply/OK and restart your PC. (This will put your PC into a Clean Boot State. And configure Windows to use the usual startup, just simply undo the changes.)
- After that, try to install the Windows Updates or upgrade again.
Read More
Creating a System Restore point is definitely a must especially when you are about to make some changes to your computer. This will help make sure that the system settings and files can go back to an earlier point, should something go wrong, without affecting any personal files. However, there are cases when creating a System Restore Point does not go smoothly and you encounter an error that says, “The shadow copy provider had an unexpected error while trying to process the specified operation ( ox8004230F )”. Aside from creating System Restore Point, you can also encounter this error when you create a system image or backup.
According to reports, this error pops up when the required services are not running or not properly responding. And to fix it, there are several recommendations that will be provided in this post to fix the Error 0x8004230F when creating System Restore point in Windows 10. You can try to check the Volume Shadow Copy Services status or run the VSSADMIN tool. You could also check the status of the Microsoft Software Shadow Copy Provider Service or create System Restore Point in a Clean Boot State. For more details, refer to the provided options below.
Option 1 – Try checking the status of the Volume Shadow Copy Service
- Tap the Win + R keys to launch the Run utility and type “services.msc” in the field and hit Enter to open the Windows Services Manager.
- From the list of services, look for the Volume Shadow Copy service and double-click on it.
- After that, this will open the Properties where you have to make sure that the Startup type is set to Automatic (Delayed Start) and then click on the Start button underneath it.
- Once done, click on Apply and then OK to save the changes made.
- Now try creating a System Restore Point again and see if the error is already fixed or not.
Option 2 – Try to run the VSSADMIN tool
In case you don’t know, the shadow copy provider is sensitive and some other backup, disk cloning, etc. can make it malfunction. To fix this, you can run the VSSADMIN tool by following these steps:
- Tap the Win + R keys to open the Run dialog box and type “cmd” and hit Enter to open Command Prompt.
- Next, execute this command to check if you have other third party VSS admin providers: vssadmin list providers
- After that, if it finds any, you need to disable them but if it does not find anything, then proceed.
Option 3 – Try to check the Microsoft Software Shadow Copy Provider Service status
- Tap the Win + R keys to launch the Run utility and type “services.msc” in the field and hit Enter to open the Windows Services Manager.
- From the list of services, look for the Microsoft Software Shadow Copy Provider Service and double click on it.
- After that, this will open the Properties where you have to make sure that the Startup type is set to Automatic (Delayed Start).
- Once done, click Apply and OK to save the changes and then try creating System Restore Point again.
Option 4 – Troubleshot the problem in a Clean Boot State
It is possible that some third-party program installed in your computer might be the one that’s causing the ox8004230F when you try to create a System Restore point. Thus, you can try to boot your computer in a Clean Boot State and then try to perform the task again.
- Log onto your PC as an administrator.
- Type in MSConfig in the Start Search to open the System Configuration utility.
- From there, go to the General tab and click “Selective startup”.
- Clear the “Load Startup items” check box and make sure that the “Load System Services” and “Use Original boot configuration” options are checked.
- Next, click the Services tab and select “Hide All Microsoft Services” check box.
- Click Disable all.
- Click on Apply/OK and restart your PC. (This will put your PC into a Clean Boot State. And to configure Windows to use the usual startup, just simply undo the changes.)
- Once your computer has restarted try to create a System Restore Point again and if it now works, start to isolate the problem by checking which one of the programs you installed recently is the root cause of the problem.
Read More
If you are trying to log into your user account on your Windows 10 computer but encountered an error message instead that says, “Your account has been disabled, Please see your system administrator”, read on as this post will guide you on how you can fix this problem.
In this kind of scenario, you won’t be able to access your data unless you have access to the administrator account. This problem could be caused by several problems. It is possible that malware has infected your computer and has changed some settings in your computer, especially if your system has been under a malware attack not too long ago. The malware could’ve changed the “Account is disabled” option.
The only thing you can do to resolve this kind of problem is to log into your computer using another administrator account and then change the setting. However, if you don’t have a second administrator account, you can just enable the built-in hidden administrator account on your computer. You shouldn’t have any problem enabling the hidden administrator account as it is quite easy when you can log into your account. And in this post, you will be guided on how you can enable the hidden administrator account using the Registry Editor to fix the “Your account has been disabled, Please see your system administrator” error.
To get started, follow the instructions given below.
- First, you need to start your computer and ensure that you are on the error screen. From there, you will see the Power options located on the right-hand side.
- Click on the Power options and tap and hold the Shift key and then select Restart.
- After that, the Advanced Boot Options will appear and from there select Troubleshoot > Command Prompt.
- Next, you have to select your user account and enter the user account’s password to open Command Prompt.
- After opening Command Prompt, open your screen and type “Regedit” and then tap Enter on your keyboard.
- Now select the HKEY_LOCAL_MACHINE in the Registry Editor and go to File > Load Hive.
- Afterward, you have to open the Windows installation drive and go to the location – WindowsSystem32Config
- From there, you should find a file named “SAM” – select this file and click the Open button.
- Next, you have to enter a key name. You can just input whatever you prefer.
- Once done, navigate to this path: HKEY_LOCAL_MACHINEkey_nameSAMDomainsAccountUsers
- From this path, you will see a key named “000001F4” – select this key and double click on the “F” entry that you can find on the right-hand side of the screen.
- After that, look for the value data line labeled “0038” which should show 11 in the first column. You have to replace it with 10.
- Once done, click on the OK button and close the Registry Editor and the Command Prompt to restart your computer.
- Now once your computer has restarted, sign in to the Administrator account and open the Computer Management window. You can just search for it using the search bar in the Taskbar.
- After you open Computer Management, go to Local Users and Groups > Users – where you can find all the user accounts. Look for your deleted user account and right-click on it and select Properties and then unmark the checkbox that says “Account is disabled”. This should fix the problem.
Read More
As you know, Windows 10 has a complicated mechanism for Activation which helps in the verification of a genuine copy of Windows 10. However, there are times when you might encounter some errors during the activation process. One of these errors is the error code 0xc000f074. This kind of error could be due to the Key Management Service or KMS which is unreachable by the client computer or if the key used in the SLSetAuthenticationData function call is incorrect.
This kind of error mostly affects surfaces on computers that are upgraded from either Windows 7 or Windows 8.1 to Windows 10. In such cases, you may encounter any of the following error messages:
“Windows is unable to reach your company’s activation service. Please connect to your corporate network. If you are connected and continue to see the error, contact your system administrator. You can also click on the error detail to find the exact error. Error code: 0xC004F074.”
“Activating Windows(R),
(Key hash)…
Error: 0xC004F074 The Software Licensing Service reported that the computer could not be activated. No Key Management Service (KMS) could be contacted.
Please see the Application Event Log for additional information.”
“Error 0xC004F074, SL_E_AUTHN_MISMATCHED_KEY, The Software Licensing Service reported that the key is mismatched.”
To fix the Windows 10 Activation error 0xC004F078, you have to use the correct key for your type of Windows copy or use Command Prompt to reinstall the key or you could also try running the Activation troubleshooter.
Option 1 – Try running the Windows 10 Activation Troubleshooter
The first thing you can do to resolve the Activation error code 0xc000f074 is to run the Windows 10 Activation Troubleshooter. To do so, follow these steps:
- Go to Settings and then select Activation.
- After that, click on the Windows Activation and then troubleshoot. This will help you address most of the commonly found activation issues in Windows devices.
The Windows 10 Activation Troubleshooter will determine if your license key is a valid Windows 10 digital license for an edition that is not currently installed. If it turns out that it’s not, then the troubleshooter will show you how to install the correct edition.
Option 2 – Try to use the correct key for the type of Windows version you have
If the Windows Activation troubleshooter wasn’t able to resolve the error, then you can try using the correct key for your type of Windows version. All you have to do so is check the type of your Windows copy if it’s OEM, retail, or volume. And make sure that you have the correct, valid product key for your operating system.
Option 3 – Try to use Command Prompt to reinstall the key
- In the Start Search, type “command prompt” and right-click on Command Prompt from the search results, and then select “Run as administrator”.
- After that, execute this command to uninstall the existing key: vbs /upk
- Next, you need to install the KMS product key by executing this command: vbs /ipk <The KMS Product Key>
- Once you’re done, you will see a prompt that’ll tell you whether the operation was either successful or not.
- To active, the KMS product key online, use this command: vbs /ato
- Use this command to activate the key using the telephone: exe 4
- After you’ve activated the KMS product key, restart the Software Protection Service. You can also verify the Activation Status to check if your fix was successful or not.
Option 4 – Contact Microsoft Support for assistance
If you’re at your wits’ end in trying to upgrade your computer, you should consider contacting Microsoft Support for help as they can offer you various options that would make fixing Windows Activation error code 0xc000f074 a lot easier and faster.
Read More
It is no secret that Fortnite is one of the most played games in the world. Epic has done a great job offering it to plenty of other platforms with cross-play feature meaning that you can play with your friends no matter on what platform they are on.
But how Fortnite is a piece of software which is constantly updated and maintained it is pretty normal to have some bugs or issues from time to time.
One of the before-mentioned issues is a connection issue or unable to connect to game servers.
In our article, we will go through common fixes and solutions in order to get you back in-game as fast as possible. Keep on reading.

Check the Epic Games Status page
Check the Epic Games Server Status page to make sure all systems are operational. If the issue you’re experiencing is related to an outage or system-wide issue, you won’t be able to connect to the Epic Games Launcher or Fortnite until it’s resolved.
Use a wired connection
Wireless connections are not as stable as wired connections. This means that the signal can be unreliable and result in packet loss, connection problems, or higher latency or ping. Connect directly to your modem or router with an Ethernet cable to eliminate this possibility and have the fastest connection possible.
Disable your firewalls
Often the quickest way to fix connection problems due to firewalls is to temporarily uninstall and/or disable it.
Windows Firewall disable guide:
- Click on Start.
- Click on Control Panel.
- Click on System and Security.
- Click on Windows Firewall.
- Click on Turn Windows Firewall on or off (You might need to provide the Administrator password at this step)
- Under each Network location, select the Turn off Windows Firewall option
Uninstall any other firewalls
Using a third-party firewall may prevent you from being able to connect to the Epic Games Launcher, Fortnite, or another Epic Games product. We recommend removing any third party firewalls temporarily to see if this resolves your issue. If it does resolve the problem, make sure to add the following executables as exceptions to your firewall:
Epic Games Launcher
- C:\Program Files (x86)\Epic Games\Launcher\Engine\Binaries\Win64\EpicGamesLauncher.exe
- C:\Program Files (x86)\Epic Games\Launcher\Engine\Binaries\Win32\EpicGamesLauncher.exe
Fortnite
- C:\Program Files\Epic Games\Fortnite\FortniteGame\Binaries\Win64\FortniteClient-Win64-Shipping.exe
- C:\Program Files\Epic Games\Fortnite\FortniteGame\Binaries\Win64\FortniteClient-Win64-Shipping_BE.exe
- C:\Program Files\Epic Games\Fortnite\FortniteGame\Binaries\Win64\FortniteClient-Win64-Shipping_EAC.exe
- C:\Program Files\Epic Games\Fortnite\FortniteGame\Binaries\Win64\FortniteLauncher.exe
Contact your firewall manufacturer for instructions on how to add these as exceptions to it as this varies between them.
Unblock your network ports
Network ports allow certain types of data to be successfully sent over a network that is used by our services. If you have any of these blocked, it may result in you being unable to connect to our games or use our services properly. To unblock your ports on your router do the following:
Windows
First, you will need to get your default gateway and internal IP address:
- Click on Start.
- Type cmd and press Enter.
- Type ipconfig and press Enter.
- Take note of your Default Gateway and IPv4.
Configuring your router to unblock the ports
- Open your web browser.
- Type your Default Gateway into the address bar and press Enter. (A common Default Gateway is 192.168.1.1)
- You may be asked for a username and password. This varies for each router. Before entering anything, try just hitting OK. If that doesn’t work, try the common default username and password below:
Username: admin
Password: password
If these don’t work, you can check this website for a list of usernames and passwords based on your router model. - Locate the Port Forwarding page in the administration tool and click on it.
- Make sure you have Port Forwarding selected and not Port Triggering as this is completely different.
- On this screen, you will need to enter the ports and port ranges below with the correct protocol and local IP of which you took note of above: 80 (TCP/UDP), 433 (TCP), 443 (TCP), 3478 (TCP/UDP), 3479 (TCP/UDP), 5060 (TCP/UDP), 5062 (TCP/UDP), 5222 (TCP), 6250 (TCP/UDP), and12000-65000 (TCP/UDP).
If you have any trouble doing the above on your router, make sure to check out the router manufacturer’s support site for additional instructions as these will vary from router to router.
VPN and Proxy Servers
Do NOT use VPN or Proxy Servers. These cause issues that can’t be resolved by us without having you disable them. Check out this article for information on how to disable your proxy server.
Switch Domain Name Systems (DNS)
Switching your DNS can result in better connectivity and performance for your internet connection. There are two different DNS services we recommend to have you try if you are having issues with your connection. Below are the followings links with instructions on how to change your DNS:
- GoogleDNS
- CloudflareDNS
Epic Games Launcher: Edit your Engine.ini file (Windows only)
Editing these settings can result in better download speeds using the Epic Games Launcher:
- Click on Start.
- Type %localappdata% and press Enter.
- Open the EpicGamesLauncher
- Open the Saved
- Open the Config
- Open the Windows
- Open ini and add the following lines to it:
[HTTP]
HttpTimeout=10
HttpConnectionTimeout=10
HttpReceiveTimeout=10
HttpSendTimeout=10[Portal.BuildPatch]
ChunkDownloads=3
ChunkRetries=20
RetryTime=0.5 - Save the file and open the Epic Games Launcher.

Read More

As previously announced by Google feature to quickly delete the last 15min of browsing history via one button is rolling out now.
For now, only Apple users will be available to use this feature but the Android update is scheduled for later this year, a strange move by Google but it is what it is.
For anyone who is unfamiliar with this feature, basically, Google wants a quick way to remove the last 15min of browsing history as a supposedly stated request to make deleting browsing history much easier.
Google came up with this idea so you can keep the previous history intact but remove just 15min time frame, no additional explanation was given on why 15 but I presume it is some round number that came up as the middle one with research, read telemetry info.
Using quick delete requires being signed into Search with a Google account. Users can access the option by simply tapping on the avatar icon to access the settings then choosing «Delete last 15 minutes.»
Read More
If you encounter Error 0xc0000005 when you try to launch a program on your Windows 10 computer then this means that Windows was unable to process the files and the configuration correctly needed in order to run the program properly. You can encounter this kind of error with an installed program and even as the installer for a particular program. To fix this error, this post will provide you with some potential fixes that might help.
Error 0xc0000005 occurs due to Access Violation which happens when a user tries to open a program and this error code may be accompanied by any of the following three error messages:
- The application was unable to start correctly
- Access violation Exception Error
- Windows Installation Error
To fix this error, you need to follow the given options below carefully but before you do that, you can try to use System Restore Point first to put your computer back to its previously known stable state.
- Tap the Win + R keys to open the Run dialog box.
- After that, type in “sysdm.cpl” in the field and tap Enter.
- Next, go to the System Protection tab then click the System Restore button. This will open a new window where you have to select your preferred System Restore point.
- After that, follow the on-screen instructions to finish the process and then restart your computer and check if the problem is fixed or not.
After performing System Restore check if Error 0xc0000005 is now fixed or not. If not, then make sure to use the options given below to resolve the problem.
Option 1 – Update or rollback drivers
If the System Restore didn’t work, then it’s time to either update or roll back the device drivers. It is most likely that after you updated your Windows computer that your driver also needs a refresh. On the other hand, if you have just updated your device drivers then you need to roll back the drivers to their previous versions. Whichever applies to you, refer to the steps below.
- Open the Devices Manager from the Win X Menu.
- Then locate the device drivers and right-click on them to open the Properties.
- After that, switch to the Driver tab and click on the Uninstall Device button.
- Follow the screen option to completely uninstall it.
- Finally, restart your computer. It will just reinstall the device drivers automatically.
Note: You can install a dedicated driver on your computer in case you have it or you could also look for it directly from the website of the manufacturer.
Option 2 – Try running the System File Checker Scan
The SFC or System File Checker scan could detect and automatically repair damaged system files that could be causing Error 0xc0000005. SFC is a built-in command utility which helps in restoring corrupted files as well as missing files. It replaces bad and corrupted system files to good system files. To run the SFC command, follow the steps given below.
- Tap Win + R to launch Run.
- Type in cmd in the field and tap Enter.
- After opening Command Prompt, type in sfc /scannow
The command will start a system scan which will take a few whiles before it finishes. Once it’s done, you could get the following results:
- Windows Resource Protection did not find any integrity violations.
- Windows Resource Protection found corrupt files and successfully repaired them.
- Windows Resource Protection found corrupt files but was unable to fix some of them.
Now restart your computer.
Option 3 – Run the Windows Memory Diagnostic tool
Since this error could be caused by some issues in the memory, you can try running the Windows Memory Diagnostic tool and see if it helps.
- Tap the Win + R keys to open Run and type exe and hit Enter to open the Windows Memory Diagnostic Tool.
- After that, it will give two options such as:
- Restart now and check for problems (Recommended)
- Check for problems the next time I start my computer
- Once your computer has restarted, perform a basic scan or you could also go for the “Advanced” options such as “Test mix” or “Pass count”. Simply tap the F10 key to start the test.
Note: After you select the option, your PC will restart and check for memory-based issues. If it finds any issues, it will automatically fix them and if there’s no issue found, then it’s most likely not a memory-based issue so you should try the other options given below.
Option 4 – Try recreating the Boot records
If your system files are infected and modified by some malware, then it’s no wonder why you’re getting Error 0xc0000005 since this error can also be due to malware. To fix this, you can try to recreate the boot records on your computer. How? Follow these steps:
- Tap the Win + R keys to open the Run dialog box.
- Then type “cmd” in the field and hit Enter to open Command Prompt.
- After that, type in each one of the following commands below and hit Enter right after you input each one of them.
- Del D:WindowsSystem32xOsload.exe
- Del D:WindowsSystem32xNtKrnl.exe
- Del D:WindowsSystem32Driversoem-drv64.sys
- attrib c:bootbcd -h -r –s
- ren c:bootbcd bcd.old
- bootrec /rebuildbcd
- After you input the listed commands above, it will recreate all the files needed inside the boot record.
Option 5 – Try turning off Data Execution Prevention or DEP
You might want to turn off Data Execution Prevention or DEP if it could be the one that’s blocking your process to run a particular program. To disable DEP, refer to the steps below.
- Type “cmd” in the Start Search and then right-click on Command Prompt from the results and select Run as Administrator.
- After that, type the following command and hit Enter to disable DEP:
bcedit.exe /set {current} nx AlwaysOff
- Restart your computer.
Option 6 – Try to fix Registry
- Tap the Win + R keys to open the Run dialog box.
- Next, type “Regedit” in the field and hit Enter to open the Registry Editor.
- After that, go to this registry path: HKEY_LOCAL_MACHINESOFTWAREMicrosoftWindows NTCurrentVersionWindows
- From there, double click on LoadAppInit_DLLs located at the right side of the panel and change its value from “0” to “1”.
- Now restart your computer.
Option 7 – Try checking RAM
You can also check RAM physically and see if it is in an operable condition. You might want to consider replacing it and see if it fixes the error.
Option 8 – Try to disable your antivirus program temporarily
Disabling the antivirus program or any security software installed in your computer might help in resolving the error since there is a good chance that it’s blocking the program from execution due to suspicious behavior. Just don’t forget to enable the antivirus program back again.
Option 9 – Troubleshot the problem in a Clean Boot State
There are some instances that some conflicting programs installed in your computer might be the one that’s causing Error 0xc0000005. To identify which program is causing the problem, you need to put your computer in a Clean Boot State. To do so, follow the steps below.
- Log onto your PC as an administrator.
- Type in MSConfig in the Start Search to open the System Configuration utility.
- From there, go to the General tab and click “Selective startup”.
- Clear the “Load Startup items” check box and make sure that the “Load System Services” and “Use Original boot configuration” options are checked.
- Next, click the Services tab and select the “Hide All Microsoft Services” check box.
- Click Disable all.
- Click on Apply/OK and restart your PC. (This will put your PC into a Clean Boot State. And configure Windows to use the usual startup, just simply undo the changes.)
- From there, start to isolate the problem by checking which one of the programs you installed recently is the root cause of the problem.
Option 10 – Try resetting Windows 10
To fix this error, you can try resetting Windows 10. Doing so won’t get rid of any file in your system – instead of erasing all your media files and documents, this reset option resets all the system settings and files.
Read More
Copyright © 2023, ErrorTools. All Rights Reserved
Trademark: Microsoft Windows logos are registered trademarks of Microsoft. Disclaimer: ErrorTools.com is not affiliated with Microsoft, nor claims direct affiliation.
The information on this page is provided for information purposes only.