
,
The following blue screen error appears when trying to install the Windows 10 v1709 (or the v1803) on a HP Pavilion 15-ab103nv notebook with the AMD Quad-Core A10-8780P processor: «Your PC ran into a problem and needs to restart. Stop Code: SYSTEM PTE MISUSE».

In this tutorial you ‘ll find instructions on how to resolve the «SYSTEM PTE MISUSE» blue screen error when installing Windows 10.
How to fix BSOD «SYSTEM PTE MISUSE» on Windows 10 Installation.
Method 1. Disable Trusted Platform Module (TPM) in BIOS.
1. Power ON your Laptop and enter BIOS Setup.
2. Inside BIOS settings, find and set the TPM to Hidden or Disabled. *
* The TPM EMBEDDED SECURITY settings, commonly can be found at Security options in BIOS.

3. Save settings and Exit from BIOS Setup.
4. Install Windows 10. If you receive the «SYSTEM PTE MISUSE» error again, then proceed to update your BIOS.
Method 2. Update BIOS to Resolve the «SYSTEM PTE MISUSE» BSOD.
1. Navigate to laptop’s manufacturer support page.
2. Download the latest BIOS version on your desktop.*
* Note: If you ‘re own the HP Pavilion 15-ab103nv notebook, download the updated BIOS from here. Then double click to run the downloaded file and follow the on-screen instructions to update the BIOS.
3. Use the downloaded file to update the BIOS.*
* Note: Carefully read the manufacturer’s instructions on how to update the BIOS.
4. After BIOS update, try to install Windows 10 again. If the problem persists, then:
5. Enter BIOS Setup again and set the Boot Configuration to Legacy only. (Disable UEFI).
6. From another computer, download Windows 10 directly from Microsoft and burn the ISO file to a DVD or create a bootable USB Media for MBR partition scheme for BIOS or UEFI-CSM using the RUFUS utility.
7. Boot from the DVD (or the USB) installation media you created and Install Windows 10.
8. After installation proceed and install all available updates.
That’s it! Let me know if this guide has helped you by leaving your comment about your experience. Please like and share this guide to help others.
If this article was useful for you, please consider supporting us by making a donation. Even $1 can a make a huge difference for us in our effort to continue to help others while keeping this site free:
- Author
- Recent Posts
Konstantinos is the founder and administrator of Wintips.org. Since 1995 he works and provides IT support as a computer and network expert to individuals and large companies. He is specialized in solving problems related to Windows or other Microsoft products (Windows Server, Office, Microsoft 365, etc.).
The problem of ‘system pte misuse’ is mostly caused due to issues with PTT and TPM security technology used by your system’s firmware. To resolve the system pte misuse error, you must rectify the BIOS settings. Let’s walk you through the methods to deal with the problem and recover any data lost due to BSOD.
How to resolve the SYSTEM PTE MISUSE error?
The SYSTEM PTE MISUSE error with the error code 0x000000DA, being a reason for BSOD, is potentially harmful to your system and the data stored on it. If the issue is caused due to logical reasons, you might lose any unsaved data as you will be forced to restart your Windows 10 PC. You won’t be allowed to save the unsaved data. Similarly, if the reason is hardware-related, your system will eventually give up unless you repair or replace the responsible component. Since you have reached this page, you need not worry, as the following methods will resolve the problem, and there is an additional tip to counter any data loss scenario.
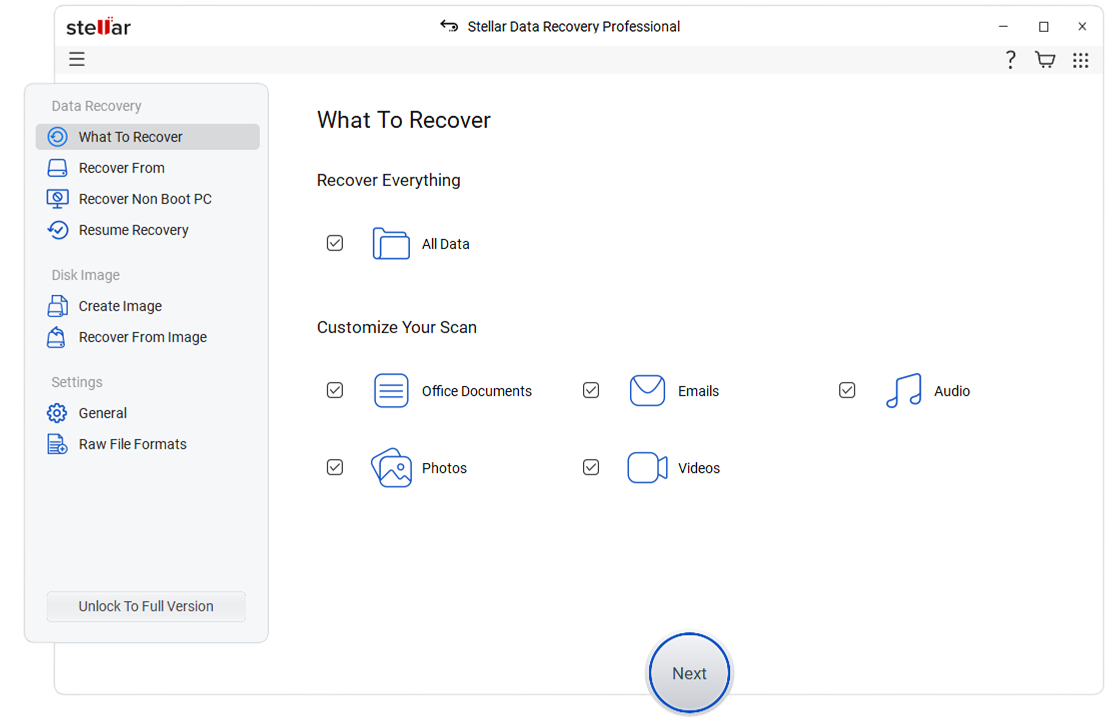
Caution: There are chances of potential data loss if you interfere with the PTT, TPM, or BIOS. Tread very carefully, stick to the exact steps and keep Stellar Data Recovery Professional for Windows handy to deal with any data loss scenario.
Method 1: Disable PTT security technology in BIOS setup
PTT or Platform Trust Technology is responsible for implementing Trusted Platform Module (TPM) in the system firmware of your PC. PTT is a functionality used by Windows 11 and 10 for credential storage and key management. You can disable it in the BIOS setup to stop the frequent appearance of SYSTEM_PTE_MISUSE error. Here’s how to do it.
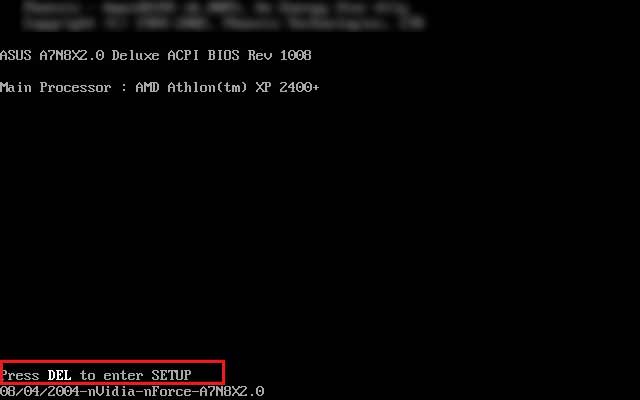
Step 1: Turn on your computer and enter the Setup by pressing the BIOS key.
Note: When you start your PC, you will find Press DEL to enter SETUP message written at the bottom of your screen. The DEL key (or any other key mentioned in its place like F1, F2, etc.) is the BIOS key for your PC.
Step 2: Click on the Security or Configuration or System Configuration tab in BIOS setup depending on your system’s manufacturer (Lenovo, HP, Dell, etc.).
Step 3: Select the Platform Trust Technology option and press Enter. Now use the up-down arrow keys to select the Disable option.
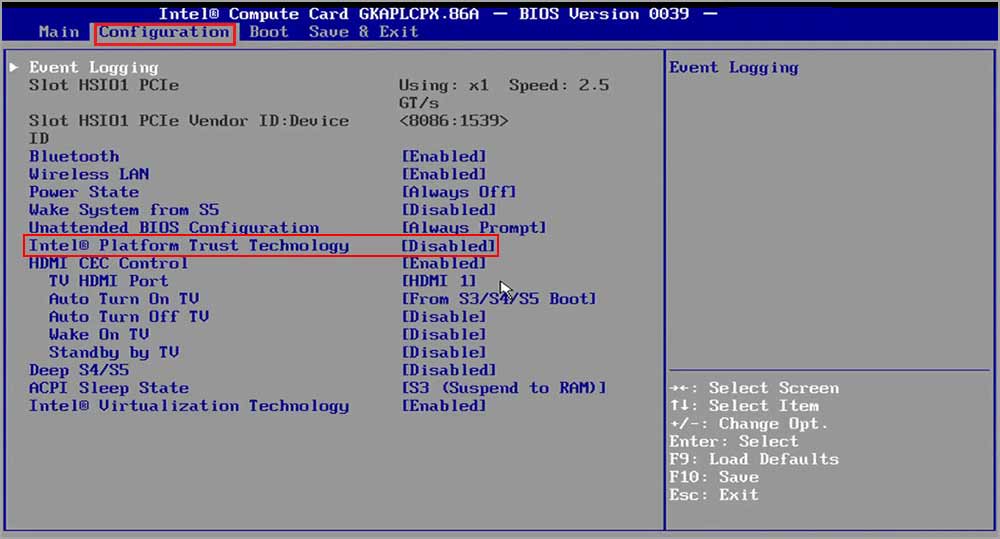
Step 4: Click F10 to save the changes and press Esc to exit.
Your system will proceed to the normal boot-up. Now, check if the error is resolved.
Method 2: Disable TPM or set it to Hidden in BIOS setup
Trusted Platform Module is an alternative to PTT. If you could not find PTT as described in the previous method, it might be because your system is using TPM instead. You can find the TPM placed in the same section as PTT. Here’s how you can disable/hide the TPM in the BIOS setup.
Step 1: Turn on your Windows 11/10 PC and press the BIOS key to enter setup.
Step 2: Click the Security tab and locate Trusted Platform Module.
Step 3: Select the TPM option and hit Enter.
Step 4: Use the up-down arrow keys to select Hidden in the options. If there’s no Hidden option, select Disable.
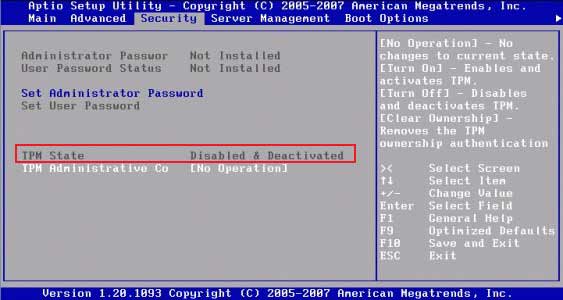
Step 5: Click the Exit system setup after saving the changes or press F10, whichever is applicable on your system based on the make of your PC.
Your OS will proceed to a normal startup. Check and confirm if the error 0x000000DA is resolved.
Method 3: Run the Hardware Troubleshooter on your PC
If you could not fix the SYSTEM_PTE_MISUSE error using the above fixes, there might be an issue with some hardware components. Therefore, before updating the BIOS, it is witty to check and fix any hardware issue on your PC. This method will help you address any hardware-related problem, and your OS will resolve it if it’s not major and within its capabilities. Here’s how to do it.
Step 1: Open Settings from the Windows Start menu and select Update & Security.
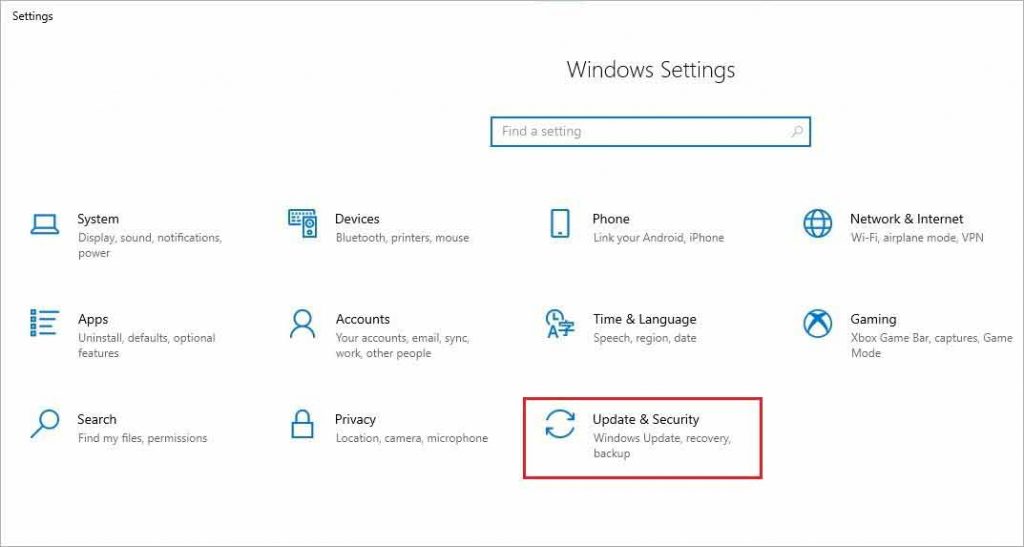
Step 2: Click on the Troubleshoot option in the left pane and select Additional troubleshooters.
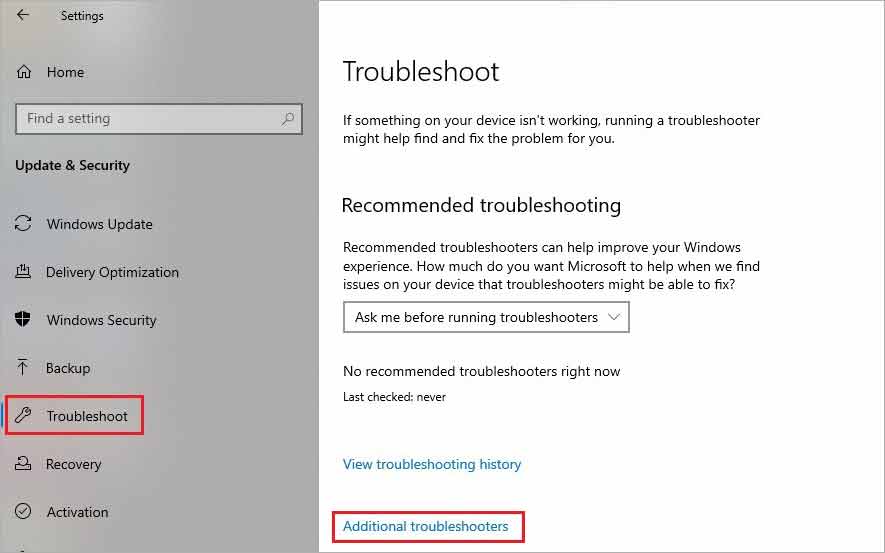
Step 3: Select the hardware component from the list and click Run the troubleshooter option under each of them.
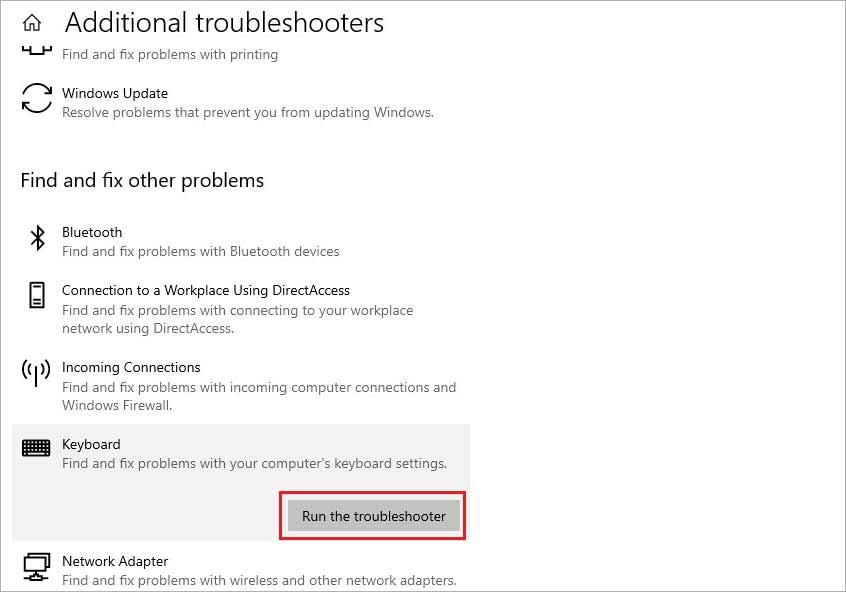
Note: If you are unsure which hardware component is causing the trouble, select the hardware components one by one and run troubleshoot for each.
Step 4: Follow the instructions on your screen to automatically resolve any existing hardware issue.
Method 4: Update BIOS on Windows 11/10 PC
If none of the methods above have resolved the problem of SYSTEM_PTE_MISUSE error and you are still facing the BSOD, you need to update the BIOS on your system. Your system’s microprocessor uses BIOS or Basic Input Output System to start your system when you turn it on. It helps in data flow between your Windows OS and connected components like a Hard drive, keyboard, printer, etc.
Updating BIOS is not a simple task, and you need an external USB drive or CD/DVD to assist you in doing it. However, we will provide the common steps, and you can use the links specific to your system’s make and manufacturer to proceed to updates. Here’s how to do it.
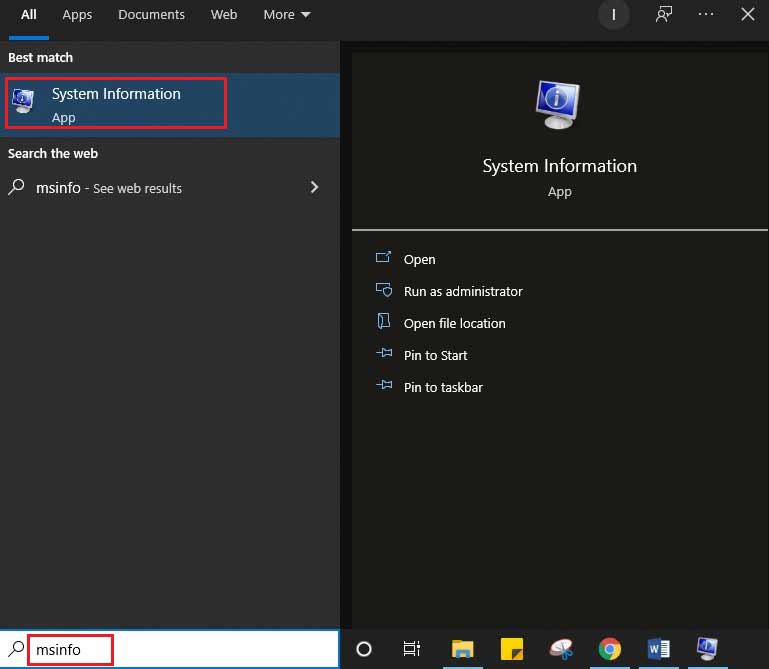
Step 1: Type msinfo in the search bar of your Windows PC and select System Information.
Step 2: In the System Information window, navigate the BIOS Version/Date below the Processor information and note it down.
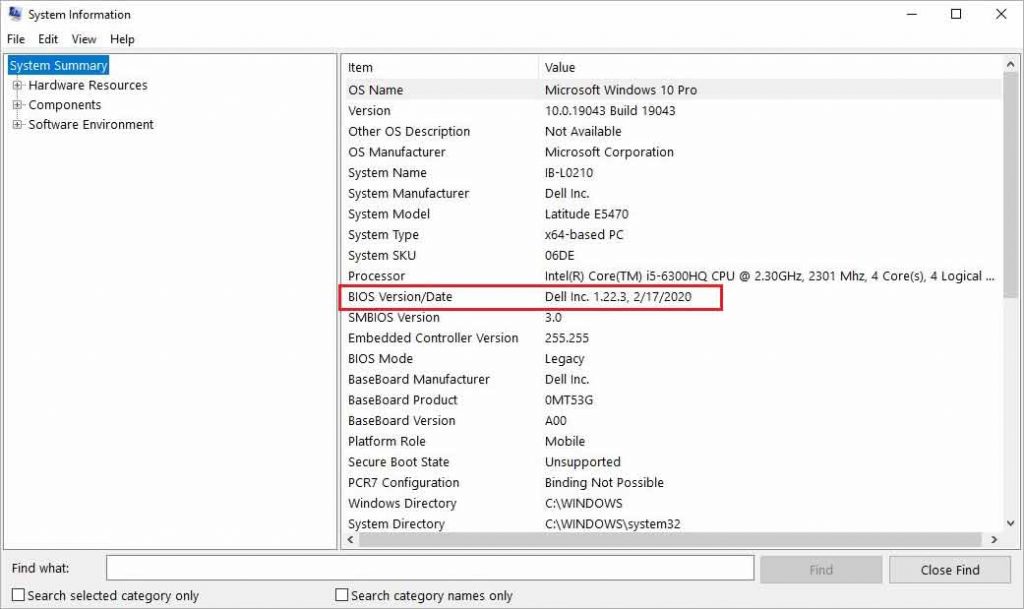
Step 3: Note down the System Manufacturer, System Model, and System Type information from the System Information window.
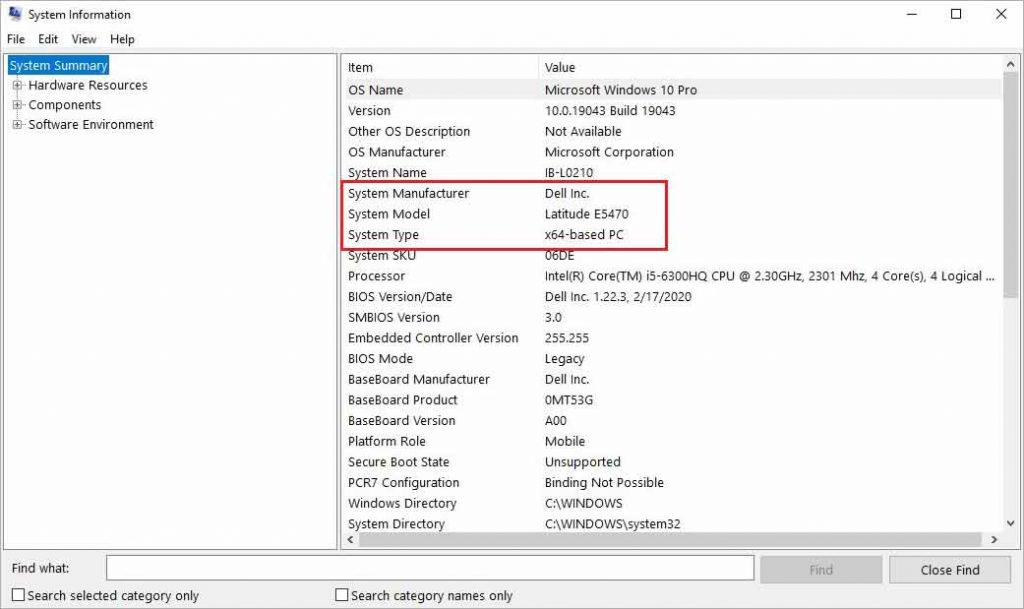
Note: In the System Type section, if you see x64-based PC, it reflects a 64-bit version of OS. Similarly, if you see an x86-based PC, you have a 32-bit version of Windows OS.
Step 4: Now, use the BIOS update link based on your system’s manufacturer from the list below.
- Dell BIOS update
- HP BIOS update
- Lenovo BIOS update
- Gateway BIOS update
- MSI BIOS update
Remedy for data loss due to SYSTEM_PTE_MISUSE error and BSOD
BIOS is a critical element of the operation of your Windows PC. There are chances of data loss if anything goes wrong while updating it. Similarly, you may lose the keys and other information collected by TPM if you disable it. Therefore, working with the system processes requires utmost caution as any glitches may jeopardize the entire data on the PC. However, as we assured you, you can easily get back any data lost during the encounter with the said error or BSOD using the secure Stellar Data Recovery Professional for Windows.
Even if you lose data due to any mishap while applying the fixes, you can recover it using the software. The software is equipped with multiple features to deal with any data loss scenario on Windows 11, 10, 8, and 7. For example, the bootable recovery option of the recovery software allows you to recover data from a crashed or non-booting Windows device. All you need to do is follow the step-by-step data recovery procedure prompted by the DIY software.
The problem of ‘system pte misuse’ is mostly caused due to issues with PTT and TPM security technology used by your system’s firmware. To resolve the system pte misuse error, you must rectify the BIOS settings. Let’s walk you through the methods to deal with the problem and recover any data lost due to BSOD.
Was this article helpful?
FAQs
Is my old MySpace gone?
No, your old MySpace account may not be gone yet. Try searching the old account with your old email address or name. If you find your old account, but forgot the log in details, contact MySpace for help by filling this form.
Why can’t I see all my photos on MySpace?
You won’t see old photos on MySpace, if your old account was not synced to the new Myspace. This means the photo from the old account are not transferred to the new MySpace account.
SYSTEM PTE (Page Table Entries) MISUSE occurs when you try to change any security-based setting from the BIOS in Windows’s firmware.
This causes firmware issues or critical operating system failure. The resulting crash causes Windows to generate a stop code shown on a blue screen, generally known as a BSOD (Blue Screen of Death).
This error may happen if you have recently changed the status of Intel’s PTT (Platform Trust Technology) and Windows TPM (Trusted Platform Module) from the BIOS. You can fix PTE MISUSE errors by disabling PTT and TPM from the BIOS.
For more detailed fixes, this article will show you how you can solve this BSoD error.
Probable Causes for This Error
There could be several reasons why your computer has received this error. Some common causes are listed below:
- Changing TPM and PTT settings from the BIOS
- Out-of-date BIOS
- Corrupt system files
Fixes for SYSTEM PTE MISUSE Error
System PTEs are the data structure utilized by a computer OS’s virtual memory system to record the mapping between virtual and physical addresses. These are kernel resources that are required by the operating system to access data in the memory.
The following fixes have been proved to solve the SYSTEM PTE MISUSE BSOD error on your Windows device.
Run Windows Troubleshooter
If your device runs an earlier version of Windows 10 (v1809 or earlier), you can use the inbuilt troubleshooter to diagnose and solve the issue. To run the blue screen troubleshooter:
- Press Windows key + I to open Settings
- Go to the Update & Security tab

- Click on Troubleshoot
- In the Troubleshooter menu, search for the Blue Screen option

- Select it and then click on Run the troubleshooter button
- Follow the on-screen prompts


Wait for some time while the program runs and finds any issues. If the problems can be solved, the troubleshooter will attempt to fix them or suggest methods from which you can solve these issues.
If your device is running a later version of Windows, your device will not have the built-in troubleshooter. Instead, you can consult Windows’s online troubleshooter guide for blue screen errors.
On the website, select the problem you have encountered, and the guide will show you the necessary fixes for your device.
Run System File Checker and DISM Scan
If the troubleshooter did not find any solution for the BSOD error, you could use the system file checker from command to scan and repair missing or corrupt files. To run the SFC firstly:
- Open Run by pressing the Windows key + R
- In Run, type
cmdand press Ctrl + Shift + Enter keys together to open the command with administrator access - In the command, type
sfc /scannowand press the Enter key
- This command will run the system file checker and attempt to repair any corrupt or damaged files
- Again type
DISM /Online /Cleanup-Image /RestoreHealthand press the Enter key


The command will start a scan process and try to solve the issue regarding any missing or damaged Windows Image files.
After the scan, restart your computer and check if the issue is solved
Hide TPM and Disable PTT from BIOS
If you have recently made changes to the TPM and PTT in BIOS, this may be causing your system to crash and display the stop code error. TPM and PTT are built-in security features and interfaces made according to the specifications set by Microsoft and Intel, respectively.
They work by storing protected key information in a secure chip with an inbuilt unique Verification Key during manufacturing.
To solve this, firstly, enter the BIOS of your device. To do this:
- Press Windows key + I to open Settings
- Go to Update & Security
- Click on Recovery> Advanced Startup|
- Click on Restart now

In the advanced startup menu,
- Select Troubleshoot
- Go to Advanced Options > UEFI Firmware Settings
- Now, click on the Restart button

You will enter the BIOS of your device.
After entering the BIOS:
- Go to the Security tab
- Search for Intel Platform Trust Technology
- To the right, change the options until you find the Disable option
- Press the Enter key to disable PTT from the BIOS

Note: Changing TPM settings from the BIOS may cause data loss from your device if you do not have the BitLocker recovery key. It is generally not recommended to change TPM settings from the BIOS.
Again in the Security tab,
- Search for TPM or TPM Support
- Select Disable to disable it
- A prompt will appear asking for confirmation
- Select Yes to confirm
- Save your changes and restart your computer

The PTE MISUSE error should be solved.
If you wish to forgo changing TPM settings from the BIOS, you can do it from Windows after backing up all your important data. To access and clear TPM from Windows, firstly:
- Press Windows key + S to open Search
- Type Windows Security and press the Enter key
- In the Home tab, search for Device security and click it
- Select Security Processor Details under Security Processor
- Now, select Security Processor Troubleshooting
- In the next window, under Clear TPM, click on the Clear TPM button
- In the popup menu, follow as instructed and after you have prepared for everything, click Clear and Restart


Update the BIOS
System PTE Misuse error can also occur if you do not have an up-to-date BIOS. Fortunately, Windows allows their users to update the BIOS and its functionalities. Updating the BIOS can also help your system solve other performance and stability issues.
Note: Updating the BIOS is a delicate procedure. Thoroughly research before attempting to update or make changes in the BIOS. A failed update can potentially render your device unusable. Always backup any data and save any work before proceeding. If you have a laptop, connect it to the charger or wall outlet until the BIOS updating process finishes.
To update the BIOS, firstly, you will need to check what version of BIOS you have in your system and the model of your device. To do this:
- Press the Windows key + S button to open Search
- Type System information and press the Enter key
- Click on the System Summary tab

- Note down the following information
- System model
- BIOS Version/ Date
- System type

Note down the serial number of your device. To do this:
- Press Windows Key + R to open Run
- Type
cmdin the dialogue box and press Enter - In the command prompt, type the following
wmic baseboard get product,manufacturer,version,serialnumber

Now, go to your device’s support page and download the appropriate version for the device. The file usually is in a .zip format.
- Extract the file to an easy-to-access location
- If you have an executable (.exe) file, open it and follow the prompts.
- If you want to update your BIOS from the BIOS interface, copy the extracted files in a USB drive
- Restart your computer and enter the BIOS
- Search for EZ Flash, Q-flash or similar under the Tool menu.

- Select your USB device to update the BIOS

- Follow the instructions shown.


If you need more detailed instructions on how to update BIOS, you can check here.
Perform a System Restore
If the methods mentioned above do not solve your problem, you can try and perform a system restore to repair any missing or corrupt files. This process may also undo any recent changes made to your device. Save any important data or make a backup before proceeding.
Note: If you haven’t enabled system restore or have created a system restore point earlier, this method will not work. You first must enable and create a system restore point for this method.
To perform a system restore, firstly:
- Press Windows key + R to open Run
- Type
rstruiin the dialogue box and press the Enter key - Click on Next

- On the system restore menu, select your system restore point
- If you have multiple, select the one before you encounter the BSOD problem
- Click on Next and Finish to start the system restore process

Wait for a while and check if your device has encountered any problems.
These methods can help you solve the SYSTEM PTE MISUSE error. If none of the solutions work, take your device to an authorized technician for repairs.
You are here: Home / How to / How to Fix SYSTEM_PTE_MISUSE Blue Screen of Death Error?
If your computer repeatedly restarts and showing Blue Screen with an error SYSTEM PTE MISUSE, it means the Page Table Entry (PTE) was accessed inappropriate way and it is a security issue caused due to corrupt or outdated hardware. It is one of the most annoying errors encountered in Windows that can crash your system. So, if you met with this issue, then don’t get stressed as here you will get some fruitful solutions that will resolve the issue.
What is SYSTEM PTE MISUSE Stop Code?

The SYSTEM PTE MISUSE bug has a check value of 0x000000DA. This indicates that a page table entry (PTE) has been inappropriately accessed. This type of Blue Screen error occurs due to the hardware problems, such as any incompatible device in your PC and system file corruption.
If any system driver for particular hardware gets corrupt, it will not be able to recognize that external device and will lead to the crashing of the system with a Blue Screen of Death Error.
Why SYSTEM PTE MISUSE Blue Screen Error occurs?
- Two different security technologies i.e. PTT and TPM.
- Wrongly configured, old, or damaged system drivers.
- Damaged hard disk.
- Due to memory (RAM) corruption.
- Virus or Malware Infection.
- Clash of Driver due to newly installed hardware.
- Windows registry database corruption.
So, these were the major factors behind the issue and due to this some Vista users also reported an error Windows Defender not working Vista. So, resolving the security errors and fixing the drivers and hardware will eradicate the entire issues.
Fix SYSTEM PTE MISUSE Blue Screen Errors

In this tutorial, you ‘ll find instructions on how to resolve the “SYSTEM_PTE_MISUSE” blue screen error when installing Windows. Keep reading!
Disable TPM
Trusted Platform Module is a system firmware offers security to the OS. The SYSTEM PTE MISUSE Blue Screen Errors arises due to security reasons and disabling TPM may resolve the issue. So, you need to perform the task in BIOS.
- Turn off your PC completely.

- Now turn ON your computer and on the screen, you will get access to enter the BIOS by pressing the relevant key. The keys are different for different models and amid doing the task, the key will flash on the screen, so press it to enter the Setup zone. Generally, the keys are Del, F1, F2, F10 and more.

- After landing into the BIOS Setup page, you will find few tabs listed at the top of the page, use the arrows key to select ‘Security’.

- Now, move to ‘TPM Embedded Security’ and turns the radio button to ‘Hide’ mode.

- After performing the above task, save the settings and exit the BIOS Setup page.
- Now restart your computer.
Disable PTT security in BIOS
If you are facing this error 0x000000DA error on your Dell computer then you can enter the BIOS and uncheck PTT security and check whether the error has been resolved or not.
- During the boot process, press F2 or F12 key to enter into the BIOS mode.

- Now go inside Security tab > PTT Security section and uncheck the “PTT On” box.
- Restart your computer and check for the error.
Update Driver
- Press ‘Windows’ and ‘X’ keys together to open the shortcut menu and then click on ‘Device Manager’.

- Thereafter, the Device Manager page will appear on your screen, select ‘Display Adapter’ and click on the arrow button that is located at the left side of the Display Adapter. It will give you the list of drivers.

- After getting the list, select the driver, right-click on it and then choose ‘Update Driver’.

- Now, the Windows will look for the update and after the completion of the process, restart your computer.
Roll Back Driver
If you have recently updated any driver then there may be chances to encounter this error. In this case, you can go back to the previous version of the driver by following these steps:
- Click on the Start button and search for the Device Manager and click on the result.

- Now expand the category with the problem and right-click on it and select Properties option.

- Click on Driver Tab and then tap on the Rollback Driver option.

- In the next window, click on Yes if it’s asking for the confirmation.
Once you have successfully rollback driver the recent driver will get replaced by the older one and check for the 0x000000DA error.
Run System File Checker
If you are looking for a tool concerning windows fix corrupt files, then System File Checker is the best option for you. The inbuilt tool of Windows OS will scan and repair the corrupted files and will help you to resolve the issue. The process is simple and the steps for the same are listed beneath.
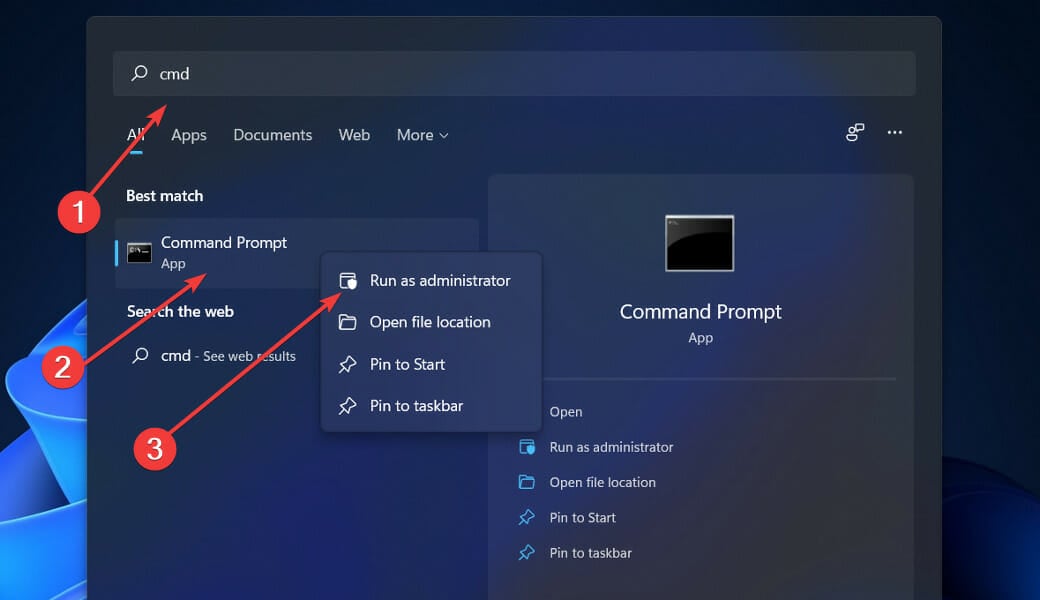
- Click on the ‘Start’ menu and then type CMD in the search bar.

- After getting the search result, select Command Prompt, right-click on it and further click on ‘Run as administrator’. If asked for any confirmation, then click on the ‘Yes’ button.

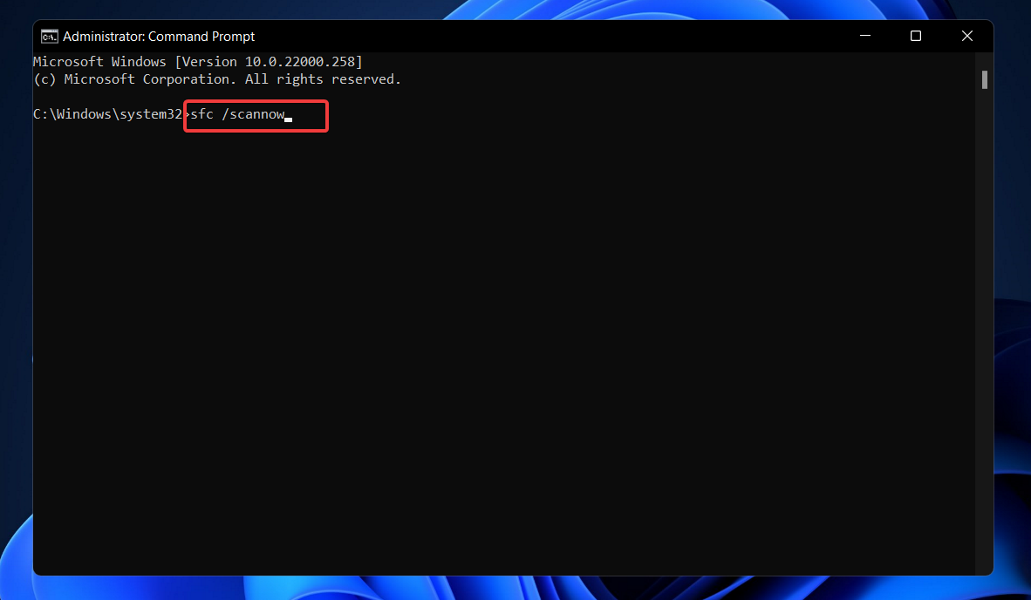
- Thereafter, you will get the Command Box, type ‘sfc/scannow’ and hit the ‘Enter’ key.

- Now, wait for some time because Windows will take time to find and fix the corrupted files.
- Once the process is completed, you need to restart your computer.
System Restore Point
Sometimes, the Windows Update or the newly installed application clash with the system and give rise to SYSTEM PTE MISUSE Blue Screen Errors. So to fix the issue, you can use System restore point feature of the Windows OS and this will revert your PC to that point where it was working smoothly. The method is pretty simple and for your solace, the steps are provided below.
This method will need admin authorization, so if you can log in to your computer, then go for the method. However, if you failed to access your computer due to repeated shutdown, then perform the Safe Mode operation and then apply the listed steps.
- Click on the ‘Start’ menu, type ‘Control Panel’ in the search bar and press the ‘Enter’ key.

- Soon, you will find the ‘Control Panel’ page on your screen with featured computer settings.

- Click on the ‘System and Security’ section.

- Thereafter, you will find the features of the ‘Windows’, click on ‘System’.

- A pop-up window will appear on the screen, move to the ‘System protection’ section and choose to System Restore. If earlier you have prepared the restore points, then select the one from the featured list in next window and click on the ‘OK’ button.

- Now, follow the on-screen instructions to complete the process and after the completion of the same, make sure to restart your computer.
Run DISM tool
To fix this error code 0x000000DA try to run DISM(Deployment Image Service and Management). To do so follow these steps:
- Open command prompt in the administrator mode and type the following commands one by one and hit Enter:
Dism /Online /Cleanup-Image /CheckHealth

Dism /Online /Cleanup-Image /ScanHealth

Dism /Online /Cleanup-Image /RestoreHealth

- Once the process is completed just Restart your computer and check for the error.
Run the Troubleshooter
Try to Run the Troubleshooter to fix this error code 0x000000DA. To do so follow the steps given below:
- Open Settings and type “Troubleshooting” and choose the first option from the result.

- In the top left corner click on “View All“.

- You will see the list of inbuilt troubleshooters available on your computer. Now click on the Hardware and Devices and run the Troubleshooter.

Run your System in Safe Mode
Try to boot your system in Safe Mode. We have a detailed guide on how to boot your system in Safe Mode else you can follow the below steps:
- Go to Start menu and select Settings.

- Click on Update & Security.

- Now search for the Recovery option.

- Now go to the Advanced Startup option and click on Restart Now. Now your system will enter in Safe Mode.

- Go to the Troubleshoot option.

- Click Advanced options and Startup Settings and then Restart.

- Now press the numeric key 4 to start in Safe Mode.

Scan your PC using Windows Defender
The virus or malware affects the system files and hence led to SYSTEM_PTE_MISUSE Blue Screen Errors. So you can use the Windows Defender tool to remove the virus. Some of the users also reported Windows Defender not working Vista and fail to detect the virus. So, in this case, they can access some trusted antivirus to remove the dangerous viruses from the PC.
- Click on the ‘Start’ menu and further click on the ‘Settings’ button located above the Power menu.

- Soon, a settings page will appear on the screen. Move to the ‘Update and Security’ section.

- Thereafter, you will find the summary of Windows Update and at the left end of the page, you will get some useful options, click on ‘Windows Security’.

- In the ‘Windows Security’ page, you will get ample of options, select ‘Virus and Threat Protection’.

- After that, a pop-up will appear on your screen, click on ‘Run a new advanced scan’.

- Soon, a page will appear on your screen featuring the modes of ‘Advanced Scans’, Select ‘Full Scan’ and then click on the ‘Scan now’ button.

- That’s it; now wait for some time and allow Windows Defender to fix the issue.
Conclusion
Hence, these were effective solutions against SYSTEM_PTE_MISUSE Blue Screen Errors. On the off chance, if you stuck amid the way or failed to resolve the issue, then post your comment in the box and soon our techies will assist you and will fix the issue in a quick span of time. Stay connected and enjoys the salient features of the Windows OS by resolving the BSOD.
If you feel this article helpful please like, share and follow our Facebook page and keep visiting our website for such tutorials.
Readers help support Windows Report. We may get a commission if you buy through our links.
Read our disclosure page to find out how can you help Windows Report sustain the editorial team. Read more
SYSTEM PTE MISUSE is a BSoD (Blue Screen of Death) problem that causes your computer to crash and forces you to restart it. A problem with certain files (such as file corruption or mismatched drivers) will almost always cause these types of warnings to appear.
Another cause for the SYSTEM PTE MISUSE error code, in some cases, is the mechanism that is implemented by the firmware. It is possible for this situation to arise as a result of the deployment of two separate types of security technologies: PTT and TPM.
You may remedy this issue quickly by disabling them in the BIOS when the computer is rebooted, or by updating your BIOS.
How can I fix the SYSTEM PTE MISUSE error in Windows 11?
1. Disable PTT security in BIOS
- Restart your PC and while your system boots, keep pressing the F2 or Del key to enter the BIOS screen.
- Use the arrow keys to navigate to the Security tab or a similar-sounding tab inside BIOS. Inside, select an option named PTT or PTT Security and set it to Disabled.

- Navigate to the Exit section and choose to Exit Saving Changes. This will proceed with the computer’s boot.

2. Set TPM as hidden
- Restart your PC and while your system boots, keep pressing the F2 or Del key to enter the BIOS screen.
- Use the arrow keys to navigate to the Security tab or a similar-sounding tab inside BIOS. Inside, select an option named TPM and set it to Hidden or Disabled.

- Navigate to the Exit section and choose to Exit Saving Changes. Now your PC will restart and apply the changes made.

3. Update your BIOS
Looking for the motherboard manufacturer’s website, such as Dell’s official page, and finding the Downloads or Support page for the motherboard model that you are interested in will be the first step to take.
The readers out there who have reported getting the SYSTEM PTE MISUSE error and who use HP computers should instead go to the official HP website for more information.
In a similar vein, for our Lenovo users, we recommend that you visit Lenovo’s official page for drivers and updates.
Download the version of the software to which you wish to make an upgrade and save it to your computer. Unless you have a specific requirement for an earlier version, you should generally go for the most recent one that is currently available on the market.
Your download will almost definitely be in the form of an archive, generally a ZIP file, and will take some time to complete. Once it is downloaded, you will have to unzip it, by right-clicking the file and tapping on the Extract all files option.
The flashing tool you choose will be determined by the motherboard you have. There are many different sorts of such tools available. The readme file that comes with the firmware upgrade should be able to assist you in determining which option is the best fit for your particular hardware setup.
Once the package has been unzipped, copy the documents to a USB drive and restart your computer. After that, navigate to the BIOS screen and select the BIOS update option.
More information and methods can be found in our post on how to upgrade your BIOS, which includes thorough guides with images attached to them to simplify the process.
4. Run a quick SFC scan
- Press the Windows + S key to open the Search bar, right-click on the most suitable cmd result and select Run as Administrator.

- Press Enter after you type or paste in the following command inside your cmd window:
sfc /scannow
Restart your computer when the process is completed. Note that it could take some time, make sure not to stop it midway.
5. Update Windows
- Press the Windows key + I to open the Settings app, then click on Windows Update in the left panel.

- To see if there are any new updates available, click the Check for updates button, otherwise click on the Install now option and then wait for the download to complete.

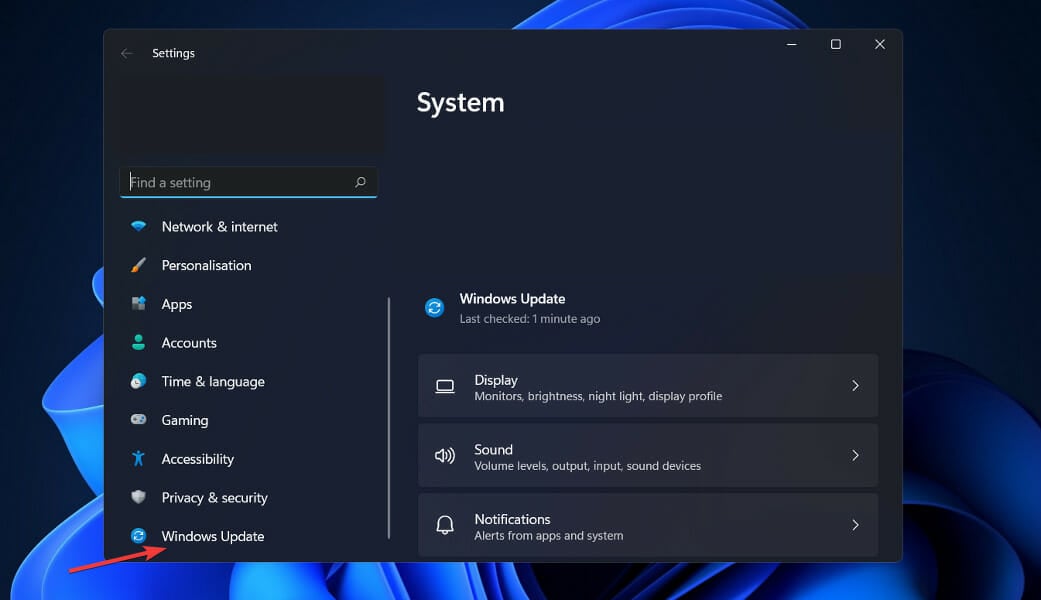
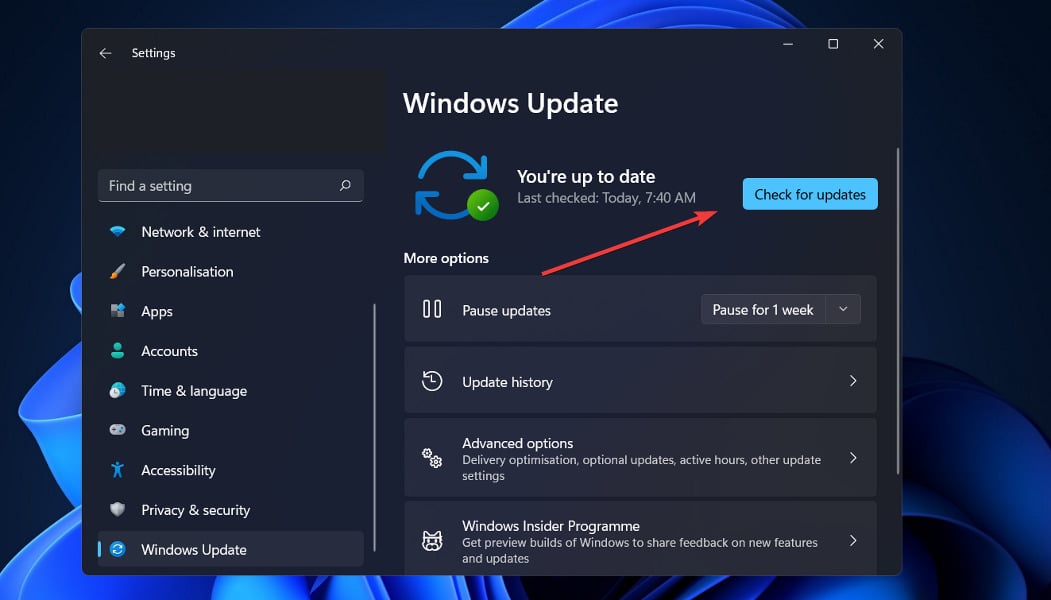
It is possible that running an older version of Windows is a contributing factor to the SYSTEM PTE MISUSE issue. Luckily it can be remedied by simply updating the operating system.
6. Update drivers
- Press the Windows key + I to open the Settings app, and click on Update & Security from the left panel. Now navigate to Advanced options as we’ve shown below.

- After you have found the Additional options area, click on Optional updates to proceed to the next step.

- Now click on the Driver Updates option, then select all the boxes listed and lastly click on the Download & install button.


When an issue occurs, you can manually seek updates, even though Windows is frequently in charge of driver updates. However, we strongly advocate using a specialized program such as PC HelpSoft Driver Updater to do automatic scans of out-of-date drivers.
Can a BSoD hurt my computer?
The answer is a resounding no. In reality, the entire purpose of a BSoD is to safeguard your computer’s hardware. When Windows detects that something has the potential to inflict serious harm, it immediately suspends all operations, culminating in the famed Blue Screen of Death.

A blue screen of death (BSoD) might be a symptom of a hardware failure. In that instance, it may appear as if the error was the root cause of the problem itself.
Despite that it will not harm your hardware, it might make your day miserable. Everything comes to a grinding halt while you’re busy working or playing. You’ll have to restart your computer, then reload any programs or files that were currently open.
Loredana Harsana
Windows Software Expert
Loredana is a passionate writer with a keen interest in PC software and technology. She started off writing about mobile phones back when Samsung Galaxy S II was on top of the world and she fell in love with tech of all sorts.
Whenever she’s not at her work desk, you’ll find her enjoying refreshing tea flavors, spilling stories on paper, and listening to the radio.