
DistributedCOM or Distributed Component Object Model is a vital system protocol working throughout numerous network transports, such as HTTP. It allows different software components and apps to interact with each other through a network. However, users often encounter errors related to this protocol, such as DistributedCOM event id 10016 error.
In this article, we will introduce effetucve ways to fix the event id 10016 in Windows 11, 10, and other verisons; check out:
| Workable Solutions | Step-by-step Troubleshooting |
|---|---|
| Fix 1. Open Registry Editor | Hit Windows + Q, type Registry, opt for the probable suggestion, and detect the registry key…Full steps |
| Fix 2. Manually Edit XML Query | Hit the Windows + X key and select Event Viewer; Move to Windows Logs and opt for System…Full steps |
| Fix 3. Enable DCOM Permission | Type event viewer in the Start menu and select the most suitable match, Navigate to Windows Logs..Full steps |
DistributedCOM event id 10016 error is a standard Windows error, which has been found on every Windows PC since Windows XP. Your system can’t get crashed immediately, so you won’t have to encounter a BSOD. Simply put, the DCOM error 10016 is a harmless one.
What is event ID 10016? This error code is generated when an app attempts to access the DCOM server or issues requests without adequate permissions. This error code 10016 mainly contains the CLSID and APPID, which are distinctive for every app and are needed to permit app-oriented permissions. As per Microsoft, this error is pretty benign but can be ignored as it won’t affect a PC’s functionality.
Event ID 10016 Occurs? Possible Causes Here
This DistributedCOM error 10016 ensues when Microsoft components try to generate a request via the Distributed Object Model sans the mandated permission. Although it’s safe to overlook a DistributedCOM error as they don’t disrupt your system’s functionality. However, such errors can be mitigated by a PC user and overlooking these events is one of the most essential actions.
Fix DistributedCOM Event ID 10016 in 3 Ways
Often, Windows users desire their PCs to be error-free! Are you one of those users wondering how to eliminate this error text? If so, we will delve into 3 leading methods to eradicate the DistributedCOM Event ID 10016 error in this section. This error often leads to data loss, which usually involves recovering data from a crashing PC.
- Tip
- In case you discover yourself combating the issue of restoring lost files due to this looming error on your Windows 10/11, one of the simple remedies is to use EaseUS Data Recovery Software. With the assistance of EaseUS, data recovery has always been smooth!
Fix 1. Open Registry Editor to Fix Event ID 10016
This is the most vital method to eradicate the DistributedCOM error 10016, where you learn how to tweak system registries to solve the issue. Prior to deleting any registries from your Windows PC, maintain a backup using the steps below:
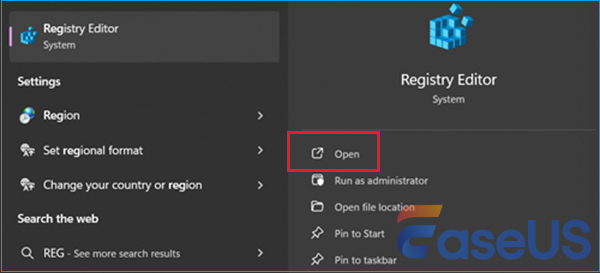
Step 1. Hit «Windows + Q» and type «Registry.» Now, opt for the probable suggestion.
Step 2. Detect the registry key you want to back up and select.
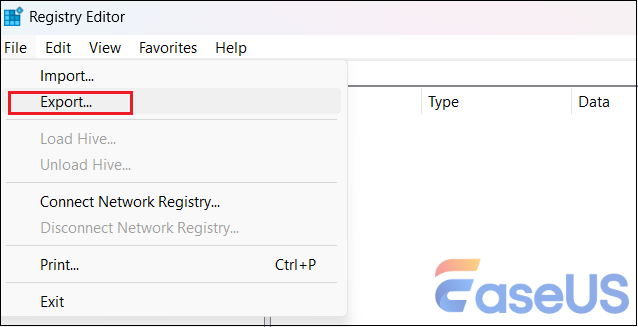
Step 3. Opt for «File» at the top-left side, and opt for «Export».
Step 4. Opt for where you would like to save the registry keys in the «Export Registry File» window and type its name in the «Name» field. Hit «Save».
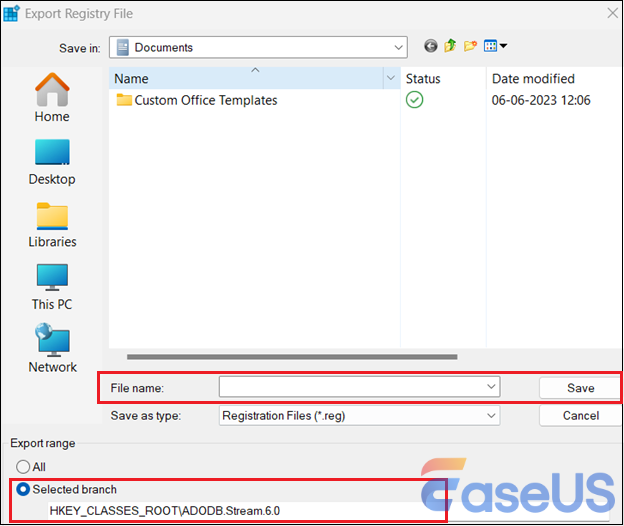
Note: You may also opt for the «All» option in the Export range section to back up the registry keys.
Once you’re done backing up the registry keys, go through the steps below:
Step 1. Hit «Windows + R» to open the «Run» window, type regedit and hit «Enter».
Step 2. Type the address below, and hit «Enter».
HKEY_LOCAL_MACHINE\SOFTWARE\Microsoft\Ole
Step 3. Delete these keys:
- DefaultAccessPermission
- DefaultLaunchPermission
- MachineAccessRestriction
- MachineLaunchRestriction
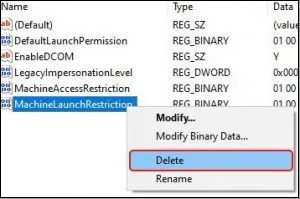
Step 4. Shut down the «Registry Editor» and reboot your Windows 10/11 PC to corroborate the changes.
If you think this article is helpful, share it on your SNS to help more people facing the same issue — event id 10016.
Fix 2. Manually Edit XML Query
Go through the steps below to manually edit the XML query:
Step 1. Hit the «Windows + X» key and select «Event Viewer».
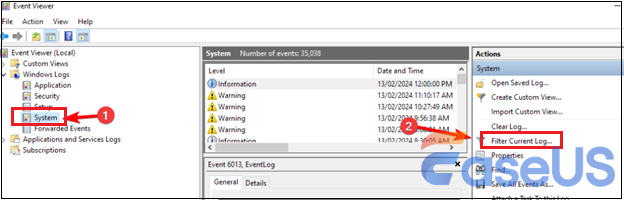
Step 2. Move to «Windows Logs» and opt for «System».
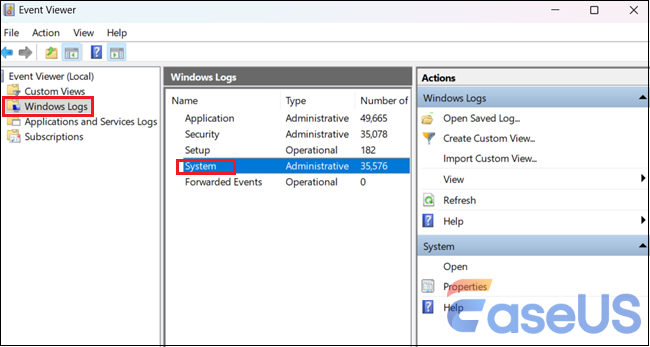
Step 3. Now, select the «Filter current log» in the right panel.
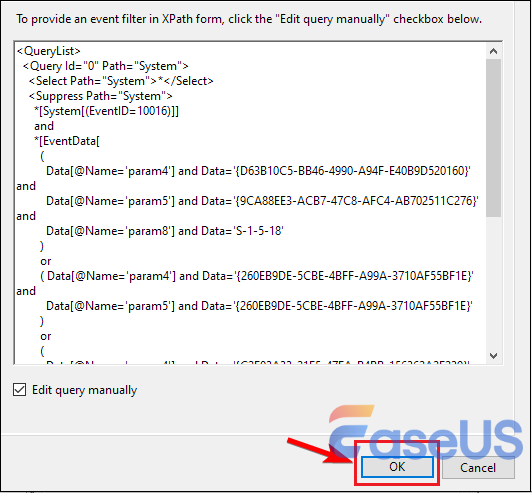
Step 3. Move to the XML tab and tick the box of «Edit query manually > Yes».
Step 4. Paste this code blow and hit «OK» to save changes.
*[System[(EventID=10016)]]
and
*[EventData[
(
Data[@Name=’param4′] and Data='{D63B10C5-BB46-4990-A94F-E40B9D520160}’ and
Data[@Name=’param5′] and Data='{9CA88EE3-ACB7-47C8-AFC4-AB702511C276}’ and
Data[@Name=’param8′] and Data=’S-1-5-18′
)
or
( Data[@Name=’param4′] and Data='{260EB9DE-5CBE-4BFF-A99A-3710AF55BF1E}’ and
Data[@Name=’param5′] and Data='{260EB9DE-5CBE-4BFF-A99A-3710AF55BF1E}’
)
or
(
Data[@Name=’param4′] and Data='{C2F03A33-21F5-47FA-B4BB-156362A2F239}’ and
Data[@Name=’param5′] and Data='{316CDED5-E4AE-4B15-9113-7055D84DCC97}’ and
Data[@Name=’param8′] and Data=’S-1-5-19′
)
or
(
Data[@Name=’param4′] and Data='{6B3B8D23-FA8D-40B9-8DBD-B950333E2C52}’ and
Data[@Name=’param5′] and Data='{4839DDB7-58C2-48F5-8283-E1D1807D0D7D}’ and
Data[@Name=’param8′] and Data=’S-1-5-19′
)
]]
Source from: Microsoftcom
Fix 3. Enable DCOM Permission
This fix is time-consuming. In several situations with distributedCOM errors from distinct individual apps, the process will need to be repeated for each error. Therefore, the steps are the following:
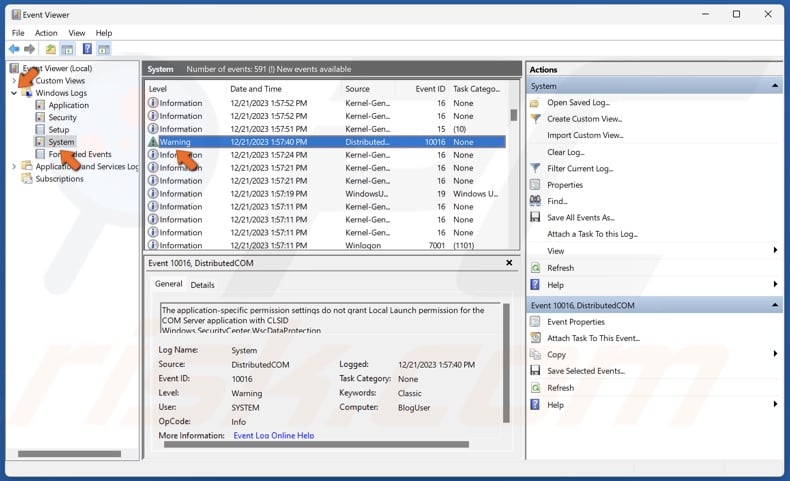
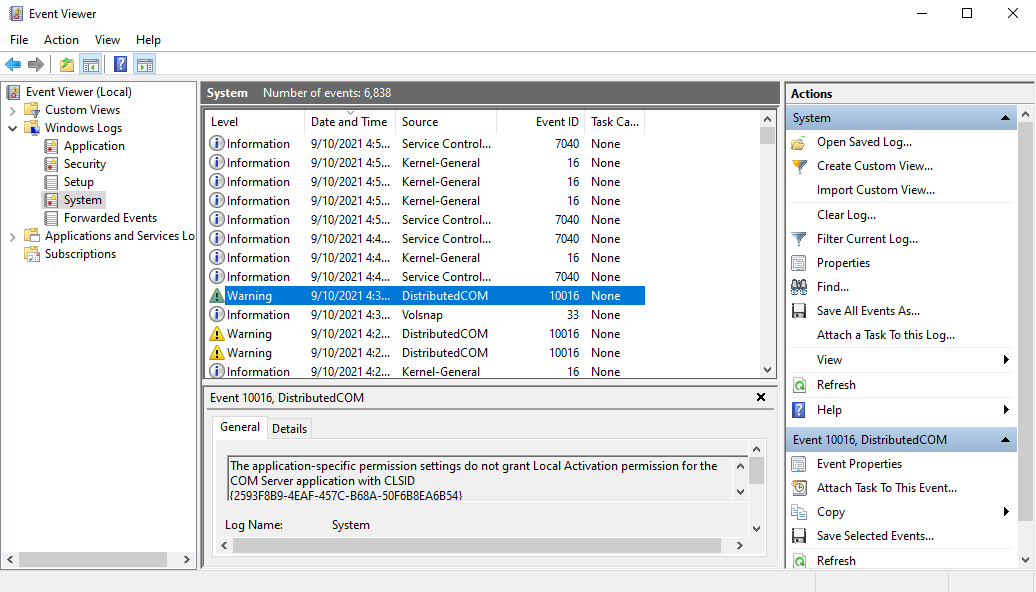
Step 1. Type «event viewer» in the «Start» menu and select the most suitable match.
Step 2. Navigate to «Windows Logs > System» and detect the most recent DCOM error 10016. Now, double-click the error text to enlarge it.
Step 3. The «General» tab will elaborate on the reason for the DCOM 10016 error, demonstrating the CLSID and APPID. However, you might use them to determine which app or service is the best way to eliminate this 10016 error.
1. Spot CLSID and APPID in the Registry Editor
This is how you may spot the service in the Registry Editor:
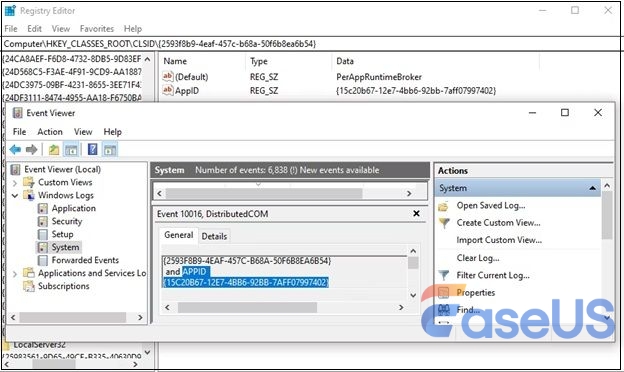
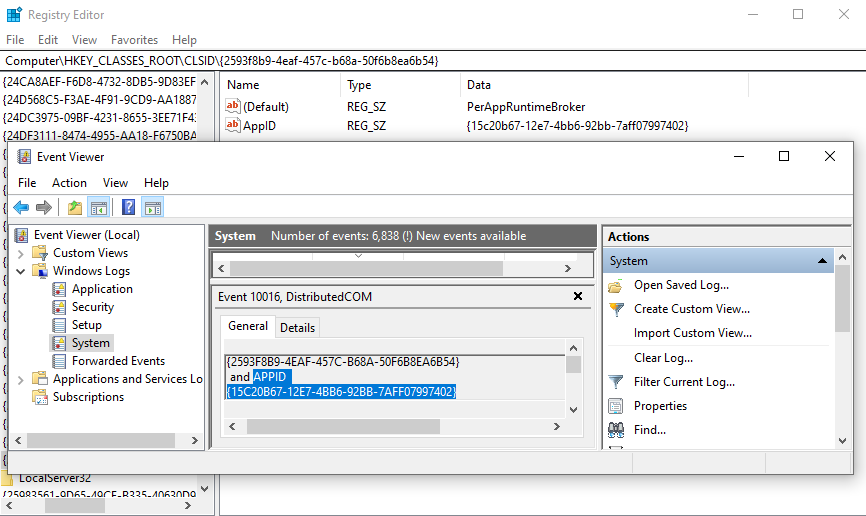
Step 1. Emphasize the CLSID in the «Event Viewer,»> Hit «CTRL + C» to copy it, and launch «Registry Editor.» Now, search for the registry: HKEY_CLASSES_ROOT\CLSID\{Paste Your CLSID Here}
All you need to remember is that you have to copy & paste the address into the Registry Editor address bar. Now, compare the APPID indicated inside the CLSID with the APPID found in the error text. DCOM error 10016 may originate from the Runtime Broker.
2. Edit the CLSID Permissions
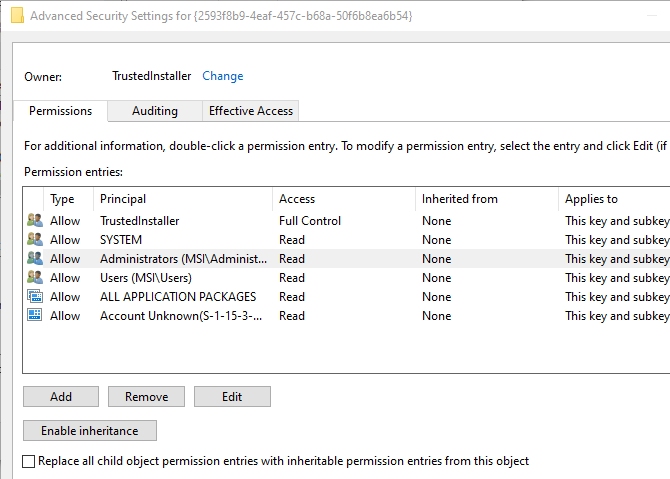
Step 1. Right-click the CLSID located in the left-hand list of registry entries, now opt for «Permission»> «Advanced.»
Step 2. This is how you may edit the service permissions. Now, emphasize «Administrators,» and opt for «Edit.»
Step 3. Navigate to the «Basic Permissions» to include «Full Control», and finally, hit «OK > Apply > OK». Then, reboot your PC.
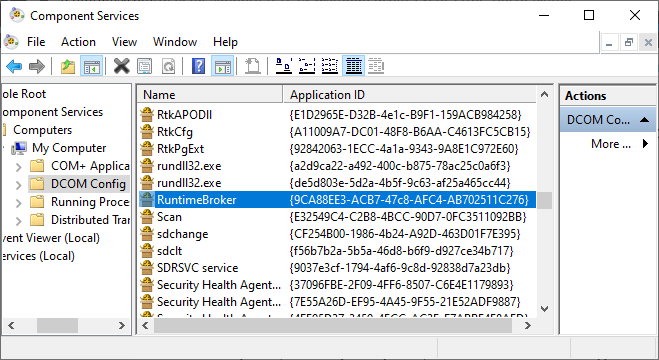
Step 4. Input «Component Services» into the «Start» menu search bar once the reboot is complete. Opt for the «Best Match». Finally, navigate to «Computers > My Computer > DCOM» config.
Step 5. You will notice a long list of services that employ DCOM in a few ways. All you need to do is spot the service using the APPID and name, right-click it, and opt for «Properties > Security».
Step 6. Opt for «Edit > Add > Add a local service» underneath «Launch and Activation Permissions». Finally, tick the «local activation» box > hit «OK» > Restart your PC.
Conclusion
DCOM is a vital system protocol liable for inter-process interaction between distinct PCs linked on a network. However, there are specific times when this protocol demonstrates errors, such as the DCOM 10016 error. In this article, we have illustrated the error and probable methods to fix it instantly. Hopefully, the methods mentioned above will assist you in fixing this issue in your Windows 10/11 PC.
DistributedCOM Event ID 10016 FAQs
Go through the FAQs below to fix the issue:
How do I fix DistributedCOM error 10016 in Windows 11?
All you need to do is head to «Component Services > Computers > My PC > DCOM Config». Now, search for the application by its name and right-click on the «Properties». Now, navigate to the «Security» tab and select the appropriate action. Finally, select «Launch and Activation Permission» and set it to «Customize > Edit».
What is a 10016 server error?
This error pops up in the «Event Viewer» when an app attempts to access the DCOM server but doesn’t have the required permissions. This error code is generated when an app attempts to access the DCOM server or issues requests without adequate permissions. This error code 10016 mainly contains the CLSID and APPID, which are distinctive for every app and are needed to permit app-oriented permissions. As per Microsoft, this error is pretty benign but can be ignored as it won’t affect a PC’s functionality.
Ошибка DCOM 10016 в Windows 10/11 является очень распространенной проблемой среди пользователей, проблематичной в том смысле, что она не исчезает даже после обновления. Оказалось, что с этой ошибкой трудно справиться, хотя известно, что она не наносит серьезного ущерба операционной системе. Ошибка DCOM в значительной степени исправима, и показать вам, как это сделать, является основной целью этой статьи. Но сначала давайте взглянем на то, что такое ошибка DistributedCOM 10016 и что за нее отвечает.
- Часть 1: Обзор Distributedcom
-
Часть 2: Как исправить ошибку Distributedcom 10016 в Windows 10/11?
- Исправление 1: Удалите ключи реестра Windows
- Исправление 2: Включите разрешения DCOM для конкретной ошибки
- Исправление 3: Используйте стороннее программное обеспечение для ремонта
- Часть 3: Как восстановить данные из-за ошибки Windows Distributedcom 10016?HOT
- Часть 4: Люди также спрашивают об ошибке DCOM
What is Distributedcom?
DistributedCOM, также известный как DCOM (объектная модель распределенных компонентов), является жизненно важным аспектом для упрощения набора протоколов, позволяющих осуществлять межсетевую работу между программами на компьютерах с операционной системой Windows. Широко признанная в качестве запатентованной технологии, разработанной Microsoft, она запускается, когда приложение подключается ко Всемирной паутине. Распределенная объектная модель способна получать доступ к информации на RAS (серверах удаленного доступа), в отличие от традиционного COM, способного получать доступ только к информации, хранящейся на том же компьютере.
Что вызывает ошибку Distributedcom 10016?
Ошибка DistributedCOM 10016 server 2016 является преднамеренной и возникает, когда компоненты Microsoft пытаются отправить запрос через распределенную объектную модель без требуемого разрешения на это. Однако можно с уверенностью игнорировать ошибки DistributedCOM, поскольку они никоим образом не нарушают функциональность вашей системы. Хотя эти ошибки могут быть устранены пользователем, рекомендуется игнорировать эти события.
Часть 2: Как исправить ошибку Distributedcom 10016 в Windows 10/11?
Поскольку компьютер, на котором отсутствуют ошибки, намного лучше и предпочтительнее последнего, ниже приведены наилучшие способы устранения ошибки 10016 в Microsoft-Windows-DistributedCOM system server 2016.
Исправление 1: Удалите ключи реестра Windows
Редактирование реестра Windows должно быть первым вариантом, когда дело доходит до исправления события distributedcom 10016. Просто удалив некоторые разделы реестра Windows, этих ошибок можно было бы избежать. Однако, прежде чем вносить изменения в реестр, настоятельно рекомендуется создать резервную копию вашей Windows. Чтобы сделать это:
- Введите «реестр» в строке поиска, расположенной в меню «Пуск», затем нажмите на наиболее подходящее.
- Перейдите к файлу, затем экспортируйте, в поле Диапазон экспорта измените значение на «Все», а затем сохраните в защищенном месте.
Советы: Удаление разделов реестра Windows не нарушит функциональность вашей системы, но в ваших интересах создать ее резервную копию на случай непредвиденных обстоятельств. Ниже приведены шаги, которые необходимо предпринять для выполнения исправления путем удаления разделов реестра Windows после создания резервной копии:
- Введите «regedit» во всплывающем окне ‘Выполнить» после нажатия клавиш ‘Windows + R’.
- В адресной строке редактора реестра скопируйте и вставьте следующий адрес – HKEY_LOCAL_MACHINE\SOFTWARE\Microsoft\Ole.
- Извлеките из реестра перечисленные ниже ключи: MachineLaunchRestriction, DefaultAccessPermission, MachineAccessRestriction, DefaultLaunchPermission.
- Завершите работу «Редактора реестра Windows’, а затем перезагрузите систему.
Выполнение этого должно быстро устранить проблему. Но если этого не произойдет, вы могли бы попробовать следующее исправление.
Исправление 2: Включите разрешения DCOM для конкретной ошибки
Это исправление отнимает много времени и как таковое должно быть альтернативой, когда удаления вышеупомянутых разделов реестра недостаточно. В ситуациях, когда имеются ошибки DistributedCOM из нескольких отдельных приложений, потребуется повторить этот процесс для каждой ошибки, и, конечно, это займет много времени. Ниже приведены шаги, которые необходимо предпринять для выполнения этого исправления.
- Введите «Просмотр событий» в строке поиска, расположенной в меню «Пуск», затем нажмите на наилучшее возможное совпадение. Вы можете найти информацию, касающуюся определенного процесса или приложения, ответственного за событие 10016 distributedcom, в окне просмотра событий.
- Определите последнюю ошибку DCOM, перейдя в раздел «Журналы Windows — Система’. Разверните сообщение об ошибке, дважды щелкнув по нему. В разделе «Общие» вы найдете подробную информацию о том, почему у вас происходит событие 10016 distributedcom, в нем указаны идентификатор класса (CLSID) и идентификатор приложения (APPID). Хотя эти идентификаторы выглядят случайными, их можно использовать для определения того, какая служба или приложение ответственны за ошибку DistributedCOM.
- Найдите идентификаторы класса и приложения. Для этого вам нужно выделить и скопировать идентификатор класса, запустить regedit, а затем выполнить поиск по этому каталогу, используя адресную строку regedit — HKEY_CLASSES_ROOT\CLSID\{ваш идентификатор класса находится здесь}. Как только поиск будет завершен, перепроверьте отображаемый идентификатор приложения, чтобы убедиться, совпадает ли он с идентификатором, указанным в сообщении об ошибке.
- Отредактируйте разрешения для идентификатора класса. В списке записей в левой части экрана вы найдете идентификатор класса, ответственного за ошибку, щелкните по нему правой кнопкой мыши и затем установите для параметра ‘Разрешение» значение «Дополнительно». Затем нажмите на «Редактировать», выделив ‘Администраторы…’ Отредактируйте ‘Основные разрешения’, чтобы разрешить «Полный контроль», нажмите «Ок», когда закончите, затем «Применить» и «ОК’. Перезагрузите компьютер после выполнения этого шага.
- После перезагрузки компьютера введите «Службы компонентов» в строке поиска, расположенной в меню «Пуск», затем нажмите на наиболее подходящее. Перейдите к ‘Конфигурации DCOM» через «Компьютеры – Мой компьютер». Здесь вы найдете расширенный список служб и приложений, использующих распределенную объектную модель. Используйте имя и идентификатор приложения, которые вы указали на шаге 3, чтобы найти службу. Щелкните по нему правой кнопкой мыши и перейдите в раздел ‘Свойства – Безопасность’.
- Нажмите «Редактировать», «Добавить», «Добавить локальную службу», а затем «Применить» на вкладке «Разрешения на запуск и активацию». Поле «Локальная активация» должно быть отмечено галочкой, когда вы нажмете ‘Ок’. Перезагрузите компьютер во второй раз, когда закончите.
Исправление 3: Используйте стороннее программное обеспечение для ремонта
Если перечисленные выше исправления вам не по силам, вы всегда можете воспользоваться сторонним программным обеспечением. Существует программное обеспечение, специально разработанное для решения таких проблем, как ошибка DistributedCOM 10016. Однако убедитесь, что вы используете программное обеспечение, которому доверяете. Проверьте наличие отзывов и оценок перед установкой, так как это увеличит ваши шансы получить хорошую версию.
Часть 3: Как восстановить данные из-за ошибки Windows Distributedcom 10016?
Хотя событие 10016 Windows distributedcom не может нарушить функциональность вашего компьютера, применение определенных методов исправления без надлежащего резервного копирования файлов может привести к потере ценных данных или даже к сбою работы вашего компьютера. Если вы столкнулись с проблемой восстановления потерянных файлов в результате сбоя DistributedCOM error 10016 Windows 10, есть простое средство, которое предполагает использование стороннего программного обеспечения. Рекомендуемым программным обеспечением для таких сценариев является программное обеспечение для восстановления данных Tenorshare 4DDiG. Программное обеспечение для восстановления данных Tenorshare 4DDiG работает во всех сценариях, и ниже приведены его удивительные возможности:
- Он способен восстанавливать более 1000 типов файлов, которые включают, но не ограничиваются ими, видео, аудио, фотографии и документы
- Он способен восстанавливать потерянные данные в результате повреждения, вирусной атаки, форматирования, удаления, потерянного раздела, вирусной атаки и других типов сценариев
- Он может восстанавливать потерянные данные с персональных компьютеров / ноутбуков, SD-карт, USB-флэш-накопителей, внешних и внутренних накопителей и других
С помощью программного обеспечения для восстановления данных Tenorshare 4DDiG восстановление данных еще никогда не было таким простым. Ниже приведены шаги, которые помогут вам в процессе восстановления данных:
- Запустите программное обеспечение для восстановления данных Tenorshare 4DDiG после установки. Отобразится начальный интерфейс программного обеспечения с восстановлением данных и расширенными опциями. Вам будет представлен список жестких дисков на выбор, выберите локальный диск с потерянными данными и затем нажмите на него, чтобы продолжить. Кроме того, вы можете выбрать тип файла, который вы хотите отсканировать, в правом верхнем углу, прежде чем продолжить.
- Пока 4DDiG сканирует выбранный каталог на наличие потерянных файлов, вы можете остановить или приостановить процесс в любое время, если увидели файлы, которые хотите восстановить. Использование фильтра поможет сузить область поиска.
- Просмотрите результаты сканирования и восстановите потерянные файлы в более надежном месте. Старайтесь не сохранять восстановленные потерянные файлы в том же месте, где вы их потеряли.
Часть 4: Люди также спрашивают об ошибке DCOM
Как исправить ошибку DCOM 10016 в Windows 11?
Ошибку DCOM можно устранить с помощью одного из следующих исправлений; удаление разделов реестра, включение разрешений DCOM для определенных ошибок и использование программного обеспечения, специально разработанного для исправления ошибок DCOM.
Как исправить ошибку Distributedcom 10005?
Ошибка DistributedCOM 10005 может быть устранена тремя простыми способами, а именно: установить службы интеграции серверов (SQL) в нормальное состояние на обоих узлах, удалить серверы Microsoft SQL с помощью стороннего программного обеспечения или проигнорировать ошибку, поскольку она является доброкачественной и не оказывает влияния на операционную систему.
Вывод
Исправить распространяемую com-ошибку 10016 в Windows 11 довольно просто и не требует от пользователя технических знаний для этого. Однако некоторые исправления занимают больше времени, чем ожидалось, и поэтому некоторые пользователи обращаются к стороннему программному обеспечению, которое также эффективно. Нельзя исключать непредвиденных обстоятельств, таких как потеря данных в результате внедрения некоторых исправлений. В таких случаях мы рекомендуем использовать программное обеспечение Tenorshare 4DDiG для восстановления потерянных файлов.
Tenorshare 4DDiG Data Recovery
4DDiG — это ваш непревзойденный выбор для восстановления всех потерянных данных на компьютере Windows / Mac после различных сценариев потери, таких как удаление, форматирование, RAW и т.д. с более высокой вероятностью успеха.
Скачать Бесплатно
Скачать Бесплатно
Купить Сейчас
Купить Сейчас
В этой заметке я покажу, как исправить ошибку c Event ID 10016 от источника DistributedCOM на компьютере с Windows 10 / Windows Server 2012 R2. Ошибка DCOM 10016 довольно часто встречается как в клиентских, так и в серверных версиях Windows, начиная еще со времен Windows XP и исправляется она одинаково, независимо от редакции Windows.
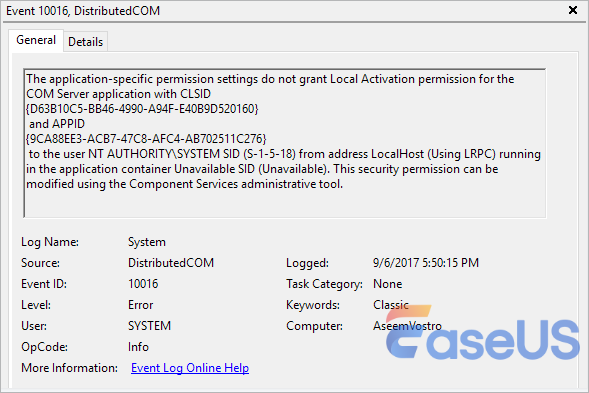
Проблема проявляется следующим образом: в журнале событий системы при загрузке компьютера или попытке запуска/установки приложения появляется следующая ошибка:
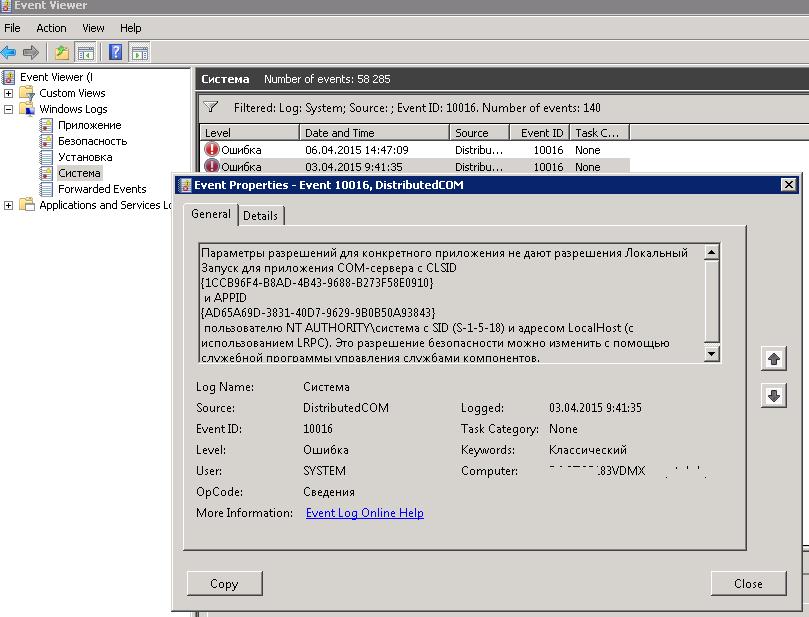
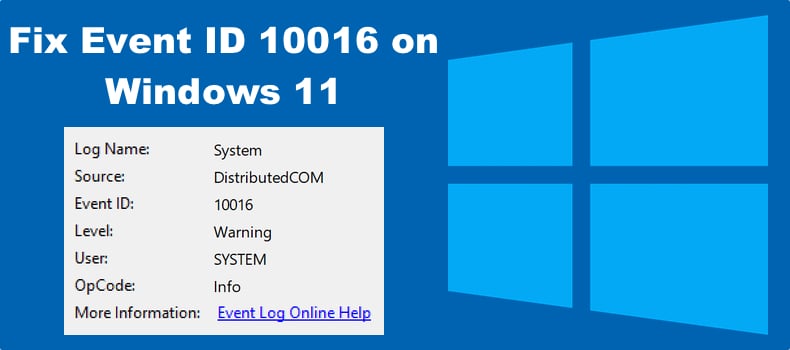
Log Name: Система
Source: DistributedCOM
Event ID: 10016
Level: Ошибка
User: SYSTEM
Описание: Параметры разрешений для конкретного приложения не дают разрешения Локальный Запуск для приложения COM-сервера с CLSID {1CCB96F4-B8AD-4B43-9688-B273F58E0910} и APPID {AD65A69D-3831-40D7-9629-9B0B50A93843}пользователю NT AUTHORITY\система с SID (S-1-5-18) и адресом LocalHost (с использованием LRPC). Это разрешение безопасности можно изменить с помощью служебной программы управления службами компонентов.
В англоязычных версиях Windows описание ошибки такое:
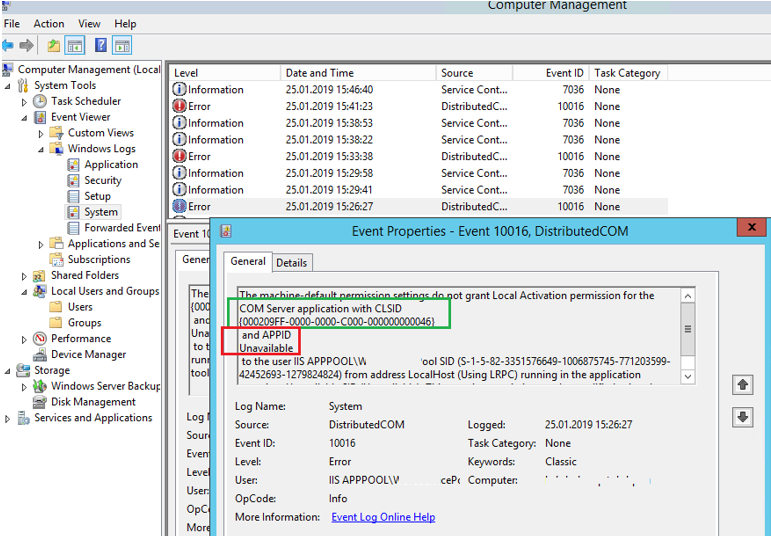
The machine-default permission settings do not grant Local Activation permission for the COM Server application with CLSID
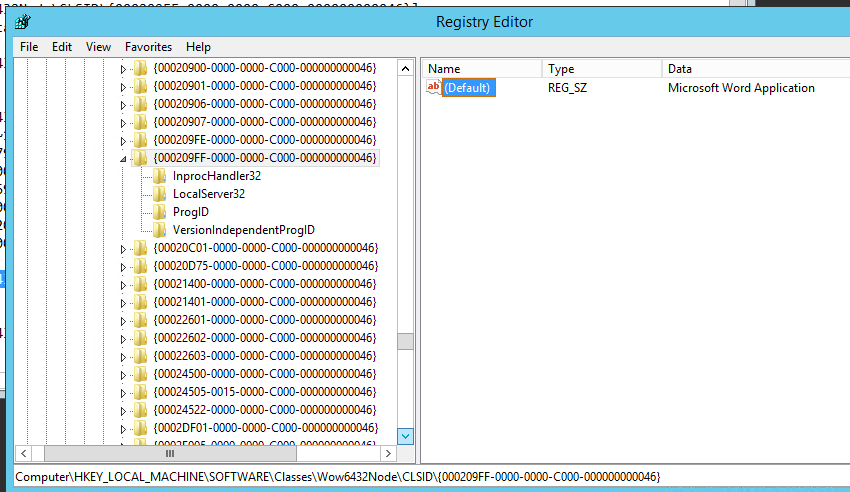
{000209FF-0000-0000-C000-000000000046} and APPID Unavailable to the user IIS APPPOOL\appIISPool SID (S-1-5-82-3351576649-1006875745-771203599-42452693-1279824824) from address LocalHost (Using LRPC) running in the application container Unavailable SID (Unavailable). This security permission can be modified using the Component Services administrative tool.
Судя по описанию ошибки: некий пользователь (например, IIS Apppool) или система (NT AUTHORITY\система) пытается запустить некий компонент COM с помощью инфраструктуры DCOM и не может этого сделать из-за отсутствия права «Локальный Запуск» или «Локальная активация» (Local Activation Permission). В коде ошибки содержатся только коды классов COM компонента и приложения. Попробуем определить, какому именно приложению принадлежит идентификатор и предоставить права, необходимые для его запуска.
Из описания события необходимо скопировать идентификаторы CLSID и APPID. В моем случае это
CLSID : {000209FF-0000-0000-C000-000000000046}
APPID: {AD65A69D-3831-40D7-9629-9B0B50A93843}
(в некоторых случаях идентификатор приложения может быть не указан — APPID Unavailable).
Также обратите внимание каких разрешений не хватает (Local Activation permission) и для какой учетной записи (NT AUTHORITY\SYSTEM или IIS APPPOOL\appIISPool SID — S-1-5-82-3351576649-1006875745-771203599-42452693-1279824824).
В каждом конкретном случае идентификаторы класса, приложения, учетной записи и типа доступа может отличаться.
- Запустите редактор реестра (regedit.exe);
- Перейдите в ветку реестра, соответствующую вашему CLSID. У меня это HKEY_CLASSES_ROOT\CLSID\{000209FF-0000-0000-C000-000000000046};
В некоторых случаях нужно смотреть также в разделе реестра [HKEY_CLASSES_ROOT\Wow6432Node\CLSID\. При удаленном подключении к реестру он будет находиться в разделе HKEY_LOCAL_MACHINE\SOFTWARE\Classes\AppID.
- В параметре класса должно быть указано имя. У меня это Microsoft Word Application;
Чаще всего эта проблема возникает с компонентами:
Immersive Shell
CLSID: {C2F03A33-21F5-47FA-B4BB-156362A2F239}
APPID: {316CDED5-E4AE-4B15-9113-7055D84DCC97}
RuntimeBroker
CLSID: {D63B10C5-BB46-4990-A94F-E40B9D520160}
APPID : {9CA88EE3-ACB7-47C8-AFC4-AB702511C276}
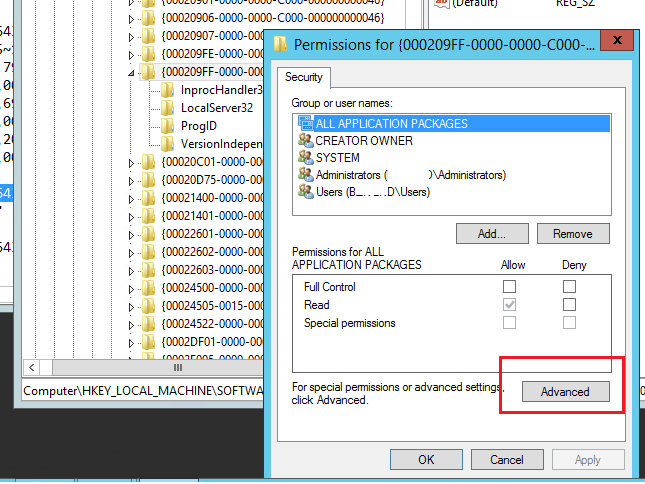
- Щелкните правой кнопкой мыши по разделу реестра и выберите пункт Permissions (Разрешения);
- Нажмите на кнопку Advanced;
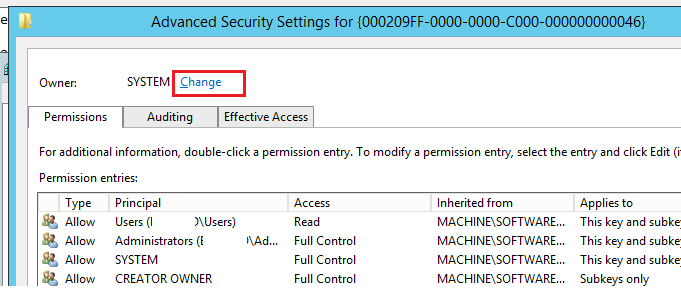
- В разделе Owner (Владелец) будет указано NT Service\TrustedInstaller или System;
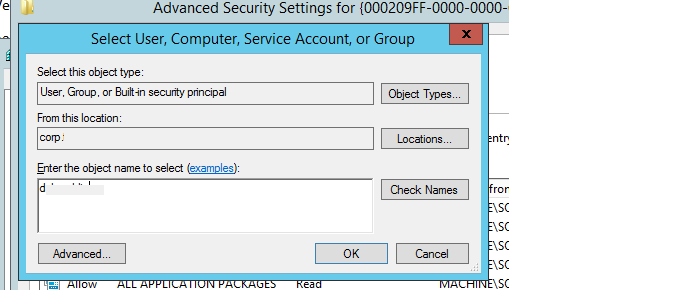
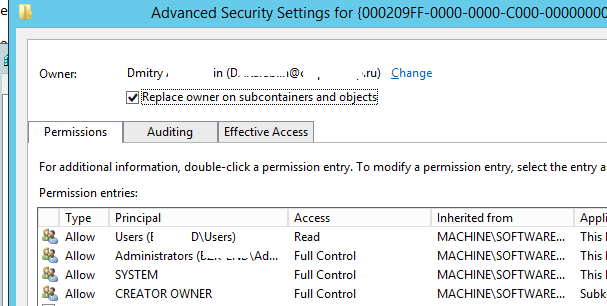
- Нажмите кнопку Change и укажите имя своей учетной записи администратора. Сохраните изменения;
- Обратите внимание, что имя владельца ветки сменилось на вашу учетную запись. Поставьте галку Replace owner on subcontainers and objects (Заменить владельца подконтейнеров и объектов) и нажмите “ОК”;
- В списке разрешений добавьте вашу учетную запись администратора и предоставьте ей полный доступ (Full Permissions);
- Вы предоставили права на ветку с CLSID. Теперь нужно повторить предыдущие шаги, предоставив учетной записи администратора права на ветку с вашим идентификатором APPID из текста ошибки (например, HKEY_CLASSES_ROOT\AppID\{AD65A69D-3831-40D7-9629-9B0B50A93843};
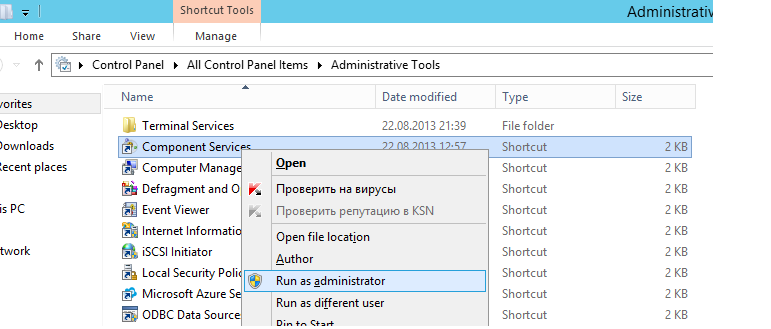
- Теперь запустите консоль управления компонентами dcomcnfg с правами администратора (Control Panel\All Control Panel Items\Administrative Tools\Component Services);
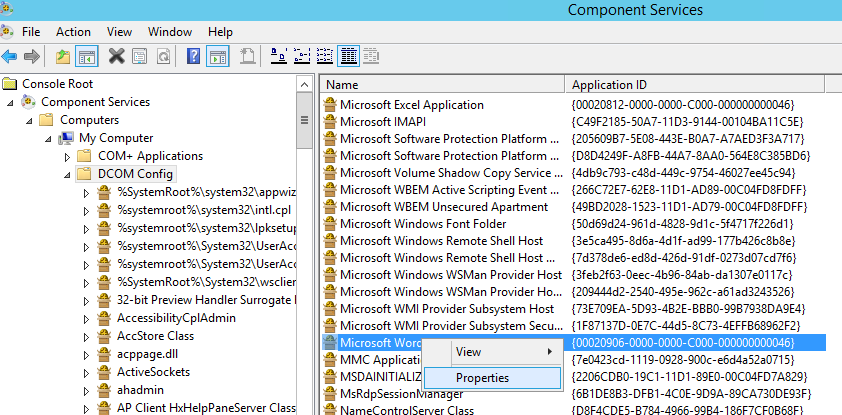
- В консоли компонентов перейдите в ветку Component Services -> Computers -> My computer -> DCOM Config. В списке компонентов найдите имя компонента, которое вы определили на втором шаге (значение в столбце Application ID должно соответствовать вашему CLSID из ошибки). Откройте свойства компонента;
Если вы не можете найти свой компонент в списке, вероятно у вас 64 битная версия Windows, а запускаемый компонент является 32 битным. В этом случае нужно запустить консоль DCOM командой:
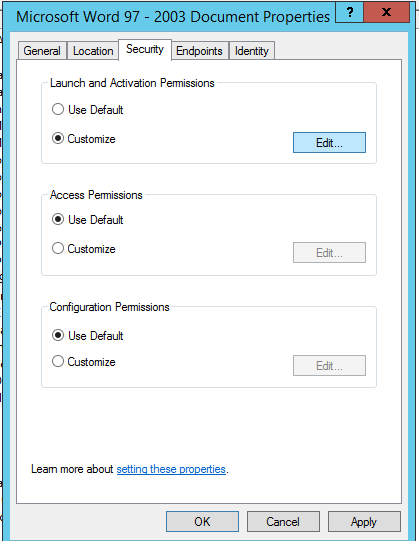
mmc comexp.msc /32 - Перейдите на вкладку Security. Все элементы управления должны быть доступными для изменения;
Если открыть консоль dcomcnfg до изменения разрешений на ветку реестра, все настройки на вкладке Security окажутся заблокированы (недоступны для изменения), несмотря на то, что вы запустили консоль от имени администратора.
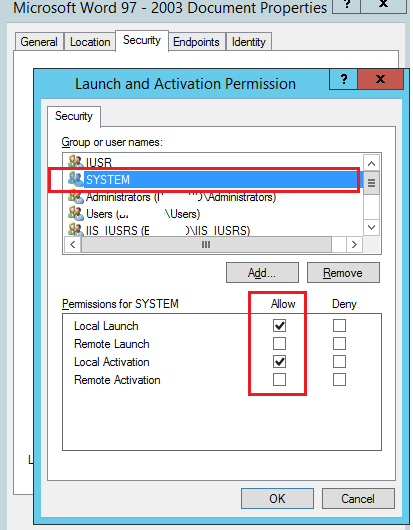
- В моем случае приложению не хватало прав на «Локальный Запуск» (Local Activation Permission). В секции Launch and Activation Permissions выберите Customize и нажмите кнопку Edit;
- В список доступа нужно добавить учетную запись, которой не хватало разрешений на запуск. Имя учетной записи было указано в тексте ошибки: в зависимости от текста в ошибке DCOM 10016 это может быть System, конкретный пользователь или учетка под которой запускается пул IIS (в этом случае нужно добавить доступ для локальной группы IIS_IUSR).
Совет. Если в начальном логе ошибки вместо NT AUTHORITY\система была указана NT AUTHORITY\NETWORK SERVICE, необходимо дать права на локальный запуск и активацию для учетной записи NetworkService.
- Предоставьте нужные разрешения для учетной записи. Например, Local Activation -> Allow и Local Launch (Локальная активация) -> Allow;
- Перезагрузите компьютер и проверьте журналы событий. Ошибка DCOM 10016 должна исчезнуть.
How to Fix DistributedCOM Event ID 10016 Error on Windows 11
Event ID 10016 is logged when Windows tries to access DistributedCOM (DCOM) components with a preferred set of parameters but is unsuccessful. You can ignore Event ID 10016 since Windows should access DCOM components using a second set of parameters that don’t impact functionality. However, if you want to fix this issue, follow the guides in this article.
DistributedCOM (also called Distributed Component Object Model or DCOM) is a critical system protocol designed to work across numerous network types of transport like HTTP. This protocol allows various software components and apps to communicate with each other directly over a network.
What Causes DistributedCOM Event ID 10016?
The code first tries to access the necessary DCOM components with one set of parameters. If it cannot successfully access the components with the preferred parameters, it tries again with another set of parameters. The first unsuccessful attempt is recorded as Event ID 10016. The code never skips the first attempt because the first set of parameters is preferable.
Event ID 10016 is logged when Microsoft components attempt to access DCOM components without the necessary permissions or get timed out. Event ID 10016 can be seen in the Events Viewer. The event log usually contains the APPID and CLSID. These IDs are unique to each application and are necessary to grant app-specific permissions.
Do I Need to Fix DistributedCOM Event ID 10016?
You can ignore DCOM Event ID 10016 because it doesn’t adversely affect functionality and is by design. Any event that says “application-specific settings do not grant Local Activation permission” is typical for Windows 11 and older Windows OSs. These events are normal and don’t need to be fixed or removed.
However, if you don’t want to see Event ID 10016 in the Events Viewer, follow the steps in the methods below.
Video Tutorial on How to Fix DCOM Event ID 10016
Table of Contents:
- Introduction
- Method 1. Hide DistributedCOM Event ID 10016 from Event Viewer
- Method 2. Delete Values in Windows Registry
- Method 3. Enable DCOM Permissions for a Specific Error
- Video Tutorial on How to Fix DCOM Event ID 10016
Download Computer Malware Repair Tool
It is recommended to run a free scan with Combo Cleaner — a tool to detect viruses and malware on your device. You will need to purchase the full version to remove infections. Free trial available. Combo Cleaner is owned and operated by Rcs Lt, the parent company of PCRisk.com read more.
Method 1. Hide DistributedCOM Event ID 10016 from Event Viewer
Since Event ID 10016 doesn’t adversely affect functionality, you can choose to hide Event ID 10016 from Event Viewer.
1. Hold down Windows+R keys to open Run.

2. Type eventvwr in Run and click OK to open Event Viewer.
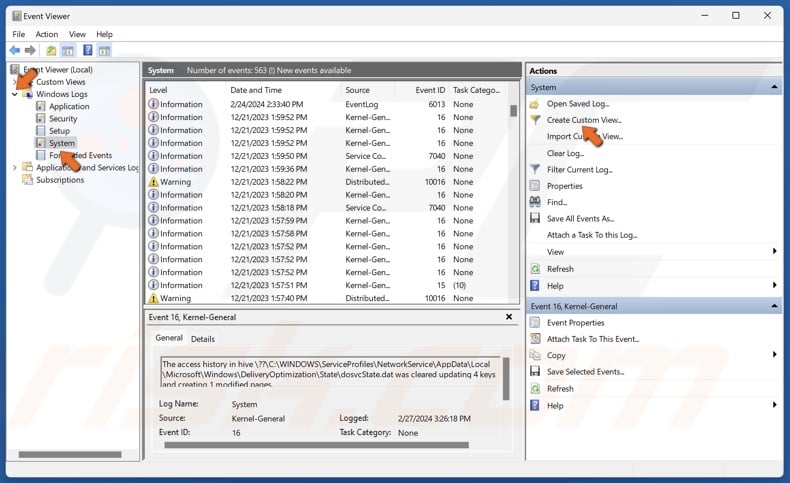
3. In Event Viewer, navigate to:
Windows Logs > System
4. In the Actions panel, click Create Custom View.
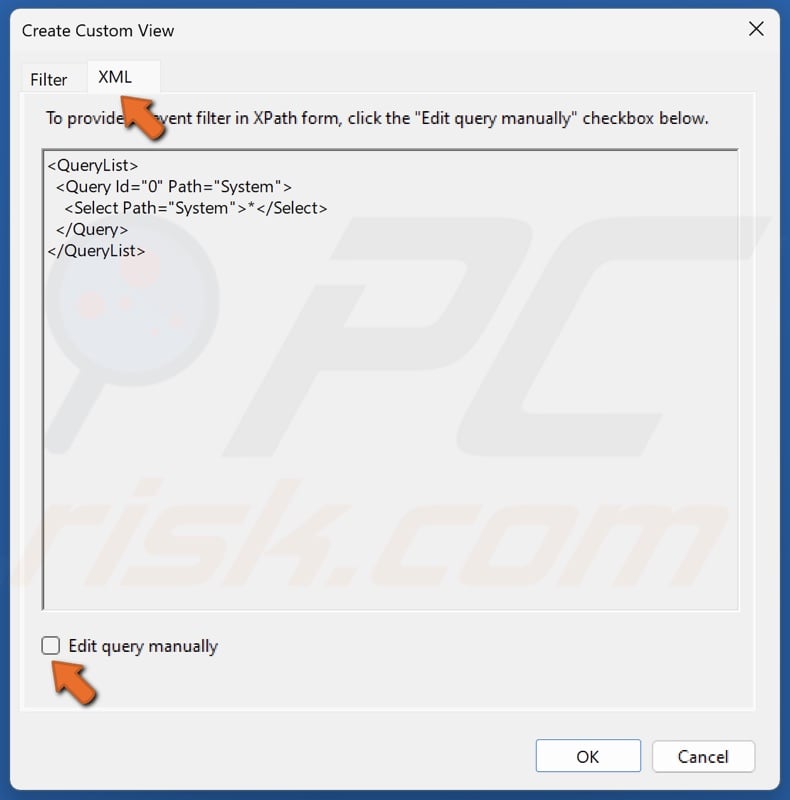
5. Select the XML tab.
6. Click Edit query manually.
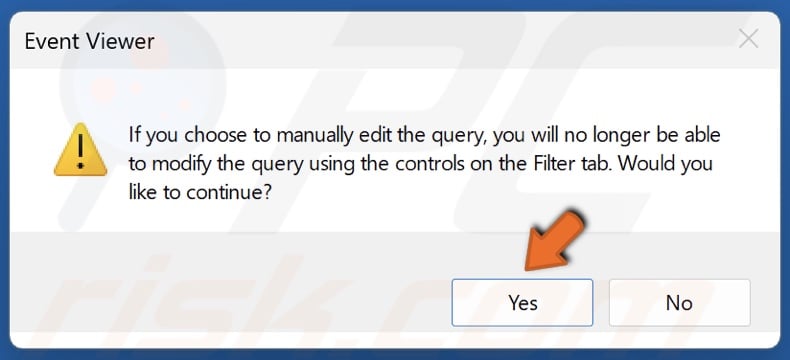
7. Click Yes when prompted by Event Viewer.
8. Copy and paste the XML filter query.
*[System[(EventID=10016)]]
and
*[EventData[
(
Data[@Name=’param4′] and Data='{D63B10C5-BB46-4990-A94F-E40B9D520160}’ and
Data[@Name=’param5′] and Data='{9CA88EE3-ACB7-47C8-AFC4-AB702511C276}’ and
Data[@Name=’param8′] and Data=’S-1-5-18′
)
or
( Data[@Name=’param4′] and Data='{260EB9DE-5CBE-4BFF-A99A-3710AF55BF1E}’ and
Data[@Name=’param5′] and Data='{260EB9DE-5CBE-4BFF-A99A-3710AF55BF1E}’
)
or
(
Data[@Name=’param4′] and Data='{C2F03A33-21F5-47FA-B4BB-156362A2F239}’ and
Data[@Name=’param5′] and Data='{316CDED5-E4AE-4B15-9113-7055D84DCC97}’ and
Data[@Name=’param8′] and Data=’S-1-5-19′
)
or
(
Data[@Name=’param4′] and Data='{6B3B8D23-FA8D-40B9-8DBD-B950333E2C52}’ and
Data[@Name=’param5′] and Data='{4839DDB7-58C2-48F5-8283-E1D1807D0D7D}’ and
Data[@Name=’param8′] and Data=’S-1-5-19′
)
]]
This query contains the following values:
- param4 corresponds to the COM Server application CLSID.
- param5 corresponds to the APPID.
- param8 corresponds to the security context SID.
All of them are recorded in the 10016 event logs. If you can’t find the values, you won’t be able to use this method and the XML query because it’s specific to Event ID 10016.
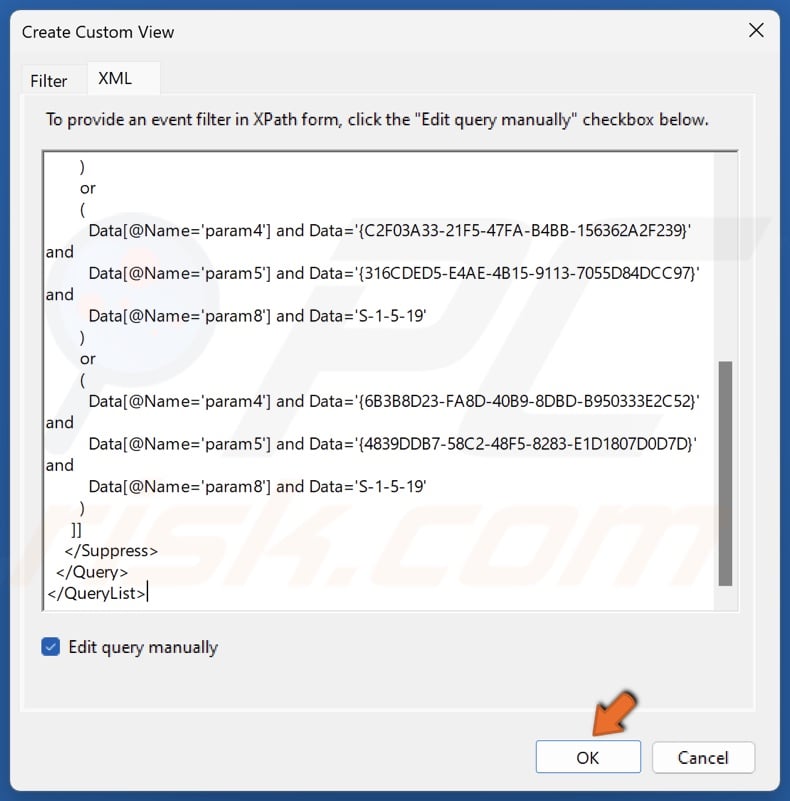
9. Click OK.
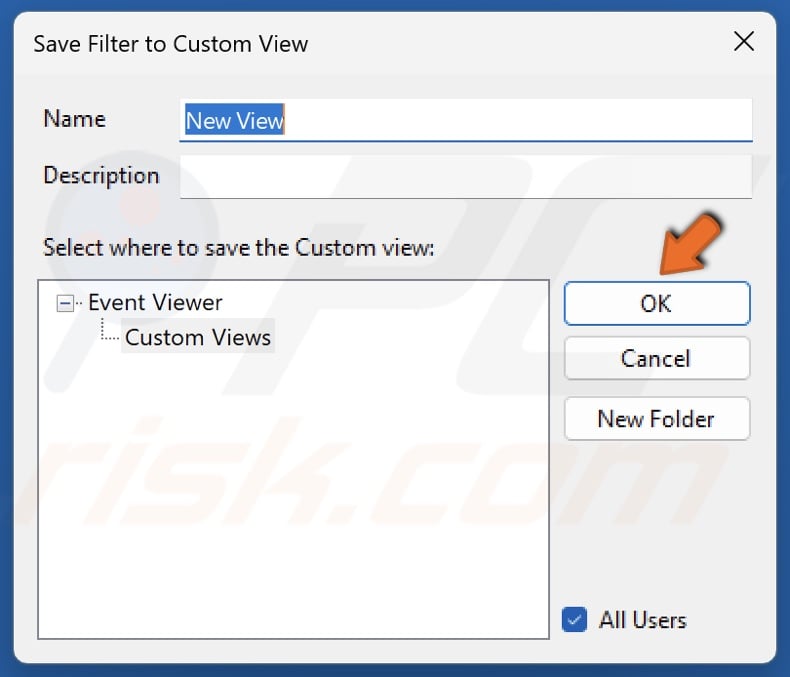
10. Click OK to save the filter.
[Back to Table of Contents]
Method 2. Delete Values in Windows Registry
Deleting some values in Windows Registry Editor will permanently fix Event ID 10016 on your system. However, remember to back up your Windows Registry before deleting the values.
1. Hold down Windows+R keys to open Run.
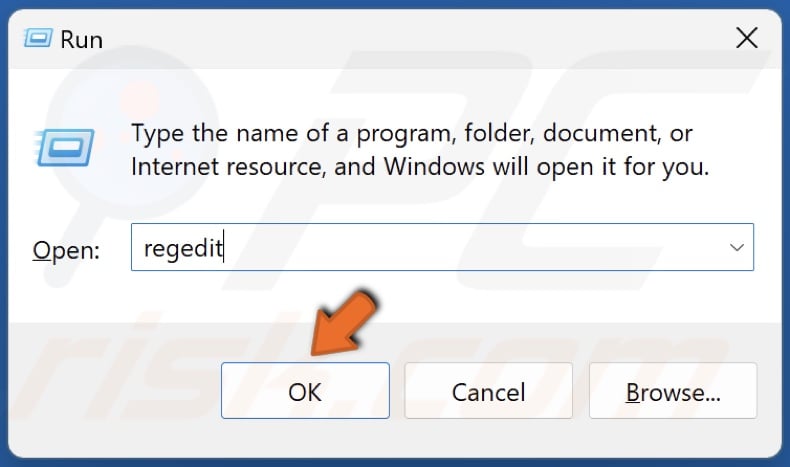
2. Type regedit in Run and click OK.
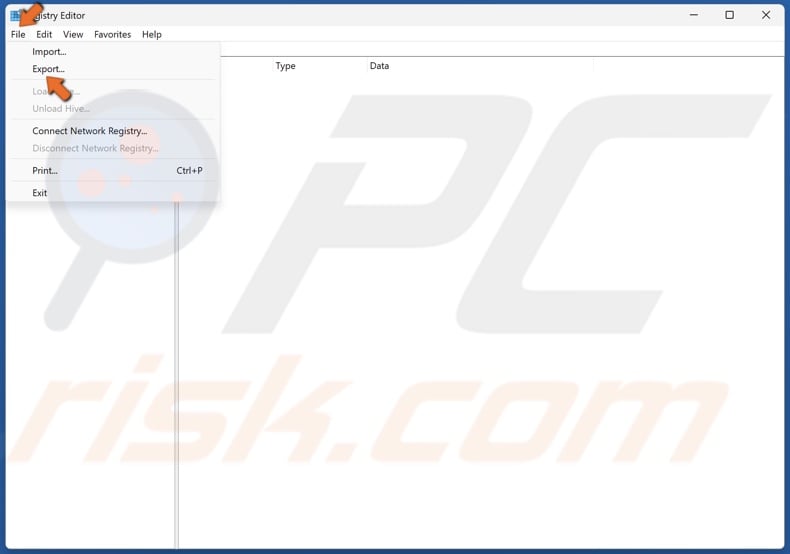
3. Before editing your Windows Registry, click File at the top-left of the window and click Export.
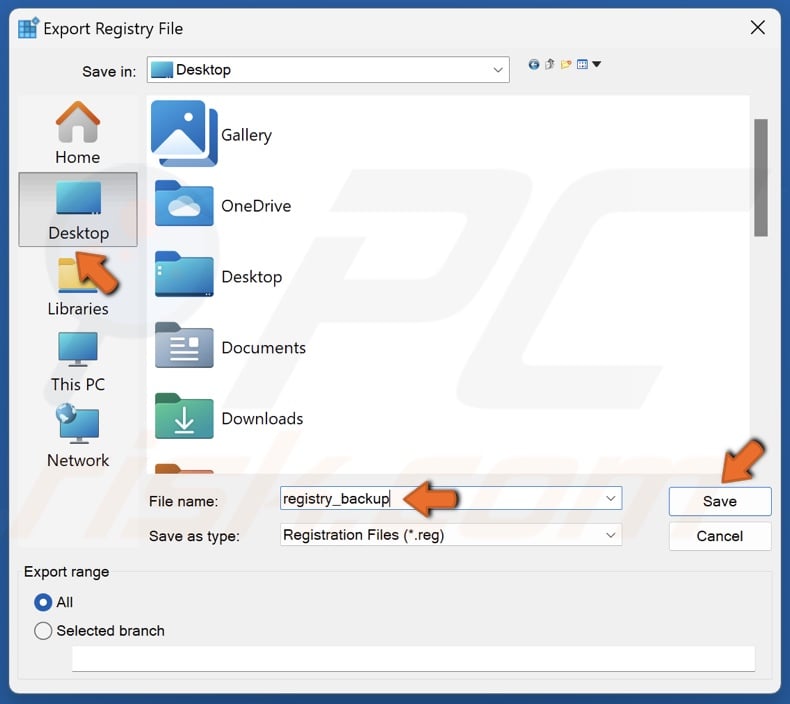
4. Choose where to save the file, name the file Registry backup, and click Save.
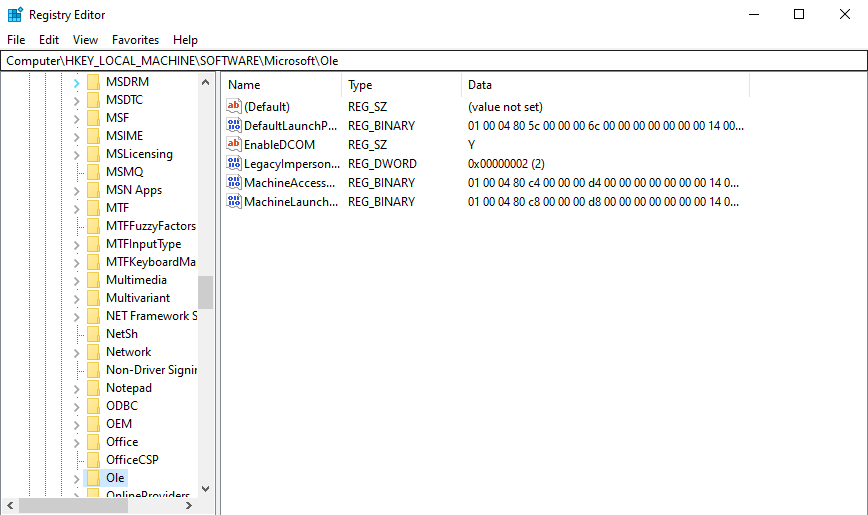
5. In the Registry Editor, navigate to:
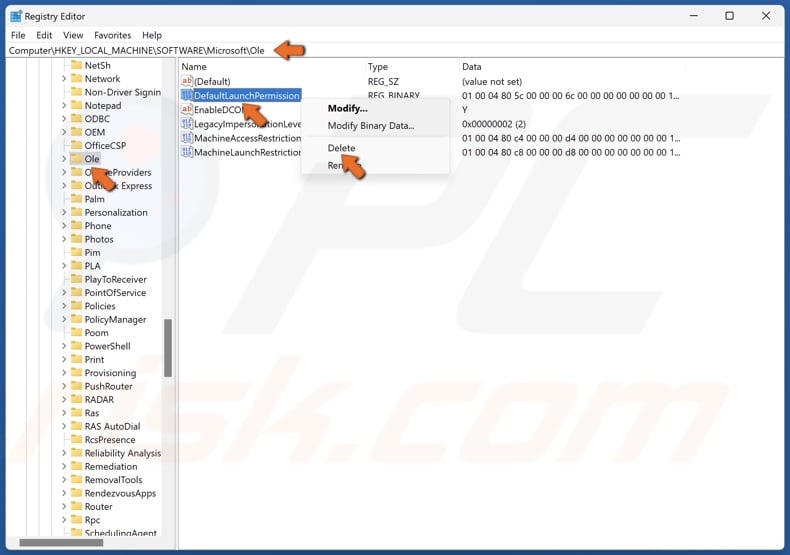
HKEY_LOCAL_MACHINE\SOFTWARE\Microsoft\Ole
6. Select the Ole key.
7. In the right pane, right-click the keys listed below and click Delete.
- DefaultAccessPermission
- DefaultLaunchPermission
- MachineAccessRestriction
- MachineLaunchRestriction
8. Close the Registry Editor and restart your PC.
[Back to Table of Contents]
Method 3. Enable DCOM Permissions for a Specific Error
You can enable DCOM permissions for specific applications if you still get the Event ID 10016 error. However, if you have different applications generating DCOM errors, you must repeat this process for each ID log.
DistributedCOM Event ID 10016 contains information about the specific application or process generating the event log.
1. Hold down Windows+R keys to open Run.
2. Type eventvwr in Run and click OK to open Event Viewer.
3. In Event Viewer, navigate to:
Windows Logs > System
4. Double-click the DistributedCOM Event ID 10016 Error.
5. The General tab contains the CLSID (Class ID) and APPID (Application ID), which you can use to identify the application or service that triggers Event ID 10016.
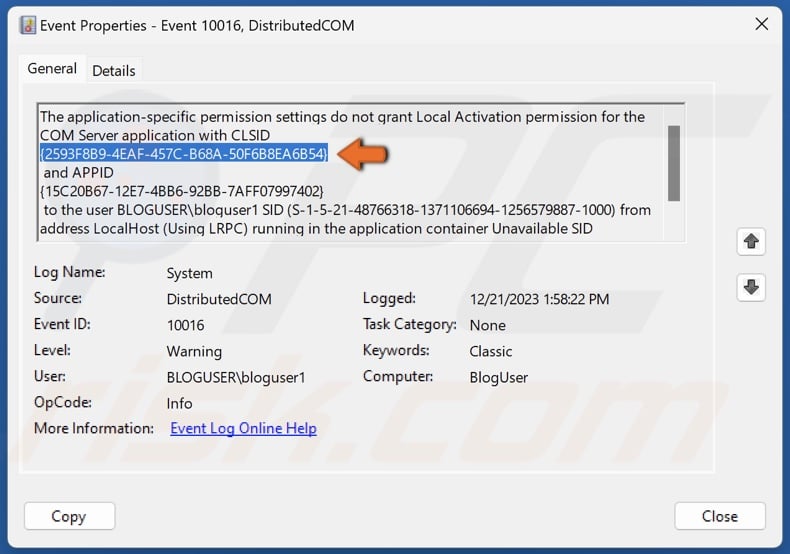
6. Highlight the CLSID and hold down Ctrl+C keys to copy the text to the clipboard. Then, move the Event Viewer window aside.
7. Hold down Windows+R keys to open Run.
8. Type regedit in Run and click OK.
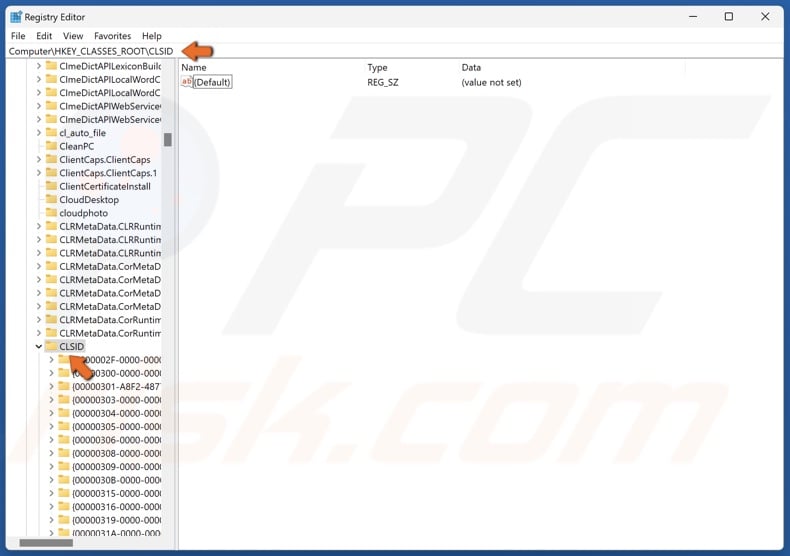
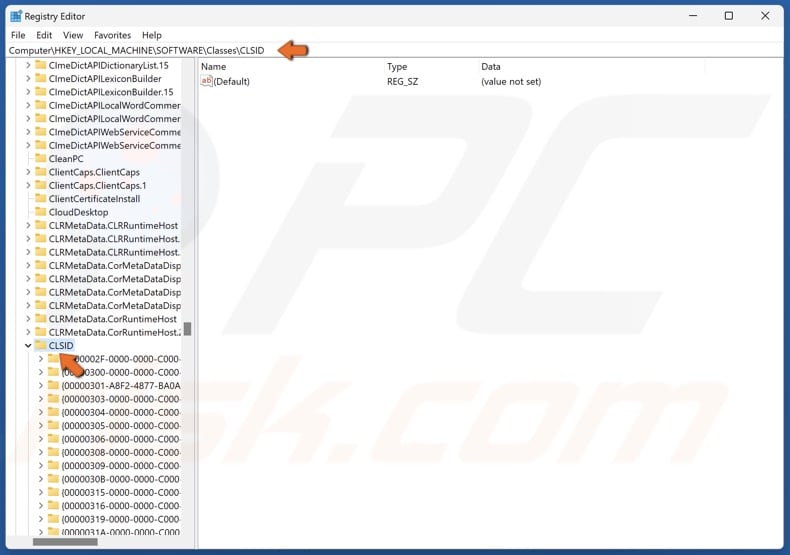
9. In the Registry Editor, navigate to:
HKEY_CLASSES_ROOT\CLSID\
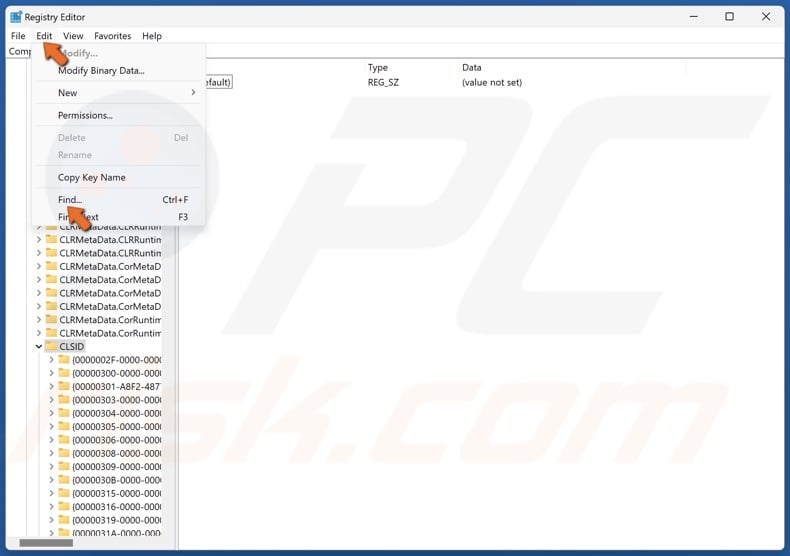
10. Click Edit in the menu bar and click Find.
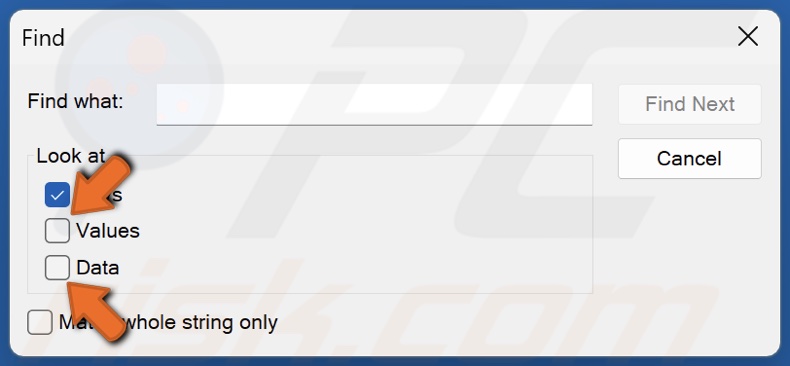
11. Unmark the Values and Data checkboxes.
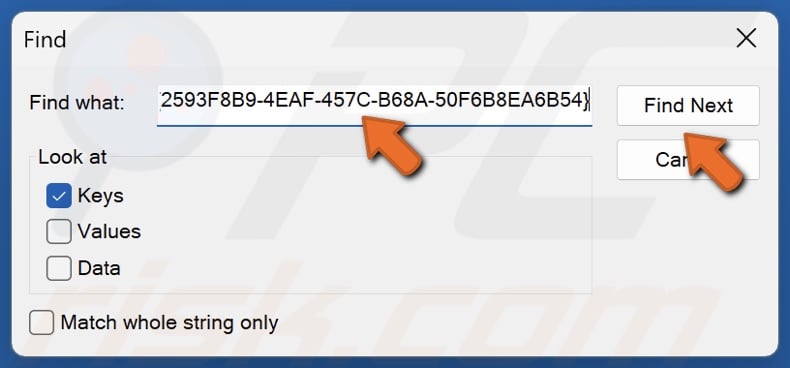
12. Right-click the text field and click Paste. You will paste in the CLSID copied from the Event Viewer.
13. Click Find Next.
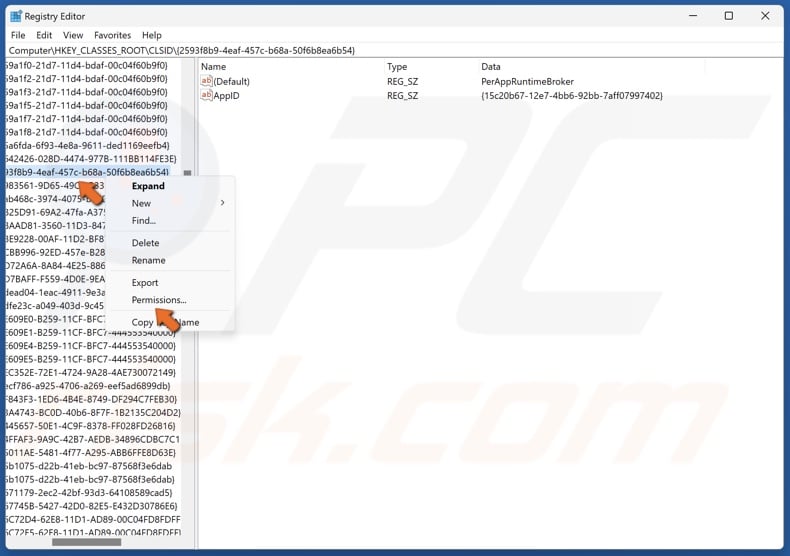
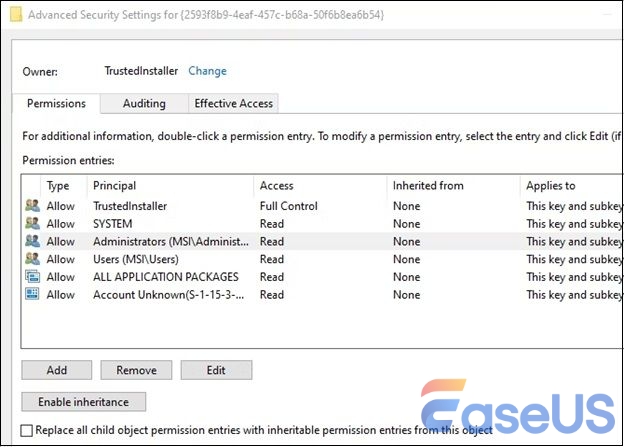
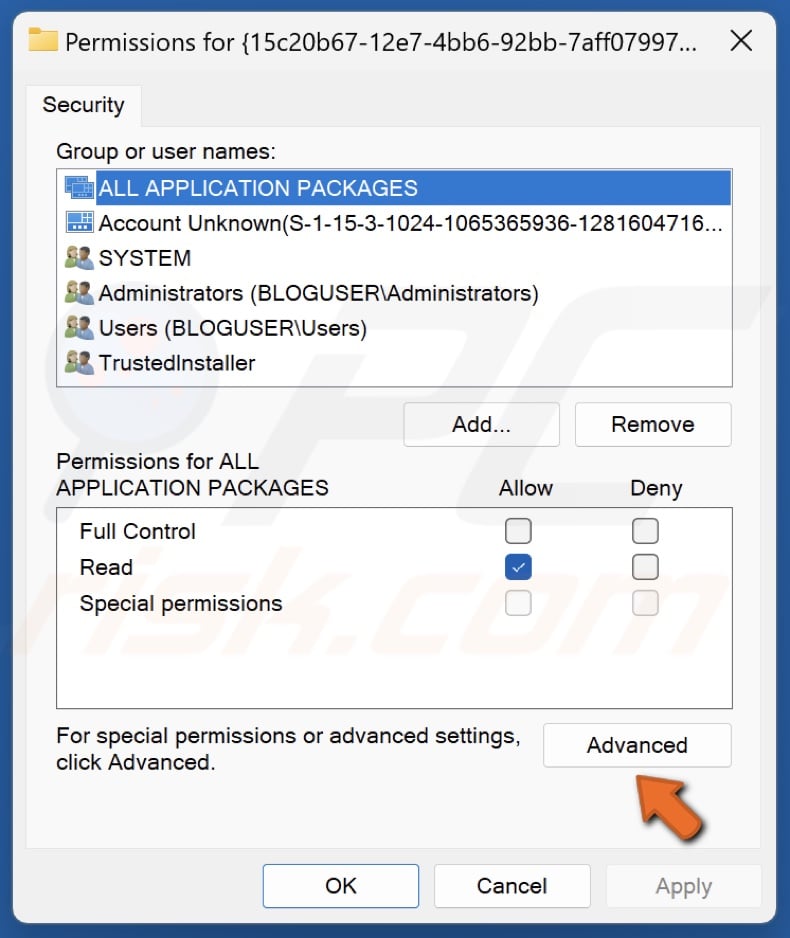
14. Right-click the relevant CLSID and click Permissions.
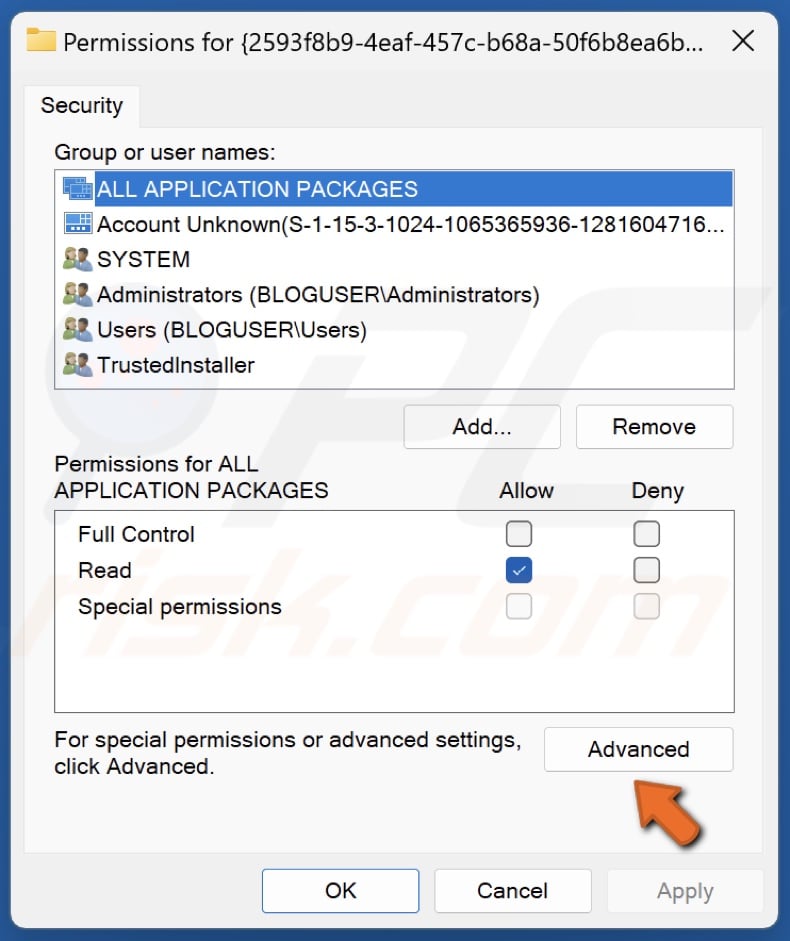
15. In the Permissions window, click Advanced.
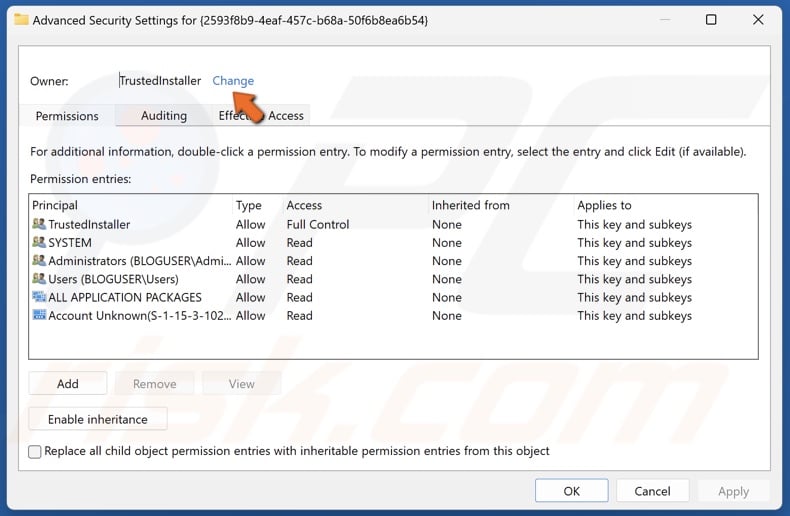
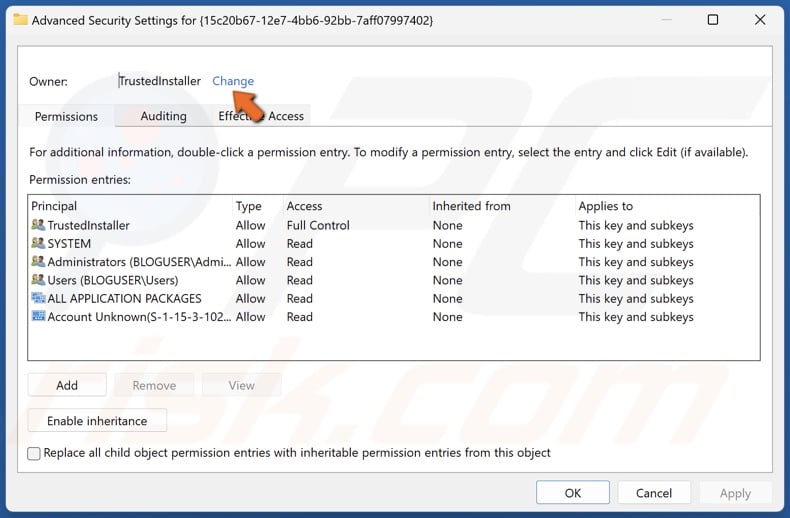
16. In Advanced Security Settings, click Change.
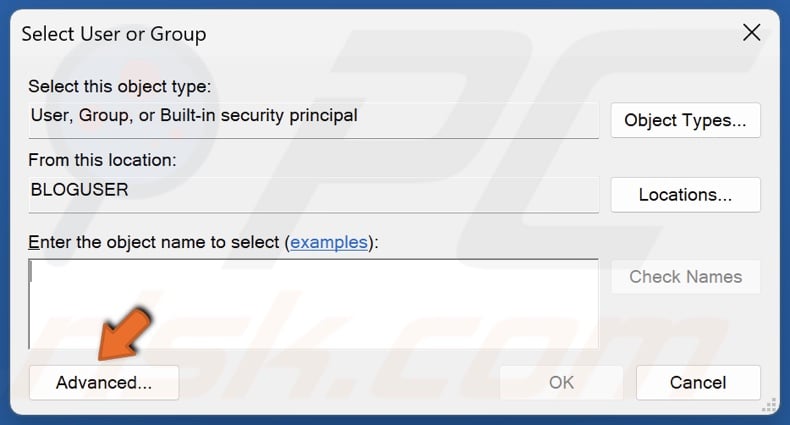
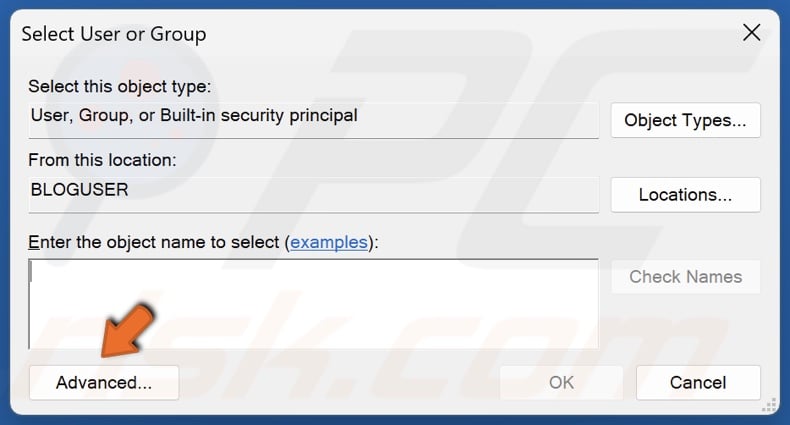
17. Click Advanced.

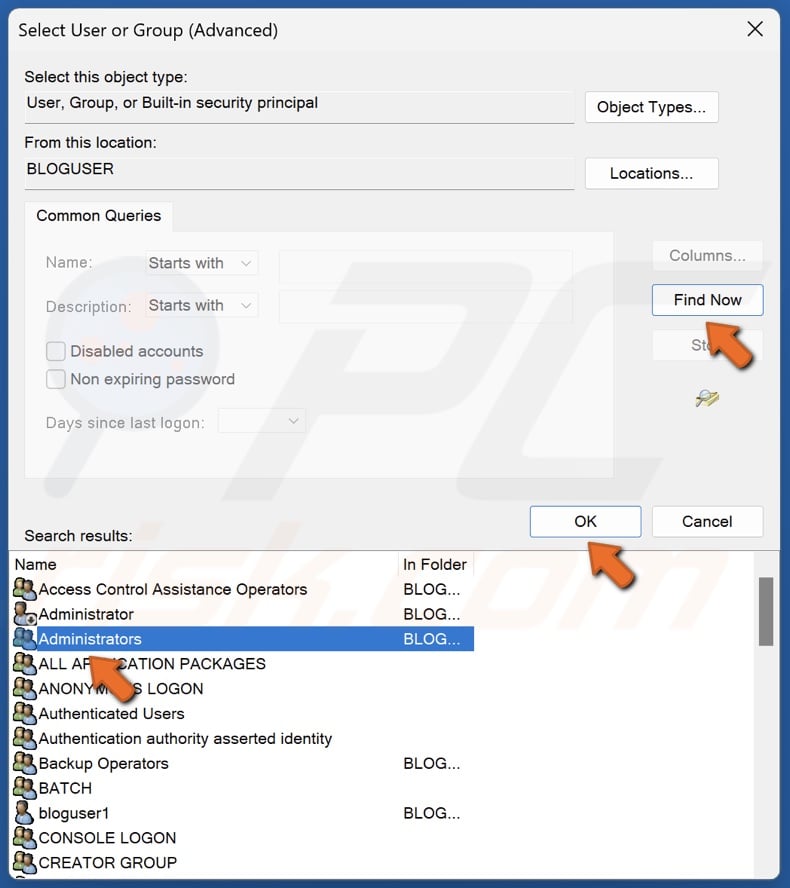
18. Click Find Now.
19. Select Administrators in the search results and click OK.
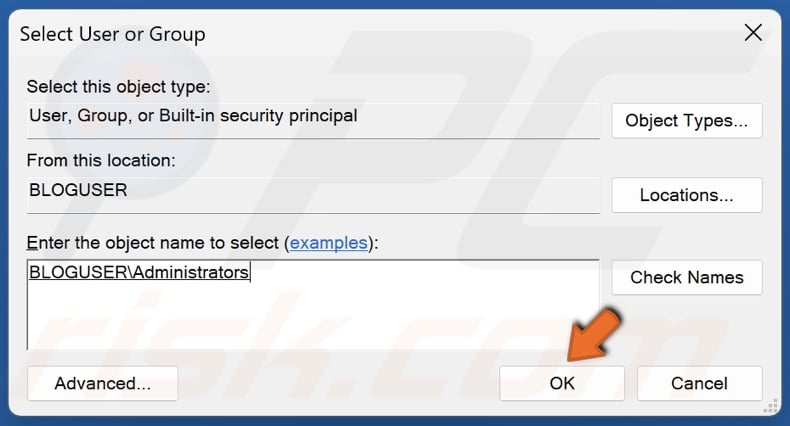
20. Click OK.
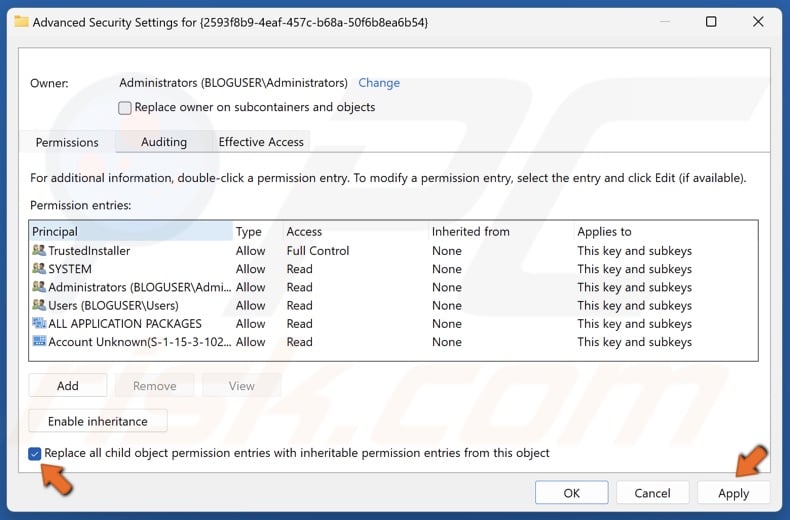
21. Mark the checkbox next to Replace all child object permission entries with inheritable permission entries from this object and click Apply.
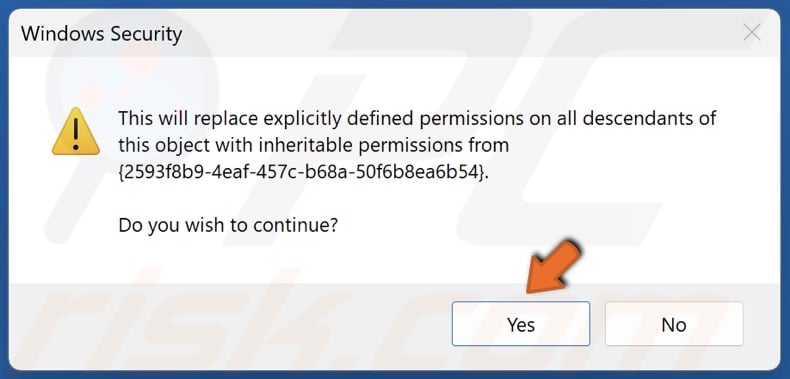
22. Click Yes when prompted.
23. Click OK when prompted.
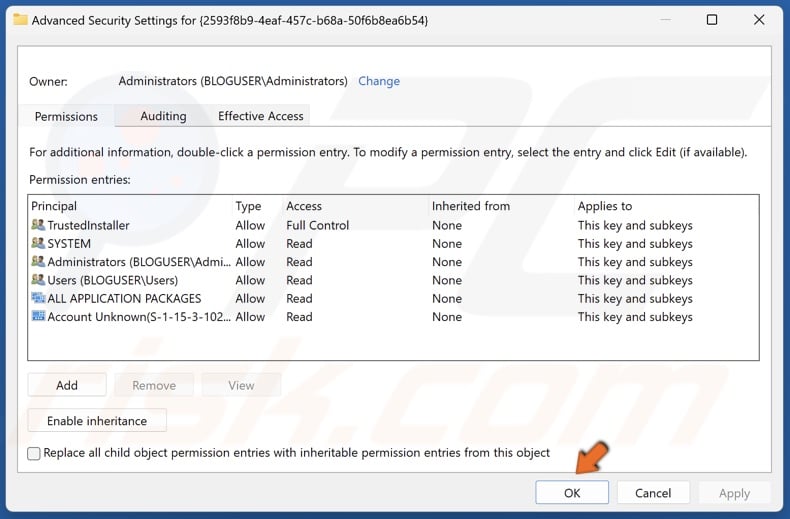
24. In Advanced Security Settings, click OK.
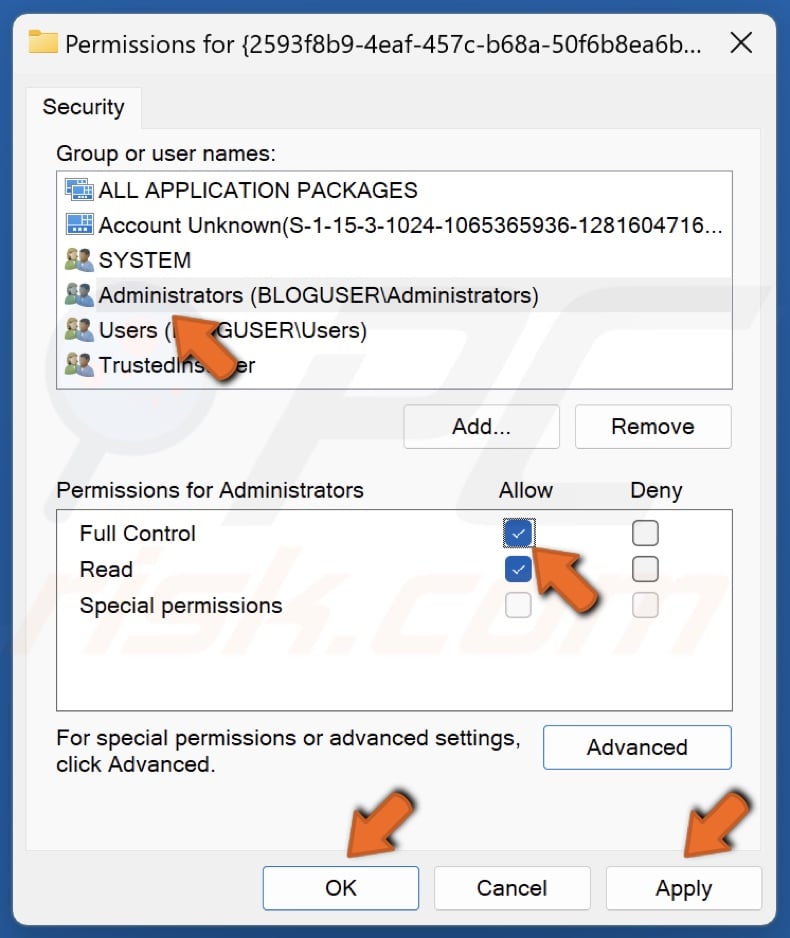
25. In the Permissions window, select Administrators.
26. In the Permissions for Administrators section, mark the Allow checkbox next to Full Control.
27. Click Apply and click OK.
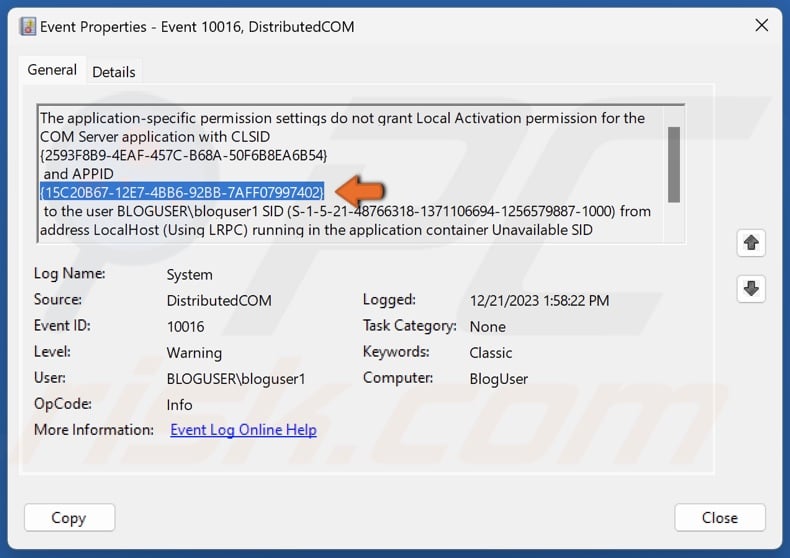
28. Return to the Event Viewer window, highlight the relevant APPID, and hold down Ctrl+C keys to copy the text to the clipboard.
29. Return to the Windows Registry Editor window.
30. Navigate to:
HKEY_LOCAL_MACHINE\SOFTWARE\Classes\CLSID\
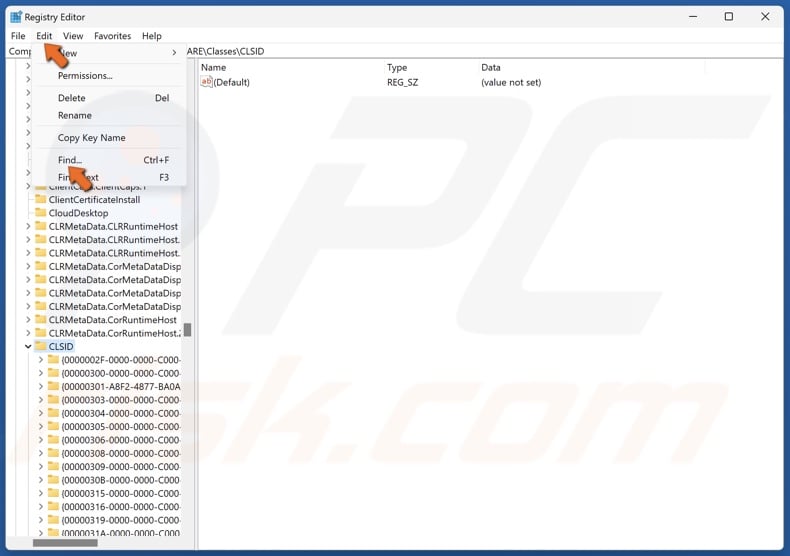
31. Click Edit in the menu bar and click Find.
32. Unmark the Values and Data checkboxes.
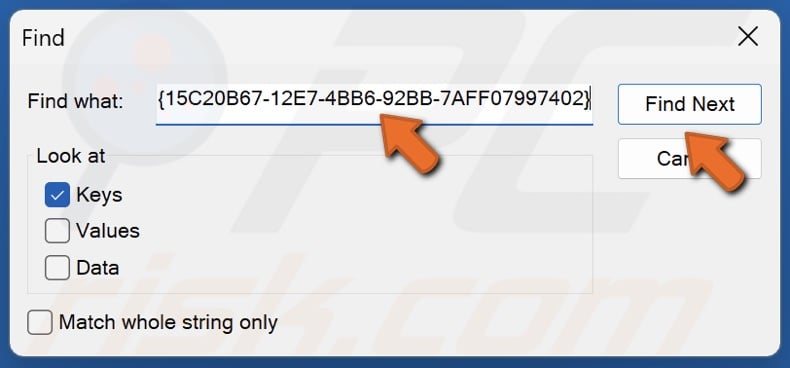
33. Right-click the text field and click Paste. You will paste in the APPID copied from the Event Viewer.
34. Click Find Next.
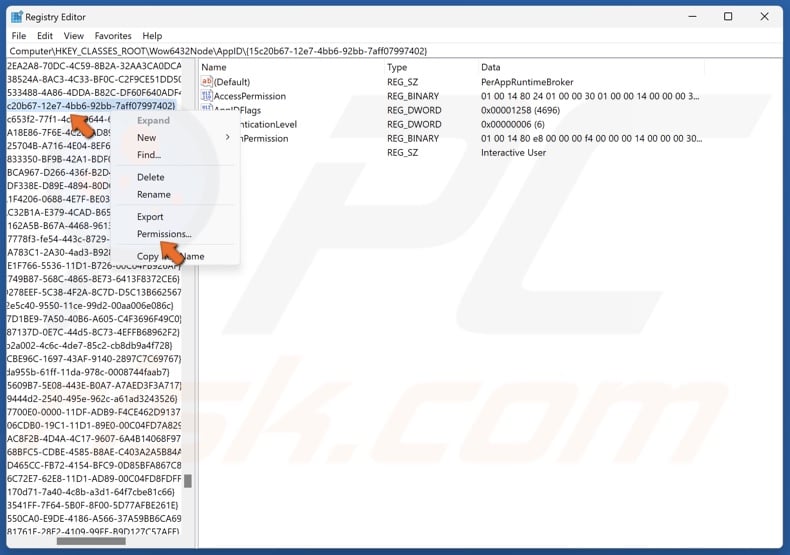
35. Right-click the relevant APPID and click Permissions.
36. In the Permissions window, click Advanced.
37. In Advanced Security Settings, click Change.
38. Click Advanced.
39. Click Find Now.
40. Select Administrators in the search results and click OK.
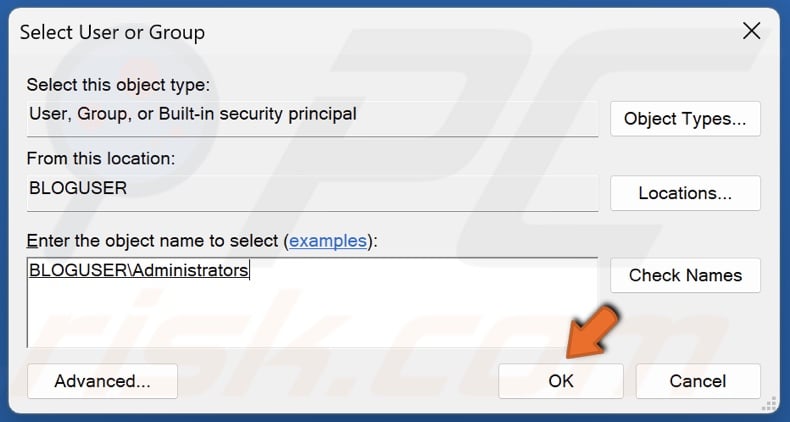
41. Click OK.
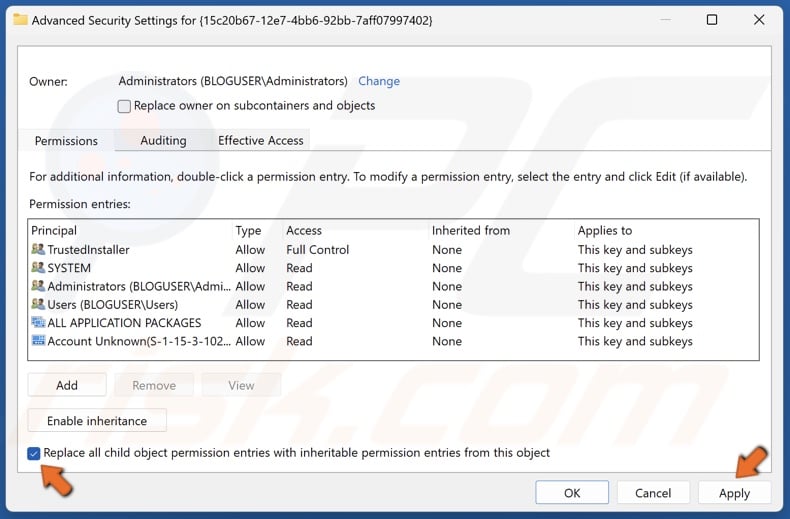
42. Mark the checkbox next to Replace all child object permission entries with inheritable permission entries from this object and click Apply.
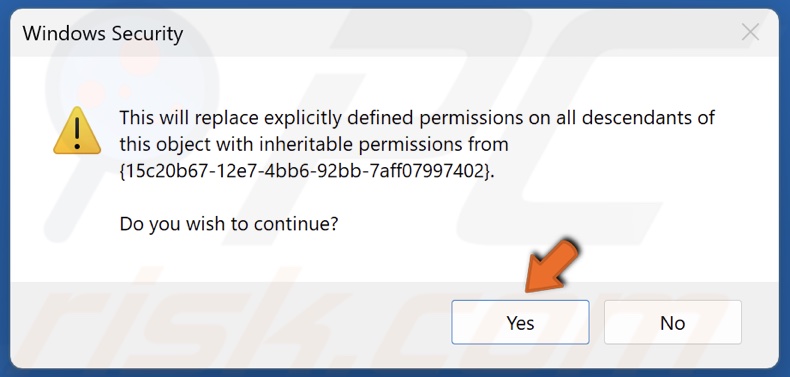
43. Click Yes when prompted.
44. Click OK when prompted.

45. In Advanced Security Settings, click OK.
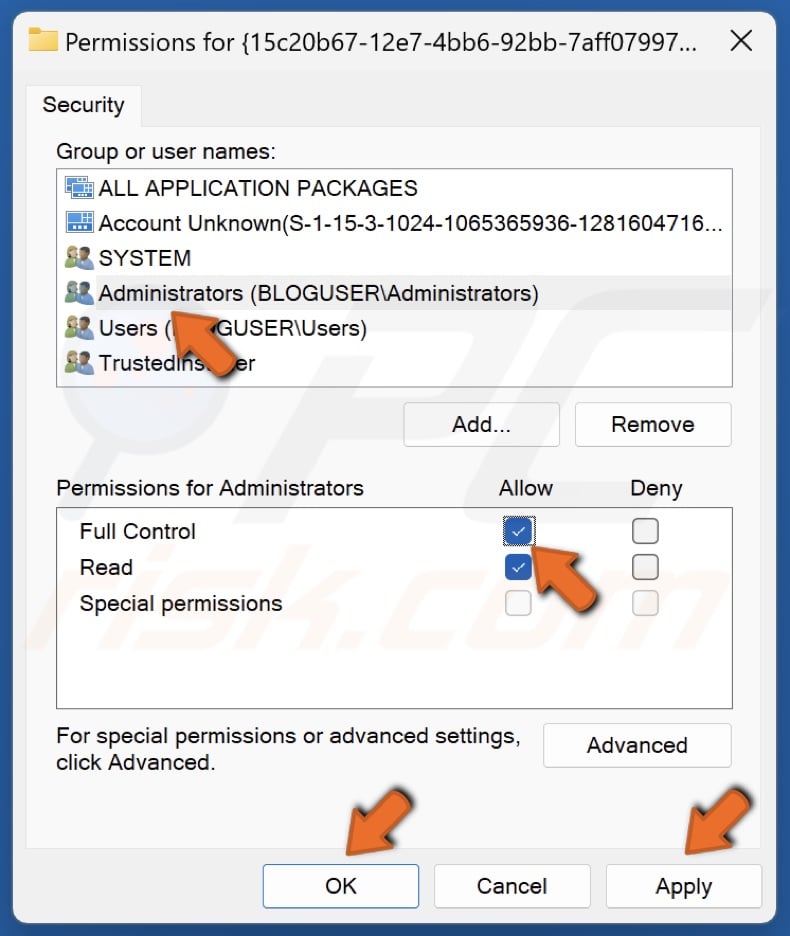
46. In the Permissions window, select Administrators.
47. In the Permissions for Administrators section, mark the Allow checkbox next to Full Control.
48. Click Apply and click OK.
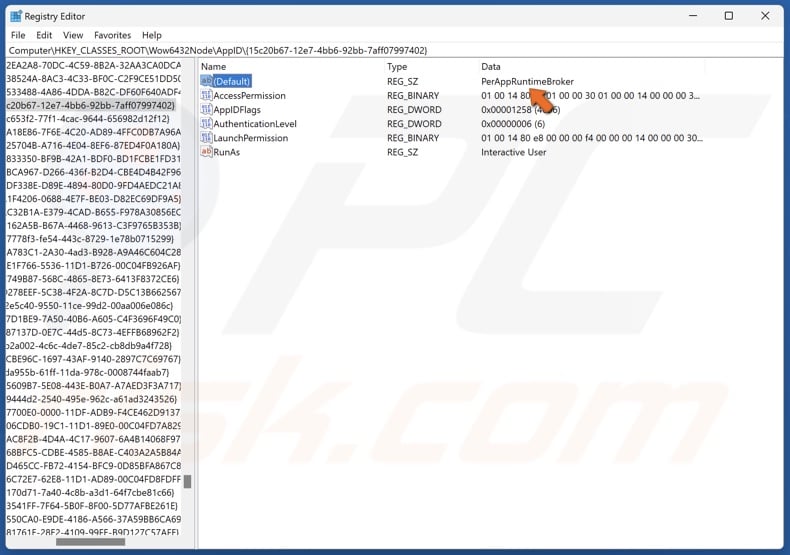
49. In the Registry Editor’s right pane, find the (Default) value. The Data line contains the name of the application/service that will be relevant moving forward.
50. Close the Windows Registry Editor.
51. Hold down Windows+R keys to open Run.
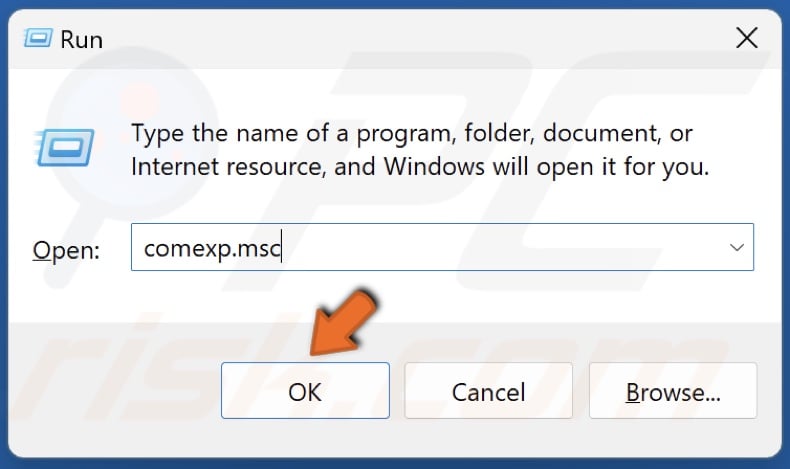
52. Type comexp.msc in Run and click OK.
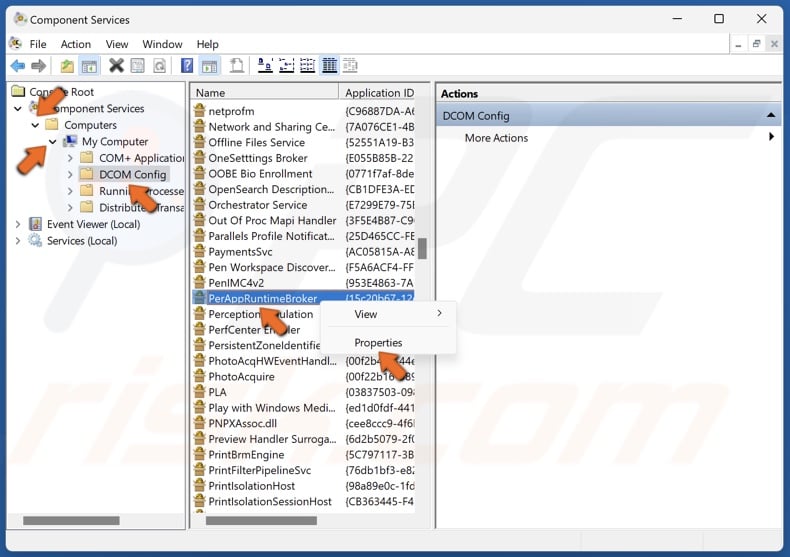
53. In Component Services, navigate to:
Computers > My Computer > DCOM Config
54. Find the application/service name you noted in the (Default) value’s Value data line of the APPID key.
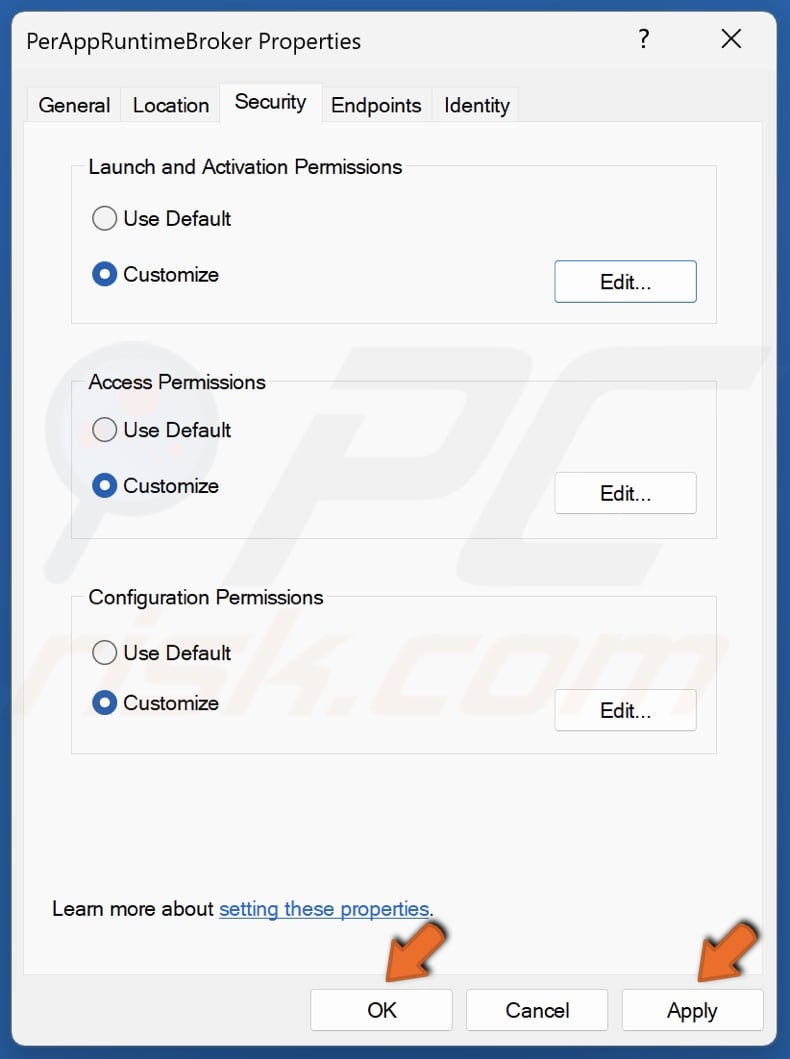
55. Right-click the application/service and click Properties.
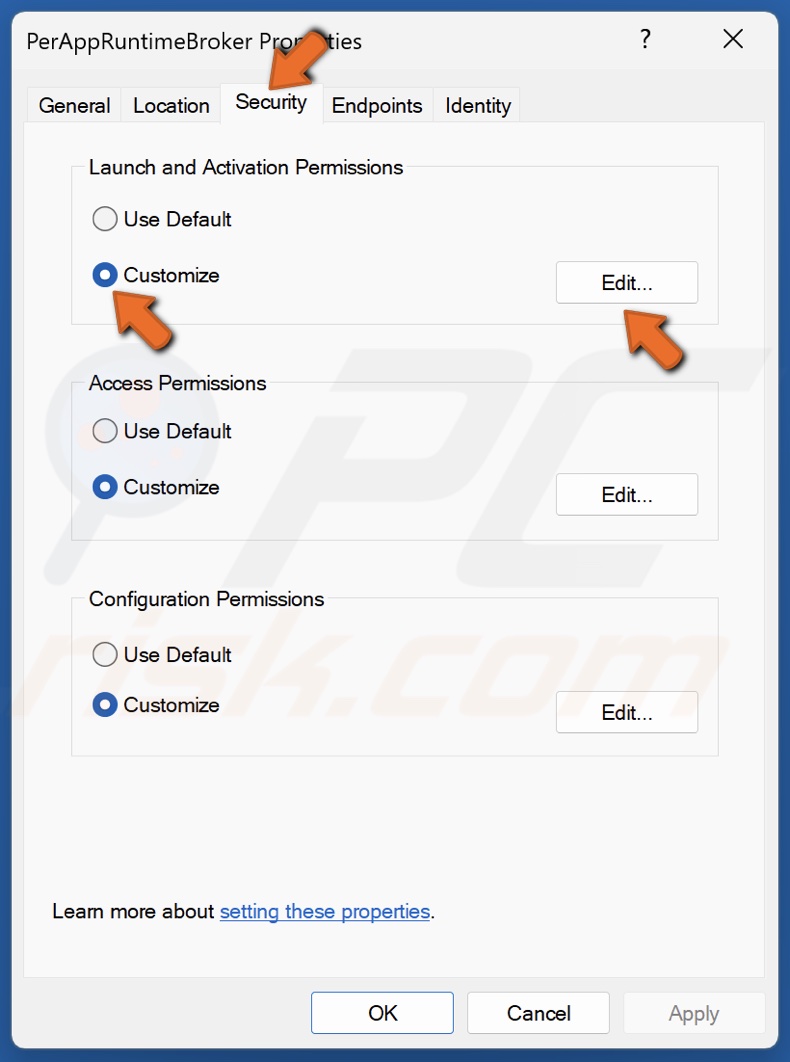
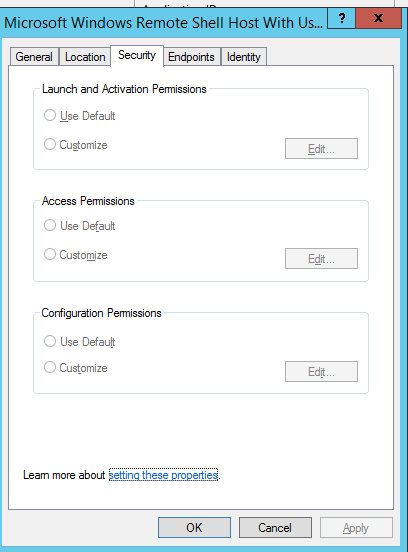
56. Select the Security tab.
57. Tick Customize and click Edit.
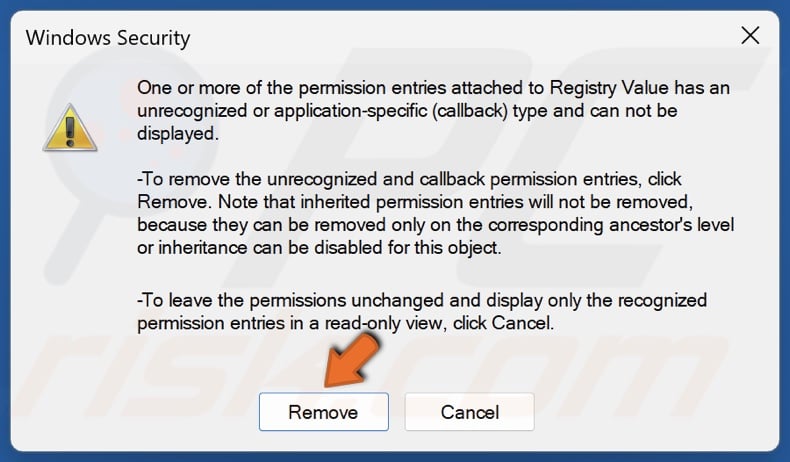
58. Click Remove when prompted.
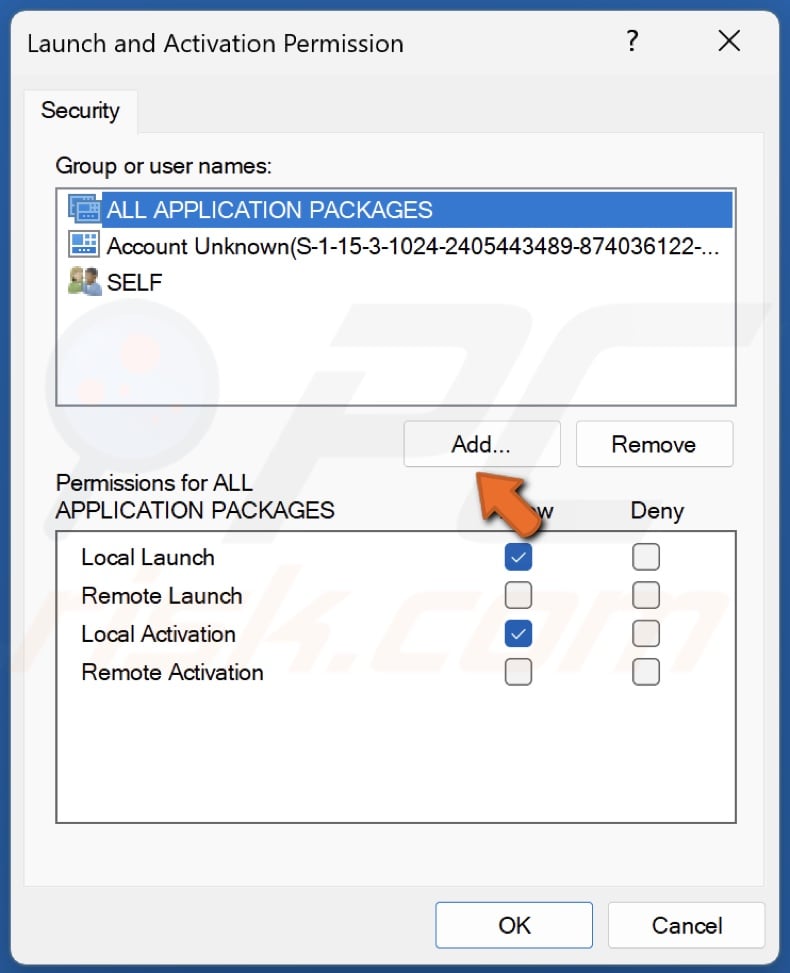
59. Click Add.
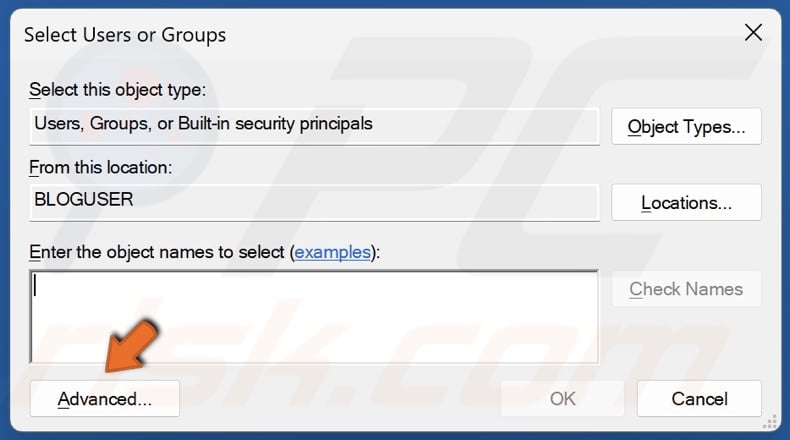
60. Click Advanced.
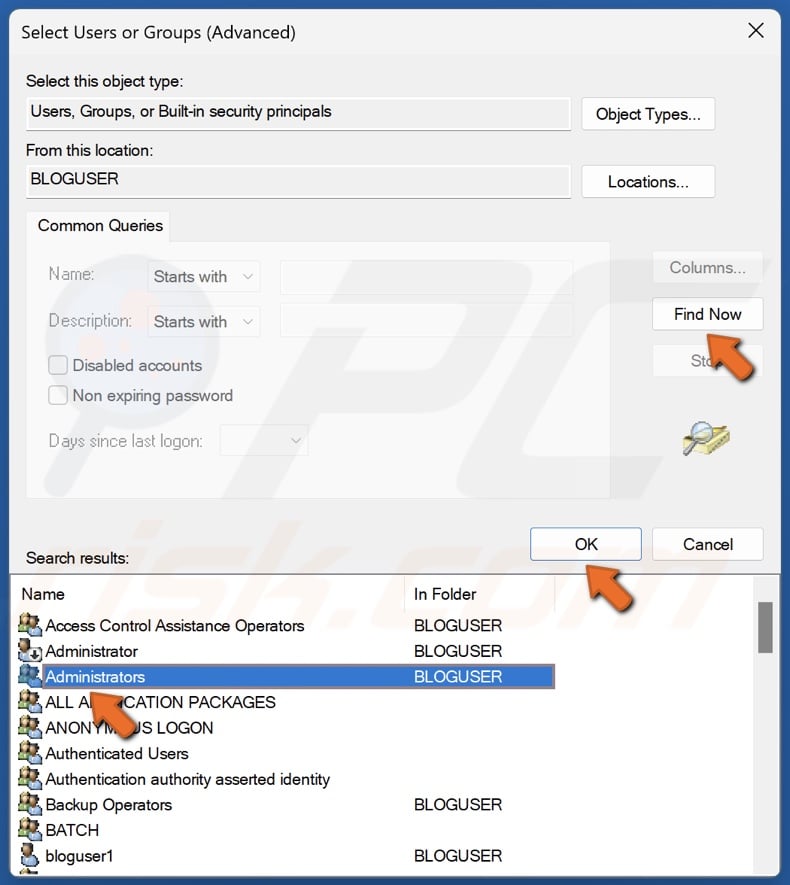
61. Click Find Now.
62. Select Administrators in the search results and click OK.
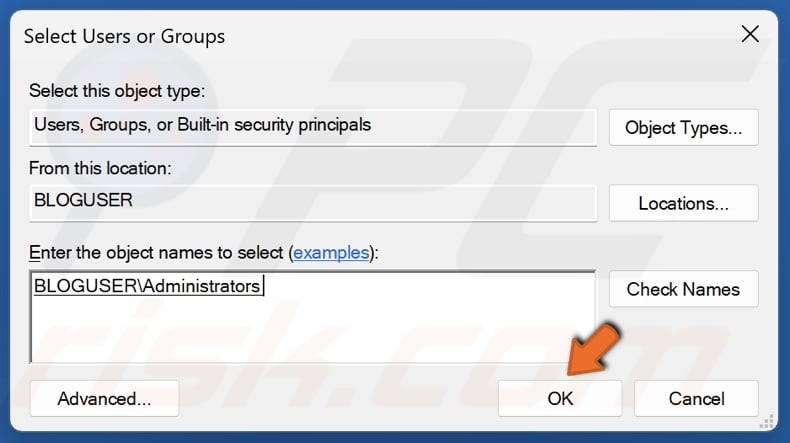
63. Click OK.
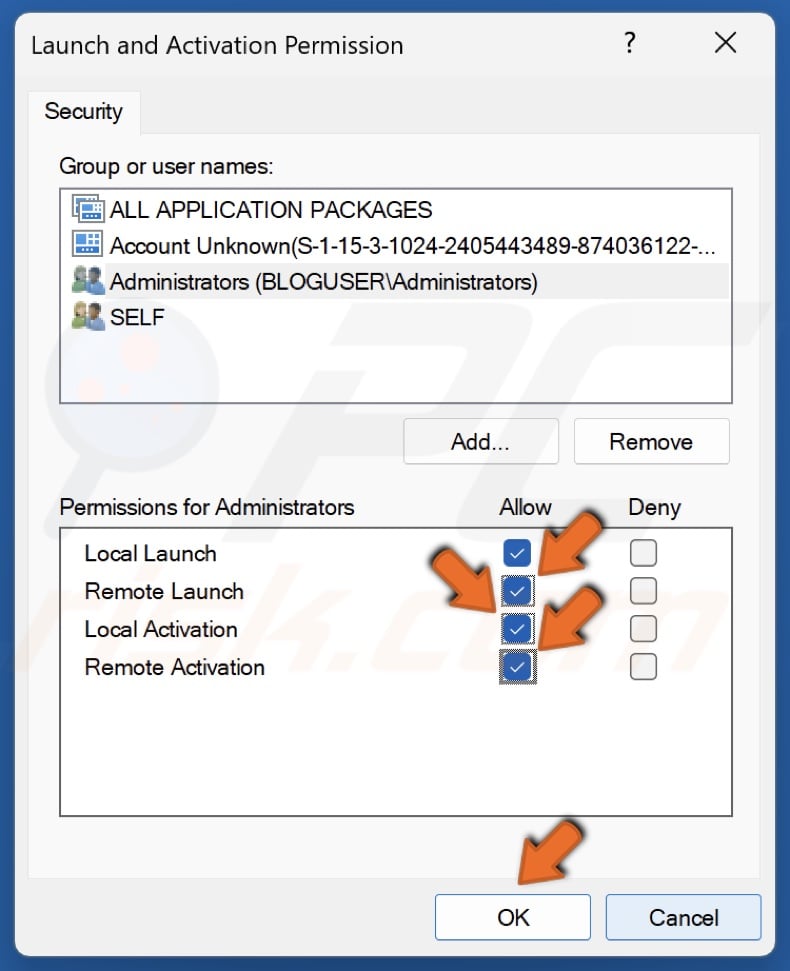
64. In the Permissions window, select Administrators.
65. In the Permissions for Administrators section, mark the Allow checkbox next to all options.
66. Click OK.
67. Click Apply and click OK.
68. Restart your PC.
Did this article help you fix DCOM Event ID 10016 error on your PC? Let us know in the comments below.
[Back to Top]
The DistributedCOM Error 10016 is a common Windows issue found on almost every Windows version since Windows XP. The error doesn’t immediately crash your system, and you won’t suffer a sudden blue screen of death. In fact, the DCOM Error 10016 is benign.
However, that doesn’t mean you can’t fix it. So, here’s how to fix the DistributedCOM Error 10016 on your Windows 10 system.
What Is DistributedCOM?
First up, let’s look at what is DistributedCOM, and why is it showing an error?
The Distributed Component Object Model (DCOM) is an integral aspect of networked communication on Windows computers. It is a proprietary Microsoft technology that whirs into action every time an application makes a connection to the internet. A traditional COM can only access information on the same machine, whereas DCOM can access data on remote servers.
For example, many websites and services use scripts that access a remote server. When your system makes a request using a script or otherwise, DCOM forwards the request to the specific script object. Given how frequently modern applications use a network connection and our general use of computers, you can see how frequently DCOM comes into use.
A DCOM error usually occurs when an application or service attempts to use DCOM but does not have the proper permissions. Most of the time, DCOM errors won’t affect your system, other than clogging up your Event Viewer. Given most Windows 10 users do not check the Event Viewer regularly, DCOM errors are nothing to worry about. Still, an error-free system is better than the alternative.
With that in mind, here is one easy method for fixing DCOM Error 10016, and one slightly more long-winded fix.
The first port of call is the Windows Registry. A simple registry tweak can sometimes fix the DCOM Error 10016 immediately.
Before editing the registry, we recommend taking a Windows backup.
Type ‘registry’ in your Start menu search bar, and select the Best Match. Head to File > Export, set the Export Range to All, then Save the Windows Registry to a handy location. The following fix won’t damage your computer, but it is best to take a backup to restore from if an unexpected error.
Now, let’s attempt the fix.
- Type in ‘registry’ in your Start Menu search bar, and select the Best Match.
- Navigate to HKEY_LOCAL_MACHINE\SOFTWARE\Microsoft\Ole. You can copy and paste the address into the Registry Editor address bar.
-
Delete the following four registry keys:
DefaultAccessPermissionDefaultLaunchPermissionMachineAccessRestrictionMachineLaunchRestriction - Close the Windows Registry Editor, then reboot your system.
That’s it. Do this and your system should remain DCOM Error 10016 free from now on.
If that doesn’t work, there is a substantially longer workaround that you can follow. However, if you have several individual applications all providing DCOM errors, the following process will take some time as you have to repeat the majority of it for each error.
The DCOM Error 10016 error message in the Event Viewer contains information regarding the specific application or process creating the issue.
Input ‘event viewer’ in your Start menu search bar, and select the Best Match.
Head to Windows Logs > System and locate your most recent DCOM Error 10016. Double-click the error message to expand it.
The General tab explains the reason for DCOM 10016 error, listing the CLSID (Class ID) and APPID (Application ID). The CLSID and APPID character strings look random. However, you can use them to identify which application or service is the route of the 10016 error.
Locate CLSID and APPID in the Registry Editor
Here’s how you locate the service in the Registry Editor.
First, highlight the CLSID in the Event Viewer, then press CTRL + C to copy it. Then, open the Registry Editor. Search the registry for the following:
HKEY_CLASSES_ROOT\CLSID\{Paste Your CLSID Here}
For us, that looks like HKEY_CLASSES_ROOT\CLSID\{2593F8B9-4EAF-457C-B68A-50F6B8EA6B54}.
Remember, you can copy and paste the address into the Registry Editor address bar. Once the CLSID search finishes, you can cross-reference the APPID from the error message with the AppID listed under the CLSID.
In our case, the DCOM Error 10016 stems from the Runtime Broker, which is one of the most common causes of this error.
Edit the CLSID Permissions
In the left-hand list of registry entries, right-click the CLSID relating to the error, then select Permission > Advanced. From here, you can edit the Permissions of the service. (Changing file permissions can fix a bunch of other Windows 10 issues, too.)
Highlight Administrators and select Edit. Switch the Basic Permissions to include Full Control, then hit OK > Apply > OK.
Now, restart your system.
Once the restart completes, input Component Services in your Start Menu search bar and select the Best Match. Head to Computers > My Computer > DCOM Config.
You will see a long list of service that uses DCOM in some manner. Locate the service using the name and APPID, right-click and select Properties > Security.
Under Launch and Activation Permissions, select Edit > Add > Add a Local Service > Apply. Now, tick the Local Activation box, hit OK, and reboot your system again.
Whew! All done, the process is complete.
Note: Unfortunately, if you have multiple 10016 error causes, you’ll have to complete this process for each CSLID/APPID combination.
Hopefully, that has alleviated your Distributed COM 10016 error. We must emphasize that a DCOM 10016 error is highly unlikely to affect your system performance. In the old days, when Microsoft first introduced «Distributed» to the Component Object Model, there were vulnerabilities. However, these vulnerabilities have been patched and DCOM is safe now.
Of course, DCOM error 10016 is far from the only error Windows 10 throws up. But don’t sweat, as there are plenty of ways to fix those, too. In fact, there’s a host of dedicated third-party apps that specialize in troubleshooting random Windows 10 bugs.