
Running Sysprep on Windows 10 is a process that prepares an operating system for disk cloning and restoration. It’s primarily used to deploy the same OS installation on multiple computers. You’ll need to access the Sysprep tool, configure the settings, and run the tool. The following steps will guide you through this process.
In this section, we will walk through the steps you need to take to run Sysprep on a Windows 10 machine. By the end, you will have a Windows 10 installation that is ready to be cloned and deployed to other computers.
Step 1: Open the Sysprep Tool
Open File Explorer and navigate to C:WindowsSystem32Sysprep.
Here you’ll find the Sysprep executable. This is the tool required to prepare your Windows installation for cloning. Make sure you’re logged in with administrative privileges, or you won’t be able to run the tool.
Step 2: Run the Sysprep Executable
Double-click sysprep.exe to launch the Sysprep tool.
Once the tool opens, you’ll see a dialog box with options for what actions to perform. This is where we’ll configure the settings for our preparation process.
Step 3: Choose the Generalize Option
In the Sysprep dialog box, check the Generalize checkbox.
This option removes all system-specific data, which is crucial for deploying the image to multiple machines. Without this, each cloned copy will retain the unique system data from the original machine, leading to potential conflicts.
Step 4: Select the Shutdown Option
Under Shutdown Options, select Shutdown from the dropdown menu.
This will shut down your computer once the Sysprep process is complete. It ensures that your machine is properly prepared and not running when you move on to creating a disk image.
Step 5: Start the Sysprep Process
Click the OK button to start the Sysprep process.
The process can take several minutes to complete. During this time, the tool will remove all unique system information and generalize the installation. Once finished, your computer will shut down.
After running Sysprep, your Windows 10 installation will be generalized and ready for cloning. The machine will shut down automatically, signaling that the process is complete and it is safe to create a disk image for deployment.
Tips for Running Sysprep on Windows 10
- Back up important data: Before running Sysprep, make sure to back up any important data. The process will remove system-specific configurations.
- Close all applications: Ensure that all applications are closed before running Sysprep to avoid any unexpected errors.
- Check for updates: Make sure Windows is fully updated before running Sysprep. Any pending updates can cause issues.
- Run as administrator: Always run Sysprep with administrative privileges.
- Test deployment: After creating your image, test it on a single machine to ensure everything works as expected before deploying it to multiple systems.
Frequently Asked Questions about Running Sysprep on Windows 10
What does Sysprep do?
Sysprep removes system-specific data to prepare a Windows installation for cloning and deployment to multiple computers.
Can I run Sysprep multiple times on the same computer?
Yes, but there are limits. Microsoft recommends not exceeding more than three Sysprep runs on the same image.
Will Sysprep delete my personal files?
No, Sysprep doesn’t delete personal files but removes system-specific data and configurations.
Is it necessary to use Sysprep before cloning a Windows installation?
Yes, using Sysprep ensures that the cloned system will not have conflicts due to unique system information from the original machine.
Can I undo the Sysprep process?
No, once Sysprep is run and the machine is generalized, the process cannot be undone.
Summary
- Open File Explorer to
C:WindowsSystem32Sysprep. - Run
sysprep.exe. - Select the
Generalizeoption. - Choose
Shutdownunder Shutdown Options. - Click
OKto start the process.
Conclusion
Running Sysprep on Windows 10 is a crucial step when preparing an operating system for deployment across multiple machines. This process removes all unique system data, ensuring that cloned installations don’t conflict with each other—a bit like setting the stage before opening night. Following the steps outlined above will make the process smooth and efficient.
Remember, always back up your data and close all applications before starting. After running Sysprep, your computer will be ready for imaging and deployment. For further reading, consider looking into more advanced deployment strategies or Microsoft’s documentation on Sysprep.
Feel ready to generalize and deploy your Windows 10 installation? Give it a go, and enjoy the streamlined efficiency that comes with a well-prepped system!
Matt Jacobs has been working as an IT consultant for small businesses since receiving his Master’s degree in 2003. While he still does some consulting work, his primary focus now is on creating technology support content for SupportYourTech.com.
His work can be found on many websites and focuses on topics such as Microsoft Office, Apple devices, Android devices, Photoshop, and more.
SysPrep (System Preparation Tool) is used to generalize the Windows 10/11 installation and prepare a customized reference Windows image for deployment to corporate computers. This allows administrators to quickly deploy a reference Windows image that includes all the all the necessary apps, drivers, settings, and security updates that your users need to get started.
What is Sysprep and how does it work?
The idea is that an administrator can prepare a reference Windows computer with all the necessary drivers, programs, and required system settings. This configured Windows image can then be captured and deployed to client computers. SysPrep is a built-in tool used to generalize the Windows image and remove computer-specific information (SID, GUID, etc).
This guide explains how to create a reference Windows computer, generalize it using SysPrep and capture the WIM image that will be installed on other computers. I will cover the following basic steps:
- Perform a clean installation of Windows 10/11 from the original ISO image on the reference computer.
- Use the SysPrep tool to put the Windows into the Audit Mode.
- Configure your Windows environment: install drivers, updates, language packs, apps, configure user personalization options, configure the Desktop, create shortcuts, set files and folder permissions, etc.
- Generalize the image using the SysPrep.
- Boot into Windows PE and capture an image using the DISM command.
- Copy the resulting WIM image to the installation media or use the deployment tools to install it on the users’ computers (such as MDT, WDS, DISM, or ImageX).
How to create a Windows 10 or 11 reference image
Download the latest Windows build (you can use the Media Creation tool to make Windows installation media) and perform a clean Windows installation on a reference computer or virtual machine. Do not connect the computer to the Internet at this stage (unplug the Internet connection (Ethernet) or disable your Wi-Fi adapter on your computer).
The reference builds for this article are Windows 10 22H2 or Windows 11 23H2.
Disable automatic updating of Microsoft Store apps (which can break the SysPrep process in Windows 10 and 11):
- Open the Local Group Policy Editor (gpedit.msc) and go to Computer Configuration > Administrative Templates > Windows Components > Store;
- Enable the policy Automatic Download and Install of updates;


Then configure the ImageState registry parameter:
reg add "HKLM\SOFTWARE\Microsoft\Windows\CurrentVersion\Setup\State" /v ImageState /t REG_SZ /d IMAGE_STATE_GENERALIZE_RESEAL_TO_OOBE /f
And make changes to the file C:\Windows\Setup\State\State.ini
[State]

ImageState=IMAGE_STATE_SPECIALIZE_RESEAL_TO_OOBE

This will prevent SysPrep from failing when processing Microsoft Store apps.
Customizing Reference Windows Image in Audit Mode with SysPrep
The next step is to customize your reference Windows image in the Audit Mode. You can boot into Audin Mode from the OOBE screen (run CTLRL+Shift+F3) or open an elevated PowerShell console and run sysprep command:
C:\windows\system32\sysprep\sysprep.exe

Select the following options:
- System Cleanup Action: Enter System Audit mode;
- Shutdown Options: Reboot;
- Press the OK button.
Sysprep on Windows can be run from the command line with basic options:
sysprep.exe [/oobe | /audit] [/generalize] [/reboot | /shutdown | /quit] [/quiet] [/unattend:answer_file_name]
- /audit — boots Windows into audit mode. In this mode, you can install additional apps and drivers;
- /generalize — preparing Windows for image capture. All identifiers, logs, Event Viewer logs, and restore points are removed;
- /oobe — restarts the Windows in the Welcome screen mode. The Windows Welcome screen allows users to configure Windows operating system, create new accounts, rename the computer, and perform other tasks;
- /unattend:answer_file_name — allows you to apply the settings from the answer file to Windows during an unattended installation.

Note. In some cases, SysPrep returns the error: unable to validate your Windows installation. The cause of the error is listed in the %WINDIR%\System32\Sysprep\Panther\setupact file.
Refer to the article for other possible sysprep errors and fixes: Sysprep was not able to validate your Windows installation.

For other SysPrep errors, you can check the log files. Depending on the stage, Sysprep may write information to one of the directories:
- Generalize — %WINDIR%\System32\Sysprep\Panther.
- Specialize — %WINDIR%\Panther.
- Windows Unattended installation — %WINDIR%\Panther\UnattendGC.
The computer will automatically restart and boot into Audit Mode. Windows automatically logs on using the built-in administrator account (even if it was previously disabled). Windows will always boot into the Audit Mode until you explicitly switch your computer to Out-of-Box Experience (OOBE), Windows will always start in Audit Mode.

The only visible sign that you’ve entered audit mode is the Sysprep dialogue box in the center of the screen. Do not close the SysPrep window, just minimize it.
You are now ready to start customising your Windows. We will take a look at some popular steps that sysops most often configure in their reference image.
Step 1 (Optional): Install OEM Information and Logo
Set your company branding info. In this example, we will set the OEMLogo, Company name, tech support website, and working hours. Create a text file oem.reg, and copy the following code into it:
Windows Registry Editor Version 5.00

[HKEY_LOCAL_MACHINE\SOFTWARE\Microsoft\Windows\CurrentVersion\OEMInformation]

“Logo”=”C:\\WINDOWS\\oem\\OEMlogo.bmp”

“Manufacturer”=”TheITBros, LLC”

“Model”=”Windows 10 Pro 22H2”

“SupportHours”=”9am to 5pm ET M-F”

“SupportURL”=”https://theitbros.com”
Note. Create the graphic file C:\WINDOWS\oem\OEMlogo.bmp with your company logo.
To apply the REG file, double-click it, and accept the registry changes. This will import these settings into the registry.

After restarting, check your branding information in the System Properties dialog:

Step 2: Install the Drivers and Apps
Install all the required drivers and third-party programs you would like to see in your Windows 10/11 image.
Install all the necessary drivers for all the computers and laptop models on which you want to deploy this reference Windows image. Extract the driver files (including the *.inf files) to the local folder and use PowerShell to inject all the drivers from the source folder into the Windows image:
Get-ChildItem "C:\Drivers\" -Recurse -Filter "*.inf" |

ForEach-Object {PNPUtil.exe /add-driver $_.FullName /install}
Then you can download and install apps manually, or use the built-in WinGet package manager to install software from the WinGet repo. Let’s say, we want to install Opera, Google Chrome, VLC media player, Adobe Acrobat Reader DC, 7Zip, K-Lite Codec Pack Full, and Zoomit. Open the elevated PowerShell prompt and run the command:
winget install --id=7zip.7zip -e && winget install --id=Opera.Opera -e && winget install --id=Google.Chrome -e && winget install --id=VideoLAN.VLC -e && winget install --id=Adobe.Acrobat.Reader.32-bit -e && winget install --id=CodecGuide.K-LiteCodecPack.Full -e && winget install --id=Zoom.Zoom –e

Note. Don’t install or update any Microsoft Store apps on a reference computer.
If you need to reboot Windows to install the application or update, you can do so. After reboot, the system will return to audit mode.
Step 3: Install Windows Security Update in Audit Mode
Windows will not allow you to install updates in audit mode by using the Windows Update section of the Settings panel since the OOBE phase is not complete.
Use the PSWindowsUpdate module from PowerShell Gallery to install the security updates from the command prompt.
- Install the PSWindowsUpdate module:
Install-Module -Name PSWindowsUpdate
- Automatically download and install all the available Windows updates:
PowerShell -ExecutionPolicy RemoteSigned -Command Import-Module PSWindowsUpdate;

Install-WindowsUpdate -MicrosoftUpdate -AcceptAll -AutoReboot
- Check again for available updates:
Get-WindowsUpdate
Step 4 (Optional): Uninstall Built-in Microsoft Store Apps
Also, you can uninstall built-in Microsoft Store (UWP apps), but it’s really up to you. So, if you don’t want to uninstall built-in apps, just skip this step.
You can remove pre-installed Microsoft Store apps in Windows 10 22H2 and Windows 11 23H2 using the following PowerShell commands:
#News app

Get-AppxPackage *BingNews* | Remove-AppxPackage

#Weather

Get-AppxPackage *BingWeather* | Remove-AppxPackage

#PowerShell

Get-AppxPackage *PowerShell* | Remove-AppxPackage

#Music app

Get-AppxPackage *ZuneMusic* | Remove-AppxPackage

#Movies and TV

Get-AppxPackage *ZuneVideo* | Remove-AppxPackage

#MS Office

Get-AppxPackage *MicrosoftOfficeHub* | Remove-AppxPackage

#People app

Get-AppxPackage *People* | Remove-AppxPackage

#Maps

Get-AppxPackage *WindowsMaps* | Remove-AppxPackage

#Help and tips

Get-AppxPackage *GetHelp* | Remove-AppxPackage

#Voice Recorder

Get-AppxPackage *WindowsSoundRecorder* | Remove-AppxPackage

#Sticky Notes

Get-AppxPackage *MicrosoftStickyNotes* | Remove-AppxPackage

#PowerAutomate

Get-AppxPackage *PowerAutomateDesktop* | Remove-AppxPackage

#Xbox and related apps

Get-AppxPackage *Xbox* | Remove-AppxPackage

#Feedback Hub

Get-AppxPackage *WindowsFeedbackHub* | Remove-AppxPackage

#Microsoft To-Do

Get-AppxPackage *Todos* | Remove-AppxPackage

#Calculator

Get-AppxPackage *WindowsCalculator* | Remove-AppxPackage

#Alarms and Clocks

Get-AppxPackage *WindowsAlarms* | Remove-AppxPackage

#Teams/Chat

Get-AppxPackage *Teams* | Remove-AppxPackage

#Your Phone

Get-AppxPackage *YourPhone* | Remove-AppxPackage

#Spotify

Get-AppxPackage *SpotifyAB.SpotifyMusic* | Remove-AppxPackage

#Screen & Sketch/Snipping tool

Get-AppxPackage *ScreenSketch* | Remove-AppxPackage

#Solitaire Collection

Get-AppxPackage *MicrosoftSolitaireCollection* | Remove-AppxPackage

#Photos

Get-AppxPackage *Windows.Photos* | Remove-AppxPackage

#OneDrive

Get-AppxPackage *OneDriveSync* | Remove-AppxPackage

#Skype

Get-AppxPackage *SkypeApp* | Remove-AppxPackage

#Xbox Console Companion

Get-AppxPackage *GamingApp* | Remove-AppxPackage
Note. An error may occur during Sysprep after you are removing some of the built-in Microsoft Store apps (check c:\Windows\Panther\setuperr.log):
Error SYSPRP Package <PackageFullName> was installed for a user, but not provisioned for all users. This package will not function properly in the sysprep image.
Error SYSPRP Failed to remove apps for the current user: 0x80073cf2.
This is a known Windows 10/11 issue and you can fix it according to the guide.
Generalizing Windows image using SysPrep
If your computer has a static IP address, change the configuration to get it automatically (from a DHCP server). Open the network adapter settings, select the IPv4 protocol properties and select Obtain an IP address automatically.

Or, you can use the following PowerShell script to automatically get an IP address from a DHCP server:
$IPType = "IPv4"

$adapter = Get-NetAdapter | ? {$_.Status -eq "up"}

$interface = $adapter | Get-NetIPInterface -AddressFamily $IPType

If ($interface.Dhcp -eq "Disabled") {

If (($interface | Get-NetIPConfiguration).Ipv4DefaultGateway) {

$interface | Remove-NetRoute -Confirm:$false

}

$interface | Set-NetIPInterface -DHCP Enabled

$interface | Set-DnsClientServerAddress -ResetServerAddresses

}
Now cleanup your image:
- Use the Disk Clean-up tool (cleanmgr.exe) to remove junk and unnecessary files from your computer’s hard disk;

- Empty the Recycle Bin;
- Remove temporary files and folders (%LocalAppData%\temp, C:\Windows\Temp, etc.);
- Delete all local user profiles, except for the Administrator and Default profiles.
- Clean up the Web Cache files in the Administrator and Default profiles:
rd /s /q "C:\Users\Administrator\AppData\Local\Microsoft\Windows\WebCache"

rd /s /q "C:\Users\Administrator\AppData\Local\Microsoft\Windows\INetCache"

del /f /q /a:sh "C:\Users\Administrator\AppData\Local\Microsoft\Windows\WebCacheLock.dat"

rd /s /q "C:\Users\Default\AppData\Local\Microsoft\Windows\WebCache"

rd /s /q "C:\Users\Default\AppData\Local\Microsoft\Windows\INetCache"

del /f /q /a:sh "C:\Users\Default\AppData\Local\Microsoft\Windows\WebCacheLock.dat"
After everything is configured, you can expand the SysPrep windows and select the options:

- System Cleanup Action: Enter System Out-of-Box Experience (OOBE);
- Shutdown Options: Shutdown;
- Check the Generalize option.

Once the Windows image has been generalized, it will start in Out-of-Box Experience (OOBE) mode and reassign unique SIDs.
Using Answer Files with Sysprep for Unattended Windows 10/11 Installation
SysPrep allows using an answer file for unattended Windows installation. This step is optional (used to specify various image deployment options). You can skip this step, and go straight to the step of capturing a Windows image.
The answer file can contain the answer to any question you are asked during Windows Setup (region, language, product key, keyboard, account, and privacy setting, etc.). You can use the answer file to skip some of the steps during the out-of-box experience (OOBE).
How to create Windows Answer File using Windows System Image Manager
The answer file is a file with XML syntax. The preferred tool for generating the correct answer file is the Windows System Image Manager (Windows SIM).
Download the Windows Assessment and Deployment Kit (ADK) for Windows 10 or ADK for Windows 11. Use the ADK version for the Windows version you want to deploy.
Run the adksetup.exe file as an administrator. Then select Deployment Tools to install (it includes the latest version of DISM and Windows SIM).

You will need the install.wim file with the Windows image you want to deploy. You can copy the install.wim file from the sources directory on the installation Windows ISO image. If only the install.esd file is available in the sources directory, you can convert ESD to WIM to get install.wim.
Let’s create an answer unattended file for Windows 10 22H2.
Run the Windows System Image Manager as an administrator (C:\Program Files (x86)\Windows Kits\10\Assessment and Deployment Kit\Deployment Tools\WSIM\imgmgr.exe). Select File > New Answer File.

Specify the path to your install.wim for which you want to create an answer file for.
Wait for the SIM to mount the Windows installation image and create the catalog file (.clg). This will take some time, after which the install_Windows 10 Pro.clg file will appear in the directory with the install.wim file.

Note. If you try to open the install.wim file of your Windows 10 build using WSIM from an older version of the ADK, you may receive an error message:
Windows SIM was unable to generate a catalog.

In order to fix this error, you need to install the latest ADK and WSIM available for your Windows build.
Select your Windows 10 edition. If there is only one edition of Windows in your install.wim file, it will be selected automatically.
Using WSIM, you can configure various parameters for the answer file. For example, you can configure the Windows product key (if you are using KMS server or MAK keys), time zone, organization and owner info, default language and region settings, input locales, etc.
First of all, we need to do the most important thing: tell Sysprep to copy all our customizations to the default user profile.
To do this, find the amd64_Microsoft-Windows-Shell-Setup__neutral in the Windows Image section. Right-click on it and select Add Setting to Pass 4 specialize.

Then, in the Answer File panel, expand section 4 Specialize > amd64_Microsoft-Windows-Shell-Setup__neutral. Set the CopyProfile value to TRUE.

Additionally, you can configure the following options in the Answer file.
Pass 1 Windows PE
Choosing an installation language in WinPE:
Microsoft-Windows-International-Core-WinPE

InputLocale: en-US;

SystemLocale: en-US

UILanguage: en-US

UserLocale: en-US
Pass 7 oobeSystem
Create a local administrator account and set a password for it:
Microsoft-Windows-Shell-Setup –> UserAccounts –> LocalAccounts -> Insert New Local Account

Name: admin

Group: Administrators

All empty (blank) answer file parameters must be removed.
To check the settings in answer file, select in Tools > Validate Answer File option. If you configured everything correctly, a message should appear in the Messages console: No warning or errors.

Save the answer file by choosing File > Save Answer File As > autounattend.xml.
Now you can close WSIM.
Generalize Windows Image Using Answer File
Now you can use your autounattend file to Sysprep your Windows image. Run the command in the elevated command prompt (replace the path to autounattend.xml with yours):
c:\windows\System32\Sysprep\sysprep.exe /generalize /oobe /shutdown /unattend:C:\ps\autounattend.xml

Hint. If you want to capture a Windows image running in a virtual machine, you can use the special Sysprep switch /mode:vm:
C:\windows\system32\sysprep\sysprep.exe /generalize /oobe /mode:vm /shutdown /unattend:C:\ps\autounattend.xml
With the /generalize option the Sysprep will remove unique computer data. This allows you to safely deploy this reference Windows image on other workstations or laptops. After executing the command, the computer will shut down.
Capture Reference Windows 10/11 Using DISM
After shutting down your computer, you can capture a customized Windows image. You can use special tools to capture a Windows image (such as MDT) or use DISM. Below we will consider the DISM option.
Boot the reference computer into Windows PE. The easiest way to access WinPE is to boot the computer from the Windows 10/11 installation media, or recovery drive.
Press Shift + F10 on the first setup screen.
Type Diskpart command. Use the list vol command to identify the drive letters. In this example, the installed Windows image is located on drive D.
Capture the image with the command:
dism /capture-image /imagefile:E:\win10referenceimg.wim /capturedir:d:\ /name:"Win10 Pro reference image"

- /Capturedir — the reference Windows folder.
- /imagefile — the target WIM image file you want to create. Connect an additional disk or USB flash drive to the computer and save the image to it (do not specify the Windows partition drive letter here);
- /Compress — use the /compress:maximum option for best WIM image file reduction (this will increase the image capture time, but save a disk space).

Hint. You can capture your reference Windows image and immediately save it to a shared network folder on your file server (or MDT host). To do this, you need to mount a network drive in WinPE before running the dism /capture-image command:
- Initialize network in WinPE and get IP address from DHCP server:
wpenit
- Map a shared network folder using the net use command:
Net use E: \\192.168.31.20\share

- Provide user credentials to access shared folder;
- Now you can capture an image to a shared folder over the network.

Note. Note that the reference WIM image you get may be significantly larger than the clean Windows 10 or 11 installation image.
Copy the reference WIM image you’ve got to the installation drive media (copy and replace file ..\sources\install.wim), or put it into your deployment software (MDT, SCCM).
Now you can deploy your customized Windows image to computers across the company using MDT, WDS, SCCM, etc.
Друзья, привет. В этой статье поговорим о штатной утилите Windows Sysprep. Её работа до сих пор на страницах сайта рассматривалась только в контексте использования инструмента, участвующего в процессе создания своих дистрибутивов операционной системы. Но эту утилиту можно использовать и в других целях. Что это за цели, и как в процессе их достижения применять Sysprep?
Sysprep – утилита, присутствующая на борту Windows 7-10 – является средством отвязки операционной системы от драйверов комплектующих конкретного компьютера и отдельных профильных данных.
Такая отвязка предусматривается преимущественно для подготовки эталонного образа Windows – состояния системы с внесёнными настройками и установленным софтом – к дальнейшему развёртыванию на множестве компьютерных устройств. Что всерьёз облегчает работу системщиков OEM-производителей и корпораций. Все те фирменные ноутбуки с предустановленными в среду Windows брендовыми надстройками и программным обеспечением, от которых попробуй ещё избавиться – это результат развёртывания на них операционной системы, эталонный образ которой создавался на базе чистого её дистрибутива и потом дорабатывался в режиме аудита. И в этом процессе на одном из этапов участвовала утилита Sysprep.
Sysprep производит удаление из Windows драйверов комплектующих компьютера, и при следующем запуске система автоматически устанавливает новые драйверы для, соответственно, новой конфигурации оборудования. Утилита также обнуляет SID, проводит очистку системного журнала событий, удаляет содержимое системной папки «Temp», удаляет точки отката – в общем, зачищает следы своей работы на текущем устройстве, чтобы с новым запуском Windows начать работу по-новому. Как если бы операционная система была только что установлена. При необходимости Sysprep может до трёх раз сбросить активацию системы.
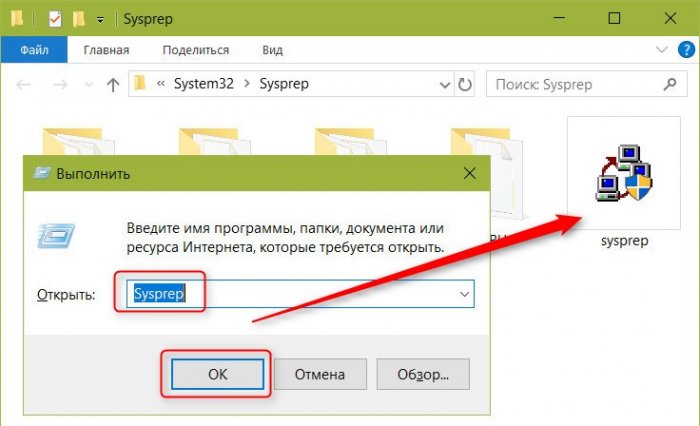
Чтобы запустить утилиту, жмём Win+R, вписываем «Sysprep» и в открывшейся системной папке двойным кликом открываем EXE-шник.
Для каких целей можно использовать эту утилиту?
Если вы, друзья, хотите создать свою сборку Windows – со своими предустановленными программами, внедрёнными обновлениями, выполненной активацией, изменёнными настройками и т.п., вы будете использовать Sysprep перед захватом настроенного образа системы. А как создаются свои сборки Windows, этому у нас на сайте посвящён целый раздел статей.
Замена важных компьютерных комплектующих типа материнской платы или процессора в системах Windows 8.1 или 10 обычно не влечёт за собой синий экран смерти. В большей степени этому подвержена Windows 7. Но акцент на слове «обычно», ситуации могут быть разные. Лучше всё же в любой версии системы перед заменой материнки или процессора выключить Windows с предварительным запуском Sysprep. Её запуск отвяжет систему от текущих драйверов устройств (т.е. попросту удалит их). И при следующем запуске компьютера драйверы установятся по-новому. Этот способ поможет не только избежать возможного появления синего экрана смерти, но и предотвратит ещё одну проблему, которая может проявится не сразу, а через какое-то время работы компьютера в новой конфигурации – конфликт старого и нового драйвера заменённого устройства.
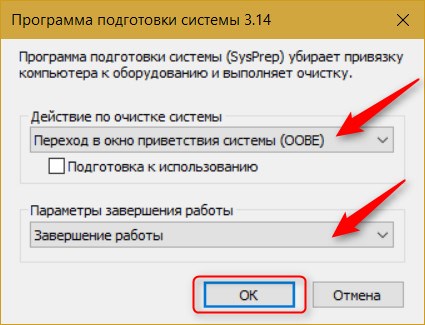
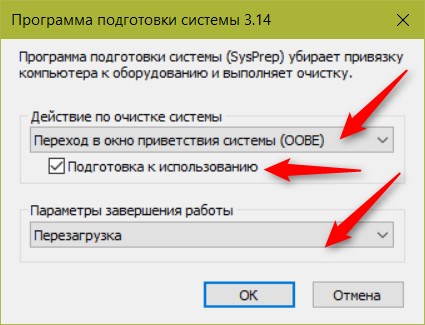
Запускаем Sysprep перед непосредственным выключением компьютера для замены в нём материнской платы или процессора. В окне утилиты выставляем действие «Переход в окно приветствия OOBE». В параметрах выключения выбираем «Завершение работы».

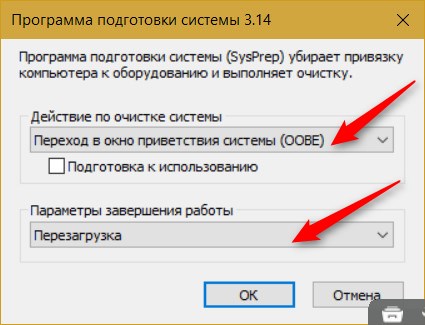
Если в процессе замены материнской платы или процессора Sysprep не использовалась, не беда, утилиту можно запустить в любой момент позднее. Если, конечно же, в этом есть необходимость — в работе Windows наблюдаются проблемы из-за того, что драйвер старого устройства конфликтует с драйвером нового. Запускаем Sysprep. В её окне выбираем переход в окно OOBE, а в параметрах завершения – перезагрузку.
Sysprep удалит драйвер старой материнки и процессора вместе с прочими драйверами. И, как и в предыдущем случае, при следующем запуске Windows они установятся по-новому. Это, кстати, универсальный способ решения проблем с драйверами. Его можно использовать и в других ситуациях – например, когда при сбое работы Windows или её некорректном обновлении до новой версии слетают драйверы устройств и потом не хотят устанавливаться. Sysprep может даже помочь в переустановке драйверов режима работы жёсткого диска IDE, AHCI, RAID, NVMe. Не уверен, что всегда, но в части случаев точно. Но вы можете попробовать: перед тем, как менять в BIOS режим работы жёсткого диска, сделайте сброс драйверов с помощью Sysprep.
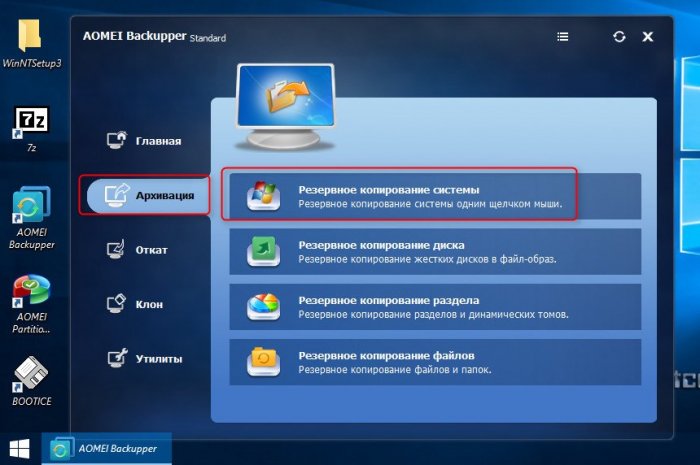
Чтобы можно было перенести свою наработанную Windows на другой компьютер, создатели ПО для резервного копирования в своих продуктах реализуют специальные технологии по отвязке драйверов комплектующих при восстановлении из бэкапа. Такие технологии есть, например, у бэкаперов Acronis и AOMEI – соответственно, Acronis Universal Restore и AOMEI Universal Restore. Есть такая технология также у EaseUS Todo Backup. Эти технологии, по сути, делают то же, что и Sysprep, только не перед захватом образа, а на этапе развёртывания Windows, т.е. восстановления её из бэкапа. Но тогда как Sysprep можно пользоваться совершенно бесплатно, она является частью Windows, технологии типа Universal Restore обычно поставляются в платных редакциях программ для резервного копирования. И если, к примеру, Acronis весь платный, то с помощью средств резервного копирования AOMEI или EaseUS и участия утилиты Sysprep совершенно бесплатно можем перенести свою рабочую Windows на другой компьютер. Ведь у программ AOMEI Backupper и EaseUS Todo Backup базовый функционал, куда входит обычное резервное копирование и восстановление Windows, бесплатный.
Чтобы перенести наработанную Windows на другую конфигурацию железа, подготавливаем загрузочный носитель с программой для резервного копирования. Если вам, друзья, нравится программа EaseUS Todo Backup, вот статья, как создать загрузочную флешку и работать с неё, создавая системные бэкапы и восстанавливая их. А если вам нравится программа AOMEI Backupper, можете скачать готовый ISO-образ с ней для записи на флешку или оптический диск.
Загрузочный носитель с бэкапером подготовили, теперь запускаем Sysprep. В её окне выбираем переход в окно OOBE, а в параметрах выключения – завершение работы.
Запускаем компьютер с загрузочного носителя с бэкапером. Создаём резервную копию уже отвязанной от драйверов Windows.
При создании указываем местом хранения резервной копии либо вместительную флешку, либо USB-HDD, либо внутренний жёсткий диск, который потом можно будет временно подключить к новому компьютеру. Далее подсоединяем флешку или жёсткий диск с резервной копией к другому компьютеру, загружаемся с загрузочного носителя с бэкапером и восстанавливаем Windows.

При восстановлении Windows её драйверы будут установлены по-новому.
Примечание: друзья, по теме переноса Windows на другой компьютер с отличным железом смотрите также детальный мануал с использованием разных инструментов в статье сайта «Как перенести Windows 10 на другой компьютер» (применимо также к Windows 7 и 8.1).
Ещё одна функция Sysprep – возможность сброса активации. В идеале эта функция предназначается, опять же, для отвязки эталонного образа Windows от активации и поставки модифицированного дистрибутива системы без вшитого ключа продукта. Но поскольку нигде не написано и мокрой печаткой не закреплено, что эту функцию можно использовать в других целях, сброс активации с помощью Sysprep знающие люди используют для продления 30-дневного триал-срока Windows 7. Активацию системы можно сбросить трижды, следовательно, в целом триал-срок работы с «Семёркой» может составить 120 дней.
Как сбросить активацию Windows 7? Запускаем Sysprep. В её окне выбираем переход в окно OOBE, ниже ставим галочку «Подготовка к использованию», в параметрах завершения указываем перезагрузку.
Примечание: Сбросить активацию системы можно и другим способом — с помощью командной строки. Этот способ мы рассматривали в статье о Windows Embedded 7.
Сброс активации с помощью Sysprep также можно использовать для продления срока бесплатных пробных лицензий Evalution ознакомительных Windows. Такие предлагаются IT-специалистам компаний в рамках проекта TechNet Evaluation Center компании Microsoft. В число таких ознакомительных систем входит Windows 10 Корпоративная и LTSB. Их официально можно бесплатно использовать 90 дней, а потом нужно либо покупать ключ продукта, либо переустанавливать систему, чтобы заново начался отсчёт дней Evalution-лицензии. Но если под конец 90-дневного срока сбросить активацию Evalution с помощью Sysprep, Windows не нужно будет переустанавливать ещё 90 дней, а потом ещё таких же 90 дней. В итоге получим 360 дней бесплатного использования.
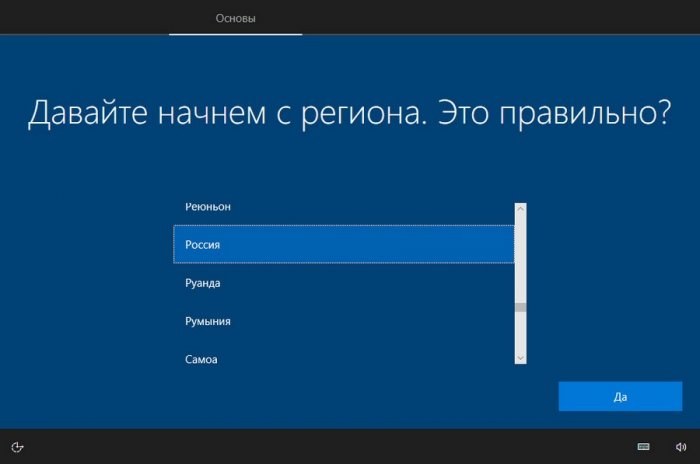
После использования Sysprep с указанным действием «Переход в окно приветствия OOBE» Windows запустится на этапе задания региональных и профильных параметров. Этот этап мы всегда проходим при установке системы. Здесь нужно указать страну, раскладку клавиатуры и создать новую локальную учётную запись.
В эту новую учётную запись можно даже не входить, если она сама автоматом не запустится. Если запустится, выходим на экран блокировки, заходим в свою старую учётную запись.
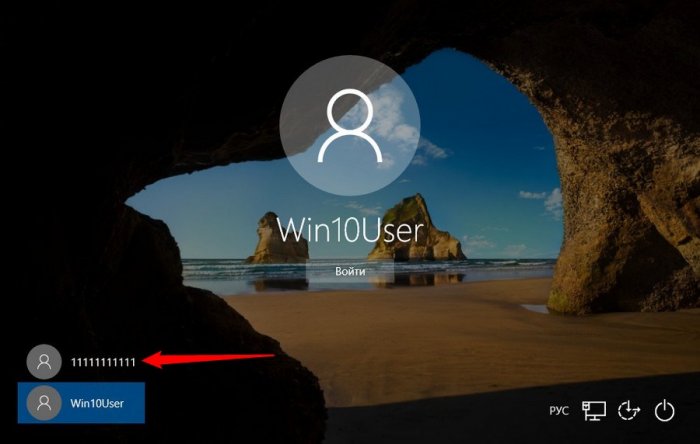
И потом из своей учётки можем удалить новую учётку.
- В процессе использования утилиты sysprep у вас могут выходить различные ошибки, читайте о них в отдельной статье
-
О том, как использовать Sysprep при переносе Windows написано здесь.
-
Home
-
News
- Detailed Guide to Run Sysprep on Windows 10/11
Detailed Guide to Run Sysprep on Windows 10/11
By Aurelie | Follow |
Last Updated
What is Sysprep? How to run Sysprep to prepare a system image? If you have no idea about these questions. You’ve come to the right place. In this post from MiniTool Website, you can get all the answers you want. Scroll down to get more details now!
What Is Sysprep?
Sysprep, also known as System Preparation tool, is designed to duplicate, test, and deliver new installations for the Windows OS based on an established installation. Sysprep generalizes Windows by removing security identifiers (SIDs) and other computer-specific information.
What is SID? Every time you install Windows on a computer, the OS will assign a security identifier to that particular installation. If you intend to create a system image to install the same OS on multiple computers, the SID information will also be copied to other devices as well.
Once there’s more than one computer with the same SID on the same network, this might lead to some problems. In this case, you can run Sysprep to clear the SID or GUID information. When you are running Sysprep, you can configure whether the PC will boot into audit mode or to the Out-of-Box Experience.
How to Run Sysprep Manually?
First, you can access the Sysprep.exe file to run it manually. To do so:
Step 1. Press Win + R to open the Run box.
Step 2. Type sysprep and hit Enter to locate C:\Windows\System32\Sysprep.
Step 3. Double-click on the executable file of sysprep > tick Generalize > select Shutdown from the Shutdown Options drop-down menu > hit OK to save the changes. Then, the computer generalizes the image and shuts down.
How to Run Sysprep via Command Prompt?
Another way to run Sysprep is to run it via CMD. To do so:
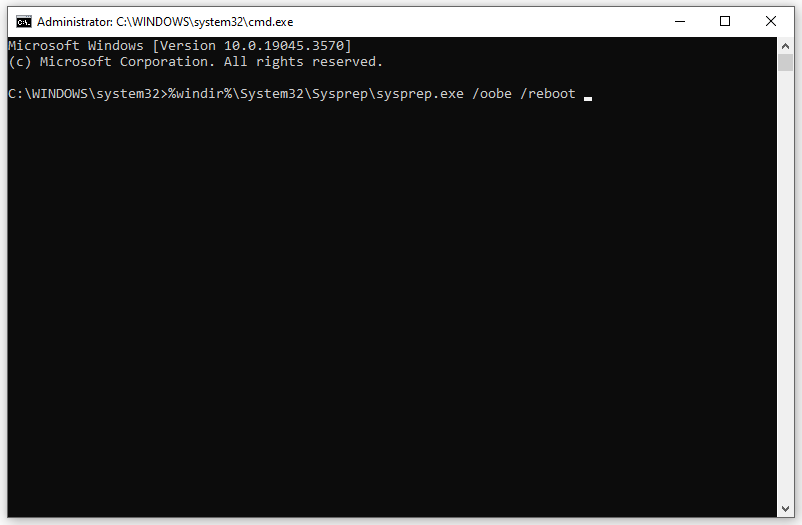
Step 1. Launch Command Prompt with administrative rights.
Step 2. In the command window, type %windir%\System32\Sysprep\sysprep.exe /oobe /reboot and hit Enter.
After deploying system image to multiple devices, it is necessary to create a backup of your data with MiniTool ShadowMaker on a regular basis. When it comes to backup, MiniTool ShadowMaker stands out from the similar products in the market.
This free Windows backup software supports backing up files, folders, systems, disks, and partitions on Windows 11/10/8/7. When your computer suffers from an unexpected data loss, you can recover your data easily with the backup. Now, let’s see how to create a backup with it:
Step 1. Launch MiniTool ShadowMaker and go to the Backup page.
MiniTool ShadowMaker TrialClick to Download100%Clean & Safe
Step 2. In this page, you can choose the items you want to backup in SOURCE. As for a destination path, go to DESTINATION. Here, selecting an external hard drive or a USB flash drive is more preferred.
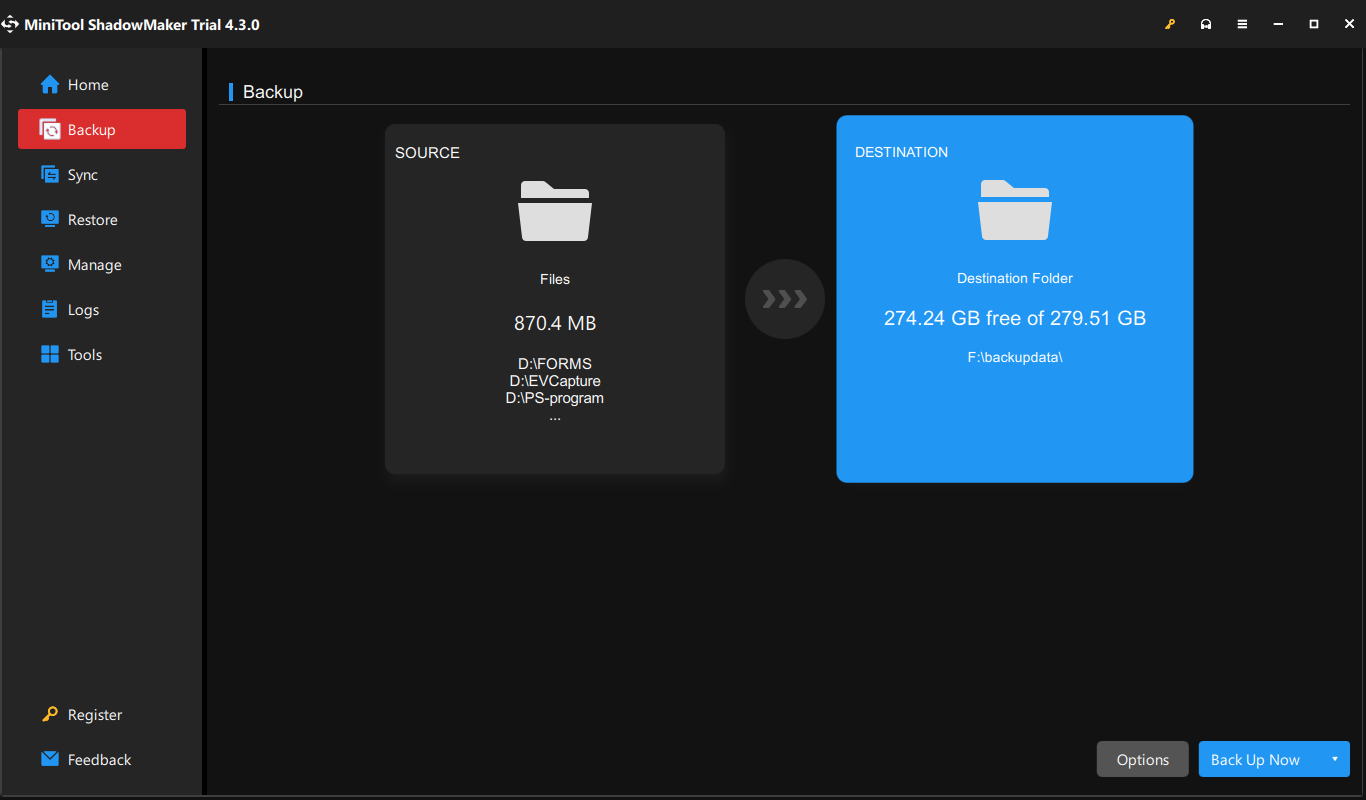
Step 3. After making your choice, click on Back Up Now to start the process immediately.
Tips:
As for create a scheduled backup, see this guide — How to Set a Scheduled Backup to Protect Your Data.
Final Words
This post illustrates the definition of Sysprep and how to use Sysprep on Windows devices. More importantly, we introduce you a handy tool called MiniTool ShadowMaker to back up your data. Get the free trial and have a try!
About The Author
Position: Columnist
Aurelie is a passionate soul who always enjoys researching & writing articles and solutions to help others. Her posts mainly cover topics related to games, data backup & recovery, file sync and so on. Apart from writing, her primary interests include reading novels and poems, travelling and listening to country music.
- Заметки
- Windows
06.10.2020
Что такое Sysprep
Sysprep это стандартная программа для подготовки настроенной системы для переноса на новое железо, убирает любые идентифицирующие данные устройств и удаляет все драйвера комплектующих вместе с
системным журналом. В итоге после её применения мы получаем новую, чистую систему, но со своими старыми файлами и настройками. Программа появилась на борту системы уже в Windows NT 4.0 (1996 год).
Для чего нужен Sysprep?
Sysprep нужен для создания различных образов и сборок windows для последующего развёртывания на клиентских компьютерах, для развёртывания/клонирования виртуальных машин или если вы собираетесь полностью обновить железо на своём компьютере.
Установка Sysprep
Данная утилита не поставляется как отдельное программное обеспечение, а идёт сразу вместе с установленной ОС Windwows и её можно найти в каталоге sysprep:
%WINDIR%\system32\sysprep
Запуск Sysprep
Программу необходимо запускать от имени Администратора и желательно из под учётной записи Администратора. Для запуска программы перейдём в каталог программы, выполнив WIN + R команду:
Sysprep
После запуска программы мы увидим следующее диалоговое окно:
Переход в окно приветствия системы (OOBE) означает что после завершения сброса при следующем запуске появится настройка первого запуска, где мы будем указывать имя пользователя, давать имя своему компьютеру и т.д,
а галочка напротив параметра Подготовка к использованию в Sysprep поможет нам сбросить активацию ОС Windows.
При развертывании Windows распространенной практикой является настройка параметров первого запуска компьютеров, на которых выполняется развертывание. Эту процедуру также называют OOBE.
Параметры завершения работы дают нам выбор:
- Завершение установки — выбираем в том случае, когда мы собираемся заменить материнскую плату или процессор. А сам сброс мы выподняем ДО (!) замены оборудования
- Перезагрузка — данный пункт нам нужен в случае сброса лицензии или устранения каких-то ошибок на текущей конфигурации компьютера (без замены комплектующих) для чистой установки всех необходимых драйверов.
- Выход — соответственно завершает сеанс пользователя по завершению.
После выбора всех параметров запускаем очистку sysprep OK
Sysprep ошибка
Произошла неустранимая ошибка при выполнении sysprep
Такая ошибка появляется в том случае, если срабатывает ограничение на количество запусков. По умолчанию в Sysprep заложено ограничение на 3 запуска. Но выход есть, обратимся к реестру
WIN + R
regedit
Идём по ветке:
HKLM/SOFTWARE/Microsoft/Windows NT/CurrentVersion/SoftwareProtectionPlatform
И меняем значения параметра SkipRearm на 1 или 0. После этого проблема должна уйти.
Ещё бывает, что собьётся другая настройка, но это реже случается. Переходим по ветке в реестре:
HKLM/SYSTEM/Setup/Status/SysprepStatus
И у параметра GeneralizationState выставляем значение 7. И, если есть, у параметра CleanupState выставляем значение 2
Если уже и это не помогло, то запускаем Командную строку от имени Администратора и выполняем последовательно следующие две команды:
msdtc -uninstall
msdtc -install
Тем самым мы перезапустим службу координатора распределенных транзакций MSDTC. И после этого для верности перезапустите машину. После этого ошибка должна уйти 100%
Sysprep не удалось проверить установку Windows
Иногда возникает ошибка проверки установки Windows. Для решения этой ошибки мы переходим в каталог:
C:\Windows\System32\Sysprep\Panther
И открываем на редактирование файл setupact.log. Этот файл представляет собой журнал программы sysprep. И смотрим что за ошибку мы поймали.
Отключение BitLocker
Error SYSPRP BitLocker-Sysprep: BitLocker is on for the OS volume. Turn BitLocker off to run Sysprep. (0x80310039)
Error [0x0f0082] SYSPRP ActionPlatform::LaunchModule: Failure occurred while executing 'ValidateBitLockerState' from C:\Windows\System32\BdeSysprep.dll
If you run manage-bde -status command it will show the following:

Disk volumes that can be protected with
BitLocker Drive Encryption:
Volume C: [System]
В этом случае для устранения ошибки нам нужно отключить BitLocker (это понятно из самой ошибки, если просто прочитать её). Чаше всего проблема возникает на ноутбуках с Windows 10, которые используют шифрование InstantGo. Чтобы
отключить BitLocker запускаем Командную строку от имени Администратора и выполняем следующую команду:
manage-bde -off X:
Или командой через PowerShell:
Disable-Bitlocker –MountPoint "X:"
Где X — это буква вашего системного диска.
Не удается удалить современные приложения у текущего пользователя
Error SYSPRP Package Application_2.2.5.666_x64__xxxx was installed for a user, but not provisioned for all users. This package will not function properly in the sysprep image.
Error SYSPRP Failed to remove apps for the current user: 0x80073cf2.
Такая ошибка появляется, когда вы устанавливали приложение из Windows Store или криво его удалили  Удалим через PowerShell командой:
Get-AppxPackage –Name Application | Remove-AppxPackage
Remove-AppxProvisionedPackage -Online -PackageName Application_2.2.5.666_x64__xxxx
Заключение
Вот собственно и всё, не знаю что ещё написать по такой небольшой, но очень полезной утилите. Надеюсь я вам помог разобраться с инструментом Sysprep, спасибо что заглянули 
Автору на кофе ☕ или просто поднять мотивацию писать больше статей для вас 😉 !
Отдельное спасибо всем, кто отправляет донатики 😀! Очень приятно и неожиданно. Благодаря вам сайт может и в дальнейшем обходиться без рекламных баннеров.