
With Windows System Preparation Tool (Sysprep) tool, you can create customized Windows 10 or 11 reference images. You can install apps, drivers, and slipstream updates to a Windows installation image. After that, you can deploy Windows image to users’ computers within your company.
In this article, we’ll show how to use Sysprep to create the reference image of Windows 10 21H1 (19043.1320) and Windows 11 21H2 (22000.258) builds. Use this guide to create a Windows image that is ready and you can deploy it on a physical or virtual machine (VDI solutions).
What is SysPrep?
Before deploying a Windows image on users’ computers, you need to configure a reference image. Install the necessary drivers, applications, and configure other Windows settings. The resulting image must be generalized by deleting computer-specific information (SID, GUID, etc.). You can generalize the Windows image with the Sysprep utility.
Sysprep allows you to delete all the information related to a specific operating system instance. This includes unique identifiers (SID, GUID, etc.), the Windows activation reset, and installing apps and drivers in the Audit mode.
All the configuration of the operating system before you run Sysprep remains untouched. This includes the installed software, personalization and network settings, installed and pinned Metro apps on the start screen, File Explorer, and other parameters.
In Windows 10/11 and Windows Server 2019/2022, the Sysprep.exe utility is located in folder C:\Windows\System32\sysprep.

After you installed a prepared reference Windows 10 image and configured in the correct way (with certain installed software, with the operating system settings, with the specified permissions and restrictions), you can deploy it to all computers of the company using MDT, WDS, SCCM or manually (take a look at Deploying Windows 10 with MDT and WDS).
Benefits and Disadvantages of Using Sysprep
Syprep’s benefits:
- The customized reference Windows 10/11 image allows you to quickly deploy a ready-to-work environment on a user’s computer. You do not need to install drivers, programs, security updates. Also no need to configure custom Windows Settings on each computer;
- You can deploy the Windows image using the answer (unattended) file. After the installation, you do not need to select the various options on the initial Windows 10 setup screen;
- At any time, you can extract the image, make changes to it, and update it with the deployment tool.
Disadvantages of Sysprep:
- The size of the Windows reference image can be significantly larger than the clean Windows 10 or 11 installation ISO image;
- Periodically you have to update the versions of programs and drivers injected into the reference image, and install the latest security updates;
- You cannot use the Sysprep tool on domain-joined computers. Sysprep will remove the computer from the AD domain;
- You can run Sysprep up to 1001 times on a single Windows image. After reaching this limit, you should recreate your Windows image.
How to Create a Windows 10 or 11 Reference Image?
You can create your reference WIM image of Windows 11 or 10 through the following steps:
- Perform clean Windows 10/11 install from the ISO image, then enter the Audit Mode;
- Install apps, drivers, and configure the system settings;
- Prepare the operating system environment using the Sysprep utility;
- Boot into Windows PE and capture an image using the DISM tool.
Then, the resulting image WIM can be added to the installation disk or deployed using different tools such as MDT, WDS, DISM, or ImageX.
Customizing Windows 11 and 10 in Audit Mode with Sysprep
You need to customize your reference Windows Image in the Audit Mode. On the installed Windows 10/11 OS, you can boot Windows to Audit Mode or OOBE by pressing Shift + Ctrl + F3 on the OOBE (out-of-box experience user experience), or the Windows Welcome screen. You can also enter Audit Mode using Sysprep. To do this, open the Sysprep folder with File Explorer, hold down Shift, right-click on an empty space and select the Open PowerShell windows here or Open in Windows Terminal option.
Then run the command:
C:\windows\system32\sysprep\sysprep.exe

In the System Preparation Tool window, select the options:
- System Cleanup Action: Enter System Audit mode;
- Shutdown Options: Reboot;
- Press the OK button.
In our case, Sysprep is returning the following error:
System Preparation Tool 3.14
Sysprep was not able to validate your Windows installation. Review the log file at %WINDIR%\System32\Sysprep\Panther\setupact.log for details. After resolving the issue, use Sysprep to validate your installation again.
To find out the reason why Sysprep cannot start on your computer, press Win + R and run the command:
%WINDIR%\System32\Sysprep\Panther\setupact.log
Look for the Error lines in the setupact.log file. In our case, the error looks like this:
2021-11-19 06:12:56, Error SYSPRP Sysprep_Clean_Validate_Opk: Audit mode cannot be turned on if reserved storage is in use. An update or servicing operation may be using reserved storage.; hr = 0x800F0975
2021-11-19 06:12:56, Error SYSPRP ActionPlatform::LaunchModule: Failure occurred while executing ‘Sysprep_Clean_Validate_Opk’ from C:\Windows\System32\spopk.dll; dwRet = 0x975
2021-11-19 06:12:56, Error SYSPRP SysprepSession::Validate: Error in validating actions from C:\Windows\System32\Sysprep\ActionFiles\Cleanup.xml; dwRet = 0x975
2021-11-19 06:12:56, Error SYSPRP RunPlatformActions:Failed while validating Sysprep session actions; dwRet = 0x975
2021-11-19 06:12:56, Error [0x0f0070] SYSPRP RunDlls:An error occurred while running registry sysprep DLLs, halting sysprep execution. dwRet = 0x975
2021-11-19 06:12:56, Error [0x0f00d8] SYSPRP WinMain:Hit failure while pre-validate sysprep cleanup internal providers; hr = 0x80070975

In our case, the reason for the Sysprep error is specified here: “An update or servicing operation may be using reserved storage”. This means you cannot use Sysprep at this time, because your Windows image is locked by some changes. This can be installed updates, installation of Windows features, system programs, antiviruses, etc.
Go to Settings > Windows Updates. As you can see, there are several Pending Updates. Finish installing security updates, restart your computer, and run Sysprep again.

Tip. Another error “Sysprep was not able to validate your Windows installation” was covered in this guide.
The computer will automatically restart and boot to the Audit Mode. Windows automatically boots and logs in with the built-in administrator account when in the Audit Mode. Further, this account will be disabled.

Windows 11/10 will boot in this mode no matter how many times you reboot your computer until the Sysprep is running.
There is only one visible sign to understand that you’ve entered the Windows Audit Mode desktop — the Sysprep dialog in the middle of the display. Do not close the Sysprep utility window — you will need it at the end of the configuration step. Minimize it.
In Audit Mode, you can configure your Windows reference image. We will take a look at several popular steps that sysops configure most often in their reference image.
Step 1: Install OEM Information and Logo
You can set your company branded info in the computer properties windows. In this example, we will configure OEMLogo, Company name, tech support website, and working hours. The easiest way to configure these settings is through the registry. Create a text file oem.reg, and copy the following code into it:
Windows Registry Editor Version 5.00
[HKEY_LOCAL_MACHINE\SOFTWARE\Microsoft\Windows\CurrentVersion\OEMInformation]
“Logo”=”C:\\WINDOWS\\oem\\OEMlogo.bmp”
“Manufacturer”=”TheITBros, LLC”
“Model”=”Windows 10 Pro 21H1”
“SupportHours”=”9am to 5pm ET M-F”
“SupportURL”=”https://theitbros.com”
Note. First, create the graphic file C:\WINDOWS\oem\OEMlogo.bmp with your company logo.
To apply the reg file, double-click on it, and accept registry changes. As a result, these settings will be imported into the registry.

After rebooting in the System Properties, you can see the following branded info:

Step 2: Install the Drivers and Apps
You can install drivers and third-party programs you would like to see in your Windows 10/11 image.
You can install programs manually, or using the Windows 10 package manager — Chocolatey.
Now install the Chocolatey. To do this, run the PowerShell console with administrator privileges. Enter the following commands:
Set-ExecutionPolicy Bypass -Scope Process -Force; `
iex ((New-Object System.Net.WebClient).DownloadString('https://chocolatey.org/install.ps1'))

Restart the PowerShell console. Now you can install more programs with a single command.
Let’s say, we want to install Opera, Google Chrome, VLC media player, Adobe Acrobat Reader DC, 7Zip, K-Lite Codec Pack Full, and Zoomit using choco. Run the command:
choco install 7zip, Opera, googlechrome, vlc, adobereader, k-litecodecpackfull,zoom
Tip. You can find packages by their names with the command choco search opera.
On Windows 11, you can use the new built-in WinGet Package Manager to install the required software (about 3000 programs available in WinGet repo). To install the same set of programs, run the command:
winget install --id=7zip.7zip -e && winget install --id=Opera.Opera -e && winget install --id=Google.Chrome -e && winget install --id=VideoLAN.VLC -e && winget install --id=Adobe.Acrobat.Reader.32-bit -e && winget install --id=CodecGuide.K-LiteCodecPack.Full -e && winget install --id=Zoom.Zoom –e

Tip. You can use the WinGet online repository browser (https://winstall.app/) to select the programs you want to install and generate the WinGet installation script.

You can also install drivers for all computers and laptops models on which you want to deploy this reference Windows 10/11 image. Download and extract the driver packages to a specific directory. Then search for all *.inf files, and inject all the drivers described there to the Windows image with the command:
for /f %i in ('dir /b /s *.inf') do pnputil.exe -i -a %i
If you need to reboot Windows to install the application or update, you can do it. After reboot, the system will return to audit mode.
Note. You can clean up your driver repository from driver duplicates using our script.
Step 3: Disable Telemetry and Data Collection in Windows 10/11
Windows 10 and 11 collect information about the operation of users on the computer. Examples of handwriting and voice samples, location information, error reports, calendar contents — all of these can be sent to Microsoft servers.
If you do not want the OS sending data to Microsoft’s telemetry servers, you can disable the Telemetry and Data Collection services. Run the elevated Command prompt, and execute the following commands:
sc delete DiagTrack
sc delete dmwappushservice
echo ““ > C:\ProgramData\Microsoft\Diagnosis\ETLLogs\AutoLogger\AutoLogger-DiagTrack-Listener.etl
REG ADD "HKLM\SOFTWARE\Policies\Microsoft\Windows\DataCollection" /v AllowTelemetry /t REG_DWORD /d 0 /f
Also, you can disable tracking in Windows 10 and 11 using the DisableWinTracking tool from GitHub.
Step 4: Install Windows Security Update in Audit Mode
Starting with Windows 8.1, you cannot install updates using the Windows Update Center in the Settings panel in the auditing mode. The Windows Update Center checks if the system has completed the OOBE stage. If not, the update won’t be performed.
To update the system from the console, you can take the PSWindowsUpdate Module from TechNet Gallery.
Save the PSWindowsUpdate.zip archive to a USB drive, and (this is important!) right-click on it > Properties > Unblock.
Extract the PSWindowsUpdate.zip to both folders:
- %USERPROFILE%\Documents\Windows\PowerShell\Modules;
- %WINDIR%\System32\Windows\PowerShell\v1.0\Modules.
To download and install all available Windows updates, run the commands:
PowerShell -ExecutionPolicy RemoteSigned -Command Import-Module PSWindowsUpdate;
Get-WUInstall -AcceptAll -IgnoreReboot
That’s all! Available updates will be downloaded from the Windows Update servers and installed automatically.
Step 5: Uninstall Built-in Microsoft Store Apps
Also, you can uninstall built-in UWM apps, but it’s really up to you. So, if you don’t want to uninstall built-in apps, just skip this step.
Here is a list of the pre-installed Microsoft apps in Windows 10 21H1.
Get-AppxPackage *3dbuilder* | Remove-AppxPackage
Get-AppxPackage *windowsalarms* | Remove-AppxPackage
Get-AppxPackage *windowscalculator* | Remove-AppxPackage
Get-AppxPackage *windowscommunicationsapps* | Remove-AppxPackage
Get-AppxPackage *windowscamera* | Remove-AppxPackage
Get-AppxPackage *officehub* | Remove-AppxPackage
Get-AppxPackage *skypeapp* | Remove-AppxPackage
Get-AppxPackage *getstarted* | Remove-AppxPackage
Get-AppxPackage *zunemusic* | Remove-AppxPackage
Get-AppxPackage *windowsmaps* | Remove-AppxPackage
Get-AppxPackage *solitairecollection* | Remove-AppxPackage
Get-AppxPackage *bingfinance* | Remove-AppxPackage
Get-AppxPackage *zunevideo* | Remove-AppxPackage
Get-AppxPackage *bingnews* | Remove-AppxPackage
Get-AppxPackage *onenote* | Remove-AppxPackage
Get-AppxPackage *people* | Remove-AppxPackage
Get-AppxPackage *windowsphone* | Remove-AppxPackage
Get-AppxPackage *photos* | Remove-AppxPackage
Get-AppxPackage *bingsports* | Remove-AppxPackage
Get-AppxPackage *soundrecorder* | Remove-AppxPackage
Get-AppxPackage *bingweather* | Remove-AppxPackage
Get-AppxPackage *xboxapp* | Remove-AppxPackage
The list of built-in MS Store Apps on Windows 11 21H2 has changed. Use the following PowerShell script to remove the preinstalled Windows 11 apps:
Remove built-in MS Store Apps on Windows 11 21H2:
#AV1 Codec
Get-AppxPackage *AV1VideoExtension* | Remove-AppxPackage
#News app
Get-AppxPackage *BingNews* | Remove-AppxPackage
#Weather
Get-AppxPackage *BingWeather* | Remove-AppxPackage
#PowerShell
Get-AppxPackage *PowerShell* | Remove-AppxPackage
#WebP image support
Get-AppxPackage *WebpImageExtension* | Remove-AppxPackage
#HEIF image support
Get-AppxPackage *HEIFImageExtension* | Remove-AppxPackage
#Windows Terminal
Get-AppxPackage *WindowsTerminal* | Remove-AppxPackage
#Music app
Get-AppxPackage *ZuneMusic* | Remove-AppxPackage
#Movies and TV
Get-AppxPackage *ZuneVideo* | Remove-AppxPackage
#MS Office
Get-AppxPackage *MicrosoftOfficeHub* | Remove-AppxPackage
#People app
Get-AppxPackage *People* | Remove-AppxPackage
#Maps
Get-AppxPackage *WindowsMaps* | Remove-AppxPackage
#Help and tips
Get-AppxPackage *GetHelp* | Remove-AppxPackage
#Voice Recorder
Get-AppxPackage *WindowsSoundRecorder* | Remove-AppxPackage
#Notepad
Get-AppxPackage *WindowsNotepad* | Remove-AppxPackage
#MS Paint
Get-AppxPackage *Paint* | Remove-AppxPackage
#Sticky Notes
Get-AppxPackage *MicrosoftStickyNotes* | Remove-AppxPackage
#PowerAutomate
Get-AppxPackage *PowerAutomateDesktop* | Remove-AppxPackage
#Xbox and related apps
Get-AppxPackage *Xbox* | Remove-AppxPackage
#Feedback Hub
Get-AppxPackage *WindowsFeedbackHub* | Remove-AppxPackage
#Microsoft To-Do
Get-AppxPackage *Todos* | Remove-AppxPackage
#Calculator
Get-AppxPackage *WindowsCalculator* | Remove-AppxPackage
#Alarms and Clocks
Get-AppxPackage *WindowsAlarms* | Remove-AppxPackage
#Teams/Chat
Get-AppxPackage *Teams* | Remove-AppxPackage
#Microsoft Edge
Get-AppxPackage *MicrosoftEdge* | Remove-AppxPackage
#Your Phone
Get-AppxPackage *YourPhone* | Remove-AppxPackage
#Spotify
Get-AppxPackage *SpotifyAB.SpotifyMusic* | Remove-AppxPackage
#Screen & Sketch/Snipping tool
Get-AppxPackage *ScreenSketch* | Remove-AppxPackage
#Solitaire Collection
Get-AppxPackage *MicrosoftSolitaireCollection* | Remove-AppxPackage
#Photos
Get-AppxPackage *Windows.Photos* | Remove-AppxPackage
#OneDrive
Get-AppxPackage *OneDriveSync* | Remove-AppxPackage
#Skype
Get-AppxPackage *SkypeApp* | Remove-AppxPackage
#Xbox Console Companion
Get-AppxPackage *GamingApp* | Remove-AppxPackage
Copy the list of commands for your Windows build, paste them into the PowerShell console, and press Enter:
Generalizing Windows 10/11 Image Using Sysprep
If your computer has a static IP address configured, specify that the address should be obtained automatically (from a DHCP server). You can do that in the network adapter settings.

Or, you can use the following PowerShell script to automatically get an IP address from a DHCP server:
$IPType = "IPv4"
$adapter = Get-NetAdapter | ? {$_.Status -eq "up"}
$interface = $adapter | Get-NetIPInterface -AddressFamily $IPType
If ($interface.Dhcp -eq "Disabled") {
If (($interface | Get-NetIPConfiguration).Ipv4DefaultGateway) {
$interface | Remove-NetRoute -Confirm:$false
}
$interface | Set-NetIPInterface -DHCP Enabled
$interface | Set-DnsClientServerAddress -ResetServerAddresses
}
After everything is configured, you can run the Sysprep and select the options:
- System Cleanup Action: Enter System Out-of-Box Experience (OOBE);
- Shutdown Options: Shutdown;
- Check the Generalize option.

After generalizing the Windows image, it will start from Out-of-Box Experience (OOBE) mode and reassign unique SIDs during the first boot.
Using Answer Files with Sysprep for Unattended Windows 10/11 Installation
You can use an answer file together with the System Preparation (Sysprep) tool. It allows configuring unattended Windows Setup settings. This step is optional (used to automatically specify various parameters that must be configured when the image is at first run). You can skip this step, and go straight to the step of capturing a Windows image.
The answer file may contain the answer to each question. This must be selected when installing Windows and choosing the initial settings (region, language, product key, keyboard, account, and privacy setting, etc.). Follow the steps during the out-of-box experience (OOBE).
Due to the answer file, the number of installer screens is significantly reduced.
How to Create Windows 10 Answer File Using Windows System Image Manager?
You can create an answer file manually (this is simple XML). But it’s more convenient to generate the correct answer file using the Windows System Image Manager (SIM) tool. You can do it from the Windows Assessment and Deployment Kit (ADK).
Download the Windows Assessment and Deployment Kit (ADK) for Windows 10 or ADK for Windows 11. Use the ADK version for the Windows version you want to deploy.
Run the adksetup.exe file with administrator privileges. Then select Deployment Tools to install (it includes the latest version of DISM and Windows System Image Manager).

You will need install.wim file with the Windows 10 or image you want to deploy. You can copy the install.wim file from the sources directory on the installation Windows 10 ISO image. If only the install.esd file is available in the sources directory, you can convert it to the install.wim.
Let’s create an answer unattended file for Windows 10 21H1.
Run the Windows System Image Manager with administrator privileges (C:\Program Files (x86)\Windows Kits\10\Assessment and Deployment Kit\Deployment Tools\WSIM\imgmgr.exe). Select File > New Answer File.

SIM will prompt you to specify a Windows image file for which you want to create an answer file. Specify the path to the before installed install.wim file.
Wait for the SIM to mount the Windows installation image and create the catalog file (.clg). This will take some time, after which the install_Windows 10 Pro.clg file will appear in the directory with the install.wim file.

Note. If you try to open the install.wim file of your Windows 10 build using WSIM from an older version of the ADK, you may receive an error message:
Windows SIM was unable to generate a catalog

In order to fix this error, you need to install the latest ADK and WSIM available for your Windows build.
Select your Windows 10 edition. If there is only one edition of Windows in your install.wim file, it will be selected automatically.
Using WSIM, you can configure various parameters for the answer file. For example, you can configure the Windows product key (if you are using KMS or MAK keys), time zone, organization and owner info, default language and region settings, input locales, etc.
First of all, we need to do the most important thing: to tell Sysprep to copy all our customizations to the default user profile.
To do this, in the Windows Image section, find the amd64_Microsoft-Windows-Shell-Setup__neutral section. Right-click on it and select Add Setting to Pass 4 specialize.

Then, in the Answer File panel, expand section 4 Specialize > amd64_Microsoft-Windows-Shell-Setup__neutral. Set the CopyProfile value to TRUE.

Additionally, you can configure the following options in the Answer file.
Pass 1 Windows PE
Choosing an installation language in WinPE:
Microsoft-Windows-International-Core-WinPE
InputLocale: en-US;
SystemLocale: en-US
UILanguage: en-US
UserLocale: en-US
The Windows 10 Product key:
Microsoft-Windows-Setup -> UserData -> ProductKey -> Key = {specify your MAK or GVLK key}
To automatically accept user agreement:
Microsoft-Windows-Setup -> UserData -> AccepptEula = True
Pass 7 oobeSystem
Skip Microsoft account creation screen (MSA):
Microsoft-Windows-Shell-Setup –> OOBE -> HideOnlineAccountScreens = True
Do not ask 3 security questions for your local account:
Microsoft-Windows-Shell-Setup –> OOBE -> ProtectYourPC= 3
Create a local administrator account and set a password for it:
Microsoft-Windows-Shell-Setup –> UserAccounts –> LocalAccounts -> Insert New Local Account
Name: admin
Group: Administrators

All empty (blank) answer file parameters must be removed.
To check the settings in answer files, select in Tools > Validate Answer File option. If you configured everything correctly, a message should appear in the Messages console: No warning or errors.

Save the answer file by choosing File > Save Answer File As > autounattend.xml.
Now you can close WSIM.
Generalize Windows Image Using Answer File
Now you can use your autounattend file to Sysprep your Windows 10 image. Run the elevated command prompt, and execute the following command (replace the path to autounattend.xml with yours):
c:\windows\System32\Sysprep\sysprep.exe /generalize /oobe /generalize /shutdown /unattend:C:\ps\autounattend.xml

With the /generalize option the Sysprep will remove unique computer data. This allows you to safely deploy this reference Windows 10 image on another workstation or laptop. After executing the command, the computer will shut down.
Capture Reference Windows 10/11 Using DISM after Generalize
After shutting down your computer, you can capture a customized Windows 10 image using MDT. You can also use other special tools for capturing a Windows image or using DISM. Below we will consider the DISM option.
Note. In previous versions of Windows, the ImageX tool could be used to capture and deploy an image. In the latest Windows 10 and 11 builds, you can do all this with DISM.
Boot the computer with the Windows reference image into Windows PE. You can do this by booting the computer from the Windows 10/11 installation disc, or recovery disc.
On the language selection screen, press Shift + F10.
In the command window that opens, type Diskpart command. Use the list vol command to identify the drive letters. In our example, the installed Windows image is located on drive D.
To capture the image, run the command:
dism /capture-image /imagefile:D:\win10referenceimg.wim /capturedir:d:\ /name:"Win10 Pro reference image"

/imagefile — the wim image file that we need to create;
/Capturedir — the reference Windows install folder.

Copy the wim Image file from a local disk. Import it into your deployment software (MDT, SCCM), or put it on the installation drive (rename the file to install.wim).
Windows 10 is here and for most admins this means frustration and challenges getting that first working Windows 10 image. As in my previous sysprep articles, I’ve put together a simple help guide to get you through this process. The aim is to achieve that first deployment image quickly and easily.
This article builds on my previous two sysprep articles:
- Windows 8/8.1
- Windows 7
Files you will need…
— Windows Assessment and Deployment Kit (Windows ADK) for Windows 10
From the kit you need to install the Deployment Tools which contains Windows System Image Manager (SIM) used for creating unattend .xml files. This should be install on a computer not being used for imaging.
- Home Page
- Direct Link
— Windows 10 image.wim
To create an unattend.xml file to be used for sysprep, you will also need the image.wim file located on the Windows 10 installation disk you used to Install Windows on your image computer (located in the Sources folder).
Let’s get started…
Install Windows 10 on your image computer. Here are initial settings I use.
Initial OS Load
During Install (leave defaults unless stated
- Choose the Custom (advanced) option: Setup partition/s as needed. Format your partition/s.
- Let’s get connected: Skip and click Next
- Get going fast: Customize settings
Customize Settings
- Personalization: All off
- Location: All off
- Browser and protection: All off
- Connectivity and error reporting: All off
- Choose how you’ll connect: Join a domain
- Who is going to use this PC?: Operator (no password)
Immediately After Install
- Logon using the Operator account you created above.
- Activate Windows then disconnect the computer from the Internet.
This will ensure that the built-in apps do not update otherwise your sysprep will fail. - Uninstall built-in apps using PowerShell. Run PowerShell as Administrator. Paste the following commands onto the PowerShell command line and hit Enter.
Get-AppxPackage *3dbuilder* | Remove-AppxPackage
                      Get-AppxPackage *windowsalarms* | Remove-AppxPackage
                      Get-AppxPackage *Appconnector* | Remove-AppxPackage
                      Get-AppxPackage *windowscalculator* | Remove-AppxPackage
                      Get-AppxPackage *windowscommunicationsapps* | Remove-AppxPackage
                      Get-AppxPackage *windowscamera* | Remove-AppxPackage
                      Get-AppxPackage *CandyCrushSaga* | Remove-AppxPackage
                      Get-AppxPackage *officehub* | Remove-AppxPackage
                      Get-AppxPackage *skypeapp* | Remove-AppxPackage
                      Get-AppxPackage *getstarted* | Remove-AppxPackage
                      Get-AppxPackage *zunemusic* | Remove-AppxPackage
                      Get-AppxPackage *windowsmaps* | Remove-AppxPackage
                      Get-AppxPackage *Messaging* | Remove-AppxPackage
                      Get-AppxPackage *solitairecollection* | Remove-AppxPackage
                      Get-AppxPackage *ConnectivityStore* | Remove-AppxPackage
                      Get-AppxPackage *bingfinance* | Remove-AppxPackage
                      Get-AppxPackage *zunevideo* | Remove-AppxPackage
                      Get-AppxPackage *bingnews* | Remove-AppxPackage
                      Get-AppxPackage *onenote* | Remove-AppxPackage
                      Get-AppxPackage *people* | Remove-AppxPackage
                      Get-AppxPackage *CommsPhone* | Remove-AppxPackage
                      Get-AppxPackage *windowsphone* | Remove-AppxPackage
                      Get-AppxPackage *photos* | Remove-AppxPackage
                      Get-AppxPackage *WindowsScan* | Remove-AppxPackage
                      Get-AppxPackage *bingsports* | Remove-AppxPackage
                      Get-AppxPackage *windowsstore* | Remove-AppxPackage
                      Get-AppxPackage *Office.Sway* | Remove-AppxPackage
                      Get-AppxPackage *Twitter* | Remove-AppxPackage
                      Get-AppxPackage *soundrecorder* | Remove-AppxPackage
                      Get-AppxPackage *bingweather* | Remove-AppxPackage
                      Get-AppxPackage *xboxapp* | Remove-AppxPackage
                      Get-AppxPackage *XboxOneSmartGlass* | Remove-AppxPackage
Open in new window
- Confirm that all the apps have been uninstalled. The shortcuts should no longer appear on the All Apps start menu.
- The following four apps should still be present as they cannot be removed.
- Cortana
- Contact Support
- Microsoft Edge
- Windows Feedback
- NOTE: In Windows 8.1 the Store app could not be uninstalled. This has changed in Windows 10. if you would like to make this available to all users then you should not permanently uninstall preinstalled apps. Useful apps that you may want users to have access to are: Store, Calculator and Voice Recorder
- Following the uninstall instructions above will allow the apps to be reinstalled on first log on for all new users. To remove certain apps you will need to script this at logon or just after the user logs in.
- Enable the local Administrator account. Set a password for the account. Password never expires (optional).
- Update the local Operator account. Set a password for the account. Password never expires (optional).
Now, install all necessary programs, run windows updates, configure the start screen, create local user accounts and configure the profile and OS the way you would like it to be. Find below some tips and tricks to add to your image. When completed, the computer should almost be ready to be sysprepped.
Additions – Image Tips and Tricks
Create SetupComplete.cmd File
On your image computer browse to the C:\Windows\setup directory. Within the Setup folder create a new folder named Scripts. Within the Scripts folder create a file named SetupComplete.cmd. Commands placed in this file will run just before you are presented with the Windows logon screen. We’ll add some commands to this file shortly.
Run First Log On Commands
You can do this a few ways, including through your unattend.xml file. I choose to create a script and call it when users log in for the very first time. Launch.exe will call Cleanup.exe, which contains the commands to run.
Here is the code for the Launch.vbs script:
Set WshShell = WScript.CreateObject("Wscript.Shell")
                      Set objFSO = CreateObject("Scripting.FileSystemObject")

                      strAppData = WshShell.ExpandEnvironmentStrings("%APPDATA%")

                      '-----------------------------------------------------------------------

                      ' Run computer cleanup script

                      Set objShell = CreateObject("WScript.Shell")
                      strCleanup = strAppData & "\Scripts\Cleanup.exe"
                      objShell.run "cmd /c " & strCleanup,0,False

                      '-----------------------------------------------------------------------

                      WScript.Quit
Open in new window
Convert Launch.vbs to an executable (Launch.exe) and place it in Operator’s Startup folder. This file will get deleted on completion of Cleanup.exe. You should add this file just before you’re ready to run sysprep as you may need to reboot your computer at different stages.
Note: To create and compile my scripts I use VbsEdit. It’s costs $59 but you can install it on multiple machines and it comes with a lifetime license.
Now let’s create the Cleanup.exe script. Here is the code for the Cleanup.vbs:
Set WshShell = WScript.CreateObject("Wscript.Shell")
                      Set objFSO = CreateObject("Scripting.FileSystemObject")
                      Set objShell = CreateObject("WScript.Shell")

                      strAppData = WshShell.ExpandEnvironmentStrings("%APPDATA%")
                      strLocalAppData = WshShell.ExpandEnvironmentStrings("%LOCALAPPDATA%")
                      strUserProfile = WshShell.ExpandEnvironmentStrings("%USERPROFILE%")
                      strAllUsers = WshShell.ExpandEnvironmentStrings("%ALLUSERSPROFILE%")

                      '-----------------------------------------------------------------------


                      ' ADD COMMANDS HERE


                      '-----------------------------------------------------------------------

                      ' Delete Launch.exe

                      strAppData = WshShell.ExpandEnvironmentStrings("%APPDATA%")
                      strLaunch = strAppData & "\Microsoft\Windows\Start Menu\Programs\Startup\Launch.exe"

                      If objFSO.FileExists(strLaunch) Then
                        objFSO.DeleteFile strLaunch, True
                      End If

                      '-----------------------------------------------------------------------

                      WScript.Quit
Open in new window
You can add any commands you like in this script. Here you can re-install OneDrive, which we will go over later in the guide. At the end of the script Launch.exe will get deleted so that it does not run again for the currently logged in user. Copy Cleanup.exe to %AppData%\Scripts. You will need to create the Scripts folder as it does not exist.
Cleanup.exe and Launch.exe will become part of the Default profile. It will only run when a new user logs in for the very first time.
Adjust Display Settings
You may notice that some programs when opened do not display as sharp as others. In my case, as an example, Adobe Acrobat. The program seems fuzzy or blurry when opened. If this is the case for you then check the following setting:
- All Apps — Settings — Display
- Change the size of text, apps and other items: Set the slider to 100%. I find in some cases the default is 125%.
Boot To Desktop
Boot right to the desktop. Navigate to: All Apps – Settings – System – Tablet Mode
When I sign in: Go to the desktop
Here you’re also able to set how your device handles switching from desktop to tablet mode.
WinSAT prepop (Windows System Assessment Tests Scores)
You may lose the aero theme after sysprep. Run the following command at an elevated command prompt:
WinSAT prepopOpen in new window
This will generate the WinSAT prepop .xml results files to the Datastore directory, located at:
%WINDIR%\performance\winsa
This enables you to keep the configured aero theme after running sysprep (otherwise it will be reset back to basic). Additional informa
Restart the computer then log back in as Operator. Make sure the theme is still set to your default theme. If needed, set it back to your default theme.
PowerCFG Command (GUID for Default power plan)
Specify the default power plan in your unattend.xml file. Run the following at an elevated command prompt:
Powercfg –listOpen in new window
Look for your default power plan. Write down the guid for the plan. We will add this to your unattend.xml file later.
Slipstream Drivers
To slipstream drivers into your Windows image you can use the command line utility “pnputil.exe”.
If you need a certain driver installed in the image, like an adapter, scanner or printer driver, and do not want your users to be prompted for the driver, then add it to the DriverStore in your Windows image. The command to add a driver using this utility is (HP001.inf is an example driver):
pnputil.exe -a HP0001.infOpen in new window
The command needs to be run at an elevated command prompt. More information about this command can be found here.
Disable Windows Features or Noticifactions
Using notepad, create the following registry files to disable features or notifications. Copy and paste the following code then save the file with a .reg extension. For example DisableBackupMonitoring.re
Disable Backup Monitoring:
Windows Registry Editor Version 5.00

                      [HKEY_LOCAL_MACHINE\SOFTWARE\Microsoft\Windows\CurrentVersion\WindowsBackup]
                      "DisableMonitoring"=dword:00000001
Open in new window
Disable Password Reveal:
Windows Registry Editor Version 5.00

                      [HKEY_LOCAL_MACHINE\SOFTWARE\Policies\Microsoft\Internet Explorer\Main]
                      "DisablePasswordReveal"=dword:00000001
Open in new window
Disable IE Suggested Sites:
Windows Registry Editor Version 5.00

                      [HKEY_CURRENT_USER\Software\Policies\Microsoft\Internet Explorer\Suggested Sites]
                      "Enabled"=dword:00000000
Open in new window
Note: You can also apply the registry files via group policy.
OneDrive Setup
When you use the CopyProfile switch in your unattend file, the OneDrive shortcut in the All Apps menu continues to point to the Operator account instead of the currently logged in user. To resolve this issue OneDrive needs to be re-installed on first log on for each user. Do the following when logged in as Operator:
Manually copy the OneDrive Update folder from within the Operator profile to the ProgramData folder:
%LOCALAPPDATA%\Microsoft\ OneDrive\Update to %PROGRAMDATA%\Microsoft\On
Run the following commands at an elevated command prompt to clean up the old OneDrive folders:
move "%LOCALAPPDATA%\Microsoft\OneDrive" "%LOCALAPPDATA%\Microsoft\OneDrive.old"
                      del "%APPDATA%\Microsoft\Windows\Start Menu\Programs\OneDrive.lnk" /q/s
                      rd "%LOCALAPPDATA%\Microsoft\OneDrive.old" /q/s
                      rd "%USERPROFILE%\OneDrive" /q/s
Open in new window
To clean up the old OneDrive registry entries, create a registry file named OneDriveCleanup.reg using notepad and paste the following code. Run the registry file.
Windows Registry Editor Version 5.00

                      [-HKEY_CURRENT_USER\SOFTWARE\Microsoft\OneDrive]
Open in new window
Now you can add the following code to the Cleanup.exe file you created above to re-install OneDrive when the user logs in for the very first time.
' Run OneDrive Setup

                      strOneDrive = strAllUsers & "\Microsoft\OneDrive\Update\OneDriveSetup.exe /silent"
                      objShell.run "cmd /c " & strOneDrive,0,True
Open in new window
All folders will be recreated, including the All Apps shortcut.
Create Unattend.xml File
When the computer is ready you’ll need to create a unattend.xml answer file using Windows System Image Manager (Windows SIM). You should already have Windows SIM installed on another computer. If not, the download link is listed above.
- Insert the media you used to install Windows 10 on your image computer into your CD-DVD drive.
- Start Windows SIM. From the menu select “Tools – Create Catalog”. You’ll be prompted for the “install.wim” file located on your media. Browse to the install.wim file in the sources directory on your disk. When the catalog is complete you’ll be ready to configure your answer file.
- I’ve attached a sample unattend.xml file for reference. Open the file with Windows SIM and take a look at some of the settings I’ve configured.
In my unattend.xml file you’ll see:
<ComputerName>*</ComputerName>Open in new window
This will allow sysprep to provide a random name for the computer after sysprep.
<CopyProfile>true</CopyProfile>Open in new window
This tells sysprep to copy the configured profile you’ve created to the default profile.
<SkipRearm>0</SkipRearm>Open in new window
Set SkipRearm to 1 while customizing your computer.
Before running the Sysprep command the final time before deploying an image, rearm the computer by setting the SkipRearm setting to 0. This resets the Activation grace-period timer.
<PreferredPlan>your.guid</PreferredPlan>Open in new window
This specifies the default power plan for your image. Update the unattend.xml file with the guid of the power plan you retrieved earlier.
<DisableAntiSpyware>true</DisableAntiSpyware>Open in new window
Setting this to True will disable Windows Defender. Set this to False if you are not deploying your own antivirus program.
<MachineObjectOU>OU=Re-Imaged,OU=Computers,DC=your,DC=domain,DC=com</MachineObjectOU>Open in new window
You must specify an OU to add the computers to otherwise they will not be added to the domain.
<DoNotCleanUpNonPresentDevices>true</DoNotCleanUpNonPresentDevices>
                      <PersistAllDeviceInstalls>true</PersistAllDeviceInstalls>
Open in new window
When set to True, this tells sysprep not to remove installed hardware from the image during sysprep. This should be the case when distributing the image to the same model computer. If you would like to create a clean sysprep image, meaning you are able to install the image on any computer, no matter the hardware, the above should be set to False.
The other thing regarding the unattend.xml, you need to create a local user during the sysprep process. When you install Windows 10 (using the disk) you’re prompted to create a local user. This process still occurs when using an attend.xml file and sysprep. In the answer file I create a local user named TempUser. TempUser gets deleted when the laptop first boots up to Windows logon screen. The sole purpose of TempUser is to hide the prompt to create a local user after sysprep runs.
Customize the answer file to meet your image needs. After you’ve completed the unattend.xml file, copy the file to C:\Windows\System32\Syspre
Customize SetupComplete.cmd
On your image laptop, browse to the C:\Windows\setup\Scripts directory your created earlier. Open SetupComplete.cmd for editing. As I said earlier, commands placed in this file will run just before you are presented with the Windows logon screen.
To delete the previously created TempUser account, add the following command to SetupComplete.cmd:
net user TempUser /deleteOpen in new window
To enable the local Administrator account, add the following command to SetupComplete.cmd:
net user Administrator /active:yesOpen in new window
Even though you may have enabled the administrator account on the imaged laptop before running sysprep, it will be disabled again.
Delete the Domain Users group from the local Administrators and Users groups using the above commands.
net localgroup Administrators "Domain\Domain Users" /delete
                      net localgroup Users "Domain\Domain Users" /delete
Open in new window
To delete the unattend.xml file, add the following command to SetupComplete.cmd:
del C:\Windows\System32\Sysprep\unattend.xmlOpen in new window
Even though the passwords you enter in the xml file are encrypted, you’ll feel better knowing the file is not there. I’ve attached a sample SetupComplete.cmd file for reference. You may add whatever commands you need to run here in this file. Save the file when finished.
Note: One change I’ve noticed from Windows 8.1 to Windows 10 is that you will
not
be able to add domain users/groups to local groups through SetupComplete.cmd. If you find otherwise Let me know.
Run Sysprep
You should now be ready to run sysprep on the computer.
Note: I highly recommend that you take an image of your image computer before you run sysprep. Things DO go wrong and being able to get back to a pre-sysprep state will save you a lot of time and heart-ache.
From within the configured profile you’ve created, open a command prompt. Navigate to C:\Windows\System32\Syspre
sysprep.exe /generalize /oobe /shutdown /unattend:unattend.xmlOpen in new window
The computer will shut down after sysprep has finished.
Take An Image
Now it’s time to take an image of the hard drive. Everyone has their own way of doing this. I use Symantec Ghost as it takes an image of the whole drive. I’ve tested ImageX and found it to have it drawbacks. The main reason I choose not to use it is because we use two partitions in our image. The C: partition for the OS and the D: partition for the users’ data. You cannot take a disk image with ImageX. You have to do each partition individually. The same goes for when applying the image. I ghost the hard drive and have our completed image.
I’ve attached a zip containing the files discussed in this guide.
I hope this guide is helpful and puts you in the right direction for a successful sysprep image. You’re welcome to post messages for your own tricks or tips that you think will be beneficial to the Windows 10 sysprep community!
Good luck!
Ivano
GuideFiles.zip
В этом гайде мы разберемся как создать собственный установочный образ с Windows 10/11 с предустановленными программами, необходимыми файлами, другими настройками среды и приложений. Превалирующий сейчас подход предполагает развертывания чистого образа Windows, после чего на компьютер устанавливаются необходимые программы: через GPO, командами загрузки и установки приложений в
AutoUnattend.xml
или в скрипте
%WINDIR%\Setup\Scripts\SetupComplete.cmd
, логон скриптами Windows, средствами автоматизации (SCCM, Intune, Ansible, и пр). Однако в некоторых случаях особенности бизнеса требуют, чтобы на компьютер сразу разворачивался готовый образ Windows со всеми необходимыми программами.
Содержание:
- Подготовка эталонного образа Windows с установленными программами
- Захват настроенного образа Windows с помощью DISM
- Замена оригинального образа Windows (Install.wim) на USB флешке
Процесс создания собственного установочного образа Windows с предустановленным софтом будет состоять из следующих этапов:
- Развертывание чистой Windows на эталонном компьютере (виртуальной машине);
- Вход в режим аудита, установка необходимых приложений, настройка окружения;
- Загрузка в среде WinPE и захват WIM образа Windows с помощью DISM;
- Замена оригинального install.wim на установочной USB флешке (ISO образе).
Если вы развертываете Windows на компьютеры в корпоративной сети, удобнее использовать MDT, который позволяет добавлять/обновлять программы в установочный процесс без модификации каждый раз установочного WIM образа.
Подготовка эталонного образа Windows с установленными программами
На первом этапе вы должны создать эталонный образ Windows со всем необходимым набором программ, файлов и настроек. Для этого нужно выполнить чистую установку Windows на виртуальную машину или компьютер
Итак, начните с получения оригинального установочного образа Windows 10/11 в виде ISO файла или сразу запишите его на загрузочную USB флешку с помощью Media Creatin Tool или Rufus.
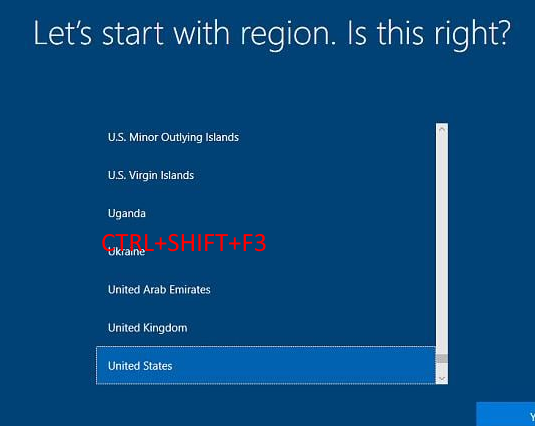
Выполните ручную установку Windows и на этапе OOBE (когда вам предлагают выбрать региональные настройки и создать учетную запись), нажмите
CTRL + SHIFT + F3
. Это переведет компьютер в режим аудита (Audit Mode), в котором будет выполнен автоматический вход под встроенной учётной записью Administrator.
После появления рабочего стола, сверните окно утилиты sysprep (не закрывая его) и можете приступить к установке программ, обновлений, настройке нужных параметров Windows.
В этом примере я воспользуюсь пакетным менеджером WinGet для установки программ в Windows:
winget install --id=7zip.7zip -e ; winget install --id=Notepad++.Notepad++ -e ; winget install --id=VideoLAN.VLC -e ; winget install --id=WinDirStat.WinDirStat -e ; winget install --id=dotPDNLLC.paintdotnet -e ; winget install --id=IrfanSkiljan.IrfanView -e ; winget install --id=Microsoft.PowerToys -e
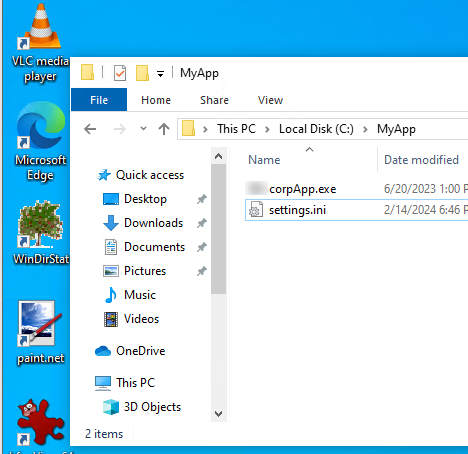
Дополнительно я вручную создал каталоги и скопировал файлы для некоторых корпоративных приложений.
Настройте ярлыки на рабочем столе, плитки в меню Start, фоновые рисунки, заставки, цветовые схемы и прочее. Настройте параметры локальной групповой политики с помощью редактора
gpedit.msc
. Эти настройки в дальнейшем будут применены ко всем пользователям на компьютерах, которые вы развернете из вашего образа.
После того, как вы завершили настройку операционной и приложений, нужно выполнить очистку Windows для уменьшения итогового размера образа.
Удалите имеющиеся теневые копии и точки восстановления:
vssadmin delete shadows /All /Quiet
Очистите неиспользуемые файлы компонентов и обновлений в папке WinSxS:
Dism.exe /Online /Cleanup-Image /StartComponentCleanup /ResetBase
Удалите загруженные файлы обновлений Windows:
del %windir%\SoftwareDistribution\Download\*.* /f /s /q
Для очистки папок Temp, Downloads и кэша в профиле пользователя можно использовать этот PowerShell скрипт.
Выполните очистку диска с помощью утилиты cleanmgr:
Cleanmgr /sagerun:1
Очистите логи Windows:
for /F "tokens=*" %1 in ('wevtutil.exe el') DO wevtutil.exe cl "%1"
Очистите корзину:
Clear-RecycleBin -Force
Чтобы применить настройки текущего пользователю к шаблонному пользователю Default, создайте файл ответов unattend.xml в каталоге C:\Windows\System32\Sysprep:
<?xml version="1.0" encoding="utf-8"?>
<unattend xmlns="urn:schemas-microsoft-com:unattend">
<settings pass="specialize">
<component name="Microsoft-Windows-Shell-Setup" processorArchitecture="amd64" publicKeyToken="31bf3856ad364e35" language="neutral" versionScope="nonSxS" xmlns:wcm="http://schemas.microsoft.com/WMIConfig/2002/State" xmlns:xsi="http://www.w3.org/2001/XMLSchema-instance">
<CopyProfile>true</CopyProfile>
</component>
</settings>
</unattend>
Осталось подготовить ваш настроенный образ Windows к развертыванию с помощью утилиты sysprep.exe. Разверните окно sysprep и выберите в ней опции:
- Enter System Out-of-Box Experience (OOBE)
- Generalize
- Shutdown
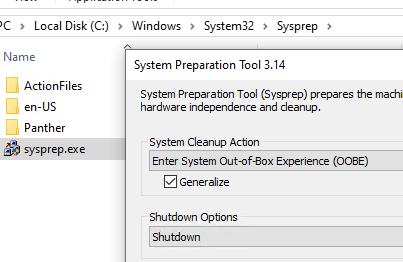
После завершения этой операции, компьютер выключиться автоматически.
Захват настроенного образа Windows с помощью DISM
На этом этапе нужно выполнить офлайн захват образа установленной Windows в WIM файл и поместить его на отдельный диск (мы подключили отдельный диск емкостью 60 Гб к компьютеру)
Загрузите компьютер с эталонной версией Windows с загрузочного диска в среде WinPE (WinRE). Можно загрузиться с установочной USB флешки с Windows и на этапе начала установки нажать
Shift+F10
, чтобы открыть командную строку.
Вам нужно идентифицировать буквы диска, которые назначены разделу с Windows и чистому разделу, куда будет скопирован WIM файл. Выполните команды:
diskpart
list disk
exit
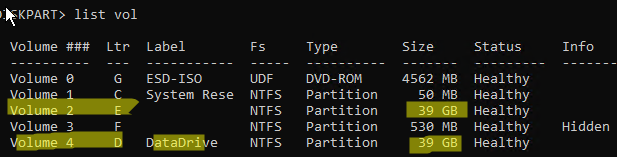
В нашем примере диску с Windows присвоена бука E:, а чистому диску – буква D:.
Чтобы выполнить захват офлайн образа Windows на диске E и поместить полученный WIM образ на D, выполните команду:
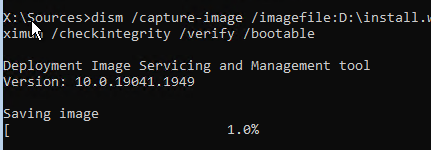
dism /capture-image /imagefile:D:\install.wim /capturedir:E:\ /ScratchDir:D:\ /name:"MyWinImage" /compress:maximum /checkintegrity /verify /bootable
В моем случае захват образа длился около 30 минут.
Замена оригинального образа Windows (Install.wim) на USB флешке
После того, как вы захватили ваш настроенный образ Windows, вы можете заменить файл с оригинальным установочным образов install.wim или install.esd (ESD это формат с максимальным сжатием образа WIM) на установочной USB флешке (каталог
\sources
).
В моем случае, я переименовал старый образ в install.esd_bak и скопировал на флешку новый образ install.wim.
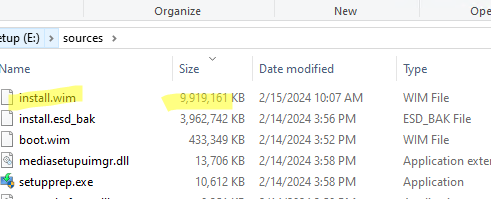
Обратите внимание, что размер WIM образа с предустановленными программами существенно увеличился (с 4 до 10 Гб).
Если у вас USB флешка с FAT32 для установки Windows на UEFI компьютерах, вы не сможете разместить файл больше 4 Гб на этой файловой системе. В этом случае большой WIM файл нужно разбить на несколько мелких SWM:
Dism /Split-Image /ImageFile:D:\sources\install.wim /SWMFile:c:\tmp\install.swm /FileSize:3500
В данном случае DISM создаст четыре файла install.swm, install2.swm, install3.swm, install4.swm, которые нужно скопировать в папку
\sources
. Установщик Windows сам соберет SWM файлы при развертывании операционной системы.
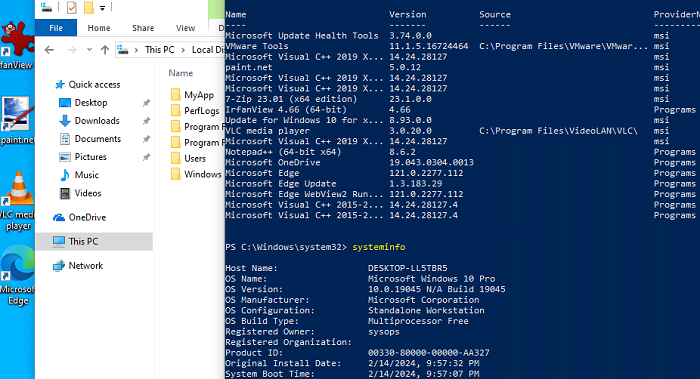
Теперь вы можете с USB флешки развернуть на любой компьютере созданный вами образ Windows. После завершения установки Windows убедитесь, что все предустановленные программы доступны:
Get-Package
Недостаток такого подхода с развёртыванием преднастроенного образа Windows в том, что для обновления любого приложения в образе вам придется пересобрать его заново.
Windows10-OOBE-all-skip
Sysprep Unattended Setup
This repository provides instructions for using sysprep with an unattended setup file unattend.xml. The default file path for unattend.xml is %WINDIR%\System32\Sysprep\unattend.xml.
Prerequisites
- Ensure you have administrative privileges on the machine.
- Prepare the
unattend.xmlfile with the necessary configurations.
Instructions
- Place the
unattend.xmlfile in the following path:
%WINDIR%\System32\Sysprep\unattend.xml
- Run the following
sysprepcommand to initiate the setup with the unattended file:
/generalize: Prepares the machine for imaging by removing system-specific data./oobe: Initiates the Out-Of-Box Experience (OOBE) on the next boot./shutdown: Shuts down the computer after sysprep completes./unattend: Specifies the path to the unattended setup file.
sysprep /generalize /oobe /shutdown /unattend:%WINDIR%\System32\Sysprep\unattend.xml
Account Configuration
In the unattend.xml file, you can configure account settings as follows:
<Name>Admin</Name>: The name displayed when creating the account.<DisplayName>Admin</DisplayName>: The name displayed when logging in.
Customizing for Different Languages
To change the system language settings, update the SystemLocale, UserLocale, and UILanguage elements in the unattend.xml file to match the desired language codes (e.g., en-US for English. default is ja-JP).
Troubleshooting
- Ensure that the
unattend.xmlfile is properly formatted and located in the correct directory. - Check for any syntax errors in the XML configuration.
For more details on sysprep and unattend.xml, refer to the official Microsoft documentation.
License
None! free for anyone.
At work I tend to deal with creating the image we use for distribution of our computers. Windows 10 was a rather unique challenge of anything that could go wrong, did. We use Windows 10 Professional. Here’s just a quick list of versions:
- 1609 — Works, but updates can get stuck, requires different UAC on a domain
- 1703 — Skipped, updating to worked fine, requires same UAC settings same as 1609
- 1709 — Skipped, updating sometimes broke the system files, UAC settings same as 1609
- 1803 — Could not get to work, updating to it broke permissions making searching impossible unless you were a pre-existing admin
- 1809 — Works, requires slightly different Unattend, works with domain settings and UAC used for Windows 7
(UAC settings need Admin Approval mode enabled and all Admins to run in Admin approval mode)
Common issues I ran into included:
- Users logged in were unable to use search features
- The very first login may appear okay, but any after that break
- Warnings about running programs as an administrator (UAC settings in domain can fix this)
- Unable to apply all group policies without numerous attempts
- Creating the .clg file needed has only worked for me once
- Enabling .NET 3.5 in Windows features
- Shutdown not working correctly
Currently I am trying to only work on a 64 bit image, we’re in the process of phasing out 32 bit. So now let’s do a walk-through and with any luck someone will find this helpful, maybe even help me fix problems I’ve come across. I’ll be doing the most recent at the time, 1809.
So the first and obvious step, install Windows 10. After installed and gets ready for setup, press Ctrl+Shift+F3. Get into Windows and get it started on updates. After that, you can install any software you need to. I personally try to install everything through Chocolatey, and I may include setting that up in another post.
So let’s talk about enabling .NET 3.5. To do this, you need the Windows 10 installation disc in, and let’s assume that it’s the D drive (adjust to your needs). You then use the command:
DISM /Online /Enable-Feature /FeatureName:NetFx3 /All /LimitAccess /Source:D:\sources\sxs
After that, your .NET 3.5 should be enabled.
Now at this point, we should direct our attention to the unattend file. On another computer, install the Windows ADK (make sure the computer is the same architecture). From what I’ve read, some say to create an unattend using the install.wim on the iso, others say turn a blank Windows 10 installation to a wim and then use that. Both fail when creating the .clg file for it after a while of sitting there trying. One day after it said it failed, a .clg file magically appeared. Why or how, I don’t know. Rather than walk anyone through the process, I’ll just include the .wim and .clg file. If anyone knows why it fails making the .clg file, let me know.
WIM
CLG
So here’s the bear minimum settings I found I needed to get the installation to go through. Keep in mind, it still flashes the setup for a moment, I think it’s just because the network takes a minute to figure itself out. Open up Windows System Image Manager and create a new Unattend using the WIM file. Then add these settings at minimum:
- amd64_Microsoft-Windows-Security-SPP_neutral -> Pass 3 Generalize
- SkipRearm set to 1
- amd64_Microsoft-Windows-Deployment_neutral -> Pass 4 Specialize
- ExtendOSPartition
- Extend set to true
- Delete other options that appear
- amd64_Microsoft-Windows-Shell-Setup_neutral -> Pass 4 Specialize
- ComputerName set to *
- Set your product key
- Set your timezone
- Do NOT put in anything for copy profile, that breaks the search feature for users setup after the installation
- Delete all the other sub pieces that show.
- amd64_Microsoft-Windows-International-Core_neutral -> Pass 7 oobe System
- InputLocale set to 0409:00000409 for en-US
- SystemLocale set to en-US
- UILanguage set to en-US
- UserLocale set to en-US
- amd64_Microsoft-Windows-Deployment_neutral -> Pass 7 oobe System
- AutoLogon should be set if you need any of that set with enabled to true and logoncount to 2
- Set a password if you want it to autologon
- FirstLogonCommands is where you are going to set any Post-SysPrep stuff that should supercede a logon, add as many as you need with whatever you need
- Under OOBE you need all of these to skip the setup:
- HideEULAPage true
- HideLocalAccountScreen true
- HideOEMRegistrationgScreen true
- HideOnlineAccountScreens true
- HideWirelessSetupInOOBE true
- ProtectYourPC 2
- UserAccounts needs at least the administrator password to skip past the login
- You can either set the AdministratorPassword or right-click on LocalAccounts and create one if needed
After that is done, you should be ready to load what you need on the computer to create an image with and get that going. So let’s talk about that.
First we need to copy over our unattend.xml file we so painstakingly made. I copy this to C:\. Now there is a cleanup we can do, using the SetupComplete.cmd that will get ran automatically after. So do that, we need to create the directory C:\Windows\Setups\Scripts. Then let’s create a file called SetupComplete.cmd in that folder and open it with notepad. We need the following commands for a decent cleanup:
DEL /Q /F C:\Windows\System32\sysprep\unattend.xml
DEL /Q /F C:\Windows\panther\unattend.xml
DEL /Q /F C:\unattend.xml
DEL /Q /F C:\Windows\Setup\Scripts\SetupComplete.cmd
This will remove all the traces of our unattend file and then itself. With that being setup, we need to run the sysprep. So do this, just run the command:
«C:\windows\system32\sysprep\sysprep.exe» /generalize /oobe /reboot /unattend:c:\unattend.xml
Word of caution, this will reboot the computer, not shut it down. I’ve had to use reboot because shutdown does not shut down Windows properly, it hibernates. That means after you boot back up, it just drops you back where you were until you tell it to restart. At one point shutdown worked, but I had other issues around then and I think it was because I changed the shutdown procedure.
Anyway, that’s a rough guide for setting up a Sysprep of Windows 10 x64 version 1809 to install and skip past the setup. Hope it helps anyone having issues with this.