
Synology Snapshot Replication and File Versioning

Files get lost, edited incorrectly, or corrupted by malware and other not so pleasant issues. Large office environments take advantage of the features built into Microsoft File Server environment called File Versioning. Other backup software of their version of file edits versioning depending on the frequency. This luxury is nice but most likely does not contain the latest version of your file. Moreover, it does not protect you from malware such as ransomware where you files are no longer readable and the data you want back is held up for large sums of money. You are probably thinking you have some form of backup so you are good. This is not necessarily the truth. Reality sets in when you are trying perform a recovery from a disaster or even a mini file crisis, and the file you need is simply not there. The file most likely locked during the backup and therefore was skipped by the backup process.
Multi prong Approach
There’s no silver bullet for a Disaster and Recovery plan. Read our post to prepare from future threats and some virus removal utilities when you are knee deep in the threat.
Incorporating BTRFS File System into Disaster and Recovery Process
BTFRS is the Next Generation file system, built by multiple parties with the same goal. This is a big deal. Snapshots feature was not available on the old HFS4 File system. These developers built a file system with the best data integrity and the most efficient method for snapshots. The next-generation BTFRS file system brings these tools to the Synology NAS or file servers. Synology’s BTRFS allows organizations to reduce maintenance overhead all while efficiently storing their data. The benefits are plain and simple, no more file corruption combined with some easy to use recovery tools for employee self-service recovery.
Synology Small Business IT Support
What’s a Quick Way of know whether I have BTFRS on my Synology?

File Recovery Tool – Snapshot Replication
Snapshot technology maintains the integrity of a backup.
Below is one picture summary of all of what happens during the Synology Snapshot file recovery process.
- Open the Snapshot Replication.
– Snapshot Replication is a package that must be downloaded and configured before using. We will build out a section below on how to configure this. - Click on “Recovery” in Synology Snapshot Replication application
- Select the Shared Folder to recover the file from.
-Browse the Synology Snapshot Recovery dates
-This executes a file explore window better known as File Station in Synology File Station or DiskStation terminology. - Selection “Action” in the Synology Snapshot Replication recovery tab gives you two options
- Restore in-place if you want to write over the existing file.
- Clone with a new name

Snapshot Retention
The policy can be set to just about anything and it won’t significantly compromise your space.
More Nerdy Stuff – Synology Snapshot Manager
Take advantage of those Window version features with Synology Snapshot Manager. It’s plug-in allows you to take application-consistent snapshots directly from DiskStation Manager (DSM). After installing and activating Synology Snapshot Manager on Windows Server or VMware ESXi Server, you can click NAS Register List to see the registered clients.
- In the VMware environment, you need to install Synology Snapshot Manager on the Windows server where VMware vCenter Server has been installed. When a snapshot taking is triggered on DSM, VMware vCenter Server will be notified and flush all the data from memory to the LUN on which the snapshot is taken to guarantee data consistency. Once the snapshot is complete, VMware vCenter Server will resume normal I/O operations of VMware datastore. Synology Snapshot Manager for VMware vCenter Server is supported on vSphere 5.1 and above.
- In the Windows environment, you need to install Synology Snapshot Manager on your Windows server. When a snapshot taking is triggered on DSM, Synology Snapshot Manager will leverage Microsoft Volume Shadow Copy Service (VSS) technology to generate consistent point-in-time copies of your data. Synology Snapshot Manager for Windows is supported on Windows Server 2008 R2, 2012, and 2012 R2.
- Synology Snapshot Manager can be downloaded for free from www.synology.com.
Snapshot and Replication Slideshow Setup
Introducing Synology Snapshot Replication and File Versioning Summary
Most of the Synology Snapshot Replication dry material can be found in Synology’s knowledgebase. I thought I break down the most essential material in one little blog post because the information for this particular topic is vague and confusing. However, this could save you hours or maybe your livelyhood if you invest some time in enabling this feature. You’re welcome.
Page load link
A way to uninstall Synology Snapshot Manager for Windows from your PC
Synology Snapshot Manager for Windows is a computer program. This page contains details on how to uninstall it from your PC.
The Windows release was developed by Synology Inc..
More info about Synology Inc. can be read here.
Usually the Synology Snapshot Manager for Windows application is placed in the C:\Program Files\Synology Snapshot Manager for Windows directory, depending on the user’s option during install.
You can uninstall Synology Snapshot Manager for Windows by clicking on the Start menu of Windows and pasting the command line C:\Program Files\Synology Snapshot Manager for Windows\uninst.exe. Note that you might receive a notification for administrator rights.
Synology Snapshot Manager for Windows’s primary file takes about 397.50 KB (407040 bytes) and its name is SynoVssTray.exe.
Synology Snapshot Manager for Windows is composed of the following executables which occupy 1.22 MB (1277040 bytes) on disk:
- SynoCommEngine.exe (72.00 KB)
- SynoVssPlugin.exe (249.00 KB)
- SynoVssRequesterBinary.exe (178.50 KB)
- SynoVssTray.exe (397.50 KB)
- uninst.exe (350.11 KB)
The information on this page is only about version 1.1.40.0 of Synology Snapshot Manager for Windows.
Click on the links below for other Synology Snapshot Manager for Windows versions:
- 1.1.34.0
How to uninstall Synology Snapshot Manager for Windows with the help of Advanced Uninstaller PRO
Synology Snapshot Manager for Windows is an application by Synology Inc..
Frequently, computer users try to uninstall this program. This is efortful because deleting this manually takes some knowledge regarding PCs. One of the best SIMPLE way to uninstall Synology Snapshot Manager for Windows is to use Advanced Uninstaller PRO. Take the following steps on how to do this:
1. If you don’t have Advanced Uninstaller PRO already installed on your PC, install it. This is good because Advanced Uninstaller PRO is one of the best uninstaller and general utility to clean your computer.
DOWNLOAD NOW
- visit Download Link
- download the program by clicking on the DOWNLOAD NOW button
- set up Advanced Uninstaller PRO
2. Start Advanced Uninstaller PRO. It’s recommended to take some time to admire the program’s design and wealth of functions available. Advanced Uninstaller PRO is a powerful Windows tool.
3. Click on the General Tools button

4. Click on the Uninstall Programs feature

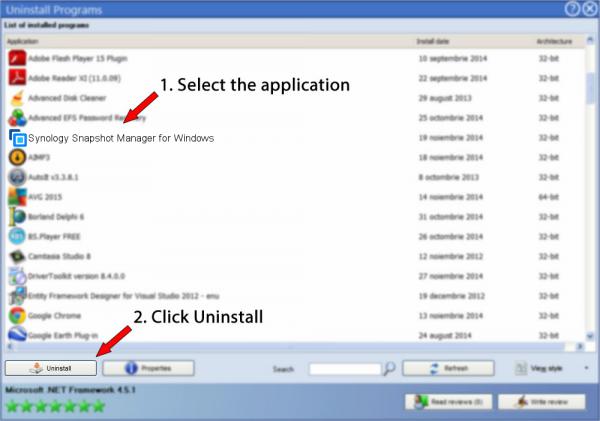
5. A list of the programs existing on the computer will appear
6. Navigate the list of programs until you locate Synology Snapshot Manager for Windows or simply activate the Search field and type in «Synology Snapshot Manager for Windows». If it exists on your system the Synology Snapshot Manager for Windows app will be found very quickly. Notice that when you select Synology Snapshot Manager for Windows in the list of applications, some information regarding the program is shown to you:
- Safety rating (in the lower left corner). The star rating tells you the opinion other users have regarding Synology Snapshot Manager for Windows, ranging from «Highly recommended» to «Very dangerous».
- Opinions by other users — Click on the Read reviews button.
- Technical information regarding the program you wish to remove, by clicking on the Properties button.
7. Click the Uninstall button. A confirmation dialog will come up. accept the uninstall by clicking Uninstall. Advanced Uninstaller PRO will then remove Synology Snapshot Manager for Windows.
8. After uninstalling Synology Snapshot Manager for Windows, Advanced Uninstaller PRO will offer to run a cleanup. Click Next to go ahead with the cleanup. All the items that belong Synology Snapshot Manager for Windows that have been left behind will be found and you will be asked if you want to delete them. By uninstalling Synology Snapshot Manager for Windows using Advanced Uninstaller PRO, you can be sure that no Windows registry items, files or directories are left behind on your PC.
Your Windows system will remain clean, speedy and ready to serve you properly.
Disclaimer
The text above is not a recommendation to uninstall Synology Snapshot Manager for Windows by Synology Inc. from your computer, nor are we saying that Synology Snapshot Manager for Windows by Synology Inc. is not a good application for your computer. This page only contains detailed info on how to uninstall Synology Snapshot Manager for Windows supposing you want to. The information above contains registry and disk entries that our application Advanced Uninstaller PRO discovered and classified as «leftovers» on other users’ PCs.
Last update on: 2020-11-19 13:19:55.720
If you have two synology NASes there are a lot of ways for you to backup your data.
You can backup your data using:
- File station : Drag and drop files between NASes
- Cloud Station ShareSync: One/Two way sync for files and folders that change frequently in real time (hot storage).
- Shared Folder Sync: One way sync for files and folders that do not change that often (cold storage).
- Snapshot Replication (this post): Snapshots of your folders on specific periods of time.
- Hyper Backup: Data backed up are kept in a database which can be browsed, downloaded or restored with tailor-made multi-version explorer on DSM, Windows and Linux platforms.
In this post we will cover the Synology replication which is my favourite form of back up and the one that saved me the most! (Probably that is why it is my favourite)
Snapshot Replication
Ok, so what is a snapshot? In simple words, it is like taking a snapshot of your data so you can go back in time and see how things looked like at different periods of time.
And what is a replication? Replication allows you to get your snapshots and copy them to other destinations, in other words, create a copy of your snapshots.
Limitations
The following limitations apply to the snapshots:
- The folders have to use the Btrfs file system
- The following number of snapshots are allowed:
- 1024 snapshots for each shared folder (or 256 on certain Synology NAS models)
- 256 snapshots for each iSCSI LUN
- 65536 snapshots in total in the system (or 4096 on certain Synology NAS models)
Overview of the Snapshot Replication application
To take snapshots of your folders,
- Click on Menu
- Click on Snapshot Replication
and it will take you to:
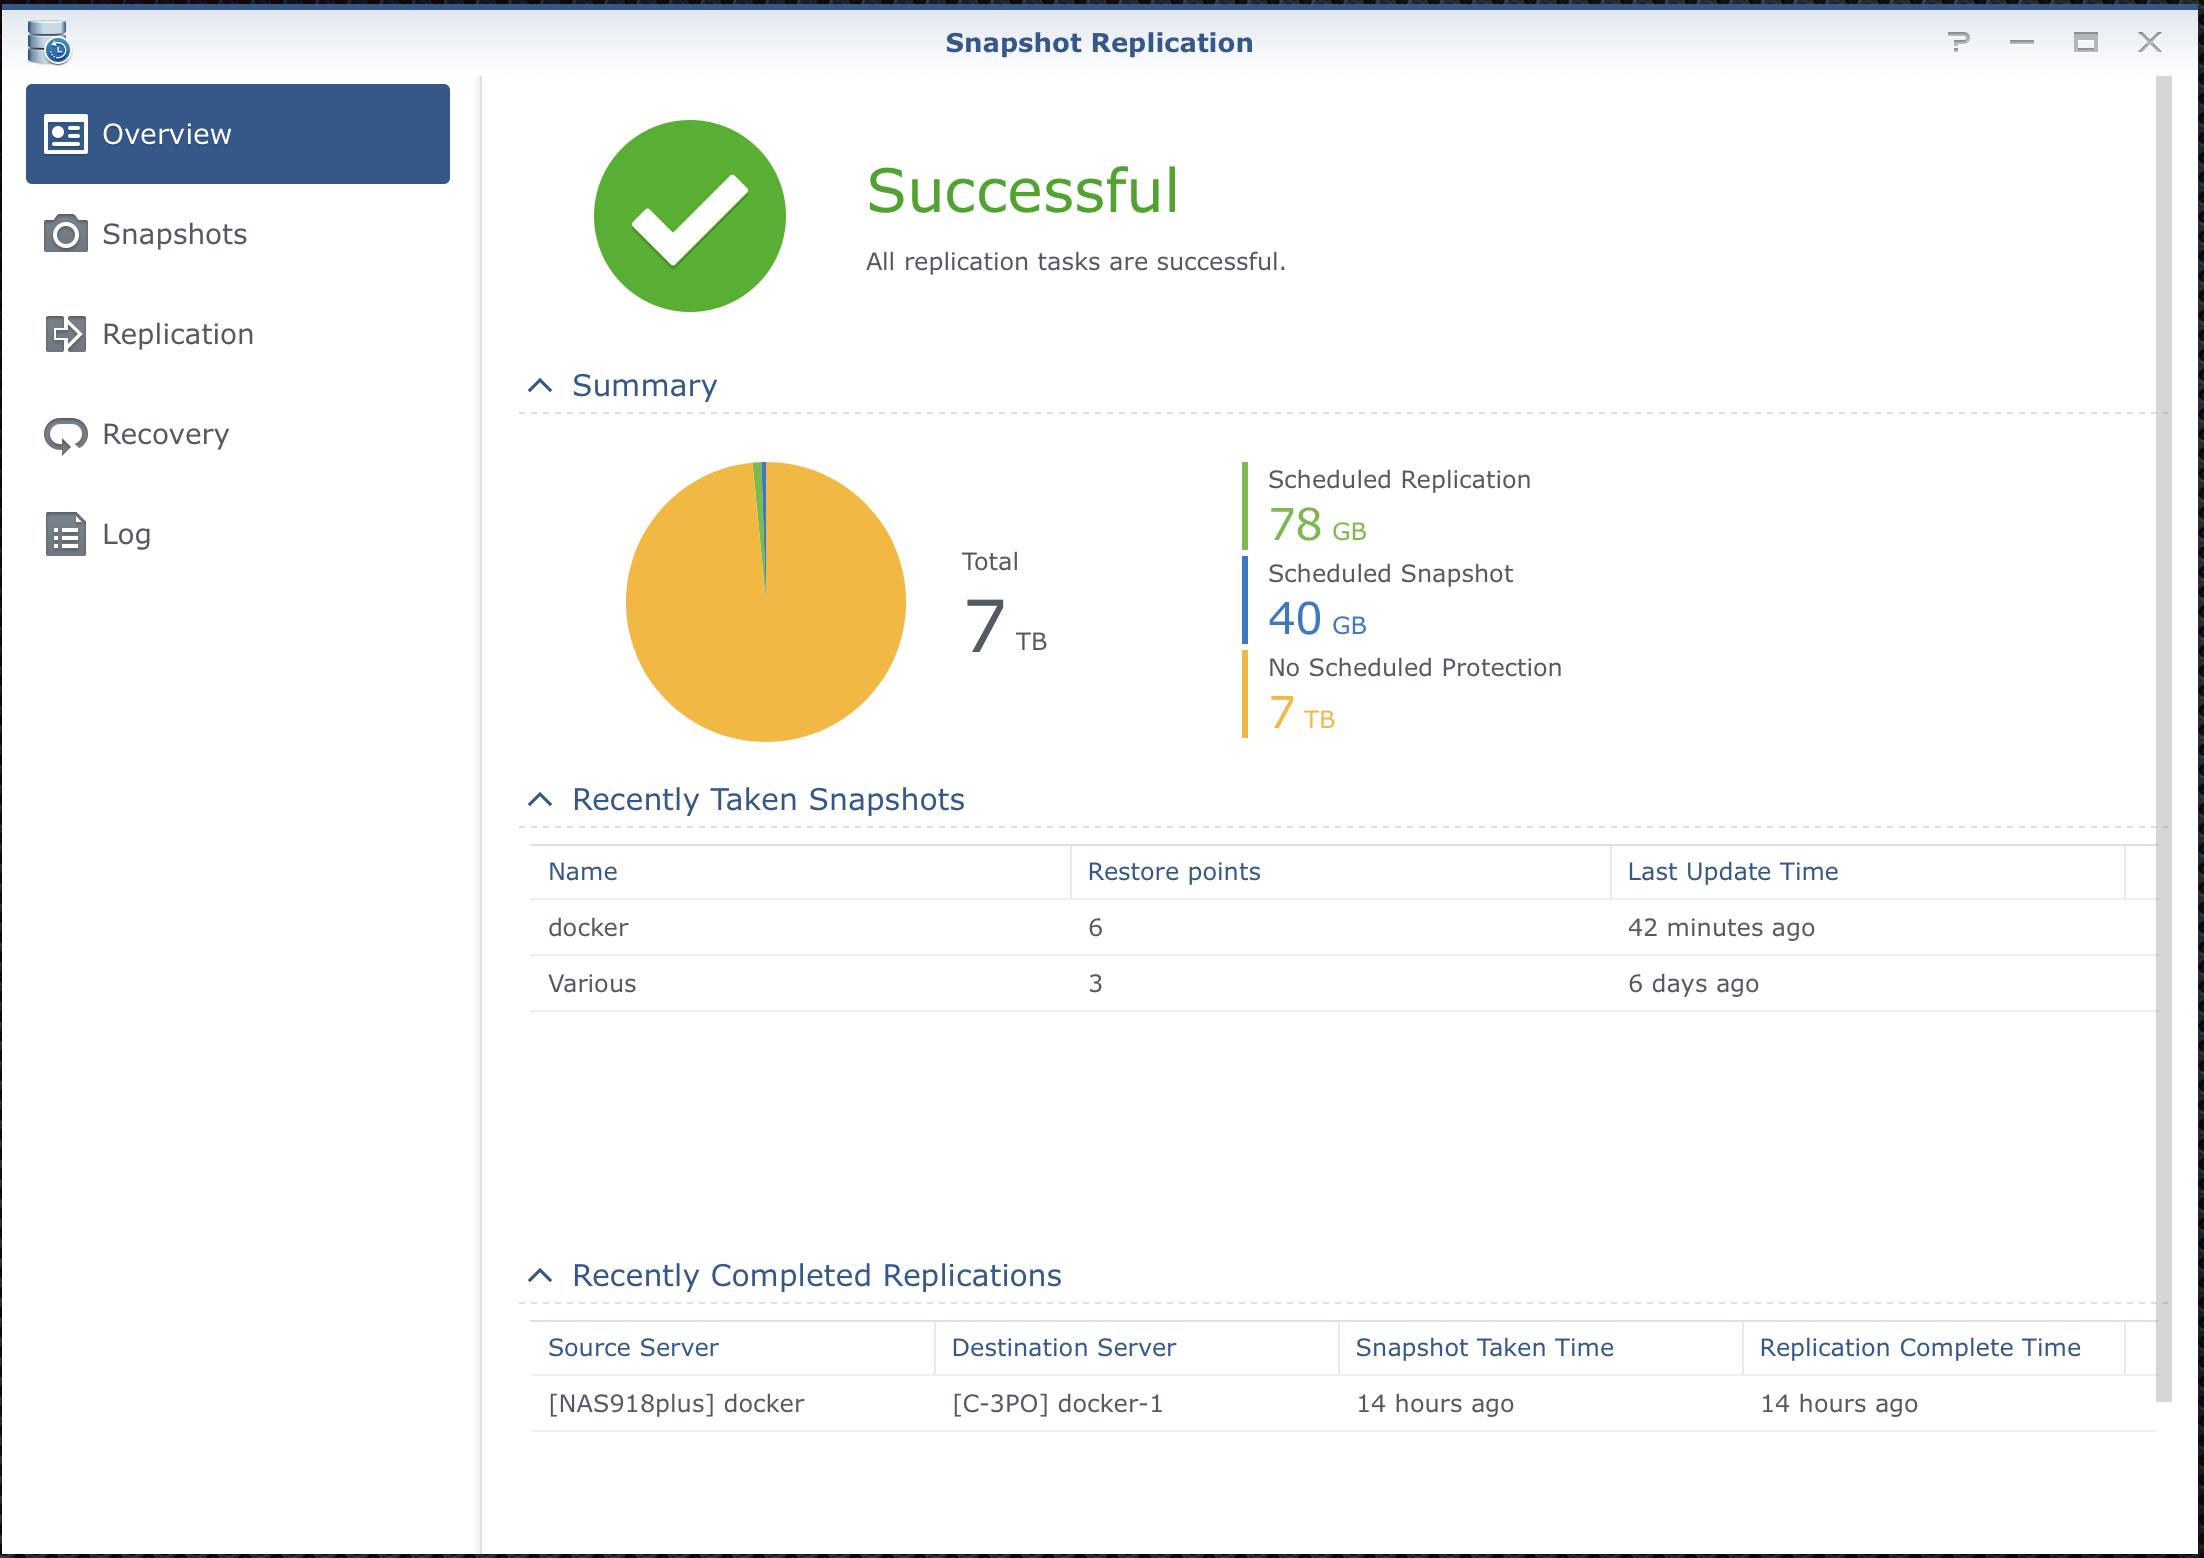
- the overview of the snapshot replication where
- You can see how much data you have replicated and snapshots on
- and the last time a replication or a snapshot was done.

If we click on snapshot, we will see all the snapshots we have done on this NAS and on which folders:

Take a snapshot:
If you want to schedule or take a new snapshot, you
- Click on snapshot
- To take a new snapshot, click on “Take a snapshot” (without scheduling, see below for more info on schedule snapshots)
- To see a list of snapshots taken click on “Snapshot list”
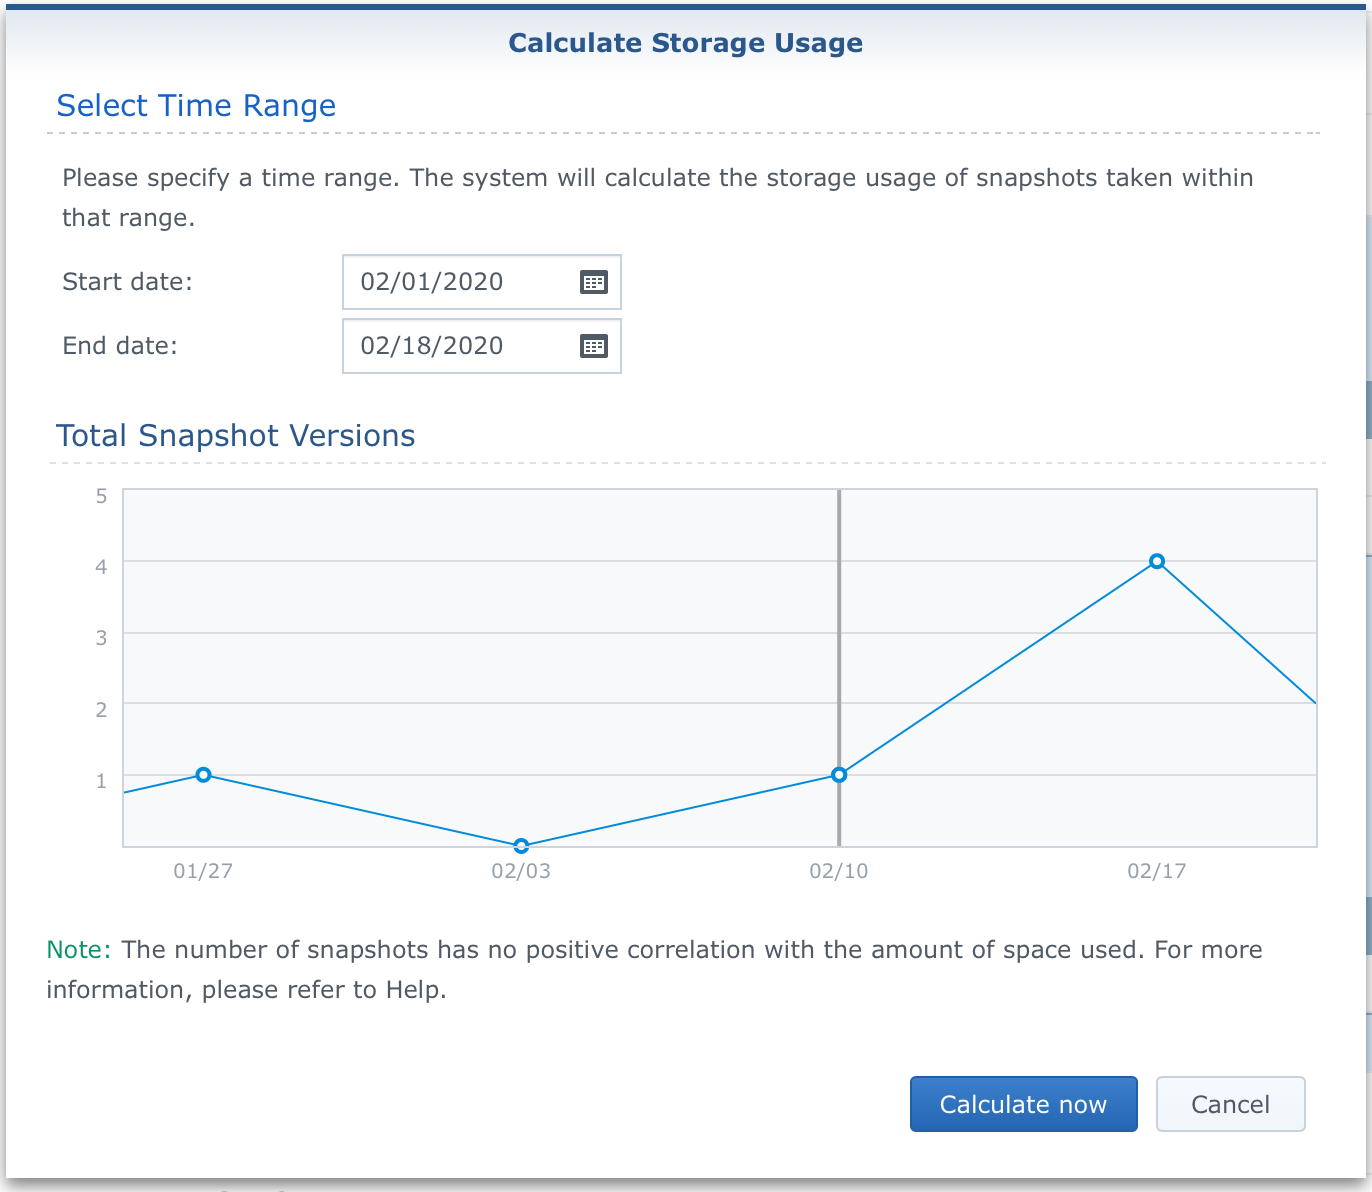
- To calculate the size of your snapshot click on “Calculate size”

And fill in the following:
- Description of the snapshot
- Lock the snapshot so it doesnt get removed during the creation of new ones,
- Ok

Schedule snapshots on your synology
If you want to have your synology create snapshots at different points in time, you do like this instead:
- Click on snapshots
- Click on the folder you want to create a scheduled snapshot
- Click on Settings

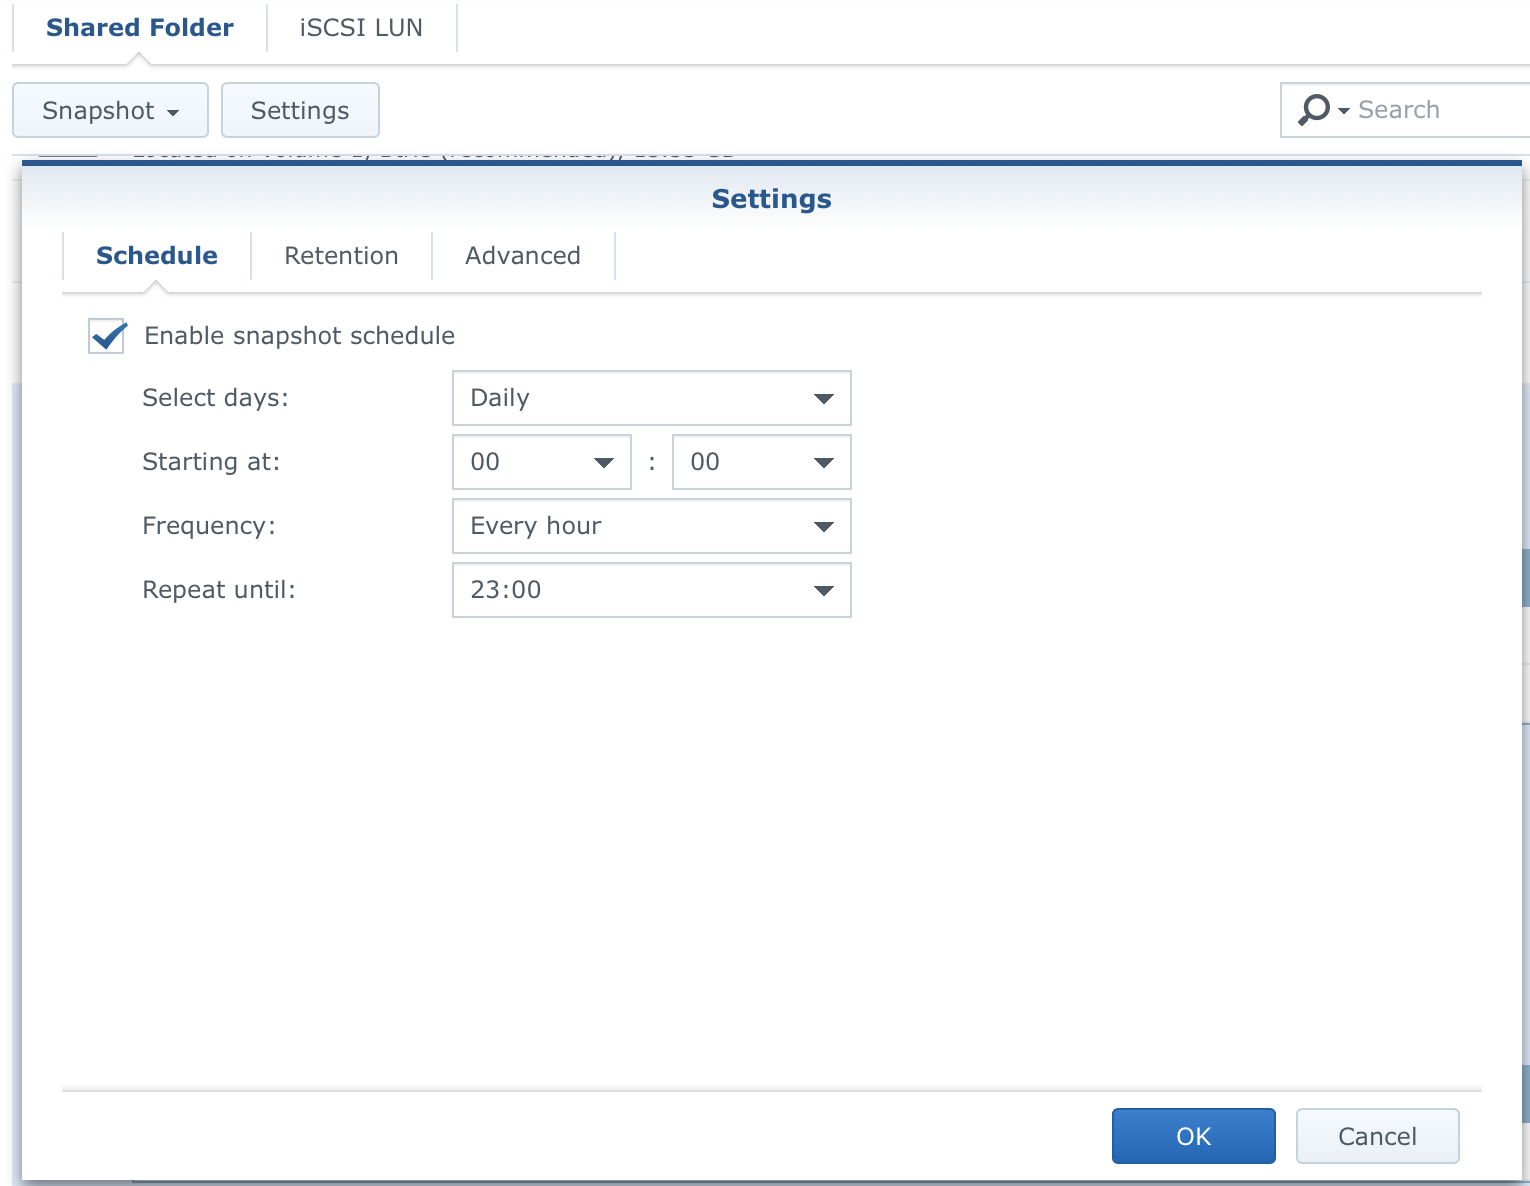
On the Schedule tab, select your schedule settings:
- How often ( I pick daily)
- Frequency: every day
- and when the snapshot should be done ( I always pick at night, so all the work has be done and it is ready for a backup)

On the retention tab we specify how often the snapshots should be retained.
Here I always set my own retention schedule, which is 1 snapshot daily, weekly, montly and yearly. The is enough for my needs.

Last but not least you can specify if you want the snapshot taken at GMT 0 (if your synologies are in different time zones) and if you want to make the snapshots visible.

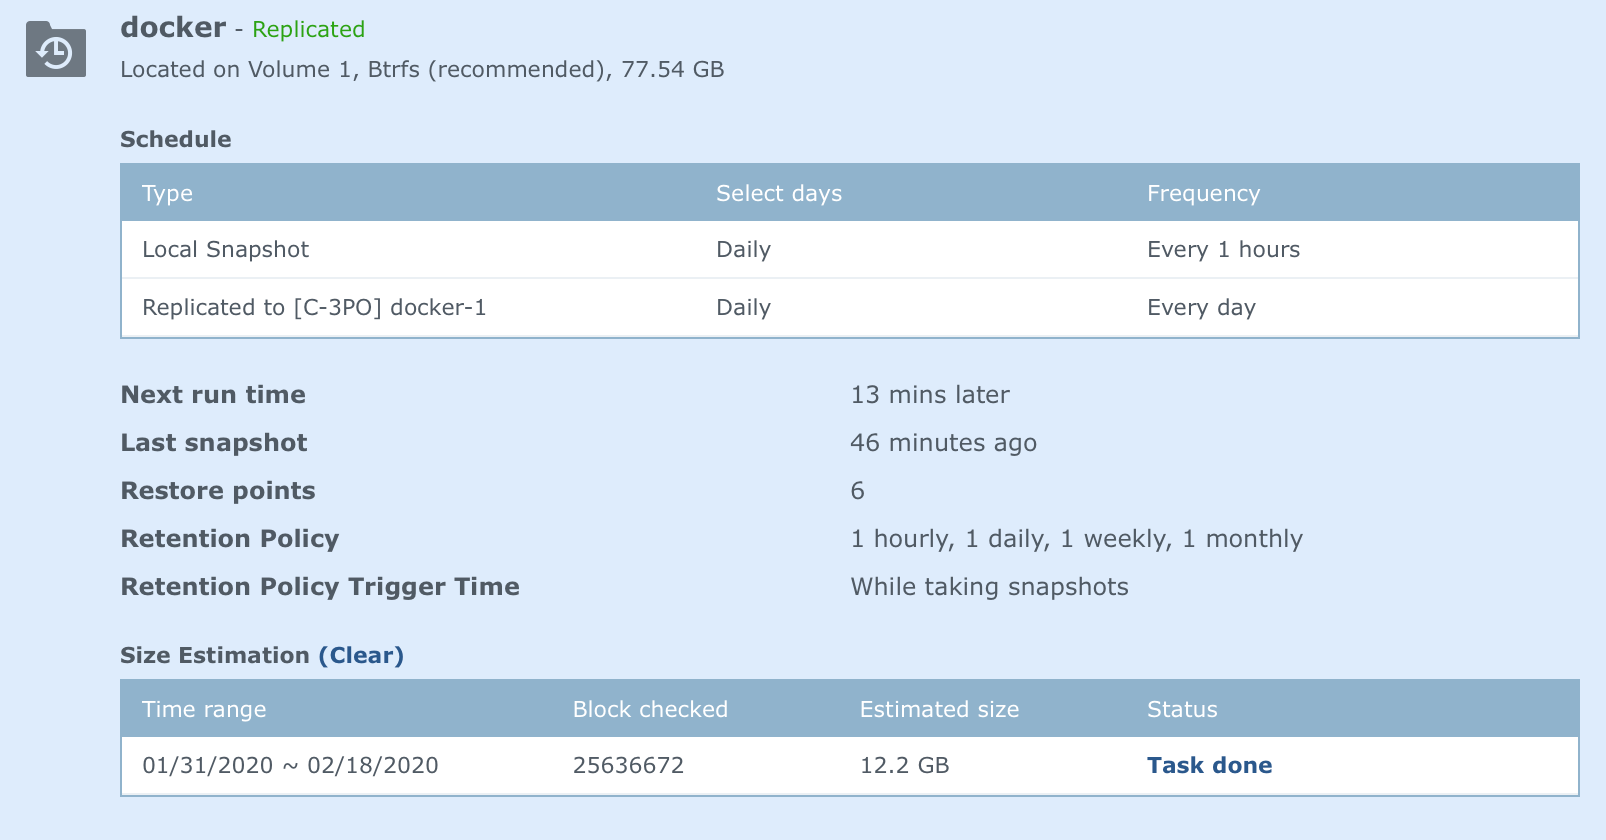
Once you have configured the snapshots, you can check the settings on the main menu:

And to see the snapshots, you:
- navigate to your folder
- Expand the snapshot folder
- and you will see all the snapshots you specified before
- and if you expand on of them you will see the actual files

Easy right? This little functionality has saved me countless of times when deleting things a bit too fast!!!
This post is running too long, so I will go through the replication settings in another post.
Have fun, enjoy your Synology and Happy New Year!!!
I am buying my third synology in January, so I will run a series of posts on how to configure your synology from scratch very soon, Stay tuned!!
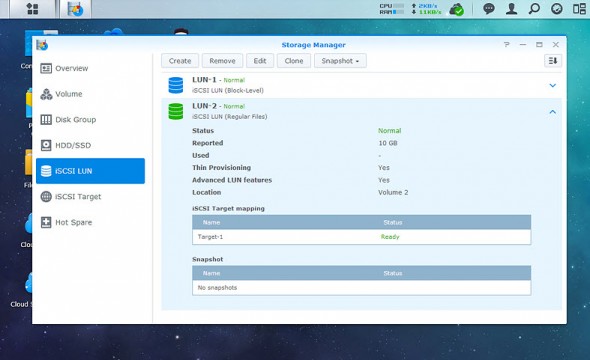
Many homelabs do use Synology NAS devices for virtualization, but not only. Synology has just released a new update enhancing the DiskStation Manager to version 5.0. It’s the latest operating system that is used all range of NAS devices. One of the new features is a new user interface that comes with a high-resolution mode for Ultra HD display devices. Synology Disk Station Manager 5.0 has also LUN snapshot (compatible with vSphere 5.1 and higher) and LUN clone.
Together with VAAI support which was introduced in one of the previous releases, Synology is starting to stand out from the already very crowdy NAS builders market.
For VMware labs it’s worth to mention LUN clone or VAAI support on those devices:
LUN Clone lets you create near-instantaneous virtual copies of a LUN with a simple click. For system engineers, it means much higher productivity and less complex deployment during system-wide operations. LUN Clone also consumes only a fraction of storage at the time of creation.
Screenshot from Synology website:
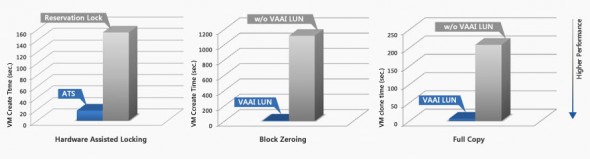
There are models compatible VAAI which can offload the processing of cloning and snapshots to the NAS and free the CPU of the hypervisor. Full VAAI support includes Hardware Assisted Locking (ATS), Block Zero, Full Copy, and Thin Provisioning.
Here is few details concerning those VAAI functions:
- Hardware Assisted Locking: creating multiple VMs is 9 times faster with ATS enabled
- Block Zeroing: creating a VM with Write Same support is nearly 140 times faster than on a non VAAI LUN
- Full Copy: copying a VM on a VAAI LUN is 34 times faster than on a non VAAI LUN
Synology Snapshot Manager – (needs vSphere Web client to be installed) very interesting feature which can be installed on vCenter server. After installation, when a snapshot is triggered on DSM, vCenter Server will be notified and flush all the data from memory to the LUN to guarantee data consistency. Once the snapshot is complete, vCenter Server will resume normal I/O operation of VMware datastore. Up to 256 snapshots can be created per LUN.
Requirements for snapshot manager are follows:
Synology Snapshot Manager for VMware vCenter Server supports vSphere 5.1 or later, and vSphere web client server plugin is required for application interface. Snapshot Manager for Windows supports Windows Server 2008 R2, 2012 and 2012 R2. VMware applications support up to 3 maximum concurrent snapshot tasks.
A screenshot showing the impact of VAAI on performance:
The Synology Disk Station 5.0 brought new functions in this release as well and not only the UI that changed. The DSM 5.0 introduced Private cloud feature which allows storing media or other files in cloud environment which can be synced from different devices without the need for an external (paid) cloud service like Dropbox. Not limited by monthly fees or capacity. You basically own the device, so you own your own cloud.
Of course there will be VSAN which I’m planning to run in my homelab, but I seriously start thinking of having one of those devices in my lab as well to allow me to play with and my family to store their media files, sync with their devices etc… -:) I found some top rated Synology NAS page on Amazon. I might look a bit closer too.
Availability
Synology DSM 5.0 is free to download for users who own a DiskStation or RackStation x10 series and onward. Supported models include:
- 14-series: RS3614xs+, RS2414+, RS2414RP+, RS814+, RS814RP+, DS214+, DS214play, RS814, DS214, RS214, DS414, DS114, DS214se
- 13-series: RS10613xs+, RS3413xs+, DS2413+, DS1813+, DS1513+, DS713+, DS413, DS413j, DS213+, DS213, DS213air, DS213j
- 12-series: RS3412xs, RS3412RPxs, RS812+, RS812RP+, RS2212+, RS2212RP+, RS812, RS212, DS3612xs, DS1812+, DS1512+, DS712+, DS412+, DS212+, DS212, DS212j, DS112+, DS112, DS112j
- 11-series: RS3411xs, RS3411RPxs, RS2211+, RS2211RP+, RS411, DS3611xs, DS2411+, DS1511+, DS411+II, DS411+, DS411, DS411j, DS411slim, DS211+, DS211, DS211j, DS111
- 10-series: RS810+, RS810RP+, DS1010+, DS410, DS410j, DS710+, DS210+, DS210j, DS110+, DS110j
Download link: Synology
🚀
NEW features with version 7.4.0-1608. Keep in mind that this update is only compatible with DSM 7.1-42555 or above!
(2022-02-17)
What’s New
- Supports configuring the number of concurrent tasks on certain models to better allocate system resources. (Learn more)
Fixed Issues
- Fixed an issue where the «Replication in progress» status was continuously displayed after replication tasks were stopped.
- Fixed an issue where users might be unexpectedly signed out from DSM when editing replication tasks.
- Fixed an issue where shared folders’ snapshots were kept when users only chose to reserve LUN snapshots and snapshot settings during package uninstallation.
- Fixed an issue where replication tasks might fail when the «Replicate schedule local snapshots» option was enabled.
📢
UPDATE: added replication recovery process on the bottom Replication recovery methods.
Let’s start with a question first. You do have backups right? I mean for everything? Not just your pictures and videos on your phone. I’m talking about documents, configurations, settings, online passwords, emails, you know, the IMPORTANT stuff.
Well know that we know that you don’t (shame on you), lets’s see what Synology NAS can do for you in terms of keeping your important data safe. Specifically, I will focus on a more business end of the spectrum and talk about snapshots today.
Keep in mind that this does not necessarily need to be a business topic because as long as you have a NAS that supports the snapshot package there is no reason not to use it.
Also, this is another, separate package and scenario, that has nothing to do with my previous article: 3-2-1 > Active Backup. There I talked about an Active Backup for Business package (that also doesn’t mean it’s for business use only!) and showed a few methods of how you can use that tool to keep your data safe.
SNAPSHOT?
Now, what is a snapshot and how is it different from your usual copy backup that you transfer your data on a USB stick or NAS? Well, let’s run this through an example. Suppose you are infected with a modern version of a malware, a cryptovirus. What will happen is that all your data will be encrypted and if your USB drive that you have your backup on (or your NAS for that matter) is plugged in your computer (or accessible on the network), chances are your data will get encrypted and that will be it.
The only way to get it back is 1) paying the ransom to get the unlock solution (don’t do this!) or 2) restoring from backup. Now, if that is your only backup, then you are done, right? The same thing applies to your NAS. If your data is stored on your NAS and that folder gets encrypted it’s game over. Unless you have a proper backup.
Most people think that running all your data on a RAID array set up on your NAS is backup. IT IS NOT! RAID is not a backup, it’s just a redundancy solution so you don’t have to stop working if one drive for example dies (and they will). Having all your data on your NAS without a proper backup of that same data is just the same as keeping it all on your computer. Period.
So, I already scared you enough, and still no word on what snapshot is. Well, here it is. What if we take that same crypto incident but this time if your data gets encrypted you can just go back in time and restore an early version of that same file good as new? Great right? Well, let’s see how that works and what you need to make that happen.
Restoring from a backup is always stressful and people don’t like it. Well, it definitely beats not having a backup at all, right? Well with Synology backup tools, it was clear that the intent behind it all was that there was no need to stress out over losing a file or restoring it. It’s just there when you need it.
Unlike backing up your computer data on your NAS (so having a version on your computer AND on the NAS), the snapshot method is useful in cases when you have a running version of your data on your NAS and you wanna protect that version from getting lost or corrupted in any shape of form.
When would this be useful? Well, let’s say that you are running a database on your NAS, or lots of documents that are edited of a NAS. In any case, changes to those files are done on the client-side of things but then saved back on the NAS where they “live”. If anything happens to them, again, game over, unless you have a backup of those files. This is where most users get in trouble. They keep that data on the NAS (multiple disks, RAID, etc) but in fact, if that’s the only place that you have that data on, you are taking a huge risk.
Snapshot and replication package
With the introduction of the BTRFS file system in DSM, Synology has changed some of its backup apps and offered some new ones. One of them is Snapshot & Replication
This tool can do two things as stated by its name. Create local snapshots of your data, and replicate that data (separate function) to a compatible destination as a backup.
Before I go any further, Snapshot tool has specific requirements that need to be in place before you can enjoy a quick and fast backup restore when you mess things up.
First, your NAS needs to have a compatible CPU in order to support this package (you can check the compatibility page here: https://www.synology.com/en-global/dsm/packages/SnapshotReplication), and second, as stated before, you will need to run the BTRFS file system on your NAS, as appose to EXT4 as an alternative.
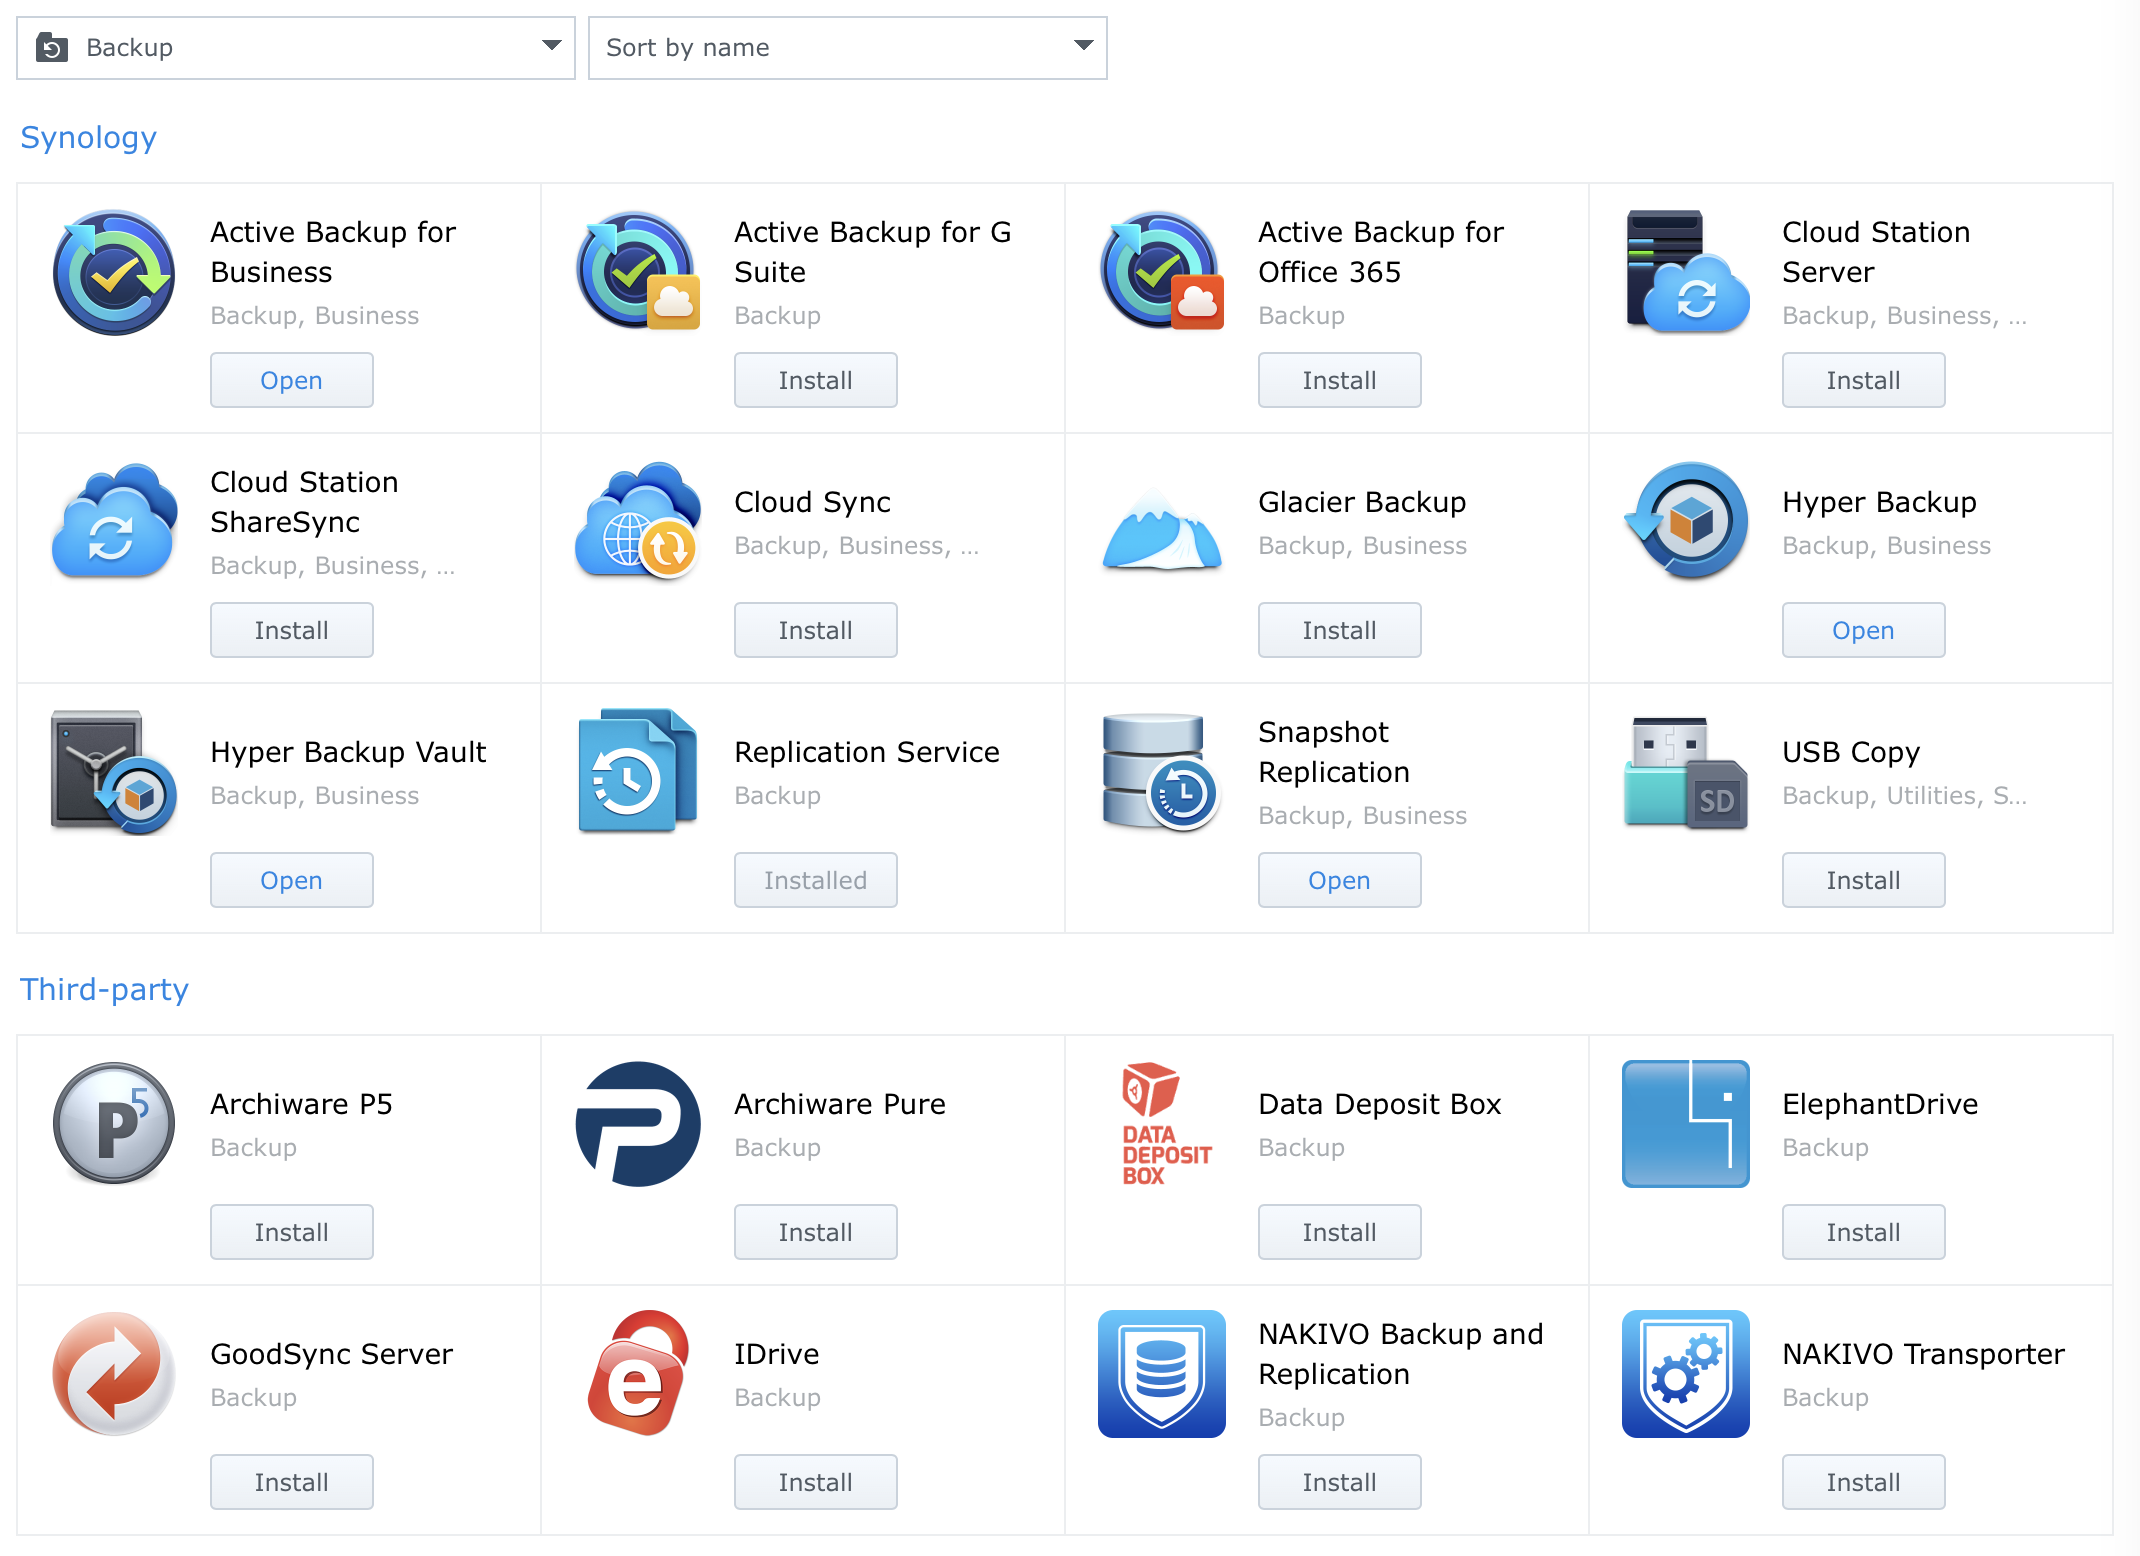
With those two requirements set, you can open up Package Center and look for Snapshot & Replication package in the Backup section.
As soon as you install the package and open it, you will be ready to start making local snapshots or any shared folder or iSCSI LUN that “lives” on a BTRFS volume as well as make separate replication tasks towards a compatible NAS.
🗒️
NOTE: compatible NAS means a device that has Snapshot & Replication package installed and is running on BTRFS.
IMPORTANT LIMITATIONS
Be aware of the following limitations when it comes to using Snapshot and Replication tool
The maximum number of replication tasks varies depending on your Synology NAS models. Please visit Synology’s website for information about applied models.
XS/XS Plus series
Maximum number of shared folder replication tasks: 64
Maximum number of LUN replication tasks: 32
Maximum number of replication tasks in total: 64
Plus series
Maximum number of shared folder replication tasks: 32
Maximum number of LUN replication tasks: 16
Maximum number of replication tasks in total: 32
Value series
Maximum number of shared folder replication tasks: 16
Using snapshot
There are two options that you can do when it comes to snapshots. Creating a one-time snap or a scheduled one (or both). In any case, when you move to the snapshot section of the app, compatible shared folders will be listed.
Select the shared folder you wanna take a snapshot off and use the Snapshot or Settings button on the top. Each will open up a dialog box with more or fewer options that you can configure and set.
If you decide to make a local scheduled snapshot, then use the Settings button to open up a dialog window that will offer schedule, retention, and some advanced option.
The main thing here is the Retention tab and its configuration. The reason is that you can set a specific number of snaps (hour/day/week/month/year). Keep in mind that even if there are no major changes, snaps will take up space on your NAS.
🗒️
NOTE: You can always calculate the size of snapshots for a specific time frame so that you can get the sense of how much space, on top of its initial size, is being used on your NAS.
Also when a snapshot is completed you can simply expand the view and see all the data in one place.
Now that we have seen how to make a snapshot, let’s see how to use them in case you need fast recovery.
Open up Snapshot of Recovery section inside the main window, and select the protected shared folder that you need to recover. Depending on where you are, you will have either Recover button (via Recovery section), or Snapshot > Snapshot List menu (via Snapshot section). In any case, you will be presented with the same window.
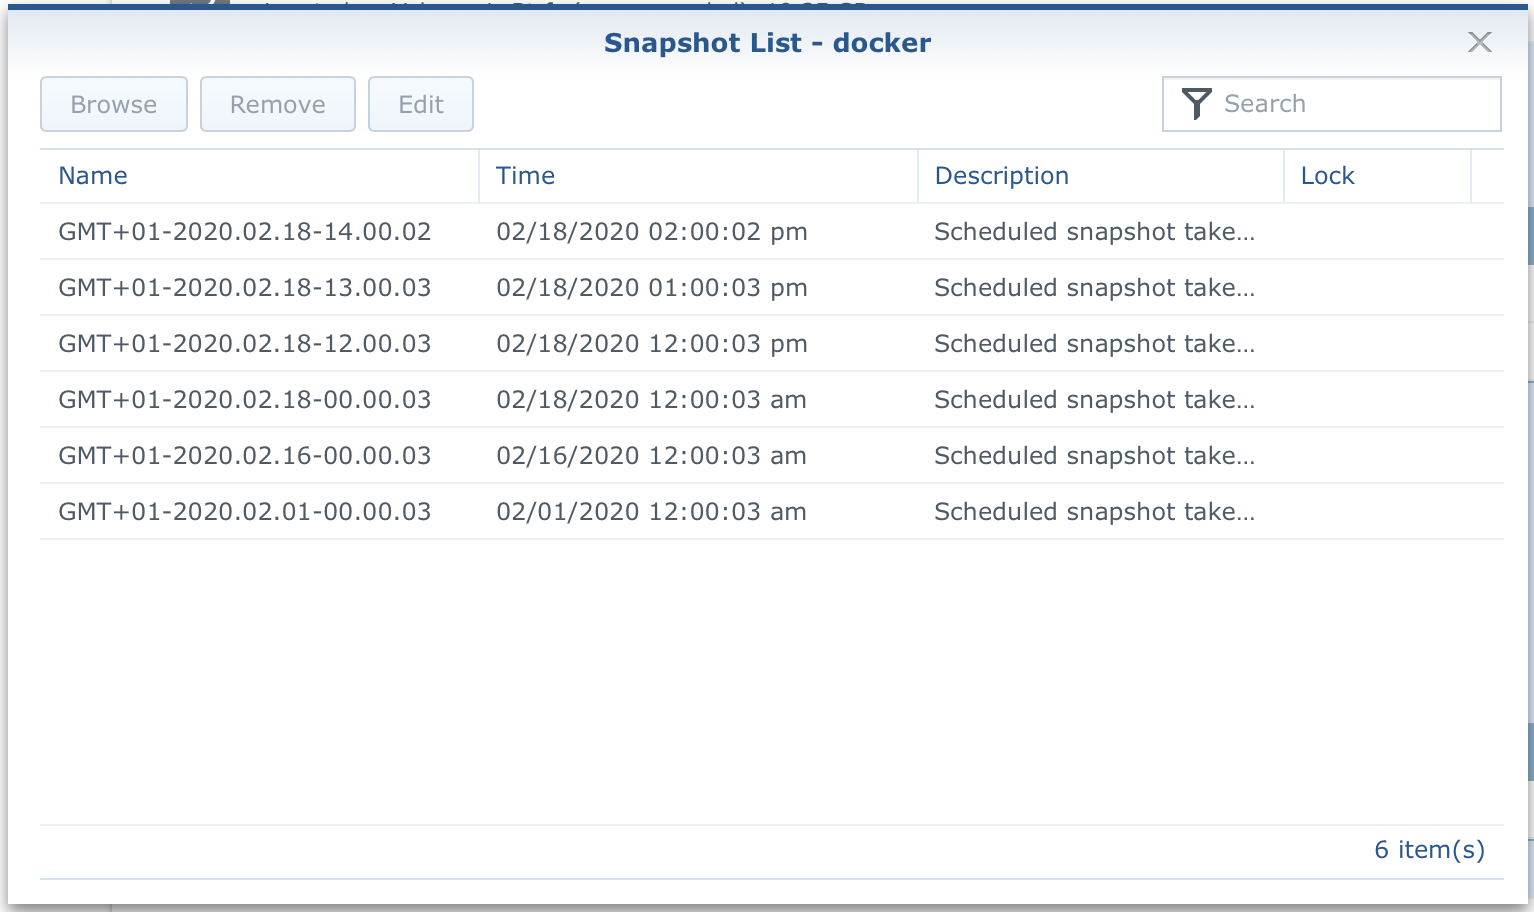
As we can see on the image, there is a list of all available snapshot points. Simply select one and click Browse. DSM will open up File Station and unhide a snapshot folder for that specific shared folder, that will list the state of all the data for that point in time.
All that is left now to do is copy the content to its original location and you are done! That was easy, right?
Ok, but what if you have a large number of files and folders inside that shared folder and the damage is so great that it’s best to just wipe it in place with complete content from a specific point in time?
In that case just use the Recovery section, select the shared folder and use the Recover button. In the list window, select a point in time, and from the Actions menu select Restore in-place. Done. One more option that you can do from the same menu is clone that content with a new name on a separate location. Those two actions are best used in cases when you work with a large number of files. In case you have to handpick several files out of thousands, File Station browse options are your best bet.
Using replication
If you are in a situation where you can use the replication part of this great package read on. As I said several times before, using Snap and Replication does require specific requirements and in case of replication, you need a Synology NAS with this package installed and a BTRFS file system. On top of this, you will need network visibility between your source and destination NAS.
Setting up a replication destination is easy. On top of snapshots, you can (at the same time) replicate that same shared folder and its content to a remote NAS and pull data from there in case your primary NAS is not accessible for any reason. There is also a failover option in case the NAS is really dead or not accessible on the network.
So, select the Replication section, and click the create button. This will open up a wizard. You will see that you can also replicate locally and remotely.
🗒️
NOTE: You can only replicate locally if you have a NAS with multiple BTRFS volumes. In case that you don’t, you simply use the snapshot method
Remote replication is what will protect your data in case something physically happens to your NAS. The good news is that this can be done inside your LAN as well as over the internet (encrypted of course) in case your target NAS is on a remote location.

If you are running this over the web, make sure that all the needed ports are open and forwarded on your destination side so that replicas can work as intended.
🗒️
NOTE: default replication port is 5566/tcp
After you have set your destination server and credentials, all that is left to do is to pick what shared folder you wanna replicate with this given job, set a schedule (optional and you can edit settings and retention later on) and retention policy and you are done!
🗒️
NOTE: Even though you can snapshot and replicate homes shared folder, you will NOT be able to perform a switchover or failover replication task on that folder. You will be able to access the read-only data on your target NAS.
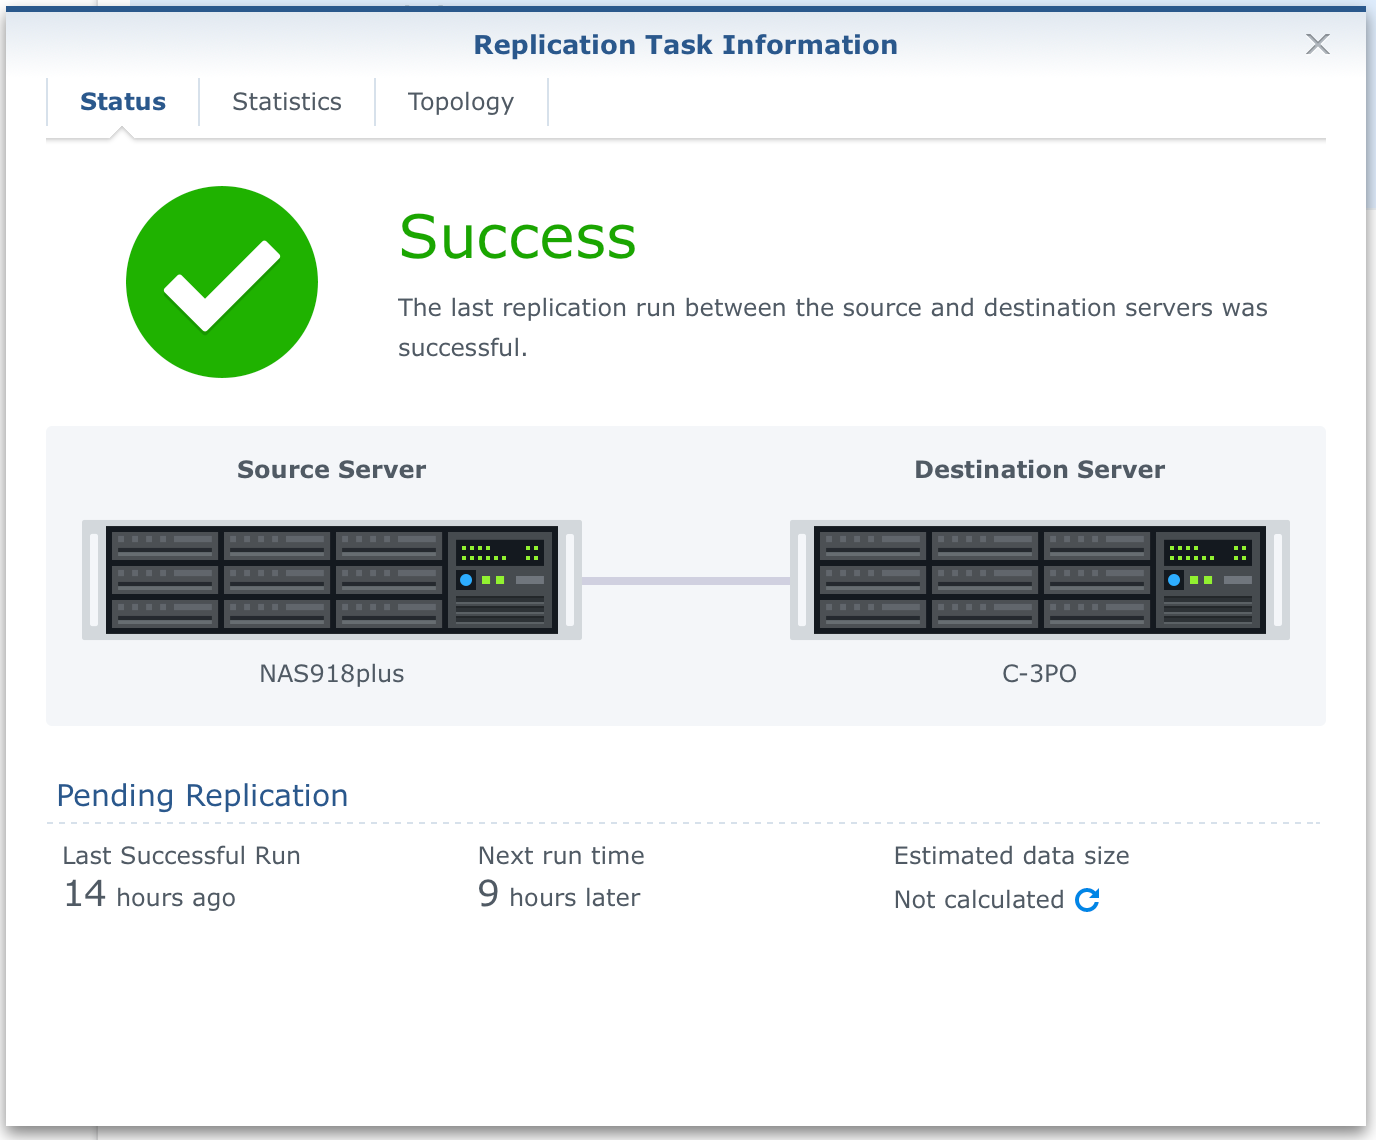
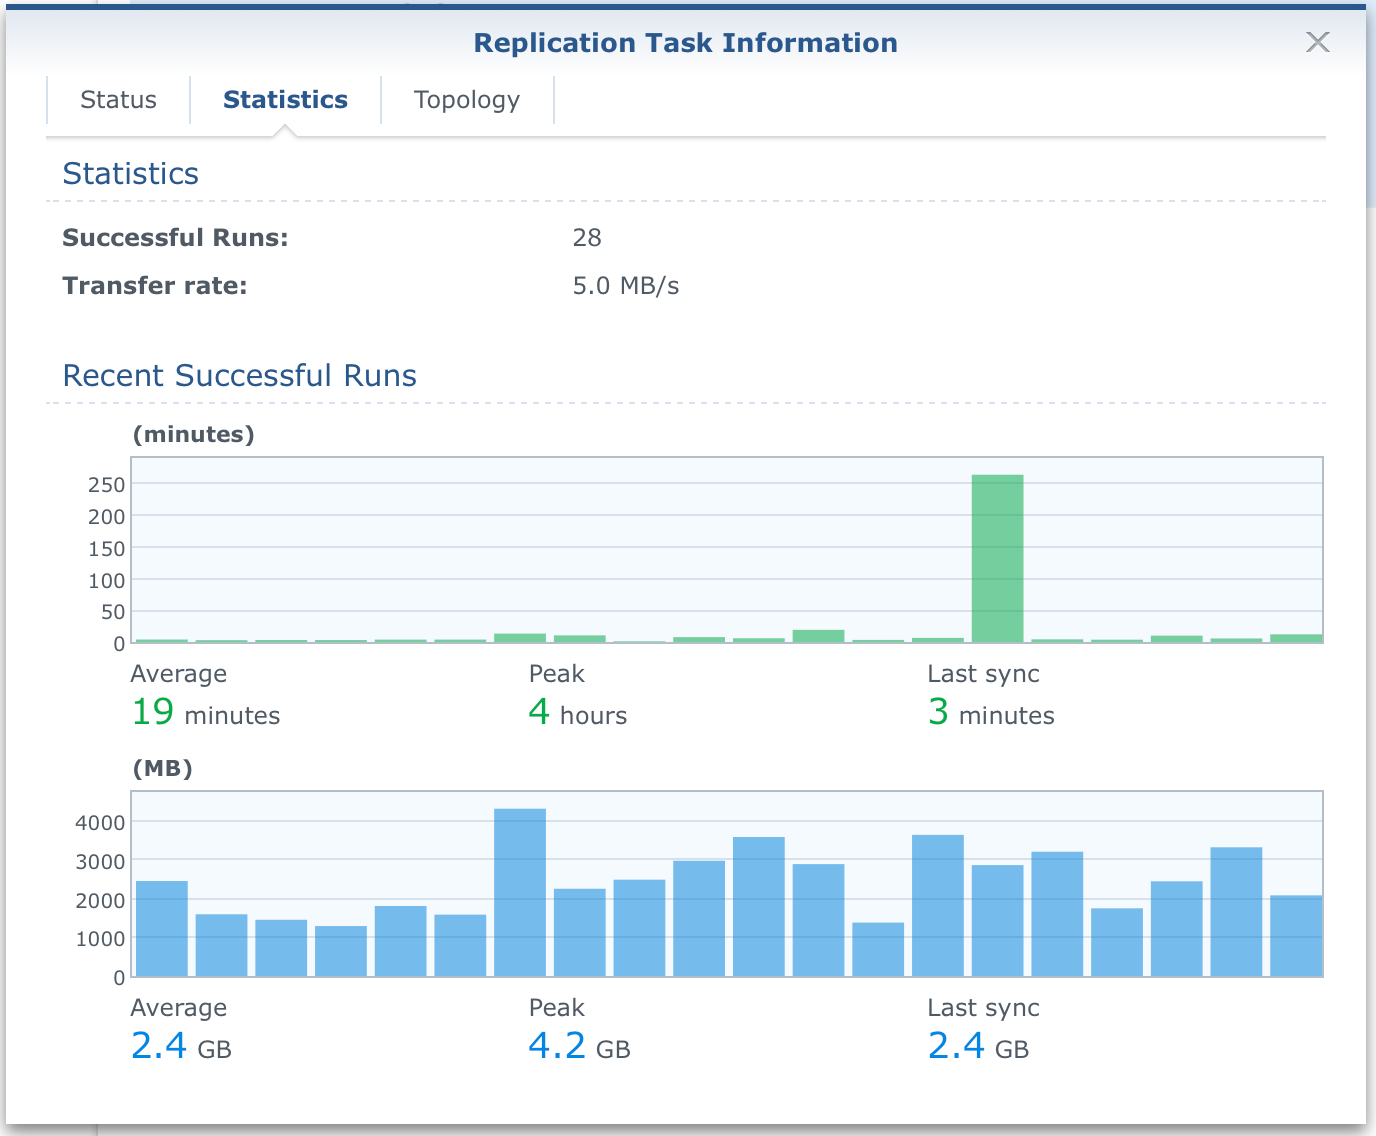
Replication tasks also have a nice little task information dialog where you can see some statistics on a specific job.
So all in all, personally I think this is a great way to have a fast and secure way of resorting to your data without using the slow classic backup restore. Keep in mind that this method of backup is useful for dynamic files that change often as opposed to large media files that you almost never change (well that will depend on the business you are running). Not that large media files are not someone bread and butter, but the idea behind snapshots is to keep your active, most important content protected from accidental damage, corruption of any kind, and to have a way to restore previous versions as fast as possible without the need to hook up any external drives (with outdated backups), wait for the backup to complete and then, in the end, realize that you don’t have a version of a backup that you want.
In most cases, people lose a lot of time just because their backups are not up to date and the only thing you want when a disaster strikes, is to get back on track. Snapshot and Replication might be just the thing for you.
Hopefully, this was a useful read and will give some idea of what a compatible Synology NAS and its Snapshot and Replication backup package can do for you. As always, ask for comments and criticize in the comments below.
Replication recovery methods
We have already seen how to recover from a local snapshot, but how does it all work when you are in a replication model?
To make use o remote replication you will have two options. Switchover and Failover.
Switchover can be used when you have both «sites» (NAS device) up and running fine. At any moment you can decide to switch the main NAS role to the secondary NAS for whatever reason.
One example might be that on your main side your folder that is a replication needs to be maintained in some manner and you need to have your users continue to use the data, so you switch over to the other site.
Failover on the other hand will/can be used in cases when your current main NAS is down or inaccessible for whatever reason. In that case you failover to your secondary location to continue to use the content.
An example of this would be in case there is a major problem with your NAS volume, drives, or the NAS itself.
Now that you know the difference, let’s see how to recover in case you need to fail over to your secondary NAS.
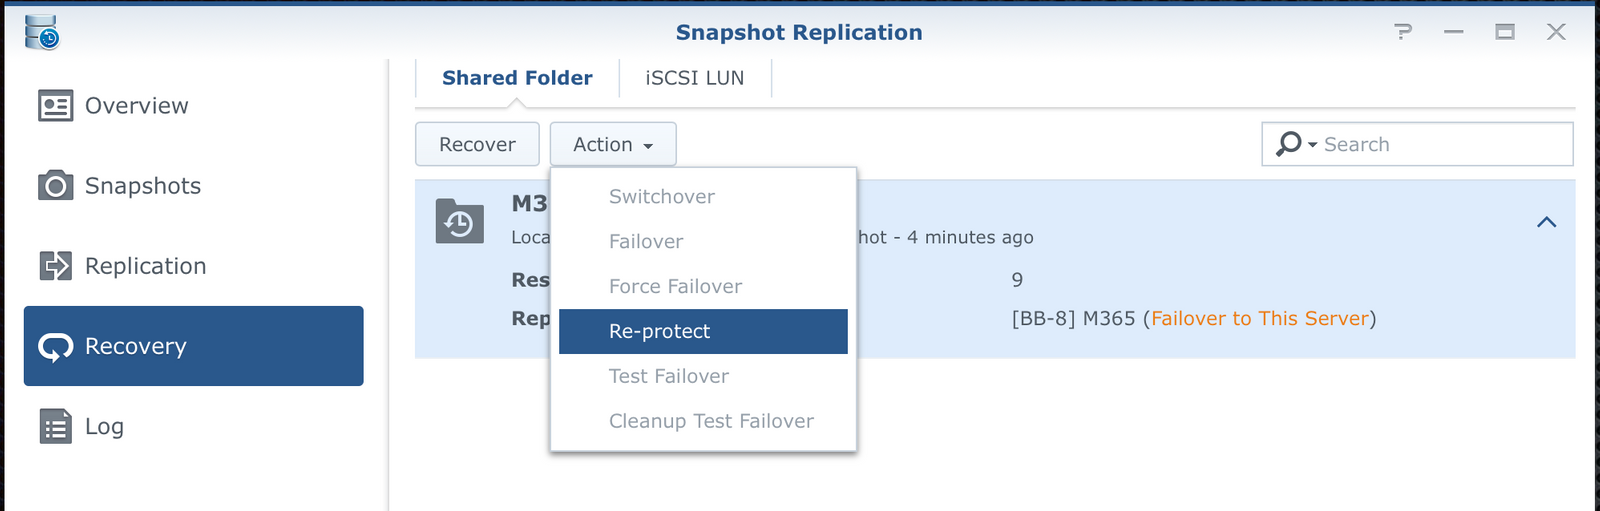
First log into your NAS2 and in the Snapshot Replication app initiate a failover from the Action menu.

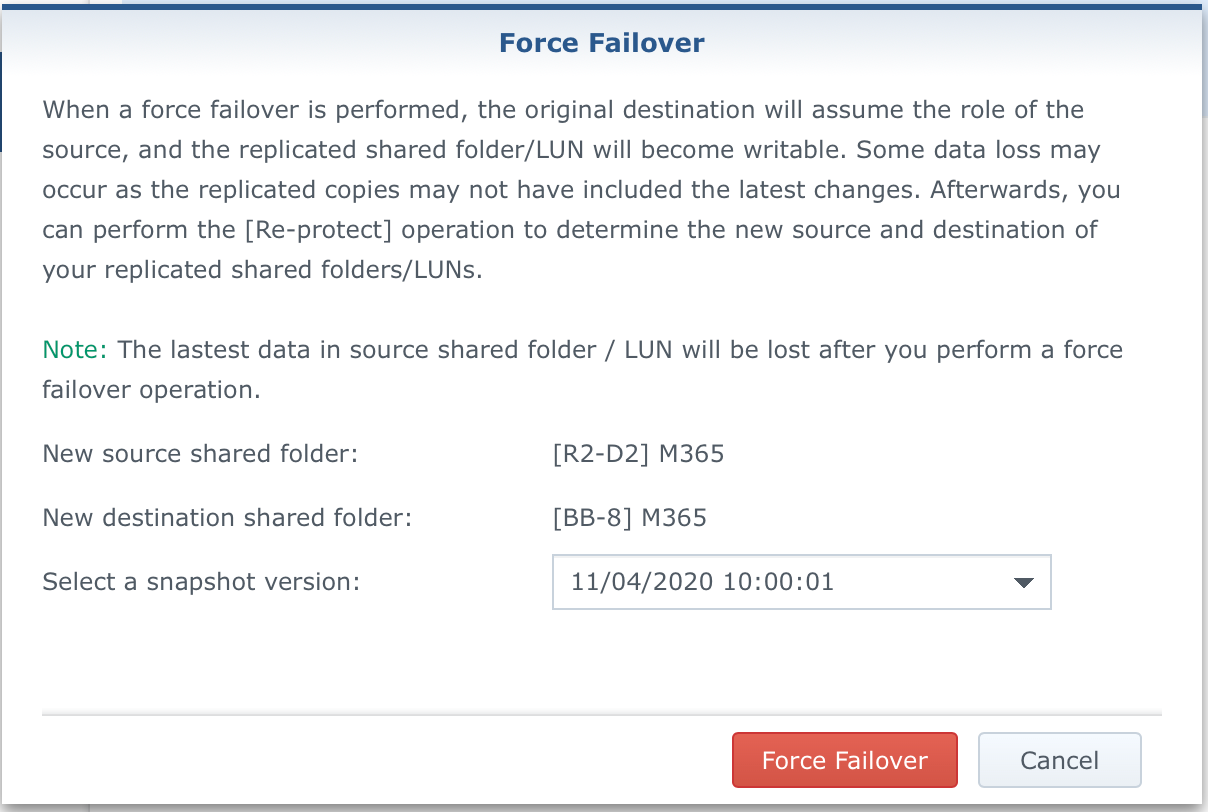
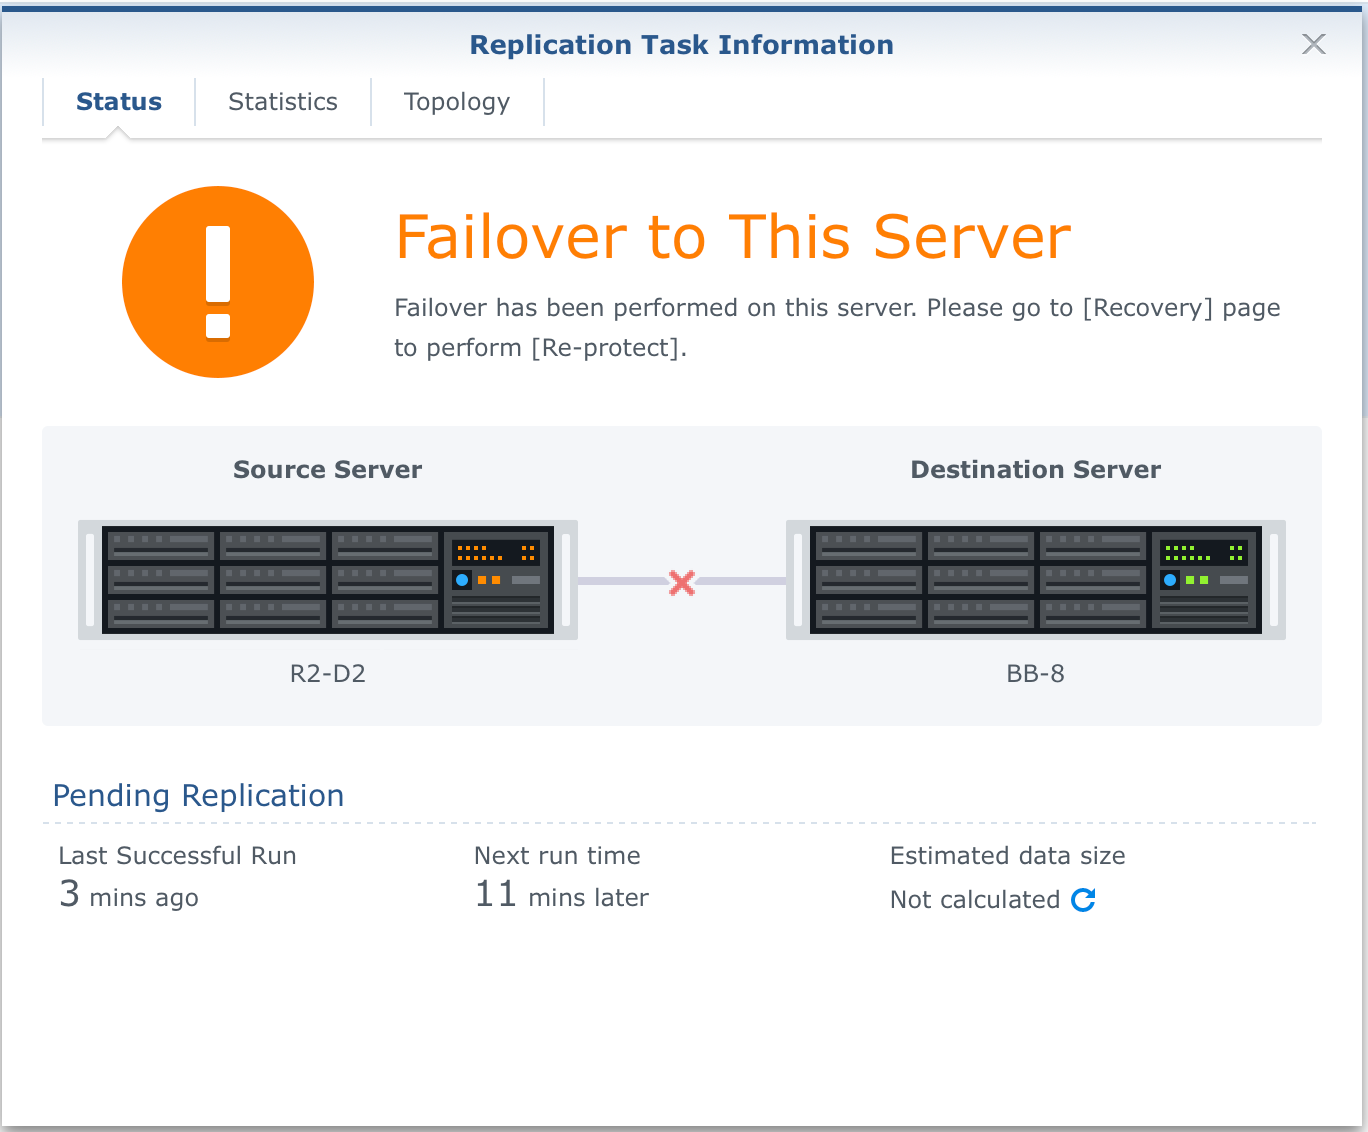
Despite the image above, failover is complete and successful. You simply need to re-protect your new destination (NAS2) to make it a new main replication point.
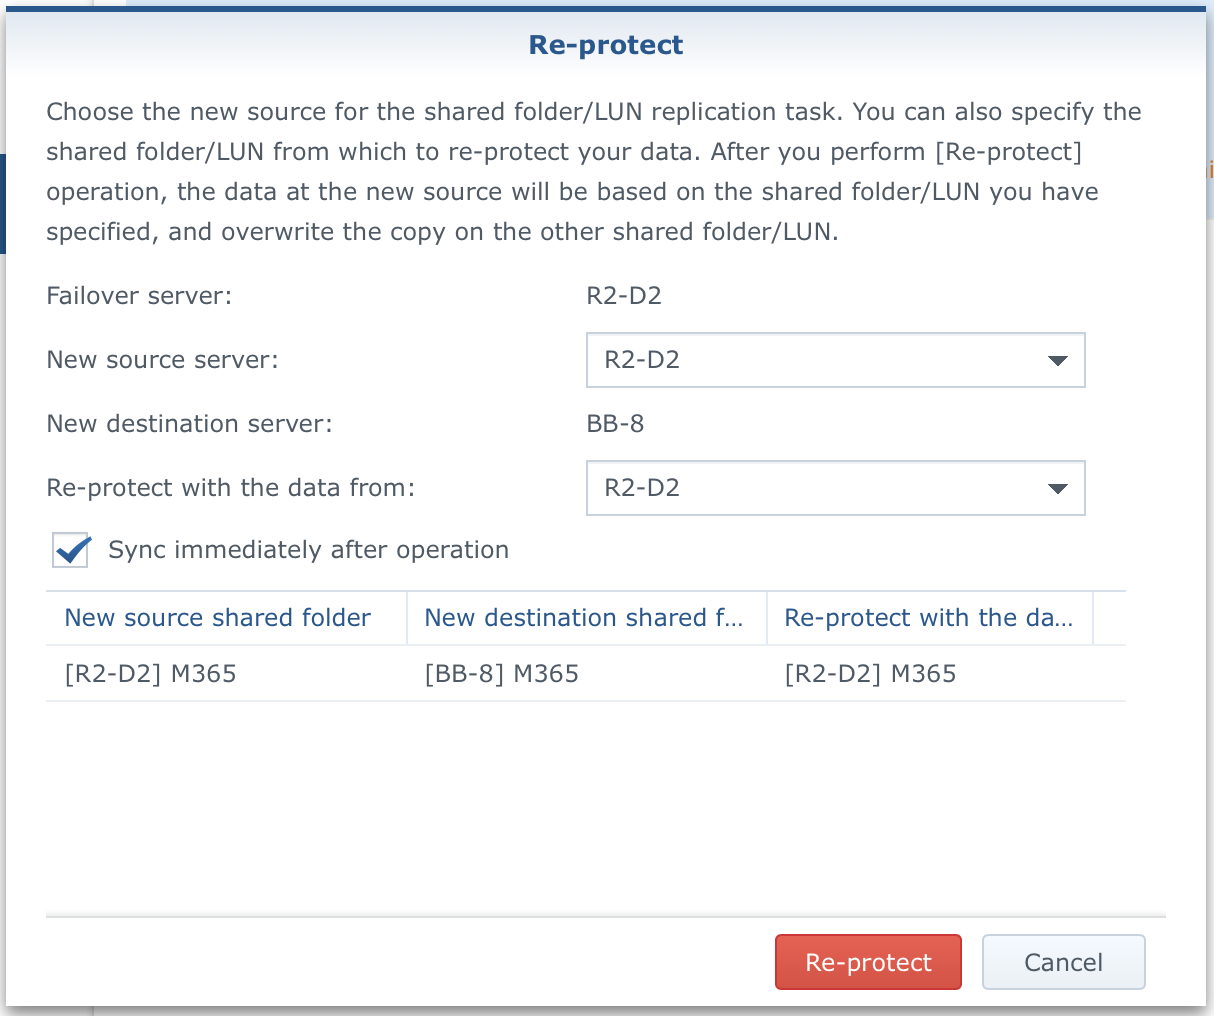
So now we have decided to use NAS2 and its snaped data as the new source NAS and source data for this replication task.
There you have it, NAS2 is now the new «master» device that will have a copy of your data until you repair the damage on NAS1.
Afterward, you can recreate the replication task from NAS2 to NAS1 and start fresh.