
What is SyncToy Windows 10? How to use SyncToy to sync folders or files automatically? What if SyncToy task scheduler is not working? This post on MiniTool will show you what you want to know. It will also show you an alternative to SyncToy – MiniTool ShadowMaker.
SyncToy Windows 10
When you use a Windows computer, you usually might back up your important files to avoid losing data after sudden system failures. Is there any method to back up crucial data periodically and automatically? Most commonly, you may choose to sync folders in Windows 10.
As for synchronization, it is usually related to cloud storage services, for example, Dropbox or OneDrive, but you can also sync your files or folders locally. Here, Microsoft has released its own sync tool called SyncToy.
This is a free syncing application that is a part of Microsoft’s PowerToys series. It offers an easy-to-use graphical user interface for syncing files and folders between locations. Some of the typical uses include sharing files with other computers and creating backup copies of files & folders. Additionally, it is written using Microsoft’s .NET framework and uses Microsoft Sync Framework.
How to Use SyncToy Windows 10
After knowing this Windows 10 sync tool, some of you may want to know how to use SyncToy. Actually, it is quite easy to sync folders Windows 10 with this sync app. Here is the guide below:
Operation 1: Download and Install Microsoft SyncToy on Windows 10
Step 1: First of all, download SyncToy from a third-party source like download.cnet. Note that Microsoft has removed the official download link.
Step 2: Once the .exe file is downloaded, please double-click it to start setup.
Step 3: Please read Microsoft Sync Framework 2.0 Core Components agreement and click the Accept button to continue.
Step 4: Windows is installing Microsoft Sync Framework 2.0 Core Components, please wait patiently.
Step 5: Check I have read and understand the warning above, and agree on the license agreement by hitting the I agree option.
Step 6: Choose a destination directory where you want to install SyncToy. Then, confirm the installation to finish all the operations.
After you have downloaded and installed Microsoft SyncToy on Windows 10 computer, now let’s see how to use it to sync files or folders.
Operation 2: Sync Folders Windows 10
To start synchronizing your files or folders with Microsoft SyncToy, you need to do the following steps:
Step 1: Double-click SyncToy 2.1 on your Windows 10 PC to open it. Then, please click the Create New Folder Pair button to go on folder sync.
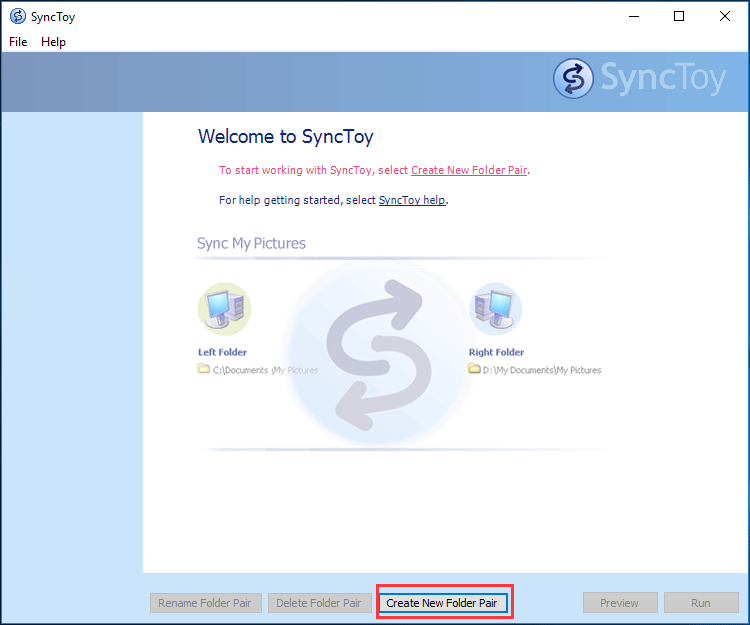
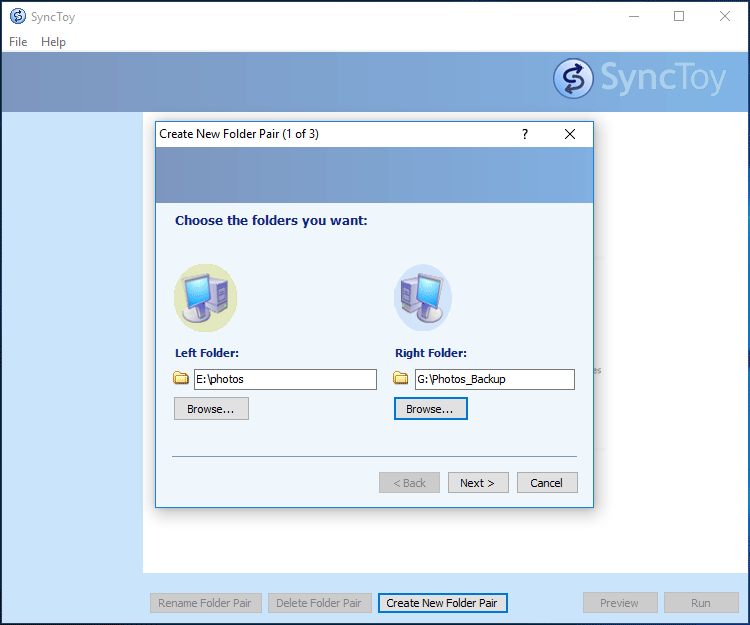
Step 2: In the pop-up window, click the Browse button to select Left Folder and Right Folder to continue. Then, click the Next button.
As for the former folder, it should be one on your computer that contains personal information like pictures, documents, videos, and more. As for the latter folder, it should be a folder on the external hard drive for each folder you want to synchronize from your computer.
Tip: Here, you can create a new folder on an external hard drive or USB flash drive. You can give the folder a name that allows you to recognize it as a backup folder, like Photos_Backup, as shown below.
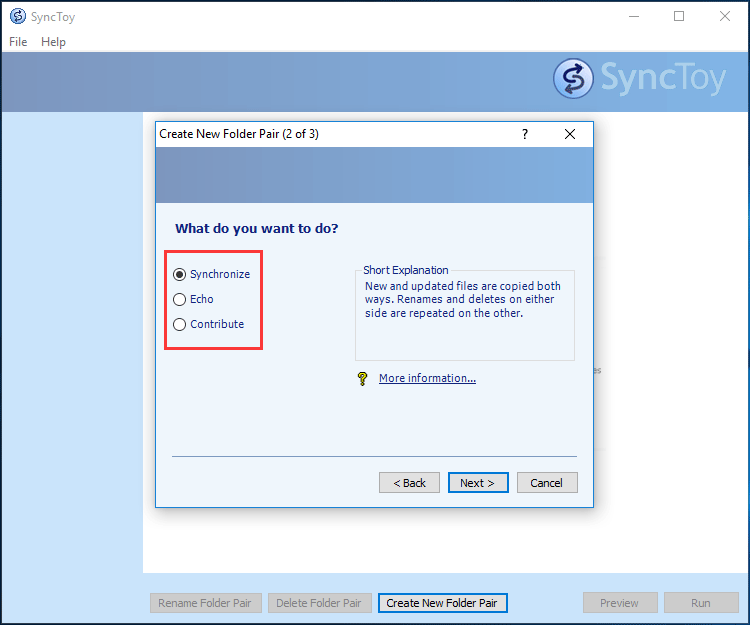
Step 3: SyncToy Windows 10 offers you three options to synchronize two folders and you need to choose one sync method that you want to use.
Synchronize: This option will synchronize any new, updated, renamed or deleted files. This means if you delete or rename any file on either side, the changes will be also performed to the second folder. In other words, both of these two folders have exactly the same files.
Echo: This option works similarly as the previous option but with one difference that is changes are only applied from the left folder to the right folder. That is to say, if you make any changes (file modifications, new files, rename, delete) to the right folder, there will not any changes in the left folder.
Contribute: This option is like the Echo option but it doesn’t allow deleting. In other words, if you delete any file in the left folder, that folder won’t be removed from the right folder.
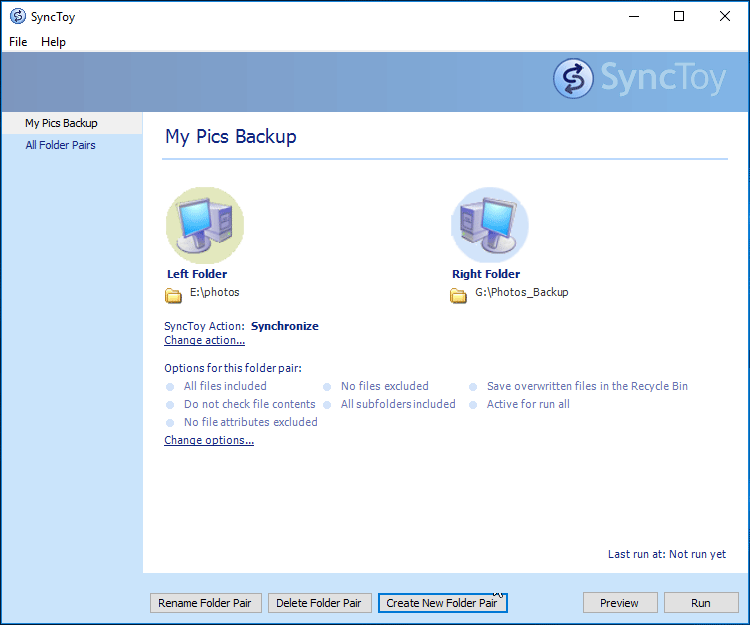
Step 4: Input the name of the folder pair (e.g. My Pics Backup) and click the Finish button.
Step 5: Then, you can see the SyncToy Acton and some details about the task. Here, you can change the action. The job has not been run yet. You can click the Preview button to see the files being synced. From there, you can exclude certain ones. If everything looks correct, just click the Run button.
Step 6: After successful folder sync is created by SyncToy Windows 10, you can see a detailed report.
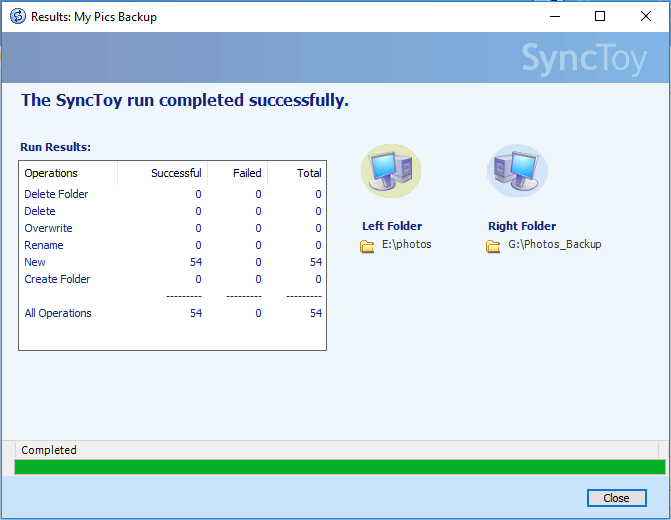
Tip: If the sync task is not successful, you are able to go to see what errors have occurred.
Now, all information about how to use SyncToy has been shown to you. To protect data well, you may choose to sync folders in Windows 10 once a week, every day, etc. Then, some of you might want to know: how do I schedule SyncToy in Windows 10? Just get the answer from the following part.
SyncToy Windows 10 Schedule
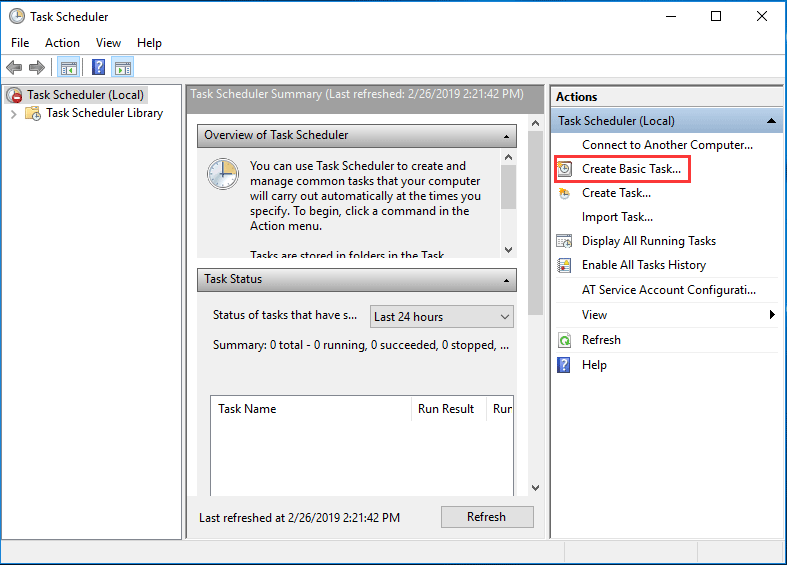
How to schedule SyncToy in Windows 10 to run automatically? Here, you need to use Windows Task Scheduler. Follow the step-by-step guide:
Step 1: Go to Windows 10 Search box, type task scheduler and click the result to run this tool.
Step 2: Click Create Basic Task in the right Actions pane.
Step 3: In the pop-up window, enter a name and a description so you can recognize the task easily.
Step 4: Please decide when you want the synchronization to start; this is entirely up to you.
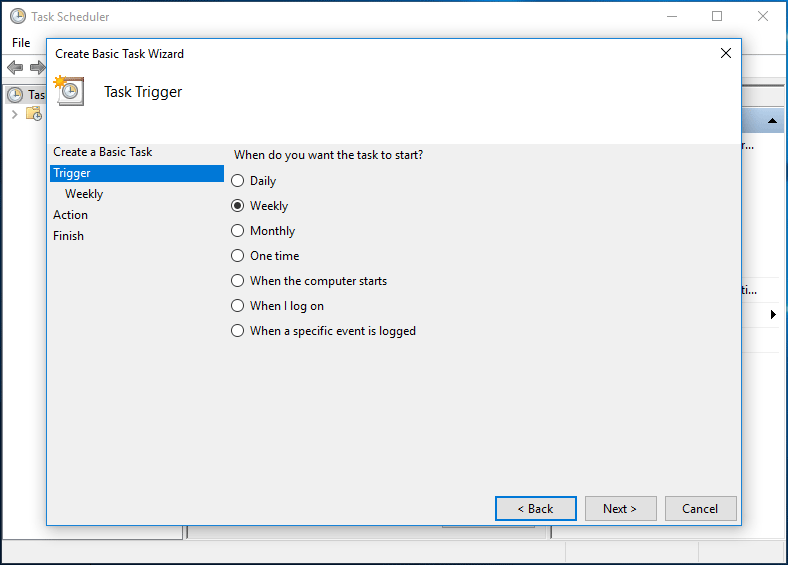
Step 5: Set up the time point for the task to run.
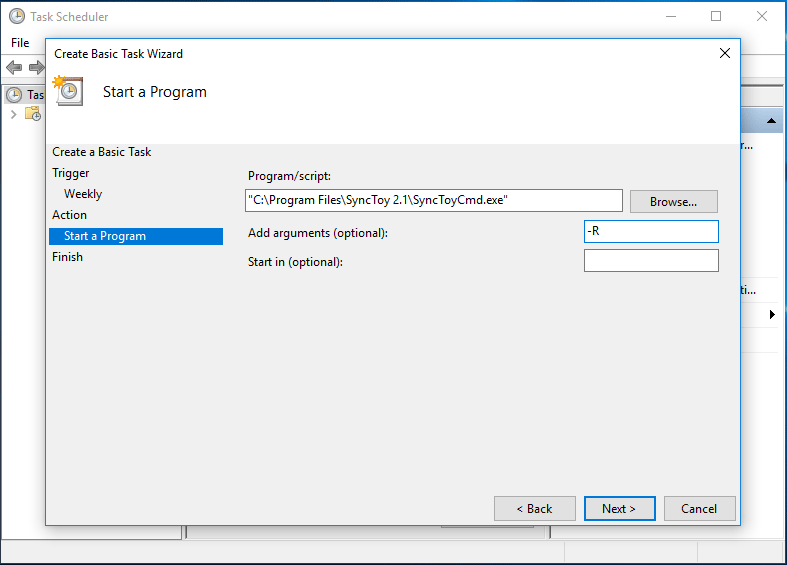
Step 6: Check the Start a program option.
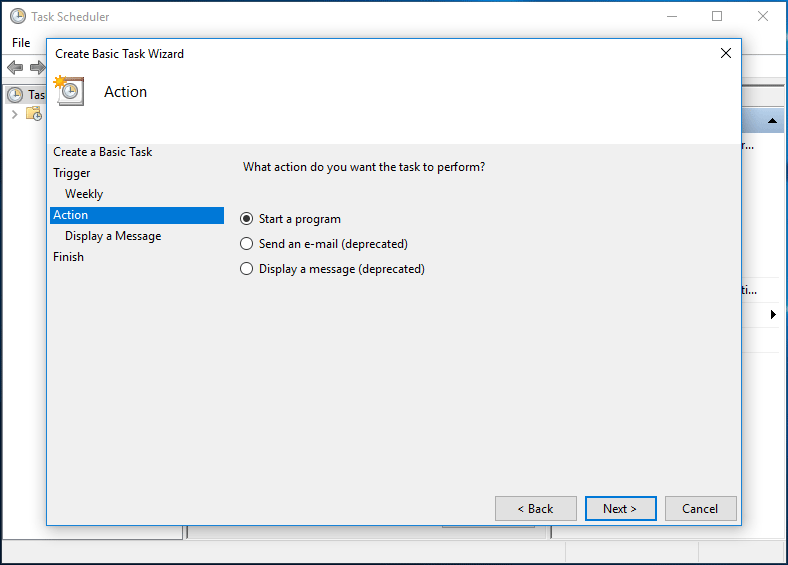
Step 7: Click the Browse button in Program/script and locate to SyncToy.exe. Normally, it is located in “C:\Program Files\SyncToy 2.1\SyncToyCmd.exe”. And type -R in the Add Arguments textbox.
Step 8: Then, you can see an overview of how the task will run. Just click the Finish button

As you see from the above guide, Windows Task Scheduler can assist you in SyncToy Windows 10 schedule. However, it is complex to set up an automatically run Windows sync task.
What’s more, some of you may report the issue: SyncToy Task Scheduler not working Windows 10. Sometimes, when you sync folder in Windows 10 with SyncToy, some errors like SyncToy failed to create folder pair, SyncToy access denied, SyncToy not copying all files, etc. may appear.
In order to sync files or folders in Windows 10 on a regular basis easily and effectively, you probably need a SyncToy alternative. In the following part, we will show you professional file sync software, MiniTool ShadowMaker.
MiniTool ShadowMaker, a piece of reliable and professional Windows backup software, can be used to back up files, OS, disks or partitions within simple clicks. Additionally, it can be as free sync software since it offers a feature called Sync that allows you to sync files or folders to other locations.
Importantly, MiniTool ShadowMaker offers an option called Schedule, enabling you to automatically sync files or folders easily in case of SyncToy Task Scheduler not working Windows 10.
Right now, you can download this SyncToy alternative from the following button and install it on your Windows 10 to start file synchronization.
MiniTool ShadowMaker TrialClick to Download100%Clean & Safe
Tip: The Trial Edition of MiniTool ShadowMaker allows you to free use for 30 days. If you want to use it all the time, please upgrade it to Pro Edition or an advanced one.
How to sync folders Windows 10 automatically? Here is the guide.
Step 1: Run MiniTol ShadowMaker Trial Edition on your computer.
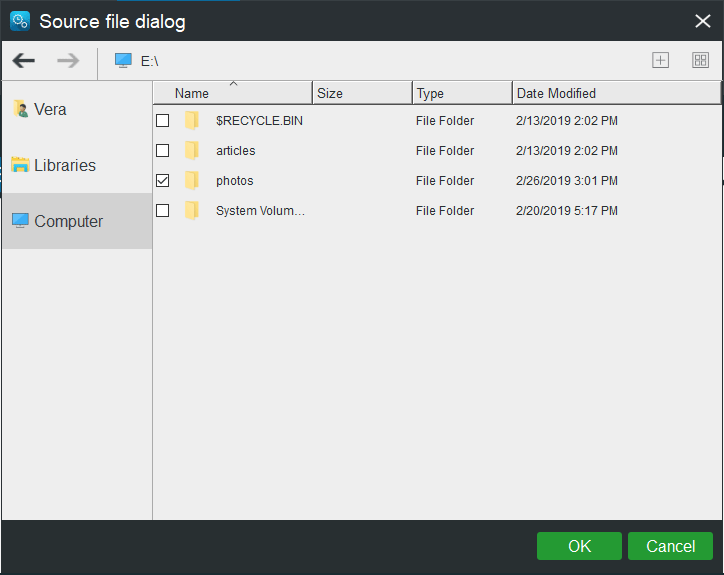
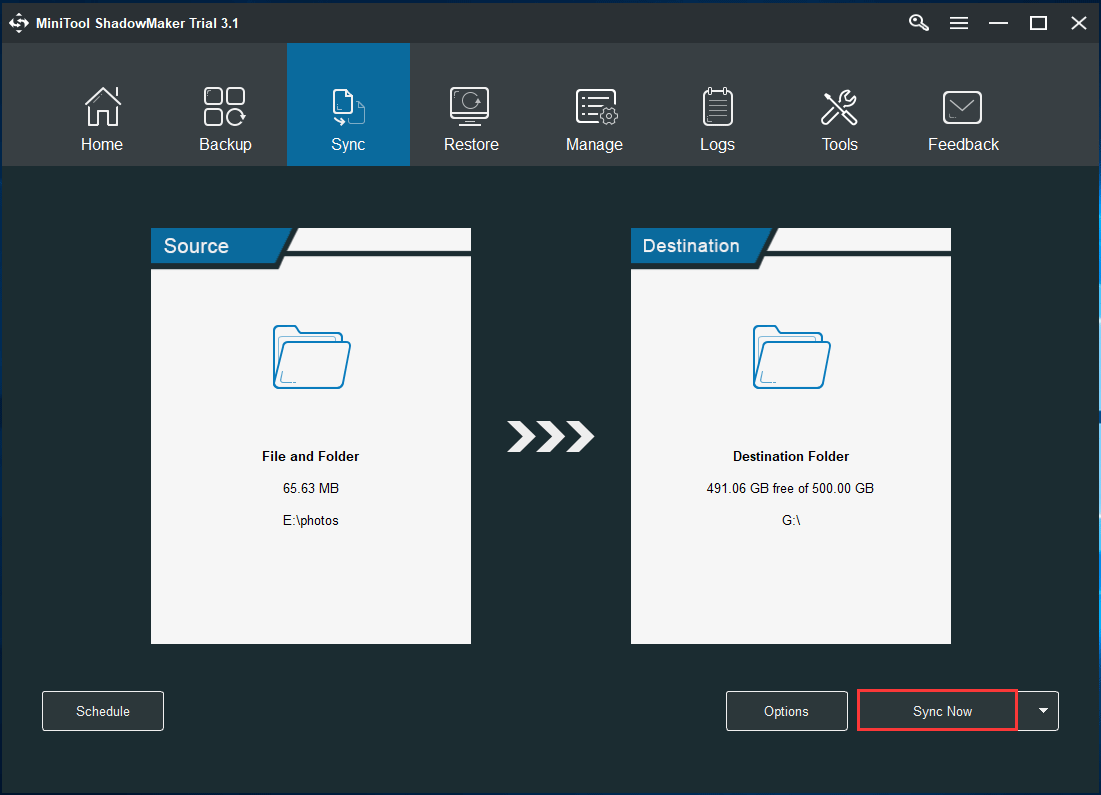
Step 2: Then, this Windows 10 SyncToy alternative will go to the Home page. Just click the top Sync feature for file or folder sync. In this page, you can view two modules: Source and Destination.
Go to the Source part, and choose files or folders that you want to sync.
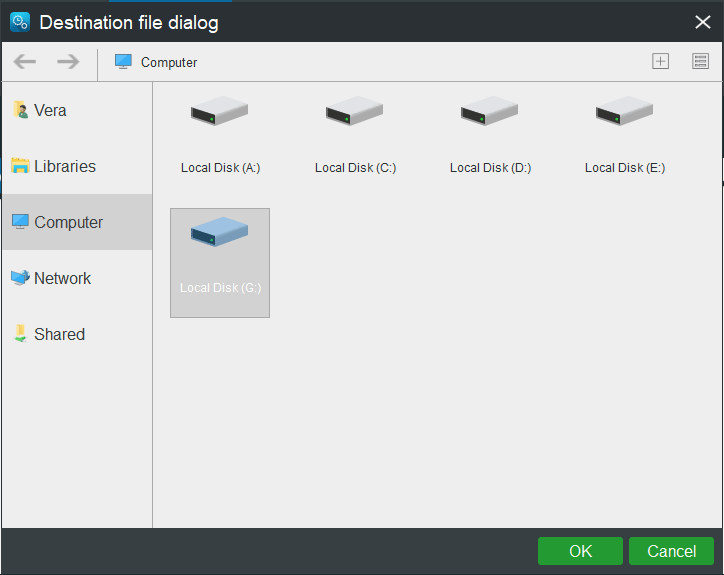
Then, go to the Destination part, choose a storage path to save the synchronized files or folders. Here, you can choose a USB flash drive, external hard drive, Network or NAS.
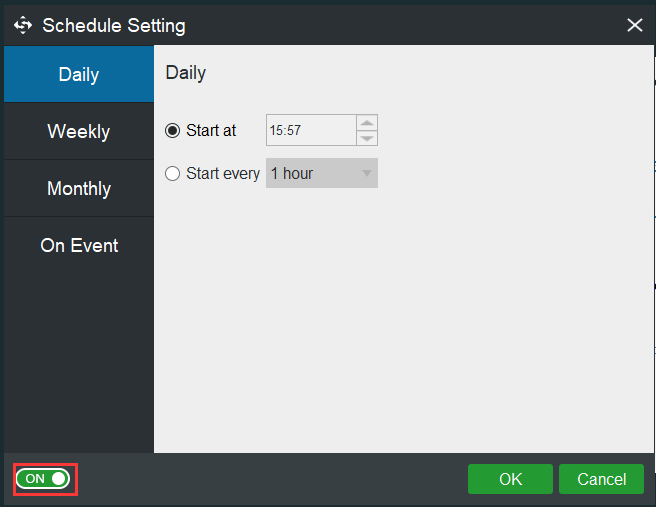
Step 3: Now, the sync source and destination are selected. MiniTool ShadowMaker will return to the Sync interface. If you want to know how to sync files automatically in Windows 10, you can make full use of the Schedule feature in the bottom left corner of Sync interface. Just click it and switch this feature to ON.
Here, four schedule settings are offered: Daily, Weekly, Monthly and On Event. Please choose one, set up a time point and click the OK button to confirm the setting for automatic file sync.
Step 4: After automatic file sync setting is set, please click the Sync Now button to execute the sync task immediately. And automatic sync tasks will be done at the time point that you have set.
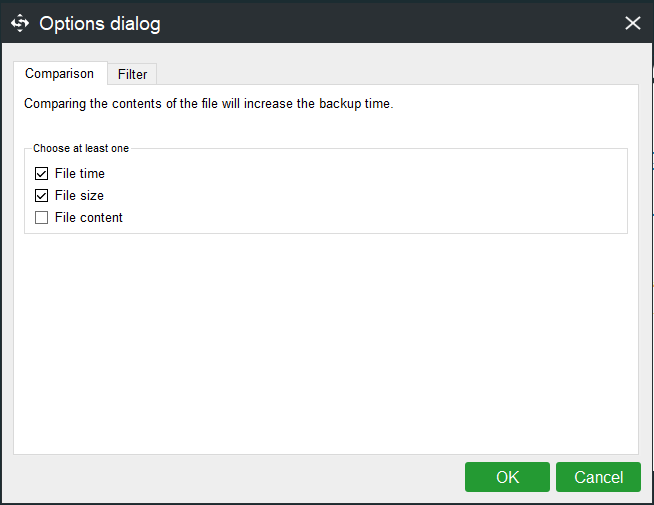
Tip: Before executing folder or file sync, you can use Options to make advanced settings such as Comparison and Filter, as shown below. For more information, go to the help document.
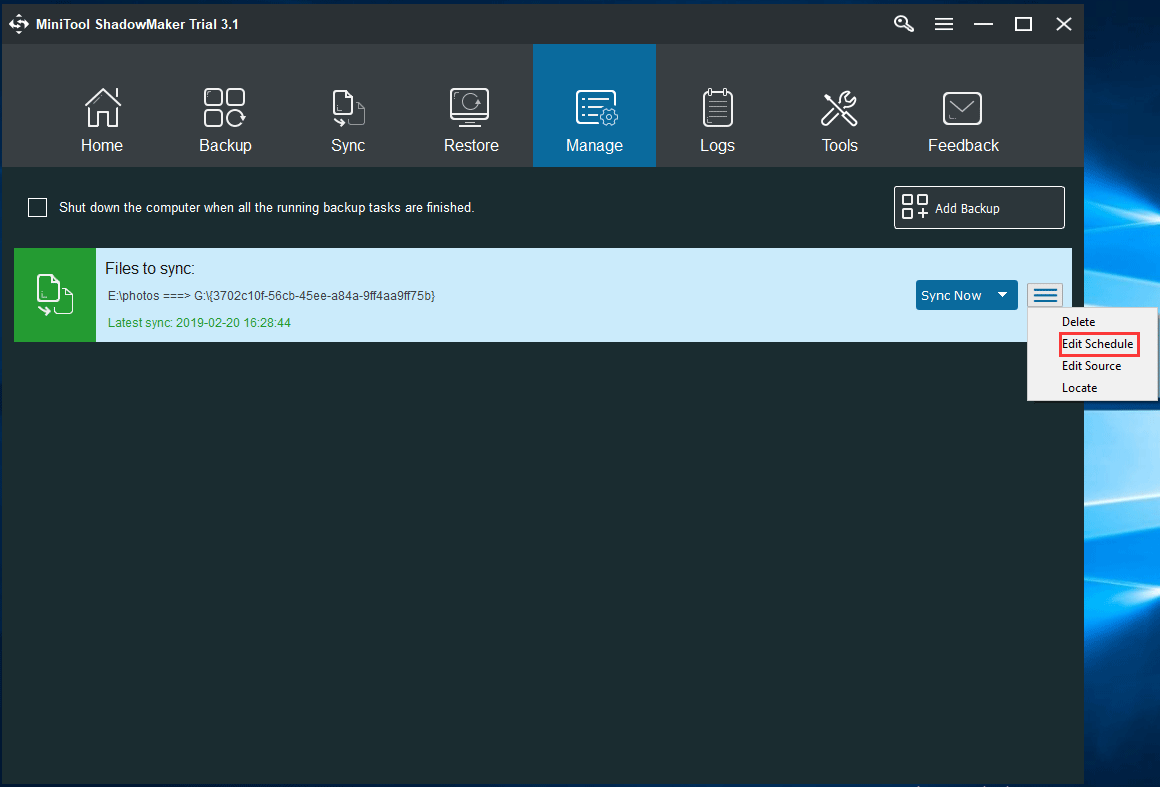
You can also let this alternative to SyncToy Windows 10 schedule the setting in the Manage page. Similarly, you need to operate the step 1, step 2 and step 4. And then, click Edit Schedule from the context menu to set up a time point for automatic file sync.
Further reading:
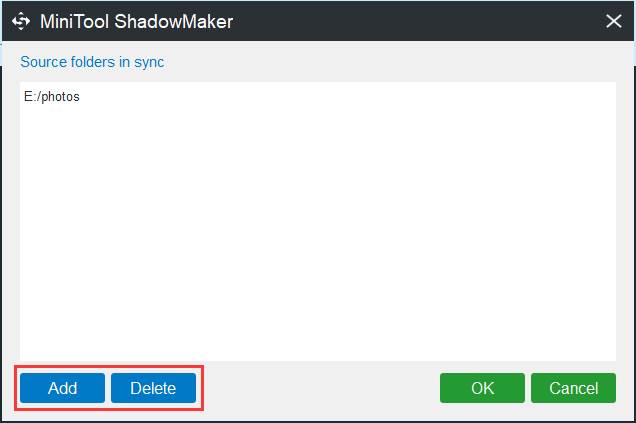
In Manage, you can manage your sync task. For example, by clicking Edit Source, you can receive the following window where you are able to click the Add or Delete button to change the source folders in sync. After updating successfully, you still need to click the Sync Now button to finish the sync task.
If you want to view the folders or files that you have synchronized by using the SyncToy alternative, MiniTool ShadowMaker, you can directly locate to that folder.
“I had SyncToy in Windows 10 but it’s a complex and sometimes I met SyncToy Task Scheduler not working Windows 10. Thankfully, MiniTool ShadowMaker is a good SyncToy alternative.”Click to tweet
Bottom Line
What is SyncToy Windows 10? How to use SyncToy to sync folders? This post gives you the answers in detail. However, it is fairly complex for most of you and some of you may even report the issue of SyncToy Task Scheduler not working Windows 10 if you need to sync folders automatically.
Fortunately, MiniTool ShadowMaker, SyncToy alternative 2018, can be used to satisfy your needs. Just get it from the following button and sync folders in Windows 10 easily.
MiniTool ShadowMaker TrialClick to Download100%Clean & Safe
If you have any question when using our free sync software, please leave your idea in the comment part or send an email to [email protected]. Of course, any suggestions are also appreciated.
SyncToy Windows 10 FAQ
Does SyncToy work on Windows 10?
SyncToy 2.1 can work perfectly on Windows 10. If you are using this program in Windows 7/8 and you will be happy since you can continue using it on Windows 10. Just download SyncToy from Microsoft’s website and have a try.
Can SyncToy run automatically?
SyncToy is an excellent tool to ensure your files are kept in different locations. You can run this file sync tool automatically as long as you configure a task with Task Scheduler.
How do I schedule SyncToy in Windows 10?
- Go to Windows 10’s search box and search for task scheduler.
- Click Create Basic Task in the Actions section.
- Type in a name and description.
- Choose the frequency of when to start the task.
- Set up a time point.
- Select what action to perform the task.
- Finish the Program/script section and confirm the task.
How do I sync files in Windows 10?
MiniTool ShadowMaker, a professional file sync software, can be used to help you easily sync files in Windows 10.
- Download MiniTool ShadowMaker and install it on your PC.
- Choose a local computer to manage.
- Go to the Sync window, choose files that you want to sync and specify a path.
- Start the file sync operation at once.
SyncToy is an excellent tool, which allows you to sync folders in Windows 10 in few clicks. Synchronizing a folder pair is required pretty often, especially if you download a lot or you work on multiple computers. While there are cloud services that can do this, but if you are looking at something which is not hooked to the cloud and is pure local sync solution, this tool is perfect. It works across the network if permissions are available.
SyncToy is an official software from Microsoft. It allows us to set up folders to sync in such a way that any modification in one folder is instantly available on another. Yes, you can configure it further to set up one-way sync, or only act as a contributor and so on.
Once you download, install, and launch SyncToy, you get to see a window that asks you to create a folder pair, i.e., define the source and destination folders.
")
Once you have created a folder pair, move on and decide what you want to do out of three available options, i.e., Synchronize, Echo, or Contribute.
")
What are the Synchronize, Echo, and Contribute?
- Synchronize: It will maintain an exact copy of files in both the folders.
- Echo: Any new and modified files are copied left to right. Renames and deletes on the left are repeated on the right.
- Contribute: While the new and updated files are copied left to right, there is no deletion.
Later, after this step, you will be asked to name this folder, which will save you from creating the folder pair every time you want to sync these folders.
")
In addition to the names of each folder pair you have created, the left navigation menu will also contain an entry for “All Folder Pairs.” Selecting “All Folder Pairs” allows you to preview or run multiple folder pairs at a time.
When you run the preview mode, you can view all operations. It includes folder creation, deletion, overwrites, renames, and so on. A summary of this becomes available in the preview window. Finally, when you run the sync between the folders, you get exhaustive details of success, failure of each of the operations.

Inclusion and Exclusion during Folder Sync
The ‘Change options…’ allow you to make Exclusions and inclusions by defining file types and based on other attributes etc. as shown below. Once done with all these, you can go ahead and preview, which allows you to preview the run.
")
- Files to include: Specify what files to include in the SyncToy run. The default is to include all the files. You can customize SyncToy to include only specific files, such as *.jpg, to include only .jpg files. To add multiple extensions, separate them using a semicolon.
- Files to exclude: Specify what files to eliminate in the SyncToy run. By default, this text box will be blank. The exclusion text box provides the ability to leverage a wild card character similar to the inclusion text box. Also, multiple values can be specified using a semicolon between each, as described above, for the inclusion text box.
- Exclude read-only files, hidden files, and system files.
- Check file contents: This option is off by default. When running with “check file contents” selected, SyncToy will perform a SHA1 hash against all files. Selecting this option will make a SyncToy preview or take longer but provides a guarantee that SyncToy will never conclude that two files with the same name, size, and date are identical when in fact, their contents are different.
- Select subfolders: Specify which subfolders to include. The default is to include all subfolders, but you can use this option to unselect folders that you do not want to add in the SyncToy run.
- Active for a run all: This option is on by default. This folder pair will be selected by default when you view multiple folder pairs before running all folder pairs. You can always unselect a pair from the multiple folder pair screen before running. If this folder pair could be part of a frequent SyncToy set of actions, such as nightly backups, select this option.
- Save overwritten files in the Recycle Bin: This option is on by default. Before overwriting an older file with a newer file or deleting a file, by default, SyncToy will move the older data to the Recycle Bin. If this option is unchecked, the older data is overwritten with the newer file. If you delete a folder or file, it will be gone forever. You cannot recover older files after this, but it will occupy less space on the storage.
How to schedule Folder Sync using SyncToy
This software is pretty old, and developers did not add automatic sync or way to run the sync operation every few minutes. If you would have expected real-time sync, it is not there. The only way out is using Task Manager.
- Type Task Manager in the Start menu, and click on it when it appears.
- In the Task Manager, select Create Basic Task in the Actions pane on the right.
- Add a Name and Description and select Next.
- Choose when you want the task to star and date/times (if applicable) to run the task and select Next.
- Choose Start a Program option and select Next.
- Select Browse and locate the SyncToyCmd.exe.
- Type “-R” in the Add Arguments textbox. –R all by itself will run all folder pairs that are active for a run all. If you want to run just a single folder pair, add –R “My Pair” to the end of the command line. If the folders have space in their name, then make sure to use the quotes.
SyncToy is amazing utility, simple and easy to use, light on resources, and pretty fast as well, a must-have service for windows. Go ahead and give it a try, do share your views about SyncToy via comments.
Download SyncToy
Достаточно часто возникает необходимость автоматически синхронизировать содержимое двух папок – например, с целью поддержки на внешнем носителе актуальных версий документов, резервного копирования файлов и т.д.
Реализовать это можно, например, при помощи небольшой бесплатной утилиты от Microsoft – SyncToy. Первоначально она предназначалась для синхронизации фотографий на фотоаппарате и компьютере, однако возможности программы шире.
При запуске, SyncToy предлагает создать пару папок, между которыми будет происходить синхронизация содержимого (Рис. 1). Можно создать любое количество пар папок.

Рис.1
На следующем шаге нужно выбрать папки, синхронизация содержимого которых должна выполняться (Рис. 2).

Рис. 2
Далее программа предложит выбрать способ, которым будет выполняться синхронизация (Рис. 3). Возможны три варианта:
-
Синхронизировать (Synchronize) – изменения в файлах любой из папок синхронизируются во вторую;
-
Отразить (Echo) – изменения в файлах левой папки синхронизируются в правую (при удалении файлов в левой папке файлы в правой также удаляются);
-
Дополнить (Contribute) – действия аналогичны сценарию «Отразить», за исключением того, что файлы в правой папке не удаляются при удалении их из левой.

Рис. 3
На последнем шаге нужно задать понятное имя паре папок и нажать кнопку «Готово» (Finish), (Рис. 4).

Рис. 4
Пара папок создана – теперь можно запустить синхронизацию, нажав по кнопке «Run» (Выполнить).
Изменить папки для синхронизации и имя пар SyncToy не позволяет – если вы допустили ошибку, исправить ее можно, пересоздав пару.
Скачать программу (на английском языке) можно с сайта Microsoft по ссылке:
http://www.microsoft.com/download/en/details.aspx?displaylang=en&id=15155
Page Content
What Is Microsoft SyncToy for Windows 10/11?
How to Utilize SyncToy?
Warning! SyncToy Not Functioning Issues
Is There an Alternative to SyncToy? Discover SyncToy Replacement
Frequently Asked Questions: SyncToy for Windows 10/11
What Is Microsoft SyncToy for Windows 10/11?
SyncToy was a free software utility in Microsoft’s PowerToys collection that offered an intuitive graphical user interface for synchronizing files and folders in Windows XP, Vista, 7, and 10. — Wikipedia.com
Microsoft SyncToy is a utility tool that enables users to synchronize files and folders between two different locations. It can be utilized for synchronizing files on a local computer, a network share, or a remote server.
SyncToy can be utilized for creating backups, synchronizing files across multiple computers, or maintaining two folders in harmony. It offers both one-way and two-way synchronization capabilities and can be employed with various storage devices, such as external hard drives, USB flash drives, and cloud storage services.
SyncToy is included with all versions of Windows starting with Windows Vista and is available for download from the Microsoft website.
SyncToy Download
Important: SyncToy download availability ended in January 2021.
If you go to the official page and try to download SyncToy, you’ll get a 404 error! Microsoft no longer provides SyncToy downloads, and SyncToy 2.1 is the most recent version available.

Fortunately, you can download it from CNET.
Click the green button to install SyncToy.
Please confirm the following prompts:
- Translate into English:
- Read the Microsoft Sync Framework 2.0 Core Components agreement and select the «Accept» button.
- Check «I have read and understand the warning above» and click «I agree.»
- Browse to select the installation location, then start the download and installation process.
Then open it and check how to use SyncToy in the following section.
How to Use SyncToy?
Using SyncToy involves the following steps:
1. **Download and Install**: First, download SyncToy from Microsoft’s official website. It’s a free utility for Windows users. Once downloaded, run the installer to install it on your computer.
2. **Launch SyncToy**: After installation, locate the SyncToy icon in your Start menu or on your desktop and double-click it to launch the application.
3. **Create a New Folder Pair**: A «Folder Pair» is a pair of folders that you want to keep synchronized. Click on «New» under «FolderPairs» in the left pane. You’ll be prompted to select the «Contribute» folder (the source folder) and the «Receive» folder (the destination folder).
4. **Choose Synchronization Action**: SyncToy offers three synchronization actions:
— **Sync**: Updates both folders to have the same content.
— **Echo**: Copies all changes made in the «Contribute» folder to the «Receive» folder, deleting any extra files in the «Receive» folder.
— **Contribute**: Only adds new files or updates existing ones in the «Receive» folder from the «Contribute» folder, never deleting anything.
5. **Run the Sync**: After setting up the Folder Pair, click on the «Run» button to initiate the synchronization process. SyncToy will show you a preview of the changes before executing them.
6. **Save and Schedule**: If you want to save the settings for future use, click «Save». You can also schedule SyncToy to run automatically at specific times by clicking «Schedule».
7. **Monitor Progress**: While SyncToy is running, you can monitor its progress in the main window. Once completed, you’ll receive a notification.
Remember, SyncToy only synchronizes files and folders, not system settings or program data. Always back up important data before using synchronization tools.
Quick check: Firstly, choose the source and destination directories for SyncToy to utilize. Next, select your preferred synchronization option from the available menu. Lastly, click the «Synchronize» button to initiate the process.
Detailed Guide:
#1. Check the SyncToy Panel
#2. How to Create a Folder Pair
#1. Check the SyncToy Panel
When you launch the SyncToy application, it presents a straightforward interface containing three main concepts:
- Left Folder — The folder you wish to backup.
- Right Folder — The backup destination where you want to save the files, such as a USB flash drive or external hard drive.
- Create New Folder Pair — Establish a backup process between the left and right folders. This is also referred to as a «What-Where» backup rule.

#2. How to Create a Folder Pair
Step 1. Click the «Create New Folder Pair» button.

Step 2. Click «Browse…» to select the folder you want to back up.

Step 3. Click «Browse…» to choose the location. Here, I select my external USB drive. Click «Next».

Step 4. You’ll see three SyncToy actions in the next panel. Choose one and click «Next».

- Synchronize — In synchronize mode, files are copied in both directions. If a file is added or modified in either location, it will be updated in the other location.
- Echo — In echo mode, files are copied only from the left folder to the right folder. If a file is added or changed in the left folder, it will be updated in the right folder. However, any changes made in the right folder will not be copied back to the left folder.
- Contribute — In contribute mode, files are copied from the left folder to the right folder only. No deletions are performed.
Which mode should I check?
- Create a one-time, full backup from the local computer to an external device — Echo.
- Synchronize data files between two computers — Synchronize.
- Backup data file excluding deleted files — Contribute.
Step 5. Name your folder pair and click «Finish».

Step 6. The next panel will display the backup details, including the folder name, target source and destination, and the SyncToy action to be performed.

Click «Change options» to specify which files to include or exclude.

Step 7. Final Step, click the «Preview» and then «Run» button.

Video Tutorial — How Does SyncToy Function
In this video, the YouTuber demonstrates the primary use of SyncToy and how to synchronize folders using this free Microsoft software.
02:24 — Basic information.
04:12 — Begin to create a new pair.

Translation:
Using SyncToy to Automatically Sync or Copy Files
Attention! Issues with SyncToy Not Working
#1. SyncToy Not Copying All Files
One issue that SyncToy users might encounter is that SyncToy appears to be failing to copy all files from one location to another.
- Reason 1 — The folders you are trying to synchronize are not set up correctly.
SyncToy can only synchronize two folders located on the same drive; it does not support synchronization across different drives. Furthermore, both folders must be accessible when SyncToy is running. If one of the folders is situated on a network drive that is currently unavailable, SyncToy will not be able to copy the files.
- Reason 2 — Some of the files in the folder are being excluded by SyncToy.
SyncToy, by default, excludes certain files like system and temporary files. However, you can also add custom exclusions if you choose. If you suspect this might be the issue, you can check SyncToy’s log file to see which files are being skipped.
#2. SyncToy Failing to Sync When Run as a Scheduled Task
SyncToy can be used in conjunction with Task Scheduler to set up a scheduled backup.

However, occasionally you might encounter the issue where SyncToy’s Task Scheduler is not functioning properly. We suggest you review your setup options once again.
Well, these two issues may let you down. Why not look at a SyncToy alternative and start an essential and automatic backup?
Is There a SyncToy Alternative? Check Out the Replacement for SyncToy
Todo Backup, a free backup software, is a dependable and user-friendly backup software that ensures the safety of your systems, files, disks, and partitions across all Windows versions. With its password-protected backup feature, you can rest assured that your data is secure from loss.
Moreover, Todo Backup equips you with flexible backup options, allowing you to copy your data on a schedule to address the «SyncToy Not Syncing with Scheduled Task» issue.
Free Download Backup Software Tools:
Step 1. To start a backup, click the Select backup contents option.

Step 2. There are four data backup categories: File, Disk, OS, and Mail. Click on File.

Step 3. On the left, both local and network files will be displayed. You can expand the directory to select the backup files.

Step 4. Follow the on-screen prompts and select a location to save the backup.

Click Options to set a password for encrypting the backup in Backup Options, then click Backup Scheme to define the backup schedule and initiate the backup at a specific event. You can also select additional options to customize the backup process according to your needs.

Step 5. The backup can be stored on a local disk, the tool’s online service, or a NAS.

Step 6. Todo Backup allows users to back up data to both a third-party cloud drive and its own cloud drive.
If you want to back up data to a cloud drive provided by a third party, select Local Drive, scroll down to add Cloud Device, and then add and log in to your account.

You can also opt for the Tools cloud drive. Sign up for a Tools Account and then click on Tools Cloud to log in.

Step 7. Click Backup Now to initiate the backup process. Once completed, the backup job will appear as a card on the left side of the panel. Right-click the backup job to perform additional actions on it.

People Also Asked: SyncToy for Windows 10/11
1. Can I still use SyncToy with Windows 10?
Yes, you can. SyncToy remains compatible with Windows 10.
2. Has SyncToy been discontinued?
The last significant update was released in 2021, which might be deemed outdated by some users. SyncToy is no longer available for download from the Microsoft website.
3. What has replaced SyncToy?
Several distinct applications can execute similar functions. For instance, FreeFileSync is a complimentary software that enables users to synchronize files between two directories. Alternatively, there are paid programs such as GoodSync and ChronoSync, which provide additional features and customization possibilities.
Как установить Synctoy для Windows 10
Synctoy — это удобное приложение, которое позволяет синхронизировать файлы и папки между различными устройствами. В нашей статье мы рассмотрим, как установить Synctoy для Windows 10 и начать использовать его для упрощения вашей работы с файлами.
1. Скачивание и установка Synctoy

Первым шагом является скачивание и установка Synctoy на ваш компьютер. Для этого необходимо перейти на официальный веб-сайт Microsoft и найти страницу загрузки Synctoy. После того, как страница загрузки откроется, вы должны выбрать версию Synctoy для Windows 10 и нажать на кнопку «Скачать».
После завершения загрузки файла установки, вам необходимо запустить его и следовать инструкциям на экране для установки Synctoy. В процессе установки у вас может быть предложено выбрать путь для установки Synctoy, рекомендуется использовать путь по умолчанию.
После завершения установки Synctoy будет доступен для использования на вашем компьютере.
2. Настройка синхронизации
После установки Synctoy вы можете приступить к настройке синхронизации файлов и папок. Для этого вам необходимо запустить Synctoy и выбрать опцию «Создать новую пару». Затем вам будет предложено выбрать исходную папку и папку назначения.
Исходная папка содержит файлы и папки, которые вы хотите синхронизировать, а папка назначения — место, куда эти файлы и папки будут копироваться. Вы можете выбрать любые папки на вашем компьютере в качестве исходной и папки назначения.

После выбора исходной и папки назначения вам необходимо указать тип синхронизации, который вы хотите использовать. Synctoy предлагает три типа синхронизации: «Синхронизация», «Зеркалирование» и «Установка времени». Выберите тот тип, который наиболее подходит для ваших потребностей.
После того, как все настройки синхронизации будут выполнены, нажмите на кнопку «Запуск» и Synctoy начнет синхронизацию выбранных файлов и папок.
3. Регулярное использование Synctoy
После настройки синхронизации вы можете регулярно использовать Synctoy для обновления файлов и папок. Для этого вам необходимо запустить Synctoy и нажать на кнопку «Экземпляр». После этого Synctoy проверит изменения в исходной папке и автоматически обновит файлы и папки в папке назначения в соответствии с выбранным типом синхронизации.
При использовании Synctoy очень важно регулярно проверять наличие обновлений и загружать их с официального веб-сайта Microsoft. В новых версиях Synctoy могут быть исправлены ошибки и добавлены новые возможности, поэтому рекомендуется всегда использовать последнюю доступную версию программы.
Итог
Как вы могли убедиться, установка и использование Synctoy для Windows 10 довольно просто. Это удобное приложение, которое поможет вам синхронизировать файлы и папки между различными устройствами. Не забывайте регулярно обновлять Synctoy для получения новых функций и исправления ошибок. Теперь у вас есть все необходимые знания для успешной работы со Synctoy!
Как установить Synctoy для Windows 10
Если вы ищете удобный способ синхронизации и резервного копирования данных на компьютере под управлением операционной системы Windows 10, то Synctoy — идеальное решение для вас. Это мощный инструмент, разработанный Microsoft, который позволяет легко синхронизировать файлы и папки между различными устройствами.
Шаг 1: Загрузка и установка Synctoy

Первым шагом является загрузка и установка Synctoy на ваш компьютер с ОС Windows 10. Для этого следуйте инструкциям ниже:
- Откройте ваш любимый веб-браузер и перейдите на официальный сайт Microsoft.
- Найдите страницу загрузки Synctoy. Обычно она расположена на странице загрузки дополнительного программного обеспечения для Windows.
- Нажмите на ссылку загрузки Synctoy для Windows 10.
- Сохраните загруженный файл на вашем компьютере.
- Откройте загруженный файл и следуйте инструкциям мастера установки для успешного завершения процесса.
Шаг 2: Работа с Synctoy
После установки Synctoy на ваш компьютер, вы можете начать его использование. Следуйте простым шагам, чтобы настроить синхронизацию ваших файлов:
- Откройте Synctoy, найдите его в меню «Пуск» или нажмите на ярлык на рабочем столе.
- Выберите тип синхронизации, который вы хотите использовать. Synctoy предлагает три варианта: «Синхронизировать», «Эхо» и «Обновить».
- Выберите источник файлов и папок, которые вы хотите синхронизировать. Щелкните на кнопку «Выбрать папку» и укажите нужные папки на вашем компьютере.
- Выберите место назначения, где Synctoy будет синхронизировать ваши файлы. Вы можете выбрать другую папку на вашем компьютере, внешний жесткий диск или сетевое хранилище.
- Настройте дополнительные параметры синхронизации, если это необходимо. Например, вы можете исключить определенные типы файлов из синхронизации или включить проверку целостности файлов.
- После того, как вы настроили все параметры, нажмите на кнопку «Синхронизировать» и Synctoy начнет процесс синхронизации файлов и папок.
Итог
Установка и использование Synctoy для Windows 10 является простым и удобным способом синхронизации и резервного копирования данных. Следуя вышеуказанным инструкциям, вы сможете без труда настроить синхронизацию вашего компьютера и гарантировать безопасность ваших файлов.

Не стоит беспокоиться о потере данных или сложностях в синхронизации между различными устройствами. Synctoy делает все это быстро и безопасно! Установите Synctoy для Windows 10 и наслаждайтесь его простотой и эффективностью уже сегодня.
Как установить synctoy для Windows 10
Приветствую всех! В сегодняшней статье я расскажу вам, как установить synctoy для операционной системы Windows 10. Synctoy — это мощное и удобное приложение, которое позволяет легко и быстро синхронизировать файлы и папки между различными устройствами.
Шаг 1: Загрузка synctoy
Первым делом, чтобы начать использовать synctoy, вам следует загрузить его с официального сайта Microsoft. Просто откройте ваш любимый браузер и перейдите по ссылке на страницу загрузки synctoy.
Для того чтобы найти страницу загрузки synctoy, вы можете воспользоваться поисковыми системами, например, Google или Яндекс. Введите ключевое слово «скачать synctoy для Windows 10» и после этого нажмите на одну из ссылок, предложенных результатами поиска.

Когда вы будете на странице загрузки synctoy, прокрутите страницу вниз и найдите соответствующую ссылку для скачивания. Обычно это большая кнопка «Скачать», которая находится в заметном месте и подписана «Синхронизация файлов (Synctoy) для Windows 10». Нажмите на эту кнопку и начнется загрузка файла установщика synctoy.
Шаг 2: Установка synctoy
Когда загрузка файла установщика synctoy будет завершена, найдите его на вашем компьютере. Обычно установщик сохраняется в папке «Загрузки» или автоматически запускается после завершения загрузки. Чтобы установить synctoy, просто дважды кликните на установщик и следуйте инструкциям на экране.
Когда откроется окно установки synctoy, вам может быть предложено выбрать путь для установки прогаммы. Рекомендуется использовать стандартный путь, предложенный установщиком, но если у вас есть свои предпочтения, вы можете выбрать другую директорию.
После выбора пути установки, нажмите кнопку «Далее» и дождитесь окончания установки synctoy. Обычно процесс установки длится всего несколько минут. Когда установка будет завершена, вам будет предложено запустить synctoy, нажмите «Завершить», чтобы закончить установку.
Шаг 3: Использование synctoy
Теперь вы готовы начать использовать synctoy на Windows 10! После установки synctoy, на вашем рабочем столе или в меню «Пуск» появится ярлык synctoy. Для запуска приложения просто кликните на этот ярлык.
Когда synctoy запустится, вы увидите простой и интуитивно понятный интерфейс. Слева находится список «Папок для синхронизации», а справа — список «Папок назначения». Просто выберите папки, которые вы хотите синхронизировать, и нажмите кнопку «Синхронизировать», чтобы начать процесс синхронизации.
Synctoy предлагает несколько режимов синхронизации, включая «Синхронизация», «Сравнение» и «Echo». В режиме «Синхронизация» synctoy будет обновлять обе папки, чтобы они содержали идентичные файлы и папки. В режиме «Сравнение» synctoy просто показывает различия между папками, а в режиме «Echo» synctoy копирует файлы только из исходной папки в папку назначения.

Также вы можете настроить расписание синхронизации, чтобы synctoy автоматически выполнял синхронизацию в заданное время или с определенной периодичностью. Для этого просто выберите в меню «Файл» пункт «Расписание» и настройте нужные параметры.
Итог
Теперь вы знаете, как установить synctoy для операционной системы Windows 10. Synctoy — это отличный инструмент для синхронизации файлов и папок между различными устройствами. Он прост в использовании, интуитивно понятен и позволяет сэкономить время и упростить процесс работы с файлами. Установите synctoy на свой компьютер и начинайте наслаждаться его преимуществами уже сейчас!