
Quick Tips
- Windows allows you to sync various settings, such as your wallpapers, passwords, language, and more when using the same Microsoft account.
- Enabling sync settings can be helpful if you work on multiple Windows devices.
- You can turn sync settings on or off using the Settings app, Registry Editor, or Group Policy Editor.
Method 1: Turn Sync Settings On or Off Using the Settings App
The Settings app gives you several options for managing your account preferences, including the ability to enable or disable sync. Whether you want to configure a single setting or stop syncing altogether, you can use the following steps to manage sync settings in Windows.
Step 1: Press the Windows + I keys to open the Settings app. Then, head to Accounts > Windows backup.

Step 2: Click on Remember my preferences to expand it. Then, use the checkboxes to enable or disable sync for accessibility, passwords, language preferences, and other Windows settings.

Alternatively, you can use the toggle next to Remember my preferences to enable or disable sync entirely.
Method 2: Turn Sync Settings On or Off With the Registry Editor
The Registry Editor is a useful tool that lets you configure various system settings by modifying a few registry files. However, as registry files contain important settings for Windows and its system apps, it’s important to be cautious while making any changes.
Step 1: Click the search icon on the taskbar and type in registry editor. Select Run as administrator.
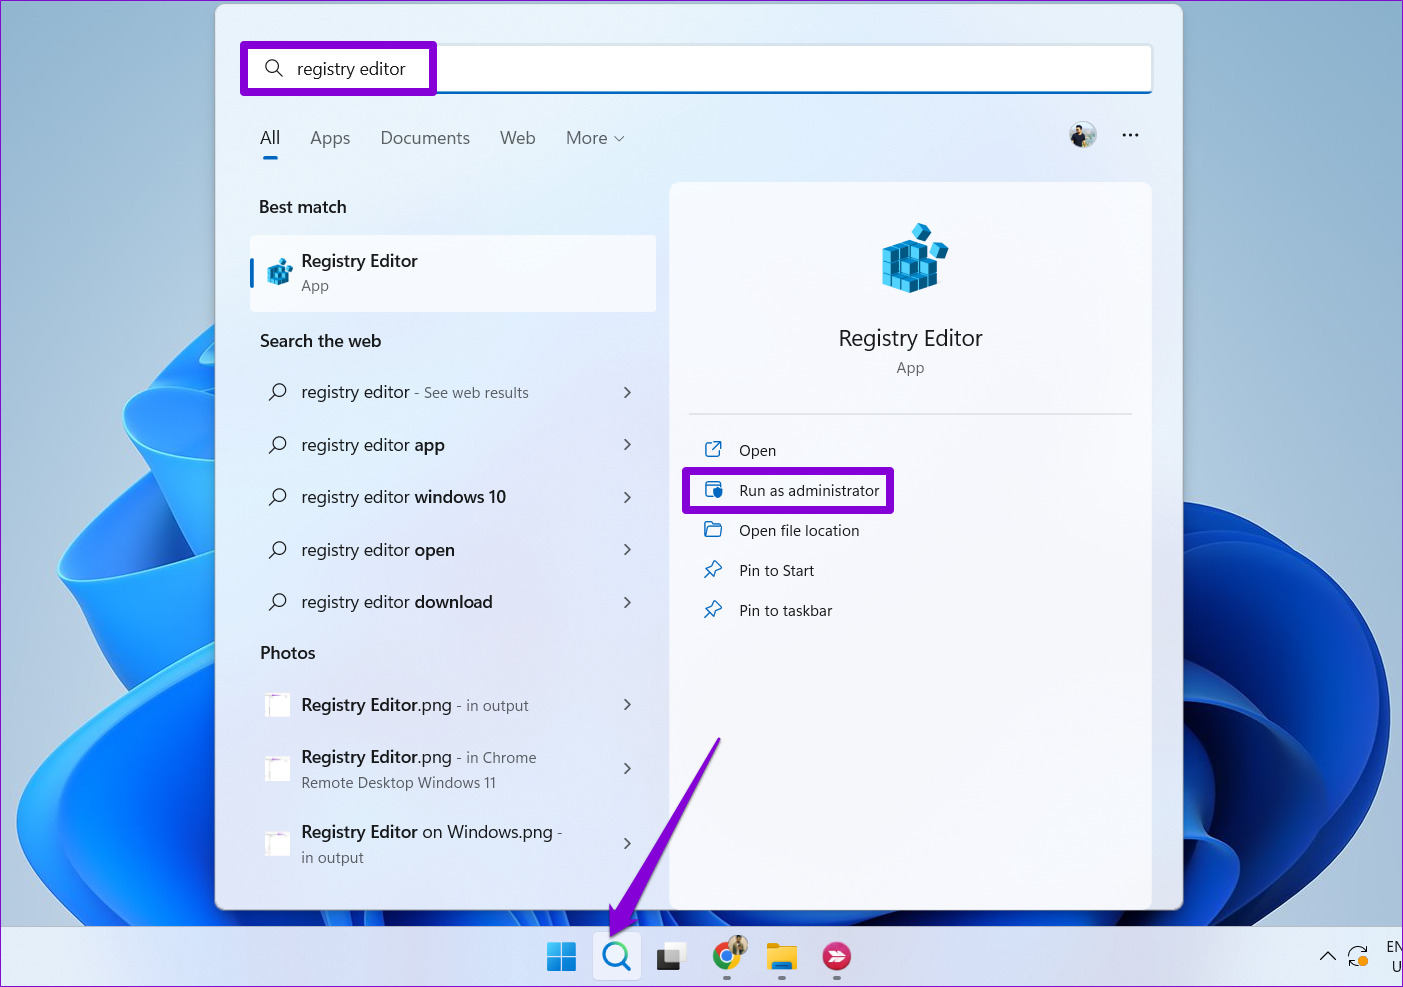
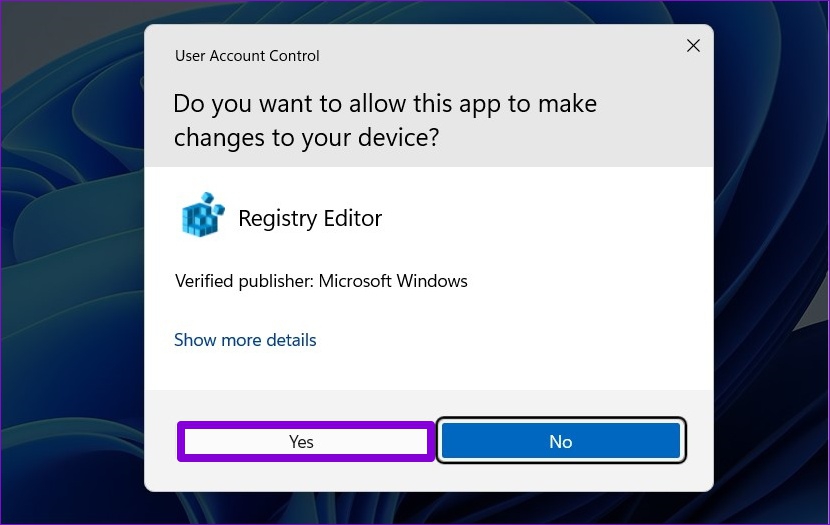
Step 2: Select Yes when the User Account Control (UAC) prompt appears.
Step 3: Paste the following path in the address bar at the top and press Enter to quickly navigate to the SettingSync key.
HKEY_CURRENT_USER\SOFTWARE\Microsoft\Windows\CurrentVersion\SettingSync

Step 4: Right-click on the SettingSync key in the left sidebar and choose New > DWORD (32-bit) Value. Name the new DWORD DisableSettingSync.

Step 5: Right-click on the SettingSync key in the left sidebar and choose New > DWORD (32-bit) Value. Name the new DWORD DisableSettingSyncUserOverride.

Step 6: Double-click the DisableSettingSync DWORD and change its value data to 2 to disable sync settings. Then, click OK.

Step 7: Double-click the DisableSettingSyncUserOverride DWORD and set its value data to 1 to disable sync settings. Then, click OK.

Similarly, if you want to configure Windows to sync settings across your devices, set the value of the DisableSettingSync and DisableSettingSyncUserOverride DWORDs to 0. Then, restart your PC to apply the changes.
Method 3: Turn Sync Settings On or Off Using the Group Policy Editor
The Group Policy Editor provides yet another way to configure sync settings on your Windows computer. However, you can only use this method if you’re using Windows 10 or Windows 11 Professional, Education, or Enterprise editions. If you’re using Windows Home Edition, you will have to use the Settings app or the Registry Editor solutions above to enable or disable sync settings.
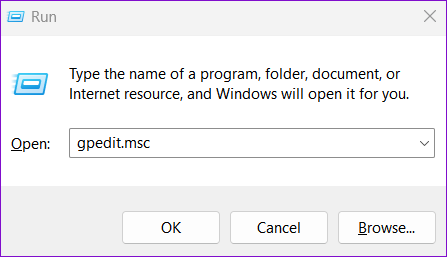
Step 1: Press the Windows + R keys to open the Run dialog box. Type gpedit.msc in the text box and hit OK.
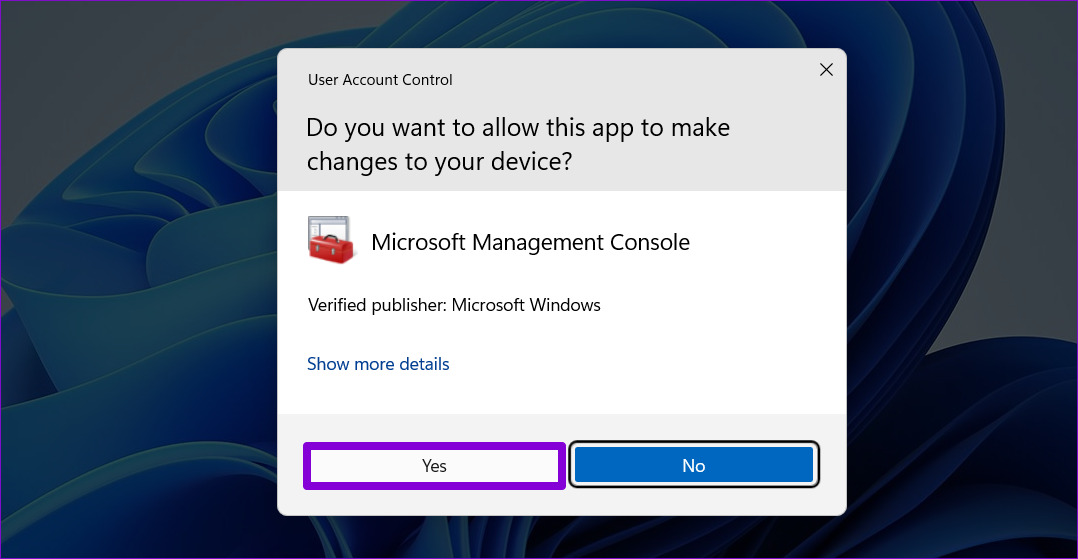
Step 2: When the User Account Control (UAC) prompt appears, select Yes to proceed.
Step 3: Use the left pane to navigate to the following folder:
Computer Configuration\Administrative Templates\Windows Components\Sync your settings
Step 4: Double-click the Do not sync policy from the right pane.

Step 5: Select the Enabled option if you want to stop Windows from syncing settings across devices. If you want to turn on sync settings, select Disabled or Not Configured instead.
Step 6: Click Apply followed by OK.

Was this helpful?
Thanks for your feedback!
The article above may contain affiliate links which help support Guiding Tech. The content remains unbiased and authentic and will never affect our editorial integrity.
Всё начало после того, как я скачал репак игры с торрентов. У меня не открывались все антивирусы и компьютер жутко зависал, прочитав один из постов на этом сайте я зашёл в безопасный режим (предварительно скачав Malwarebytes и DrWeb) запустил и ждал проверки. Антивирусы нашли угрозы и удалили их, после чего зайдя в обычный режим у меня стали запускаться антивирусами, я ещё раз всё проверил и угроз на этот раз выявлено небыло. Дальше я скачал программу AVbr, запустил и погодя пару секунд она начала удалять «майнер», удалила учётную запить о которой я не знал, всё было хорошо пока я не перезагрузил компьютер. В последующей проверке AVbr предлагала сбросить файл «host», я соглашался и после перезагрузки ничего не менялось. Каждый раз когда после того как программа AVbr удаляет майнер скриптом компьютер перезагружается и всё по новой, ничего не меняется. Прошу помочь. Лог прикреплён.
Сообщение от модератора thyrex
Темы объединены
CollectionLog-2023.05.01-12.33.zip
Go to Settings > Time & Language > Language > Add a language > search for and select language, then follow the on-screen prompts. To stop syncing language settings across devices, go to Settings > Accounts > Sync your settings, and toggle off Language preferences.
- What is individual sync settings in Windows 10?
- Should I turn sync on or off?
- How do I remove sync themes from Windows 10?
- What is sync Settings?
- What does sync Settings mean?
- Does Windows 10 have a sync program?
- How do I change Windows 10 from German to English?
- How do I change Windows 10 from Turkish to English?
What is individual sync settings in Windows 10?
Below the master sync switch are the individual sync settings. These are the settings that will carry over from one computer to the other that you log into with your Microsoft account.
Should I turn sync on or off?
If you are using Enpass on multiple devices, then we recommend enabling sync to keep your database updated across all your devices. … Also, you don’t need to worry about the safety of your database as using sync is safe. Your cloud always contains a copy of the same encrypted data as on your device.
How do I remove sync themes from Windows 10?
Windows 10: Disable Syncing Themes
Go to Settings > Accounts > Sync your settings. From the right-hand pane, select Individual sync settings. Toggle the Theme setting to off. That’s all there is to it!
What is sync Settings?
Sync essentially syncs your contacts and other things with Google and other services. You may see all accounts on your phone by visiting Settings > Accounts and Sync. The Sync part of Android syncs things such as Documents, Contacts, and other things to services such as Facebook, Google, Ubuntu One…
What does sync Settings mean?
Originally Answered: What does sync mean in Android phones? It means uploading your settings and other data(which you would have selected in backup settings) to a specific internet server so that you can access it later on from the internet from any other device or the same device after resetting.
Does Windows 10 have a sync program?
Windows 10 allows you to sync your Windows settings and data files across multiple computers so that changes made on one computer automatically update all your computers.
How do I change Windows 10 from German to English?
Click Start > Settings or Press Windows key + I then click Time & Language. Select the Region & Language tab then click Add Language. Select a language you would like to install.
How do I change Windows 10 from Turkish to English?
In the Settings window, choose Time & language option. 2) On the left side of the pane, choose Region & language. Then on the right side of the pane, choose Add a language option under Languages category. 3) Then choose the language that you want to add to your system from the choices.
Hi,
We’ve used the optimization script on a 20H2 image and are having some strange issues. Logging in with a fresh user profile on the optimized 20H2 image and then logging out fairly quickly after is causing the Windows logout to hang due to the above mentioned task. If you force the logout and log back in again, open Task Scheduler, we can see this task initiates at login and runs for 10 minutes until it hits the defined 10 minute timeout. A logout after the task has timed out, or if the task is stopped manually is successful.
What’s interesting is that the same does not occur on the same image before the optimization script has been run against it. The task will fire at login and complete with the same second.
Do you have any thoughts around this?
Thanks in advance.
Reading time4 min
Views13K
Read this article to find out how to change the language of Windows 10 interface without having to reinstall it, what system languages can be installed and what settings should be modified for that purpose.

Introduction
In Windows 10, people usually choose the preferred language for the entire operating system when they install it. However, if the language settings were wrong, or people have to use computing devices with certain language preferences, there are some settings to be modified in order to bring them in line with your personal likings.
So if you ever need to change language preferences in Windows 10, this can be done in a quick and easy way with the help of the Settings app and without having to reinstall the operating system.
In today’s article, we will show you how to change the default display language into any other, including doing it for new and existing user accounts.
How to change the default display language in Windows 10?
If you have to move to a different region or you need to use a display language different from the default choice, or the initial language settings for the computing device have been wrong, there is absolutely no point in reinstalling Windows 10. All you need is to modify a couple of system settings to enjoy the experience of using your operating system in the right language.
Disable language synchronization
If you are using a Microsoft account, the language settings will apply to all devices linked to such account. If you plan to change regional and language settings for one computer only, you need to disable synchronization of such settings before you proceed.
This is how you disable language sync in Windows 10.
Open the main system application, Settings. You can do it in any way you prefer. For example, click on the Start button in the lower left corner of your desktop, on the Taskbar, and open the main Windows menu. Use the scroll bar or the mouse wheel to search the list of all programs and applications installed on this computer and find the line Settings, or click on the Settings button in the left side of the user menu, and the application will open.

In the main Settings window, scroll down if necessary and choose the tab Accounts.

In the left panel, go to Sync your settings.
In the right panel, find the section Individual sync settings and the line Language preferences, then set the slider to the Off position (disabled).

When these steps are taken, you can start changing language settings for the copy of Windows 10 installed on this computer, without worrying that this can affect similar settings in other linked devices.
The steps to take if you want to change the display language
To change the display language of your Windows 10, you should close all running applications and do what is described below.
Use any method you prefer to open the Settings application. For example, right-click on the Start button that you can find on the Taskbar, in the left lower corner of the desktop, or press the key sequence Windows + X instead to open the context menu, and select the line Settings. The application will start immediately.

Use the scroll bar or the mouse wheel to navigate the Settings window, and find the tab Time and language.

In the left panel, go to Language.
Now look to the right and find the section Preferred languages, where you can prioritize language settings, and click on the button Add a preferred language, with a + (plus) symbol on it.

In the new window Choose a language to install use the scroll bar or the mouse wheel to find the language you need, or start typing its name in the search field above.
Choose the language pack you are planning to use in Windows 10 from the list.

When the language is chosen, hit Next.
In the next page Install language features check the box for Install language pack to confirm your choice (the box with the tick will become blue, i.e. active).

Click Install below.
Changes will take effect after the language package is installed, which usually takes several minutes only. In some cases, restarting your Windows 10 may be required, and then the corresponding language settings will apply to all system elements. The changes will affect the sign-in screen, the Settings app, Windows Explorer, desktop, all applications, preferred browsers and websites you visit. From now on, they will use the new language by default. Besides, Windows 10 may suggest reviewing your current privacy settings.
Changing region settings
If you change the display language for Windows 10 because you move to a different region, then regional settings should be modified too.
Changing them in Windows 10 is easy enough: just follow the steps below.
Open the main system application, Settings, using any way you prefer. For example, press the keyboard shortcut Windows + I to access the app directly.
In the main window of the Settings app, find and select the tab Time and language.
In the left panel, select Region.
In the right panel, find the section Region and use the nested menu Country or region to specify your new location if it differs from the current settings.
In the section Regional format use another nested menu to select proper formats to display date and time in Windows, if these differ for your time and region.

Now look at the left panel and jump to the tab Language again.
Use the scroll bar or the mouse wheel to find the section Related settings and click on the link Administrative language settings.

In the new pop-up Region window, jump to the tab Administrative and in the section Welcome screen and new user accounts hit the button Copy settings.

The new window will show you corresponding screen and account settings. In the section Copy your current settings to check the boxes for each option: Welcome screen and system accounts and New user accounts.

Click ОК.
Click ОК one more time, and then restart the computer.
After all these steps, your computer will display proper regional settings specified according to your physical location.
Most of the time, people don’t change or install additional languages regularly for their personal needs. This opportunity to change language packs quickly is more often required in small or large companies that need to deal with customers having various language preferences.
Besides, this option would be useful for people who have to move to a different region and would like their regional settings to comply. Another scenario is buying a computer from another country when the required configuration is not available locally.
Also, you should remember that modifying language settings may disable some functions like Cortana because this service is not supported in certain regions.
Conclusion
Preferred display language is one of the easily customizable things in the operating system. If you ever need to change the language settings, use one of the methods described here to replace the language pack currently used by Windows 10 without having to reinstall it.
See the full article with all additional video tutorials. If you still have any questions, please ask in a comments. Also visit our Youtube channel, there are over 400 video tutorials.