This tutorial shows you how to load any ISO file in the virtual CD/DVD-ROM of a Supermicro server and boot from it if it is bootable. You could install operating systems from a ISO file or just share a data. Here we use an installation DVD disk of CentOS 7 to boot. This tutorial expect there is a windows (samba) share on the local network if you need to do it you can check here – Configure and mount samba share in Supermicro IPMI Virtual media (CD-ROM)
Loading an ISO disk in the (virtual) CD/DVD-ROM device attached to your server could be of a great help to the system administrators, you could use diagnostic disks, update disks (BIOS and firmware of devices), install multiple operating systems including MS Windows, share data and many more! You could use ISO disk right from your computer or from a server next to the server you want to use the ISO to speed up access.
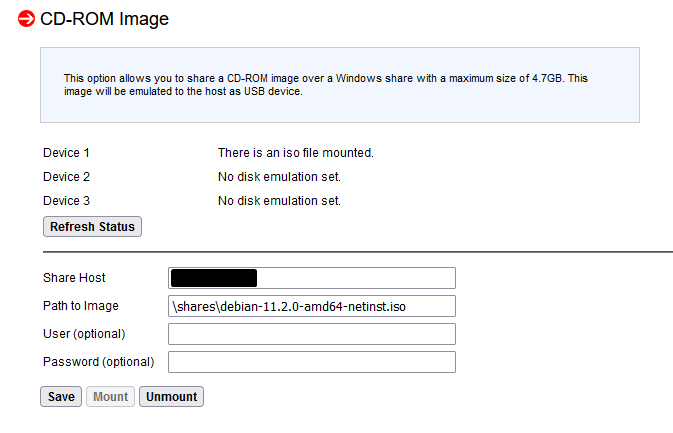
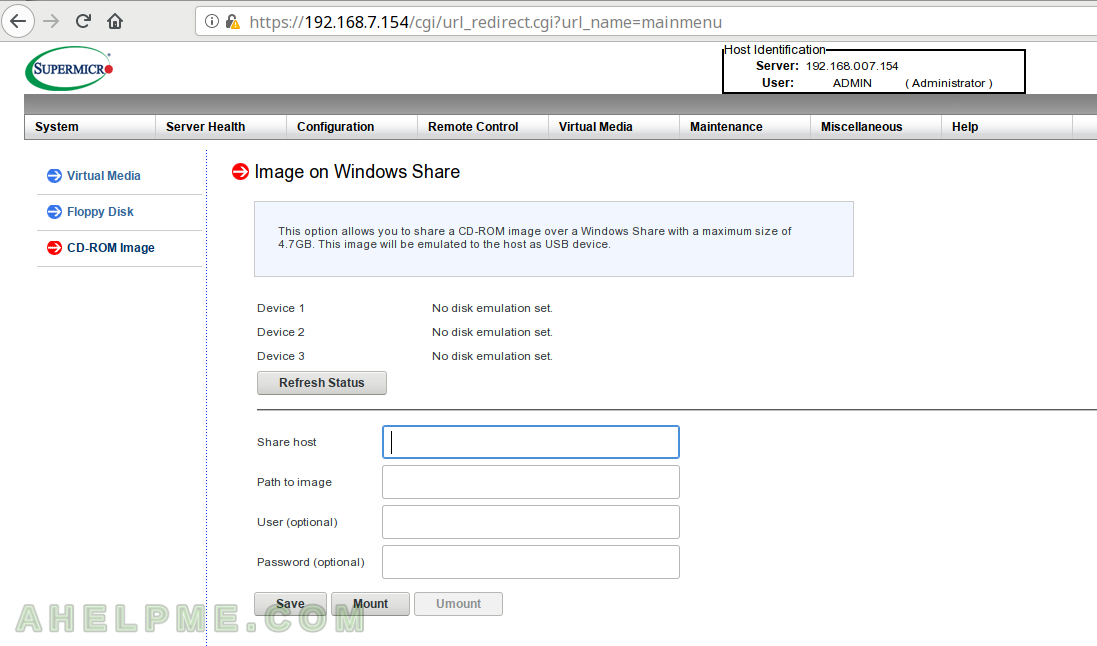
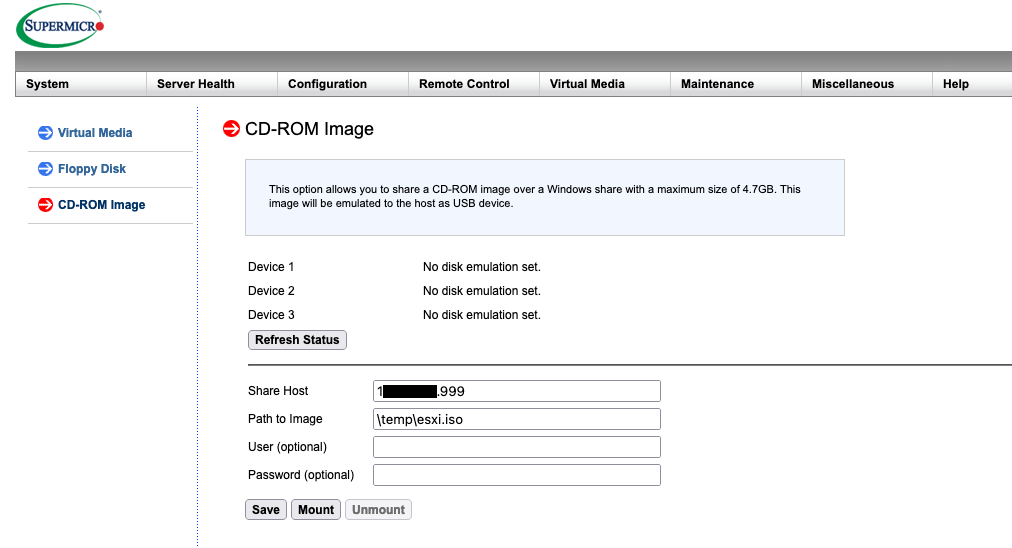
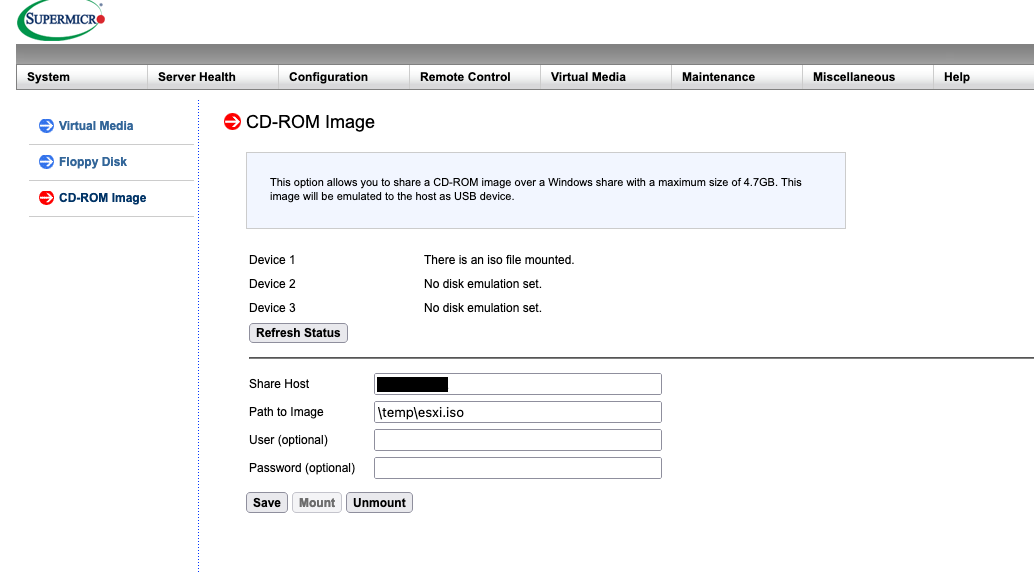
STEP 1) When you are logged in the Supermicro IPMI web interface click on Virtual Media menu and then CD-ROM Image.

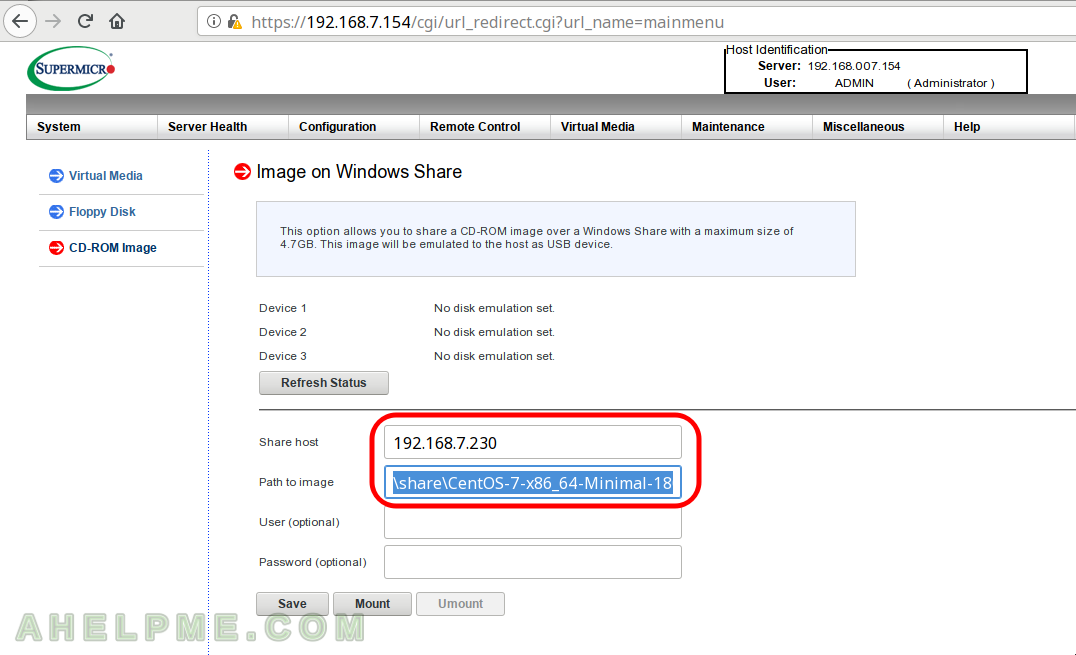
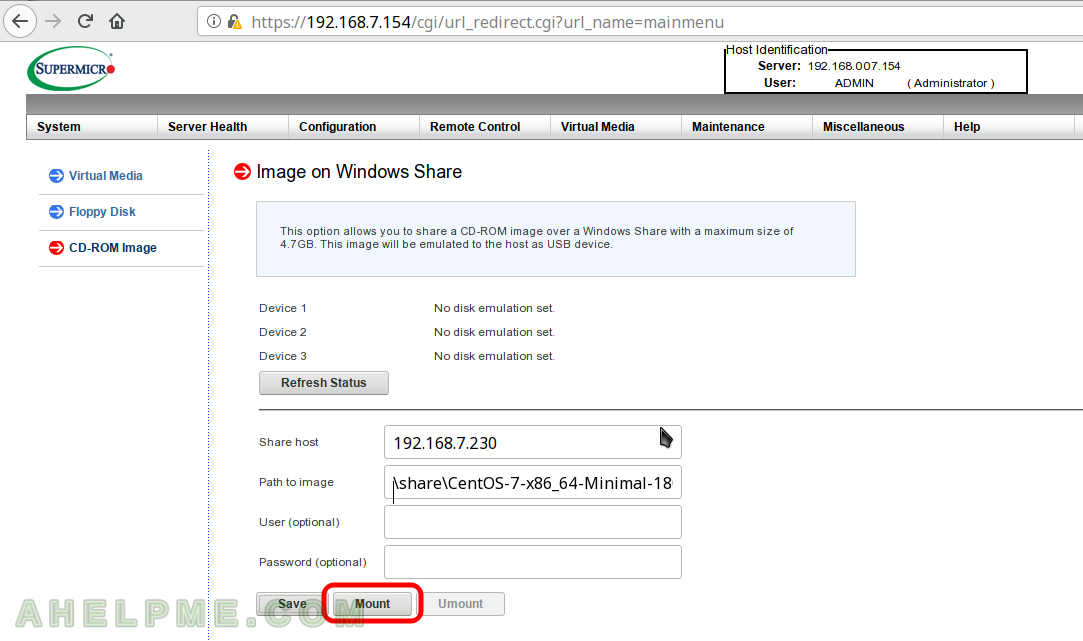
STEP 2) Fill the required edit boxes “Share host” (hostname or IP address) and “Path to image” the path to the image with “\” notation for the directories.
If anonymous login (guest) has access to the share you can leave “User” and “Password” blank.
STEP 3) When the required edit boxes are filled you can save the configuration.
Here we use our server with IP: 192.168.7.230, which is a samba server with shared resource “share” and a file CentOS-7-x86_64-Minimal-1804.iso, which is a bootable installation disk of CentOS 7. It is important the “Save” button do not check if the shared resource is available, it just checks for special characters the edit boxes and if everything is OK it saves the configuration. You can save everything in “Share host” and “Path to image” even a server and path to non existing server and share resource! If you cannot save the data there is probably a problem with your browser (or you used special characters that are not allowed).
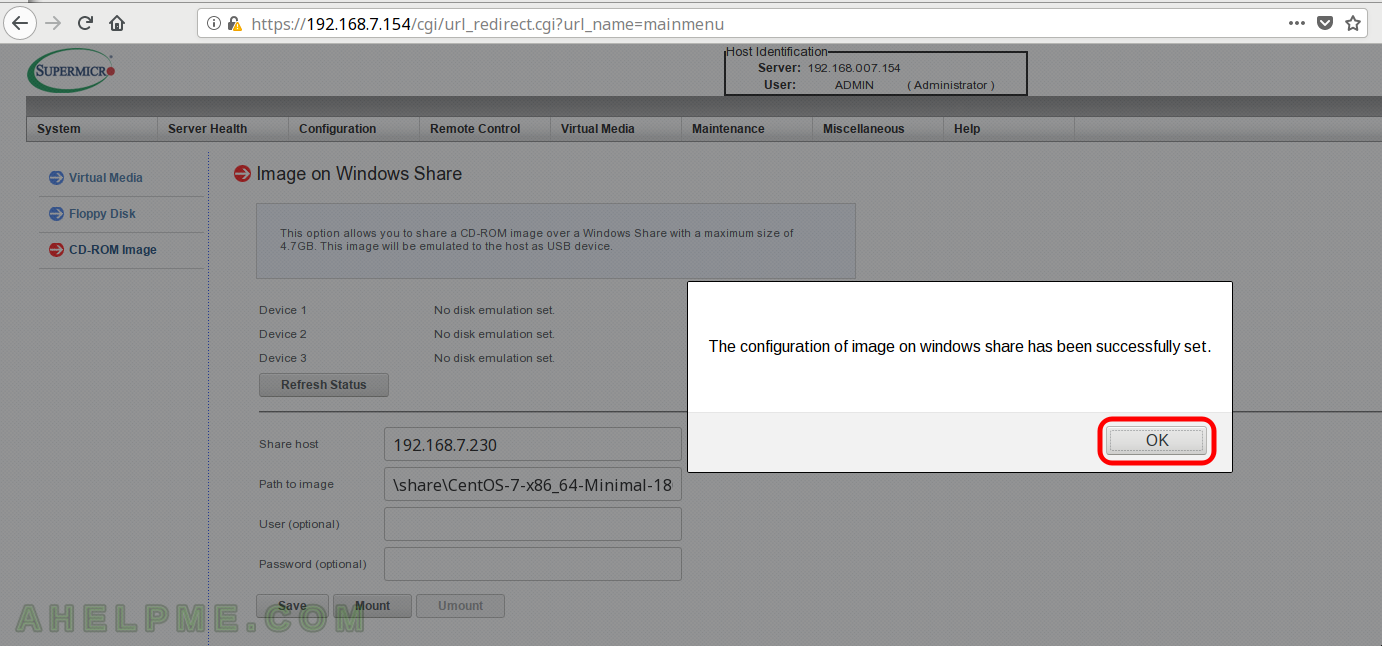
STEP 4) It should pop up a dialog with “The configuration of image on windows share has been successfully set.” As said above if there is no pop up for confirmation you got a problem (look the previous step).
STEP 5) Click “mount” to mount the ISO file from the “Path to image”.
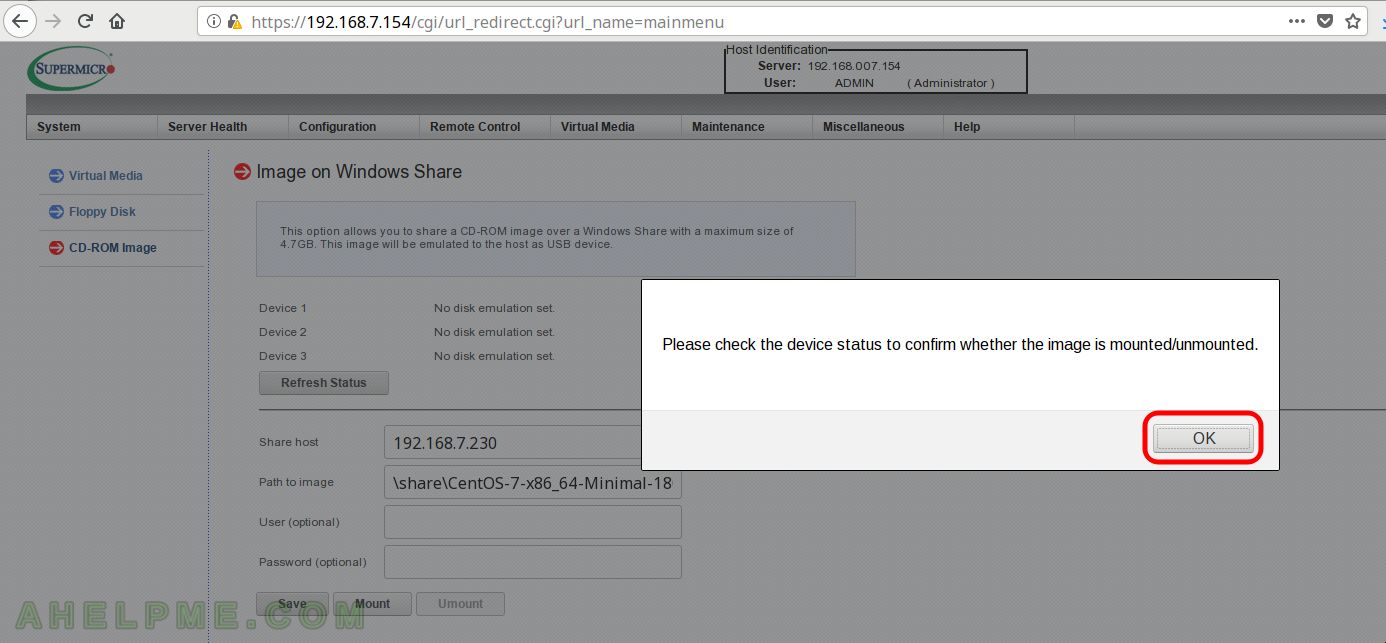
STEP 6) No confirmation here, the dialog just says you should check the Device status in the page to see if the mount operation was successful.
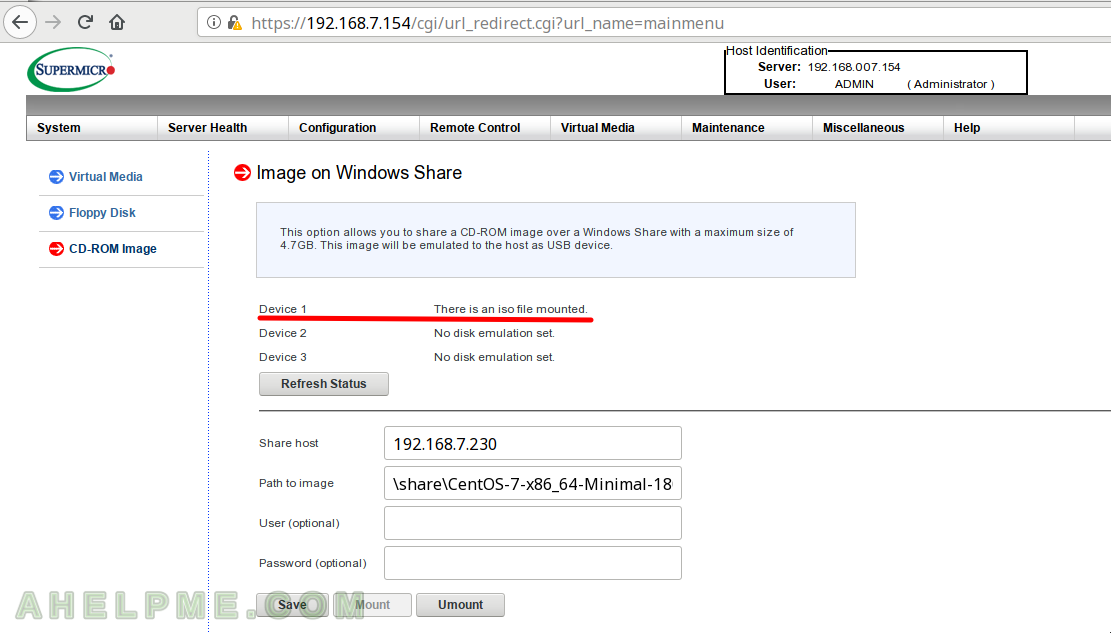
STEP 7) Upon successful mounting (loading the ISO file as a CD in the virtual CD-ROM) the status of the Device 1 would get changed into “There is an iso file mounted”.
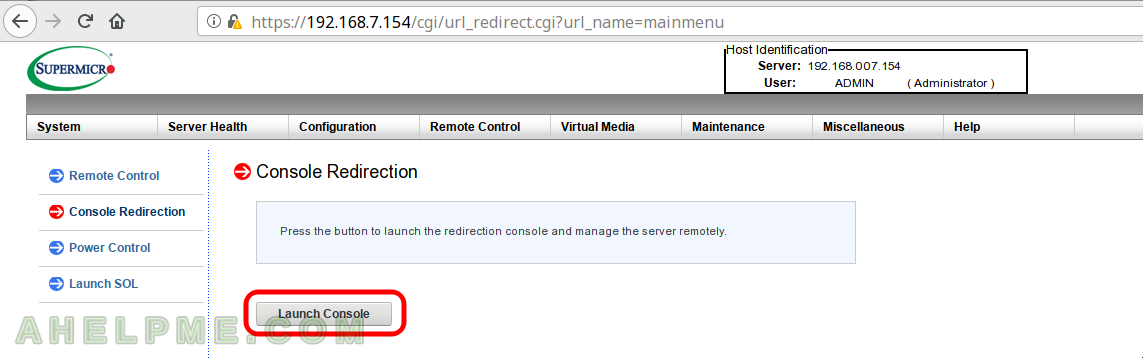
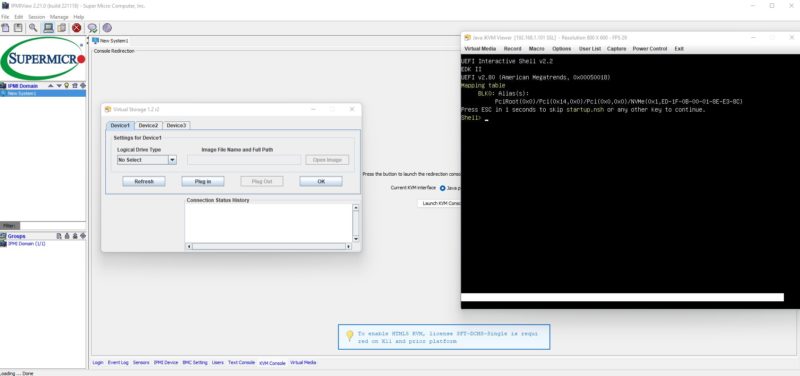
STEP  Click on Remote Control -> Console Redirection to start the IPMI KVM to boot from the ISO file we’ve just mounted – CentOS 7 installation DVD.
 Click on Remote Control -> Console Redirection to start the IPMI KVM to boot from the ISO file we’ve just mounted – CentOS 7 installation DVD.
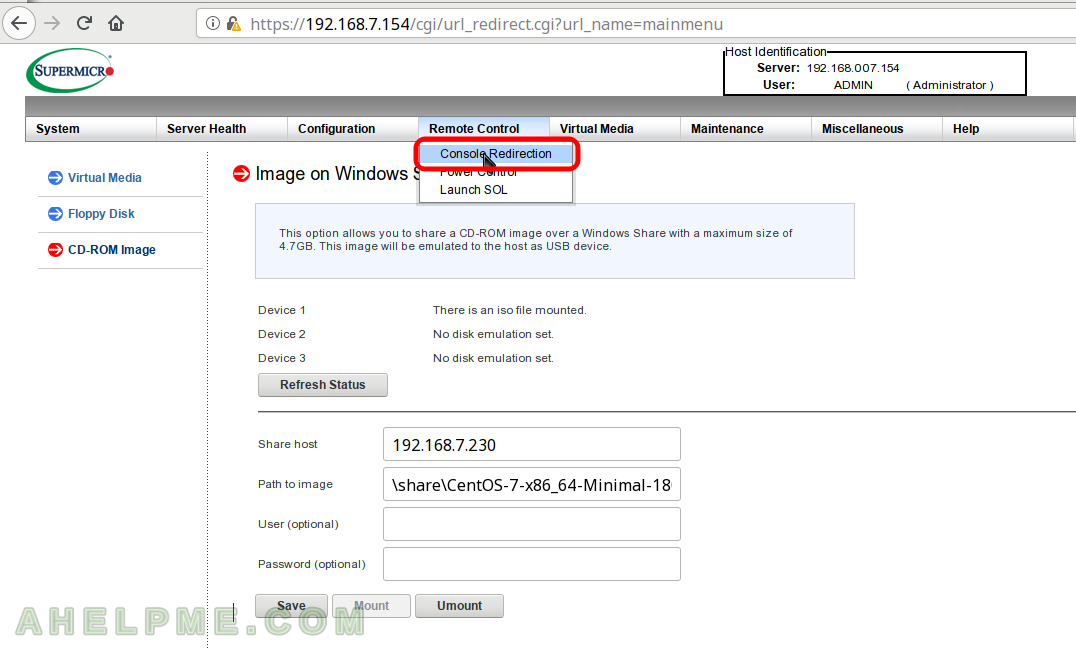
STEP 9) To start the IPMI KVM click on “Launch Console” and it will start the Java web start application, which offer manipulation of the redirected the Keyboard,Video and Mouse (KVM) on your computer.
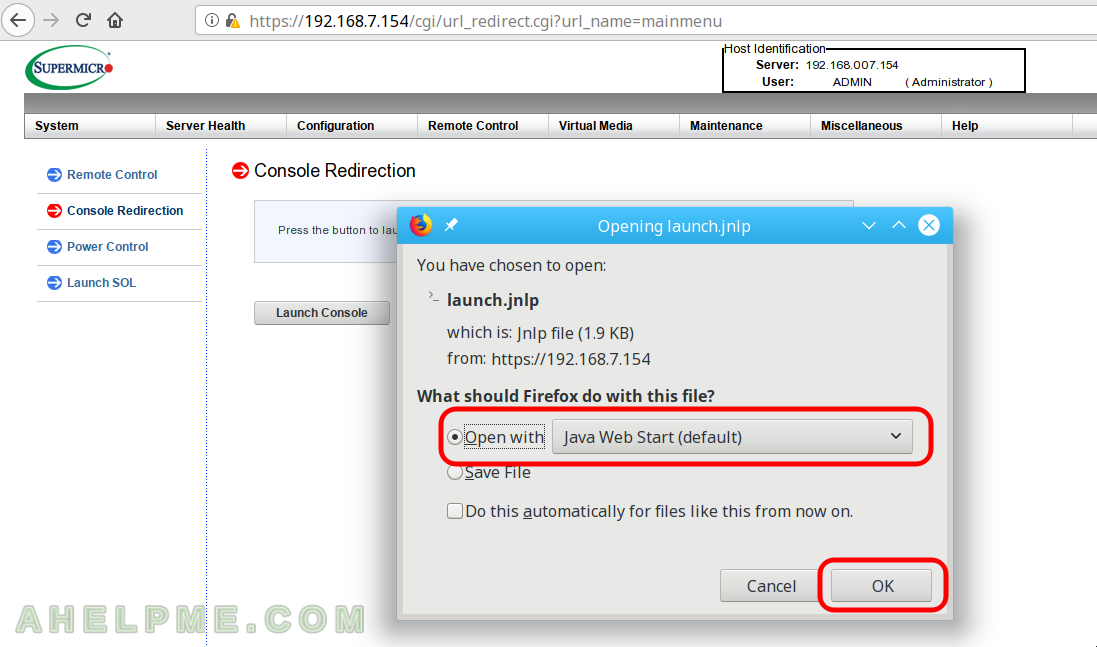
STEP 10) Java Web Start start confirmation dialog in Firefox.
Pages: 1 2
This short document describes how to mount a virtual media in Supermicros BMC IMPI.
Procedure
- Read the relevant section in the BMC IPMI Users Guide
- Setup an SMB Server / Windows share
- Make sure to enable SMBv1 protocol
- Place some
.isofile onto the share - Login to Supermicro IPMI and navigate to «Virtual Media» > «CD-ROM Image»
- Fill in all the details and consider the following Tips
- Press «Save» and then press «Mount»
Tips / Good to know
- Start the «Path to image» with a forward slash (
/). Otherwise the following warning will appear: «The path does not meet the expected pattern. (It is not an ISO file or contains ..)» - Provide the username without domain
- You always need to insert the Password again before pressing «Save». Eventhough the password field may still be filled with dots from previous attemps, a warning will popup «The special characters are not allowed !», if you do not provide the passward again.
- Do not use
?(and probably other special) characters in your password - You may have to press «Save» and «Mount» twice in order for the image being loaded.
Example when using a Fritz.Box as NAS
Fritz.Box must be running in the same network and should have some USB stick mounted (to have enough storage).
- Share Host:
fritz.nas - Path to Image:
/fritz.nas/DISK_IMG/supergrub2-classic-multiarch-CD.iso - User:
fritz1234 - Password:
mysecret
Make sure to enable SMBv1 in Fritz.Box UI!

Supermicro made a change with its newer IPMI firmware. One of the great features that we get is the ability to use an HTML5 iKVM instead of using Java. For all of those admins who had to work through Java prompts for years just to get an iKVM session going, HTML5 is simply awesome. In the newer X12, X13, H12, H13, and later generations of systems, Supermicro made a change to how remote mounting media works. That means it is time for a quick guide.
If you log into a newer Supermicro server’s IPMI management interface and open the HTML5 iKVM, you will see something like this:

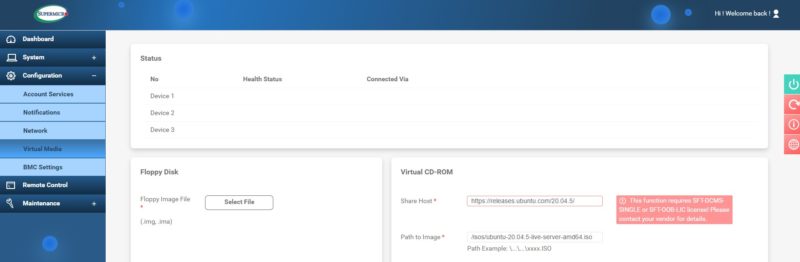
The “Virtual Media” menu item that we are familiar with from the Java version is there, but it is not available. Supermicro’s newer servers do not let you use this function, on the HTML5 browser, without a license. It usually still works on the Java browser, but the whole point is not to have to use Java. In the newer version of the IPMI firmware, you may see this layout instead:
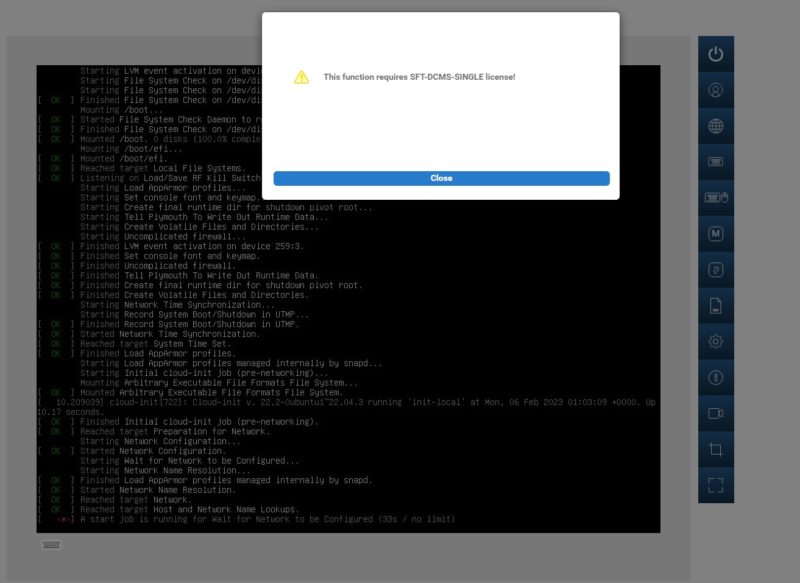
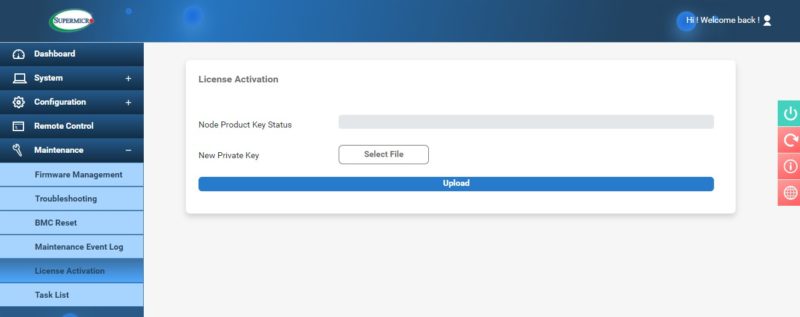
We have an easy and a hard way to get it working. The easy way is to buy SFT-DCMS-SINGLE and then apply the license file. That will allow you to do a traditional virtual media mounting via the browser.
If you have a single server, this is a $130-200 license that adds other features, but it is the easiest way to get that HTML5 Virtual Media working.
The less expensive way is to mount over a network share. Here we have a QNAP NAS that we have an isos share available. This network share needs to be available from the management network. The below look at the directory is being viewed from a Windows PC with the network share mounted.
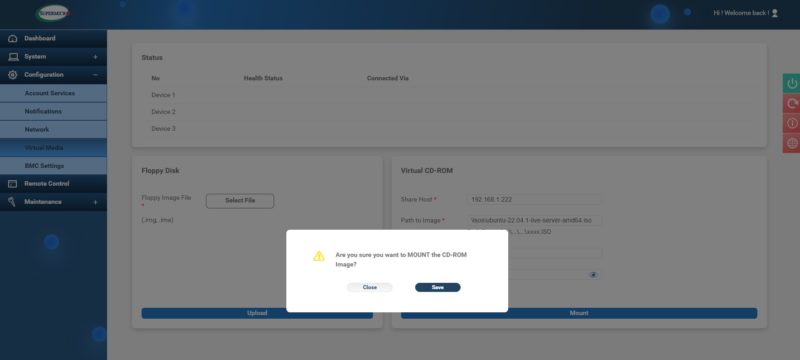
On the Supermicro IPMI web interface, you will want to navigate to Configuration then Virtual Media on the left-hand menu.

There, the two required fields are the host and the path. On the hostname, if your NAS has a DNS name of “nas123456” for example, you cannot just put “nas123456” in the share host field.
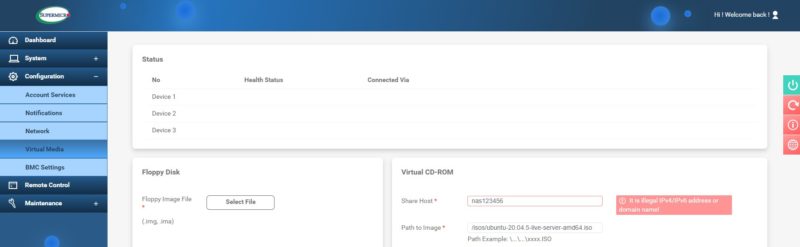
Since one sees “domain” for the field, another option one may think of is using a https server with ISO images. That requires a SFT-DCMS-SINGLE or SFT-OOB-LIC license.
That leaves us with an IP address and then a path.
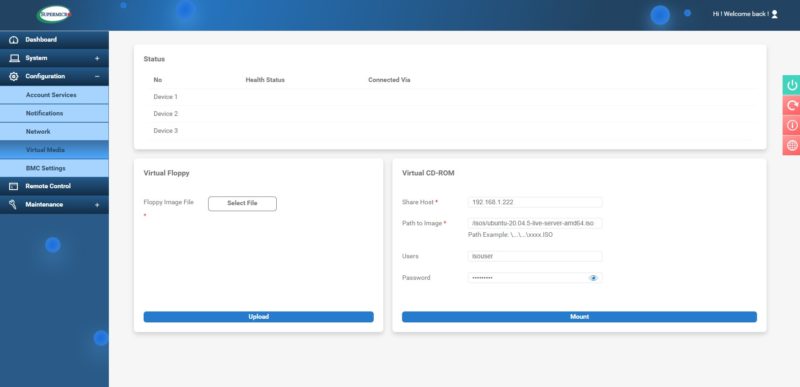
So here we have:
- Share Host – IP Address
- Path to Image – path on the network share. In this case it is “\isos\ubuntu-20.04.5-live-server-amd64.iso”.
- Note here, if you try “/isos/ubuntu-22.04.1-live-server-amd64.iso” because that is the directory when you are going through the share on linux, or “\\isos\ubuntu-22.04.1-live-server-amd64.iso” those will not work. Be careful with the “\”.
- Users – This is a username if the share requires it
- Password – This is the password if the share requires it. Note, there are some characters that you cannot use, for example the “?” here. So if the network share, by chance, has a “?” is the password, the Supermicro IPMI will not accept this.
Once that is set, the ISO can be mounted using the mount button at the bottom.
Once that is done, you should see the ISO mounted up top under “Device 1”.
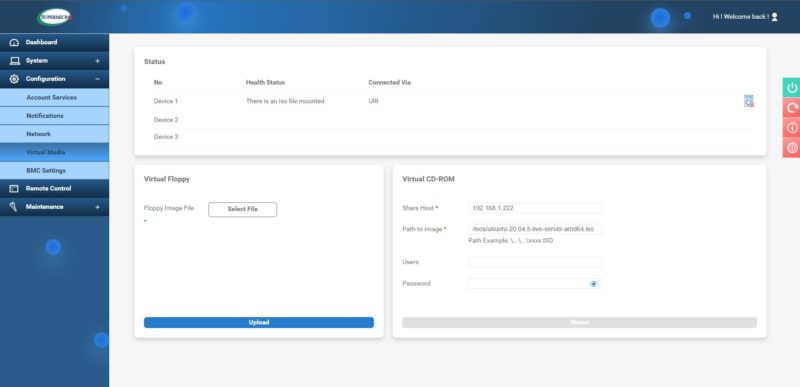
At that point, you can install the OS or drivers as needed.
How to Unmount a Supermicro Virtual Disk
If you want to unmount a Supermicro virtual disk, then you will go under Device 1 (pictured below) and on the right side there is a disk with a red “x” image. Click on that, and you will get this dialog.
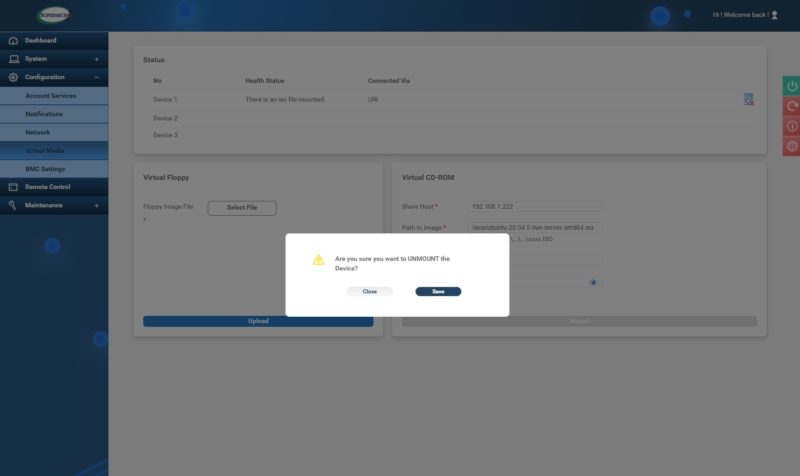
After that, the disk should be unmounted. If you forget this step, then the system might continue to boot from the virtual media ISO.
BONUS: Supermicro IPMIview 2.0 Works in the Opposite Manner Without Installing Java
Many at STH know we have been using IPMIview 2.0 for a long time. The IPMIview 2.0 program has been one that is known to let you run the Java iKVM client without installing Java and keeping that up-to-date. Given what we showed above, many will be surprised to find that IPMIview 2.0 works almost in an opposite way. The Virtual CD-ROM with IPMIview 2.0 requires a license (SFT-DCMS-SINGLE or SFT-OOB-LIC):
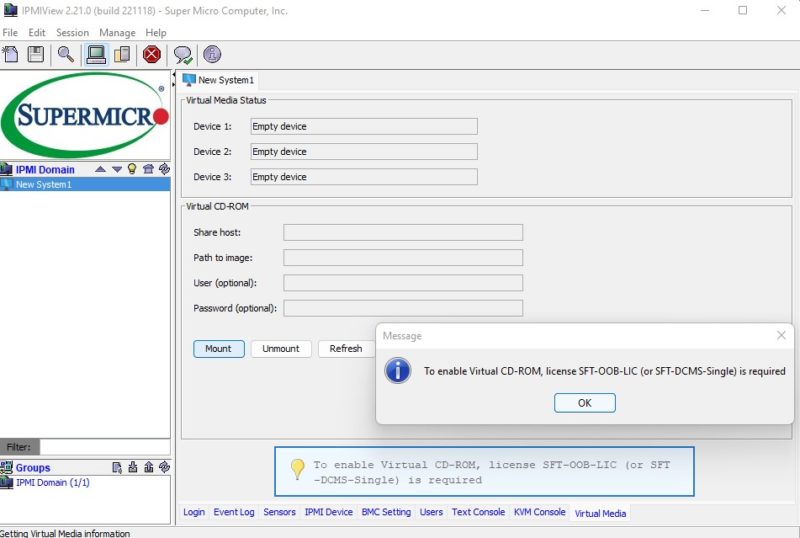
However, if you utilize the OpenJDK viewer, then you can get the remote iKVM and also select virtual media and mount a drive remotely using this.
If you want to mount a local ISO to Supermicro IPMI and do not have a network share reachable by the hosts, and do not have a license, then using IPMIview 2.0 will allow you to get your job done without a license.
Final Words
It is too bad that this feature is being taken away and hidden behind a paywall with the HTML5 viewer. It is one that previously set Supermicro apart from Dell, HPE, and Lenovo. While having the current functionality is OK, the price point of $130-$200 to get the feature SFT-DCMS-SINGLE for the HTML5 iKVM virtual media feels like a lot if you are not using other features. At least there are alternatives available. Usually, we pay $50-75 for a USB drive to get mounted to a server with remote hands in a data center, so that is another option if the server’s USB ports are enabled.
I recently had the need to mount a bootable ISO to the Supermicro server I use in my lab environment using the built in IPMI tool.
Its a relatively straight forward process, or at least it should be 
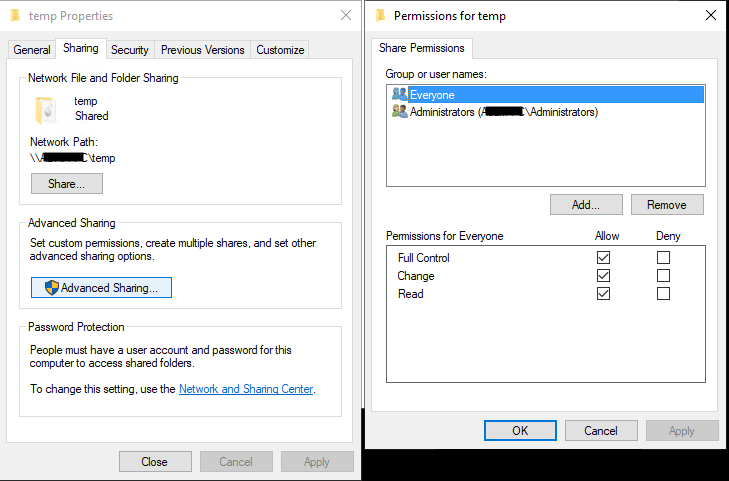
1. Create a standard windows share and give open or authenticated account access permissions
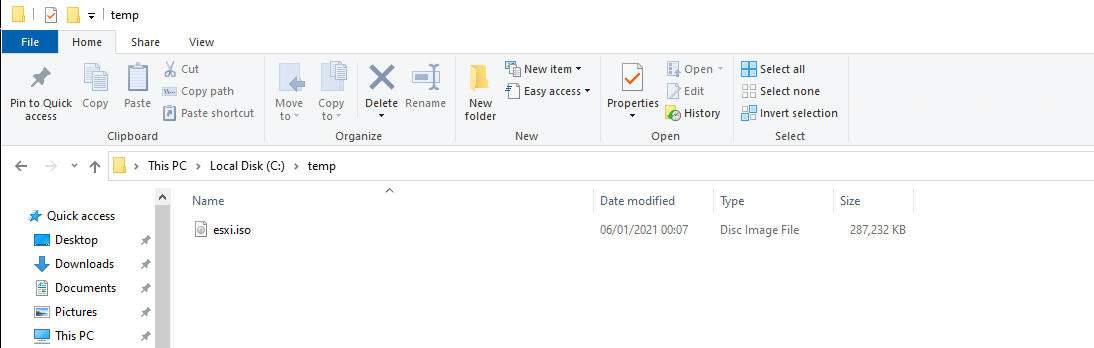
2. Place the ISO file that you wish to mount at boot time in the new folder.
3. Enter the share details on the IPMI setting page
4. Save the settings then hit mount.
This is where you may (as I did) run in to issues….
Basic check time … everything was configured spot on, share wide open, ISO valid and not corrupt, all lower-case naming and no special characters in the share name.
After a lot of wasted time and ensuring the latest release of IPMI Firmware was installed (version 0.88 at the time of writing) still nothing.
After further digging I found that the Supermicro software requires the machine that hosts the share to support SMB v1.0 which on Windows 10 is disabled
A quick trip to Add Remove Features to select SMBv1.0 Server support and a reboot solved the issue allowing the ISO to mount as required.
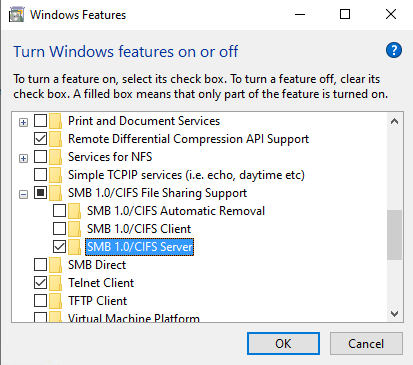
*Once finished with the mounted ISO I recommend removing the added SMBv1.0 Support not forgetting to reboot.
Hope this helps others save some time and a lot of head scratching.
Thanks for Reading
Adam
Supermicro IPMI & Samba/Windows share
Special thanks to Peter Kieser, whose blog post I found after a bit of searching: https://peterkieser.com/2020/05/14/supermicro-ipmi-virtual-media-and-samba-4-11-ubuntu-20-04/
For most modern installations of Samba (according to the blog post, Samba 4.11+ on Ubuntu 20.04), you need to manually set NT1 as a supported protocol in /etc/samba/smbd.conf — Make sure it’s under the [global] section:
[global]
server min protocol = NT1
Run systemctl restart smbd for good measure and try to connect again.
I had to set guest ok = yes under my share settings as well and get rid of username/password in the IPMI input fields, but maybe that was unrelated:
[shares]
    path = /data/shares
    public = yes
    guest ok = yes
    read only = yes