
A Sublime Plugin that allow you run a HTTP Server in SublimeText 2, and serves all the open project folders in Sublime
Fork the Project on GitHub learning/SublimeServer
- Download ZIP File
- Download TAR Ball
- View On GitHub
Preface
- SublimeServer is a Sublime Text Plugin, so you must get Sublime Text first
- I’m not a Pythoner, so, the code maybe uncomely
Introduction
What SublimeServer can do? It can serves all the open project folders in Sublime, also the sub-floders and files in it, convenience for test you static html pages.

System Tested
SublimeServer has been test on Mac OS X 10.7+, Windows XP+ and linux.
Installation
Install with Package Control
If you’re using wbond’s sublime package control, that’s the easy way to install SublimeServer, I strongly recommend you use package control to install SublimeServer, it will auto update when a new version SublimeServer is available.
- Call out the Sublime Command Palette with
Ctrl+Shift+PorCommand+Shift+P, typeInstall Packageand return - Now input
SublimeServerand return, now SublimeServer will auto install
Using git
- cd to your Sublime packages folder, don’t know where is it? Open Sublime and choose Preferences -> Browser Packages, yeah, here is it!
$ git clone git://github.com/learning/SublimeServer.git- Done!
Using archive file
- Open Sublime and choose Preferences -> Browser Packages.
- Extract the archive file here, you’ll get a folder named SublimeServer, and now it works.
How to use
- Go to you Sublime, you’ll find a SublimeServer menu under Tool -> SublimeServer
- Change the setting as you wish, choose Tool -> SublimeServer -> Settings
- Once the SublimeServer started, you can view your file by control-click(right-click in Windows) at the current edit region.

- Or just type
http://localhost:port/in your browser, the default port is8080, your can change it in the SublimeServer settings file

Change Log
0.3.3 — Mar 6, 2016
- Fix bug #25
- Add OPTIONS, PUT, POST support, thanks fantonangeli
0.3.2 — Oct 12, 2014
- Add markdown support, thanks rookiecj.
- Add default stylesheet.
- Add default extension setting, thanks jdiamond.
- Fix some ST3 problems
0.3.1 — Jun 1, 2014
Add Sublime Text 3 support.
0.2.1 — Aug 31, 2012
Improvements
- Add auto-start support, Thanks sapara.(#8)
0.2.0 — Jul 20, 2012
Bug fix:
- While dragging new folders to Sublime or remove folders from Sublime, SublimeServer cannot refresh it.(#4)
Improvements
- Custom mime-types support.
- Disable unavailable menu items, Thanks bizoo.(#6)
0.1.2 — Jun 28, 2012
Bug fix:
- Thread still alive and cannot stop.(#2)
Misc:
- Move
SublimeServer.sublime-settingstoUserfolder.
0.1.0 — Jun 02, 2012
SublimeServer can basically use
Know issues:
- While sublime reload plugins, last SublimeServer thread still alive and cannot stop it.(#2)
- While dragging new folders to Sublime or remove folders from Sublime, SublimeServer cannot refresh it.(#4)
Support
- Any good suggestion or improvement? Welcome! Go to issue page or fork it!
SublimeServer
Turn you Sublime Text editor into a HTTP server, and serves all the open project folders, now support ST2 and ST3
Markdown Rendering
When a client requests a Markdown file(.md), the server will return an Html file instead of the requested Markdown file, the Html file contains all of content of the Markdown file and will render Markdown syntax into Html syntax on the client side.
Setup
Open Tools-SublimeServer-Settings, add mime types for Markdown like below
{
	"attempts": 5,
	"autorun": false,
	"interval": 500,
	"mimetypes":
	{
		"": "application/octet-stream",
		".c": "text/plain",
		".h": "text/plain",
		".markdown": "text/x-markdown; charset=UTF-8",
		".md": "text/x-markdown; charset=UTF-8",
		".py": "text/plain"
	},
	"port": 8080
}
Change Log
0.3.3 — Mar 6, 2016
- Fix bug #25
- Add OPTIONS, PUT, POST support, thanks fantonangeli
0.3.2 — Oct 12, 2014
- Add markdown support, thanks rookiecj.
- Add default stylesheet.
- Add default extension setting, thanks jdiamond.
- Fix some ST3 problems
0.3.1 — Jun 1, 2014
Add Sublime Text 3 support.
0.2.1 — Aug 31, 2012
Improvements
- Add auto-start support, Thanks sapara.(#8)
0.2.0 — Jul 20, 2012
Bug fix:
While dragging new folders to Sublime or remove folders from Sublime, SublimeServer cannot refresh it.(#4)
Improvements
- Custom mime-types support.
- Disable unavailable menu items, Thanks bizoo.(#6)
0.1.2 — Jun 28, 2012
Bug fix:
- Thread still alive and cannot stop.(#2)
Misc:
- Move SublimeServer.sublime-settings to User folder.
0.1.0 — Jun 02, 2012
SublimeServer can basically use
Know issues:
- While sublime reload plugins, last SublimeServer thread still alive and cannot stop it.(#2)
- While dragging new folders to Sublime or remove folders from Sublime, SublimeServer cannot refresh it.(#4)
For more details please visit http://learning.github.com/SublimeServer
Make sure to read the conditions for use on the official site. Sublime Text is not free. However, you may evaluate it without a license.
Download links for all supported platforms can be found on the Download page.
The process of installing Sublime Text is different for each platform.
32 or 64 bits?
64 bit versions should be preferred. As of Sublime Text 4 there are no (officially supported) 32-bit versions any more. Only use a 32-bit version if you are having problems with the 64-bit version or you are running a 32-bit operating system. Note that some features, such as Git Integration are only available in the 64-bit version.
macOS
There is only one version of Sublime Text for macOS.
Windows
You should be able to run the 64-bit version if you are using a modern and supported version Windows (read: anything older than Windows XP).
Linux
Run the following command in your terminal to check your operating system’s type. x86_64 means you are on a 64-bit system.
Portable or Not Portable?
Sublime Text comes in two flavors (for Windows specifically):
- normal
- portable.
Most users should be better served by a normal installation. Use the portable version only if you know you need it.
Normal installations separate data between two folders: the installation folder proper, and the data directory (user-specific directory for data; explained later in this guide). Normal installations also integrate Sublime Text with the File Explorer.
Portable installations keep all files needed by Sublime Text in a single folder. This folder can be moved around and the editor will still work.
How to Install
macOS and Windows
- Download the installer.
- Double click on the installer and follow the provided steps.
Linux
The recommended way is to use the official Linux repositories for commonly used Linux distributions and follow the corresponding steps to install Sublime Text using your system’s package manager.
If there is no repository for your system, you can look for a Sublime Text entry on your distro’s repository.
Manual Installation
The following sequence of Bash commands can be used to install Sublime Text manually. Replace 3211 with the latest build available (or any older build number).
bash
cd ~
wget https://download.sublimetext.com/sublime_text_3_build_3211_x64.tar.bz2
tar vxjf sublime_text_3_build_*_x64.tar.bz2
# Move the uncompressed files to an appropriate location.
sudo mv sublime_text_3 /opt/sublime_text
# Create a symbolic link to use at the command line.
sudo ln -s /opt/sublime_text_3/sublime_text /usr/local/bin/subl
# Create a symbolic link for the desktop entry.
sudo ln -s /opt/sublime_text_3/sublime_text.desktop /usr/share/applications/sublime_text.desktop
How to Install the Portable Version
TIP
The portable version is activated whenever a Data/ folder exists in the installation folder, i.e. the folder you extracted the portable archive to.
Windows
- Download the compressed archive with the portable version.
- Unzip it to a folder of your choice.
You will find the sublime_text.exe executable inside that folder.
Linux
The steps are similar to the manual installation steps above.
- Download the tarball.
- Unzip it to a folder of your choice.
- Create a
Data/folder inside that folder.
You will find the sublime_text executable inside that folder.
macOS
- Download
.dmgfile. - Open
.dmgfile. - Drag the Sublime Text 3 bundle into the Applications folder
To create a symbolic link to use at the command line, issue the following command at the terminal:
bash
ln -s "/Applications/Sublime Text.app/Contents/SharedSupport/bin/subl" /usr/local/bin/sublRelease Channels
Sublime Text currently has two release channels:
- Stable
- Dev
Stable releases are better tested and more reliable for everyday use. The majority of users should only use stable releases.
The dev channel is more unstable. Dev builds may contain bugs and not work reliably. They are updated more often than beta releases. Dev builds are only available to registered users.
Older Versions
In the event you want to downgrade your Sublime Text, you can access binaries for any previously released version by replacing the build number in the download URL. For example, to retrieve the Windows release for Sublime Text 3.0, grab the latest download URL provided and replace it with the one from the Sublime Text 3.0 release.
- 3.2.2 (Build 3211): https://download.sublimetext.com/Sublime%20Text%20Build%203211%20×64%20Setup.exe
- 3.0 (Build 3143): https://download.sublimetext.com/Sublime%20Text%20Build%203143%20×64%20Setup.exe
Although discouraged, Sublime Text 2 can be found on its old download page. Because it is unsupported, you will need to figure out on your own how to install it.
Last Updated :
01 Jun, 2020
Written by a Google engineer sublime text is a cross-platform IDE developed in C++ and Python. It has basic built-in support for Python. Sublime text is fast and you can customize this editor as per your need to create a full-fledged Python development environment. You can install packages such as debugging, auto-completion, code linting, etc. There are also various packages for scientific development, Django, Flask, and so on.
Downloading and Installation
Sublime Text 3 can be downloaded from its official site sublimetext.com. To install sublime text 3 on Windows, go through How to install Sublime Text 3 in Windows?
Setting up Environment Variable
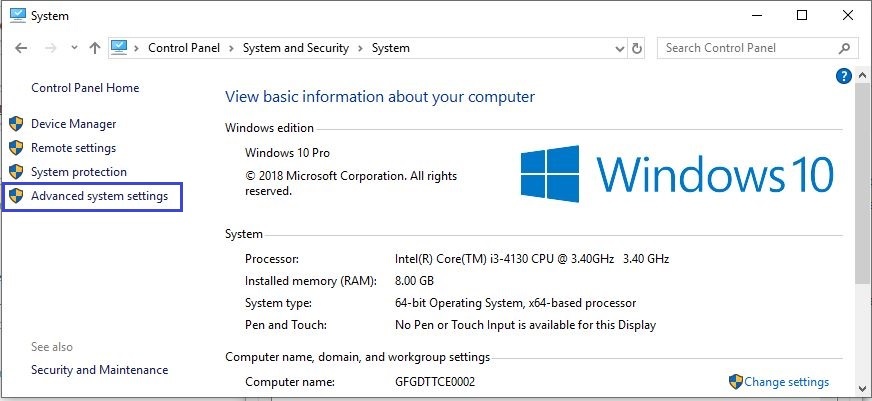
- Step 1: Click the Advanced system settings link.

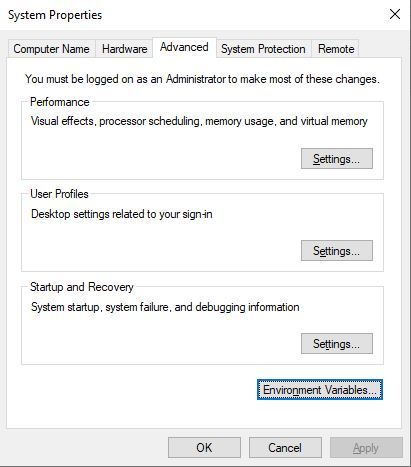
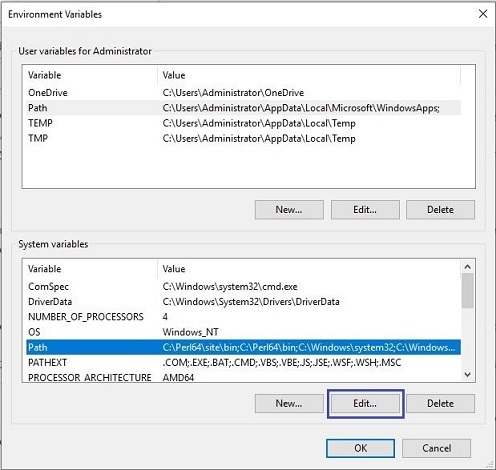
- Step 2: Click Environment Variables. In the section System Variables, find the PATH environment variable and select it. Click Edit. If the PATH environment variable does not exist, click New.


- Step 3: In the Edit System Variable (or New System Variable) window, specify the value of the PATH environment variable. Click OK. Close all remaining windows by clicking OK.
Working on Sublime Text3
Step 1: Create a new file and save it with extension .py for example save it as checkversion.py. Now, Go to Tools -> Build System -> Python then type on your checkversion.py
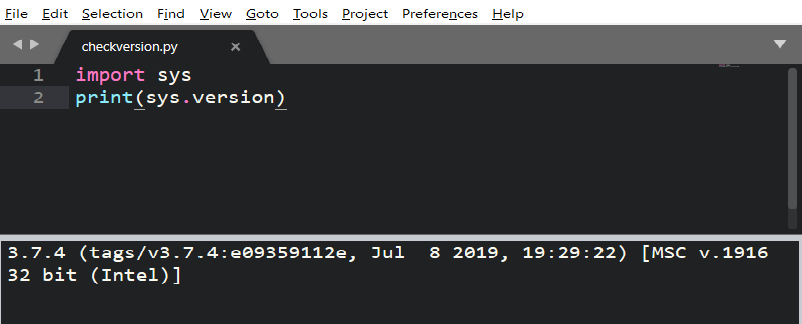
This is showing the version of python. This means python is successfully installed and added in Environment Variable.
Step 2: Add new build system on your Sublime Tools -> Build System -> New Build System and make sure that the new build system has this following command
{
"cmd":["C:/Users/<user>/AppData/Local/Programs/Python/Python37-32/python.exe", "-u", "$file"],
"file_regex": "^[ ]File \"(...?)\", line ([0-9]*)",
"selector": "source.python"
}
Select your new system build newPython3 and re-run the checkversion.py and now it should be using Python 3
ALL Done…
Now create any file and save it with .py extension
Now you can run your Python code by using CTRL+SHIFT+B and choose from the 2 options.
“Before getting in a war you need to have your tools setup right !”
Hello coderz! Welcome to CodingBroz where you find all your solutions regarding programming.
Today, I am going to help you in setting up your weapon before getting into the warzone i.e. I will help you to Download and setup Sublime Text for Competitive programming in C++ !!!
Table of Contents
Why C++ ?
Maybe you would be clear in your selection of programming language as C++ or you still must be confused between C++ or any other language.
So, let me clear your confusions and doubt and I will help to make your mind clear for your selection of C++ as a weapon (language) for your war (Competitive Programming)
First of all C++ is the most widely used Programming Language for competitive programming and why you should also choose C++ !
C++ is a very fast and best suited language for you if you are really interested in Competitive programming and it can also help during your job interviews.
Now moving towards How you can download and setup Sublime text for competitive programming in C++
Also Read:
- C++ vs Java Which to choose and why?
What is Sublime Text ?
Sublime Text is an awesome Text editor used for writing code. It is a widely used code editor, especially for Competitive Programming with C++.
It is very light weight as it is a text editor and not an IDE (Integrated Development Environment) which can be easily set up and used.
Sublime Text is full of rich and very useful features, this is why it is widely used across the globe by many competitive programmers. Let’s see what are those features which make it very useful for competitive coding :
- Track all the files and folders you are working with
- Auto correction and formatting features
- Create your own snippet
- Last and the best feature is its Colorful dark theme which you are also going to love a lot and it will make coding more fun.
Operating system for Sublime Text
Sublime Text can be used on all the there Operating System :
- Windows
- macOS
- Linux
You can download Sublime Text for your operating system using its official website i.e. www.sublimetext.com
Now let’s see, How can you Download and Setup Sublime Text for Competitive programming in C++ !
Downloading Sublime Text
As I mentioned above Sublime Text is available for all operating system, Windows, macOS and Linux.
Go to its official website i.e. www.sublimetext.com and download Sublime Text according to your Operating System.
Installing Sublime Text in Windows
You can follow these steps and install Sublime Text on your Windows system
Step 1 – Click and run the downloaded .exe file . Click next
Step 2 – Now choose a destination location to install Sublime Text and click Next.
Step 3 –Verify the destination folder and click Install.
Step 4 – Now click Finish to complete the installation.
Now, Install mingW C++ compiler to run C++ program on Sublime Text. You can download it from here – MinGW
Installing Sublime Text in Linux
Now, let’s see how you can install Sublime Text in the Linux Operating System. Follow these steps :
Step 1 : Use the terminal and install the packages for Sublime Text editor using this command –
sudo add-apt-repository ppa:webupd8team/Sublime-Text-3
Step 2 − Update the packages using the following command −
sudo apt-get update
Step 3 − Install the Sublime Text repository using the following command −
sudo apt-get install Sublime-Text
After the successful execution of above mentioned commands, you will find that Sublime Text editor is installed on the system.
If you are using Ubuntu Linux Distros, you can directly install Sublime Text using the Ubuntu Software Store.
If your linux version has a pre-installed app store you can use that to download Sublime Text editor.
Installing Sublime Text in macOS
You can follow these given step to install Sublime Text on you mac
Step 1 : Download the .dmg file of Sublime Text from the official website just like we did for windows.
Step 2 : run and install the file and then you are ready to go.
Now, you need to install the Gcc compiler on your mac.
First install homebrew which is a package manager and it will be used to download the gcc compiler in your mac system.
Copy and Paste this code in your terminal :
/bin/bash -c “$(curl -fsSL https://raw.githubusercontent.com/Homebrew/install/HEAD/install.sh)”
Now, you can follow these steps to install the C++14 compiler
Install gcc compiler using this code :
Brew install gcc
Install gtimout in mac using this code :
brew install coreutils
You are good to go !!!
Now, Lets see how you can setup Sublime text for competitive programming in C++
Setting Up Sublime Text For Competitive Programming In C++
Now let’s setup up Sublime Text for competitive programming !
Sublime Text setup for windows
- Go to toolbar in the sublime text : Tools > Build System > New Build System
- Now, Paste this following code there and save it :
{
  "cmd" : ["g++-9 $file_name -o $file_base_name && gtimeout 4s ./$file_base_name<inputf.in>outputf.in"],
  "selector" : "source.c",
  "shell": true,
  "working_dir" : "$file_path"
}
Now, We setup up the windows –
Use this key combination : Command + option + 3 OR ⌘ + ⌥ + 3
Now, Write your C++ code in your first window and save it as 1.cpp
Save the 2nd window as inputf.in and 3rd window as outputf.in .
Sublime Text setup for Linux
- Go to toolbar in the sublime text : Tools > Build System > New Build System
- Now, Paste this following code there and save it :
{
"cmd" : ["g++ -std=c++14 $file_name -o $file_base_name && timeout 4s ./$file_base_name<inputf.in>outputf.in"],
"selector" : "source.c",
"shell": true,
"working_dir" : "$file_path"
}
Now, We setup up the windows –
Use this key combination : ALT + SHIFT + 3
Now, Write your C++ code in your first window and save it as 1.cpp
Save the 2nd window as inputf.in and 3rd window as outputf.in .
Sublime Text setup for Windows
- Go to toolbar in the sublime text : Tools > Build System > New Build System
- Now, Paste this following code there and save it :
{
"cmd": ["g++.exe","-std=c++14", "${file}", "-o", "${file_base_name}.exe", "&&" , "${file_base_name}.exe<inputf.in>outputf.in"],
"selector":"source.cpp",
"shell":true,
"working_dir":"$file_path"
}
Now, We setup up the windows –
Use this key combination : ALT + SHIFT + 3
Now, Write your C++ code in your first window and save it as 1.cpp
Save the 2nd window as inputf.in and 3rd window as outputf.in .
Congratulations !!! Now you are ready with your Sublime Text editor to code in C++ and participate in a Competitive programming contest.
Broz Who Code
CodingBroz