
Applies ToWindows 11 Windows 10
Storage Sense can automatically free up drive space for you by getting rid of items that you don’t need, like temporary files and items in your Recycle Bin. Here’s more info on how it works and how to set it up to meet your needs.
If Storage Sense is turned on with the default settings, it will run when your device is low on disk space and will clean up unnecessary temporary files. Content from the Recycle Bin will be deleted by default after some time, but items in your Downloads folder and OneDrive (or any other cloud provider) will not be touched unless you set up Storage Sense to do so.
Important: Storage Sense works on your system drive only, which contains the Windows operating system and is usually referred to as C:. To free up space on other drives, go to Start > Settings > System > Storage > Advanced storage settings > Storage used on other drives.
Turn on Storage Sense
-
Go to Start > Settings > System > Storage .
-
Set Storage Sense to On.
Choose your Storage Sense settings
Note: Any settings you choose will apply only for you. Other users on your device can manage their own settings.
-
Go to Start > Settings > System > Storage .
-
Select Storage Sense. To tell Storage Sense how often to run and what to clean up, follow these instructions.
-
Make sure Storage Sense is turned on.
-
Under Run Storage Sense, select how frequently you want Storage Sense to run when you’re online and signed in.
Note: Low free disk space will vary depending on disk size and minimum operational thresholds. You’re in a low disk state when the capacity bar in Start > Settings > System > Storage turns red.
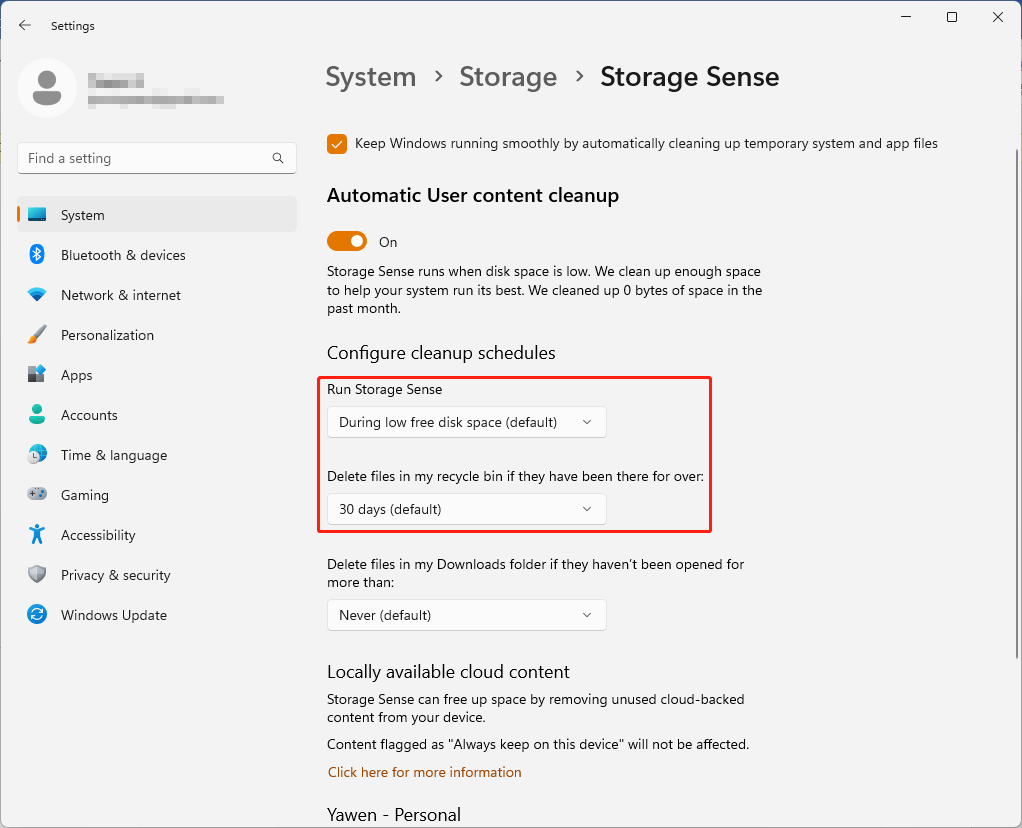
Under Delete files in my recycle bin if they have been there for over: and Delete files in my Downloads folder if they haven’t been opened for more than:, choose when files from your Recycle Bin or Downloads folder are deleted.
Note: You’ll only see cloud content settings when you’re signed in to your cloud account.
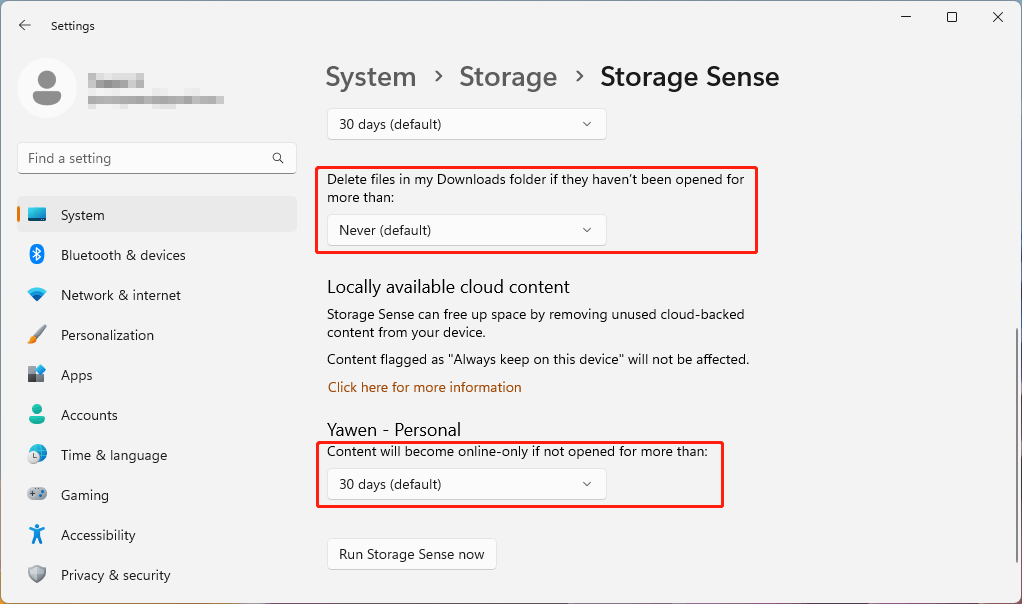
Cloud files can exist locally on the disk or be available online only. To choose the conditions for when inactive files are made online only, under Content will become online-only if not opened for more than: choose your preferred amount of time. Note that starting in Windows 11, version 22H2, the default for OneDrive cloud files is to make files online-only if not opened for more than 30 days.
Important: This setting will not permanently delete any files. Files can be made locally available again if there is free disk space and network connectivity. Any file marked as Always keep on this device is exempted and will not be managed by Storage Sense.
For more info about locally available content, see What do the OneDrive icons mean?
Frequently Asked Questions (FAQ)
Storage Sense is off by default. If your PC runs into low disk space and you have not interacted with Storage Sense in the past, we may turn on Storage Sense to manage select temporary files, then notify you. If you prefer, you can choose to turn Storage Sense off right away or after the low disk state is resolved.
If you turn on Storage Sense, the default settings will run when your device is low on disk space. Note that the Downloads folder and cloud content will not be managed unless you specify.
-
Go to Start > Settings > System > Storage .
-
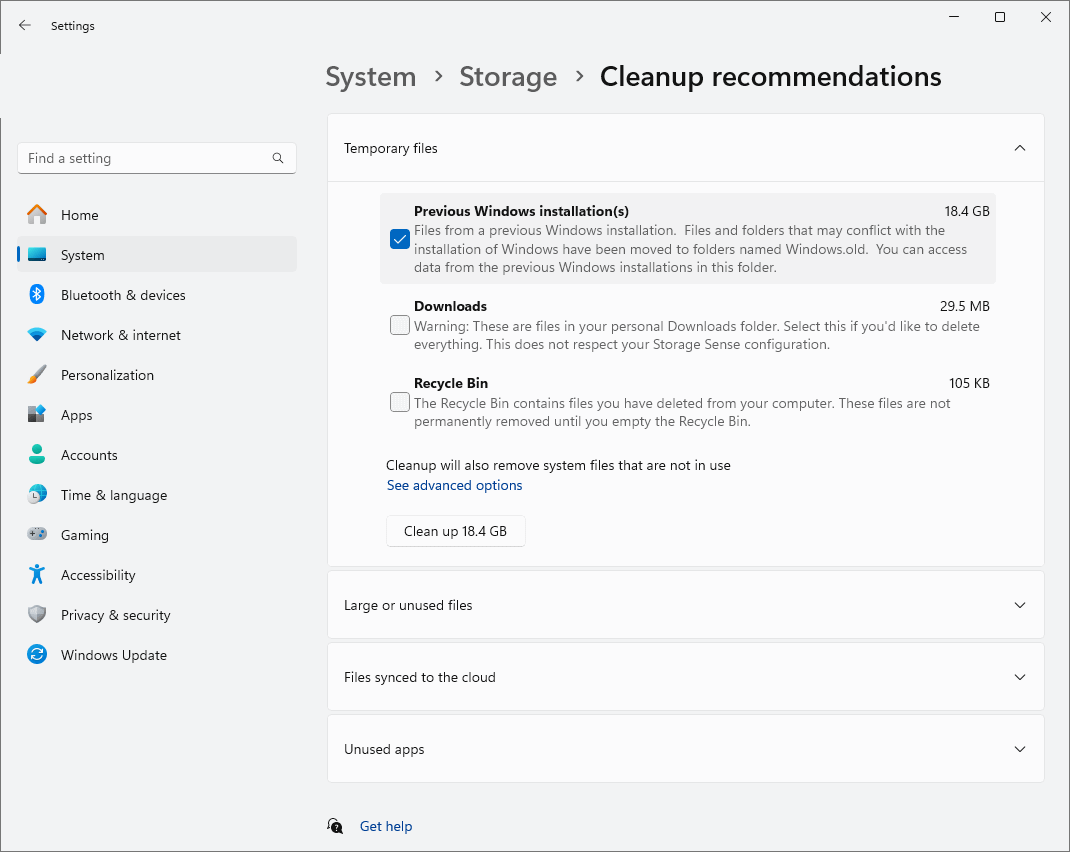
Under disk usage, select Temporary files , then ensure Previous Windows Installation(s) is checked and select Remove files.
No. Storage Sense cannot run unless you’re signed and online for more than 10 minutes.
You’ll see these notifications when your drive is running out of free space. This can affect the performance of your device and make it difficult to receive system upgrades.
Need more help?
Want more options?
Explore subscription benefits, browse training courses, learn how to secure your device, and more.
Контроль памяти (Storage Sense) это относительно новая функция Windows 10, позволяющая автоматически удалять на компьютере временные и неиспользуемые файлы, очищать старые элементы в корзине. Рассмотрим, как управлять параметрами Storage Sense на компьютерах Windows 10 вручную или централизованно с помощью групповых политик.
Содержание:
- Как включить «Контроль памяти» в Windows 10?
- Управление Storage Sense в Windows 10 с помощью групповых политик
Как включить «Контроль памяти» в Windows 10?
В Windows 10 Storage Sense по умолчанию отключен. Но если на системном диске недостаточно свободного места, Windows автоматически вызывает интерфейс Storage Sense и предлагает воспользоваться им для удаления неиспользуемых файлов.
Пользователь может управлять параметрами очистки Storage Sense в Windows 10 из Settings -> System -> Storage (Параметры -> Система -> Память устройства).
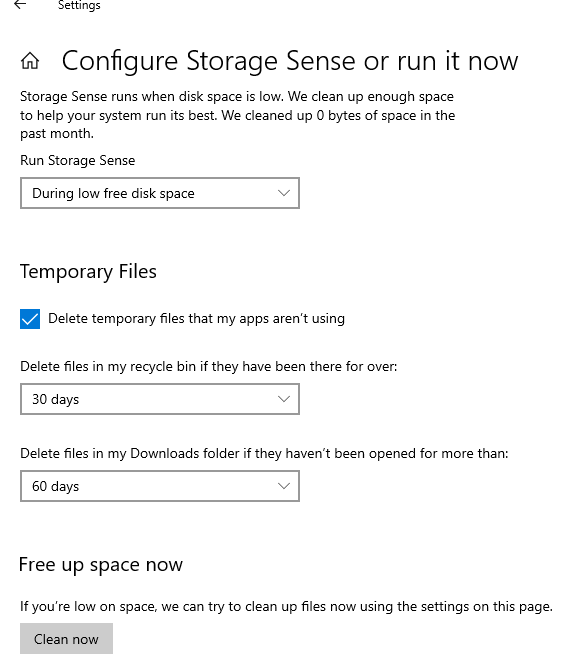
Вверху находится переключатель on/off, позволяющий включить функцию контроля памяти. Параметры очистки устройства можно задать в меню “Настроить контроль памяти или запустить его” (Configure Storage Sense or run it now).
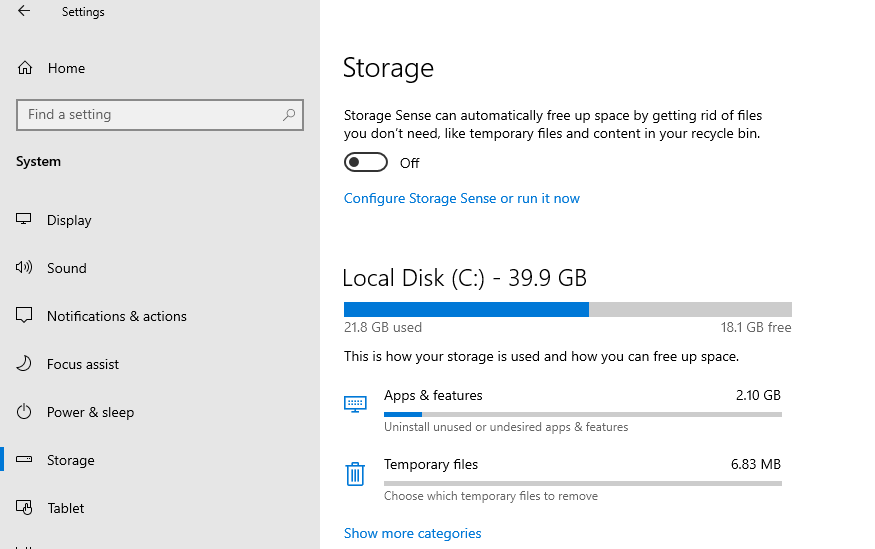
Здесь можно указать нужно ли удалять неиспользуемые временные файлы, файлы OneDrive (будут удалены с локального диска только неиспользуемые файлы, файлы в облаке останутся на месте), файлы в папке Загрузки (Downloads), а также файлы из корзины Windows.
С помощью кнопки “Очистить сейчас” (Clean now) можно удалить все указанные файлы немедленно (удобно, когда нужно срочно освободить место на диске).
Если вы включили и настроили контроль памяти, Windows 10 будет автоматически удалять выбранные файлы, освобождая вам место на диске.
Удаляются следующие файлы, которая Windows считает временными:
- Временные файлы установщиков
- Кэш системных файлов Системных
- Кэш браузера
- Кэш системных файлов
- Временные файлы обновлений Windows
- Неиспользуемые драйвера в Drive Store (в каталоге FileRepository)
- Дампы памяти и минидампы
- Старые файлы системных логов
- И т.д.
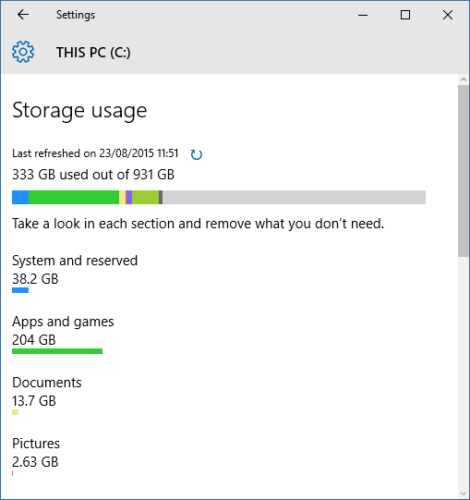
Статистика об использовании места на диске, которое вы можете освободить с помощью Storage Sense доступна на первоначальном экране настройки.
Управление Storage Sense в Windows 10 с помощью групповых политик
f you have a manageable version of Windows 10 (Pro, Ent, Edu), than you can configure Storage sense through GPO
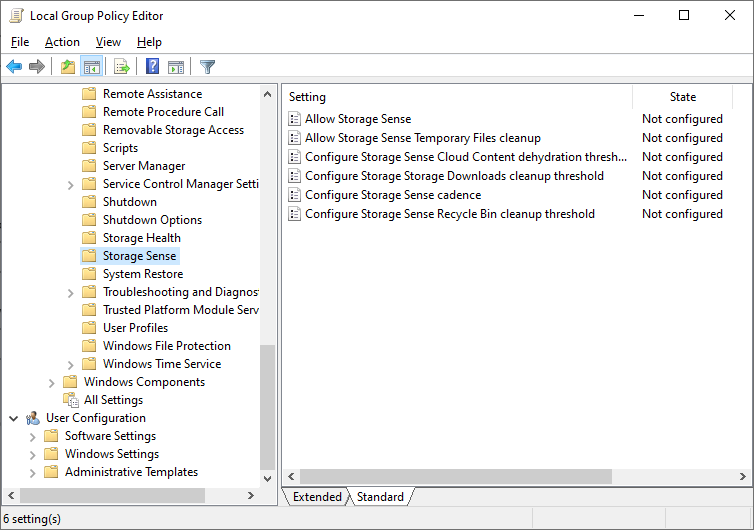
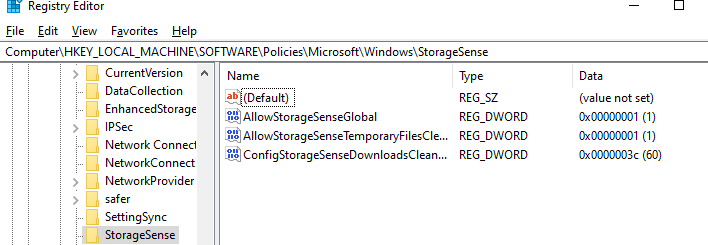
В Windows 10 1903 и выше (в редакциях Pro, Enterprise, Education) появились специальные параметры групповых политик, которые позволяют включить и настроить опции Storage Sense централизованно с помощью доменных GPO. Данные параметры находятся в разделе GPO Computer Configuration -> Administrative Templates -> System -> Storage Sense.
В Windows 10 20H2 доступны следующие политики управления параметрами Storage Sense (в скобах указаны названия REG_DWORD параметров реестра в
HKLM\Software\Policies\Microsoft\Windows\StorageSense
, соответствующие политикам):
- Allow Storage Sense (
AllowStorageSenseGlobal
)– включить/отключить функцию; - Allow Storage Sense Temporary Files cleanup (
AllowStorageSenseTemporaryFilesCleanup
)– разрешить автоматическую очистку временных файлов; - Configure Storage Sense Cloud Content dehydration threshold (
ConfigStorageSenseCloudContentDehydrationThreshold
)– позволяет настроить удаление неиспользуемых локальных копий файлов OneDrive; - Configure Storage Sense Downloads cleanup threshold (
ConfigStorageSenseDownloadsCleanupThreshold
)– очистка папки Загрузок; - Configure Storage Sense cadence (
ConfigStorageSenseGlobalCadence
) — как часто нужно запускать очистку диска: Every day, Every week, Every month, During low free disk space; - Configure Storage Sense Recycle Bit cleanup threshold (
ConfigStorageSenseRecycleBinCleanupThreshold
)– автоматическое удаление старых элементов в корзине.
Настройте параметры очистки, назначьте GPO на компьютеры пользователей. Обновите групповые политики на любом клиенте командой
gpupdate /force
и проверьте, что применились новые настройки очистки Storage Sense.
Чтобы новые параметры групповых политик для Storage Sense были доступны для редактирования через консоль управления доменной GPO (gpmc.msc), необходимо на контроллеры домена скопировать актуальную версию шаблонов групповых политик для последних билдов Windows 10. Если вы не можете установить новые admx шаблоны, можно изменить параметры Storage Sense напрямую через реестр с помощью Group Policy Preferences. [alert]
Настройка параметров Контроля памяти в Windows 10 через GPO заблокирует пользователям возможность изменить настройки очистки диска локально на своем компьютере.
[alert]Storage Sense можно использовать как простой и автоматический способ очистки диска в дополнении к инструменту Disk Cleanup (cleanmgr.exe). Более того, представители Microsoft заявили, что утилита Disk Cleanup стала deprecated инструментом и весь ее функционал в ближайшее время будет перемещен в Storage Sense.
Функцию Storage Sense можно эффективно использовать для очистки ненужных пользовательских данных в Windows 10 и в Windows Server 2019 на хостах с ролью Remote Desktop Session Host (RDSH) для уменьшения размера перемещаемого профиля или UPD диска.
In this article, you will learn how to free up space in Windows 10 and 11. This guide demonstrates how to turn on Storage Sense in Windows 10 and Windows 11 to automatically clean up disk space. It explains what Storage Sense is, how it works, and how it frees up space that may be wasted on your Windows PC.
What is Storage Sense in Windows 10 and Windows 11?
Storage Sense is a feature of Windows 10 and Windows 11 PCs that frees up disk space by deleting hidden cache and temporary files (including old Windows Update files), as well as optionally emptying the contents of the Recycle Bin and deleting everything in your Downloads folder.
Storage Sense can be run manually, or set to run automatically on a schedule. It provides users an alternative to manual storage management tools like Disk Cleanup that requires you to periodically check for files that could be deleted to free up space.
Benefits of using Storage Sense
Windows Storage Sense helps ensure that as much disk space is available to you as possible. This provides several key benefits:
- You have more space for your own files as it isn’t wasted on temporary and cache files that are no longer required
- Your PC performs better as it has more space for new cache files
- You’re less likely to completely run out of space, which can impact system stability
- When set to run automatically, Storage Sense reduces the amount of regular PC maintenance you have to do yourself
- You get to use more of the disk space you paid for
How to enable Storage Sense in Windows 10 and Windows 11
Before enabling Storage Sense, you should take a full backup of your Windows PC. This will ensure that any changes to your configuration can be rolled back, or that if Storage Sense doesn’t behave in the way you expect, you can recover any files it removes.
Storage Sense presents a number of configuration options. You can set it to only remove the files you want, ranging from only deleting temporary files, to being fully enabled to clear the Recycle Bin, delete files from the Downloads folder, and move files to the cloud.
Before you continue, you should be aware that enabling Storage Sense with certain options will automatically (and permanently) delete files from your Downloads folder and Recycle Bin.
Automatically clearing the Downloads folder may not be preferable for many users and should be done with care — if you forget you have set Storage Sense to periodically purge your Downloads folder and leave something important in there, you may lose it.
Enabling Storage Sense in Windows 10 and Windows 11
In Windows 10 and Windows 11, enable Storage Sense by following these steps:
- Open the Settings App from the Start menu
- Navigate to System > Storage
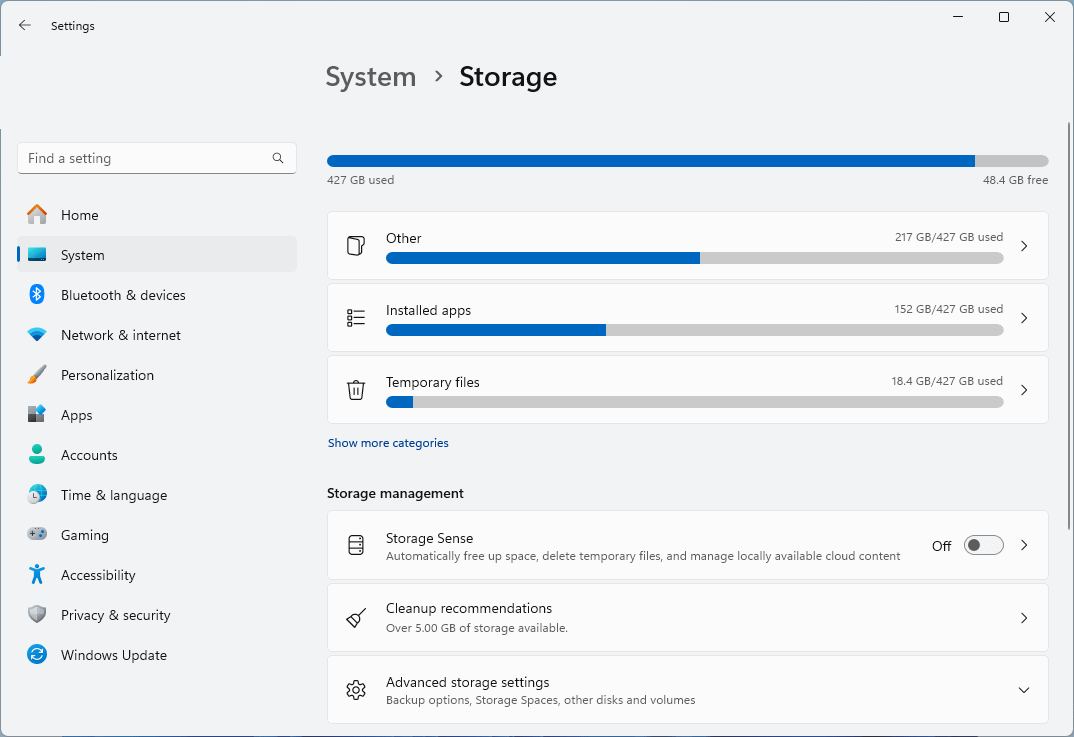
- Turn Storage Sense On
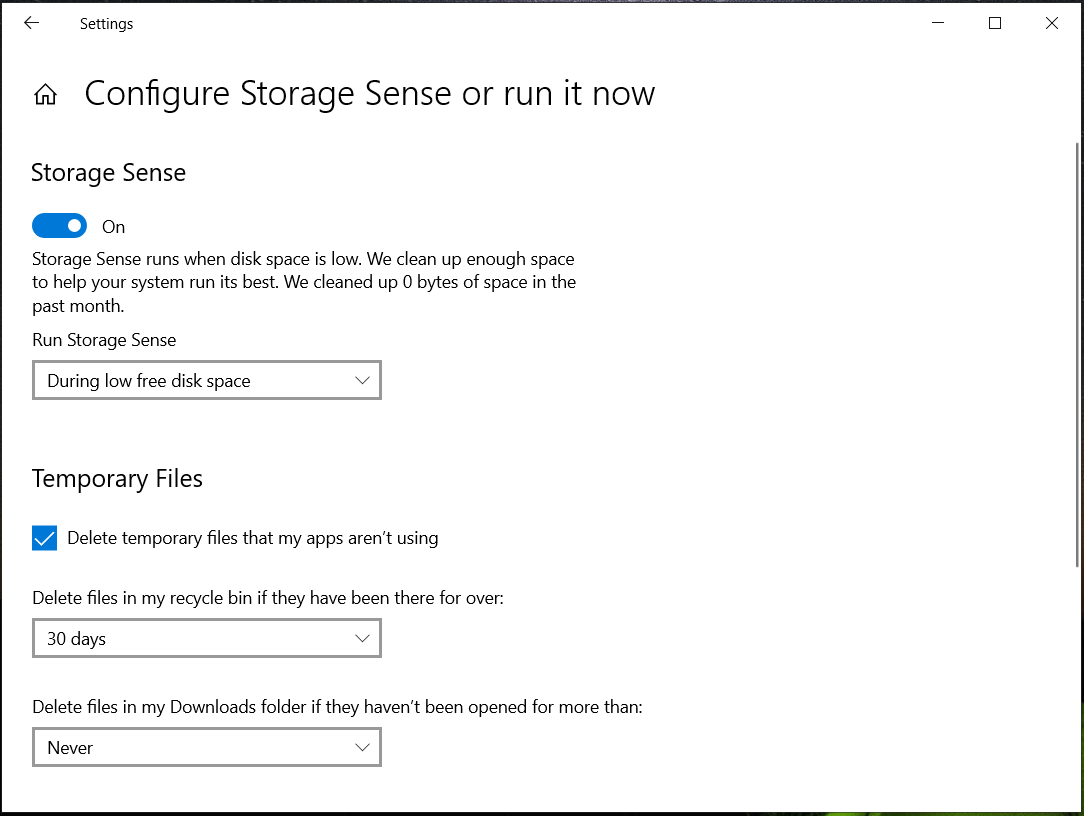
- To view advanced options, click on Storage Sense in the settings list (Windows 11) or click Configure Storage Sense (Windows 10)
Within the Storage Sense options you can configure whether you want your Downloads folder and the Recycle bin automatically emptied, and the frequency this should occur (for example, deleting files older than 14, 30, or 60 days). You can also schedule when Storage Sense runs and whether it should delete temporary files.
Note that the settings for Windows 11 to only automatically delete temporary files differ slightly, as detailed below.
Setting Storage Sense to only clean up temporary files in Windows 11
In Windows 11, you can set Storage Sense to only delete temporary files by following these steps:
- Open the Settings App from the Start menu
- Navigate to System > Storage
- Turn Off Storage Sense
- Click on Storage Sense to view the advanced options
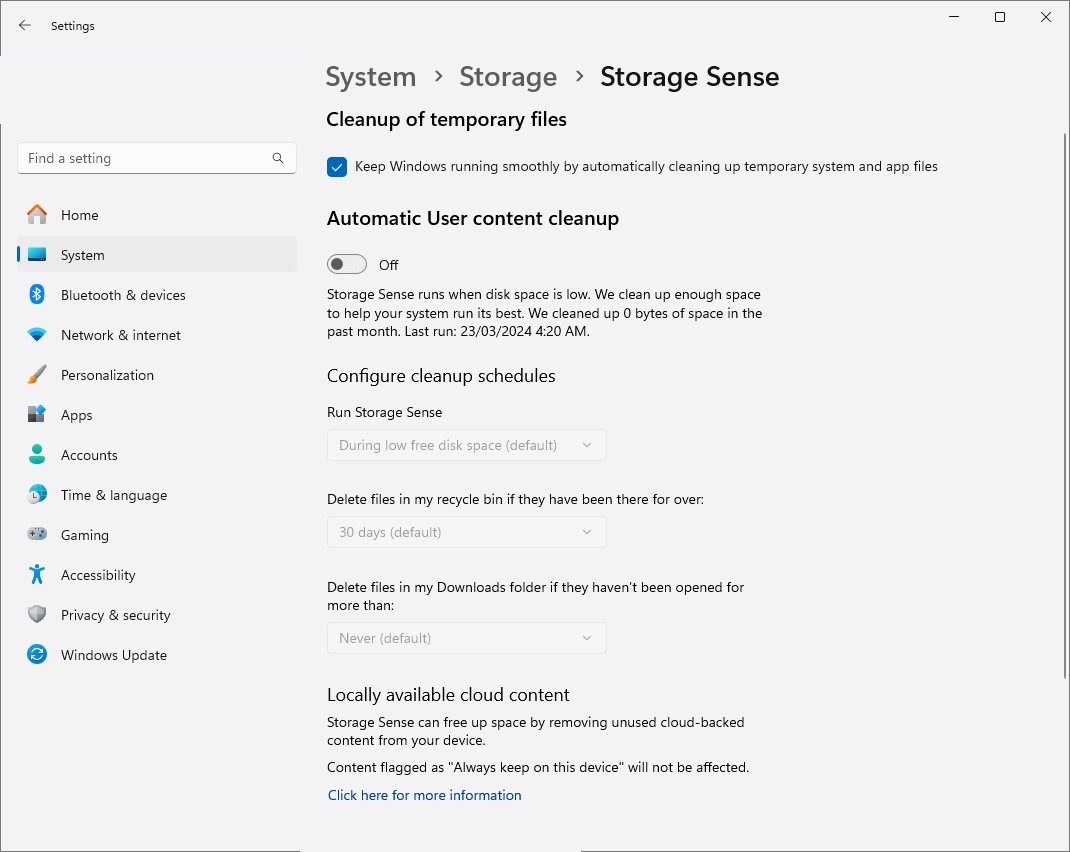
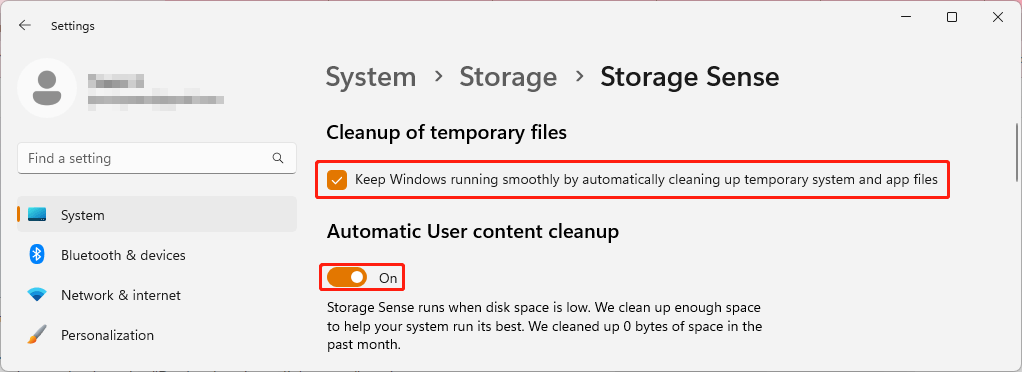
- Check Keep Windows running smoothly by automatically cleaning up temporary System and App files
This does not enable Storage Sense in full but only deletes temporary system and app files. This leaves you to manage your own files and makes sure that none of your files are automatically deleted.
Optimize Windows storage by moving files to the cloud
On both Windows 10 and Windows 11, Storage Sense provides you with the option to delete Locally available cloud content. This deletes local copies of files stored in OneDrive if you haven’t accessed them after a set period of time, leaving a copy on OneDrive in the cloud that will be downloaded the next time you need it.
While this feature can help clear up disk space for files you don’t use often, keeping a copy of your files only in the cloud comes with its own risks. For example, if you lose access to your Microsoft Account you’ll also lose access to your files in OneDrive. In many cases, it’s advisable to make sure you have your own backup of all your important files on a separate hard drive that is stored in a safe place.
Troubleshooting common Storage Sense issues
If Storage Sense doesn’t appear to be deleting files, you can manually delete the files Storage Sense manages by navigating to System > Storage > Cleanup recommendations in the Settings app.
If Storage Sense and other storage management features do not appear on a Windows device that is managed by your employer or other organization, check with your IT administrators to see if they have disabled it.
You can also troubleshoot system and disk issues using chkdsk and sfc /scannow commands.
Managing Storage Sense and performing system maintenance for multiple PCs
NinjaOne’s Endpoint Management lets you remotely monitor and free disk space for fleets of Windows devices. You can ensure that all the devices in your organization are fully updated and running optimally, preempting support calls from users who have run out of space for their files. You can also centrally manage remote access to devices for specific maintenance tasks, and manage the backup of business critical files.
How do you manage all those files you don’t need anymore? Do you dump everything in the Recycle Bin? Are you one of the few people who uses the excellent Shift + Delete shortcut? Or are your desktop and file hierarchy a mess thanks to years of poor folder management?
Whichever category you fall into, the bottom line is that staying on top all your old files is entirely your responsibility.
Or is it? Well, no. Not anymore. The Windows 10 Creators Update has brought a much-welcomed revamp to the already excellent Storage Sense feature.
But what is it? What can it do for you? And how you use it? Keep reading to find out.
What Is Storage Sense?
Microsoft released Storage Sense as part of the original Windows 10 back in 2015, though it’s been part of Windows Phone since the days of the 8.1 release. It offered you a way to manage the apps and files on your hard drive.
The feature could tell you how much of your system’s memory was being occupied by each individual file type and let you specify onto which storage media you wanted to save your apps, documents, music, pictures, and videos by default.
All those features are still present in the Creators Update version of Storage Sense, but the core purpose of the app has changed. Now you can use it to automatically monitor and free up storage space on your computer. It can delete old files, monitor for specific file types, and a whole lot more. I’ll discuss it in more detail shortly.
Why Is the New Version of Storage Sense Needed?
As I touched on in the introduction, managing old files and folders can be a mammoth task. Lots of people simply aren’t disciplined enough to keep themselves organized.
For example, Microsoft designed the Recycle Bin to be a safety net — it theoretically prevents you from accidentally losing an important document. But did you know it has a default maximum size? Windows will automatically delete the Bin’s contents on a «first-in-first-out» basis once you’ve reached the limit. If you abuse the purpose of the app and never empty out the junk, it could come back to haunt you.
If you’re curious, you can change the default size of the Bin by right-clicking on the app’s icon, heading to Properties > General and altering the Custom size number.
Other file cleaning tools, such as Disk Cleanup (Control Panel > Administrative Tools > Disk Cleanup), are not easy to use nor automatic.
In short, the new Storage Sense feature aims to fix a long-standing Windows problem that users have been complaining about for years.
How to Enable Storage Sense
There are two parts to Storage Sense: you can choose to simply enable the feature and run with the Windows default settings, or you can customize it to meet your personal requirements.
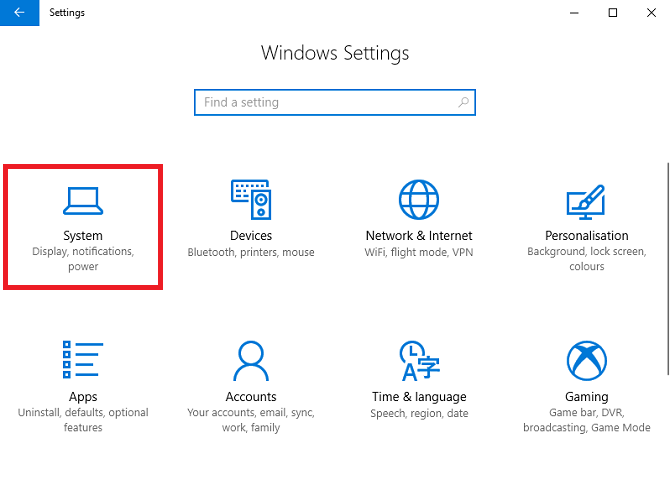
If you want to merely turn on Storage Sense, head to Start > Settings > System.
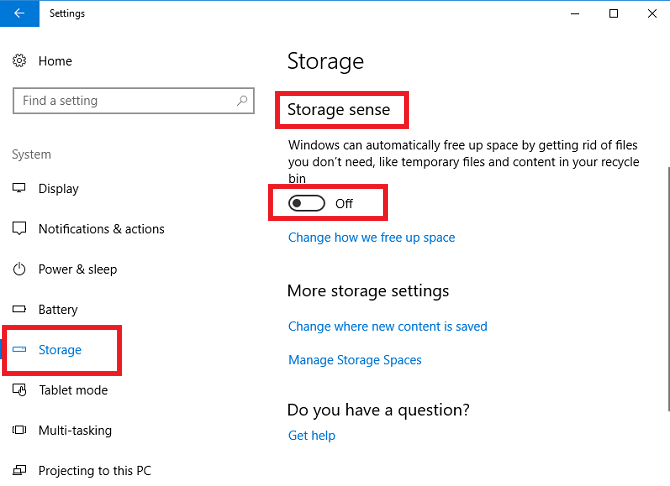
Now locate the menu item labeled Storage in the panel on the left-hand side on the Settings window and scroll down until you see the Storage Spaces option. You’ll see a sliding toggle. Set it to the On position.
If you make no further changes and quit the app, the Windows 10 Creators Update will automatically delete any junk files from your PC. That includes data files left over from long-since-uninstalled apps, some temporary files, and any items in the Recycle Bin that are more than 30 days old.
If you leave the feature turned on for a few months, you’ll even be able to see a month-by-month history of your storage savings.
How to Customize Storage Sense
If you want to make Storage Sense work in a different way from the pre-prescribed defaults, there are some options you can change.
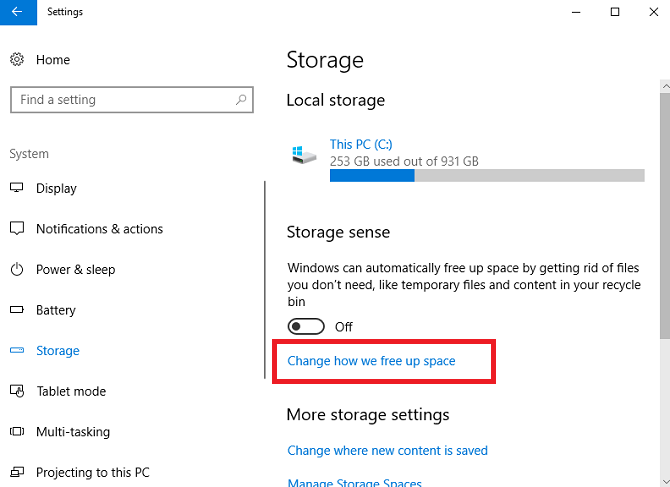
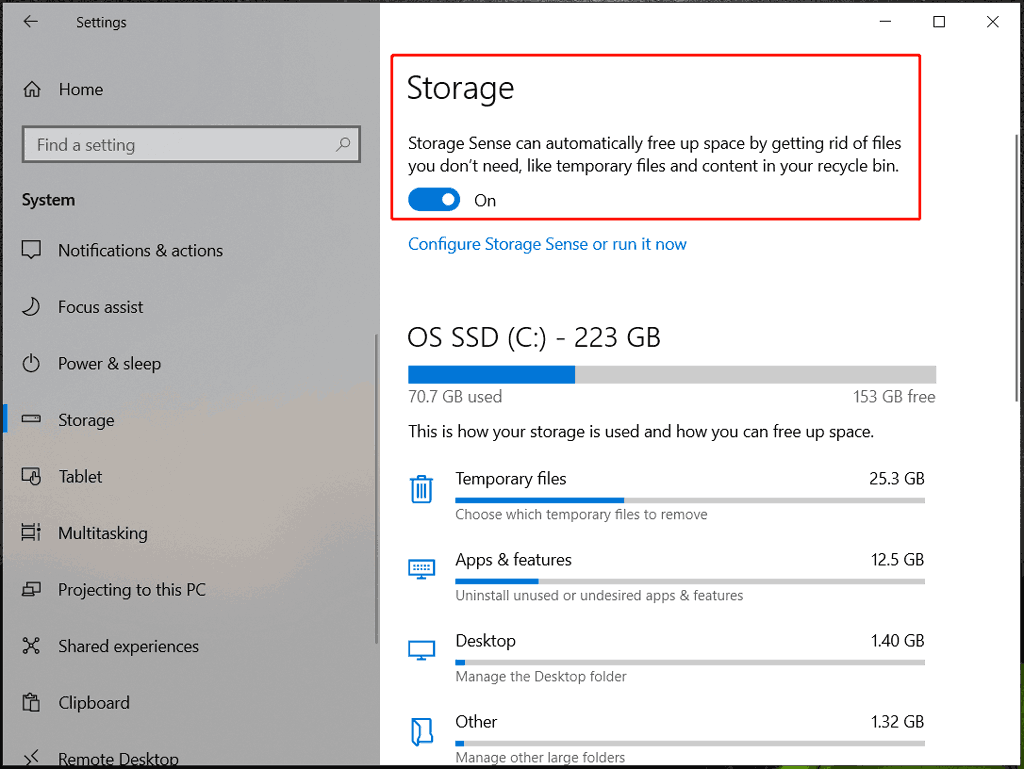
Once again, you need to head to Start > Settings > System > Storage > Storage Sense. This time, click the link titled Change how we free up space.
The new window allows you to choose whether you only delete old Recycle Bin files, only delete temporary files that your existing apps aren’t using, or delete both. Slide the toggles accordingly to make your choices.
A little further down the page, there’s also a third option called Free up space now. If you click on the Clean now button, Storage Sense will perform the clean-up actions immediately.
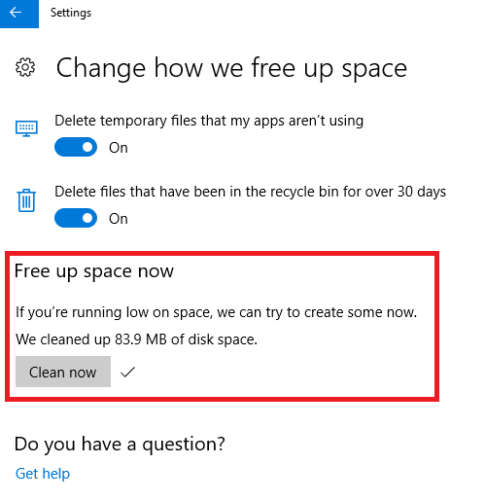
As you can see from the image above, my system instantly found 83.9 MB of new space. It might not sound like much, but I religiously keep my Recycle Bin empty and stay on top of old files — even in the hidden AppData folder. If you’re not as particular as me, the savings could be enormous.
Where Are the Old Features?
I mentioned earlier that some Storage Sense used to be about managing your storage locations and getting a snapshot of your various drives’ file breakdown.
Even though Microsoft has revamped the Storage Sense feature, you can still do those things, but you’ll now find them in a slightly different place.
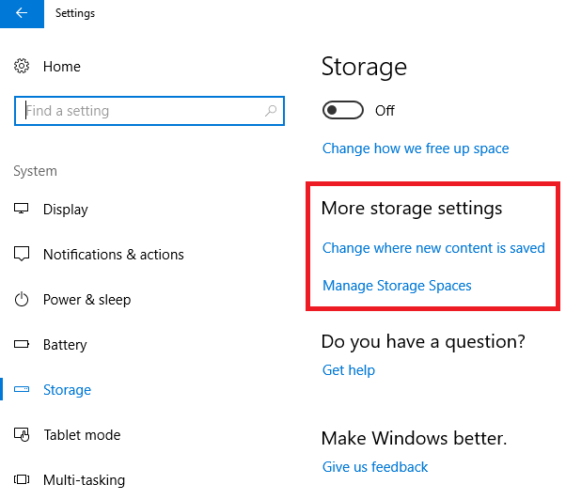
Navigate to Start > Settings > System > Storage and scroll down to More storage settings. There are two options: Change where new content is saved and Manage Storage Spaces.
Change Where New Content Is Saved
Clicking on Change where new content is saved will give you a list of six filetypes: Apps, Documents, Music, Photos and Videos, Films and TV Programmes, and Offline Maps.
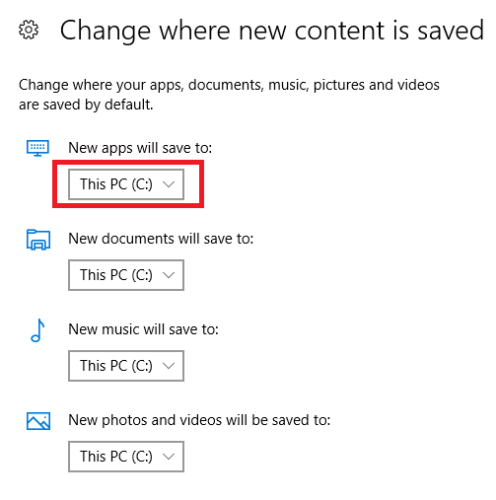
Under each filetype, you can choose your preferred location from the drop-down box. The app will list all your drives, including any removable disks.
Manage Storage Spaces
Choosing Manage Storage Spaces allows you to create pools of drives. Any content you save will be added to both drives, thus protecting you against drive failure and accidental deletion.
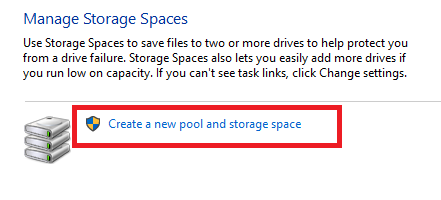
Click Create a new pool and storage space to create your pools.
Local Storage
Lastly, you can still see a breakdown of your current drives by content type.
Go to Start > Settings > System > Storage and click on the drive you want to view.
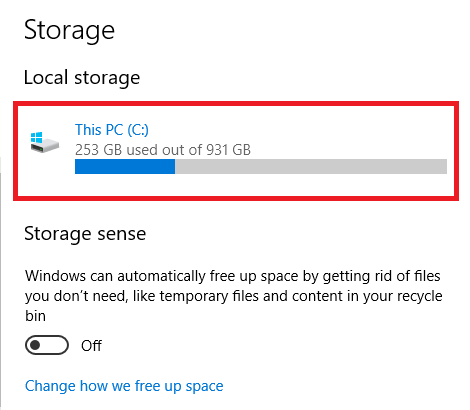
The app will show you a full list of your content along with the amount of space needed by each type.
What Other Features Would You Like to See?
There’s no doubt that the new Storage Sense feature will be a boost to anyone who feels like they’re drowning under the weight of old content.
That said, the release of the Windows 10 Creators Update only marks the first iteration of the app. Presumably, Microsoft will add a lot more functionality in future updates.
What would you like to see Microsoft include? Which extra features would make Storage Sense an even more valuable tool?
Image Credits: Andrey_Popov/Shutterstock
Storage Sense is a useful tool that can help you automatically free up disk space on a PC. Here is how to use this tool to release space. However, if you delete some important files by mistake, you can use MiniTool Power Data Recovery to help you get your data back.
Best Free Data Recovery Software for Windows:
MiniTool Power Data Recovery is a special file recovery tool to help you recover deleted files from SSDs, hard disk drives, external hard drives, USB flash drives, memory cards, SD cards, etc. You can try the free edition of this software to see if it can find and recover your lost and deleted data.
MiniTool Power Data Recovery FreeClick to Download100%Clean & Safe
What Is Storage Sense on Windows 10/11?
Windows itself has some disk space cleanup tools to help you release space for new data. Disk Cleanup and Defragmentation are two commonly-used tools. But you might overlook this tool: Storage Sense.
Storage Sense is also a Windows built-in tool that can help you manage online and offline storage on your Windows computer. You can set it to automatically delete temporary files, empty Recycle Bin, delete junk files, clean up the Downloads folder, and do other things to free up disk space.
Storage Sense is available on both Windows 10 and Windows 11. To be specific, Storage Sense is available for Windows 10 version 1809 and later versions of Windows.
Storage Sense runs only on the C: drive. But it ignores other locations, including physical drives like CD and DVD drives, and logical partitions like D: drives. So, it is a good chance to clean up C: drive.
Here comes a question: how to automatically free up space with Storage Sense on a PC? MiniTool software shows a full guide here.
How to Automatically Free up Space with Storage Sense?
This guide will walk you through the steps to enable Storage Sense and make it automatically free up space.
How to Enable Storage Sense on Windows 11/10?
On Windows 11
Step 1: Press Windows + I to open Settings.
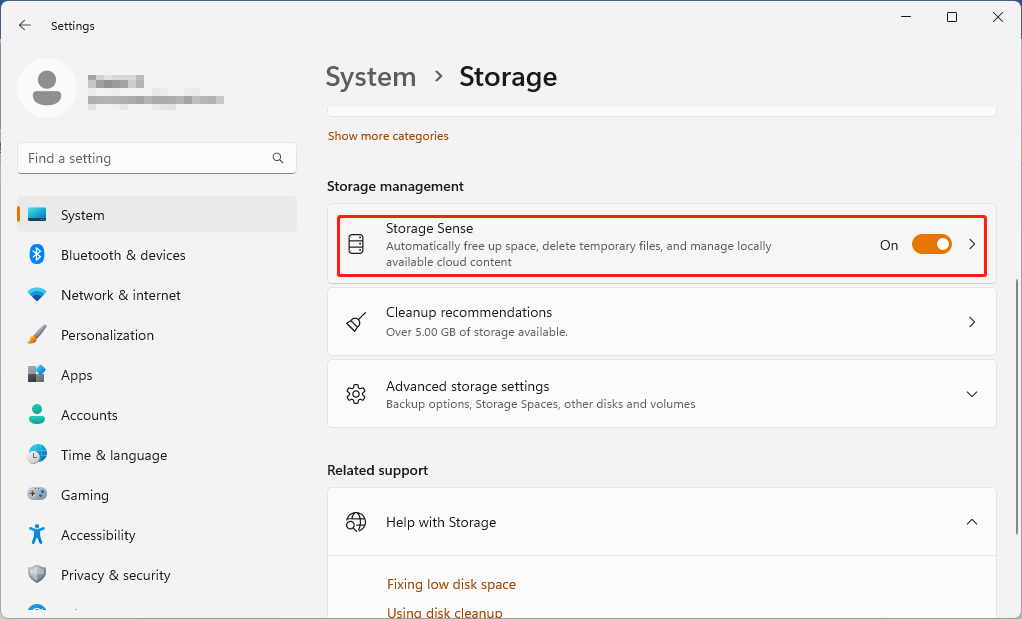
Step 2: Go to System > Storage.
Step 3: Turn on Storage Sense under Storage Management if it is turned off.
On Windows 10
Step 1: Go to Start > Settings > System > Storage.
Step 2: Turn on Storage Sense under Storage Sense can automatically free up drive space for you by getting rid of items that you don’t need, like temporary files and content in your recycle bin.
How to Automatically Free up Space Using Storage Sense?
On Windows 11:
You can use these steps to configure the Storage Sense settings to free up space automatically on a Windows computer:
Step 1: Press Windows + I to open Settings.
Step 2: Go to Storage.
Step 3: Make sure the checkbox under Cleanup of temporary files is selected.
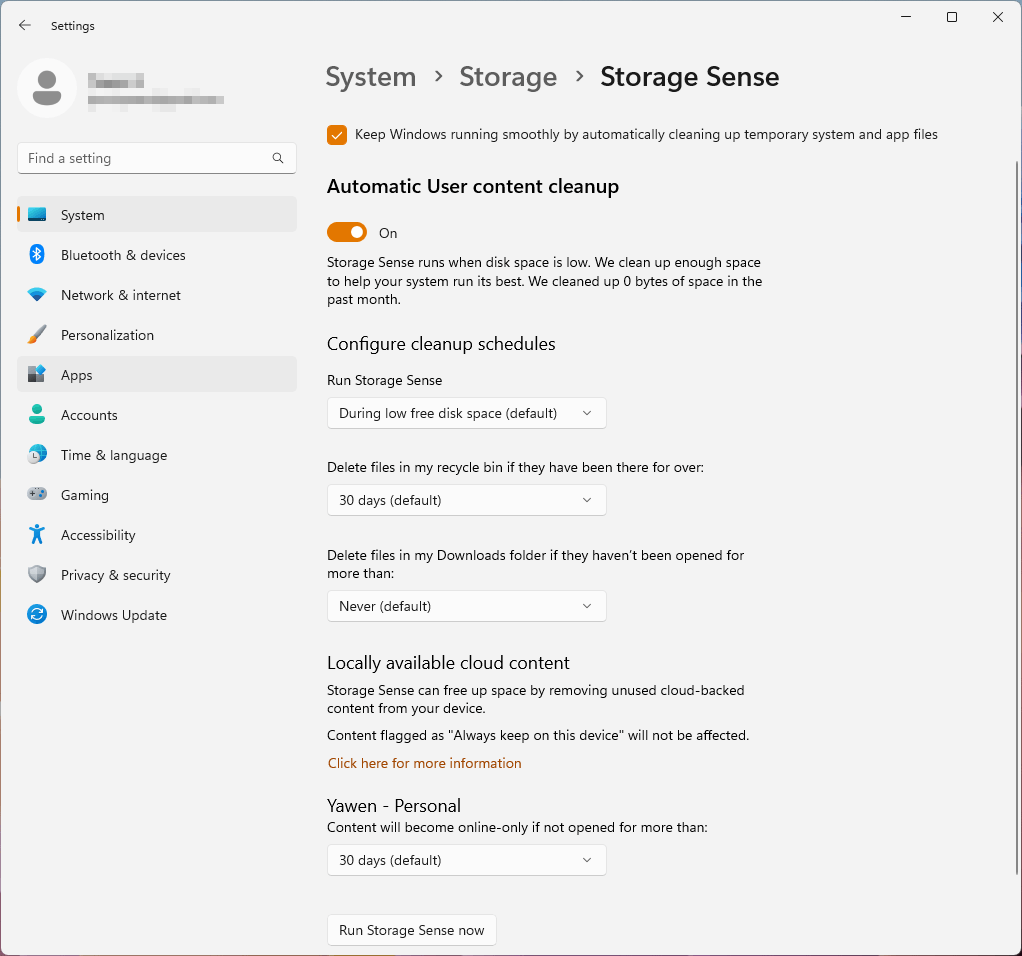
Step 4: Turn on the button under Automatic User content cleanup.
Step 5: It’s time to configure cleanup schedules. Select During low free disk space (default) for Run Storage Sense.
Step 6: Select a time for Delete files in my recycle bin if they have been there for over. There are 5 options: Never, 1 day, 14 days, 30 days, and 60 days. You can select one according to your situation.
Step 7: Select a time for Delete time in my Downloads folder if they haven’t been opened for more than if you want. But this is not a must step.
Warning:
The Downloads folder might contain some important files you have downloaded. If you set a time for this option, you’d better check the Downloads folder and transfer your vital downloads to a safe location where files will not be deleted automatically.
You can use MiniTool Power Data Recovery to recover deleted downloads if files in the Downloads folder are removed unexpectedly.
Step 8: Select a time for Content will become online-only if not opened for more than. The online files will not take up disk space. But you need an internet connection to open the files again. You can configure this setting if you think it is necessary.
On Windows 10:
You can go to Start > Settings > System > Storage > Configure Storage Sense or run it now to configure cleanup schedules using the same method.
After these settings, Storage Sense will begin to automatically delete files to free up space on C: drive when it is running low on available storage based on your configuration.
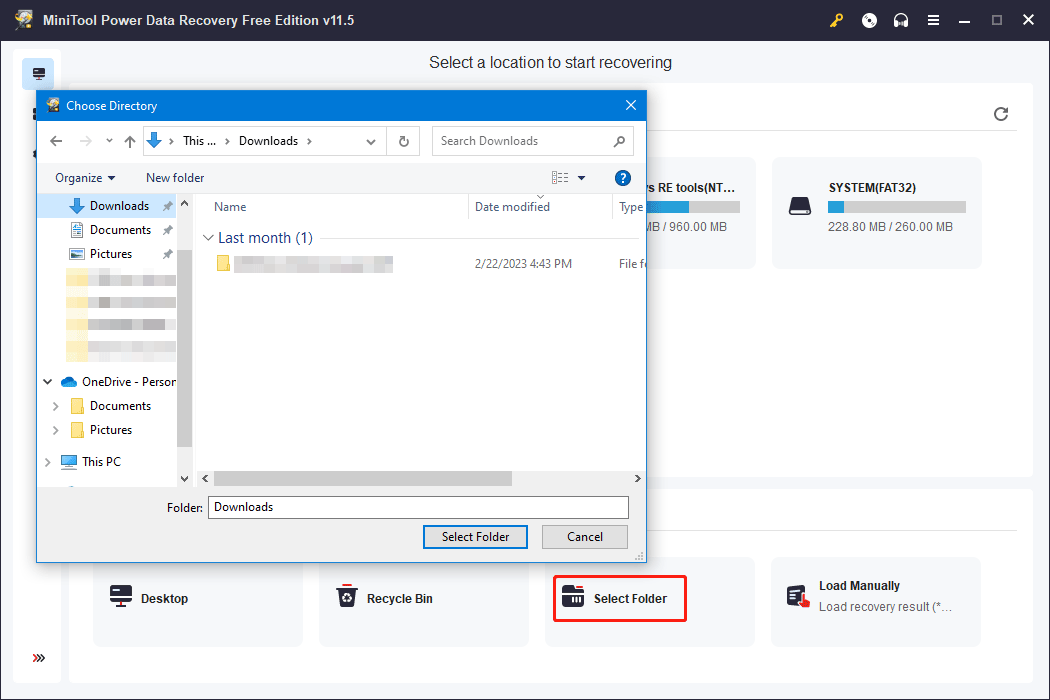
On the other hand, you can click the Run Storage Sense now button at the bottom to immediately free up space on Windows 11/10.
Bottom Line
It is easy to set Storage Sense to free up space automatically on your computer. Please follow the guide in this post to do the job.
If some files are removed by mistake, you can use the professional data restore tool, MiniTool Power Data Recovery, to get them back.
MiniTool Power Data Recovery FreeClick to Download100%Clean & Safe
This software can work under different situations:
- Files get lost or deleted by mistake.
- The storage becomes RAW, inaccessible, or formatted.
- The system crashes for some reason.
- Your PC won’t turn on.
- And more….
If you encounter issues when using MiniTool software, you can contact [email protected] for information.