
Last weeks i work with different solution in Storage Replication. Until now for a File Servers we use DFS-R as Disaster Recovery Solution.
But Windows Server 2016 launch a new feature as Storage Replica.
Until now i didn’t use it for lot of reasons but it’s time to test how is working and which scenarios can replace it with DFSR.
To be honest DFS Replication designed on low bandwidth networks which give a good solution in networks with high latency. However has big disadvantages like:
- It doesn’t replicate in-use or open files.
- It doesn’t replicate synchronously.
- Its asynchronous replication latency can be many minutes, hours, or even days.
- It relies on a database that can require lengthy consistency checks after a power interruption. This can be a big issue in specific scenarios
- Allows changes to flow in both directions that can overwrite data when you use it to replicate File Servers in multiple branches.
From the other base on Microsoft Docs Storage Replica hasn’t any of these disadvantages but maybe it doesn’t suitable for any environment.
- It only allows one-to-one replication between volumes. It’s possible to replicate different volumes between multiple servers.
- While it supports asynchronous replication, it’s not designed for low bandwidth, high latency networks.
- It doesn’t allow user access to the protected data on the destination while replication is ongoing
Another one important factor that you must know for the Storage Replica is what replication types support.
- Synchronous replication mirrors data within a low-latency network site with crash-consistent volumes to ensure zero data loss at the file-system level during a failure.
- Asynchronous replication mirrors data across sites beyond metropolitan ranges over network links with higher latencies, but without a guarantee that both sites have identical copies of the data at the time of a failure.
Let’s practice , test and learn to be sure where can use Storage Replica or where can leave DFS-R
Prerequisites
Before start to use Replica Storage you must read very careful all the prerequisites base on Microsoft Docs Storage Replica overview
- Active Directory Domain Services forest.
- Storage Spaces with SAS JBODs, Storage Spaces Direct, fibre channel SAN, shared VHDX, iSCSI Target, or local SAS/SCSI/SATA storage. SSD or faster recommended for replication log drives. Microsoft recommends that the log storage be faster than the data storage. Log volumes must never be used for other workloads.
- At least one ethernet/TCP connection on each server for synchronous replication, but preferably RDMA.
- At least 2GB of RAM and two cores per server.
- A network between servers with enough bandwidth to contain your IO write workload and an average of 5ms round trip latency or lower, for synchronous replication. Asynchronous replication does not have a latency recommendation.
- Windows Server, Datacenter Edition, or Windows Server, Standard Edition. Storage Replica running on Windows Server, Standard Edition, has the following limitations:
- You must use Windows Server 2019 or later
- Storage Replica replicates a single volume instead of an unlimited number of volumes.
- Volumes can have a size of up to 2 TB instead of an unlimited size.
Scenario
What i have use to test Storage Replication before apply in a Production Environment
- 2 x Windows Server 2019 Standard Edition as File Servers
- 2 Different Data Centers with 100Mbps Fiber Line between them
- 1 x Windows Server 2016 Std Edition to Manage Storage Replica from Windows Admin Center.
If you don’t have already a Windows Admin Center to manage your Servers find out my article Windows Admin Center — Monitoring and Managing Remote Servers how can do it.
How to Install Storage Replica Feature
Now we are ready to proceed with the installation of Storage Replica Feature in both Servers.
So let’s start
- Open Windows Admin Center
- Connect in the first Server that you would like to install Storage Replica
- Click Roles & Features
- From the Features find the Storage Replicate and check it.
- Click Install.

- Click Yes

- Wait until finish the installation

- Continues with the same steps from the second server.
How to Configure Storage Replica
Now it’s time to Configure Storage Replica in every File Server.
The steps are the below
- Create the partitions in every Server to meet the requirements for the Storage Replica
- Perform a test in Powershell from source server to verify that meet all the requirements
- Create the Partnership
Create the partitions in every Server to meet the requirements for the Storage Replica
Which are the steps that must follow?
- First of all we must create two partitions in every File Server and must meet the followings
- Must be initialize as GPT not MBR
- The first will be include the Data and the second it»s for the Logs. Don’t forget that the Servers is in Lab. So you don’t have any Disk with Data. In production environment you have already the Volume with Data.
- The Disks must has the same Size in both Servers.
- The log Volume it’s recommended to use SSD to be faster. It’s not required but you will have better performance.
- The log Volume must be at least 9 GB. The size it’s not default but may be larger or smaller base on the log requirements.
When you are ready with the Volumes in your File Servers it’s time to run a Test. The results will give us Report if met all the requirements and details for the connection between the Data Centers.
Perform a test in Powershell from source server to verify that meet all the requirements
Because Storage replica in Synchronous replication needs low latency to ensure zero data loss if we don’t know we can identify from the Test.
- Create a temp folder
- Open a Powershell Console as administrator and type the following command
Test-SRTopology -SourceComputerName flsrv3 -SourceVolumeName d: -SourceLogVolumeName e: -DestinationComputerName flsrv04 -DestinationVolumeName d: -DestinationLogVolumeName e: -DurationInMinutes 30 -ResultPath c:\temp

- After finish the test the results will be saved as HTML in the temp folder that you created.

Unfortunately because we are in Lab environment the results it’s not corresponded with the results in a production environment.
This will be a problem when you will start the implementation in your production environment.
Because its not recommended in any case to start implement Storage Replica in your production environment without test and learn in your Lab you can use any of the following workarounds.
- Copy files in the data volume while running the test.
- Download the DISKSPD to generate IOs. For example the following command run a low write IO for 10 minutes to the data Volume.
Diskspd.exe -c1g -d600 -W5 -C5 -b8k -t2 -o2 -r -w5 -i100 -j100 d:\test
Get a cup of coffee and wait until the test finish.
Examine the results of the Test to identify if you meet all the requirements.
In case that you don’t meet all the requirements find the problems , resolve it and run again the test.
If you meet all the requirements it’s time to proceed with the creation of Partnership.
Create the Partnership
This is the final step to start the Replication
- If you don’t have open Windows Admin Center
- Click in Storage Replica from the left side
- Click in New

- Type the name of the Source Server and then will identify the available Volumes.
- Give a name for a Replication Group
- Type the name of the Destination Server.
- Give a name for a Replication Group

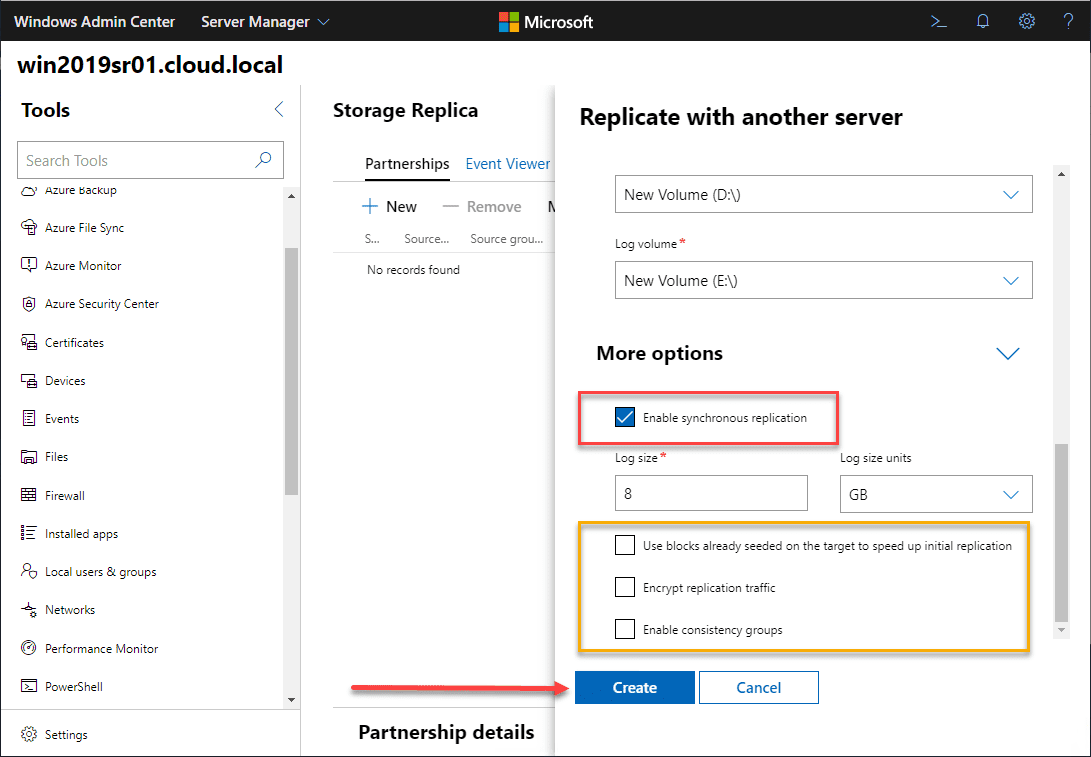
- Click in More Options and check any of these base on your requirements:
- Enable Synchronous replication only if you have low latency. You already have identify from the Test
- The log size must already knew it from the Test
- Check the Use blocks already seeded on the target to speed up initial synchronization If you have transferred data in the destination Server
- Encrypt replication traffic
- Check the Enable consistency groups when you have to replicate servers with Applications like MS SQL Server and have create different volume for logs and different volume for databases. Ensure that application which write in multiple volumes the data is written to the destination volume sequential. For example when you use MS SQL Server which write in multiple volumes and for any reason Production Server Failed then the Destination Server must start to use it in Production environment. But all the data must be written in muitple volume at the same point time to work successful.
- When you decide how will run the replication click Create.

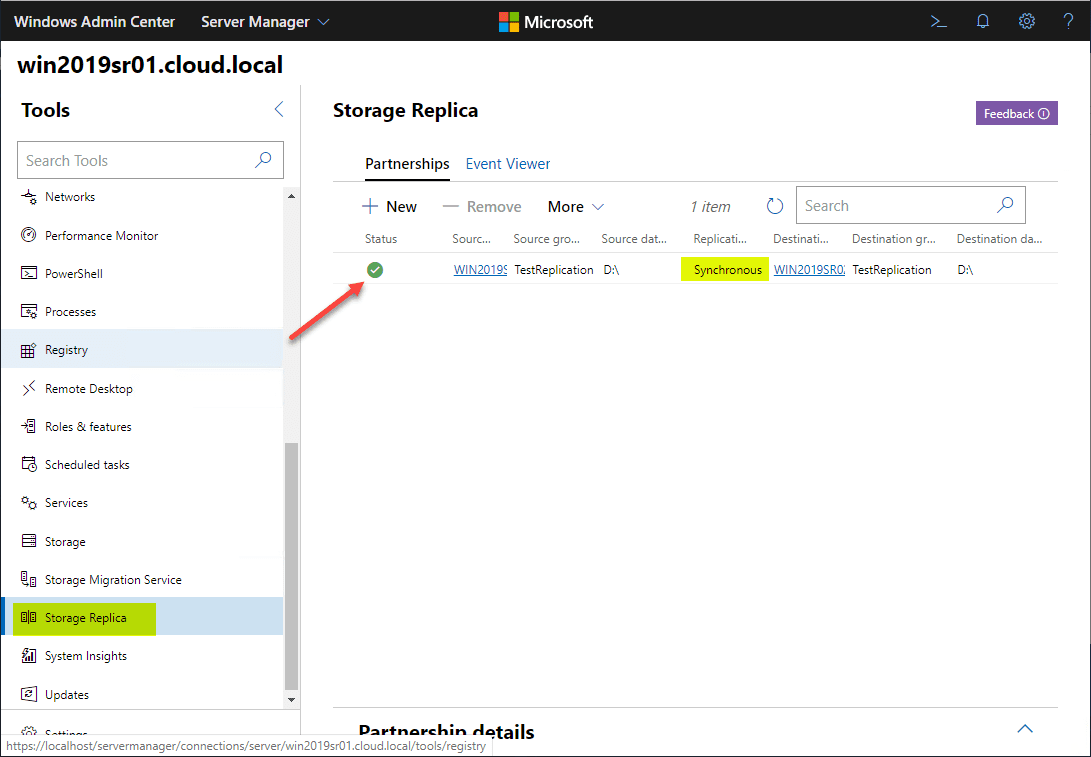
- You will see a notification that the partnership starting to created.

- When finish you can see the Partnership.

- For now on the replication start running and between the Source and the Destination Server.
Remove the Partnership
If you have decide to remove the partnership it’s better to do it from Powershell.
The reason is if remove the partnersip from Windows Admin Center will not remove the Replication Group.
So open a Powershell as Administrator and proceed with the following commands in both Servers
- Identify Partnership
Get-SRPartnerShip

- Identify Replication Group
Get-SRGroup

- Delete Partnership and verify the deletion
Get-SRPartnership | Remove-SRPartnership –confirm:$false
Get-SRPartnerShip

- Delete Replication Group and verify the deletion
Remove-SRGroup –Name rg1
Get-SRGroup

This is the first step. As IT Pro you know that the most important is to support and monitoring what you have setup.
You must be proactive probably when you have to do with data. Monitoring is the only solution to identify earlier issues and resolve it.
Until next article Have a nice weekend !!!
You can send me an email at info@askme4tech.com or do your comments in Twitter or Facebook
I invite you to follow me on Twitter or Facebook. If you have any questions, send email to me at info@askme4tech.com.
A capability that has been around for quite some time with Storage Area Network (SAN) devices is the ability to replicate the storage between one SAN device to another SAN device. SAN vendors have long had this capability. It provides an easy way to replicate all the data on a SAN device safely to a DR or other facility where you have another SAN device receiving the replicated data. Back in Windows Server 2016, Microsoft released an extremely interesting capability that allows you to essentially replicate volumes between Windows Servers. This feature is called Storage Replica. This holds out some very interesting and extremely beneficial use cases. With Windows Server 2019, these capabilities were further extended. In this post, we will take a look at Storage Replica in Windows Server 2019 Features and Configuration and see how to leverage this feature.
What is Storage Replica?
What is Storage Replica technology? Storage Replica is a new Windows Server technology that allows you to replicate the content of your volumes between servers or clusters for disaster recovery. In addition, it provides a means to create streteched failover clusters that span two sites and keeps the data between those two sites in sync.
This is a data replication technology that copies data between teh two Windows Servers at the block-level. The Windows Servers can be located at different physical locations and wasn’t an available technology in Windows Server versions prior to Windows Server 2016.
The technology is also important when thinking about architecting a multi-site failover cluster configuration. It allows keeping the the data in synce continuously between the cluster nodes at each site. This is the feature that allows successful failover between cluster configurations at various sites.
When you think about the benefits of this solution in terms of uniformity, simplicity, and functionality, it is a win-win across the board. Microsoft is the sole vendor of the solution and the solution does not depend on a specific type or brand of storage solution as it is taken care of in software. Much like the benefits of software-defined storage in general, this allows you to choose your own preference of hardware vendor backing the storage solution configured for your Windows Servers.
Types of Replication
In looking at Storage Replica in Windows Server 2019 Features and Configuration, there are two types of Storage Replica synchronization technologies:
Synchronous replication – As you would expect, this mirrors data within a low-latency network site with crash-consistent volumes to ensure you have no data loss of your data at a file-system level if and when a failure occurs.
Asynchronous replication – With Asynchronous replication, this mirrors the data across sites beyond metropolitan ranges over network links that may have much higher latencies. Using this type of replication, you don’t have a guarantee the data will be identical between both sites.
Storage Replica Features with Windows Server 2019
One of the limiting factors with Windows Server 2016 with Storage Replica was that you only had this feature with Windows Server Datacenter Edition. However, new with Storage Replica in Windows Server 2019 Features and Configuration, Storage Replica is now available with Standard Edition.
This unlocks the feature for many environments who may be limited to Standard Edition with their servers. However, there are limitations to note with Standard Edition including the following:
- You only have this feature between Standard Edition servers running Windows Server 2019
- You can only replicate a single volume instead of an unlimited number of volumes as with Windows Server 2019 Datacenter Edition
- Volumes can have a size of up to 2 TB instead of unlimited size
Also new is the ability to manage Storage Replica with Windows Admin Center which provides a really nice GUI to manage the solution.
Storage Replica Prerequisites
The prerequisites for Storage Replica include the following:
- Active Directory Domain Services
- Storage Spaces Direct, Fibre Channel SAN, iSCSI, or local SAS/SCI/SATA storage. SSDs are recommended for log drives and other similar workloads
- You want to dedicate a connection to synchronous replication and preferably an RDMA-enabled connection
- At least 2 GB RAM and 2 CPU cores per server
- An average of 5ms round trip latency or lower for synchronous replication. Asynchronous replication can deal with any amount of latency
- With Windows Server 2019, you can use Standard or Datacenter Editions for enabling Storage Replica
Storage Replica Considerations
Considerations to make with Storage Replica:
- Network bandwidth and storage are going to certainly come into play with synchronous replication. You must back sure you are using low latency, high-bandwidth connections and high-throughput disks
- With Windows Server 2016, the destination volume will not be made available for use. You won’t be able to access it through file explorer and other means even though the drive letter may show as available. With Windows Server 2019, there is a Test-Failoer cmdlet that allows you to temporarily mount a read-write snapshot of the destination volume for backups, testing, etc
- Microsoft uses their own version of asynchronous replication that actually allows better RPOs than traditional asynchronous replication. It does not use “snapshot-based replication” but rather uses the same technology that is used by synchronous replication and simply removes the requirement for serialized synchronous acknowledgement
- Storage Replica is a much better solution for replicating data than DFS replication
- Do not use Storage Replica as part of a “backup” solution
- It is not a replacement for Hyper-V Replicas or SSQL AlwaysOn Availability Groups
Configuring Storage Replica with Windows Server 2019
Installing Storage Replica couldn’t be easier. It is a simple matter of installing the Storage Replica feature in Server Manager or using Windows Admin Center.
Installing Storage Replica
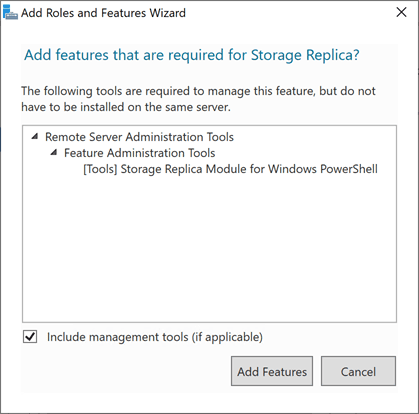
Below, using Server Manager in Windows Server 2019, Check off the Storage Replica feature for installation.

Add the Additional features that are required for Storage Replica when prompted.
After adding the additional features, click Install on the Confirm installation selections screen in Server Manager.
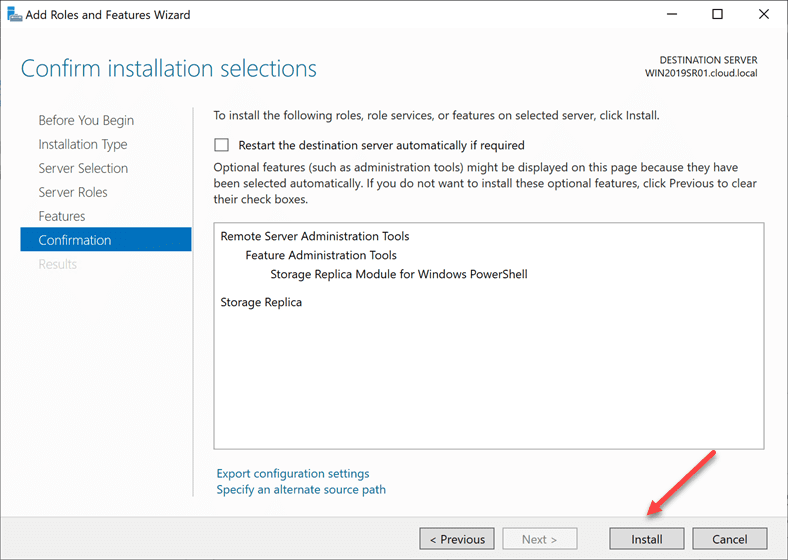
The server will need to reboot after the installation of Storage Replica. After the reboot, I went back to take a look at the features present and found the Storage Replica feature had installed.

Configuring Storage Replica
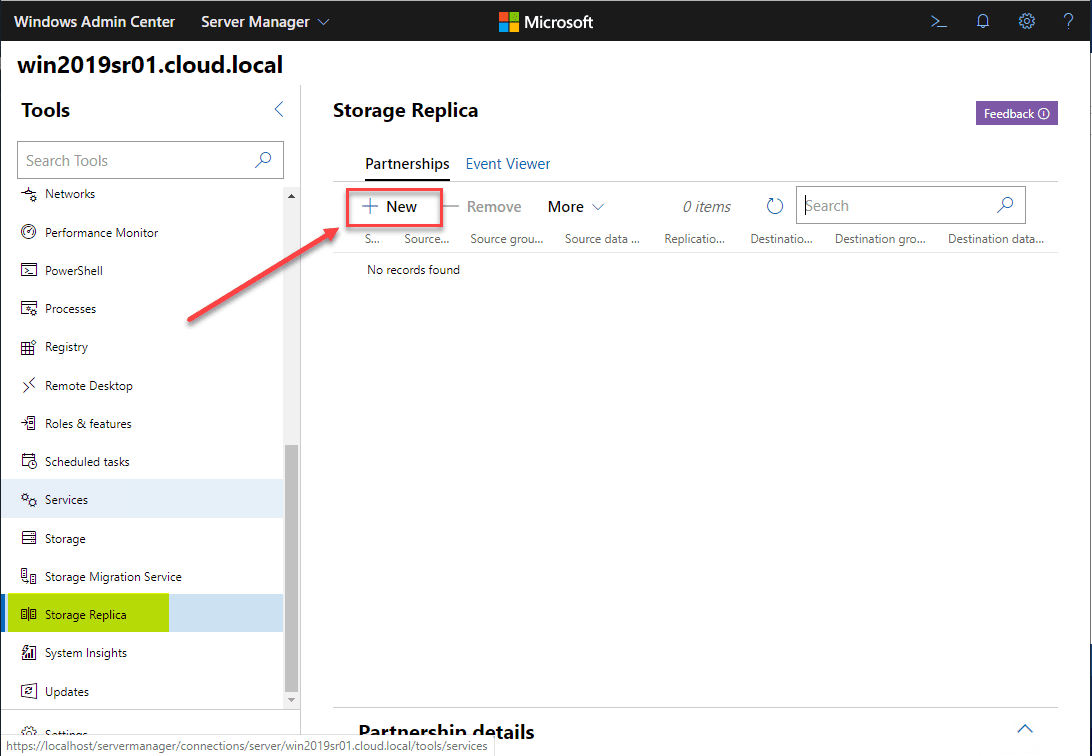
Now that Storage Replica is installed, I have also installed Windows Admin Center 1910 for easily configuring the Storage Replica feature. Navigate in Windows Admin Center to Storage Replica and select the New under Storage Replica Partnerships.
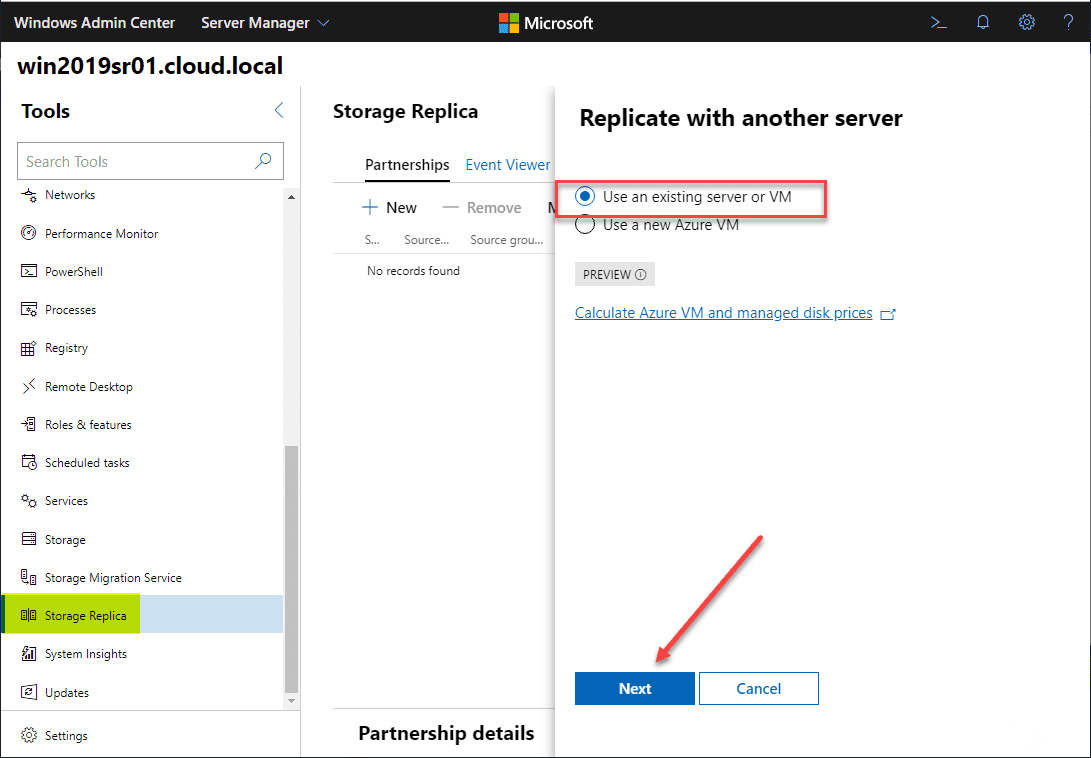
This will launch a wizard in the side panel of Windows Admin Center called Replicate with another server. Here I am choosing Use an existing server or VM and click Next.
On the next screen, you will setup your Source and Destination.
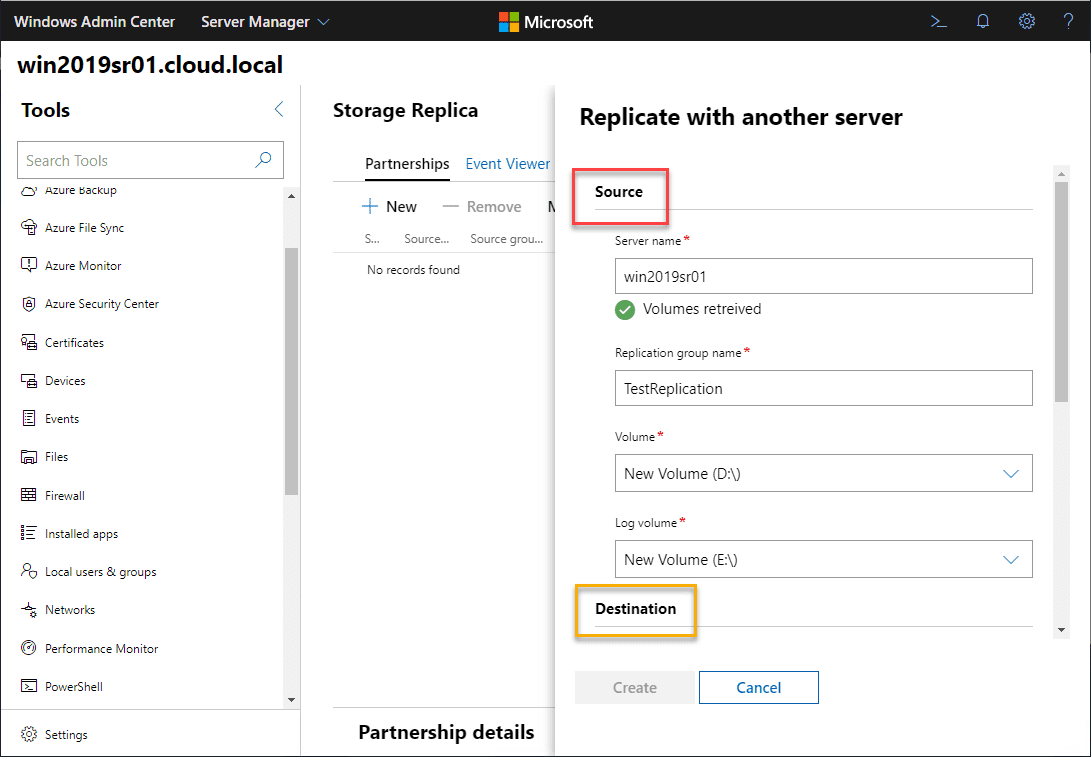
When you scroll all the way down on this screen, you will find the More options section that provides additional settings and features of the synchronization that you can either enable or leave unchecked. These include:
- Use blocks already seeded on the target to speed up initial replication
- Encrypt replication traffic
- Enable consistency groups
After a couple of moments, the Storage Replica partnership is created.
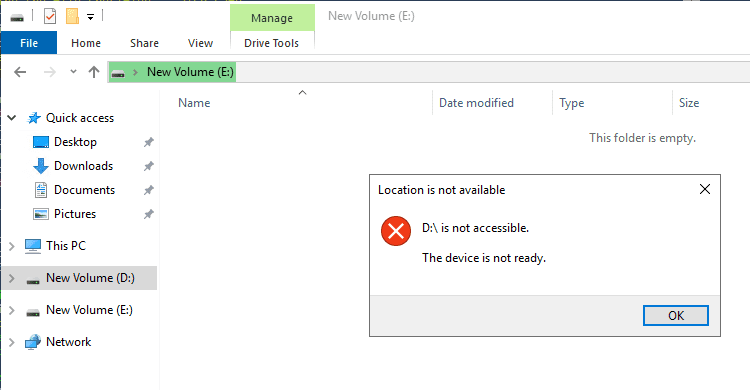
On the replication partner that is the destination of the replication, as expected, I tried to browse the “D Drive” and am unable to.
Storage Replica PowerShell Cmdlets
Below is an example of a couple of the cmdlets that are available to get the details of your Storage Replica environment as you can glean a bit more detail than is provided in Windows Admin Center if needed.
- get-srpartnership
- get-srgroup
Also, if you want to see the details of replication during the initial synchronization, you can use the following PowerShell code:
Get-SRGroup

do{
    $r=(Get-SRGroup -Name "Replication 2").replicas
    [System.Console]::Write("Number of remaining bytes {0}`n", $r.NumOfBytesRemaining)
    Start-Sleep 10
}until($r.ReplicationStatus -eq 'ContinuouslyReplicating')
Write-Output "Replica Status: "$r.replicationstatus
A full listing of available PowerShell cmdlets are found on the official Microsoft KB here: https://docs.microsoft.com/en-us/powershell/module/storagereplica/?view=win10-ps
Wrapping Up
Storage Replica is a great new feature found starting in Windows Server 2016 and now looking at Storage Replica in Windows Server 2019 Features and Configuration, it offers further enhancements. Without the need for any third-party hardware solution or vendor-specific solution, Windows Server is now able to replicate your data synchronously or asynchronously as needed between two Windows Servers by means of Storage Replica. Stay tuned for further exploration of this cool technology.
In the old days all File servers where on one place, and if you want to replicate data you needed a extra tool to do this. Now days its already build in into Windows server. Storage replica can be used in several ways, replicate data from one Cluster to another or to Azure. but in this case I do a server to server replication as not everyone has a cluster.
For moving data to the Cloud there are currently several other applications like Azure file sync or Azure Migrate https://docs.microsoft.com/en-us/azure/migrate/migrate-overview Blog about Azure File Sync https://robertsmit.wordpress.com/2017/09/28/step-by-step-azure-file-sync-on-premises-file-servers-to-azure-files-storage-sync-service-afs-cloud-msignite/
Storage Replica is Windows Server technology that enables replication of volumes between servers or clusters for disaster recovery. It also enables you to create stretch failover clusters that span two sites, with all nodes staying in sync.
Storage Replica supports synchronous and asynchronous replication:
-
- Synchronous replication mirrors data within a low-latency network site with crash-consistent volumes to ensure zero data loss at the file-system level during a failure.
- Asynchronous replication mirrors data across sites beyond metropolitan ranges over network links with higher latencies, but without a guarantee that both sites have identical copies of the data at the time of a failure.
Storage Replica allows more efficient use of multiple datacenters. By stretching clusters or replicating clusters, workloads can be run in multiple datacenters for quicker data access by local proximity users and applications, as well as better load distribution and use of compute resources. If a disaster takes one datacenter offline, you can move its typical workloads to the other site temporarily.
Storage Replica may allow you to decommission existing file replication systems such as DFS Replication that were pressed into duty as low-end disaster recovery solutions. While DFS Replication works well over extremely low bandwidth networks, its latency is very high – often measured in hours or days. This is caused by its requirement for files to close and its artificial throttles meant to prevent network congestion. With those design characteristics, the newest and hottest files in a DFS Replication replica are the least likely to replicate. Storage Replica operates below the file level and has none of these restrictions.
Storage Replica also supports asynchronous replication for longer ranges and higher latency networks. Because it is not checkpoint-based, and instead continuously replicates, the delta of changes will tend to be far lower than snapshot-based products. Furthermore, Storage Replica operates at the partition layer and therefore replicates all VSS snapshots created by Windows Server or backup software; this allows use of application-consistent data snapshots for point in time recovery, especially unstructured user data replicated asynchronously.
The Setup I used two servers both domain joined, And there are different ways to configure the Storage Replica, the easy way and the 10 second way.

First we are installing the Storage replica feature and the File server Role. The Storage replica feature needs a reboot.

Or use Powershell
install-WindowsFeature “Storage-Replica” –IncludeAllSubFeature
If you don’t know the module name you can find it easily

A reboot is needed.

Doing this server by server is not handy, So placing this together saves us some time.
$Servers = “Building-5”,”Building-9”
$Servers | ForEach { Install-WindowsFeature -ComputerName $_ -Name Storage-Replica,FS-FileServer -IncludeManagementTools -restart }
The –restart does an automatic restart if this is needed.

Storage Replica prerequisites
-
- Active Directory Domain Services forest.
- Storage Spaces with SAS JBODs, Storage Spaces Direct, fibre channel SAN, shared VHDX, iSCSI Target, or local SAS/SCSI/SATA storage. SSD or faster recommended for replication log drives. Microsoft recommends that the log storage be faster than the data storage. Log volumes must never be used for other workloads.
- At least one Ethernet/TCP connection on each server for synchronous replication, but preferably RDMA.
- At least 2GB of RAM and two cores per server. (with less memory the replication won’t start)
- A network between servers with enough bandwidth to contain your IO write workload and an average of 5ms round trip latency or lower, for synchronous replication. Asynchronous replication does not have a latency recommendation.
As there is no Gui on the replica part we need to configure this by PowerShell or with the new Windows Admin Center
-
- Download and install Windows Admin Center.
Both our servers had Two extra disks. One log and Data Disk.

-
- You must create two volumes on each enclosure: one for data and one for logs.
- Log and data disks must be initialized as GPT, not MBR.
- The two data volumes must be of identical size.
- The two log volumes should be of identical size.
- All replicated data disks must have the same sector sizes.
- All log disks must have the same sector sizes.
- The log volumes should use flash-based storage, such as SSD. Microsoft recommends that the log storage be faster than the data storage. Log volumes must never be used for other workloads.
- The data disks can use HDD, SSD, or a tiered combination and can use either mirrored or parity spaces or RAID 1 or 10, or RAID 5 or RAID 50.
- The log volume must be at least 9GB by default and may be larger or smaller based on log requirements.
- The File Server role is only necessary for Test-SRTopology to operate, as it opens the necessary firewall ports for testing.
As you can see there are some needs for the Replication As I show you below with the performance test why you need this.
First we are configuring the Disks on both servers. with some PowerShell commands but this can also be done with Disk manager.
Get-Disk | Where FriendlyName -eq ‘Msft Virtual Disk’

Get-Disk | Where FriendlyName -eq ‘Msft Virtual Disk’|Initialize-Disk -PartitionStyle GPT –PassThru

1..2 | % { Get-Disk $_ }| Where FriendlyName -eq ‘Msft Virtual Disk’|New-Partition -AssignDriveLetter -UseMaximumSize | Format-Volume -FileSystem ReFS -NewFileSystemLabel “SR01-disk” -Confirm:$false

I formatted the disk with ReFS and not with NTFS.
Now that the disks are in place we can start but before we start building the replica I want to make sure the connection and the network is fast and the server can deliver the performance we need.
Therefor I download a test tool Diskspd. https://aka.ms/diskspd
Important is that the network speed between the server is good as this is the life line for the storage replica. We can test the replication before the build things for real.
With this test tool we bring up a small load to test the server.

Using the Diskspd with the line below.
Diskspd.exe -c1g -d600 -W5 -C5 -b8k -t2 -o2 -r -w5 –i100 –j2 E:\test
Storage replica has a great test tool report. So with this we configure the test. Using Powershell
MD c:\temp
Test-SRTopology -SourceComputerName “Building-5” -SourceVolumeName “e:” -SourceLogVolumeName “f:” -DestinationComputerName “Building-9” -DestinationVolumeName “e:” -DestinationLogVolumeName “f:” -DurationInMinutes 30 -ResultPath c:\Temp
#set output file
$outputfile=”$Env:TEMP”
Test-SRTopology -SourceComputerName “Building-5” -SourceVolumeName “e:” -SourceLogVolumeName “f:” -DestinationComputerName “Building-9” -DestinationVolumeName “e:” -DestinationLogVolumeName “f:” -IntervalInSeconds 5 -DurationInMinutes 30 -ResultPath $outputfile
#open output file
If (Test-Path $outputFile) { Invoke-Item $outputFile\TestSrTopologyReport.html } Else { Write-Host “FAILED: Output file not found: $url” -fore red }
Write-Host “Done” -ForegroundColor Cyan


while running the Test-SRTopology with the -DurationInMinutes 30 option we also run Diskspd.
Diskspd.exe -c1g -d600 -W5 -C5 -b8k -t2 -o2 -r -w5 –i100 –j2 E:\test
It is a 1 Gb file placed on our E drive that is our Data disk for replication.


As you can see I have just one network adapter and no RDMA and in this config I hit the limit of the CPU and the network card max 4.4 Gbps not bad for a test config. (if you use a better machine in Azure Pick a Azure H-series those have RDMA

One CPU with 99% usage.
When the test is done the is a log file created in -ResultPath c:\Temp
Open the log file and detailed information is there about the test. this is why I choose 30 min duration.

Nice graph about the Data throughput, in this case not bad.

the Latency is always a issue this could change you from sync to async or more network adapters or better disks. But for now it is good.

Log Volume Free Disk Space Test: The log volume F: in Building-5 has enough free space to hold the recommended log volume size of 8GB
Log Volume Free Disk Space Test: The log volume F: in Building-9 has enough free space to hold the recommended log volume size of 8GB
Storage replica has not that much PowerShell commands
#list all the commands
get-command *sr*
Setting up the actual replica is done with a long PowerShell command
The default log size is 8GB. Depending on the results of the Test-SRTopology cmdlet, you may decide to use -LogSizeInBytes with a higher or lower value.
New-SRPartnership -SourceComputerName “Building-5” –SourceRGName rg01 -SourceVolumeName “e:” -SourceLogVolumeName “f:” -DestinationComputerName “Building-9” –DestinationRGName rg02 -DestinationVolumeName “e:” -DestinationLogVolumeName “f:”

The default log size is 8GB. Depending on the results of the Test-SRTopology cmdlet, you may decide to use -LogSizeInBytes with a higher or lower value.
New-SRPartnership -SourceComputerName “Building-5” –SourceRGName rg01 -SourceVolumeName “e:” -SourceLogVolumeName “f:” -DestinationComputerName “Building-9” –DestinationRGName rg02 -DestinationVolumeName “e:” -DestinationLogVolumeName “f:” -LogSizeInBytes 1gb

here you can see the disk setup between both servers, the active side you can access the data disk, on the passive side the disk is not accessible.
Don’t place files on the Log disk.
To get replication source and destination state, use Get-SRGroup and Get-SRPartnership
Get-SRGroup
Get-SRGroup |fl *

Get-SRPartnership

(Get-SRGroup).replicas

This is just after the creation so no data yet for the last time in sync.
New-SRPartnership -SourceComputerName “Building-5” –SourceRGName rg01 -SourceVolumeName “e:” -SourceLogVolumeName “f:” -DestinationComputerName “Building-9” –DestinationRGName rg02 -DestinationVolumeName “e:” -DestinationLogVolumeName “f:”
For troubleshooting there are some events that you can check, go to the event viewer and check for the Storage replica events.

Or check the events with PowerShell
Get-WinEvent -ProviderName Microsoft-Windows-StorageReplica -max 20

On the destination server, we can do the same or look for the events in the eventlog.
Get-WinEvent -ProviderName Microsoft-Windows-StorageReplica | Where-Object {$_.ID -eq “1215”} | fl

(Get-SRGroup).Replicas | Select-Object numofbytesremaining
There are also a lot of performance counters that can be viewed with PowerShell
Get-Counter -Counter “\Storage Replica Statistics(*)\Total Bytes Received”
Get-Counter -Counter “\Storage Replica Statistics(*)\Total Bytes Sent”
Get-Counter -Counter “\Storage Replica Statistics(*)\Avg. Network Send Latency”
Get-Counter -Counter “\Storage Replica Statistics(*)\Replication State”
Get-Counter -Counter “\Storage Replica Statistics(*)\Last Recovery Elapsed Time”
Get-Counter -Counter “\Storage Replica Partition I/O Statistics(*)\Number of times flush paused”
Get-Counter -Counter “\Storage Replica Statistics(*)\Number of Flushed Recovery Transactions”
Get-Counter -Counter “\Storage Replica Statistics(*)\Number of Recovery Transactions”
Get-Counter -Counter “\Storage Replica Statistics(*)\Number of Flushed Replication Transactions”
Get-Counter -Counter “\Storage Replica Statistics(*)\Number of Replication Transactions”
Get-Counter -Counter “\Storage Replica Statistics(*)\Number of Messages Received”
Get-Counter -Counter “\Storage Replica Statistics(*)\Number of Messages Sent”
Get-Counter -Counter “\Storage Replica Partition I/O Statistics(*)\Avg. App Write Latency”
Get-Counter -Counter “\Storage Replica Partition I/O Statistics(*)\Avg. App Read Latency”
Get-Counter -Counter “\Storage Replica Statistics(*)\Target RPO”
Get-Counter -Counter “\Storage Replica Statistics(*)\Current RPO”
Get-Counter -Counter “\Storage Replica Statistics(*)\Avg. Log Queue Length”
Get-Counter -Counter “\Storage Replica Statistics(*)\Current Log Queue Length”
Get-Counter -Counter “\Storage Replica Statistics(*)\Total Bytes Received”
Get-Counter -Counter “\Storage Replica Statistics(*)\Total Bytes Sent”
Get-Counter -Counter “\Storage Replica Statistics(*)\Avg. Network Send Latency”
Get-Counter -Counter “\Storage Replica Statistics(*)\Replication State”
Get-Counter -Counter “\Storage Replica Statistics(*)\Avg. Message Round Trip Latency”
Get-Counter -Counter “\Storage Replica Statistics(*)\Last Recovery Elapsed Time”
Get-Counter -Counter “\Storage Replica Statistics(*)\Number of Flushed Recovery Transactions”
Get-Counter -Counter “\Storage Replica Statistics(*)\Number of Recovery Transactions”
Get-Counter -Counter “\Storage Replica Statistics(*)\Number of Flushed Replication Transactions”
Get-Counter -Counter “\Storage Replica Statistics(*)\Number of Replication Transactions”
Get-Counter -Counter “\Storage Replica Statistics(*)\Max Log Sequence Number”
Get-Counter -Counter “\Storage Replica Statistics(*)\Number of Messages Received”
Get-Counter -Counter “\Storage Replica Statistics(*)\Number of Messages Sent”
these counters look like this

To remove the Replication we run the following command :
Get-SRPartnership Get-SRPartnership | Remove-SRPartnership Get-SRGroup | Remove-SRGroup
Or change the direction of the replication just run the PowerShell command
#move the replication direction from one site, use the
Set-SRPartnership -NewSourceComputerName “Building-9” -SourceRGName rg02 -DestinationComputerName “Building-5” -DestinationRGName rg01
Why not use Windows Admin Center ?
But all this PowerShell my fear you on using this. Good news than when using Windows Admin Center
Windows Admin Center is a locally deployed, browser-based app for managing servers, clusters, hyper-converged infrastructure, and Windows 10 PCs. It comes at no additional cost beyond Windows and is ready to use in production.
Get it here
When opening the Source Storage Replica server you will see a quick over view of you configuration

Easy switch replication direction.


Notifications on the preformed actions

With an overview of the current configuration.
But the best part of Windows Admin Center is creating a new Replica. I removed the old replica and create a new one with the WAC.
Fill in the source and destination and your done.


With the Admin center you got a GUI wrapper for creating the Storage replica, No PowerShell needed

So removing the replication or in case one server is dead.
Normaly you would do
Get-SRPartnership | Remove-SRPartnership –confirm:$false
this removes the replication and both locations will show the Data.
But if source server is no longer there this will not work
Remove-SRPartnership –Name RG02 -IgnoreRemovalFailure so that it breaks the partnership completely
Remove-SRPartnership [[-SourceComputerName] <String>] [-SourceRGName] <String> [-DestinationComputerName] <String> [-DestinationRGName] <String> [-IgnoreRemovalFailure] [-Force] [-CimSession <CimSession[]>] [-ThrottleLimit <Int32>] [-AsJob] [-WhatIf] [-Confirm] [<CommonParameters>]
here is the source link
https://docs.microsoft.com/en-us/powershell/module/storagereplica/remove-srpartnership?view=win10-ps
Clear-SRMetadata Removes unreferenced Storage Replica metadata.
There are more options in Windows Admin Center that could be useful to you just try it.
And if you want to use file replication to Azure take a look at the Azure File Sync https://docs.microsoft.com/en-us/azure/storage/files/storage-files-introduction
Step by Step Azure File Sync – on-premises file servers to #Azure Files Storage Sync Service
Follow Me on Twitter @ClusterMVP
Follow My blog https://robertsmit.wordpress.com
Linkedin Profile Robert Smit MVP Linkedin profile
Google : Robert Smit MVP profile
Robert Smit is Senior Technical Evangelist and is a current Microsoft MVP in Clustering as of 2009.
Robert has over 20 years experience in IT with experience in the educational, health-care and finance industries.
Robert’s past IT experience in the trenches of IT gives him the knowledge and insight that allows him to communicate effectively with IT professionals
who are trying to address real concerns around business continuity, disaster recovery and regulatory compliance issues. Robert holds the following certifications:
MCT — Microsoft Certified Trainer, MCTS — Windows Server Virtualization, MCSE, MCSA and MCPS. He is an active participant in the Microsoft newsgroup community and is currently focused on Hyper-V, Failover Clustering, SQL Server, Azure and all things related to Cloud Computing and Infrastructure Optimalization.
Follow Robert on Twitter @ClusterMVP
Or follow his blog https://robertsmit.wordpress.com
Linkedin Profile Http://nl.linkedin.com/in/robertsmit
Robert is also capable of transferring his knowledge to others which is a rare feature in the field of IT. He makes a point of not only solving issues but also of giving on the job training of his colleagues.
A customer says » Robert has been a big influence on our technical staff and I have to come to know him as a brilliant specialist concerning Microsoft Products. He was Capable with his in-depth knowledge of Microsoft products to troubleshoot problems and develop our infrastructure to a higher level. I would certainly hire him again in the future. »
Details of the Recommendation: «I have been coordinating with Robert implementing a very complex system. Although he was primarily a Microsoft infrastructure specialist; he was able to understand and debug .Net based complext Windows applications and websites. His input to improve performance of applications proved very helpful for the success of our project
View all posts by Robert Smit [MVP]
In the previous post, we took a look at Storage Replica in Windows Server 2019 Features and Configuration. The new features and configuration that are included with the Windows Server 2019 version of Storage Replica make it an even better solution for the high-availability of your data. We looked at configuring the Storage Replica solution in Windows Server 2019 including the process of installing the feature and setting up replication. In this post, we will take a quick look at the Windows Server 2019 Storage Replica failover process and how this is achieved both via Windows Admin Center and in PowerShell.
Windows Server 2019 Storage Replica Failover Process
In the lab environment, I have a couple of Windows Server 2019 Standard Edition servers configured to test the Storage Replica feature.
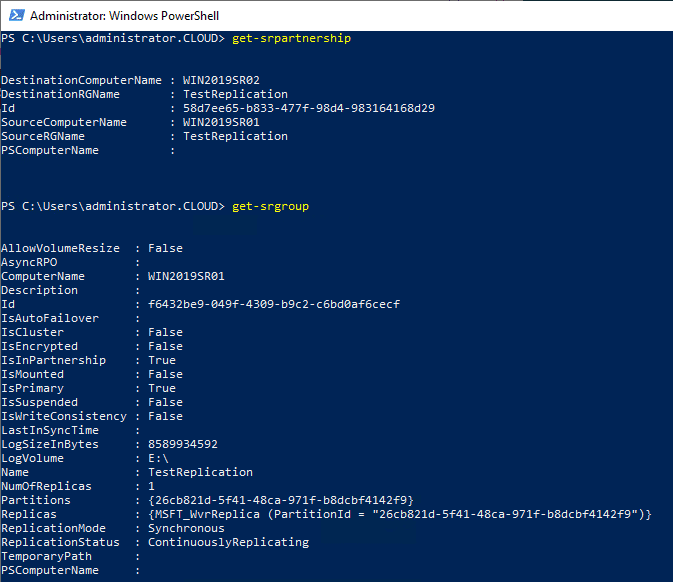
- WIN2019SR01
- WIN2019SR02
In the lab environment, I have Win2019SR01 configured as the source. Then, Win2019SR02 is configured as the destination for the Storage Replica.
Below, you see I am managing Windows Server 2019 Storage Replica in the Windows Admin Center under the Storage Replica menu.
Failing over in Windows Server 2019 Storage Replica is super simple. It simply involves the Switch direction function found under the More menu for Storage Replica in Windows Admin Center.
Simulating Storage Replica Failure
In the lab scenario outlined above, to simulate a failure, I simply shutdown the Win2019SR01 Windows Server 2019 server. In Windows Admin Center on the Win2019SR02 server, I refreshed the Storage Replica dashboard and start seeing errors as expected.
The first error seen is the Event 5014.
Connection lost to the share hosting the partner replica. LocalReplicationGroupName: TestReplication LocalReplicationGroupId: {7249b191-369e-4e73-be1b-c5093335224f} LocalReplicaName: D:\ LocalPartitionId: {2fcd3e22-2ecd-45b9-90de-46a79ec5f0a5} ReplicaSetId: {20a93416-88fd-4cd4-abae-ad6e2259b820} RemoteReplicationGroupName: TestReplication RemoteReplicationGroupId: {f6432be9-049f-4309-b9c2-c6bd0af6cecf}
Additional warnings come through the Windows Admin Center console.
Failed to establish a connection to a remote computer. RemoteComputerName: WIN2019SR01 LocalReplicationGroupName: TestReplication LocalReplicationGroupId: {f6432be9-049f-4309-b9c2-c6bd0af6cecf} RemoteReplicationGroupName: TestReplication RemoteReplicationGroupId: {f6432be9-049f-4309-b9c2-c6bd0af6cecf} ReplicaSetId: {20a93416-88fd-4cd4-abae-ad6e2259b820} RemoteShareName:{f6432be9-049f-4309-b9c2-c6bd0af6cecf}.{20a93416-88fd-4cd4-abae-ad6e2259b820} Status: {Network Name Not Found} The specified share name cannot be found on the remote server.
However, one thing I noticed in testing Storage Replica is the state of the primary Storage Replica server did not change the fact that the destination Storage Replica server volume is still in an inaccessible state.
I did notice that I saw an Event 5005 which stated that it entered a stand-by state:
Destination entered stand-by state. ReplicationGroupName: TestReplication ReplicationGroupId: {7249b191-369e-4e73-be1b-c5093335224f} ReplicaName: D:\ ReplicaId: {20a93416-88fd-4cd4-abae-ad6e2259b820}
When trying to access the D:\ drive it is still showing inaccessible.
On the Win2019SR02 server, we simply need to Switch direction.
The Switch partnership direction task completed successfully.

Switch partnership direction is successful switching to Storage Replica destination server
The Source node and the Destination node have now switched directions. We still see the “bang” on the partnership which is to be expected since the other server is still down.
I had copied a couple of ISO files to the volume to have something to test Storage Replica synchronization with. Now, after switching the direction, we can now access the volume on the remaining Storage Replica node, Win2019SR02.
Use PowerShell to Failover Storage Replica
PowerShell can easily be used to perform the same operation.
- Set-SRPartnership -NewSourceComputerName WIN2019SR02 -SourceRGname TestReplication -DestinationComputerName WIN2019SR01 -DestinationRGName TestReplication
You will have to verify the operation. Notice the note about may result in data loss.
Wrapping Up
The Windows Server 2019 Storage Replica Failover Process is extremely easy and amounts to changing the direction in your Storage Replica synchronization process.
This can easily be done in Windows Admin Center or PowerShell. Testing the Windows Server 2019 Storage Replica Failover Process was super easy and “just worked”. I didn’t run into any issues in the lab environment testing the process.
Storage Replica is great feature baked into Windows Server 2019. It enables volume replication between servers, cluster or even on the server itself. It is great disaster recovery solution at no additional cost.Today, we are going to look into server to server scenario, and configure it.
Before we begin
If you are not familiar with Storage Replica, please visit this link – https://docs.microsoft.com/en-us/windows-server/storage/storage-replica/storage-replica-overview and make sure you understand what it can and cannot do, before you go further.
It is also worth noting that you can use Storage Replica with Windows Server 2019 Standard and Datacenter editions.
Standard edition has some limitations on it:
- it is supported only on Windows Server 2019 Standard
- it can replicate only one volume (DTCNTR has no limit)
- volume can be up to 2TB (DTCNTR unlimited)
So, be sure you weight for what you need it and how much you are going to use it.
If you take into account third party solutions that can do the same thing, Datacenter version does not look that expensive anymore.
We are going to define Synchronous Replication.
Prerequisites
This scenario will work only inside domain environment.
Network setup
I have brought up informatiker.local domain
DC1 – 10.0.1.1
I will install this on two servers (Windows Server 2019 Datacenter) inside domain. Each of theseserver have 2 cores (which is minimum) and 4GB or RAM (I don’t recommend less, but it can be done with 2GB of RAM)
Replica3 – 10.0.1.7
Replica4 – 10.0.1.8
For this lab we are going to use only one network adapter.
We will also need one Windows 10 Pro Client machine on which we will install Windows Admin Center
Client1 – 10.0.1.11
For Synchronous Replication you should have 5ms latency or lower. For Asynchronous it doesn’t matter.
Disk setup
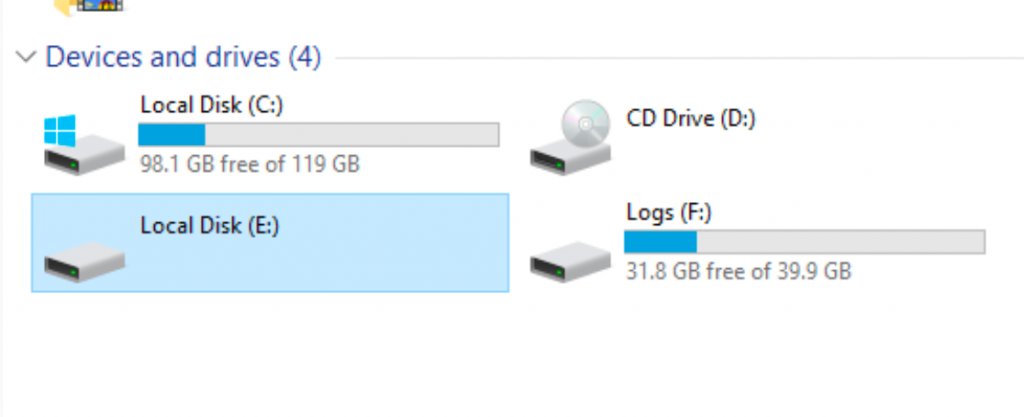
On both Replica3 and Replica4 I’m going to add two disks – E:\ is going to be data disk of 80GB in size, and F:\ is going to be logs disk with 40GB in size.
Storage Spaces support following:
- SAS JBOD, Storage Spaces Direct, FC SAN, shared VHDX, Target ISCSI or local SAS/SATA/SCSI storage.
- Log disk should be on SSDs and fast in general
- Log disk should have minimum of 9GB disk space
Physical disks should have same size and same sector size for both data and log disks.
Format disks as GPT – it will make your life easier if you have to expand beyond 2TB limit.
Software prerequisites
On Windows 10 Pro Client machine install Windows Admin Center
https://www.microsoft.com/en-us/evalcenter/evaluate-windows-admin-center
It says it is “Evaluation” but it is fully functional and free of charge (at least at the time of writing this).
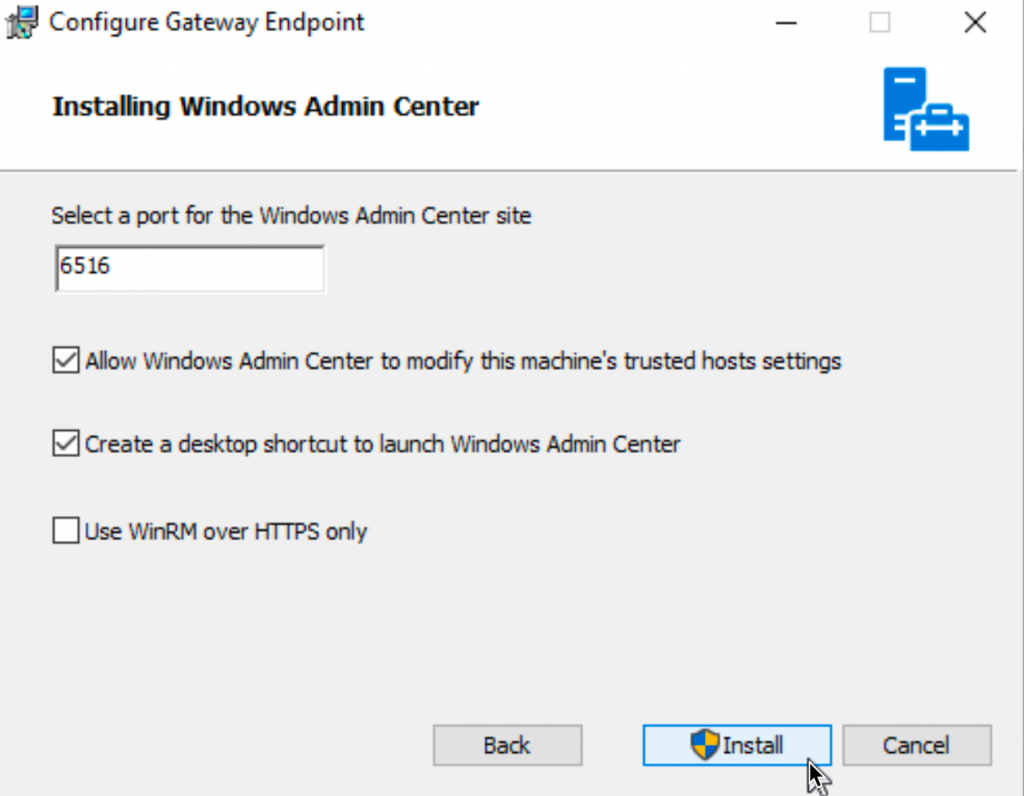
I will not cover installation of Windows Admin center – I will only tell you that you left unchecked “Use WinRM over HTTPS only.” WinRM encrypts data, so it should not be an issue. If you go ahead with WinRM over HTTPS only, make sure you have certificates configured on your servers, and also make sure WinRM listens on port 5896 and that port 5896 is allowed through firewall.
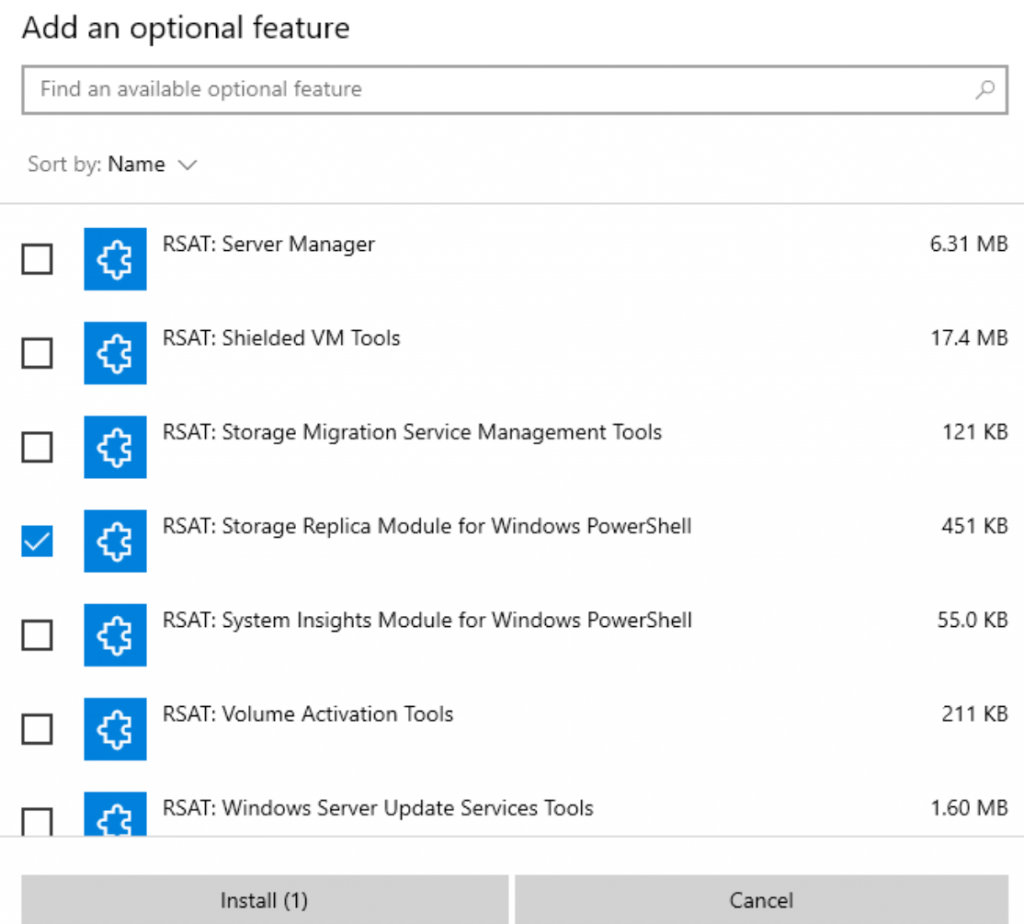
On same machine install Remote Server Administration Tools (RSAT) Storage Replica Module for Windows PowerShell.
Go to Settings | Apps | under Apps & Features select Optional Features | click on Add a Feature | find and install RSAT: Storage Replica Module for Windows Powershell
After installation open PowerShell on that Windows 10 Pro machine (as admin) and type in following
winrm quickconfigType Y to enable WinRM services (if not already enabled) and enable Firewall Exceptions.
If Firewall Exceptions are not done – make sure you let port 6516 as both inbound and outbound rules. Open port 5895/tcp on both servers and Windows 10 Pro if you have problems connecting.
Installation
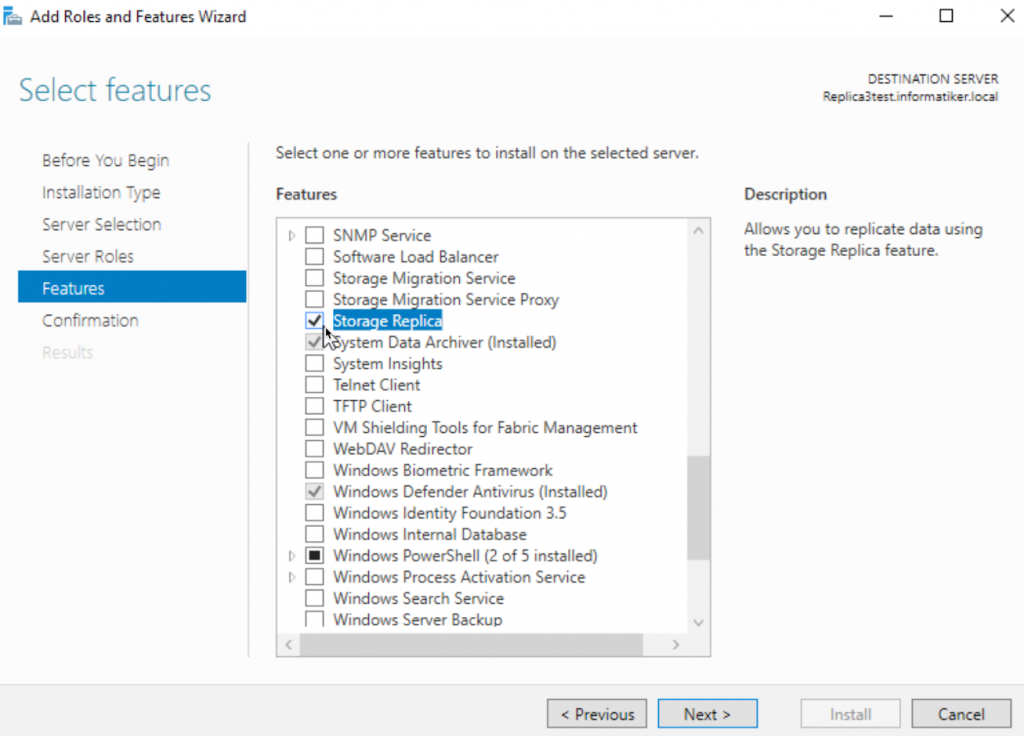
I will not go into great details here, since I assume you know how to use Server Manager and add Roles and Features onto server.
You can do this part via Admin Center or on servers. I will add this on both Replica3 and Replica4 servers as a Feature.
In Add Roles and Features Wizard, under Features add Storage Replica on both Replica3 and Replica4 servers.
Reboot servers after adding Storage Replica Feature.
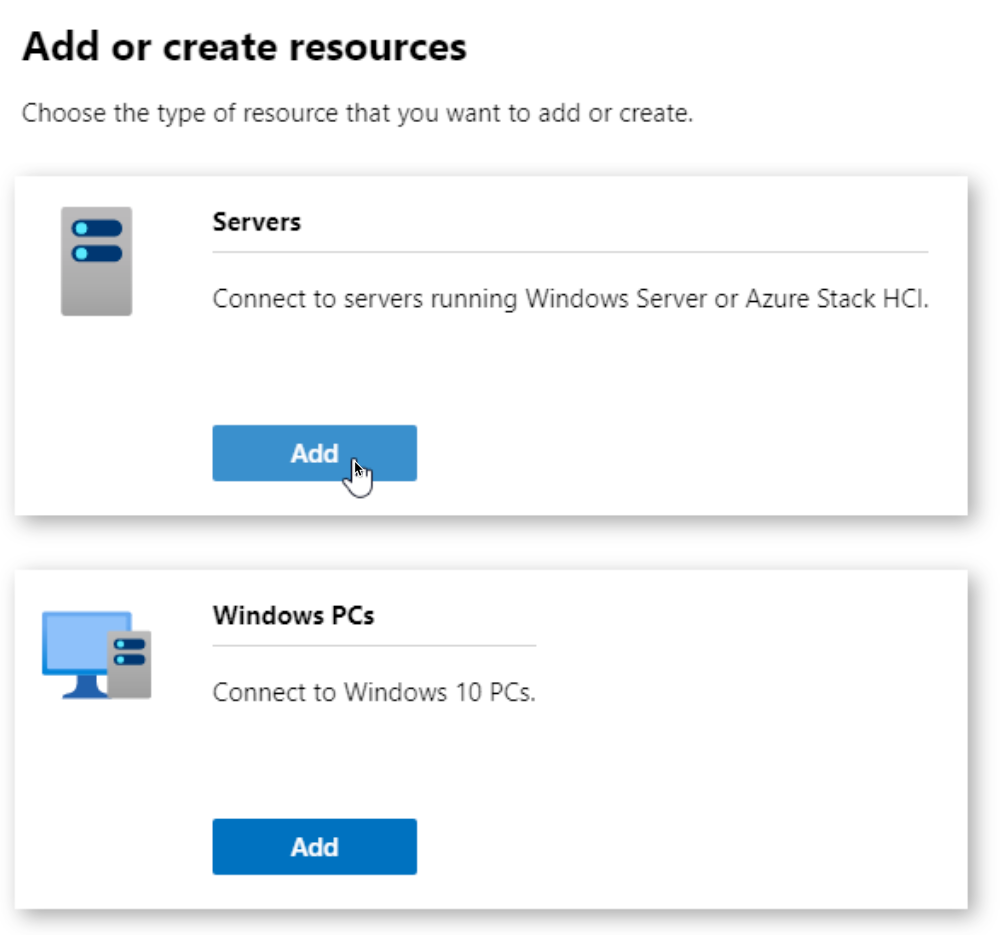
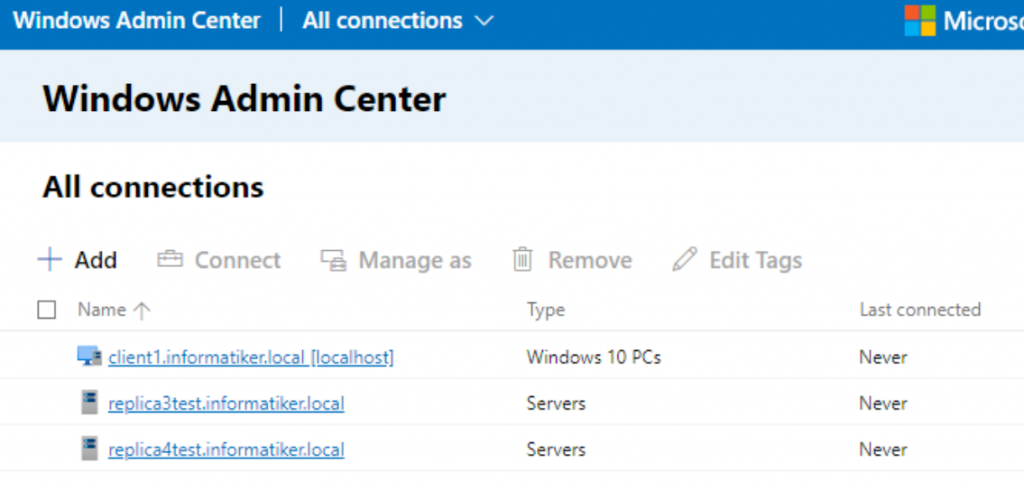
In Windows 10 Pro installation on Admin Center we are going to add both Replica3 and Replica4 into our Admin Center.
In Windows Admin Center on All connections screen click on Add
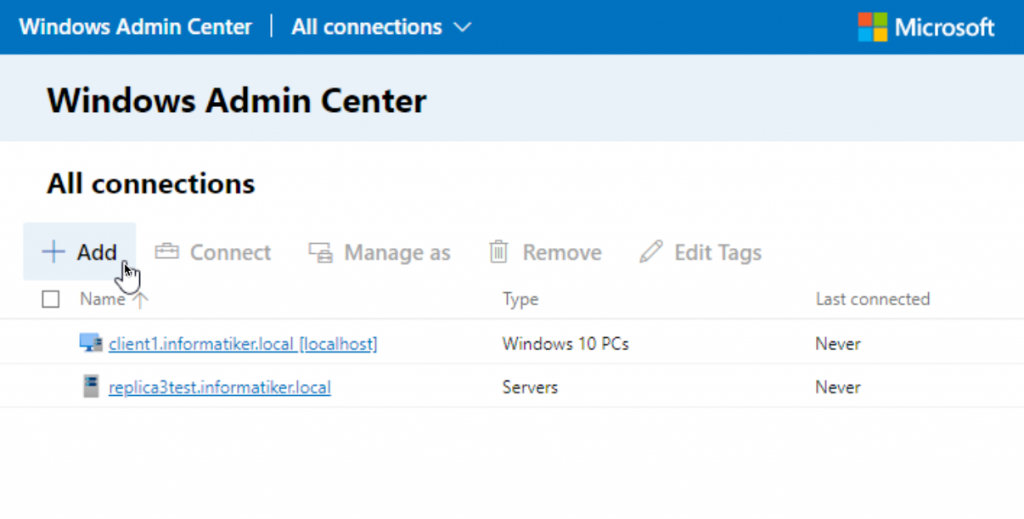
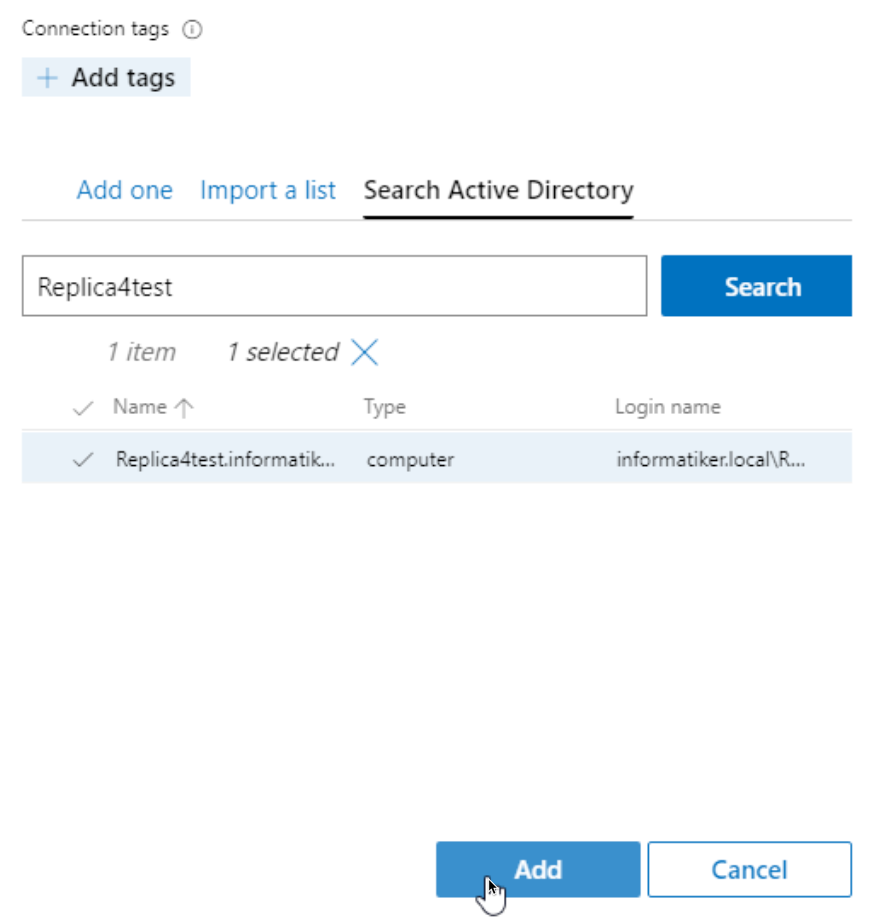
Servers | Add
Search Active Directory | Enter Server name | Select it | Add
We now have all our machines in Admin Center
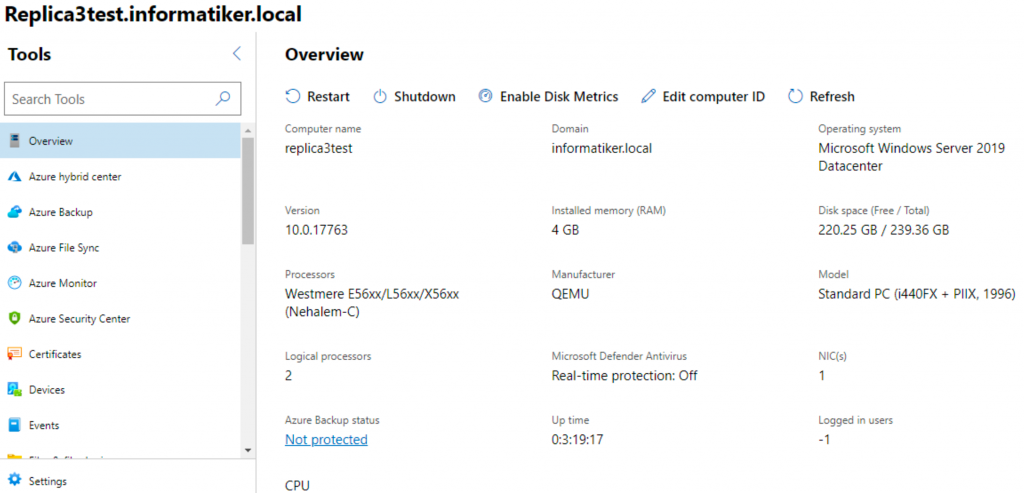
I will now click on Replica3 server name since it will be source server for replication.
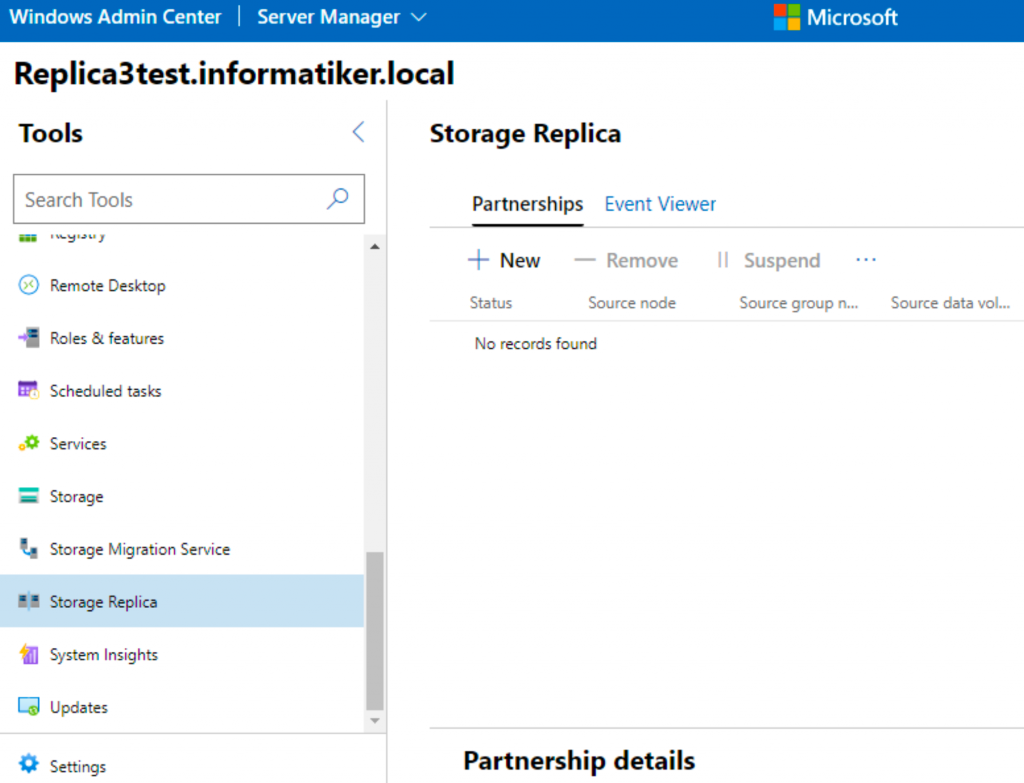
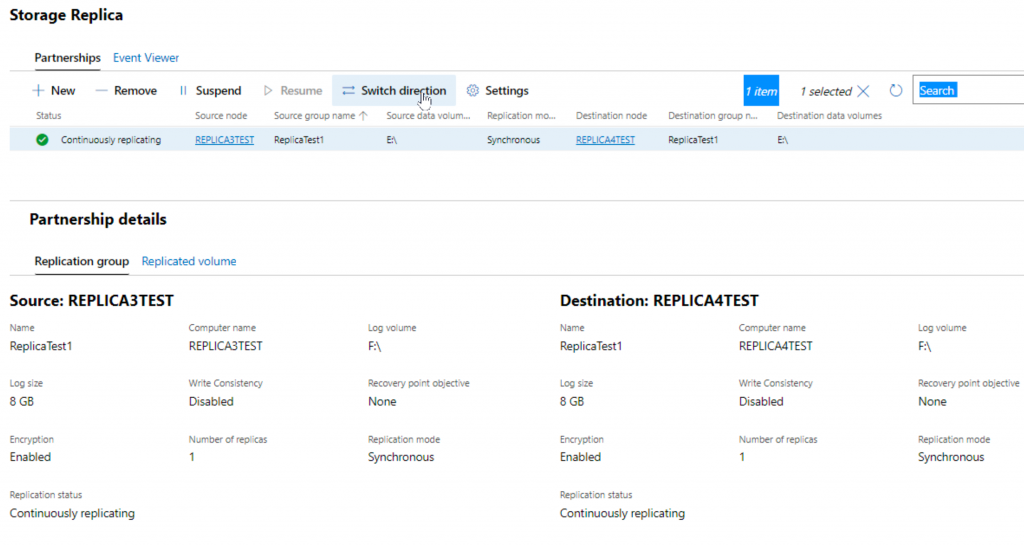
Find and select Storage Replica and under Partnerships tab select New
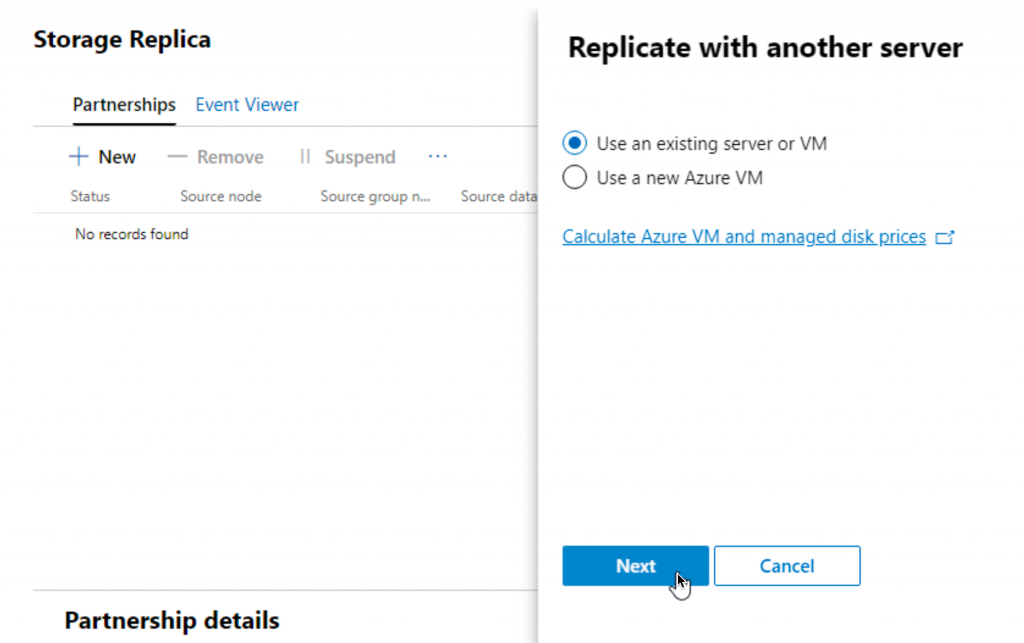
Use an existing server or VM
Under Source I entered replica3 as server name, it was automatically found – Volume and Log volume are automatically filed in, and correctly filled. Under Replication group name you can enter whatever you wish. Scroll down to Destination…

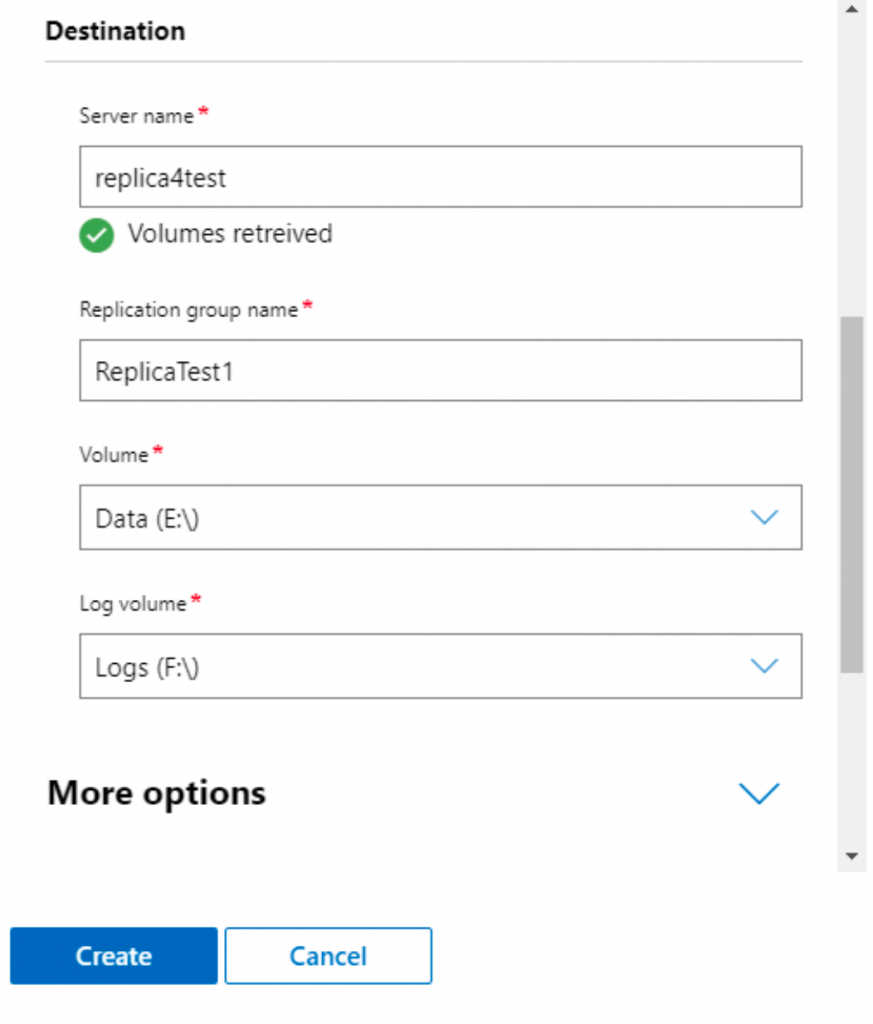
Under Destination part of the screen, I entered replica4test server. Data and log volumes again got automatically filled in. Again enter name of the replication group. Let’s check More options…
Enable synchronous replication, I left other options default, except I selected Encrypt replication traffic – Create
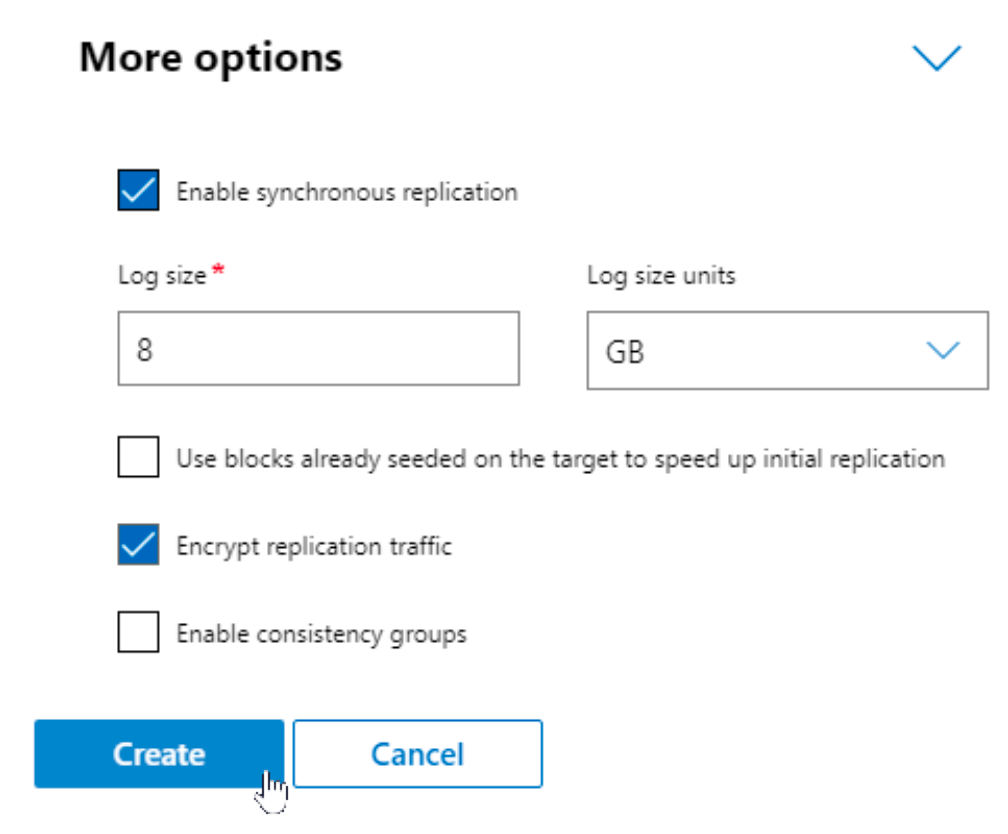
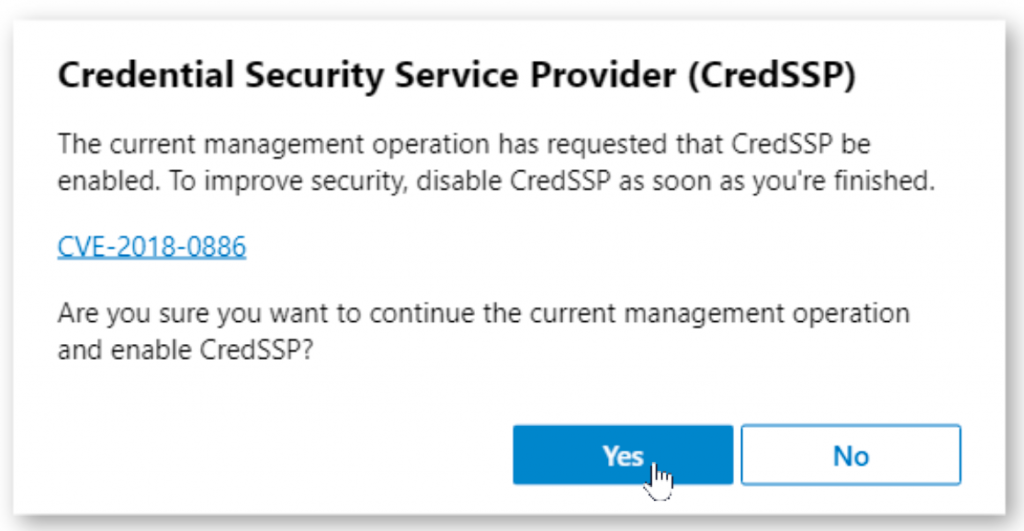
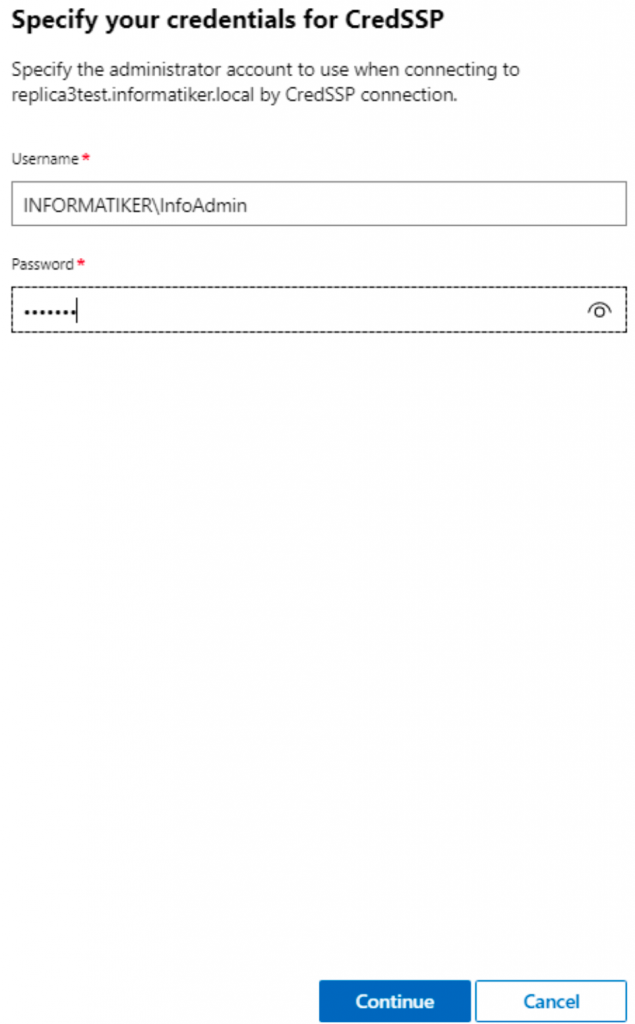
CredSSP will be enabled. Yes (CredSSP appears only if you select encrypt replication traffic).
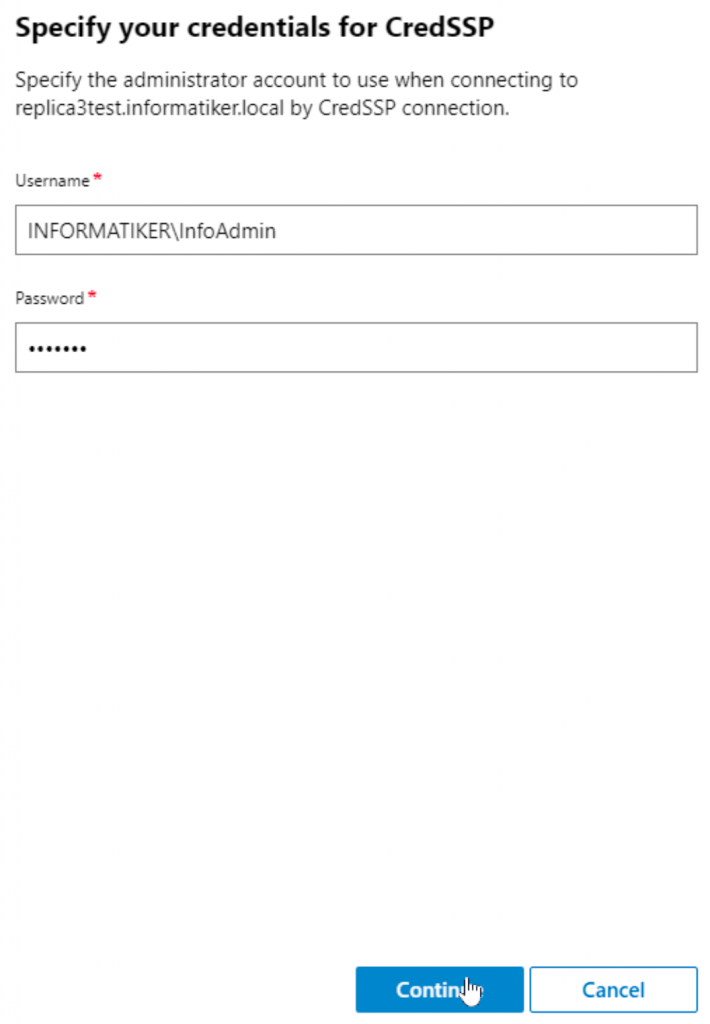
You will then be asked for administrator account. I entered domain admin, but in production, you should think about creating dedicated account. Continue
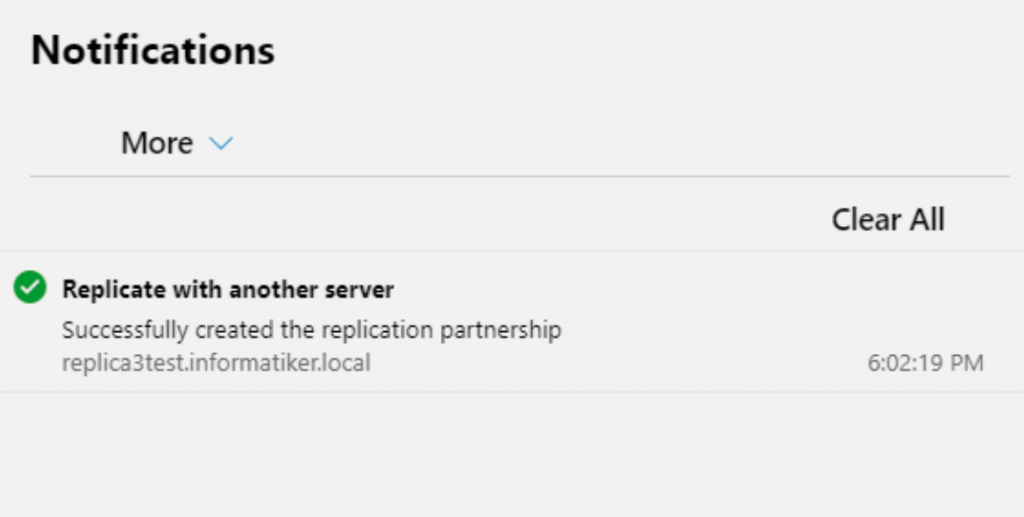
Replication is successfully created.
Under status you will get warning signs, with various stages… Give it some time…
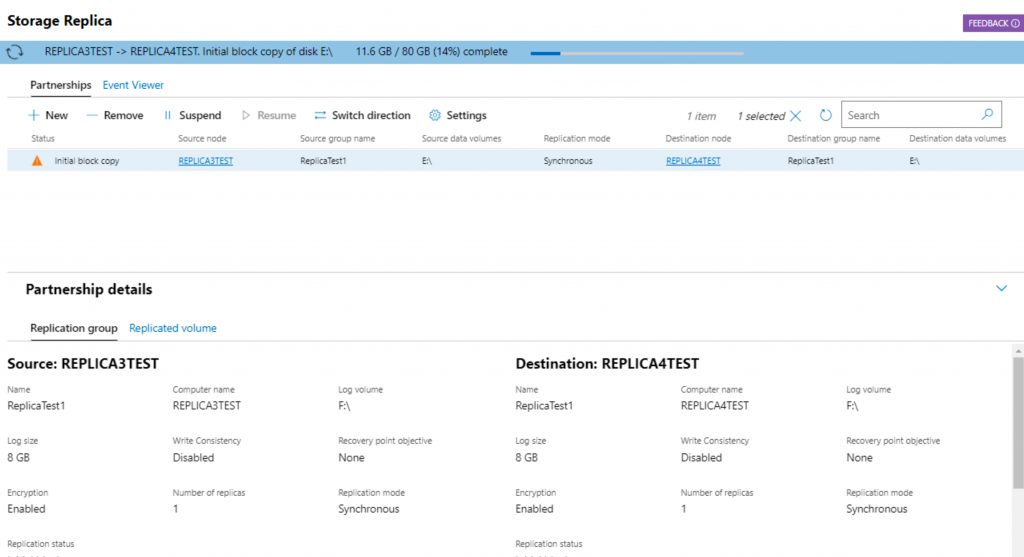
After some time you should get green sign signaling that everything is ok.
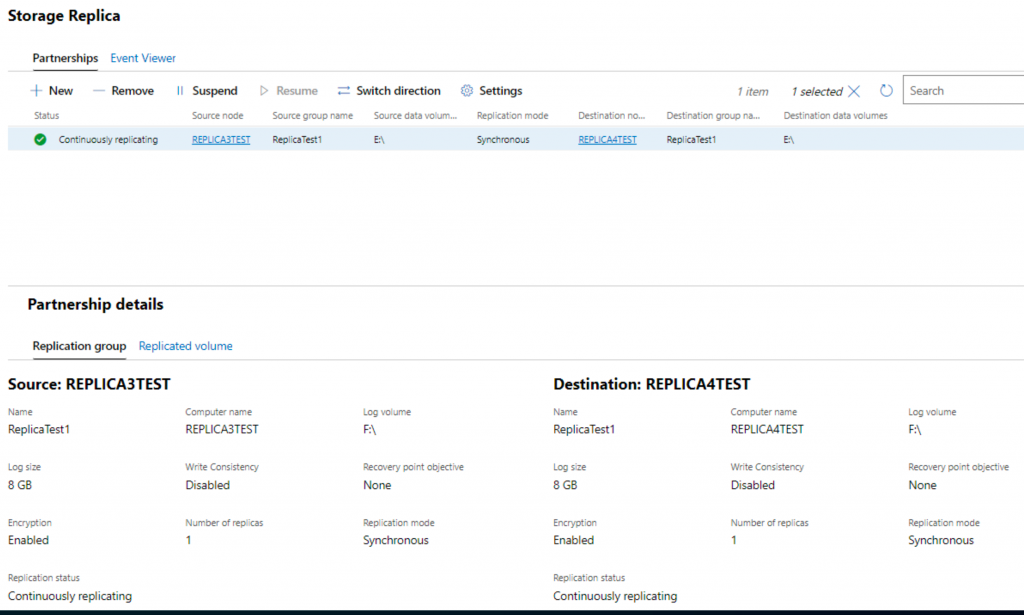
That is it, we have now created storage replica
On Replica3 server we see bot disk E (Data) and F (Logs)

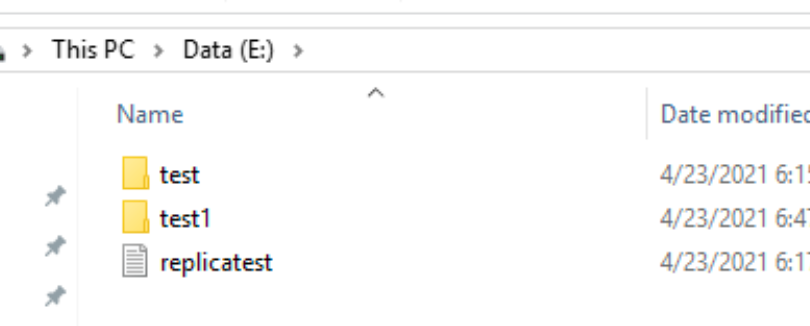
I also created few folders and file on E drive on Replica3 server
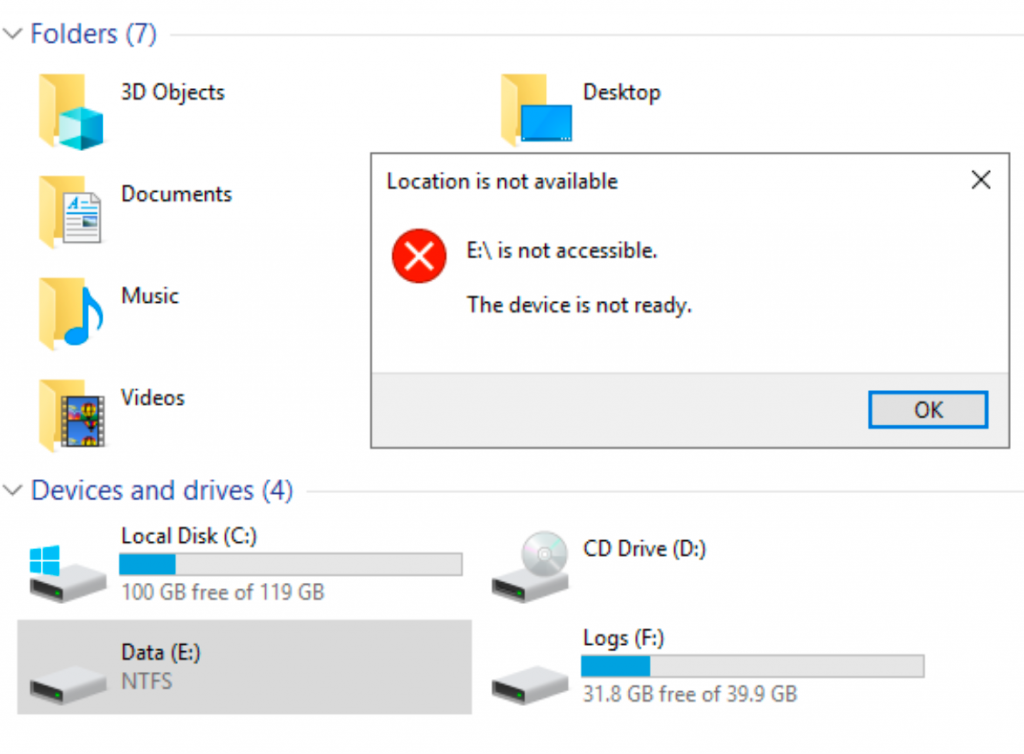
On Replica4 server, E (Data) drive is not accessible.
Switch Replication
We will switch direction of replication for a test, and make replication4 source and replication3 destination server. Click on Switch direction
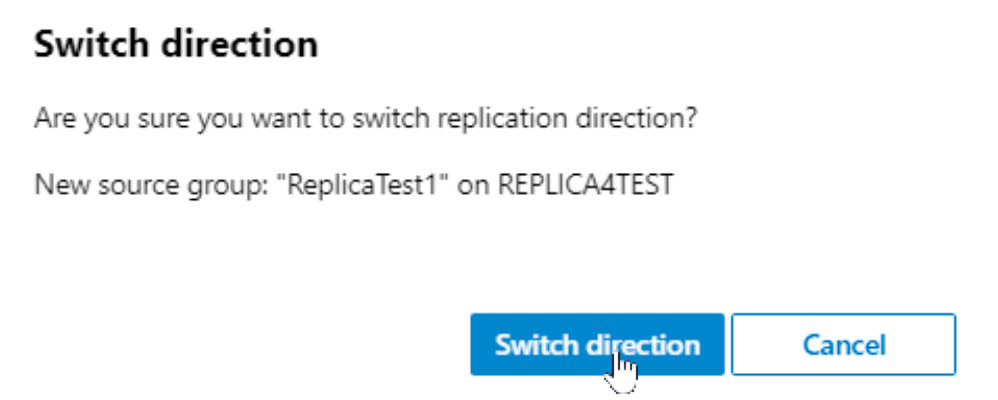
You will again be asked for credentials
Again, a little bit of waiting…
After some time, replication will be done
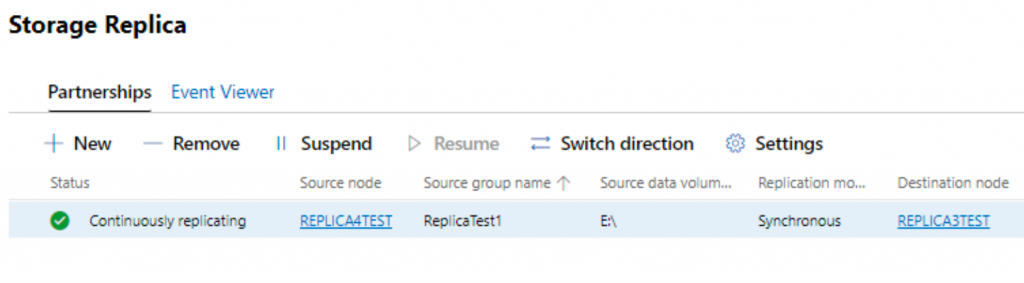
Now we can see our files on replica4 server, and replica3 is our DR site.
Testing
Everything is fine in controlled scenario, but what about unexpected situations.
I turned off replica4 server which is now source, to test this. Turned off replica4 will simulate complete loss of server.
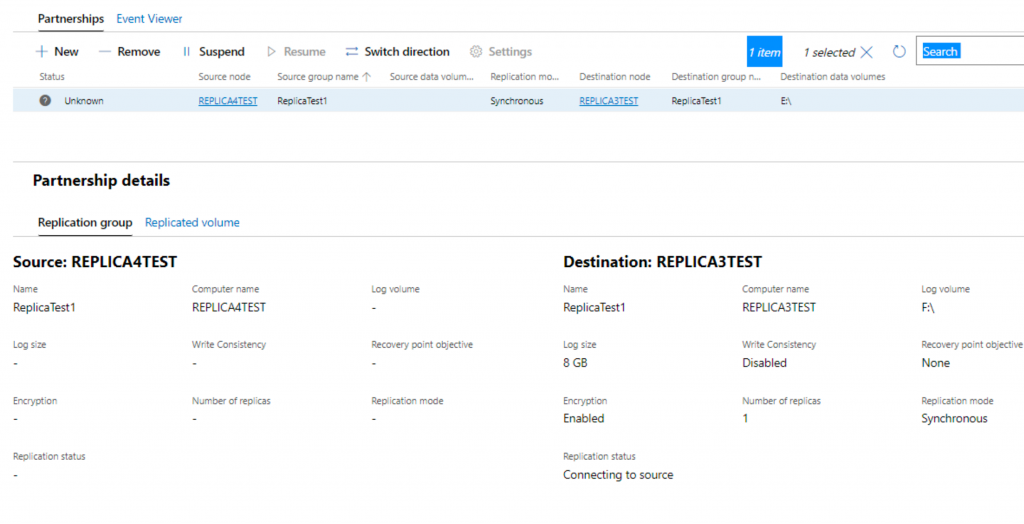
Data drive on replica3 server which is still available is not accessible.
To resolve this situation, simply switch direction of replication again. It will work, although one node is not available.
Data will be now available on replica3 server.
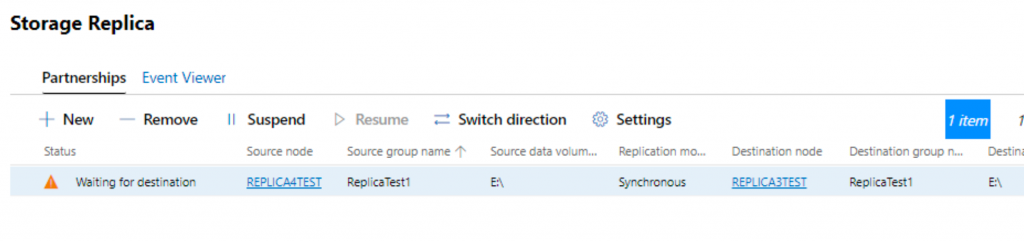
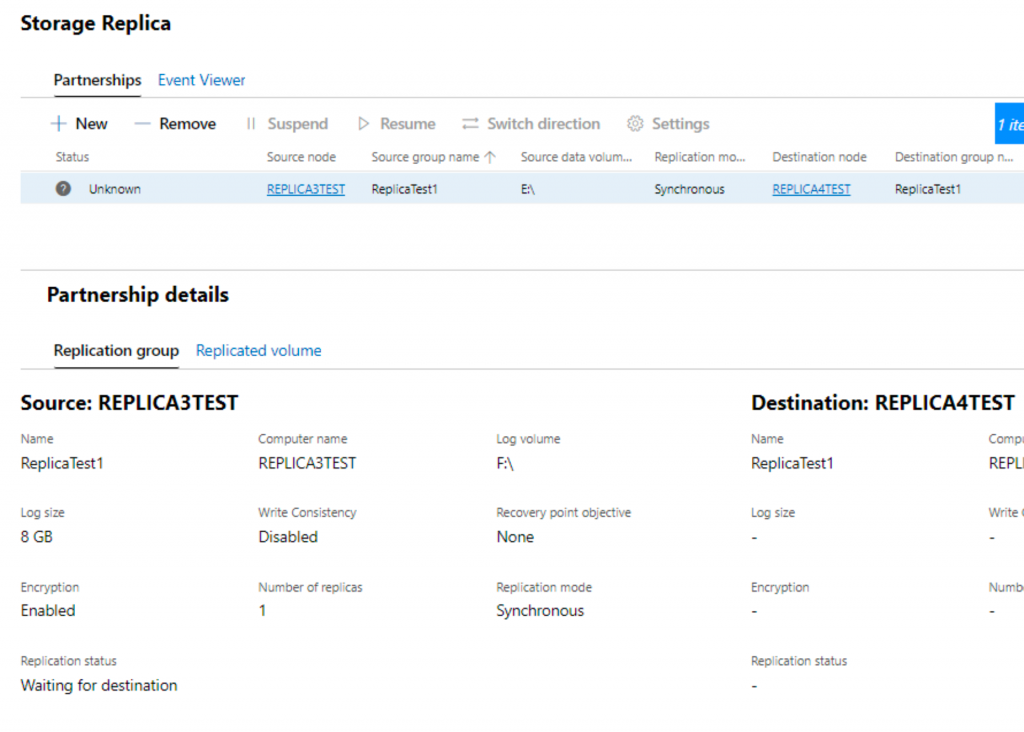
In case you bring up second node up that failed, (in my case replica4) your partnership will be stuck at “Waiting for Destination” status after you do above operation.
Backup all the data on your working storage replica volume first where the latest data are.
If you check your two nodes (in my case replica3 and replica4) on both disk E (data) is mounted and data are accessible. That is not desirable situation and storage replica is not working.
You need to remove replication partnership, and setup new one, source should be server that has the latest data. In my case that is replica3 server.
I tested this scenario and it works ok.
Conclusion
Storage replica is great and cheap solution for disaster recovery, it works well, you can replicate to another datacenter, and also to cloud as well.
Disclaimer