
Синий экран с кодом KERNEL SECURITY CHECK FAILURE (0x00000139) в Windows 11 и Windows 10 может появляться при самых разных обстоятельствах: во время загрузки системы, при работе в браузере, подключении к Wi-Fi или подключении USB-устройства к компьютеру и точную причину бывает трудно установить, однако в некоторых случаях это возможно.
В этой инструкции подробно о возможных причинах ошибки KERNEL SECURITY CHECK FAILURE и способах её исправить в случае, если вы столкнулись с проблемой.
Диагностика причин синего экрана KERNEL SECURITY CHECK FAILURE

Вы можете попробовать выяснить какой модуль (драйвер) вызвал появление рассматриваемой ошибки. Лучше всего для этого использовать утилиту WinDbg от Microsoft. Конкретно для этой ошибки другая популярная утилита — BlueScreenView, не дает нужного объема информации.
Базовый вариант использования WinDbg для поиска причин ошибки KERNEL SECURITY CHECK FAILURE будет состоять из следующих шагов:
- Скачайте WinDbg из Microsoft Store или используя файл веб-установщика с сайта Майкрософт: https://aka.ms/windbg/download
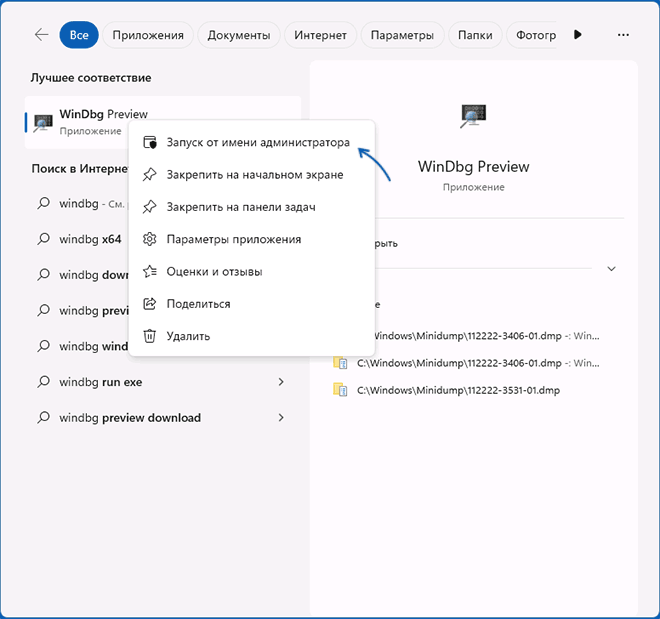
- Запустите программу, обязательно от имени администратора (правый клик по значку программы в меню Пуск или поиске на панели задач — «Запуск от имени администратора»).

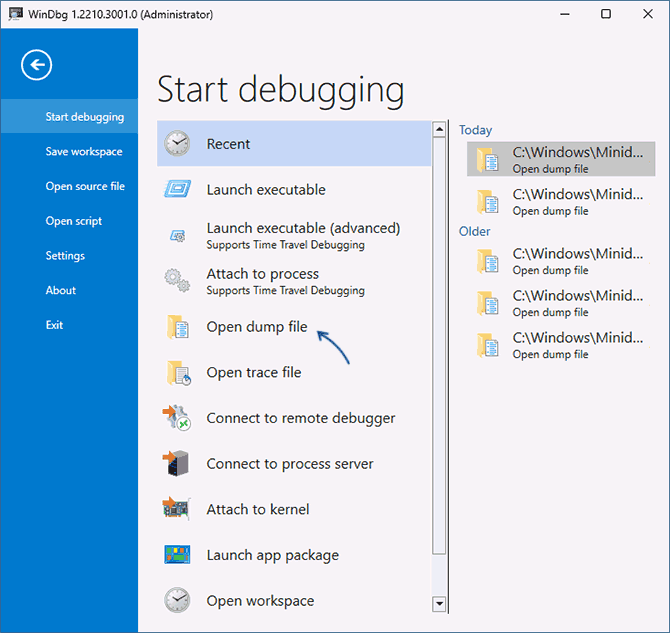
- В программе откройте меню «Файл» и выберите пункт «Open dump file» (Открыть файл дампа). Укажите путь к файлу дампа на нужную дату в папке C:\Windows\Minidump

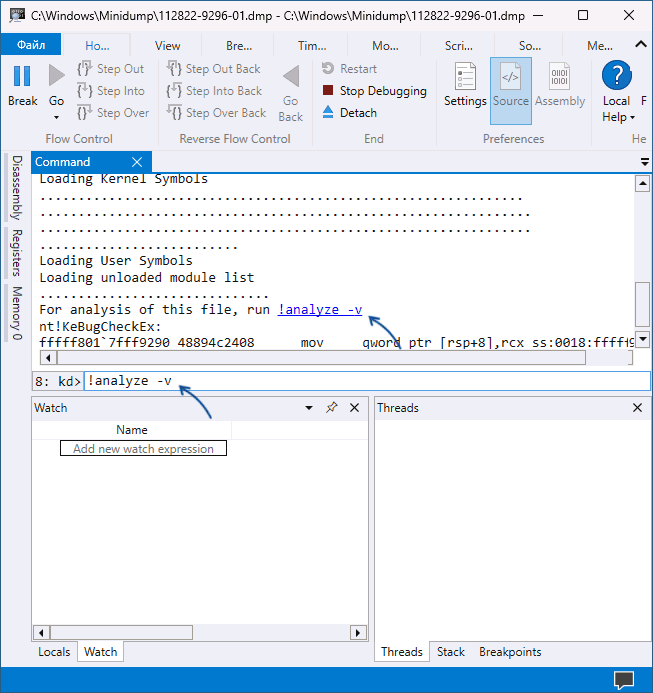
- После загрузки файла дампа введите
!analyze -v
в поле ввода команд и дождитесь завершения анализа, либо нажмите по ссылке с текстом команды в верхней панели.

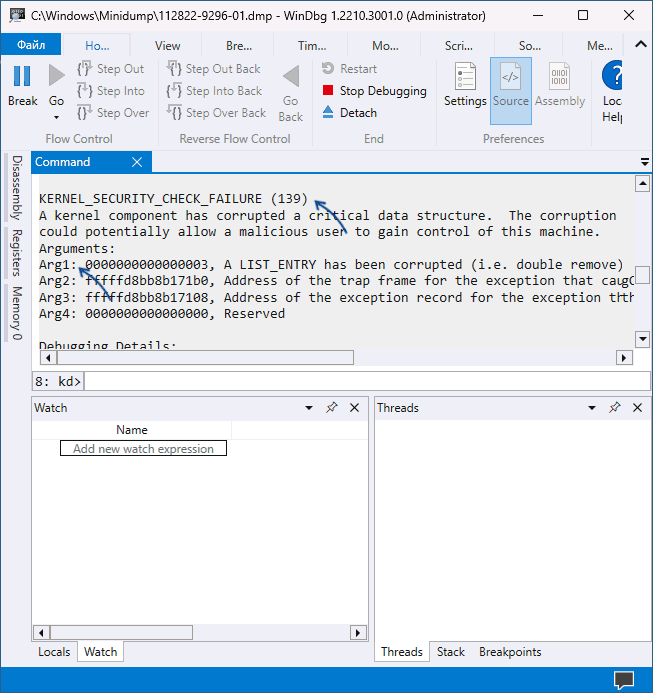
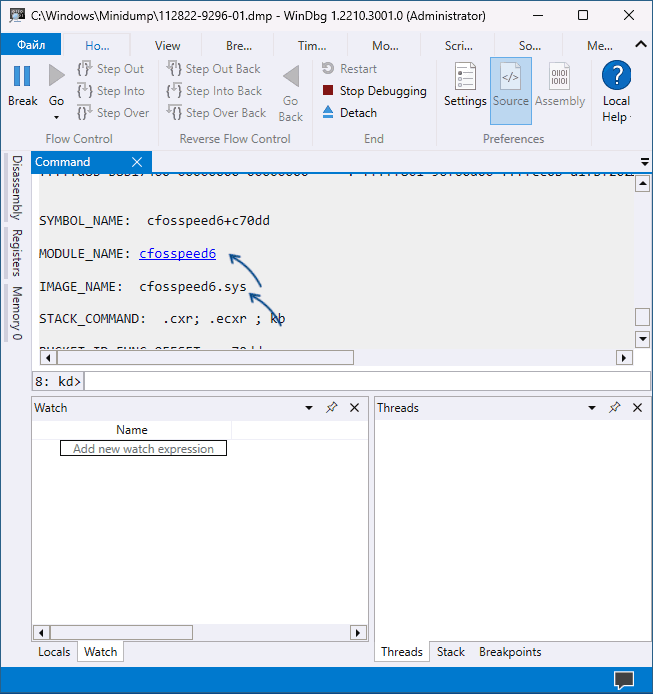
- В результате вы получите отчет о результатах анализа дампа файла. В верхней части его будет представлен код ошибки KERNEL SECURITY CHECK FAILURE 0x00000139, а также список аргументов: в первом из них (Arg1) помимо числового значения будет указана конкретная причина ошибки, обычно сложная для понимания рядовыми пользователями, но потенциально полезная для разработчиков. В случае значения 3 «A LIST_ENTRY was corrupted» для первого аргумента, наиболее вероятная причина — неправильная работа драйвера (но то же самое возможно и при других значениях).
- Ниже в отчете вы сможете найти информацию о модуле, который вызвал сбой. Например, на скриншоте ниже — это файл драйвера .sys — если вы получили информацию об имени файла, её можно использовать на следующем шаге.

- Если выполнить поиск в Интернете по имени файла драйвера, можно найти что это за драйвер, к какому устройству или программе он относится (некоторые программы также устанавливают свои драйверы) и исходя из этого предпринять необходимые действия: удалить программу, заменить драйвер устройства на драйвер другой версии или от другого поставщика, удалить драйвер и отключить устройство, если оно не используется. Например, в примере на скриншотах сбой вызывал драйвер программного обеспечения для управления и оптимизации сетевых подключений, иногда поставляемого с материнскими картами MSI, но доступного для установки и на другие Windows-устройства.
Если модули, вызвавшие сбой постоянно меняются, либо относятся к системным файлам и драйверам Windows, есть большая вероятность, что причина синего экрана — сбои работы оперативной памяти, реже — ошибки обмена данными с диском, наличие вирусов (а иногда, наоборот — сторонних антивирусов). Об этих и других причинах и методах решения — в следующем разделе инструкции.
Быстрые способы исправить ошибку KERNEL SECURITY CHECK FAILURE
Если вы не готовы разбираться с конкретной причиной ошибки, а требуется быстрое и, возможно, рабочее решение, можно попробовать следующие варианты решения проблемы. Они «универсальны» для такого типа ошибок и часто один из них оказывается результативным.
Базовые способы исправить ошибку KERNEL SECURITY CHECK FAILURE и предотвратить появление синего экрана в дальнейшем включают в себя:
- Если к компьютеру в последнее время было подключено новое оборудование, проверьте, появляется ли синий экран вновь, если его отключить. Если в данном случае ошибка исчезает, попробуйте поэкспериментировать с драйверами устройства (установить другие версии драйверов с сайта производителя или сторонних источников).
- Если устанавливались новые модули памяти, проверьте, сохраняется ли ошибка, если их отключить и убедитесь, что материнская плата поддерживает текущую конфигурацию RAM (можно уточнить в официальном руководстве к вашей модели материнской платы). Также имеет смысл проверить оперативную память на ошибки.
- В случае, если в последнее время устанавливались новые драйверы, в том числе виртуальных программных устройств — попробуйте удалить их (или вернуть старую версию). Если выполнялась установка сторонних служб, например, при установке антивируса, попробуйте удалить программу, которая установила сторонние службы.
- Проверьте, нет ли в диспетчере устройств каких-либо устройств с ошибками (желтым восклицательным знаком). При наличии таких устройств, откройте свойства с описанием и кодом ошибки и попробуйте найти решение (в том числе с помощью поиска на этом сайте по коду ошибки). Если причина — отсутствие драйвера, установите его с официального сайта производителя материнской платы или ноутбука, даже если на официальном сайте доступен только драйвер для одной из предыдущих версий системы.
- Выполните проверку компьютера на вирусы, например с помощью Kaspersky Virus Removal Tool (не требует установки на компьютер). Ещё лучше использовать загрузочные антивирусные образы, то есть выполнять проверку с загрузочной флешки, например, таким инструментом как Dr.Web CureIt!
- При наличии точек восстановления системы на дату, когда ошибка не появлялась и при условии, что оборудование компьютера не менялось, попробуйте использовать их. Подробнее: Точки восстановления Windows 11 (подойдет и для Windows 10).
- Выполните проверку и восстановление целостности системных файлов Windows.
- Если ошибка возникает только при запуске определенной программы, попробуйте следующие варианты: добавление программы в исключения антивируса, установка другой версии программы или её скачивание и установку из другого источника.
- При появлении ошибки во время чистой установки Windows с флешки, попробуйте другой образ (желательно — оригинальный) и другой накопитель. Если это новый компьютер, также имеет смысл проверить оперативную память на ошибки, как это было указано во 2-м пункте, это можно сделать и с загрузочной флешки.
- Если ошибка появилась после переустановки Windows, установите оригинальные драйверы чипсета с сайта производителя материнской платы ПК или сайта вашего ноутбука, а также сопутствующие драйверы системного оборудования и управления электропитанием при их наличии (даже если на официальном сайте представлены только старые версии драйверов).
- В случае появления ошибки после установки обновлений Windows, попробуйте удалить их.
- Есть сообщения, что у некоторых пользователей проблему решает включение классического меню загрузки Windows. Чтобы попробовать, используйте команду
BCDEDIT /SET {DEFAULT} BOOTMENUPOLICY LEGACYв командной строке, запущенной от имени администратора.
- В редких случаях причиной проблемы могут оказаться ошибки чтения/записи HDD или SSD — из-за ошибок на диске (как проверить диск на ошибки), либо из-за проблем с его подключением, например, поврежденного SATA-кабеля.
Ещё один быстрый способ решения проблемы — исправление текущей установки Windows с помощью образа ISO, этот вариант срабатывает в большинстве случаев, если синий экран KERNEL SECURITY CHECK FAILURE стал появляться на уже установленной системе. Шаги будут следующими:
- Скачайте ISO образ с той же версией Windows (или более новой), которая у вас установлена и смонтируйте его в системе.
- Запустите файл setup.exe из подключенного образа и пройдите первые шаги в мастере установки.
- Выберите один из вариантов переустановки — с сохранением файлов, настроек и приложений или с сохранением только личных файлов.

- Подтвердите установку и дождитесь её завершения.

Надеюсь, один из предложенных вариантов помог разобраться в причинах проблемы и решить её. Будет отлично, если вы сможете поделиться в комментариях своим опытом решения рассмотренной проблемы.
Users frequently experience kernel security check failure issue when installing Windows 10/11 or upgrading to Windows 10/11. This halt error has a variety of causes. For the BSOD kernel security check failure error Hard drives, corrupt data, or outdated drivers might all be to blame.
If your computer encounters this issue, it will simply enter the blue screen of death. The following methods are provided to assist you in resolving kernel security check failure Windows 10 error. But before digging into solutions we must understand what the error actually is.
What is the Error Kernel Security Check Failure?
If your Windows 10 or 11 system encounters Kernel Security check failure it means that important files on your system failed the compatibility or integrity check. Therefore, to resolve this you need to fix these files or components. Or simply remove them.
Solutions for Kernel Security Check Failure Windows 10, 11
The following methods will help you solve the BSOD Kernel security check failure Windows 11 or 10 error. Follow the order of solutions to resolve the issue without wasting any crucial time of yours.
Method 1: Enter Safe Mode
The first thing to be done when trying to resolve the stop code kernel security check failure error is to enter safe mode. Here’s how it can be done
Force shut down your Windows 10 device with the help of the power button. Then click on Enter Safe Mode option. In the Safe mode Kernel security check failure error will not come up and Windows 10.
But in some cases, you might fail to enter safe mode. For such devices, you must enable Boot options. If the Windows Kernel Security check failure error is not fixed with this method, try the next solution.
Also Read: How to Fix Critical Process Died BSOD Error in Windows 10 {SOLVED}
Method 2: Update Drivers
The most common problem behind the BSOD Kernel security check failure error is outdated or corrupted system drivers. There are several methods through which you can update system drivers. But if you perform driver updates manually it can be time-consuming to identify the problematic drivers and then update them.
Therefore, a convenient option is to rely on automatic driver updater software. Bit Driver Updater is one such tool that can update not only specific but all your system drivers with just one click. Additionally, schedule updates through the tool at your convenience. All the driver data is backed up and can be restored whenever required.
To unlock complete features use the Bit Driver updater Pro version. It comes with a complete money-back guarantee for up to 60 days. Also, you get 24*7 customer support and one-click driver updates.
Automatically Update Drivers with Bit Driver Updater
Note: If you are using the Free version of Bit Driver Updater download one update at a time using the Update Now option.
Install the updates and simply restart your PC. That’s it. Bit Driver Updater makes driver updates quick and simple.
Now with the latest updates check it the Kernel Security check failure issue is fixed. If the issue remains try the following solutions.
Method 3: Run SFC Scan
If the error Windows Kernel security failure is due to damaged or corrupted system files use the System File Checker to fix it. Apply the following steps to address the problem.
Wait till the process completes and restart your pc to check if the Windows kernel security check failure issue is fixed. This scan will fix the faulty files on your system.
However, if the problem persists try the following pair of solutions.
Also Read: How to Fix System Service Exception BSOD error on Windows 10
Method 4: Make Use of CheckDisk
In case the above solutions were not relevant in fixing the Kernel security check failure Windows 11 or 10 issues use the CheckDisk tool. The in built tool Windows will fix your faulty drive by scanning issues within the drive and resolve them automatically.
Given below are the instructions that you need to follow to use CheckDisk.
Hold back till the scan for your drive completes. If the Stop code kernel security check failure error is associated with a faulty drive, this scan will fix it. Else, try using the next method to resolve the error on Windows 10 or 11 devices.
Method 5: Download Pending Windows Update
Windows releases regular updates for its customers for continuous improvements. Therefore, for Kernel security check failure Windows 10 or 11 error check if your system has any pending updates. Downloading these updates also improves the performance and speed of the device.
Here’s how you can download the latest Windows version available
Step 1: Use the keyboard shortcut keys Windows + I in order to open the Settings app on your device.
Step 2: Now click on Windows Update and press the Advanced Settings option.

Step 3: Now under the Additional options click on the Optional Updates sections.
Step 4: Select Driver Updates and check the checkbox for all pending driver updates. To download them click on Download & Install button.

Wait till the process completes and Restart once done to bring the updates into action. Hereafter, check if the BSOD Kernel security check failure Windows 10 issue is fixed.
Also Read: How to Fix Driver Power State Failure on Windows 10
Kernel Security Check Failure Error: FIXED
Here we conclude our simple yet effective troubleshooting guide to resolve Kernel security check failure issues. Make sure you apply the solutions in the given format to quickly resolve the error. In case none of the solutions helped the problem can be with your system. Therefore, to address this reset your Windows and check if this fixes the error.
However, if you still have any concerns or questions connect with us through the section of comments below. If you found the article considerate make sure you subscribe to our blog for similar tech guides. Also, for tech news and updates follow us on our social channels i.e Facebook, Twitter, Instagram, and Pinterest.
When Windows 10 or 11 users receive the «Stop Code: Kernel Security Check Failure» error (especially when launching games), it means they have encountered the
disruptive phenomenon of a Blue Screen of Death (BSOD). The error indicates
that the system discovered corruption occurring in important system data
structures, which matches the stop code 0x00000139 registration.
System stability returns and future occurrences of the same problem are
prevented when users identify the root causes and execute suitable fixes. So,
that’s exactly what we will be discussing in this article. Without further
ado, let’s read on to explore the really useful 7 troubleshooting tips to get
rid of this 0x139 failure.
-
Fix 1. Turn Off «Kernel-mode Hardware-enforced Stack Protection» [Use
with Cautions) - Fix 2. Disable Windows Defender
- Fix 3. Run System File Check Tool (SFC / DISM)
- Fix 4. Delete and Reinstall Graphic Drivers
- Fix 5. Remove Recent Installed Hardware or Software
- Fix 6. Repair Corrupted Registries [Very Complicated]
-
Fix 7. Factory Reset Your Laptop & Only Install Drives via Windows
[Final Method]
Part 1. What Is Kernel Security Check Failure & Why It Occurs
📍 Definition
When the operating system kernel detects damaged critical data structures,
it produces the «Kernel Security Check Failure» BSOD error. The corruption
occurs from multiple sources that might involve incompatible drivers, memory
issues, and software conflicts.
Typically, you will see the Windows system display a blue screen kernel
security check failure error and say:
«Your PC ran into a problem and needs to restart. We’re just collecting some
error info, and then we will restart for you. Stop code:
KERNEL_SECURITY_CHECK_FAILURE»
📍 Common Causes
-
Driver Conflicts: The installation of recently added hardware
components or the execution of driver updates frequently produces driver
conflicts between old and new components. -
Destructive RAM or Memory: Memory-related problems due to either
defective RAM or memory might cause this error to appear. -
Corrupted System Files: Windows system files become corrupt because
of malware activity, while improper system shutdowns also lead to file
corruption. -
Interference from Third-party Software: System operations can
suffer from interruptions due to third-party applications, which include
security software programs. -
Anti-Cheat Software Issues: Users of Easy Anti-Cheat software
experience system crashes known as BSODs while playing Genshin Impact and
similar games。 This results in the «easy anti-cheat blue screen kernel
security check failure» bug due to this software’s issues.
Part 2. How to Fix BSOD Error Code 0x00000139 Kernel_Security_Check_Failure
on Windows 10/11
If you are also facing this issue with your PC, this section is for you
since it shares the top 7 Kernel security check failure fix methods that you
may easily try.
Fix 1. Turn Off «Kernel-mode Hardware-enforced Stack Protection» [Use with
Cautions)
It is a security feature that comes built-in in the Windows operating
system. Disabling it can temporarily solve the issue at your end. However,
this method must be used with extreme caution since it may leave your
computer vulnerable.
-
Search for and open the «Windows Security» app from the bottom-left
Start menu. -
Then go to «Device Security» and locate the «Core Isolation detail» Turn
on the button under «Memory integrity». -
Find the «Kernel-mode Hardware-enforced Stack Protection» option and
turn off the button below it to stop code kernel security check failure.
Fix 2. Disable Windows Defender
You may face this error when there is a conflict between Windows Defender
and some other applications. So, disabling your Windows Defender may solve
the issue:
-
Open Windows Security. Go to «Virus & Threat Protection» and click
«Manage Settings». -
Turn off «Real-time protection» and this will be your Kernel security
check failure fix.
Fix 3. Run System File Check Tool (SFC / DISM)
Apart from the above tips, you can also check and repair the Windows
corrupted system files using the SFC or DISM tools:
-
Open Command Prompt as administrator. Run: sfc /scannow and press
Enter. -
Also, you can run the following DISM commands and press Enter to repair
system files or components and terminate the stop code kernel security
check failure: -
Dism /Online /Cleanup-Image /ScanHealth
-
Dism /Online /Cleanup-Image /CheckHealth
-
DISM /Online /Cleanup-image /RestoreHealth
Fix 4. Delete and Reinstall Graphic Drivers
Sometimes outdated drivers cause BSOD issues. Thus, it is necessary to
reinstall them solves the issue:
-
Press the Win+K keys and open Device Manager.
-
Expand «Display adapters», right-click your graphics card, and select
«Uninstall device». -
Restart your computer for the Kernel security check failure fix.
-
Download and install the latest drivers from the
manufacturer’s website.
Fix 5. Remove Recent Installed Hardware or Software
Sometimes, a recently installed software comes with viruses or conflicts
with previous software on the computer. Uninstalling that software or
hardware can help get rid of the issue.
-
Unplug recently installed hardware.
-
Open the «Uninstall Program» option in the Control Panel and sort by
installation date. -
Uninstall any suspected software and restart the computer for Kernel
security check failure fix.
Fix 6. Repair Corrupted Registries [Very Complicated]
Corrupted registry entries can cause system errors and here is how to
fix them:
-
Insert a USB or DVD drive, press any key on the keyboard, and boot PC
from the media. -
Then the Windows Setup appears, click «Next» > «Repair Your
Computer». -
Select «Troubleshoot» and click «Advanced Options» then choose «Command
Prompt». -
Run the following commands and press Enter in sequence:
- «D:» or «C:» > «dir» > «CD Windows system32» (Check system volume)
-
«cd config» > «dir» > «cd RegBack» (Move to
RegBack which contains original registry files) - «dir» > «cd..«
- «Ren DEFAULT DEAFULT1» > «Ren SAM SAM1» > «Ren SECURITY SECURITY1» > «Ren SOFTWARE SOFTWARE1» > «Ren SYSTEM SYSTEM1»
-
«CD RegBack» > «copy D:\Windows\System32\config»
(Copy original registry folders from regback to system config folder) - «cd..» > «dir» > «exit»
-
Finally, restart the computer to stop the code kernel security check
failure.
Fix 7. Factory Reset Your Laptop & Only Install Drives via Windows
[Final Method]
If all of the above solutions fail, then your last resort is to factory
reset your laptop, and next time you will install drivers only through
Windows.
-
Go to «Update and Security» in Settings and choose «Reset PC» under the
«Recovery» tab. -
When the factory reset is complete, install all drivers by checking for
Windows updates.
Part 3. Bonus: How to Backup Important Data Before Resetting Laptop
A reset operation requires users to create backups of important files
because data loss will occur without this precaution. You can accomplish
safe and easy backup jobs for personal documents, installed apps, disk
partitions, and the entire computer with several clicks using
4DDiG Partition Manager.
It provides 3 main backup modes: File Backup, System Backup, and
Disk/Partition Backup. Here, you can choose to back up important data or the
whole Windows. Even you are not a tech savvy, you can operate as its
instructions effortlessly.
Why Choose 4DDiG Partition Manager?
- Backup and protect important data, disks, and even the whole system.
- Clone your OS, system files, and boot partitions between different drives.
-
Produce exact duplicates of complete disks along with partition
structures. -
Users can choose specific items to save through the preview feature before
backup. -
Restore files and Windows system from backup
effectively and easily - Very easy to use without needing any tech requirements.
Steps to Backup Entire Laptop Before Factory Reset with 4DDiG Partition
Manager
-
Start your 4DDiG Partition Manager software and choose the «Backup» >
«System Backup». -
From the backup task, you can either choose specific disk partitions or
the entire system to backup. Meanwhile, click «Change» to select a
reliable storage path. Afterward, hit the «Start» button to kick off. -
Once the backup is complete, you can click «OK» in the popup window and
close the software.
Part 4. People Also Ask about BSOD Kernel Security Check Failure
Q1: Is kernel security check failure serious?
Yes, it can be serious. The critical integrity check within the Windows
kernel fails, causing this BSOD error. The major causes behind this error
include damaged operating system files, outdated drivers, and conflicts
between system hardware components. If users choose to ignore this error,
system crashes and permanent data loss can occur.
Q2: How to fix Fortnite kernel security check failure?
Anti-cheat within Fortnite creates this issue, which commonly appears with
users of the game. Try the following:
-
Disable «Kernel-mode Hardware-enforced Stack Protection».
-
Recheck and reinstall your graphics drivers as updates.
-
You should run SFC and DISM to repair the system files through their
diagnostic procedures. -
Uninstall Fortnite and then either reinstall it from scratch or choose a
complete reinstall of Windows.
Q3: Is kernel security Check failure a virus?
Not inherently. This error develops when malware attacks system files and
causes their corruption. Users should conduct a complete antivirus analysis
simply to be safe. Most instances of this issue stem from driver and
hardware relationship problems rather than from viruses.
Conclusion
The Windows system halts because of the
Kernel Security Check Failure during operation. It creates
frustrating conditions, but you can resolve them through the available
methods. The various strategies to restore PC performance span from turning
off Windows Defender to fixing damaged system files and executing a absolute
system factory reset.
We strongly advise users to use 4DDiG Partition Manager as a backup
solution during system reset preparation and for important data protection
needs. A simple click lets you perform a drive backup alongside personal
file backup through this program, so you always stay protected.
William Bollson (senior editor)
William Bollson, the editor-in-chief of 4DDiG, devotes to providing the best solutions for Windows and Mac related issues, including data recovery, repair, error fixes.
The kernel is basically a small Computer program, that is the core of the operating system. It gets loaded after the bootloader. After that, it handles startup, and input/output request by software. It also handles memory and USB/Peripheral devices. Overall, it controls everything. But, when Kernel detects corruption of critical data structure, then Kernel Security Check Failure error occurs. Usually, KERNEL_SECURITY_CHECK_FAILURE (0x000000139) error occurs due to memory or driver incompatibility issues, or, due to system data corruption.
This error is not so common, and usually, this error shows up right after when every time you turn on the computer. Or, maybe after a couple of minutes of Windows start. And, yes if the error is coming right after boot animation, then you need to boot Windows into safe mode to try out solutions. Though, this error usually users face after a Windows update. The latest Windows update can generate driver incompatibility issues. Well, whatever is the cause, we’re here to help. This article will help you to eliminate this kernel security error in Windows 10.
What are the causes behind this error?
- Outdated, Incompatible, and Corrupted Drivers.
- Recently Added Hardware. (After RAM upgrade)
- While Playing a Game or running specific software.
- Corrupted Windows System Files.
- Third-Party antivirus or security program or due to virus attack.
- Corrupted or Damaged HDD or SSD.
- Faulty Peripheral Devices.
Kernel Security Check Failure Windows 10 Fix
Disconnect all USB and Peripheral Devices
Sometimes problems are too small, we make them complicated. It could be possible, that, due to some faulty device kernel is producing this error.
- First, Shut Down Computer Completly.
- Remove all USB Devices. (If possible remove the keyboard and mouse too.)
- Start Computer Now.
If the problem was with any connected hardware, then the error will get resolved immediately. And, if the error still occurring, then try the next solution.
Remove RAM Stick and Reconnect
Mostly RAM upgrade is the cause behind this error. When you install different frequency RAM in dual channel mode, then Windows show this error. Because the kernel checks all the hardware before Windows starts. Well, you know better, which hardware you have upgraded recently, so remove it. Also, if the error is coming in your PC build, then, assemble the PC again.
Boot Windows in Safe Mode
As I mentioned, if the error is not let you access Windows. And, coming after Windows boot animation. Then, you need to boot Windows 10 in safe mode.
Safe mode is also known as the Diagnostic Mode of Windows OS. It only allows for essential system programs and services. That’s why, this kernel error, will not occur in safe mode. Well, Kernel Security Check Failure Error is related to the Irql_not_less_or_equal Windows 10 error. Both errors occur due to kernel issues. So, you can read my article on IRQL error, to find out ways to boot Windows into safe mode.
There are multiple ways to boot Windows into Safe Mode. If you’re using Windows 7/8, then by pressing F8 just before windows get the load. You can enter into Advanced Boot Options. And, from there, you can choose the Safe Mode option. (Legacy BIOS)
But, if you’re using Windows 10 OS, then, the process to enter into safe mode is different. If you can’t able to open Windows. Then from a recovery drive, you can access Safe mode.
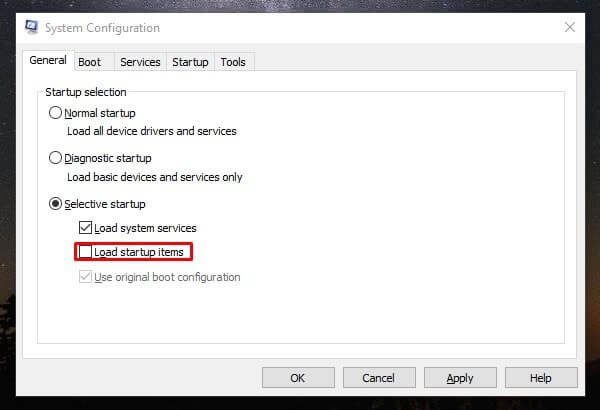
1. If the error is coming after a few minutes of startup. Then, press the Windows + R key simultaneously, type MSConfig, and press enter. In System Configuration Window, Click on the boot tab. Now, mark the Safe mode option and select the minimal radio button.
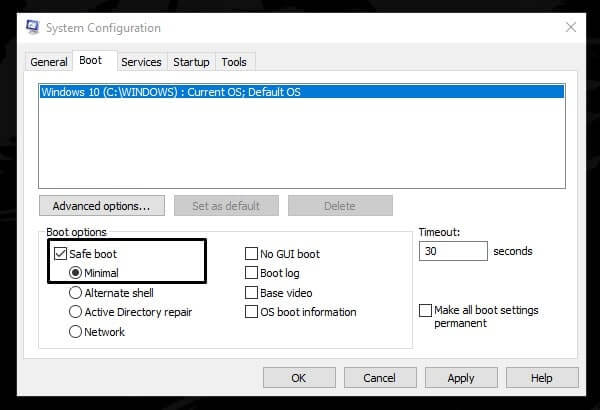
2. After that, click on OK. Then, A popup might appear, click on restart. That’s it. now the system will boot into safe mode. In safe mode, the error will not occur.
Note: To exit from safe mode. You need to follow the same process. And, you need to unmark the safe mode option.
Uninstall Recently Installed Software
Kernel security check failure can occur due to overclocking software. If you’re using software like that to get maximize output from your system hardware. Then, you’re not only damaging hardware but also creating blue screen errors.
Also, if you have installed any third-party antivirus program. Then first uninstall it. Or, if you have made any kinds of changes in the system. Then, undo those changes.
To Uninstall a Windows Program. – Press Windows + R key, type appwiz.cpl, and press enter. Here you can uninstall any program by right-clicking on it. (Or, simply open the control panel and go to the “uninstall a program” option.)
Uninstall Windows Update
If you think that the error is occurring after installing a Windows update.
1. Then, boot Windows into safe mode, and after that go to Control Panel\Programs\Programs and Features.
2. From the left pane, click on “view installed updates”
3. Now, check the “installed on” section to find out the most recent Windows update. If the “update date” is today or yesterday, then you can right-click on it to uninstall.
Check Windows Update. (Install Pending Update)
Well, not only the new Windows update can create driver incompatibility issues, but an outdated Windows version also can. It could possible that you’re using an older version of Windows. Which isn’t compatible with the hardware that you’re using. Or, maybe there was a Windows Security Update available, that wasn’t installed properly.
1. To check for Windows Update, Press Windows + I key to open settings App in Windows 10.
2. Click on “Update & Security”. Here you can check for Windows Update.
Update or Uninstall Driver Software
Kernel Security Check Failure Error in Windows 10 is a user made. By that I mean, when the user does install incompatible driver software. Then kernel failed to verify driver files, and a BSOD error occurs. If you have manually installed any driver software, then you can eliminate errors by uninstalling drivers. Or, if there if driver software got outdated, then you can try to update it.
1. You can update driver software using the device manager.
2. To open the device manager in Windows 10, press the Windows + X key. And, from the WinX Menu, click on “Device Manager”.
3. In Device Manager, if any device is showing the yellow mark. This means the driver software isn’t updated on that device. You can update by right click on it. Also, if you know which driver you have installed recently, then you can uninstall the same by right-clicking on it.
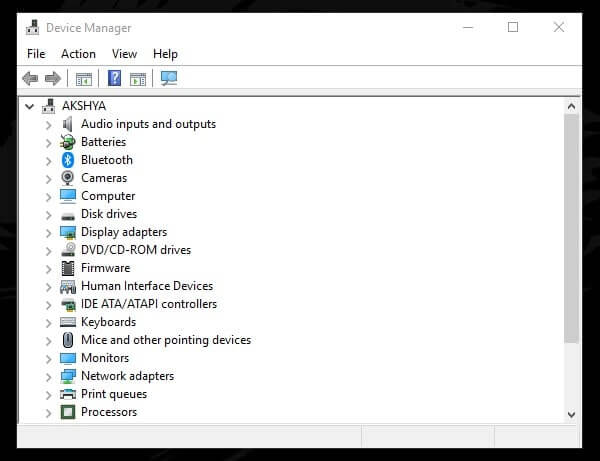
(Though, there isn’t any specific driver to update. So, you need to check manually each device for the update.)
Also, if you’re not able to find out culprit device from the device manager. Then, don’t use third-party driver updater software.
Use Driver Verifier
Driver Verifier is an inbuilt tool by Microsoft. It does monitor kernel mode and graphics drivers. And, detect illegal function and call, that are corrupting the system. This tool also let you to find out unsigned drivers installed by you. This tool has multiple settings, so you have to explore it yourself.
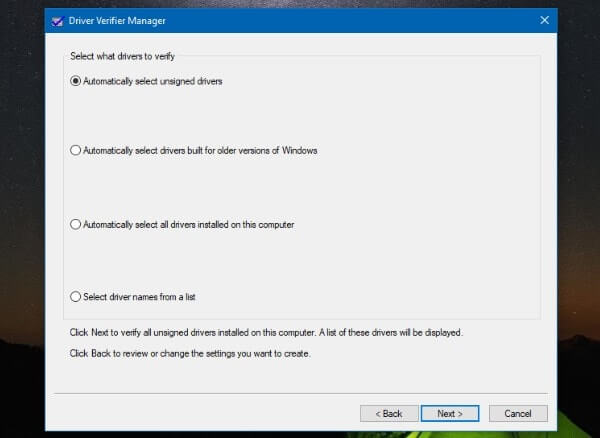
- To open “driver verifier manager”, click on the start button. Search for “verifier” and press enter.

- UAC window will appear to ask for permission. Click on yes and the driver verifier manager window will get open. (Now, Either you can check all drivers for the “kernel_security_check_failure” error. Or, can target a specific driver using custom options.)
- Select “Create Standard Settings” and click on next.
- Choose the “Automatically Select All Driver Installed on the Computer” option.
- Click on “Finish”.
That’s it. Now Computer will restart to test all drivers. You can check more information about the driver verifier from Microsoft documentation.
Perform an SFC Scan
System File Scanner is known as SFC. It does scan all protected system files. And, does replace corrupted system files with a cached copy of Windows files. So, if the Windows 10 kernel_security_check_failure error, is coming due to missing or corrupted system files. Then, it can be easily get fixed after performing the SFC Scan.
1. Press Windows + X key, and then click on “Windows PowerShell(Admin)”. (You can also use Command Prompt (Admin).)
2. Type the following command and press Enter.
sfc /scannow
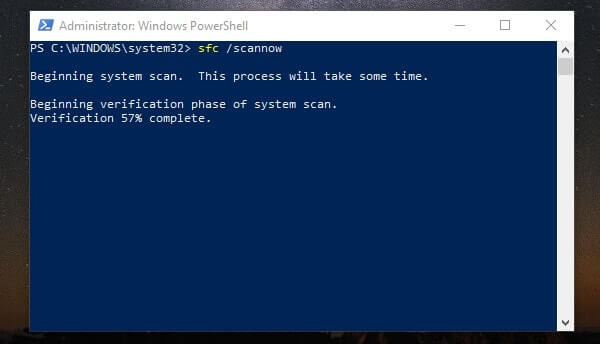
3. The process will take time to get Complete. Do not close the window until the process is running.
Run DISM Scan
Deployment Image Servicing and Management is known as DISM. And, DISM can fix things that SFC Scan can’t. When Windows Services and updates get failed to install and system files get corrupted. Then, Both these scan comes in handy. If SFC Scan wasn’t able to fix the kernel error. Then, the DISM tool maybe can. So, give it to try.
1. Open Command Prompt (Admin) or Windows PowerShell (Admin).
2. After that, give the following command to run the DISM tool. And, press enter.
DISM /Online /Cleanup-Image /RestoreHealth
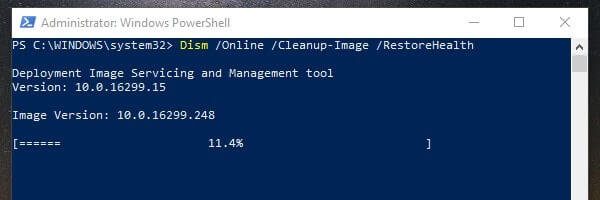
That’s it. wait for the process to get complete.
Use the Memory Diagnostic Tool
Windows Memory Diagnostic Tool is a free RAM testing tool. It’s a basic test, in which the of your Computer will test RAM Stick. So, If the problem is from the hardware part, then, it might get resolved.
1. Click on the start button and search for “Windows Memory Diagnostic”. After that press Enter to open WMD.
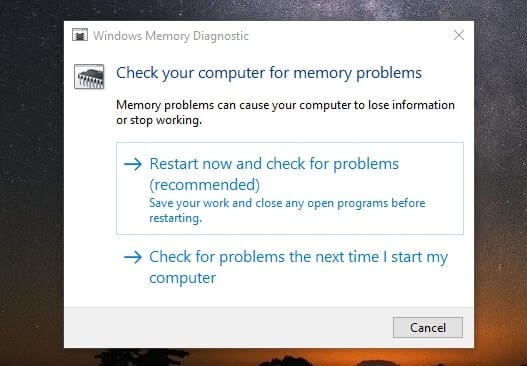
2. A Window will appear now, click on “Restart now and check for problems”.
That’s it. Windows will get restarted. And, the test will be started automatically. This tool contains many extended tests to perform. But none of those tests required for a standard memory test.
Perform a Clean Boot
If you think this error is occurring when you launch a specific software. And, you have already uninstalled it. Then, I suggest you perform a clean boot. The clean boot does start Windows with a minimal set of drivers and programs. It is also a well-known troubleshooting technique. This helps you to find out which normal process is causing the Kernel Security Check Failure Blue Screen error.
1. First, to open the system configuration Window, Press Windows + R key type “MSConfig” and press enter.
2. Select the “Selective Startup” radio button. Unmark the “Load Startup Items” checkbox.
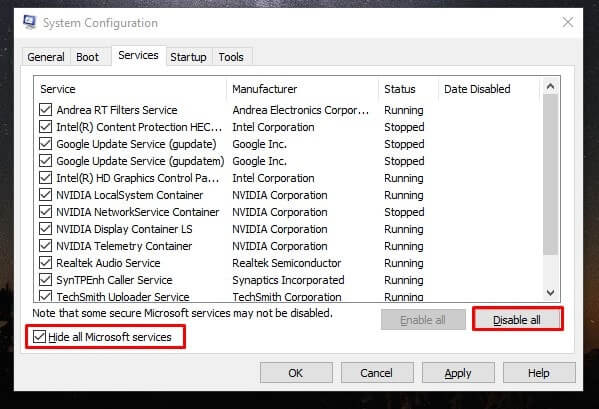
3. Click on Services Tab, and click on “Hide all Microsoft Services”. After that click on “Disable All”.
4. Now, go to the startup tab, and click on “Open Task Manager”.
5. Here, you need to disable all enabled startup items. By doing Right Click on each.
6. After that, go to the system configuration window. Click on Apply then OK. That’s it. restart system now, and hopefully the error will get resolved.
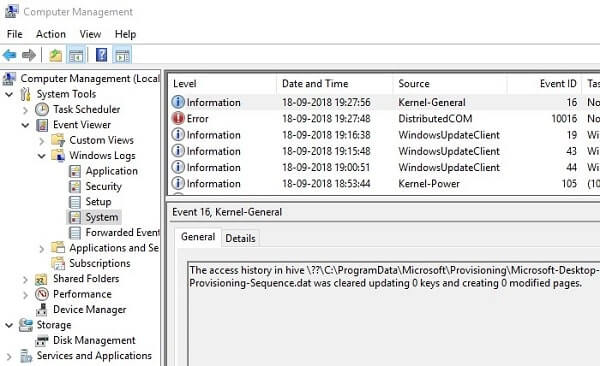
Check Error log using event viewer
Using the event viewer, you can find out, which device and driver are triggering this error. And, after pinpointing the cause, you can fix kernel security check failure error.
1. Click on the start button, and search for “Administrative Tools”. And, press Enter to open it.
2. Open Computer Management.
3. Expand “Event Viewer” and after that expand “Windows Logs”.
4. Click on System. (Here you can see what is causing the error.)
If you’re unable to understand the error caused by the event viewer. Feel free to comment.
Summing – up
So, these are the solutions, which you can try to fix the Kernel Security Check Failure error in Windows 10. First, you need to figure out the issue is with hardware or software. If you haven’t upgraded any hardware then you can try these software-related solutions. And, if nothing works. Then, I suggest you restore Windows if you have already created a backup point. If you haven’t created a backup then you can reset Windows. Only, if you can access Windows. If not, then create a bootable media and reinstall Windows. Don’t forget to create a backup of important data using safe mode.
Are you getting puzzled by Kernel Security Check Failure Blue Screen in Windows 11 or 10? Cause of this error is mostly virus infection, memory, or obsolete driver issues. Your system unexpectedly shows BSOD with certain suggestions when the problem appears.
You may see the solutions for Blue screen issues here – Whea Uncorrectable Error and Memory Management Error. Kernel Security Check Failure in Windows 11 or 10 may come in 4 scenarios –
1. After waking up PC from sleep – Some users report that after waking their PC from sleep, they face Kernel Security Check Failure with a “blue screen of death”.
2. After upgrading the RAM – The error may also appear when users upgrade a new RAM and start the computer after installing.
3. While playing games – If you are a gamer then you might have already faced interruption while playing your favorite games. Users are getting BSOD that apprises Kernel Security Check Failure in Windows 11 during playing games such as Fortnite.
4. While using specific apps – It is reported that some specific apps and programs trigger Kernel Security Check Failure in Windows 11 more frequently than others.
Stop code Kernel Security Check Failure fix
Here is how to fix Kernel Security Check Failure in Windows 11 or 10 –
There are two likely problems that you could face when this error. Either you will be unable to login to the OS while this error will show up every time you power it up or you will face Kernel Security Check failure BSOD time to time. We will cover solutions for both situations one by one. You can check the root cause of this error using BlueScreenView or WhoCrashed.
When the BSOD prevents you from logging in to your system:
If Kernel Security Check Failure won’t boot occurs then follow the solutions –
Way-1: Enable legacy advanced boot menu
Turn on your Windows 11/10 in Boot mode. If you don’t know the procedure, check out our article How to Boot Windows 10 From USB Flash Drive.
- When the Windows Setup box appears, click on Next.
- After that, click on Repair your computer from the following screen.
- Now a page will ask you to Choose an option. From there, select Troubleshoot and thereafter select Advanced options.
- Once the new options appear, click Command Prompt.
- Write down C: and hit Enter on your keyboard.
- This time type in the below-given command and press Enter.
BCDEDIT /SET {DEFAULT} BOOTMENUPOLICY LEGACY
- It will “Enable legacy advanced boot menu”.
- When the command is successfully executed, type EXIT in order to close the Command Prompt.
- In the end, go back to Choose an option screen and click on Continue.
- Finally, Start your PC normally and check if the issue is resolved.
Way-2: Use System File Checker and DISM
- If your Windows 11 or 10 doesn’t start successfully, press Windows and S.
- Type Advanced Startup and hit the Enter key.
- Click on – Restart now.
- When the new window shows up, select Troubleshoot.
- Thereafter, select Advanced Options and then click Startup Settings.
- Now click on Restart located in the bottom right corner of the screen. Windows should boot with minimum system requirements info.
- After restarting, click on Search and type cmd.
- Select – Run as administrator.
- Now type in or copy/paste the command
sfc /scannowand press Enter.
- It will immediately start detecting the corrupted files on your system. When everything finishes, type in Exit and hit Enter to close the command prompt.
- Then check if BSOD Kernel Security Check Failure error is fixed.
- Suppose this problem is still annoying then you need to run the DISM tool. For this, Start the Administrator: Command Prompt again and run the following commands by turn:
dism /online /cleanup-image /checkhealth
dism /online /cleanup-image /scanhealth
dism /online /cleanup-image /restorehealth- In the end, reboot your PC.
You may like to read SFC /Scannow, DISM.Exe, CHKDSK Windows 10.
Way-3: Run Windows Memory Diagnostic
When Kernel Security Check failure RAM then:
- Click on Start and write MdSched.exe.
- Right-click on Windows Memory Diagnostic and select “Run as administrator“.
- A pop-up will appear; click the option Restart now and check for problems.
- After rebooting, the system will check the “memory of your RAM” and show up the possible reason for getting BSOD.
See Windows 10 – How to Detect RAM Issues with Windows Memory Diagnostic Tool.
Way-4: Check the memory slot
Several times “memory slot” may trigger Windows Kernel Security Check Failure if it’s not positioned in the right way. Therefore, it’s important to place the memory slot into the socket correctly.
Experts suggest that it is always safe to replace or change the memory slot.
Once you are done, reboot the computer and check if the Blue screen bug check error still persists to occur.
Way-5: Check your hard drive
If above workaround didn’t work, it may be possible that the ‘hard drive’ is not functioning properly. To check the functionality of your hard drive, make sure that it is plugged in correctly into your device. If you use an extra hard drive then try to change it and see if starts accurately. Again you are finding the blue screen then:
- Press Windows and R keys.
- Type cmd.exe.
- Then press Ctrl + Shift + Enter.
- When User account control popup appears, click on Yes.
- Type
CHKDSK C: /F /R /X - Press Enter and wait until the process is completed.
- Restart your computer and see if the BSOD no longer occurs.
When Kernel Security Check Failure occurs occasionally:
Now, if you are able to run your system normally and the problem occurs occasionally then you should make an attempt at the below-given workarounds.
Way-6: Update your Windows
To resolve Kernel Security Check Failure in Windows 11 or 10 you should use the latest version on your PC. Microsoft frequently and regularly rolls out updates in order to improve users’ experience. These include the system’s stability and fix for various issues. To do so, head to the following steps-
- Press Win+I hotkeys to access Windows Settings.
- Then, click on Update & Security category once highlighted. In the case of Windows 11, click on Windows Update.
- Go to the right side and click on Check for updates.
- It will check if an update is available and downloaded and installed all by itself.
Way-7: Perform a full scan
“Virus infection” may also be the reason for Kernel Security Check Failure issue. In that situation, you need to scan your PC with Windows built-in antivirus Windows Defender. Here’s how to do it –
- Click on Search.
- When the result displays, select Windows Security.
- Click on Virus & threat protection.
- Then click on Scan options.
- When a new page appears, select the radio button beside Full scan.
- Thereafter, click on Scan now in order to launch a full system malware scan.
Way-8: Run System Restore
If this error is generated just after installing any software, then you may try the “system restore” to fix it. This feature helps you to remove the apps and programs that you added recently. It also allows you to restore the previous configuration without losing files, except for a few.
- Press Winkey.
- Type rstrui.
- Hit the Enter key.
- On the System Restore wizard, click on Next.
- Check the box for Show more restore points.
- Select a date and time when the bug check was not started.
- Again click on – Next.
- Review your selections and click on Finish.
- You will see a prompt asking “Once started, System Restore can not be interrupted. Do you want to continue?”. Click on Yes.
- This will take a long so sit back and take a coffee until the process is completed.
Furthermore, you can use “Reset this PC” options that allow you to clean install the operating system.
Way-9: Remove Overclock
Overclock may bring this error to your PC. Therefore, revert your computer to its default settings and uninstall “overclocking software” if you have any. Thereafter Reboot your device to see if the error persists.
The above workarounds should solve your problem but if the hardware or Ram of your device is faulty then you have to replace it with a new one.
Methods:
Way-1: Enable legacy advanced boot menu
Way-2: Use System File Checker
Way-3: Run Windows Memory Diagnostic
Way-4: Check the memory slot
Way-5: Check your hard drive
Way-6: Update your Windows
Way-7: Perform a full scan
Way-8: Run System Restore
Way-9: Remove Overclock
That’s all!!.