
Я работаю в операционной системе «Windows 10 Pro» (64-разрядной) версии 21H1. В качестве языка интерфейса у меня выбран русский язык. Мои рассуждения ниже относятся именно к этой операционной системе, при других вариантах нижеизложенное может быть неверным.
Офисные работники любят пользовать липкую бумагу для заметок (по-английски «sticky notes»). На компьютерах существуют программы, реализующие эту функциональность на экране компьютера. То есть с их помощью можно «лепить записки» на рабочий стол в компьютере. Я решил попробовать поработать с такой программой, включенной в состав операционной системы «Windows».
Чего НЕ следует делать
Черт меня дернул начать поиск в «Яндексе» по ключу «windows 10 sticky notes». В инструкциях, которые я получил из результатов поиска в «Яндексе», рекомендуется сначала найти ярлык программы на своем компьютере с помощью поиска по ключу «sticky notes». В принципе, это правильно, но не подходит для тех, у кого в «Windows 10» в качестве языка интерфейса выбран русский язык!
Дело в том, что в интерфейсе на русском языке эта программа теперь называется «Записки». Поэтому следует в поиске по компьютеру искать именно по ключу «записки», а не «sticky notes»!
По ключу «sticky notes» у меня компьютер тоже находит ярлык программы, но этот ярлык программы у меня остался от операционной системы «Windows 7» (я бесплатно обновился с «Windows 7» на «Windows 10» 17 сентября 2020 года). Этот старый ярлык указывает на следующий исполняемый файл:
%windir%\system32\StikyNot.exe
C:\Windows\System32\StikyNot.exe
Но такого файла в вышеуказанном местоположении уже нет, поэтому найденный ярлык программы «Sticky Notes» не запускается.
Как правильно
Ярлык программы следует искать на своем компьютере по ключу «записки», так как ярлык программы в интерфейсе операционной системы на русском языке озаглавлен как «Записки».
https://ru.wikipedia.org/wiki/Записки_(Windows)
С версии 1607 операционной системы «Windows 10» (которая вышла в 2016 году) старая версия программы «Записки» (StikyNot.exe) была заменена на новую. Исполняемый файл новой версии этой программы теперь называется по-другому и хранится не в местоположении %windir%\system32\.
Компания «Microsoft» теперь сделала свои программы «пакетными»:
https://docs.microsoft.com/en-us/windows/msix/desktop/desktop-to-uwp-behind-the-scenes
Такие программы устанавливаются в следующее местоположение (папка скрыта, просмотреть ее содержимое можно только с административными правами):
C:\Program Files\WindowsApps\имя_пакета\
У меня на компьютере нужный пакет хранится в следующем местоположении:
C:\Program Files\WindowsApps\Microsoft.MicrosoftStickyNotes_4.5.5.0_x64__8wekyb3d8bbwe\
Исполняемый файл называется «Microsoft.Notes.exe».
Как пользоваться
Справка (инструкция), на английском языке:
https://support.microsoft.com/en-us/office/sticky-notes-help-6b6d312a-9683-484d-b857-58dfb7863b4c
На русском языке (перевод ужасный, возможно, автоматический):
https://support.microsoft.com/ru-ru/office/справка-по-клейким-заметкам-6b6d312a-9683-484d-b857-58dfb7863b4c
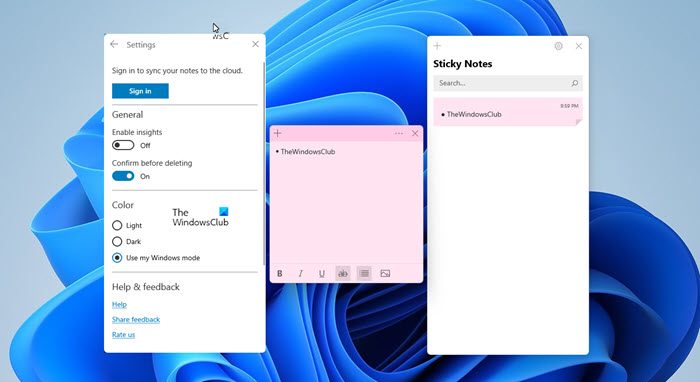
При наведении указателя мыши на ярлык программы в панели задач, если программа запущена, показываются созданные ранее записки (в данном случае — одна, но если записок несколько, то будет отображено несколько):
Вот как выглядят записки, «приклеенные» на мой рабочий стол:
Эти записки могут быть не только желтого цвета, но и других цветов. Также они не обязательно должны торчать на рабочем столе. В любой момент их можно все разом свернуть или все разом развернуть. Программу можно вообще закрыть, записки не пропадут, они хранятся в базе данных.
Classic Sticky Notes
для Windows
Начиная с обновления Windows 10 Anniversary Update, компания Microsoft заменила классическое приложение Sticky Notes для рабочего стола на универсальное приложение. Для многих пользователей классическое приложение для рабочего стола является более предпочтительным вариантом, поскольку оно работает шустрее, быстрее запускается и не имеет интеграции с Cortana. Поэтому и было разработано приложение Classic Sticky Notes для Windows 11 и Windows 10. Этот пакет полностью поддерживает Windows 11, а также Windows 10 32-bit и Windows 10 64-bit.
Многие предпочитают старое доброе классическое приложение Sticky Notes, поскольку оно потребляет значительно меньше системных ресурсов. Разница в производительности особенно заметна на менее мощном оборудовании, таком как процессоры Atom и Celeron. Сами заметки также немного меньше, поэтому пользователям больше нравится их компактный вид. Присутствует возможность закреплять заметки у любом месте рабочего стола, менять цвет стикеров, имеется поддержка эмодзи.
ТОП-сегодня раздела «Календари, органайзеры, напоминалки»
Школьный звонок 1.4
Бесплатная утилита с помощью которой можно настроить звуковые оповещения,…
Напоминалка 4.0
Напоминалка — простая портативная (не требующая инсталляции в систему) программа, которая…
Будильник 2.6.3.2
Будильник — бесплатные часы со большим количеством разнообразных и полезных функций….
Rainlendar Lite 2.21.1
Rainlendar Lite — бесплатный кроссплатформенный календарь с функцией органайзера. С помощью…
Отзывы о программе Classic Sticky Notes
Лев про Classic Sticky Notes 2.0 [20-04-2022]
Все кул, хорошее приложение
9 | 5 | Ответить
imperialregent про Classic Sticky Notes 2.0 [12-01-2022]
Ссылочка на родной микрософтовский сайт не работает
8 | 7 | Ответить
В Windows 11 и 10 присутствует встроенное полезное приложение — «Записки», позволяющее создавать заметки на рабочем столе Windows 10, хранить их, синхронизировать с другими устройствами, не только Windows, но и Android, iPhone или Mac.
В этом обзоре подробно о функциях приложения «Записки», работе с заметками на рабочем столе и дополнительных нюансах, которые могут оказаться полезными в контексте рассматриваемой темы. Обновление: появилась новая версия приложения Sticky Notes (Записки), являющаяся частью OneNote.
Как было отмечено выше, приложение «Записки» является встроенным в Windows 11/10, но, если вы не можете найти его в меню Пуск или через поиск на панели задач, возможно оно было удалено. Чтобы скачать заметки для рабочего стола Windows 10 от Microsoft, используйте официальный магазин Microsoft Store, в нём приложение называется Microsoft Sticky Notes.
Использование заметок на рабочем столе с помощью приложения «Записки»
Чтобы начать пользоваться встроенными заметками Windows 11/10, какие-либо особенные навыки не потребуются, достаточно будет сделать одно из:
- Запустить приложение «Записки» и создать новую заметку на рабочем столе: можно использовать простое форматирование текста, добавление изображений.
- Нажать правой кнопкой мыши по значку приложения «Записки» в меню «Пуск» или, к примеру, на панели задач, если вы решите закрепить значок там (через раздел «Дополнительно» в контекстном меню), и выбрать один из пунктов «Создать заметку», «Список заметок» (показывает одно окно, в котором собраны все ваши заметки), «Показать все заметки» (все заметки отображаются по отдельности на рабочем столе).
Теперь о некоторых базовых функциях и особенностях работы заметок:
- При закрытии заметки она не удаляется, а просто убирается с рабочего стола и остаётся доступной в списке заметок.
- Удаление заметки можно выполнить в её меню. Там же можно открыть список всех заметок или изменить цвет заметки со стандартного жёлтого на один из дополнительных 6 цветов.
- При редактировании заметок работают стандартные сочетания клавиш: вставка и копирование (в том числе для изображений), изменение стиля текста (например, Ctrl+B для полужирного), отмена последнего действия (Ctrl+Z). А для удаления активной заметки можно использовать Ctrl+D.
- При уменьшении размера заметки на рабочем столе (с помощью мыши), второстепенные элементы, такие как фото, скрываются, как на скриншоте ниже.
- Если у вас много заметок, то открыв список заметок (например, через контекстное меню ярлыка приложения «Записки»), вы сможете легко выполнить поиск по ним.
Как итог, в случаях, когда нужно что-то быстро записать и не потерять: номер телефона или внезапно пришедшую мысль или другую информацию, встроенные записи Windows 10 — могут быть отличным решением для этой цели.
Синхронизация и работа с записками Windows на других устройствах
Если вам требуется иметь доступ к заметкам на рабочем столе Windows 11/10 не на одном компьютере или ноутбуке, но и на других устройствах, в том числе Android и iPhone, прежде всего убедитесь, что в настройках приложения «Записки» используется ваша учётная запись Майкрософт — это необходимо для синхронизации.
Доступ к запискам с других устройств возможен следующими методами:
То есть почти все продукты Microsoft, имеющие отношение к производительности и организации дел имеют и доступ к заметкам на рабочем столе, из исключений — разве что приложение Microsoft To Do, где такой возможности мне найти не удалось.
Возможно, если вы уже регулярно используете приложение «Записки» в Windows, вы сможете дополнить список его возможностей или приёмов использования в комментариях — будет полезно и мне и другим читателям.
If you are a regular Windows 11/10 Sticky Notes user, you might find these tips & tricks to use, save, format, backup, and restore handy. It also tells you how to turn the Sticky Note delete confirmation box back on, in case you have turned it off earlier.
Sticky Notes has become a Trusted Windows Store app, so some of these tips may not work for this version. Before you begin, you may want to read our post on how to import Sticky Notes from Windows 7 to Windows 10.
- To open a new Sticky Note, type sticky in start search and hit Enter.
- To change its size, drag it from its bottom right corner.
- To change its color, you have to click the 3 dots appearing at the top.
- To create a new sticky note, click on the ‘+‘ sign in its top-left corner.
- To close a sticky note, right-click on its taskbar icon and select ‘Close window’. If you reopen Sticky Notes now, you will see the earlier Notes. The Notes will appear exactly where you left them, even if you restart your Windows computer.
- To delete a sticky note click on the ‘x‘ mark in its top-right corner. In Windows 11/10 now, you have to click you have to click on the ‘trash can’ icon.
- You can use Windows Sticky Notes to create Cortana Reminders.
Once it’s running and you start making notes, you can use the following keyboard shortcut keys to format its text:
Select the text where required, and then press the desired keys:
- Bold: Ctrl+B
- Italics: Ctrl+I
- Underline: Ctrl+U
- Strikethrough: Ctrl+T
- Bullet list: Ctrl+Shift+L
- Increase size of text: Ctrl+Shift+>
- Decrease size of text: Ctrl+Shift+<
- See the options when you press Ctrl+Shift+L each time (1 to 5 times).eg. To get Roman numerals: Press 5 times, Ctrl+Shift+L.
- Capitalize (or otherwise) highlighted letters: Ctrl+Shift+A
- Right Align: Ctrl+R
- Center align: Ctrl+E
- Left Align: Ctrl+L
- Single line space: Ctrl+1
- Double line space: Ctrl+2
- 1.5 line space: Ctrl+5
Ctrl+A, Ctrl+C, Ctrl+V, etc. of course, work as usual. Know any more? Do share below in the comments!
Read:
- How to add images to Sticky Notes on Windows 11
- How to attach Sticky Note to an Outlook email.
Backup, Save, Restore Sticky Notes
To backup Sticky Notes in Windows, do the following:
Copy all the files and folders from the following location to another place:
%UserProfile%\AppData\Local\Packages\Microsoft.MicrosoftStickyNotes_8wekyb3d8bbwe
Specifically speaking, your Notes are stored in a file named plum.sqlite, which is an SQLite file, located in the following folder:
%UserProfile%\AppData\Local\Packages\Microsoft.MicrosoftStickyNotes_8wekyb3d8bbwe\LocalState
You may copy this plum.sqlite elsewhere as a backup and use it as well to restore on the same or different Windows computer.
Those using earlier versions, can backup the Windows Sticky Notes by backing up this file to another location:
C:\Users\Username\AppData\Roaming\Microsoft\Sticky Notes\StickyNotes.snt
You may have to show hidden/system files via the Folder Options.
To restore it, delete the sticky notes from your desktop and copy-paste the backed up one into this folder:
C:\Users\Username\AppData\Roaming\Microsoft\Sticky Notes folder
How To Retrieve Back The Lost Notes, After Closing Windows Vista’s Sidebar Notes Gadget may interest some Windows Vista users.
Sticky Notes will not start up on boot
If your Sticky Note is open on your desktop during Windows shutdown, it will re-open automatically on startup. If for some strange reason you find that this does not happen, then you may create a desktop shortcut of Sticky Notes and place it in your Windows Startup folder. Use %windir%\system32\StikyNot.exe for the location field.
Read: Sticky Notes crashes frequently.
How to print Sticky Notes in Windows?
There is no built-in way to print a Sticky Note, but you can follow this workaround. You can copy-paste the contents of the Notepad or Word and then print it. You can also increase the size of the Note by dragging its edges, write all you want to, and then use the Snipping Tool or any screenshot tool to capture the image of the Note, save it as PNG or JPG and then print the image.
Turn the Sticky Note delete warning back on
If you have at any point, on selecting delete, opted to NOT have the confirmation box shows up again, by selecting Don’t Display this message again, and would now like to get this delete confirmation box, here is one way to do it. The easier way it via its settings, of course!

Open Registry Editor and navigate to the following key :

HKEY_CURRENT_USER\Software\Microsoft\Windows\CurrentVersion\Applets\StickyNotes
Now delete the value called PROMPT_ON_DELETE or set its value to 1.
If you do not want to touch the Windows registry, you could simply download our freeware FixWin to fix the issue quickly.
Read: How to use Sticky Notes to send Email.
Change Sticky Notes Font
Windows uses the Segoe Print font. Changing the default is not supported in Sticky Notes. What you can do is type your text in the desired font in a text editor like Word, and copy-paste it here. The Sticky Note should display the text in that font. Let us know if this works for you.
Read: Where are Sticky Notes saved in Windows?
Sticky Notes lets you sync notes
Sticky Notes now lets you Sync Notes, Export Notes to Outlook and more!
Read next: Windows Sticky Notes location.
See this post if you see Check your account, Sticky Notes is currently not available to you message.
You can also password protect Notes in Windows using some of these free Sticky Notes software.
When it comes to Windows programs, Sticky Notes belongs to the oldies but goldies category. This app is a simple tool for creating quick notes that stay on your desktop. In recent versions of Windows, it can also be synchronized across devices and computers so that you can access your notes from anywhere. Before you can use it, you need to know how to open it. Here’s how you can run the Sticky Notes app on Windows 10 and Windows 11:
1. How to open Sticky Notes using Search
Search is one of the fastest ways to start the Sticky Notes app. If you’re using Windows 10, click or tap inside the search box on the taskbar, type sticky notes, and press Enter or click or tap on the Sticky Notes search result. To make things even easier, the app should be at the top of your search results as soon as you finish typing the word sticky.
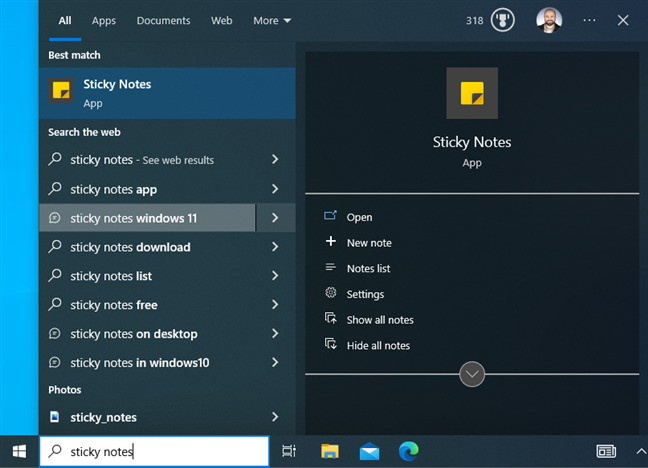
Search for Sticky Notes in Windows 10
Similarly, in Windows 11, click or tap the Search box or Start button on the taskbar, or press the Windows key, and start typing sticky notes. Then, press Enter when you see Sticky Notes as the best match, or click/tap this search result.

Search for Sticky Notes in Windows 11
To the right of the search results returned by Windows 10 and Windows 11, you notice some shortcuts to useful options in the Sticky Notes app, like New note, Notes list, and Settings. Feel free to use them to speed up your interaction with Sticky Notes.
TIP: If you want to know more about how Search works, I recommend these guides:
- 12 tips on how to search in Windows 10
- How to use Windows 11’s Search
2. How to run Sticky Notes from the Start Menu
Start Menu is the place for all the Windows apps you have installed. In Windows 10, click or tap the Windows icon, then scroll down the list of apps to those that start with the letter S. There, you’ll find the Sticky Notes shortcut. Click or tap on it to start the app.
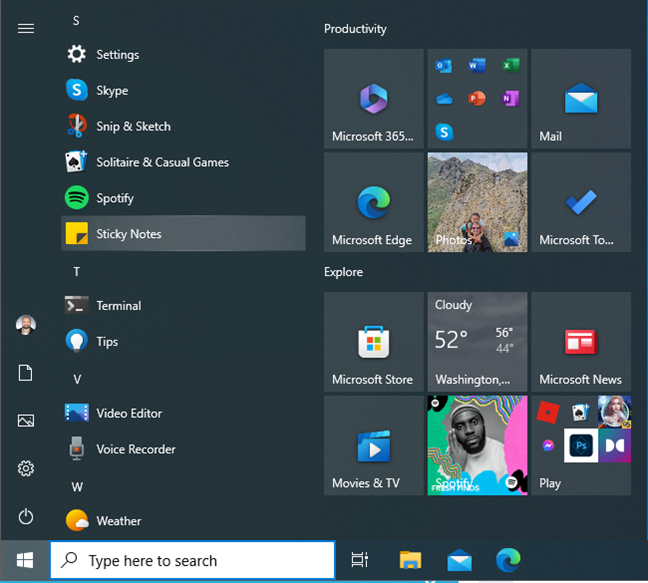
The Sticky Notes shortcut in the Windows 10 Start Menu
In Windows 11, the process takes a bit longer: click or tap the Windows icon to open the Start Menu and go to All apps, in the upper-right corner. Then, scroll the list of installed programs to those that start with the letter S, and click or tap Sticky Notes. The app opens immediately.
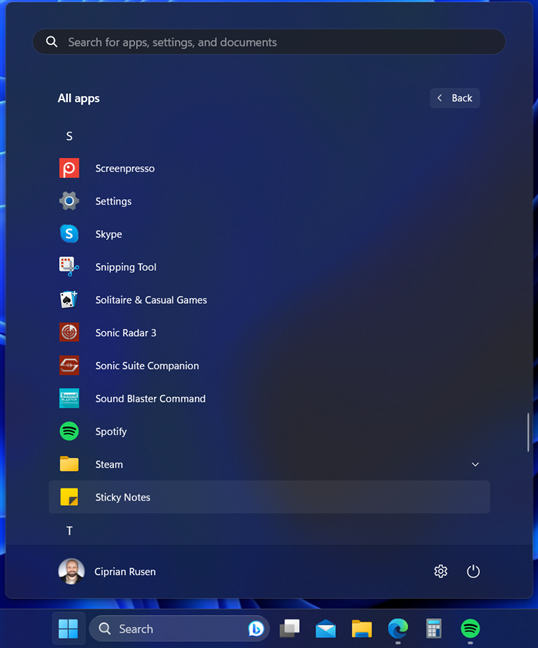
The Sticky Notes shortcut in the Windows 11 Start Menu
TIP: If you can’t find the Sticky Notes shortcut in the Start Menu, the app may not be installed on your computer. You can find it in the Microsoft Store, here: Microsoft Sticky Notes. In case you want to learn more, here are all the things you can do in the Microsoft Store for Windows.
3. Create a Sticky Notes shortcut on your desktop
You can quickly create a Sticky Notes shortcut and pin it to your desktop. If you use Windows 10, open the Start Menu and locate the Sticky Notes shortcut. Then, drag it to your desktop. Drop the shortcut on the desktop when the word Link is displayed next to it, as shown in the screenshot below.
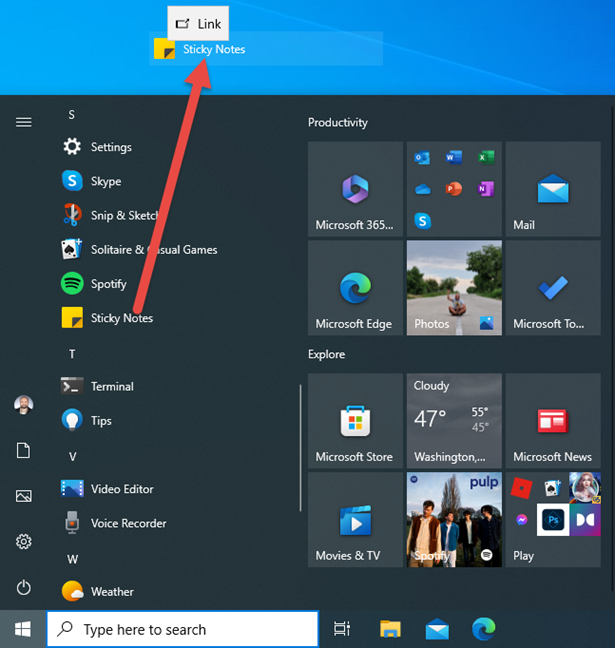
Drag the Sticky Notes shortcut to the desktop
The Sticky Notes shortcut is now on your desktop, and you can use it to run the app any time you want.
The Sticky Notes shortcut
The process is identical in Windows 11. However, getting to the Sticky Notes shortcut requires a bit more work: go to Start > All apps > Sticky Notes. Then drag and drop the shortcut to the desktop.
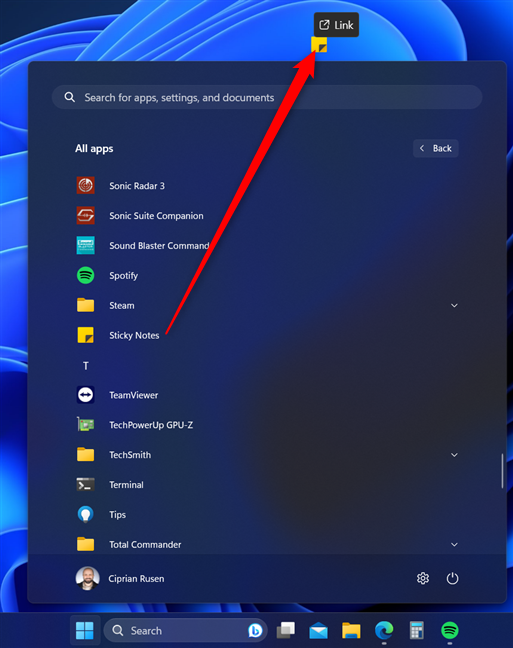
Drag the Sticky Notes shortcut to the desktop
TIP: If you have a busy schedule and rely on reminders, here’s how to make Sticky Notes stay open on startup, so that it runs every time you log into Windows 10 or Windows 11.
4. Pin the Sticky Notes shortcut to the taskbar or the Start Menu
If you right-click (or press and hold) the Sticky Notes from the Windows 10 Start Menu, you get the option to Pin to Start. Click or tap on it, and you get a Sticky Notes shortcut on the right side of the Start Menu. In the same contextual menu, you can also go to More and choose Pin to taskbar, and a Sticky Notes shortcut is immediately added to the taskbar for easy access.
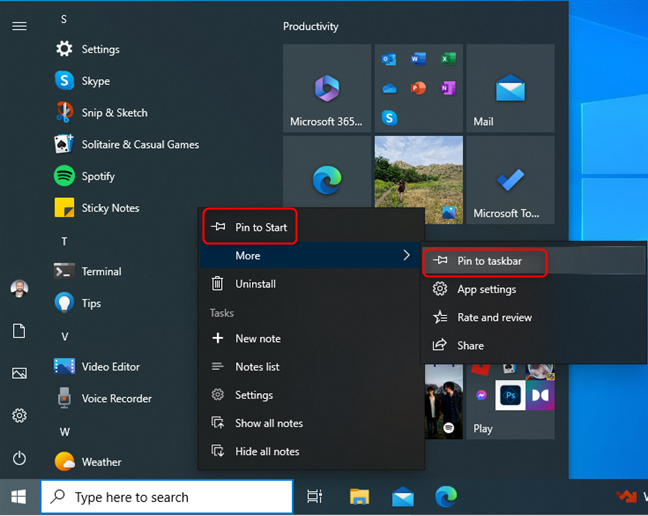
Pin the Sticky Notes shortcut to Start or to taskbar in Windows 10
The same applies to Windows 11: open the Start Menu, go to All apps, and right-click or press and hold the Sticky Notes shortcut. Next, choose between Pin to Start or More > Pin to taskbar in the subsequent contextual menu. The Sticky Notes shortcut is added to the location of your choice in Windows 11.
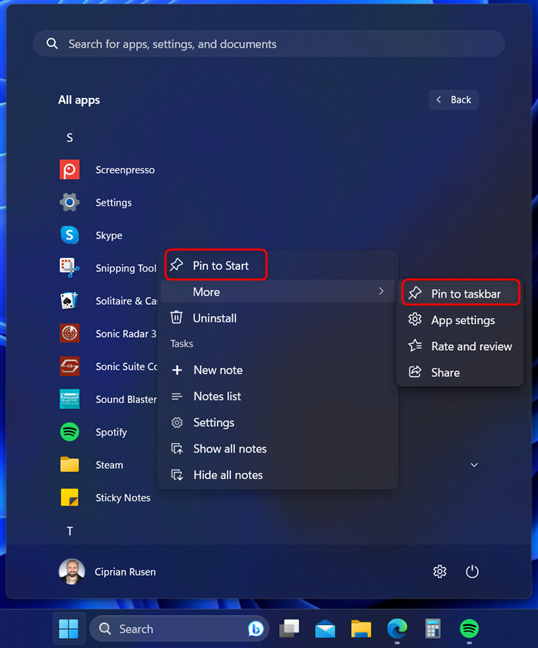
Pin the Sticky Notes shortcut to Start or to taskbar in Windows 11
TIP: If you’ve just discovered this app or want to learn more about it, here’s how to use Sticky Notes in Windows 10 and Windows 11.
5. Ask Cortana to open Sticky Notes for you
If you’re using Cortana on your Windows 10 or Windows 11 computer, say Cortana, and then ask her to open sticky notes.
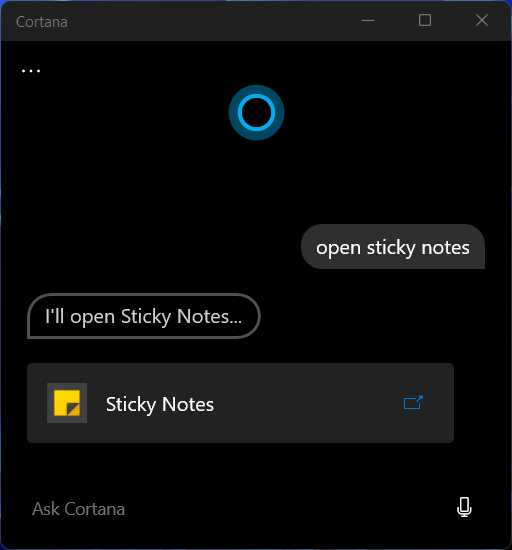
Ask Cortana to open Sticky Notes
You can also type this command, not just dictate it. Then, Cortana will start Sticky Notes for you.
IMPORTANT: The old Sticky Notes Run command no longer works
In older versions like Windows 7 and Windows 8.1, you can use a Run command to open Sticky Notes: press Windows + R on your keyboard, type stikynot.exe or stikynot, and click or tap OK. This command runs Sticky Notes, and you get the same result by using it in Command Prompt and PowerShell.
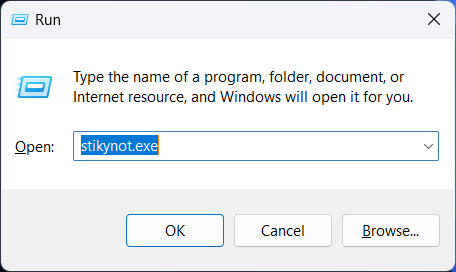
Open Sticky Notes from Run
However, this command no longer works in Windows 10 and Windows 11. This is because the Sticky Notes app has changed a lot in recent versions of Windows. It is now a modern app distributed through the Microsoft Store, not a classic desktop app. Therefore, you can’t access the Sticky Notes EXE file location anymore.
The new version can still be accessed from the Run window, CMD, or PowerShell using a new command. Copy and paste the command below to run Sticky Notes:
shell:appsFolder\Microsoft.MicrosoftStickyNotes_8wekyb3d8bbwe!App
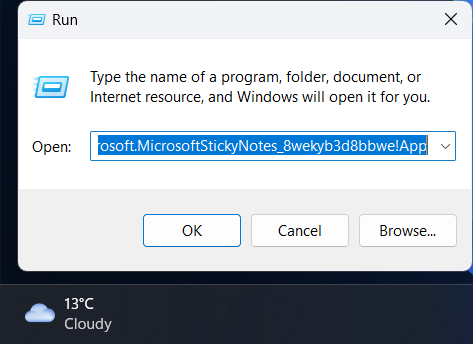
The new command for opening Sticky Notes
How do you prefer to open Sticky Notes?
These are all the methods we know for starting Sticky Notes on computers and devices with Windows 10 and Windows 11. Of course, some are faster than others. You should try them out and then choose your favorite. And once you do, don’t hesitate to return to this tutorial and share how you prefer to open Sticky Notes.