
Home » Simple Sticky Notes Download
Download new version of Simple Sticky Notes
Updated: Feb 23, 2025
Version: 6.7.5
Size: 2.75 MB
You can download a new version of Simple Sticky Notes for free
What’s new in Simple Sticky Notes Version 6.7.5
- Added «Calibri» to the default font list
- Fixed some missing translations across the app (settings, etc.)
- Fixed some UI issues on the settings screen
- Fixed minor bugs reported by users
- Improved tab key control in note windows
- Improved Windows 11 compatibility (24H2)
- Improved overall stability and performance
Minimum Requirements: Windows® 11 / 10 / 8.1 / 8 / 7
PC with a 1.5 GHz Intel or AMD processor and 2 GB of RAM
Create Sticky Notes
Easily create and edit your notes with an easy-to-use, simple and intuitive interface.
Set Reminders
Never forget a task again with the alarm feature of Simple Sticky Notes.
Note Explorer
View all your notes in one place, search to find the note you want, create notebooks, and access your deleted notes.
Print, Export and Share
Easily print, export in text and rtf formats, share on Twitter and WhatsApp the notes you create.
Customize Your Sticky Notes
Download themes, choose your desired color and opacity, personalize your sticky notes.
Dark Mode
Reduce eye strain and increase readability in low-light environments with Simple Sticky Notes’ Dark Mode.
Download Simple Sticky Notes today and start taking better notes!
License
Simple Sticky Notes is completely free for personal and commercial use. EULA
Help
Check out the quickstart and learn how to use Simple Sticky Notes.
Compatibility
Simple Sticky Notes runs on Windows® 11 / 10 / 8.1 / 8 / 7. Simple Sticky Notes is also compatible with Arm64 versions of Windows® 11 / 10.
For Windows® XP / Vista Download Simple Sticky Notes 5.8
Security & Validation
Simple Sticky Notes was analyzed by 76 security vendors on Feb 23, 2025. No security vendors and no sandboxes flagged setup file as malicious.
VirusTotal Report
Simple Sticky Notes installation and application files are digitally signed.
Filename: Setup_SimpleStickyNotes.exe
Checksum (Simple Sticky Notes Version 6.7.5)
MD5 hash: 02fa91bf5128a46731a9f7901da986e0
SHA-1 hash: e681343786e49fca94d1b7a6c44e86564fe51a87
Privacy
Learn about our privacy practices and find the policy you’re looking for. Privacy Policy
Important Notice
simplestickynotes.com is the official website of Simple Sticky Notes software. Please be aware that Simple Sticky Notes does not have any other official website or domain. Any other website claiming to represent Simple Sticky Notes is not authorized and may contain harmful software or false information. This site and its content are protected by law. For official updates, downloads, and information, always visit simplestickynotes.com
В Windows 11 и 10 присутствует встроенное полезное приложение — «Записки», позволяющее создавать заметки на рабочем столе Windows 10, хранить их, синхронизировать с другими устройствами, не только Windows, но и Android, iPhone или Mac.
В этом обзоре подробно о функциях приложения «Записки», работе с заметками на рабочем столе и дополнительных нюансах, которые могут оказаться полезными в контексте рассматриваемой темы. Обновление: появилась новая версия приложения Sticky Notes (Записки), являющаяся частью OneNote.
Как было отмечено выше, приложение «Записки» является встроенным в Windows 11/10, но, если вы не можете найти его в меню Пуск или через поиск на панели задач, возможно оно было удалено. Чтобы скачать заметки для рабочего стола Windows 10 от Microsoft, используйте официальный магазин Microsoft Store, в нём приложение называется Microsoft Sticky Notes.
Использование заметок на рабочем столе с помощью приложения «Записки»
Чтобы начать пользоваться встроенными заметками Windows 11/10, какие-либо особенные навыки не потребуются, достаточно будет сделать одно из:
- Запустить приложение «Записки» и создать новую заметку на рабочем столе: можно использовать простое форматирование текста, добавление изображений.
- Нажать правой кнопкой мыши по значку приложения «Записки» в меню «Пуск» или, к примеру, на панели задач, если вы решите закрепить значок там (через раздел «Дополнительно» в контекстном меню), и выбрать один из пунктов «Создать заметку», «Список заметок» (показывает одно окно, в котором собраны все ваши заметки), «Показать все заметки» (все заметки отображаются по отдельности на рабочем столе).
Теперь о некоторых базовых функциях и особенностях работы заметок:
- При закрытии заметки она не удаляется, а просто убирается с рабочего стола и остаётся доступной в списке заметок.
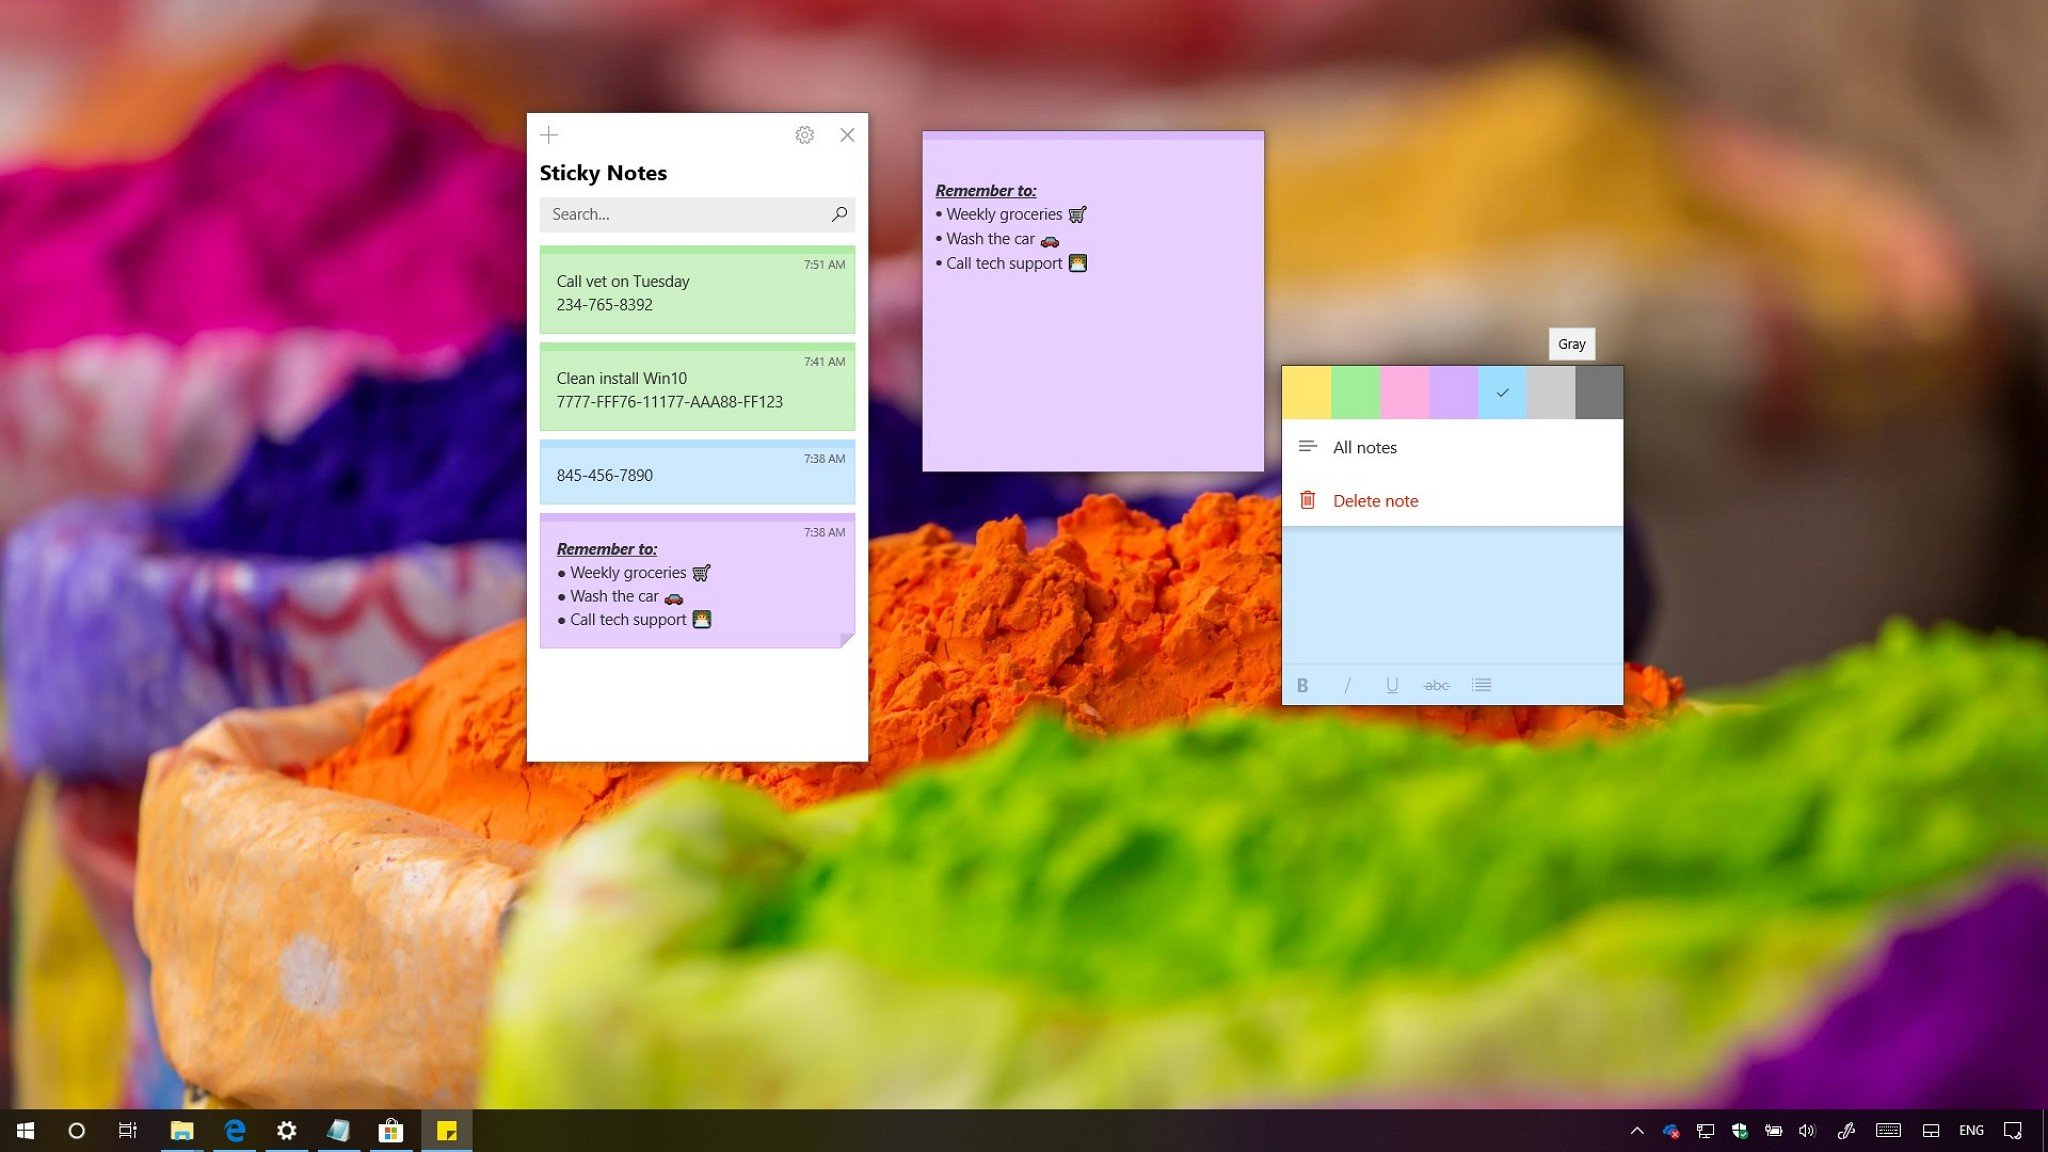
- Удаление заметки можно выполнить в её меню. Там же можно открыть список всех заметок или изменить цвет заметки со стандартного жёлтого на один из дополнительных 6 цветов.
- При редактировании заметок работают стандартные сочетания клавиш: вставка и копирование (в том числе для изображений), изменение стиля текста (например, Ctrl+B для полужирного), отмена последнего действия (Ctrl+Z). А для удаления активной заметки можно использовать Ctrl+D.
- При уменьшении размера заметки на рабочем столе (с помощью мыши), второстепенные элементы, такие как фото, скрываются, как на скриншоте ниже.
- Если у вас много заметок, то открыв список заметок (например, через контекстное меню ярлыка приложения «Записки»), вы сможете легко выполнить поиск по ним.
Как итог, в случаях, когда нужно что-то быстро записать и не потерять: номер телефона или внезапно пришедшую мысль или другую информацию, встроенные записи Windows 10 — могут быть отличным решением для этой цели.
Синхронизация и работа с записками Windows на других устройствах
Если вам требуется иметь доступ к заметкам на рабочем столе Windows 11/10 не на одном компьютере или ноутбуке, но и на других устройствах, в том числе Android и iPhone, прежде всего убедитесь, что в настройках приложения «Записки» используется ваша учётная запись Майкрософт — это необходимо для синхронизации.
Доступ к запискам с других устройств возможен следующими методами:
То есть почти все продукты Microsoft, имеющие отношение к производительности и организации дел имеют и доступ к заметкам на рабочем столе, из исключений — разве что приложение Microsoft To Do, где такой возможности мне найти не удалось.
Возможно, если вы уже регулярно используете приложение «Записки» в Windows, вы сможете дополнить список его возможностей или приёмов использования в комментариях — будет полезно и мне и другим читателям.
Classic Sticky Notes
для Windows
Начиная с обновления Windows 10 Anniversary Update, компания Microsoft заменила классическое приложение Sticky Notes для рабочего стола на универсальное приложение. Для многих пользователей классическое приложение для рабочего стола является более предпочтительным вариантом, поскольку оно работает шустрее, быстрее запускается и не имеет интеграции с Cortana. Поэтому и было разработано приложение Classic Sticky Notes для Windows 11 и Windows 10. Этот пакет полностью поддерживает Windows 11, а также Windows 10 32-bit и Windows 10 64-bit.
Многие предпочитают старое доброе классическое приложение Sticky Notes, поскольку оно потребляет значительно меньше системных ресурсов. Разница в производительности особенно заметна на менее мощном оборудовании, таком как процессоры Atom и Celeron. Сами заметки также немного меньше, поэтому пользователям больше нравится их компактный вид. Присутствует возможность закреплять заметки у любом месте рабочего стола, менять цвет стикеров, имеется поддержка эмодзи.
ТОП-сегодня раздела «Календари, органайзеры, напоминалки»
Школьный звонок 1.4
Бесплатная утилита с помощью которой можно настроить звуковые оповещения,…
Напоминалка 4.0
Напоминалка — простая портативная (не требующая инсталляции в систему) программа, которая…
Будильник 2.6.3.2
Будильник — бесплатные часы со большим количеством разнообразных и полезных функций….
Rainlendar Lite 2.21.1
Rainlendar Lite — бесплатный кроссплатформенный календарь с функцией органайзера. С помощью…
Отзывы о программе Classic Sticky Notes
Лев про Classic Sticky Notes 2.0 [20-04-2022]
Все кул, хорошее приложение
9 | 5 | Ответить
imperialregent про Classic Sticky Notes 2.0 [12-01-2022]
Ссылочка на родной микрософтовский сайт не работает
8 | 7 | Ответить
Quick Links
-
How to Launch Sticky Notes
-
Windows Doesn’t Sync Your Sticky Notes, But You Can Back Them Up
Microsoft transformed the Sticky Notes app in with Windows 10’s Anniversary Update. The new Sticky Notes app supports pen input and offers reminders and other «insights», thanks to Cortana. It’s a convenient, lightweight alternative to OneNote for taking quick notes.
How to Launch Sticky Notes
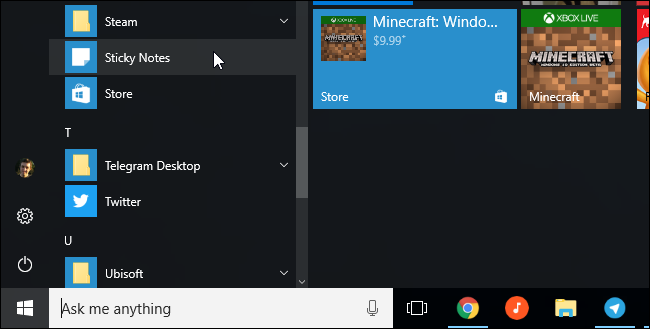
The Sticky Notes app is like any other application included with Windows 10. You can launch it by opening the Start menu, searching for «Sticky Notes», and clicking the shortcut. Once launched, you can right-click the Sticky Notes icon and select «Pin to Taskbar» if you plan to use it frequently.
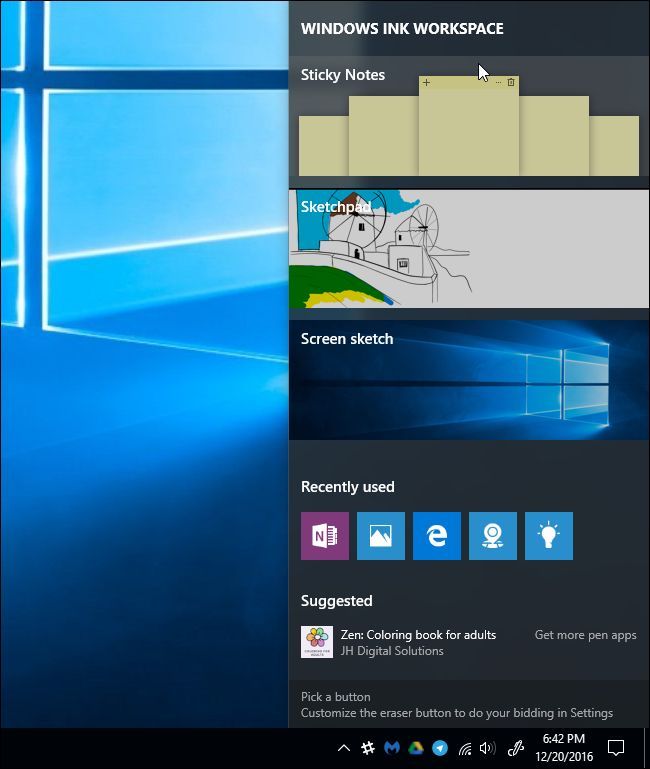
Sticky Notes can also be launched from the Windows Ink Workspace, if you have a Windows device with a pen. Click or tap the ink icon on your taskbar and select «Sticky Notes». To show the Windows Ink Workspace button if you can’t see it, right-click your taskbar and select «Show Windows Ink Workspace Button».
Sticky Notes 101
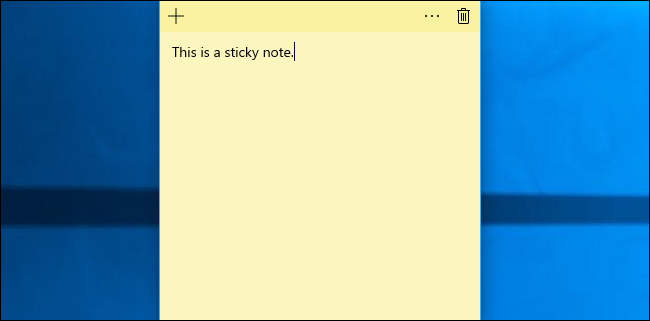
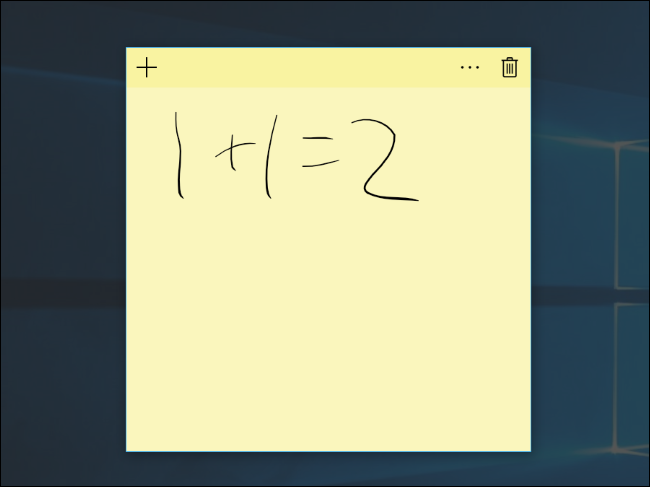
The app is simple to use. By default, you’ll see a yellow sticky note. You can type whatever you want into the note and Windows will save your note for later.
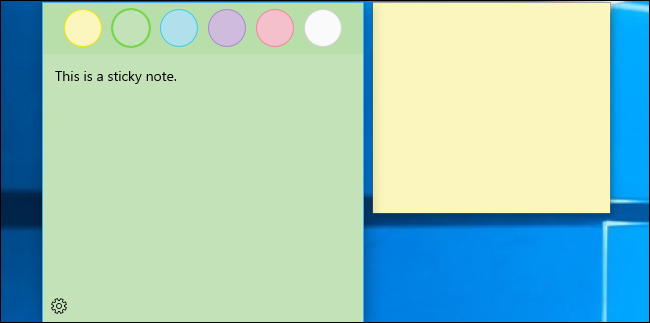
To create a new note, click the «+» button. To delete the current note, click the trash can button. To change the color of a note, click the «…» menu button and select one of the color circles.
These windows can be moved or resized as normal. Just click-and-drag or touch-and-drag the title bar to move them, or click-and-drag or touch-and-drag a corner of the window to resize them.
Move note windows around on your desktop by clicking and dragging (or touching and dragging) the title bar. You can also resize notes by clicking and dragging or touching and dragging at a corner, making them as small or large as you like.
Writing With a Pen
If your Windows device has a pen or stylus, you can draw or write notes directly in a sticky note. You just have to start with an empty note—every note can either contain typed text or something drawn with the stylus, but not both.
Getting Insights
Sticky Notes works along with Cortana, Windows 10’s integrated virtual assistant, to provide more information.
This feature is called «Insights», and it’s enabled by default. To check if Insights are enabled, click the «…» menu icon in a note and click the gear-shaped settings icon at the bottom left corner of the note. Ensure «Enable Insights» is set to «On» if you want to use this feature.

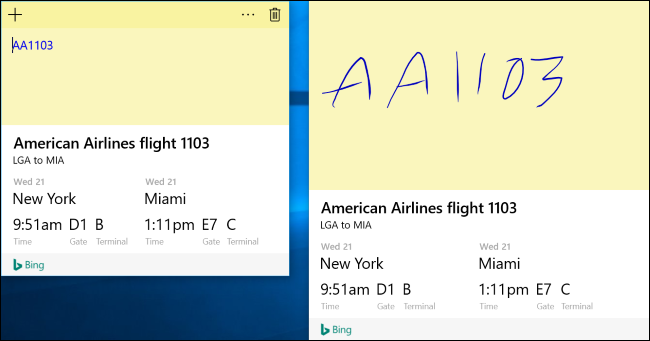
When you type or write something like a flight number—for example, «AA1234»— it will turn blue. This works both for typed text and for handwritten text you wrote with a pen. Click or tap the blue text to see more information.
For example, you could write a flight number and then click or tap it in the note to view up-to-date flight tracking information.
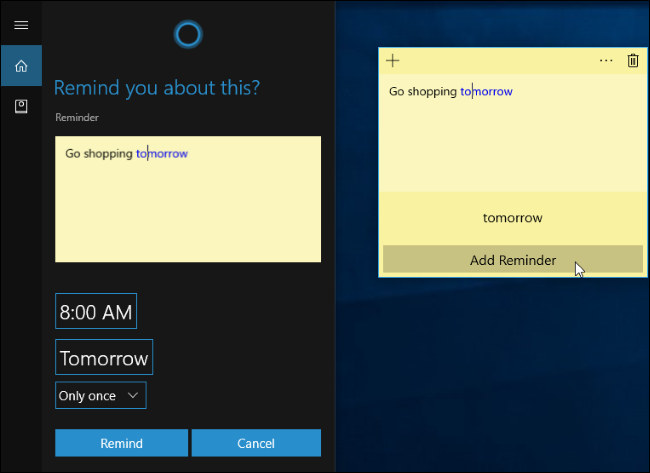
Sticky Notes are also integrated with Cortana for reminders. This is just another type of «insight». When you type something with a time or date, the time or date will turn blue and you can click or tap it to set a reminder.
For example, let’s say you type or write «Lunch at 12:30» or «Go shopping tomorrow» in a note. «12:30» or «tomorrow» will turn blue. Click or tap it and Sticky Notes will ask if you want to create a reminder. Select «Add Reminder» and it will create a Cortana reminder about this event.
You can even get these reminders on your phone if you install the Cortana app for iPhone or Android phone and sign in with the same Microsoft account you use on your PC.
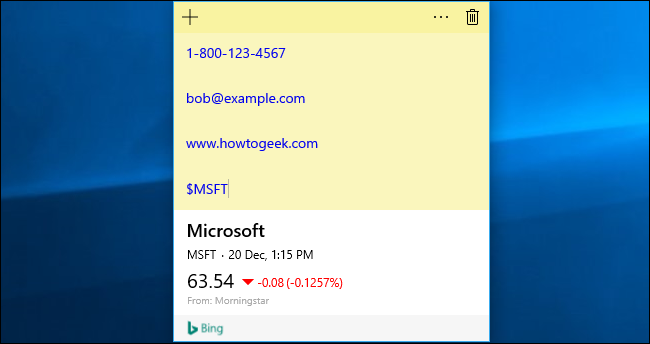
Sticky Notes offers other insights, too. It will automatically detect the following things, whether you type them with your keyboard or write them with a pen:
- Phone numbers: Call phone numbers like «1-800-123-4567» using Skype.
- Email addresses: Compose emails to email addreses like «bob@example.com».
- Web addresses: Open web addresses like «www.howtogeek.com» with your web browser.
- Physical addresses: View the location of a street address like «123 Fake Street, California 12345» and you can view its location and get directions via the Maps app.
- Stock symbols: View the performance of stock symbols like «$MSFT».
Some of these features may only work in certain countries at the moment, but Microsoft is extending them to new languages and countries with the Creators Update. Expect Microsoft to continue adding Insights and continue expanding the available Insights to more people in the future.
Windows Doesn’t Sync Your Sticky Notes, But You Can Back Them Up
As of Windows 10’s Anniversary Update, Sticky Notes don’t sync between your different Windows 10 devices. They’re stored on your computer in a local database for the Sticky Notes app. You can back up your Sticky Notes and restore them on a different PC, but you have to do that yourself.
Sticky Notes are ideal for quick, transient notes you don’t want to keep for a while. For more complex notes, notes you want to keep for a long time, and notes you just want to sync between your devices, you’ll want to use a more full-featured note-taking app.
For example, Microsoft’s own OneNote is included with Windows 10 and is very capable. But Sticky Notes is a convenient, lightweight alternative if you just want to jot down a phone number without going into your OneNote notebook.
On Windows 10, Sticky Notes is an experience that allows you to create notes rather than sticking pieces of papers around the monitor or across your desk.
The app has been around since Windows Vista, but starting with the October 2018 Update (version 1809), Windows 10 introduces Sticky Notes 3.0 with an improved design (retaining the familiar look and feel) and a new home experience to organize and find all your notes. Also, this new version introduces the ability to sync your notes to the cloud, which allows you to access your notes across devices, including to your Android phone.
In this Windows 10 guide, we’ll walk you through the steps to get started using Sticky Notes 3.0 across devices.
- How to connect Sticky Notes with your Microsoft account
- How to use Sticky Notes on Windows 10
- How to use Sticky Notes with keyboard shortcuts
- How to enable Sticky Notes insights
- How to export Sticky Notes content
- How to manage delete Sticky Notes settings
- How to sync Sticky Notes with Android
How to connect Sticky Notes with your Microsoft account
Starting with this version, you can sign in to Sticky Notes using your Microsoft account to sync your notes across your devices and keep them backed up in the cloud. Here’s how:
- Open Start.
- Search for Sticky Notes, click the top result to open the experience.Quick Tip: The new version of Sticky Notes is compatible with Windows 10 version 1803 (April 2018 Update) and later. If you can’t find the app on your installation, you can download it from the Microsoft Store.
- Click the Settings (gear) button in the top-right corner.
- Click the Sign in button. (Or the Sign out button if you want to stop syncing your notes.)
- Select the Microsoft account you’re using on Windows 10.
- Click the Continue button.
Once you’ve completed the steps, your notes will upload to your Microsoft account, and they will sync across devices (including to your Android phone).
Using a Microsoft account is a requirement to backup and sync your notes, but it’s not a mandatory step to use the app. However, if you start using the app without signing in, and then you link your Microsoft account your notes will upload to the cloud, and if you sign out your notes will no longer be available unless you sign back in.
How to use Sticky Notes on Windows 10
Although Sticky Notes version 3 remains similar to the legacy app, the experience has been updated with new interface changes and features.
All the latest news, reviews, and guides for Windows and Xbox diehards.
To get started creating, editing, deleting, and organizing your notes, use the following steps:
Creating, editing, and deleting notes
- Open Start.
- Search for Sticky Notes, click the top result to open the experience.
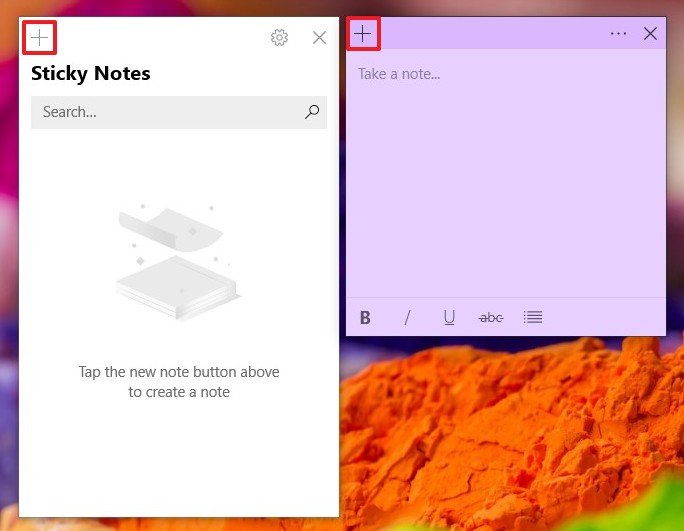
- Creating a new note: Click the plus (+) button in the top-left corner of a note, or in the home experience.
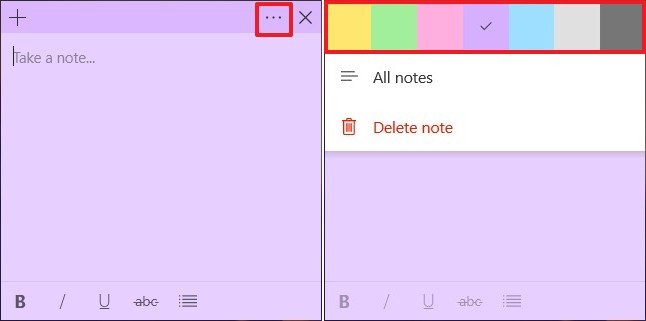
- Changing a note color: Click the menu (three-dotted) button in the top-right corner of the note, and select the color you want (including yellow, green, pink, purple, blue, gray, and charcoal).
- Formatting a note: Type your note, and use the toolbar at the bottom of the note to format the content. Options available, include bold, italic, underline, strikethrough, and bullets.
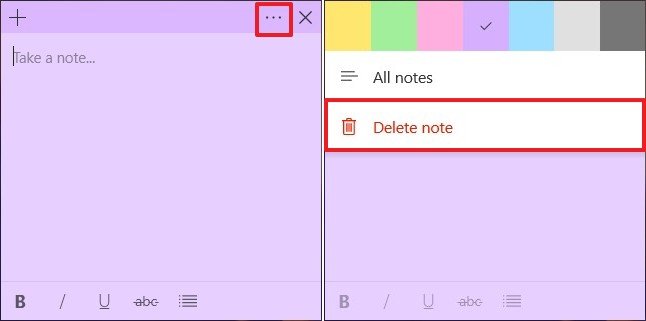
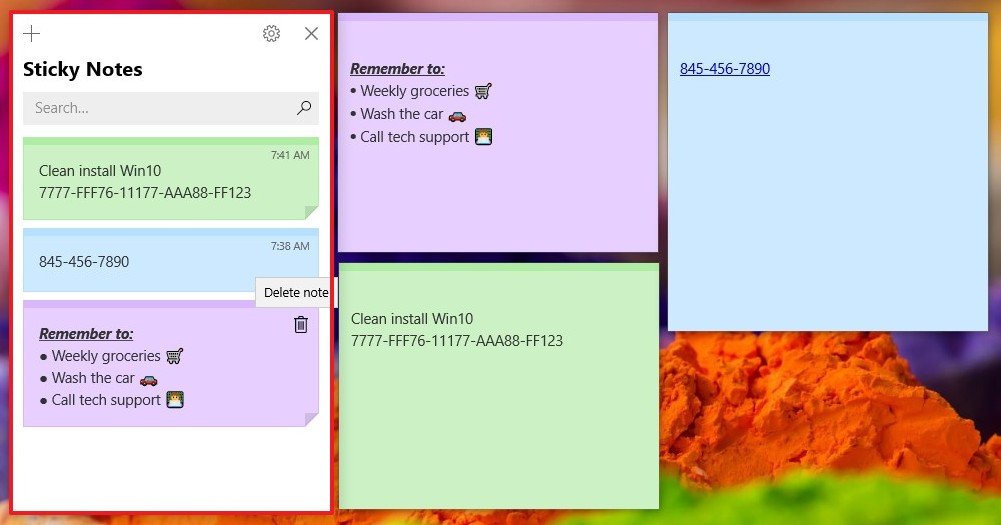
- Deleting a note: Click the menu (three-dotted) button in the top-right corner of the note, and click the Delete note option.
In addition to adding content with the keyboard, Sticky Notes 3.0 includes support for Windows Ink, which means that on touch-enabled devices, you can use natural handwriting with a stylus to create notes.
Sticky Notes home
If you use Sticky Notes on a daily basis, it’s easy for your desktop to get clutter with notes, and for that reason, starting with version 3.0, the experience also includes a new home to organize all your notes.
The new home is straightforward, as you create new notes, they will appear in a chronological order.
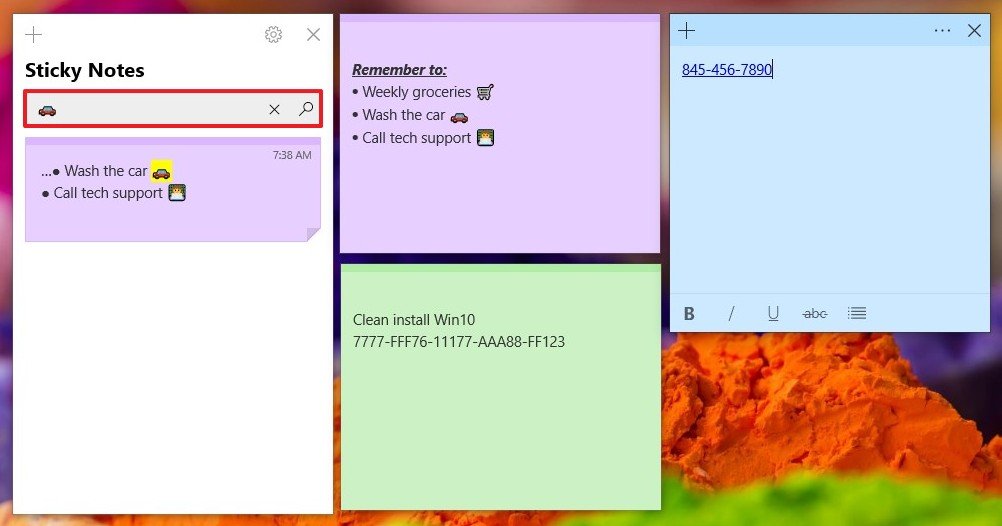
If you can’t find a note, you can use the search box to find a particular note. (And yes, a emoji is also a keyword.)
If you want to edit the note, double-click it. Or click the Trash can button to delete it.
As we outlined above, at the top, you’ll find a toolbar to create new notes, access the settings, and close the experience.
How to use Sticky Notes with keyboard shortcuts
Similar to previous versions, you can use keyboard shortcuts to work faster and more efficiently with Sticky Notes.
Here’s the full list of keyboard shortcuts that you can use with Sticky Notes on Windows 10:
Swipe to scroll horizontally
| Action | Keyboard shortcut |
|---|---|
| Create new note | Ctrl + N |
| Delete current note | Ctrl + D |
| Close current note | Ctrl + W |
| Move to next note | Ctrl + Tab |
| Move to previous note | Ctrl + Shift + Tab |
| Select all text on note | Ctrl + A |
| Cut the selected text | Ctrl + X |
| Copy the selected text | Ctrl + C |
| Paste the text | Ctrl + V |
| Undo action | Ctrl + Z |
| Redo action | Ctrl + Y |
| Move one word left | Ctrl + Left arrow |
| Move one word right | Ctrl + Right arrow |
| Move to beginning of line | Home |
| Move to end of the line | End |
| Move to beginning of note | Ctrl + Home |
| Move to end of note | Ctrl + End |
| Delete next word | Ctrl + Delete |
| Delete previous word | Ctrl + Backspace |
| Close Sticky Notes | Alt + F4 |
| Bold selected text | Ctrl + B |
| Strikethrough selected text | Ctrl + T |
| Underline selected text | Ctrl + U |
| Bulleted list | Ctrl + Shift + L |
| Italic selected text | Ctrl + I |
| Right-align selected paragraph | Ctrl + Right Shift |
| Left-align selected paragraph | Ctrl + Left Shift |
How to enable Sticky Notes insights
Insights for Sticky Notes is a feature that allows Cortana to scan your notes for information (such as dates, times, phone numbers, addresses, websites, stock symbols, flight numbers, and more), which can help you to quickly create reminders or take action based on the content that you wrote.
If you want to enable or disable insights, use these steps:
- Open Start.
- Search for Sticky Notes, click the top result to open the experience.
- Click the Settings (gear) button in the top-right corner.
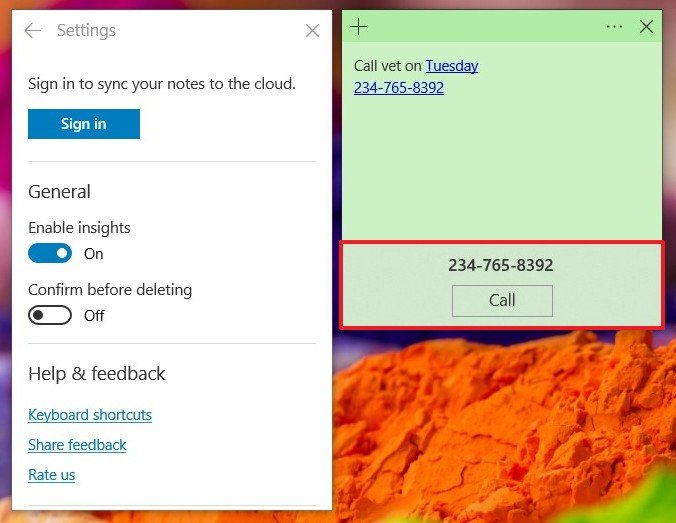
- Under «General,» turn on or off the Enable insights toggle switch.
After completing the steps, every time that you create content with specific data, the text will turn blue and clicking that text, you’ll notice an Add Reminder, Call, View Address, or another similar option, depending on the information to take action with Cortana.
How to export Sticky Notes content
If you’re about to start with a fresh copy of Windows 10, it’s no longer necessary to resource to workarounds to backup your notes, thanks to the Sticky Notes’ ability to sync your content to your Microsoft account (more specifically to Outlook). However, it’s still possible to export your notes for safekeeping, using these steps:
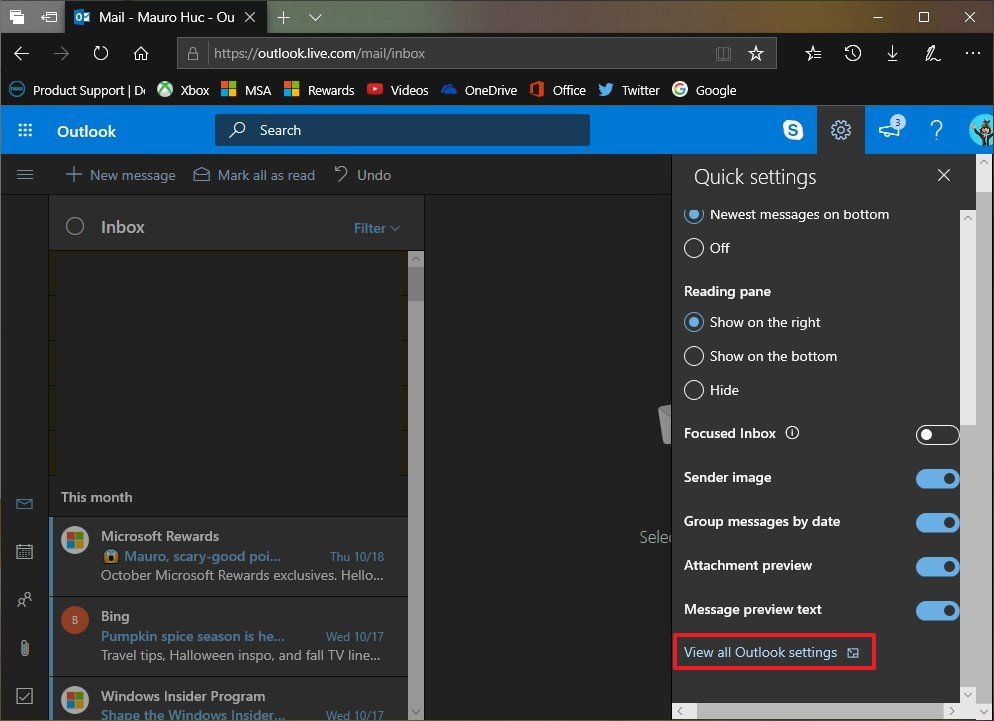
- Open Outlook on the web.
- Click the Settings (gear) button in the top-right corner.
- Click the View all Outlook settings link.
- Click on General.
- Click on Privacy and data.
- Click the Export mailbox button.
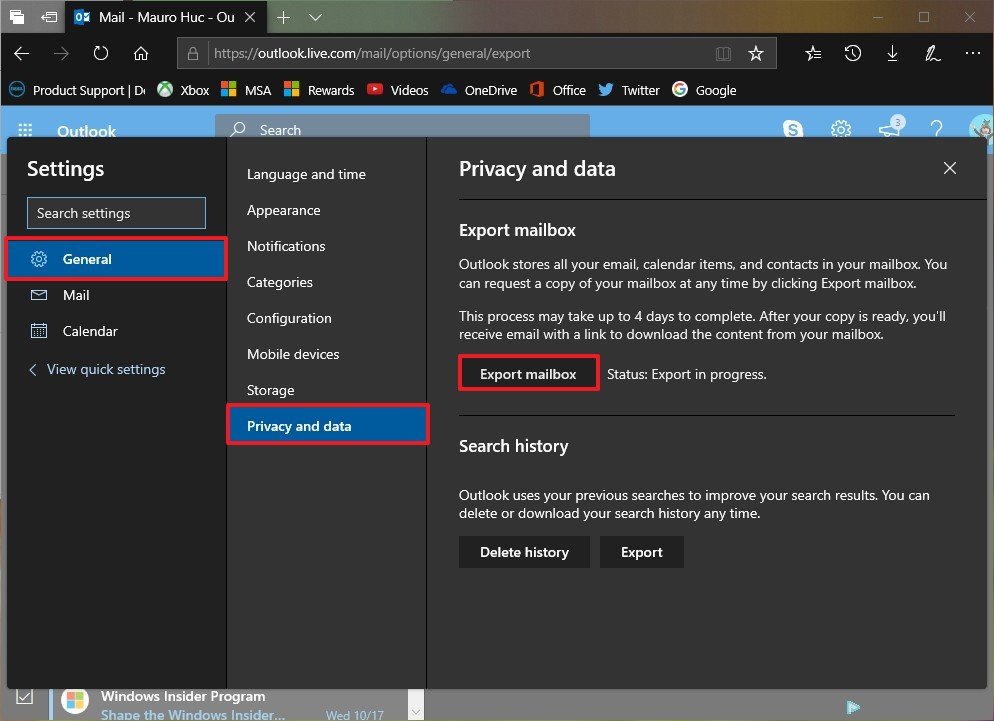
Once you’ve completed the steps, it could take up to four days for the process to complete. After the backup is ready, you’ll receive an email with the link to download the Outlook content, which also includes your sticky notes content.
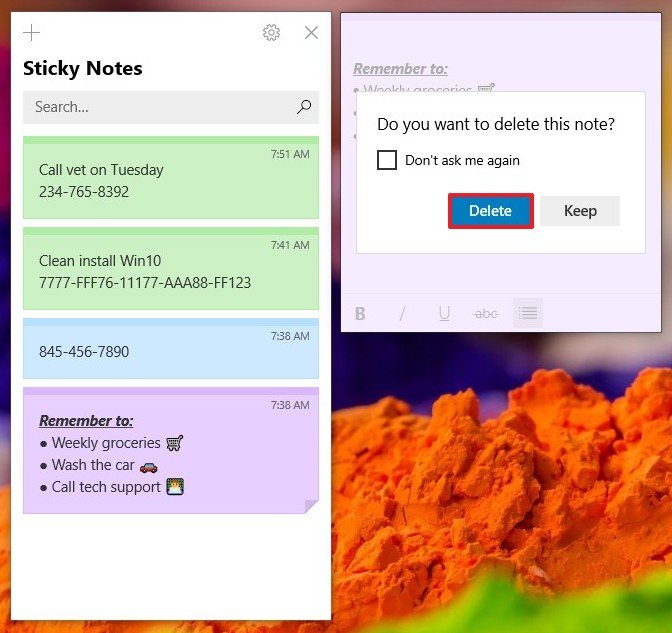
How to manage Sticky Notes deletion settings
Using the experience, you can delete notes with one click, or you can use a confirmation dialog to prevent removing notes accidentally.
To enable or disable deletion confirmation on Windows 10, do the following:
- Open Start.
- Search for Sticky Notes, click the top result to open the experience.
- Click the Settings (gear) button in the top-right.
- Under «General,» turn on or off the Confirm before deleting toggle switch.
After completing the steps, every time you try to delete a sticky note, a confirmation dialog will appear depending on the settings you configured.
How to sync Sticky Notes with Android
In addition to syncing your notes across other Windows 10 devices, starting with Sticky Notes 3.0, you can also sync your notes to your Android phone using OneNote.
The process to sync your notes across devices is a straightforward process, you only need to be using the same Microsoft account on the devices that you want to access your notes.
Quick Tip: You can always double-check that you’re using the same account on your Android device by tapping the Settings (three-dotted) > Account on OneNote.
To access your sticky notes using Android, do the following:
- Open OneNote.
- Click the Sticky Notes button in the bottom-right corner.
Once in the «All notes» interface, you can tab the note to interact with its content.
You can tap the Settings (three-dotted) button in the top-right corner to change the background color, share, or delete the note.
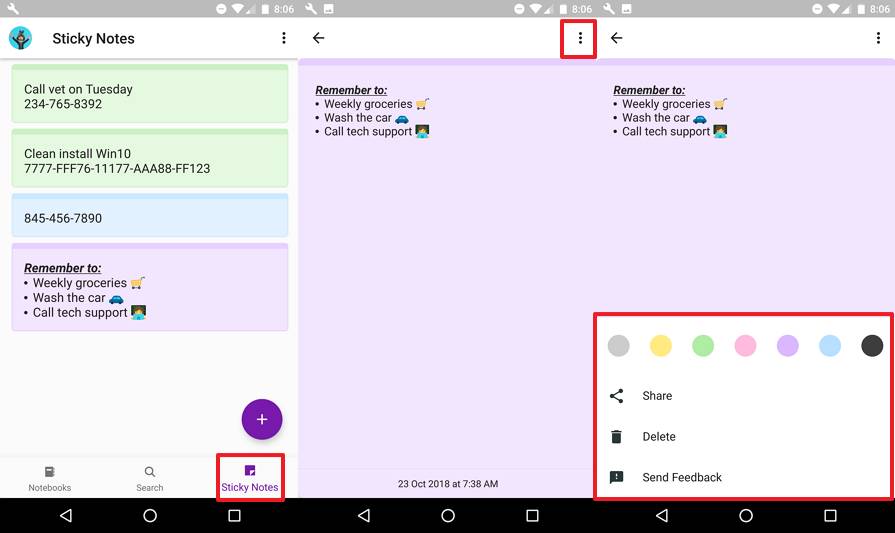
If you want to create a new note, click the plus (+) button, and use the toolbar at the bottom of the note to format the content.
After completing the steps, any changes that you made to Sticky Notes will sync automatically across devices.
Important: At the time of this writing, Sticky Notes for Android is only available in beta. This means that to use this feature, you must install the latest pre-release version of OneNote for Android. You can sign up on this Google Play website.
More Windows 10 resources
For more helpful articles, coverage, and answers to common questions about Windows 10, visit the following resources:
- Windows 10 on Windows Central – All you need to know
- Windows 10 help, tips, and tricks
- Windows 10 forums on Windows Central
Mauro Huculak has been a Windows How-To Expert contributor for WindowsCentral.com for nearly a decade and has over 15 years of experience writing comprehensive guides. He also has an IT background and has achieved different professional certifications from Microsoft, Cisco, VMware, and CompTIA. He has been recognized as a Microsoft MVP for many years.