
Home » Simple Sticky Notes Download
Download new version of Simple Sticky Notes
Updated: Feb 23, 2025
Version: 6.7.5
Size: 2.75 MB
You can download a new version of Simple Sticky Notes for free
What’s new in Simple Sticky Notes Version 6.7.5
- Added «Calibri» to the default font list
- Fixed some missing translations across the app (settings, etc.)
- Fixed some UI issues on the settings screen
- Fixed minor bugs reported by users
- Improved tab key control in note windows
- Improved Windows 11 compatibility (24H2)
- Improved overall stability and performance
Minimum Requirements: Windows® 11 / 10 / 8.1 / 8 / 7
PC with a 1.5 GHz Intel or AMD processor and 2 GB of RAM
Create Sticky Notes
Easily create and edit your notes with an easy-to-use, simple and intuitive interface.
Set Reminders
Never forget a task again with the alarm feature of Simple Sticky Notes.
Note Explorer
View all your notes in one place, search to find the note you want, create notebooks, and access your deleted notes.
Print, Export and Share
Easily print, export in text and rtf formats, share on Twitter and WhatsApp the notes you create.
Customize Your Sticky Notes
Download themes, choose your desired color and opacity, personalize your sticky notes.
Dark Mode
Reduce eye strain and increase readability in low-light environments with Simple Sticky Notes’ Dark Mode.
Download Simple Sticky Notes today and start taking better notes!
License
Simple Sticky Notes is completely free for personal and commercial use. EULA
Help
Check out the quickstart and learn how to use Simple Sticky Notes.
Compatibility
Simple Sticky Notes runs on Windows® 11 / 10 / 8.1 / 8 / 7. Simple Sticky Notes is also compatible with Arm64 versions of Windows® 11 / 10.
For Windows® XP / Vista Download Simple Sticky Notes 5.8
Security & Validation
Simple Sticky Notes was analyzed by 76 security vendors on Feb 23, 2025. No security vendors and no sandboxes flagged setup file as malicious.
VirusTotal Report
Simple Sticky Notes installation and application files are digitally signed.
Filename: Setup_SimpleStickyNotes.exe
Checksum (Simple Sticky Notes Version 6.7.5)
MD5 hash: 02fa91bf5128a46731a9f7901da986e0
SHA-1 hash: e681343786e49fca94d1b7a6c44e86564fe51a87
Privacy
Learn about our privacy practices and find the policy you’re looking for. Privacy Policy
Important Notice
simplestickynotes.com is the official website of Simple Sticky Notes software. Please be aware that Simple Sticky Notes does not have any other official website or domain. Any other website claiming to represent Simple Sticky Notes is not authorized and may contain harmful software or false information. This site and its content are protected by law. For official updates, downloads, and information, always visit simplestickynotes.com
При первом знакомстве эта утилита меня не особенно впечатлила, и я быстро о ней забыл. Но когда у меня закончились липкие бумажки для записей, я вспомнил о компьютерном аналоге и решил испытать его на практике. С тех пор я регулярно пользуюсь Записками, попутно обнаруживая новые функции, недостатки и способы их устранения. В этой статье я поделюсь с читателями своими открытиями.
Основные возможности
Пользоваться Записками очень легко. Чтобы запустить приложение, достаточно ввести в строке поиска меню «Пуск» (Start) ключевое слово «записки» (sticky, без кавычек) и нажать [Enter]. На рабочем столе появится пустая записка, которую можно перетащить в любое удобное место. По мере ввода текста записка автоматически удлиняется до определенного предела, после чего появляется полоса прокрутки (рис. A). А вообще, размеры заметок можно регулировать по собственному усмотрению.
 в Windows 7")
Рисунок A. По мере ввода текста записка автоматически удлиняется.
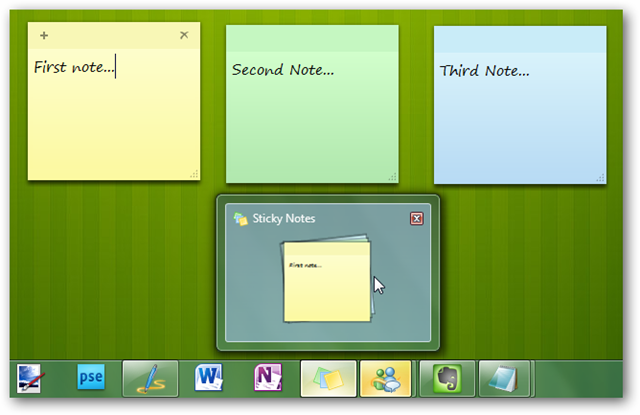
Цвет «бумаги» можно менять — достаточно щелкнуть по записке правой кнопкой мыши и выбрать подходящий вариант из контекстного меню. Создать новую записку можно кнопкой «+» в левом верхнем углу приложения или клавишной комбинацией [Ctrl]+[N]. Для удаления записок служит кнопка «х» в правом верхнем углу и клавишная комбинация [Ctrl]+[D].
При запуске приложения в панели задач Windows 7 появляется кнопка, с помощью которой можно сворачивать/разворачивать все записки на рабочем столе. Созданные записки автоматически сохраняются и не удаляются даже при выходе из приложения. Чтобы закрыть Записки, достаточно нажать правой кнопкой мыши на кнопке в панели задач и выбрать опцию «Закрыть окно» (Close Window) (рис. B). При следующем запуске приложения все созданные записки откроются автоматически.
 в Windows 7")
Рисунок B. Можете смело закрывать приложение, не опасаясь, что созданные записки пропадут.
Изменение шрифта
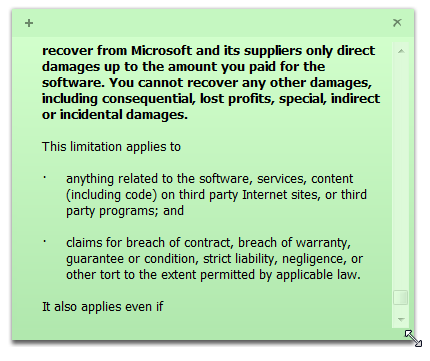
Наверняка многим захочется поменять стандартный шрифт записок. На первых порах идеальный почерк Segoe Print забавляет, но потом быстро приедается. К сожалению, в настройках приложения шрифт изменить нельзя. Зато можно скопировать из текстового редактора фрагмент текста с новым шрифтом и вставить его в записку. Например, на рис. C показаны скопированные таким образом Cambria и Arial. После вставки весь последующий текст будет набираться заданным шрифтом.
 в Windows 7")
Рисунок C. Изменить стандартный шрифт записки можно с помощью маленькой хитрости.
Правда, новые записки по умолчанию все равно используют Segoe Print. Всякий раз вставлять текст с нужным шрифтом, конечно, не особенно удобно, но это вполне жизнеспособный вариант — достаточно скопировать из предыдущей записки одно слово, набранное нужным шрифтом.
Форматирование текста
В остальном Записки предлагают широкие возможности форматирования. Достаточно выделить текст и воспользоваться одной из клавишных комбинаций, перечисленных в табл. A.
Таблица A
 в Windows 7")
Восстановление запросов на подтверждение при удалении
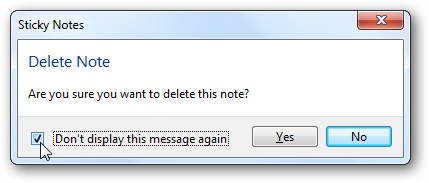
При удалении записки приложение всякий раз запрашивает подтверждение (рис. D). Многим это надоедает и они ставят флажок «Больше не показывать это сообщение» (Don’t Display This Message Again). Однако делать этого не стоит, потому что записки удаляются безвозвратно, их никак нельзя восстановить, а значит, риск случайно уничтожить нужную информацию весьма высок.
 в Windows 7")
Рисунок D. При удалении заметки приложение запрашивает подтверждение.
Если флажок «Больше не показывать это сообщение» уже поставлен, восстановить запросы на подтверждение при удалении можно с помощью Редактора реестра (Registry Editor). Для этого введите в строке поиска меню «Пуск» ключевое слово «Regedit» (без кавычек), нажмите [Enter] и подтвердите выполнение операции в диалоговом окне контроля учетных записей пользователей (UAC).
В окне Редактора реестра найдите папку «HKEY_CURRENT_USER\Software\Microsoft\Windows\CurrentVersion\Applets\StickyNotes», дважды щелкните на параметре «PROMPT_ON_DELETE» и введите «1» (без кавычек) в поле «Значение» (Value Data) (рис. E). Нажмите «OK» и закройте Редактор реестра.
 в Windows 7")
Рисунок E. Восстановить запросы на подтверждение при удалении можно с помощью Редактора реестра.
Резервное копирование
Файл данных с записками называется «StickyNotes.snt» и хранится в папке «C:\Users\{имя_пользователя}\AppData\Roaming\Microsoft\Sticky Notes». Эта сведения пригодятся на случай, если вы захотите сохранить копию файла или включить его в общую схему архивирования.
Создание поискового запроса
Когда записок очень много, найти среди них нужную становится затруднительно. Чтобы облегчить себе задачу, можно создать специальный поисковый запрос, с помощью которого система просканирует поисковый индекс Windows и выведет результаты поиска в виде аккуратного списка. Для этого необходимо создать ярлык с использованием протокола search-ms.
Нажмите правой кнопкой мыши на рабочем столе и выберите опцию «Создать | Ярлык» (New | Shortcut). В окне мастера введите следующую команду в одну строку (!):
search-ms:displayname=Результаты%20поиска%20в%20″Записки%20(Записки%20Windows)»
&crumb=&crumb=location:C%3A%5CUsers%5CИмя%20пользователя%5CSearches%
5CЗаписки%20(Записки%20Windows).searchconnector-ms
(для англоязычной Windows —
search-ms:displayname=Search%20Results%20in%20Sticky%20Notes%20(Windows%20Sticky%20Notes)
&crumb=&crumb=location:C%3A%5CUsers%5CUSER%20NAME%5CSearches%5C
Sticky%20Notes%20(Windows%20Sticky%20Notes).searchconnector-ms)
Проще всего скопировать этот текст в Блокнот (Notepad) и заменить в нем «Имя%20пользователя» на имя собственной учетной записи — например, Greg%20Shultz.
Команда запутанная, но легко расшифровывается. Коды вида %## обозначают стандартные символы: например, %20 — это пробел, %3A — двоеточие (:), а %5C — обратная косая черта (\).
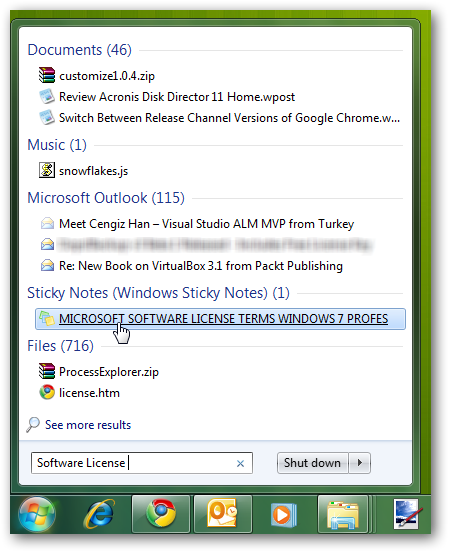
Вставьте команду в окно мастера создания ярлыка, нажмите «Далее» (Next), присвойте ярлыку имя и нажмите «Готово» (Finish). По двойному щелчку на ярлыке открывается окно Internet Explorer с предупреждением безопасности. Нажмите «Разрешить» (Allow) — и увидите результаты поиска, как показано на рис. F.
 в Windows 7")
Рисунок F. Все записки появятся в окне результатов поиска.
А что думаете вы?
Пользуетесь ли вы Записками в Windows 7? Будете ли вы ими пользоваться, прочитав эту статью? Поделитесь своим мнением в комментариях!
Автор: Greg Shultz
Перевод
SVET
Оцените статью: Голосов
Classic Sticky Notes
для Windows
Начиная с обновления Windows 10 Anniversary Update, компания Microsoft заменила классическое приложение Sticky Notes для рабочего стола на универсальное приложение. Для многих пользователей классическое приложение для рабочего стола является более предпочтительным вариантом, поскольку оно работает шустрее, быстрее запускается и не имеет интеграции с Cortana. Поэтому и было разработано приложение Classic Sticky Notes для Windows 11 и Windows 10. Этот пакет полностью поддерживает Windows 11, а также Windows 10 32-bit и Windows 10 64-bit.
Многие предпочитают старое доброе классическое приложение Sticky Notes, поскольку оно потребляет значительно меньше системных ресурсов. Разница в производительности особенно заметна на менее мощном оборудовании, таком как процессоры Atom и Celeron. Сами заметки также немного меньше, поэтому пользователям больше нравится их компактный вид. Присутствует возможность закреплять заметки у любом месте рабочего стола, менять цвет стикеров, имеется поддержка эмодзи.
ТОП-сегодня раздела «Календари, органайзеры, напоминалки»
Школьный звонок 1.4
Бесплатная утилита с помощью которой можно настроить звуковые оповещения,…
Напоминалка 4.0
Напоминалка — простая портативная (не требующая инсталляции в систему) программа, которая…
Будильник 2.6.3.2
Будильник — бесплатные часы со большим количеством разнообразных и полезных функций….
Rainlendar Lite 2.21.1
Rainlendar Lite — бесплатный кроссплатформенный календарь с функцией органайзера. С помощью…
Отзывы о программе Classic Sticky Notes
Лев про Classic Sticky Notes 2.0 [20-04-2022]
Все кул, хорошее приложение
9 | 5 | Ответить
imperialregent про Classic Sticky Notes 2.0 [12-01-2022]
Ссылочка на родной микрософтовский сайт не работает
8 | 7 | Ответить
Sign in to your How-To Geek account
Would you like an easy way to write down a quick note and keep it in front of you without wasting a piece of a dead tree? Let’s take a look at the Sticky Notes app in Windows 7 and how you can use it to its fullest potential.
Getting Started With Sticky Notes
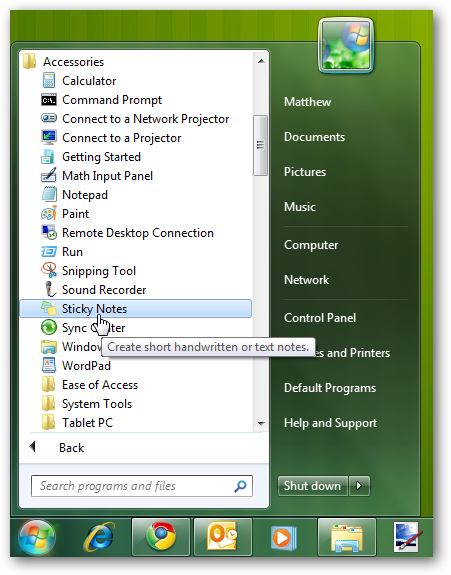
If you’ve searched the Desktop Gadget Gallery for the Sticky Notes gadget from Windows Vista, you don’t have to search any more. The Vista Gadget has been replaced in Windows 7 by the Sticky Notes application. You’ll find it under Accessories in the start menu, or just type Sticky Notes in the Start Menu search.
Sticky Notes are great for jotting down some quick text you need to remember, like an address you receive over the phone or the items you need to pick up from the store on the way home. Here’s how a default note looks: yellow with 11 point Segoe Print font.
You can easily change a note’s color from the right-click menu.
If you paste text into the Sticky Note, it will maintain most of its original formatting. You’ll notice a scroll bar on the right if there’s more text than can be displayed on the screen; you can also drag the bottom right corner to resize the note to any size you want.
Click the plus sign in the top left corner to crate a new note, or click the x in the right corner to delete an existing note.
Windows will double-check that you want to delete the note; if you don’t wish to see this message each time, check the Don’t display this message again box.
All of your Sticky Notes are saved at:
%AppData%\Microsoft\Sticky Notes\StickyNotes.snt
However, they’re not stored in a standard format, so you can’t overly use the data in the notes file. If you would like to copy your open notes to another computer, though, you could copy and replace this file on the other computer.

Format Text on Sticky Notes
Although the Sticky Notes app doesn’t include any formatting tools, it still accepts many common keyboard shortcuts for formatting text. These include:
- Ctrl+B — Bold
- Ctrl+I — Italics
- Ctrl+U — Underline
- Ctrl+T — Strikethrough
Press the keyboard shortcut to activate the formatting option, and press it again to turn it off as normal. Again, this works the exact same as the shortcuts in Word or other common applications.
You can even make your text centered or right justified with these keyboard shortcuts:
- Ctrl+L — Normal, left-justified
- Ctrl+E — Centered
- Ctrl+R — Right-justified
You can even make a simple outline in a Sticky Note. To make an outline or list, press:
Ctrl+Shift+L
This will give you a bullet point, but press it again to cycle through the options displayed below. On the 7th time, you’ll be back to plain, non-outlined text.
The next outline number or point will automatically appear when you press Enter. This is a great way to jot down a simple schedule for the day, items you need at the store, or anything you can think of.
Windows 7 Integration
Sticky Notes are well integrated with Windows 7’s new features. You can create a new note from the jumplist, and we recommend keeping Sticky Notes pinned to your taskbar so you can easily jot a note down. If you have notes open when you shutdown your computer, they’ll be automatically opened when you reboot just like the Desktop Gadgets.
Unfortunately, Windows 7 doesn’t treat each note as an individual note in the taskbar or Alt+tab, but if you hover over the note thumbnail you’ll get an Aero Preview of the notes while all the other windows turn translucent. This is a great way to see what you’d written down without minimizing your windows.
Windows 7 even indexes your Sticky Notes, so you can easily find your notes from the Start Menu search. If you enter something that you’ve written on a Sticky Note, you’ll see it come up in the search results. This is one major advantage of the older Desktop Gadget.
Conclusion
Although Sticky Notes is not a groundbreaking new feature in Windows 7, it is a nice little application that makes it easy to jot something down. It’s no replacement for OneNote or Evernote, but it is great for keeping a quick note in front of you so you won’t forget it. With these tips and tricks, you should be able to get more use out of the Sticky Notes feature.
If you’re an Outlook user check out our Beginner’s Guide to Using the Notes Feature in Outlook.
Forget pasting analog sticky-notes to the sides of your monitor. They look terrible there, and they always fall off anyway. Instead, paste digital stickies to your Windows desktop. If you’re a Windows 7 user, it’s a snap: Just run the new Sticky Notes app.
You might recognize it from the ol’ Vista Sidebar. In Windows 7, Microsoft ditched the Sidebar but kept the gadgets, allowing the latter to reside anywhere on your desktop.
To run the app, just click Start, type sticky, and press Enter. You’ll immediately see a new note; just start typing whatever it is you need to remember.
Need another note? Click the plus sign on the first one. Want to delete it? Click the x in the opposite corner. Prefer a different color. Right-click in the body of the note and choose from six options.
Remember that Sticky Notes is an app, so your notes will stay on your desktop only as long as the app is running. If you close it (by right-clicking the taskbar iconand choosing Close window), Sticky Notes will restore your notes the next time your run it.
This is a decidedly barebones program. You can’t change the font size, adjust transparency, or force notes to stay on top of other programs. If you want that kind of functionality, try Stickies for Windows.
Still, Sticky Notes can really come in handy when you need, well, a note that sticks to your desktop.