
A windows usermode controller driver for the steam deck internal controller.
View the Project on GitHub mKenfenheuer/steam-deck-windows-usermode-driver
- Download ZIP File
- Download TAR Ball
- View On GitHub
Steamdeck Windows Controller Driver
Steamdeck WIndows Controller Driver (SWICD)
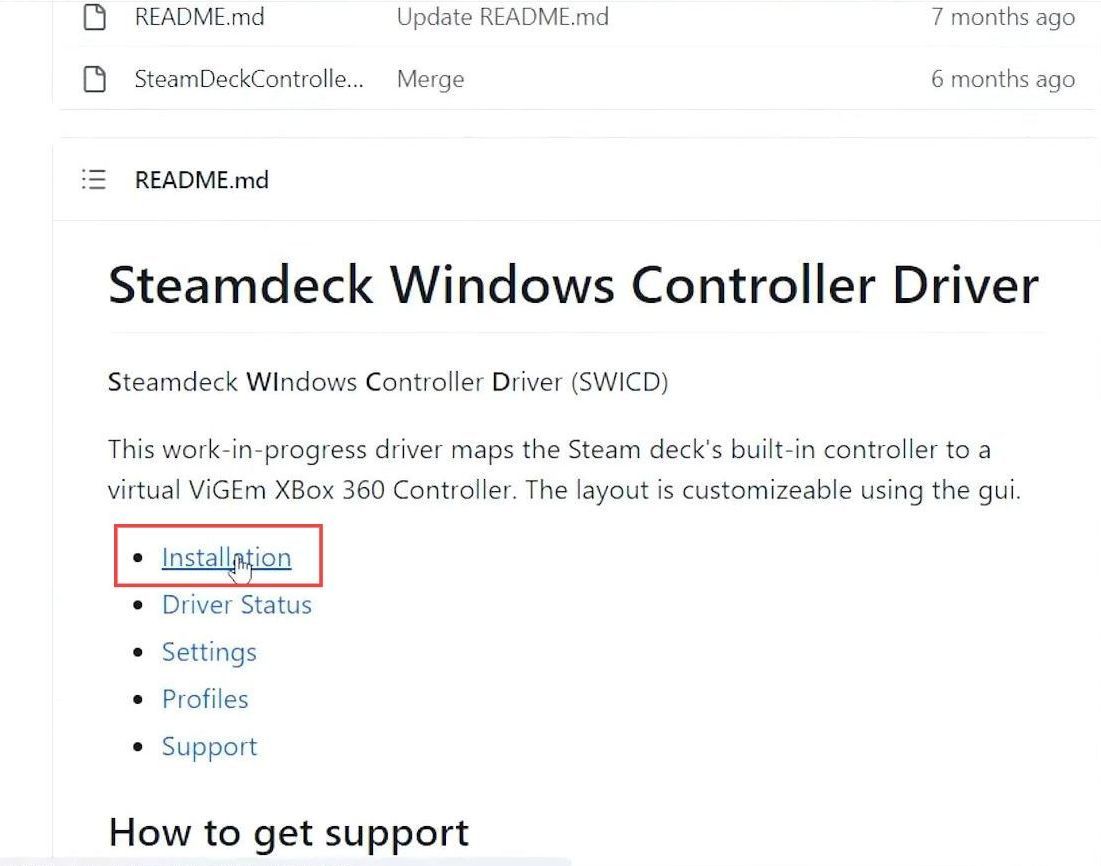
This work-in-progress driver maps the Steam deck’s built-in controller to a virtual ViGEm XBox 360 Controller. The layout is customizeable using the gui.
- Installation
- Driver Status
- Settings
- Profiles
- Support
This guide helps to set up a steam deck controller in Windows using the convenient and quick method. You must follow each step mentioned in the guide to accomplish the task.
Downloading the drivers
In this section, we will take you through the steps to download the Steamdeck Windows controller driver. By following all the steps, you will be able to identify the top three files from the list to download.
- The first step is to download the Steamdeck Windows controller driver.
This driver is necessary for your Steamdeck to function properly. - Once you reach this page, scroll down, and click the Installation button.
- Access the list of files that you need to download and identify the top three files from the list.
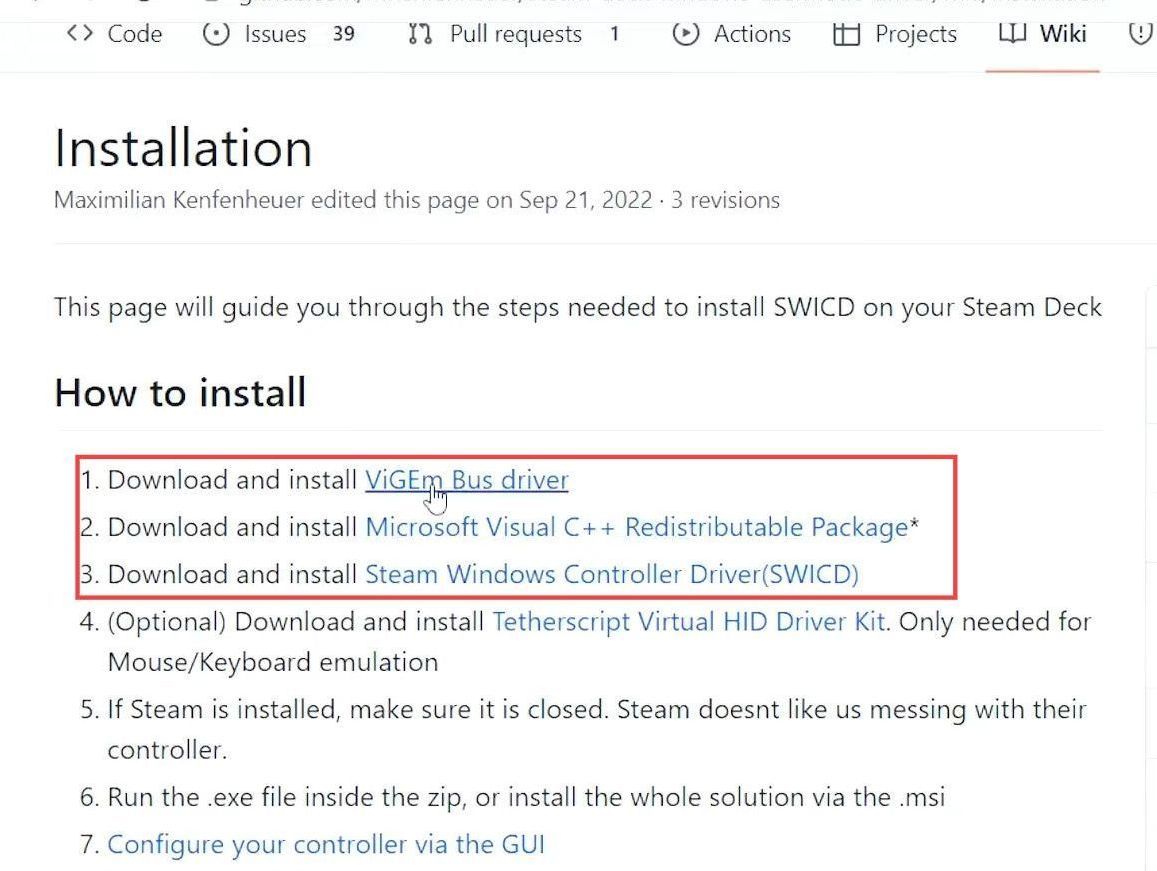
Download ViGEm Bus driver
- Click on the first file, which is the ViGEmBus driver, to start the download process.
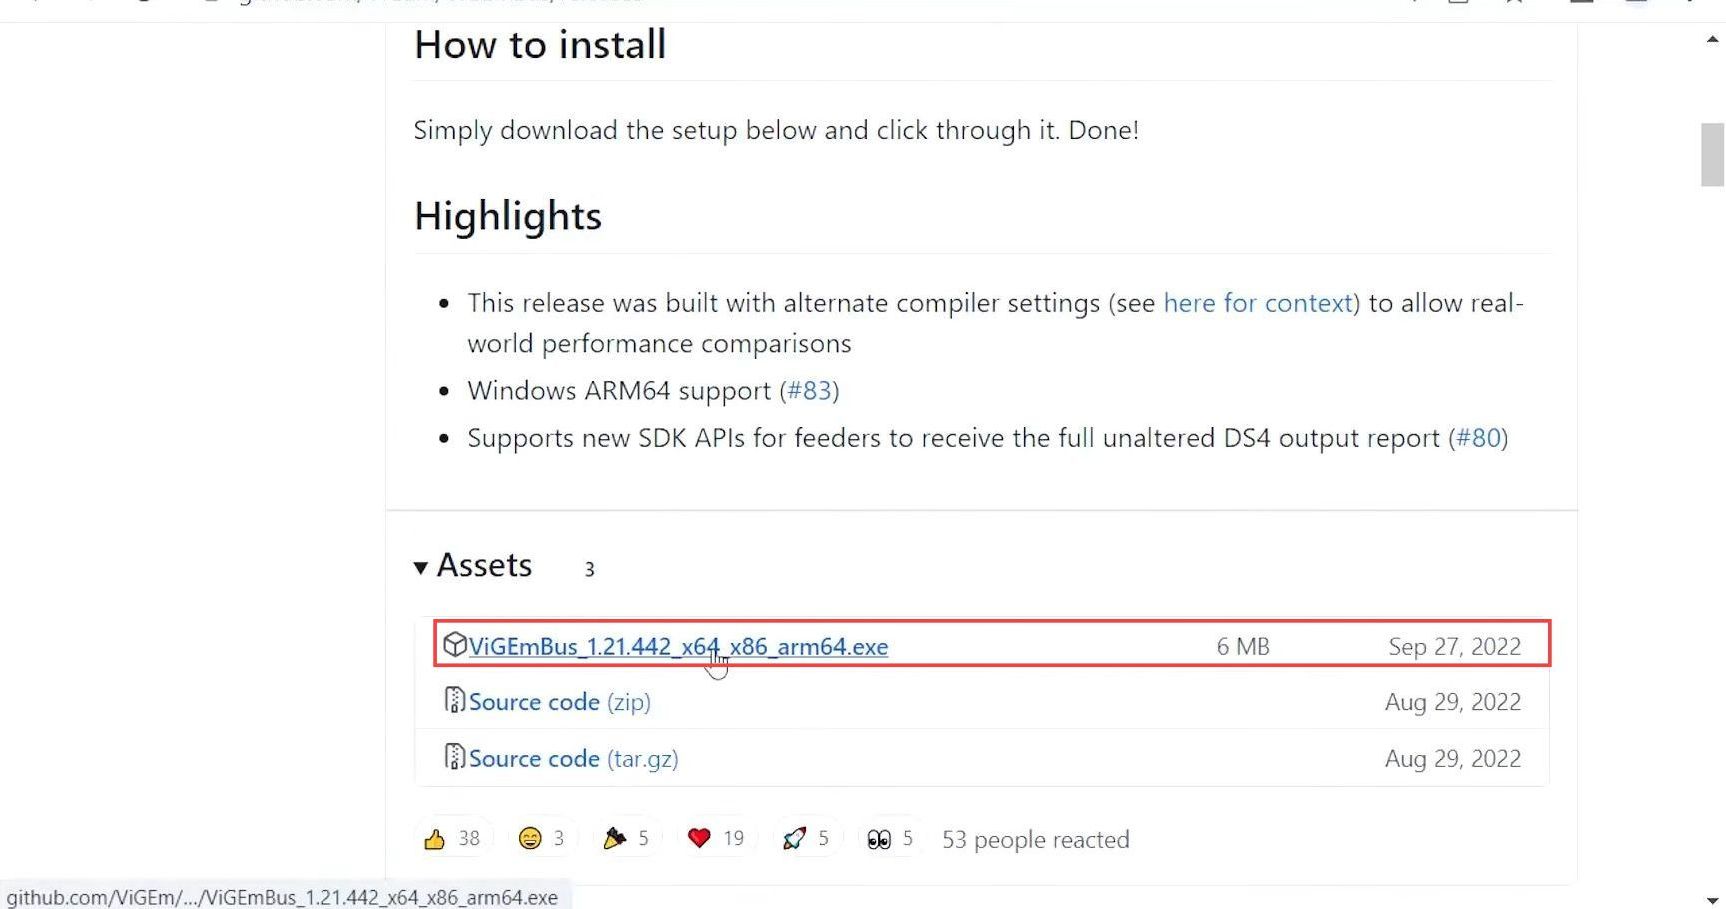
- Scroll down the webpage until you see the “Assets” section.
- Look for the link that corresponds to the file you want to download. Click on that link to start the download process.
Download Steam Windows Controller
- Look for the “Steam Windows Controller” option and click on it.
It will take you to a new page. - Scroll down on the page until you see the “Assets” section. Under the “Assets” section, you’ll see a link that you need to click to download the Steam Windows Controller.
- Click on the link to start the download process.
Download Microsoft Visual C ++
Navigate to Microsoft Visual C++ and click on the link to download it.
Install ViGEm Bus drive
The section describes how to install the ViGEm Bus driver. The users need to open the downloaded file, accept the license agreement, and then click on the “Install” button.
- Open the ViGEm Bus driver file that you downloaded and click the “Next” button on the initial setup screen.
- Read the license agreement carefully, then check the box to accept it. Click “Next” to proceed to the installation options screen.
- Choose the installation location and click “Next” to proceed and then click on “Install” to begin the installation process.
- If prompted, select “Yes” to allow the driver to make changes to your computer.

Start installing drivers
In this section, we will take you through the process of installing the VC_redist file. You will need to locate the file on the computer and double-click on it to initiate the installation process.
- Locate the VC_redist file on your computer and double-click on the file to open it.
- Follow the prompts to start the installation process.
- accept the license terms and conditions and click on “Install” to begin the installation process.

Installing SWICD driver
The section provides instructions on how to install the SWICD driver. By following the steps below, you will be able to hit the “Install” buttons to complete the installation.
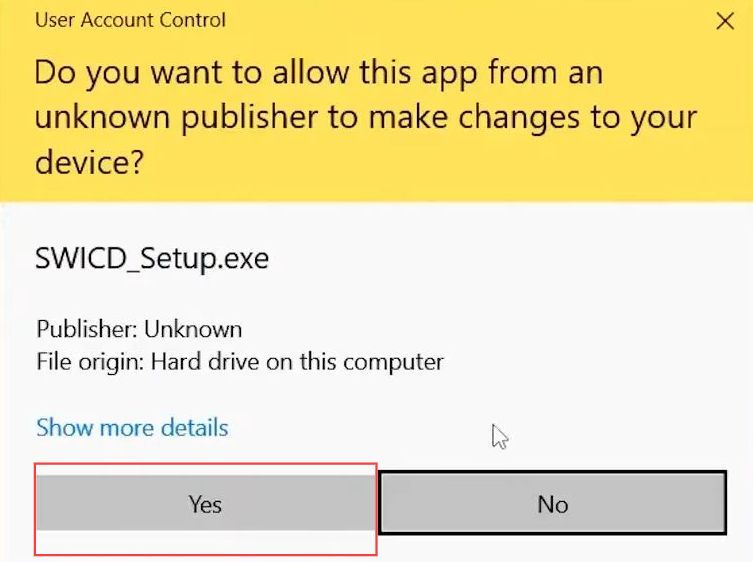
- Locate the SWICD setup file on your computer. Double-click the SWICD setup file to open it.
- If prompted, click “Yes” to allow the setup file to make changes to your computer and then select the language.
- After that, click the Next button two times and hit the Install button for the installation.
Adjusting the controllers
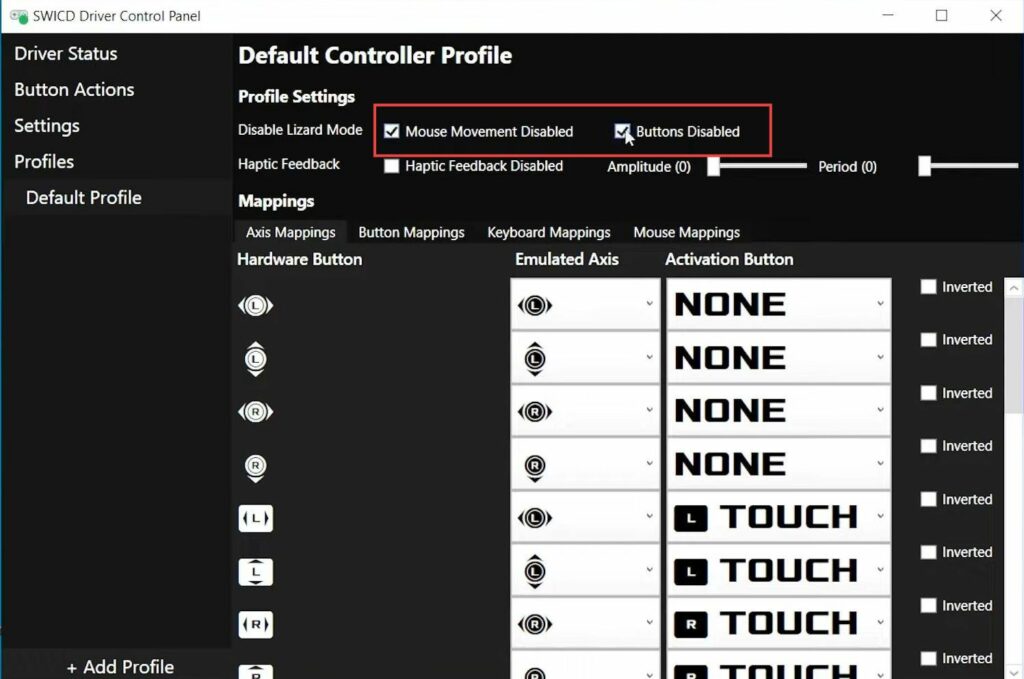
The section describes how to adjust the controllers. You need to go to the “Button Actions” option in the driver settings menu and click on it to access the settings. Finally, the user should check the boxes next to “Mouse Movement Disabled” and “Buttons Disabled” and save the changes.
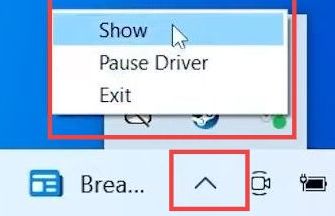
- Click the small up arrow in the taskbar to open the hidden icons menu.
- Look for the SWICD driver icon in the list of installed icons and then right-click on the SWICD driver icon.
- From the menu, select the “Show” option to open the driver settings.
- Look for the “Button Actions” option in the driver settings menu. Click on the “Button Actions” option to access the settings.
- Look for the options labelled “Mouse Movement Disabled” and “Buttons Disabled“.
- Check the boxes next to “Mouse Movement Disabled” and “Buttons Disabled”.
- After that, you need to save your changes.
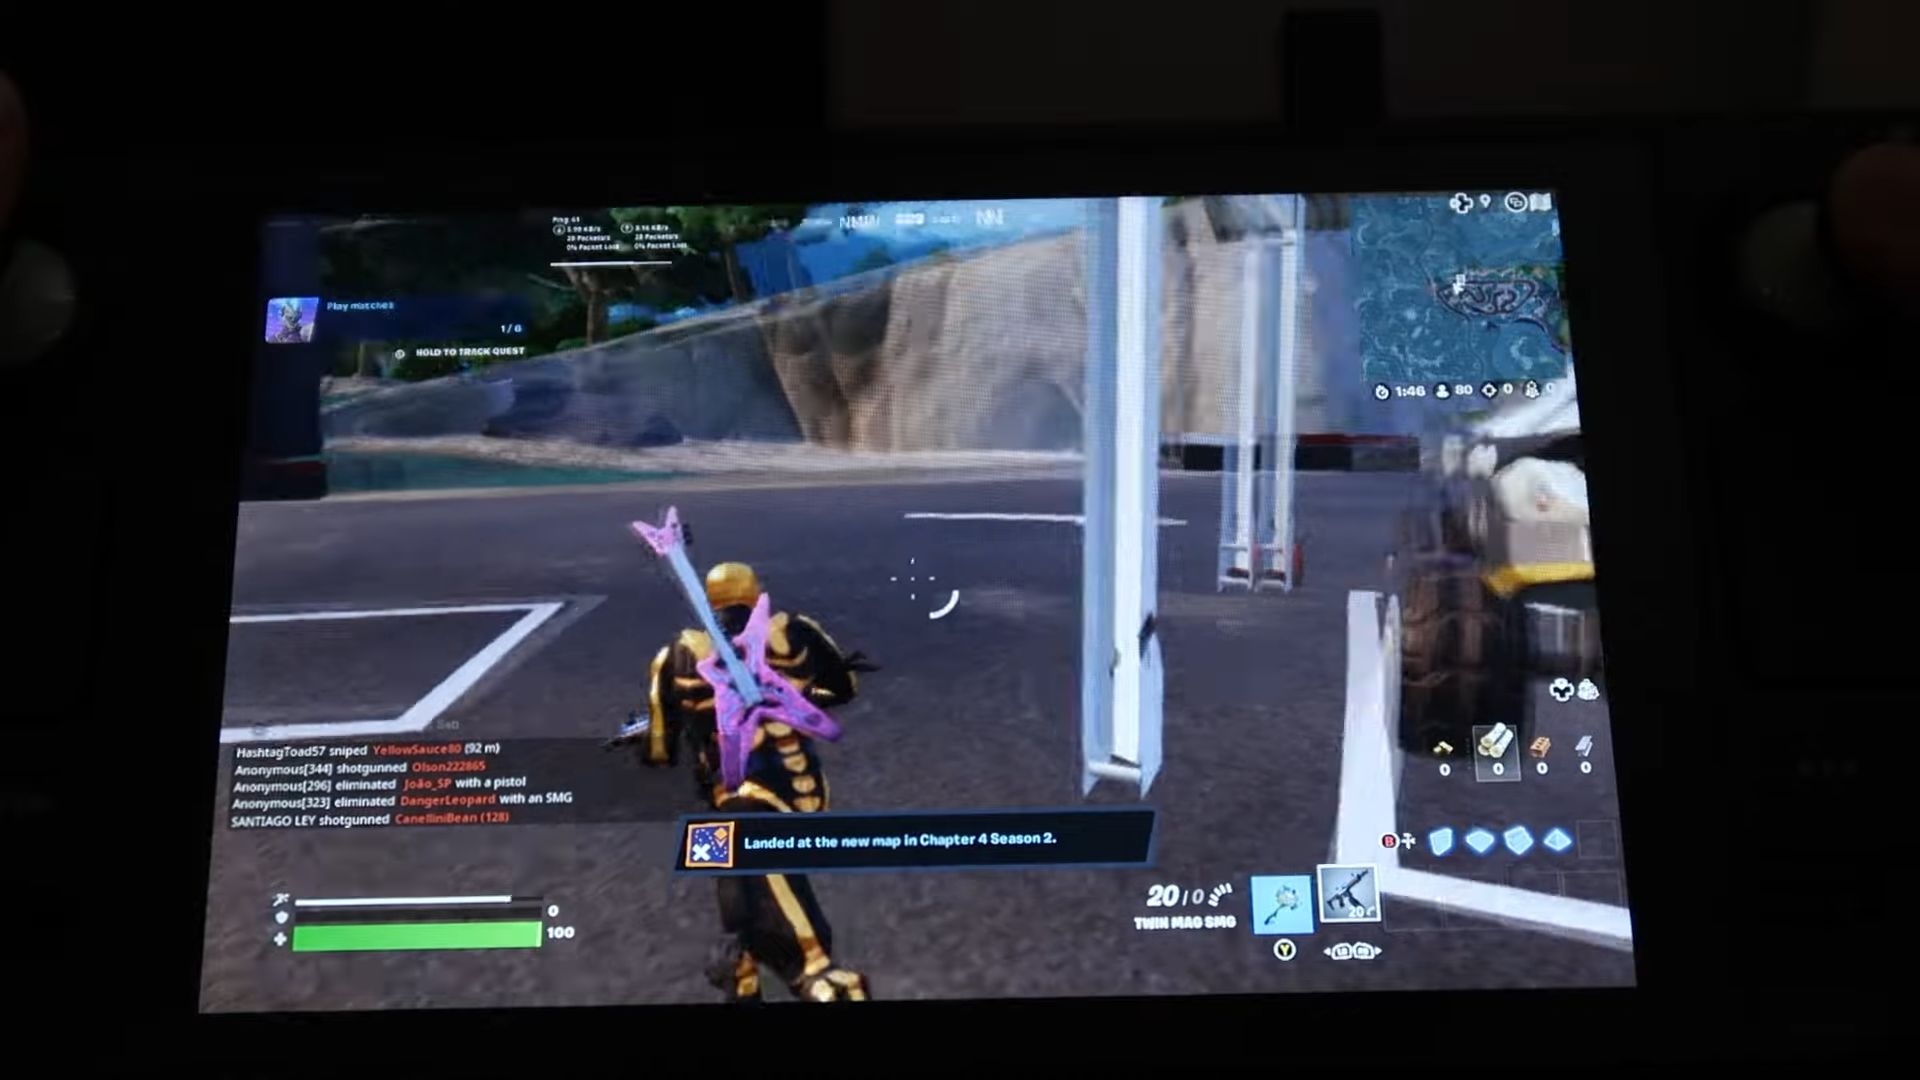
After that, play the game to check if it is working.
Readers help support Windows Report. We may get a commission if you buy through our links.
Read our disclosure page to find out how can you help Windows Report sustain the editorial team. Read more
The Steam Deck hasn’t been getting that many bad reviews, which means it’s a trustworthy portable machine for gaming. This device ships with SteamOS 3.0, an in-house-built modified Arch Linux distribution.
Valve, however, keeps reminding everyone that their new device is a PC, not a locked-down console. And it actually is, with Valve allowing users to install Windows 10 and 11 on Steam Deck and its drivers.
So, if you have been planning to install them, read through the following sections to learn all about them. As for those still wondering: is it worth installing Windows on Steam Deck?, rest assured this guide can help.
How can I download the Steam Deck Windows drivers?
NOTE
If you haven’t installed Windows on Steam Deck yet, download the Media Creation Tool, create a bootable MicroSD card, and then use it to install Windows. Once you’ve finished with the OS, you can also copy the drivers to the card and install them.
- Go to Steam’s official website and download the required drivers.

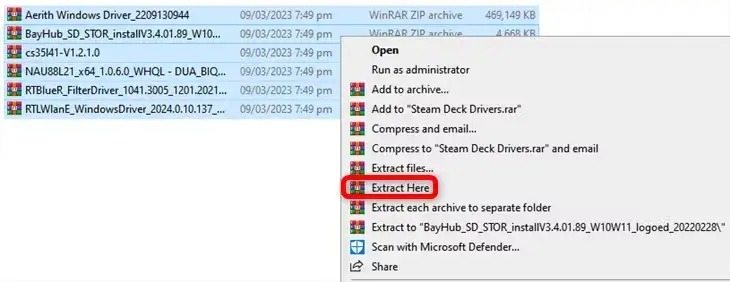
- After downloading the drivers, right-click on individual folders and select Extract All. Then, do it for all the drivers.

- Paste these on the MicroSD card and then plug it into Steam Deck.
- Please turn on the device, open the folder where the drivers are stored, launch the setup, and install them.


If you have just installed Windows on Steam Deck, it won’t be able to connect to the Internet. You must download and extract the driver files on a computer.
However, if you have a USB-C hub with an Ethernet port, use it to connect to the Internet. Once the OS has been established, you can then directly download and install Windows drivers on Steam Deck.
Will there be Windows drivers for Steam Deck? is one of the frequent questions users have. Yes, as you can see above, there are Windows drivers for Steam Deck. When the handheld gaming console was first launched, Valve confirmed it could run other operating systems, including Windows.
While initially, it only supported Windows 10 due to a lack of TPM support, the recent updates to the SteamOS now allow users to download Windows 11 as well.
And the best part, Valve has already released the Windows drivers for the console. The drivers currently available for download are:
- Steam Deck Wi-Fi drivers
- Audio drivers for Steam Deck
- Steam Deck AMD Drivers
- Steam Deck GPU Drivers
The audio driver was not available in the early days after launch, but these, too, can now be installed. This allows your Steam Deck to work as a fully functional Windows device.
How do I update my Steam Deck driver?
Until the compatibility aspect is fully polished, you can use Steam Deck’s Windows Resources page to download the latest version of all the drivers.

As many of you might have noticed when downloading them, the last update date is listed for some drivers.
Another critical thing to note is that since SteamOS now allows the installation of Windows 11, the available Steam Deck driver would also work on the latest iteration.
If Steam Deck doesn’t work as expected after you install Windows, you can reinstall SteamOS. The dual boot option is currently unavailable on Steam Deck, but we will update the guide once the functionality is released.
There are none for those looking for Steam Deck controller drivers to use the console to play games. Ensure you have the Steam app installed on the computer and that things are good.
Also, Valve has not launched the Steam Deck Linux drivers separately, so you must use the installed ones.
Besides, find out the best Steam Deck verified games and try them today. For more information, don’t hesitate to check our guide on how to download the Windows 11 Bluetooth driver for Steam Deck.
If you have any other queries or want help with the steps listed here, comment below.
Vladimir Popescu
Being an artist his entire life while also playing handball at a professional level, Vladimir has also developed a passion for all things computer-related.
With an innate fascination for research and analysis, and realizing many other people share his passion for this subject, he delved into writing Windows-related articles, so other people can also benefit from the acquired information.
When not writing kick-ass articles, Vladimir likes to spend his time doing Crossfit and creating art.
This article presents a simple guide for the download, install, and update of drivers for your Steam Deck.
If you are a computer gamer, Steam Deck needs only a little of an introduction. Developed by Valve, it is a handheld computer for gaming created for passionate gamers. It offers an immersive experience when you play your favorite games. However, it may require the Steam Deck Windows drivers to support its functionality.
The correct, up-to-date, and compatible drivers help your instructions flow seamlessly. However, if you are confused about how to download, install, and update your drivers, this article is for you. Here, we walk you through the best ways to perform this action.
Methods to Download, Install, and Update the Steam Deck Windows Drivers
You can download and install the updated drivers for your Windows Steam Deck device in the following ways.
Method 1: Download and install the Steam Deck Drivers through Windows Resources on the official website
Steam has Windows Resources on its website to help you download and install the updated Steam Deck Windows drivers. You can follow these steps to get the required drivers this way.
- The first step requires you to navigate the official website of Microsoft and get the Windows 10 media creation tool or Windows 11 creation tool downloaded.
- Next, download and install Rufus to create a bootable Windows on your USB drive or microSD card.
- You can now slot your microSD card into the card reader.
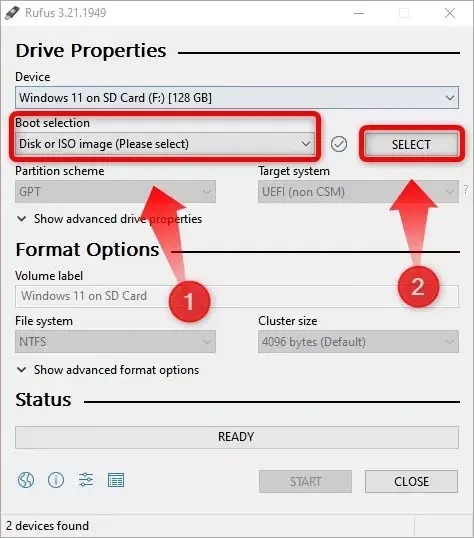
- Next, save and run the Rufus executable file.
- After opening Rufus, choose your microSD card from the options in the Device tab.
- Next, choose Disk or ISO Image from the Boot Selection menu.
- You can now click Select, locate your Windows ISO file, and choose Open.
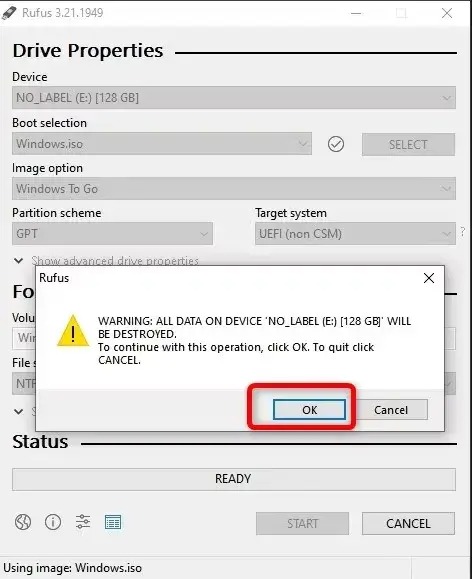
- Next, choose Windows To Go from the Image Option menu.
- In this step, if you want, you can name the SD card in the volume Label box and click Start.
- After clicking start, choose the Windows version you wish to install.
- Next, enable the options to Prevent Windows To Go from accessing internal disks, Remove requirement for an online Microsoft account (not available on Windows 10), Set regional options to the same values as this user’s, and Disable data collection.
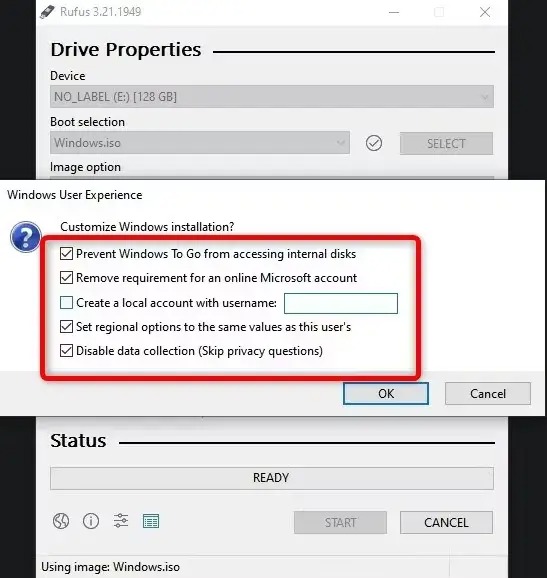
- Click OK and wait for the process to complete.
- The next step is to navigate to the Steam Deck Windows Resources page.
- After you have navigated to the Windows Resources on the official website of Steam, click on the download link of the drivers.
- In this step, save all the downloaded files in a single folder.
- Next, you can extract all the files into the same folder.
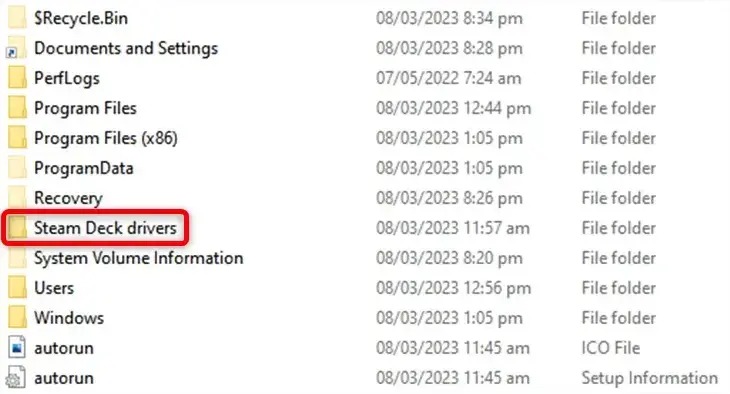
- You can now create a folder in the root of the microSD card.
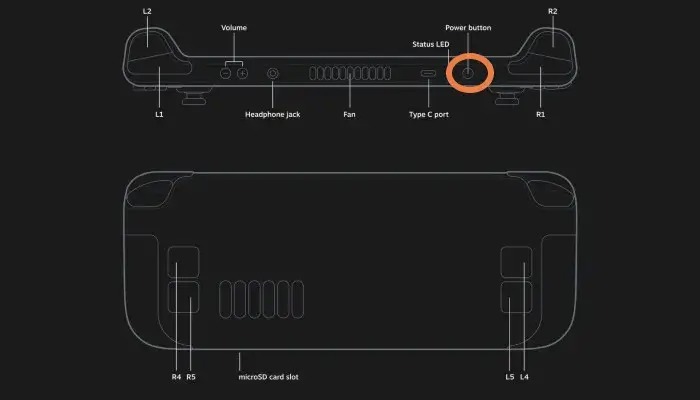
- Next, turn off Steam Deck by pressing and holding the power switch and then choosing the Shutdown option.
- After turning off the Deck, place the microSD card inside the Deck’s card slot.
- Next, press the power switch while holding the volume button.
- After hearing the sound, release both the power and volume buttons.
- Once you have entered the boot selection menu, choose your microSD card, press A, and wait until Windows boots.
- In this step, choose the desired options and click on the I don’t have internet button.
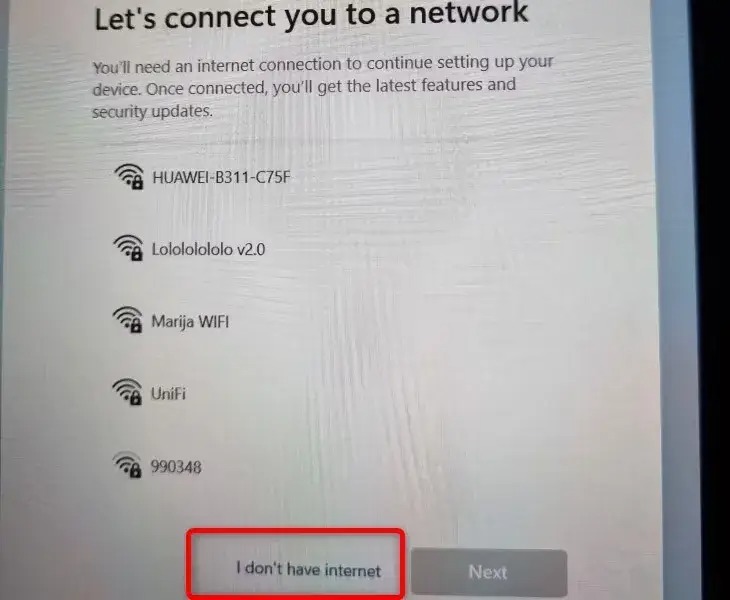
- You can now click on the continue with limited setup option.
- In this step, switch the screen orientation to landscape from portrait mode by right-clicking on the Desktop and then following the path Display Settings > Scale & Layout > Display Orientation > Switch to Landscape.
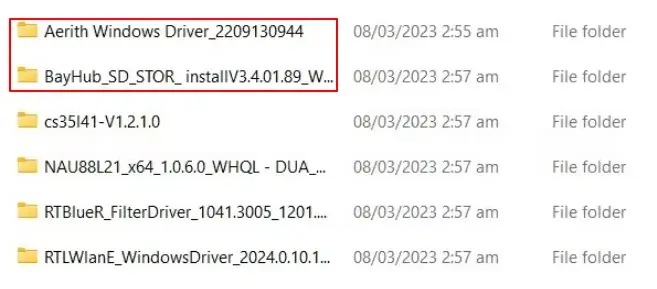
- Now, enter the Aerith Windows Driver and BayHub_SD_STOR_install folders.
- Next, find and double-click the Setup executable files for the APU and SD card storage drivers.
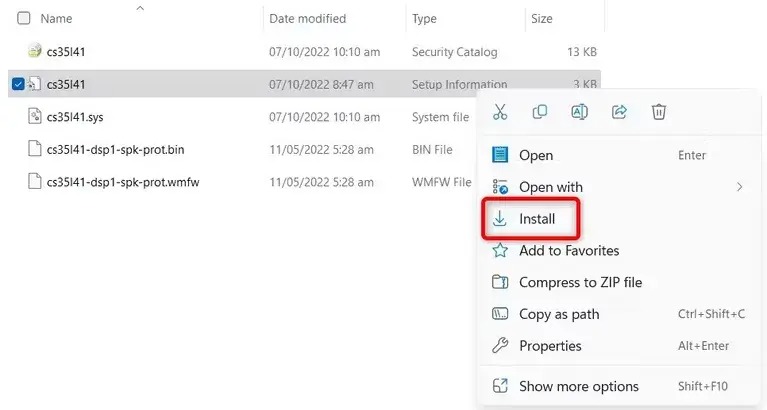
- Next, find the cs35I41 file for the first audio driver, right-click the file, and choose Install from the available options.
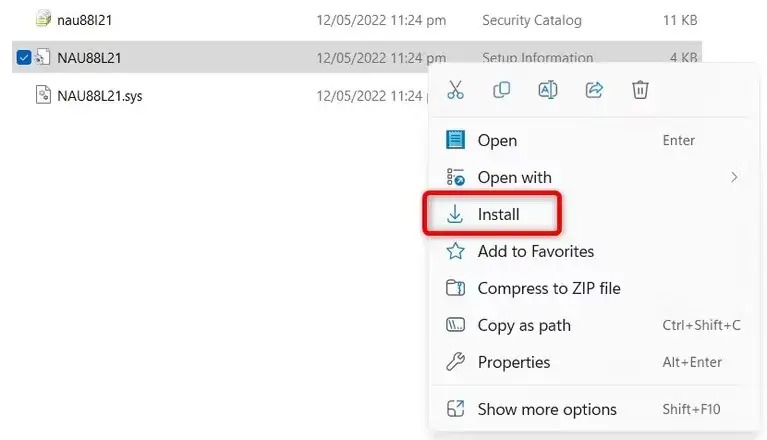
- In this step, find the NAU88L21 file for the second audio driver, right-click the file, and choose Install from the on-screen options.
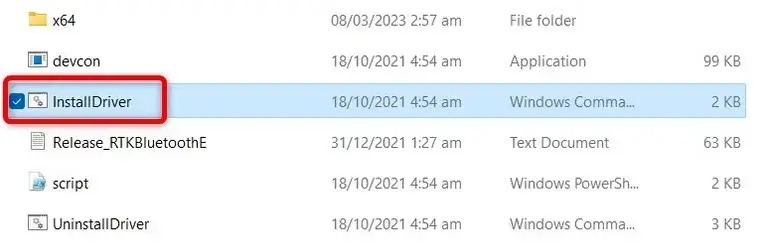
- Next, double-click the InstallDriver file to install the Bluetooth driver.
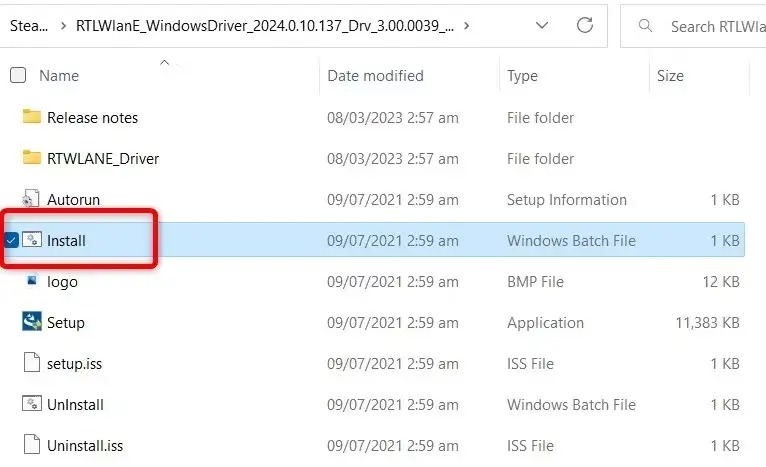
- You can now double-click the Install file to install the WiFi driver.
- You can now right-click on the Start Menu, choose Shut Down or Sign Out, and then select Shut Down.
- After the fan has stopped spinning, press the power switch when holding the volume down button.
- After hearing a sound, navigate to the Steam Deck boot menu, choose Steam Deck’s internal SSD, press A, and wait until the SteamOS boots.
Also know: Best Steam Deck Games to Play
Method 2: Download and install Steam Deck Windows Driver’s Update via Desktop Mode
You can download the Steam Deck Windows drivers through the device’s desktop mode. Below are the steps to execute this task.
- First, press and hold the power button of your Steam Deck.
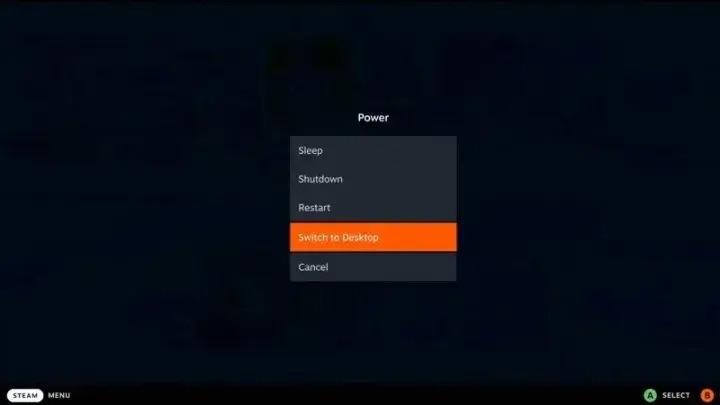
- In this step, choose the Switch to Desktop option and wait for a couple of seconds to enter the desktop mode.
- After entering the desktop mode, navigate to the Terminal.
- Next, input sudo apt update and then sudo apt full-upgrade.
- Now, wait until the system searches for the required updates.
- Next, allow the update download and installation to complete.
- Lastly, you can exit the desktop mode after completing the update installation by restarting the Steam Deck.
Steam Deck Windows Drivers Downloaded, Installed, and Updated
This article explained the methods you can use to get the appropriate Windows drivers for your Steam Deck. We hope you found this guide helpful. However, if any confusion or questions arise, we are happy to help through the comments section. Do not hesitate to leave us a comment. Also, we would be glad if you share this write-up with your pals who may find it useful.
To use the Steam Deck as a controller for PC, go to Steam’s settings, click on Controller, then select Desktop Configuration. From there, you can customize the controls for your PC games.
Additionally, you can connect your Steam Deck to a PC via Remote Play and use it as a controller.
Setting Up The Steam Deck
To use the Steam Deck as a controller for PC, start by enabling Remote Play and ensuring the device is detected. Open Steam in desktop mode, navigate to Settings and access the Controller section to configure the setup according to your preferences.
Additionally, you can explore a variety of resources provided by the community to facilitate the integration process.
Connecting The Steam Deck To Your Pc
To use the Steam Deck as a controller for your PC, you first need to connect it properly. Follow these steps to ensure a seamless connection:
- Begin by turning on your Steam Deck and ensuring that it is charged.
- Next, use a USB-C cable to connect your Steam Deck to your PC.
- Once connected, your PC should recognize the Steam Deck as a controller device.
- Make sure that your PC has the necessary drivers installed for the Steam Deck controller.
Installing The Necessary Software
To fully utilize the Steam Deck as a controller for your PC, you need to install the necessary software. Here’s what you need to do:
- Open Steam on your PC and go to the settings menu.
- Click on the “Controller” tab.
- Under controller settings, enable the option for “Generic Gamepad Configuration Support.”
- Next, install the Steam Deck drivers on your PC. You can find the drivers on the Steam website.
- After installing the drivers, restart Steam to ensure the changes take effect.
By following these steps, you can easily set up your Steam Deck as a controller for your PC. Once connected and the necessary software is installed, you can enjoy a seamless gaming experience using the Steam Deck as your primary controller.
Using The Steam Deck As A Controller
Learn how to use the Steam Deck as a controller for your PC with these simple steps. Connect your Steam Deck to your PC and enable Remote Play to use it as a controller. Customize your controls in desktop mode for an enhanced gaming experience.
Configuring Steam Deck Controls
Configuring Steam Deck controls for use as a PC controller is a simple process that allows for a customizable and tailored gaming experience on your computer. With the Steam Deck, you can easily set up and customize the controls to suit your preferences when using it as a controller for PC gaming.
Customizing Controller Profiles
Customizing controller profiles on the Steam Deck offers a personalized gaming experience tailored to individual preferences. By creating and customizing profiles, users can optimize their gaming setup for different games, ensuring seamless and intuitive controls when using the Steam Deck as a controller for PC gaming.
Using The Steam Deck In Desktop Mode
The Steam Deck’s versatility extends to its functionality in desktop mode, transforming it into a powerful controller for PC gaming. When operated in this mode, users can delve into the Steam client settings to meticulously configure the controller settings, ensuring a tailored and intuitive gaming experience on their computer. This customization process enhances the comfort and responsiveness of using the Steam Deck as a controller. However, it’s important to note that if you encounter an issue where the steam deck can’t reach the steam servers, this could potentially hinder your ability to access and modify these settings until connectivity is restored. Despite this, the ability to use the Steam Deck in desktop mode significantly broadens its utility, making it an invaluable tool for gamers seeking flexibility and control over their gaming setup.
Advanced Tips And Troubleshooting
Learn how to use the Steam Deck as a controller for your PC with these advanced tips and troubleshooting methods. From setting up the Steam controls to enabling remote play, this guide will help you make the most of your Steam Deck as a versatile gaming tool.
Optimizing Controller Performance
To enhance your gaming experience when using the Steam Deck as a controller for your PC, follow these optimization tips:
- Update Firmware: Ensure that your Steam Deck’s firmware is up-to-date to access the latest features.
- Adjust Sensitivity Settings: Fine-tune the sensitivity settings in the Steam software for precise control.
- Customize Button Mapping: Customize button layouts to suit your gameplay preferences.
Troubleshooting Common Issues

If you encounter any issues while using your Steam Deck as a controller, consider the following troubleshooting steps:
- Driver Reinstallation: Reinstall the Steam Deck drivers on your PC to resolve connectivity issues.
- Check Connection: Ensure that the Steam Deck is correctly connected to your PC via Bluetooth or USB.
- Restart Steam: Close and reopen the Steam app to refresh the connection with the controller.
Alternatives To The Steam Deck
Looking for alternatives to the Steam Deck? Learn how to effortlessly use Steam Deck as a controller for PC and access a multitude of features and benefits. Discover how to set up the Steam Deck controller in desktop mode and get the best gaming experience with your PC.
Other PC Controller Options
When considering alternatives to the Steam Deck as a controller for PC gaming, there are various options to explore. Each option comes with its own set of features and drawbacks that cater to different preferences and gaming needs.
Pros And Cons Of Using The Steam Deck As A Controller
Using the Steam Deck as a controller for PC gaming offers several advantages and disadvantages that players should be aware of before making a decision. Here’s a breakdown of the pros and cons: Pros: – Seamlessly integrates with Steam library – Portable and versatile gaming experience – Customizable controls and configurations – Can function as a standalone gaming device – Offers a unique handheld gaming experience Cons: – Limited availability and high demand – May require additional setup for non-Steam games – Potential compatibility issues with certain titles – Battery life constraints for extended gaming sessions – Ergonomics may not suit all players In the realm of PC gaming, the choice of controller can significantly impact gameplay experience. It’s important to weigh the pros and cons of using the Steam Deck as a controller against other PC controller options to determine the best fit for your gaming setup.
Frequently Asked Questions For How To Use Steam Deck As A Controller For Pc
How Do I Use Steam Deck As A Remote Controller?
To use Steam Deck as a remote controller, select Remote Play with Enable Remote Play option. Verify Steam Deck appears under Device Name and choose streaming options. For desktop mode, access Steam Settings > Controller > Desktop Configuration to customize controls.
How Do I Use Steam Deck Controller In Desktop Mode?
To use the Steam Deck controller in desktop mode, open Steam in desktop mode and access Settings > Controller > Desktop Configuration. Customize controls as desired.
How Do I Get My Steam Deck Controller To Work On Windows?
To use your Steam Deck controller on Windows, download SWICD, install it, and set up your controls. Make sure to enable Remote Play and configure the controller in desktop mode through Steam settings. You can also pair it with an Xbox controller.
How Do I Use My Steam Deck As A Xbox Controller?
To use your Steam Deck as an Xbox controller, follow these steps: 1. Open Steam in desktop mode and go to Settings > Controller > Desktop Configuration. 2. Customize the controls according to your preferences. 3. Connect your Steam Deck to your PC via Remote Play.
- Enable the Remote Play option and ensure that the Steam Deck is recognized as a device. 5. Start playing your Xbox games on your PC using your Steam Deck as a controller.
Conclusion
Thank you for learning about using Steam Deck as a PC controller. With its versatility and compatibility, you can enhance your gaming experience. Opting for Windows 10 instead of Windows 11 offers several advantages, and by following the simple instructions provided, you can seamlessly integrate your Steam Deck with your PC games, ensuring a smoother and more versatile gaming experience.
Elevate your gameplay and enjoy the convenience of a customized controller setup.