Время на прочтение4 мин
Количество просмотров6.7K

10 марта 2022 года Valve выложила в открытый доступ драйверы для Windows 10 на Steam Deck, включая софт для видеокарты, WiFi и Bluetooth.
Аудиодрайверы для Windows 10 пока еще в работе. Текущие ограничения по звуку в Windows 10: динамики и аудиопорт 3,5 мм не будут работать без дополнительных драйверов, которые еще в разработке. Аудио можно подключить через USB-C и Bluetooth.
На консоль пока что можно установить только Windows 10. Для Windows 11 требуется новая версия BIOS с поддержкой fTPM, которую Valve скоро выпустит.
Valve предупредила, что сейчас на Steam Deck можно выполнить только полную установку Windows 10. Мультисистемная загрузка со SteamOS пока недоступна, но уже дорабатывается и появится в SteamOS 3. В процессе установки Windows 10 сотрутся все ранее записанные пользовательские данные.
Пояснение о процессе установки Windows 10 для энтузиастов:
- чтобы вызвать меню загрузки, выключите устройство. Затем, зажав кнопку громкости –, нажмите кнопку питания;
- процесс установки будет происходить на экране Steam Deck вертикально (поперек), переключиться в горизонтальный режим можно будет только после полной установки Windows 10;
- чтобы ввести ключ активации Windows 10 в ходе установки нужно подключение к интернету через концентратор USB-C с портом Ethernet, так как драйверы Wi-Fi устанавливаются отдельно, если они не интегрированы в дистрибутив ОС.
Вдобавок Valve опубликовала инструкцию по восстановлению Steam Deck с помощью USB-флешки. Например, чтобы вернуться к SteamOS, установленной на Steam Deck по умолчанию.
15 июля 2021 года Valve представила компактную игровую консоль Steam Deck с гибридным процессором AMD на микроархитектурах Zen 2 (4c/8t) и RDNA 2 (8 RDNA с двумя вычислительными блоками). Приставка работает на специально адаптированной версии SteamOS 3.0, которая основана на Arch Linux с рабочим столом KDE Plasma. Также консоль специально рассчитана на отображение всех игр из библиотеки Steam с разрешением 800p с частотой 30 кадров в секунду. Три версии Steam Deck с накопителями на 64/256/512ГБ будут продаваться по цене $399/$529/$649 соответственно. Во всех версиях консоли Steam Deck есть слот M.2 2230 SSD, но Valve не советует заниматься апгрейдом.
Размеры Steam Deck (ширина, высота, толщина) — 298x117x49 мм, вес около 669 грамм, у нее емкостный мультитач-экран размером 7″ с разрешением 1280×800 (соотношение сторон 16:10) и встроенная батарея на 40 Вт·ч (до 2 часов в 3D-играх автономно или до 8 часов при запуске 2D-игр или поиске в браузере).
Steam Deck доступна для бронирования в некоторых странах. Компания пообещала расширить список стран для доставки.
В начале сентября Valve открыла приём заявок на девкиты Steam Deck и рассказала, что создала API Steam Deck для быстрой оптимизации игр разработчиками.
6 октября Valve опубликовала разбор Steam Deck. Там можно менять клавиши управления (стики) и внутренний накопитель.
В ноябре Valve предупредила о задержке в процессе выпуска своей игровой консоли Steam Deck на рынок как минимум еще на два месяца. Производитель в качестве причин назвал проблемы с поставками компонентов устройства из-за дефицита нужных материалов и полупроводников. Также Valve рассказала про чип AMD в Steam Deck и о скорости работы консоли на разных накопителях.
В начале декабря Valve показала упаковку Steam Deck: там написано, что в приставку можно играть в метро, на даче, на дереве и в туалете.
11 декабря Valve открыла внешний вид эксклюзивного чехла для топовой версии Steam Deck с внутренним накопителем NVMe на 512 ГБ. В версиях с 64 ГБ eMMC и 256 ГБ NVMe чехол такой же с точки зрения функционала, но попроще и без дополнительных бонусов внутри.
14 января 2022 года Valve показала фотографию процесса тестирования недавно собранных Steam Deck.
22 января тестировщик показал, что к девкиту Steam Deck можно подключить 10 периферийных устройств: шесть Bluetooth-контроллеров, Bluetooth-колонку, проводной геймпад, проводную клавиатуру и мышь через USB-разветвитель.
Первые тесты Steam Deck показали ее хорошую производительность и среднее время автономной работы.
12 февраля Valve выложила в открытый доступ CAD-файлы топологической поверхности корпуса Steam Deck. Теперь умельцы, модификаторы и создатели аксессуаров могут напечатать корпус Steam Deck на 3D-принтере и оценить его в руках.
15 февраля Valve объявила о партнерстве с iFixit по продаже запчастей и комплектующих для Steam Deck и Valve Index. В рамках этого события iFixit выполнила полный разбор Steam Deck и показала, как хорошо собрана и устроена эта компактная игровая консоль. iFixit заявила, что это впечатляющее по ремонтопригодности устройство.
18 февраля Valve показала 117 фрагментов прототипов Steam Deck, некоторые версии были со съемными ручками, как у Nintendo Switch.
25 февраля Valve начала первые продажи Steam Deck. Глава Valve Гейб Ньюэлл стал курьером по доставке Steam Deck покупателям в США недалеко от офиса компании.
26 февраля Valve впервые показала внешний вид фирменной док-станции для Steam Deck.
В начале марта некоторые первые обладатели компактной игровой консоли Steam Deck стали жаловаться на дрифт правого стика. Проблема пока не носит массовый характер, так как Valve только начала рассылать первую партию приставок. Ранее такая проблема часто возникала у стиков консоли Nintendo Switch.


This tool will help you setup and configure Windows 11 on your steam deck
| Home |
| Install Windows 11 |
| Drivers |
| Emulators |
| Hotkeys |
| Tools |
| Developer Guide |
Download Installer
Sourcecode
- Download ZIP File
- Download TAR Ball
- View On GitHub
Drivers
The tool can automatically download and install the latest offcial drivers for windows.
Valve Offcial Source
While SDHQ is nowhere near the first to cover this, I recently wanted to play the new Call of Duty: Modern Warfare II campaign on my Steam Deck. Its RICOCHET anti-cheat engine isn’t compatible with Proton, so my only choice was to install Windows. Windows is useful for other unsupported games as well, such as Fortnite and Destiny 2, which even bans players for attempting to play on their Steam Deck (c’mon Bungie!).
Before we begin, there are a few different ways to boot Windows on the Steam Deck:
- Alternative OS (Operating System) — This method involves using a separate device, like external SSD or Mircro SD card to boot Windows, keeping SteamOS dedicated to one device, and Windows dedicated to another.
- Dual Boot — Builds on the concept of an Alternative OS, but uses disk partitioning to share one section of a device with the other operating system. This method is especially useful if you have a large external drive or Micro SD card and want to use part of it for Windows, and the other part for extra game storage in SteamOS. Dual booting is not currently supported on the internal Steam Deck SSD.
In order to install windows on the Steam Deck, you’ll need a few things:
- A Windows PC. While there are Mac compatible methods available, the tools we will be using make the process simpler and are only available for Windows. Did you know you can install Windows on your Mac alongside MacOS? Check out Parallels (Paid) or Boot Camp (Free).
- A Windows 10 ISO or Windows 11 ISO. For Windows 10, follow the instructions to «Create installation media for another PC» and for Windows 11, download the ISO directly from the page.
- A disk image writing utility. A free tool, such as RUFUS is recommended.
- An external SSD or Micro SD card with at least 64gb capacity (256gb+ is recommended for gaming)
- The Steam Deck Windows drivers
- A USB adapter for your external SSD (optional)
Download the Windows ISO
From the Microsoft web pages linked above, download the ISO image of the operating system you wish to install. Note: You will need a valid Windows product key to remove the «Activate Windows» watermark, but you can install and use most of Windows’ features without activating. For this tutorial, we’ll be using Windows 10.
Creating your Windows Boot Drive
Plug your external SSD or Micro SD card into your computer. Open up RUFUS (no installation necessary) and select «yes» if prompted to allow RUFUS to make changes to your system. In the RUFUS UI, select your removable drive and the Windows ISO you downloaded earlier.

Under «Image Option» select «Windows to Go» and click Start
Note: Everything on this drive will be erased once you click Start, so make a backup if you are repurposing a drive.

Let RUFUS run its course writing the image. This can take anywhere from 5-25 minutes depending on the speed of your device.
Booting Windows and Installing Drivers
If this drive will be dedicated to Windows and no portion will be shared with SteamOS, then you’re almost done! Eject the drive, connect it to your Steam Deck, and access the bootloader by holding the Volume down button while powering on the Steam Deck. You’ll see a few options and will want to select «EFI — SD/USB» to access Windows. Windows will finalize the setup process and present you with the desktop.
At this point, you’ll want to install the Steam Deck drivers linked above. Simply run each setup.exe file and allow the installation to complete. For .inf drivers, right-click each one and click install. You’ll receive a confirmation message after each driver installs successfully. Windows will want you to restart the Steam Deck, so go ahead and do so using the Windows menu, and holding the volume down button to access the bootloader once the system starts powering on. Access the EFI SD/USB again, and you’ll be logged into a fully functioning Windows OS on the Steam Deck!
If you intend to split the drive’s capacity between Windows and SteamOS, power down your Steam Deck, insert your Windows SSD or Micro SD card into your PC, and follow the steps below. Otherwise, happy gaming!
Section 2: For Dual Boot ONLY
The sections below only apply if you’ll be sharing the drive capacity between Windows and SteamOS.
Let’s say you have a 1-2TB external SSD or Micro SD card you’re installing Windows on, and want a portion of that to be available to store games in SteamOS. There are a few extra steps required to partition and format the drive in a way where the space can be shared.
Note: Games installed via SteamOS will not be accessible in Windows. Even though both operating systems have access to the same physical storage device, Windows cannot read the Linux-based ext4 filesystem and each OS requires different user permissions to access the storage. You MUST install Windows first, as the process for creating a Windows to Go drive erases the entire disk. Therefore you cannot install to a partition on a drive currently used in SteamOS without erasing it. I tried a variety of tools to install and restore from an existing system image to no avail. Learn from my pain, install Windows first!
Partitioning
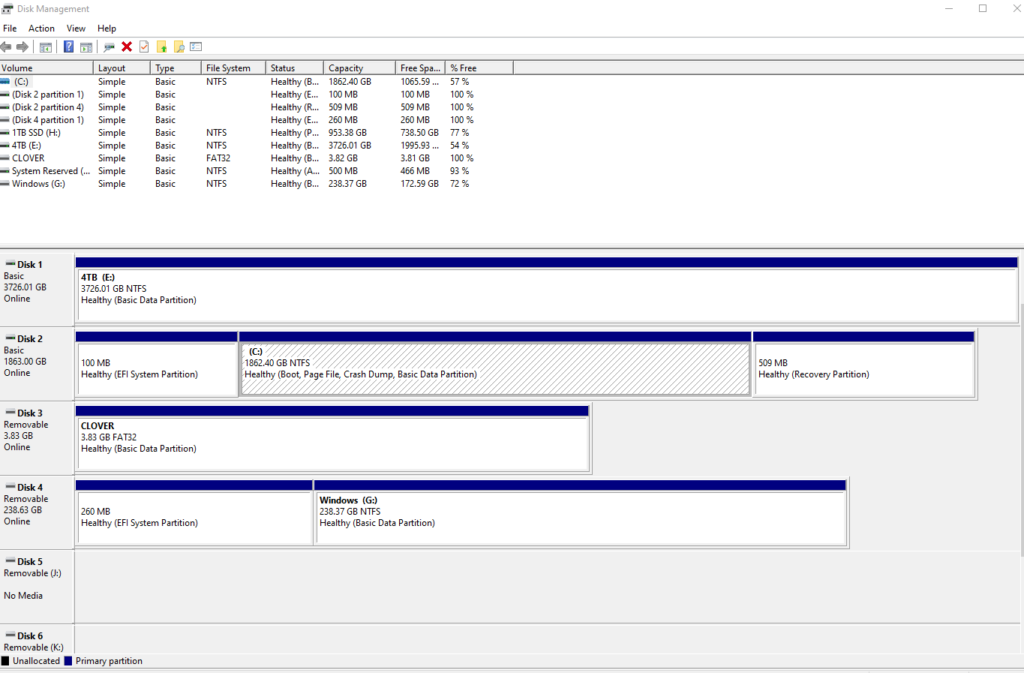
By this point in the guide, you have Windows installed on an external SSD or Micro SD card. Connect the drive to a PC and open Disk Management in Windows. You can find it by searching «partition» in Windows search. You’ll be presented with a list of disk drives connected to your computer. In the screenshot below, Disk 4 is my Windows to Go Micro SD card.

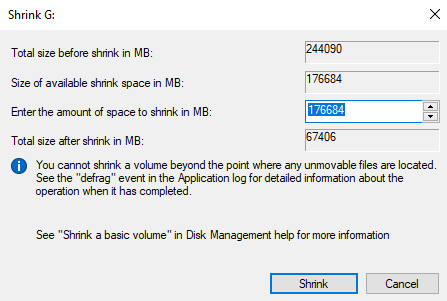
Right-click on the Windows partition and select Shrink Volume
Choose the amount of space to shrink your partition by. The space next to «Enter the amount of space to shrink in MB» will be the amount of storage available in SteamOS.

Once the operation completes, you’ll see a block of Unallocated Space on your disk. You’re all set on your computer and can eject your device.

Steam Game Library
Connect your SSD to your Steam Deck or insert the Micro SD card, and boot into Windows by holding Volume down during boot, and selecting «EFI SD/USB» from the bootloader menu. Once you’ve successfully booted into Windows, reboot your Steam Deck into SteamOS desktop mode. The next steps involve formatting the unallocated space with the ext4 filesystem, changing the partition permissions, adding the newly formatted space as a Steam game library, and if you’re using an external SSD connected via USB, editing the fstab to auto-mount the drive. Luckily, SDHQ already has a guide covering these steps.
If you’re using a Micro SD card, you can skip the steps about modifying fstab after adding the game library folder to Steam, since the Steam Deck automatically mounts the Micro SD card when powered on.
If you’ve gotten this far, you have a bootable Windows partition and SteamOS partition for use as a Steam games library folder! Happy gaming!

Readers help support Windows Report. We may get a commission if you buy through our links.
Read our disclosure page to find out how can you help Windows Report sustain the editorial team. Read more
Getting your Steam Deck to run smoothly with Windows 10 can be a bit tricky, especially when it comes to audio drivers. But don’t worry, I’ve got you covered with this step-by-step guide to install Steam Deck audio drivers on Windows 10.
How do I install the Windows 10 Steam Deck audio drivers?
1. Decompress the Audio Driver Files Before Installation
- Visit the official Steam Deck Windows Resources page and download the audio drivers for Windows 10.
- Use a file decompression tool like WinRAR or 7-Zip to extract the contents of the downloaded RAR file into a single directory.
- Go to the directory where you decompressed the files and find the cs35l41.inf and NAU88L21.inf files.
- Right-click on the cs35l41.inf file.
- In the context menu, select Install.
- Similarly, right-click on the NAU88L21.inf file and select Install.
Decompressing the files ensures the INF files are accessible for installation, resolving issues where the Install option is not available. After installing both inf files, you can also install the APU driver. When installing the driver, on Windows 11 you also have an option for Additional Options. Click on it and select the check box for Factory Reset for the update to work. On Windows 10, you will not have that problem.
2. Change the boot order to Boot from SD Card
- Turn off the Steam Deck completely.
- Press and hold the Volume Down button, then press the Power button to turn on the device. This will bring up the Boot Manager.
- Use the Boot Manager to select the SD card where Windows is installed.
- Once booted into Windows, run the setup.exe file for the APU drivers and follow the on-screen instructions. When prompted to reboot, choose the option to reboot later.
- Shut down the Steam Deck, then repeat steps 1 and 2 to boot back into Windows from the SD card to complete the APU driver installation.
- Follow steps 4-6 from Solution 1 to install the audio drivers.
Changing the boot order ensures that the Steam Deck boots into the correct OS, allowing for the successful installation of the APU and subsequent audio drivers.
3. Update and Install APU Drivers
- Go to the official Steam Deck Windows Resources page highlighted in Solution 1 and download the latest APU driver.
- Execute the setup.exe file from the APU driver package.
- Proceed with the installation by following on-screen prompts. When asked to reboot, choose to continue without rebooting.
- Manually reboot into Windows using the Boot Manager as previously instructed.
- With APU drivers installed, follow steps 4-6 from Solution 1 to install the audio drivers.
Updating the APU driver ensures compatibility and support for the audio driver installation, resolving common conflicts.
Troubleshooting Steam Deck audio problems
Some users reported that even though they installed the latest audio drivers successfully, they experience sound issues on Steam Deck. If you have no sound on Steam Deck, we have a complete guide on how to fix the problems if the Windows audio drivers are not working.
You might also be interested to read our guide on how to install and update Windows 11 Steam Deck audio drivers.
By following these solutions, you can successfully install the audio drivers on your Steam Deck running Windows 10. To avoid future issues, always ensure your drivers are up-to-date and keep a backup of your essential files.
Did you manage to install the Steam Deck Windows 10 audio driver? Let us know in the comments below.
Claudiu Andone
Windows Toubleshooting Expert
Oldtimer in the tech and science press, Claudiu is focused on whatever comes new from Microsoft.
His abrupt interest in computers started when he saw the first Home Computer as a kid. However, his passion for Windows and everything related became obvious when he became a sys admin in a computer science high school.
With 14 years of experience in writing about everything there is to know about science and technology, Claudiu also likes rock music, chilling in the garden, and Star Wars. May the force be with you, always!

