
Все способы:
- Способы устранения неисправности
- Способ 1: Восстановление BCD, BOOT и MBR
- Способ 2: Восстановления системных файлов
- Вопросы и ответы: 2
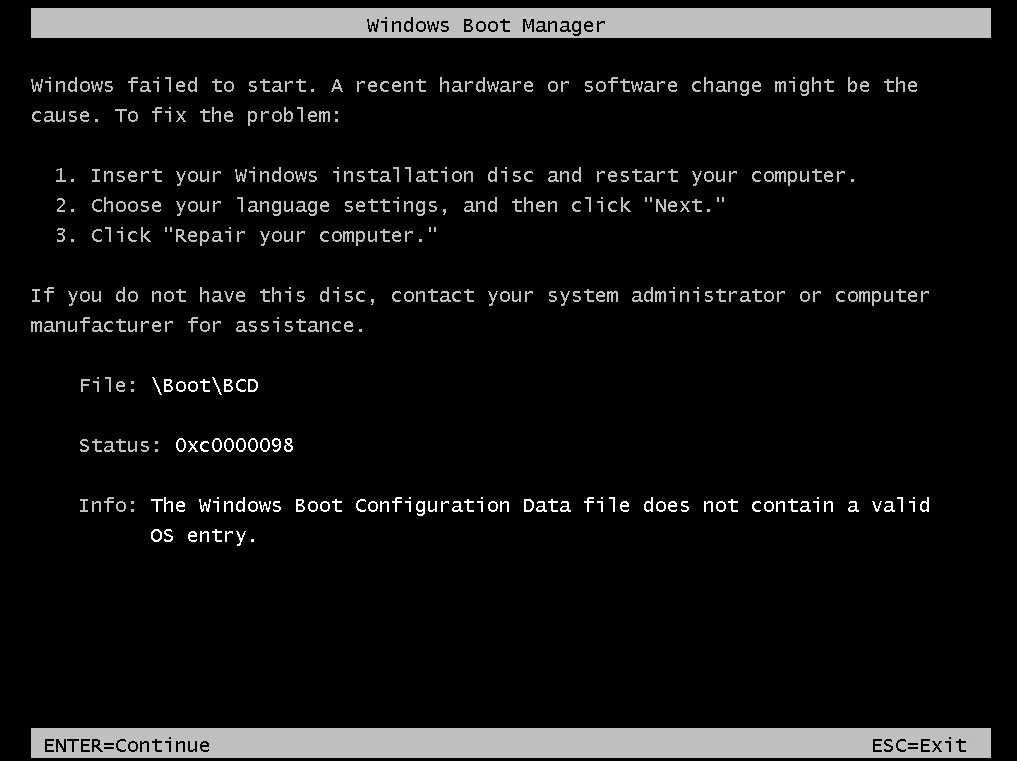
Во время запуска системы пользователь может столкнуться с такой неприятной ситуацией, как BSOD с ошибкой 0xc0000098. Положение усугубляется тем, что при возникновении данной проблемы нельзя запустить ОС, а значит, и произвести откат к точке восстановления стандартным способом. Попробуем разобраться, как ликвидировать данную неисправность на ПК под управлением Виндовс 7.
Читайте также: Как исправить ошибку 0xc00000e9 при загрузке Windows 7
Способы устранения неисправности
Практически всегда ошибка 0xc0000098 связана с файлом BCD, который содержит данные о конфигурации загрузки Виндовс. Как уже говорилось, данную проблему нельзя устранить через интерфейс операционной системы по причине того, что он просто не запустится. Поэтому все способы ликвидации данной неисправности, если исключить вариант с переустановкой ОС, осуществляются посредством среды восстановления. Для применения тех методов, которые описаны ниже, необходимо иметь загрузочный диск или флешку с Windows 7.
Урок:
Как сделать загрузочный диск с Windows 7
Создание загрузочной USB флешки с Windows 7
Способ 1: Восстановление BCD, BOOT и MBR
Первый метод предусматривает выполнение воссоздания элементов BCD, BOOT и MBR. Произвести данную процедуру можно при помощи «Командной строки», которая запущена из среды восстановления.
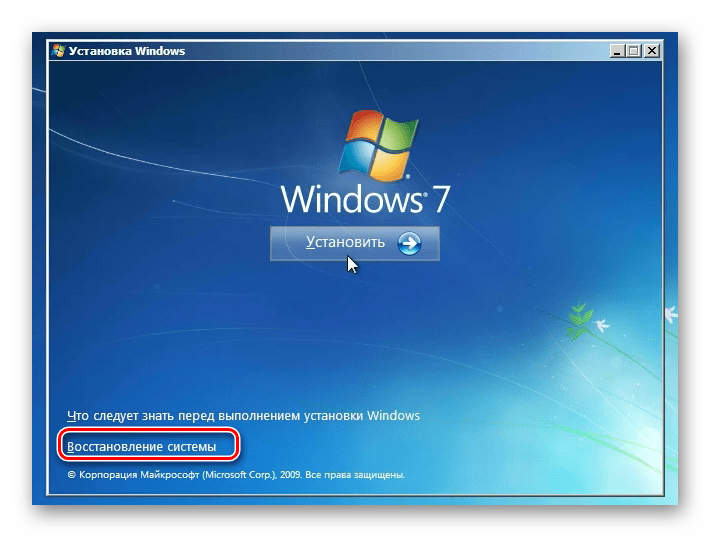
- Запуститесь с загрузочной флешки или диска. Щелкните по пункту «Восстановление системы» в стартовом окне загрузчика.
- Откроется список выбора установленных на ПК систем. Если у вас инсталлирована только одна ОС, перечень будет состоять из единственного наименования. Выделите название той системы, у которой наблюдаются проблемы с запуском, и нажмите «Далее».
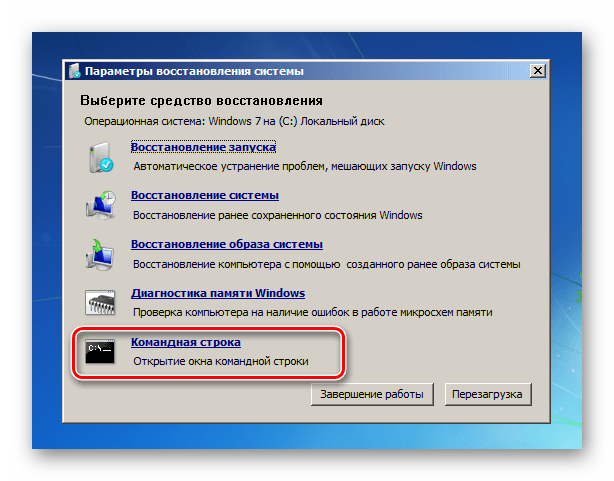
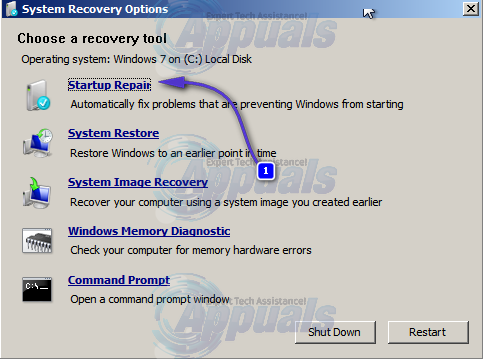
- Откроется интерфейс среды восстановления. Щелкните в нем самый нижний пункт – «Командная строка».
- Запустится окно «Командной строки». Прежде всего, нужно найти операционную систему. С учетом того, что она не отображается в меню загрузки, используйте следующую команду:
bootrec /scanos
После ввода выражения жмите Enter и жесткий диск будет просканирован на наличие ОС из семейства Виндовс.
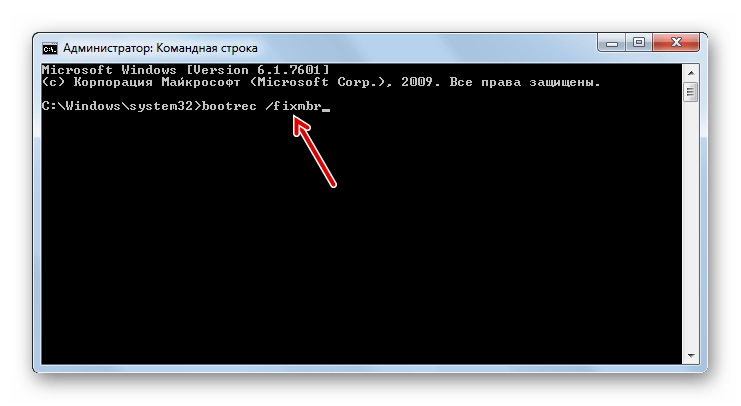
- Затем нужно восстановить загрузочную запись в системном разделе с найденной на предыдущем шаге ОС. Для этого применяется следующая команда:
bootrec /fixmbr
Как и в предыдущем случае, после ввода жмите Enter.
- Теперь следует записать новый загрузочный сектор в системный раздел. Производится это путем введения такой команды:
bootrec /fixboot
Введя её, кликните Enter.
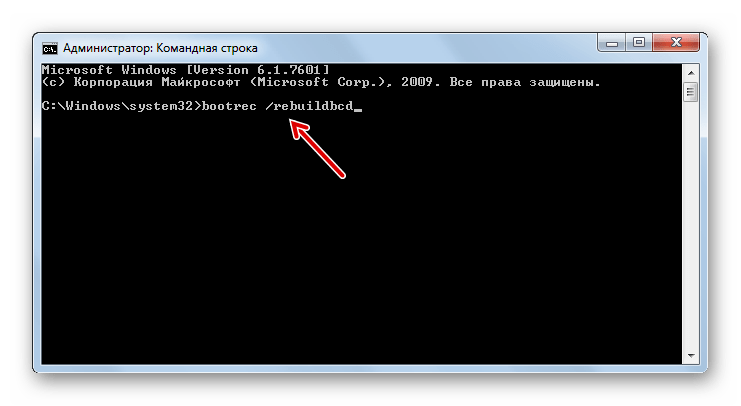
- Наконец, пришла очередь восстановить непосредственно файл BCD. Для этого введите команду:
bootrec /rebuildbcd
Как всегда, после ввода жмите Enter.
- Теперь перезагрузите ПК и попробуйте войти в систему в стандартном режиме. Проблема с ошибкой 0xc0000098 должна быть решена.
Урок: Восстановление загрузочной записи MBR в Windows 7


Способ 2: Восстановления системных файлов
Также решить проблему с ошибкой 0xc0000098 можно путем сканирования системы на наличие поврежденных элементов с последующей их починкой. Делается это тоже при помощи ввода выражения в «Командную строку».
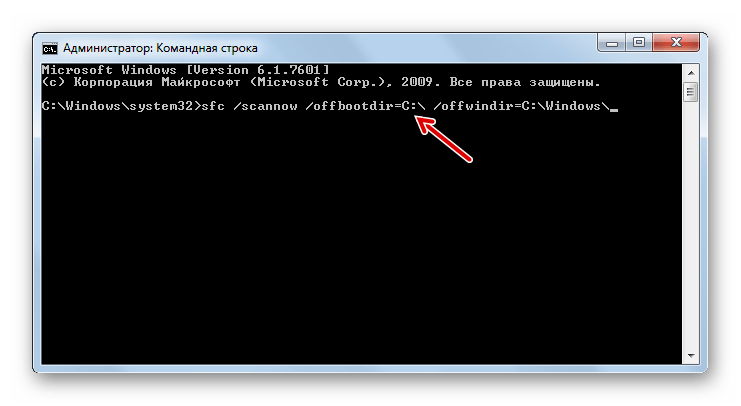
- Запустите «Командную строку» из среды восстановления так же, как было изложено при описании Способа 1. Введите выражение:
sfc /scannow /offbootdir=C:\ /offwindir=C:\Windows\Если ваша операционная система расположена не на диске C, вместо соответствующих символов в данной команде вставьте букву актуального раздела. После этого жмите Enter.
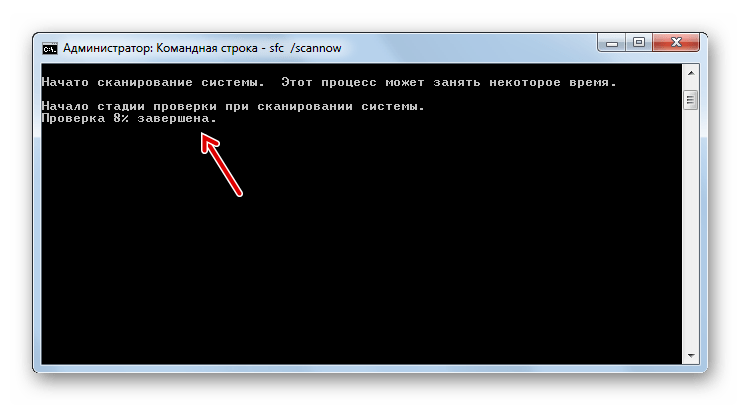
- Будет активирован процесс проверки файлов системы на целостность. Дождитесь его полного завершения. За прогрессом процедуры можно наблюдать при помощи процентного показателя. При обнаружении во время сканирования поврежденных или недостающих элементов они будут автоматически восстановлены. После этого есть вероятность, что ошибка 0xc0000098 при запуске ОС больше возникать не будет.
Урок:
Проверка целостности системных файлов в Windows 7
Восстановление системных файлов в Windows 7
Такую неприятную проблему, как невозможность запуска системы, сопровождающуюся ошибкой 0xc0000098, с наибольшей долей вероятности можно устранить, произведя воссоздание элементов BCD, BOOT и MBR путем ввода выражения в «Командную строку», активированную из среды восстановления. Если этот метод вдруг не помог, попробовать справиться с неполадкой можно, запустив проверку целостности файлов ОС с последующей их починкой, которая осуществляется с помощью того же инструмента, что и в первом случае.
Наша группа в TelegramПолезные советы и помощь
Ошибка 0xc0000098 появляется в случае повреждения конфигурационных файлов запуска операционной системы. Эта ошибка может вызываться проблемами в аппаратной части, например повреждения жесткого диска или сбоями работы оперативной памяти.
Этой проблемой страдают достаточно широкий круг пользователей, начиная от владельцев Windows Vista и заканчивая Windows 10. К счастью, есть несколько способов решения ошибки 0xc0000098.
После их использования, ваша операционная система должная запуститься как положено. Однако стоит предупредить о том, что вы должны иметь при себе диск для восстановления. Неважно в каком он будет виде: на флэш-носителе или на оптическом диске.
Для создания диска восстановления вы можете воспользоваться заметками с официального сайта Microsoft.
Как войти в BIOS для смены порядка загрузки системы
Перед тем как перейти к решению ошибки 0xc0000098, вам нужно необходимо понять как сменить порядок загрузки.
Перезагрузите свой компьютер. Войдите в настройки БИОСа сразу же на старте загрузки ОС. Кнопка, которую вы должны нажать для входа в настройки зависит от производителя вашей материнской карты. Они могут быть чем угодно: Esc, Delete, F2, F8, F10, F12. Данная кнопка должна будет высвечиваться в нижней части экране при загрузке системы. Или вы можете просто загуглить вопрос «как зайти в БИОС на *****?». Как только окажитесь внутри БИОСа, перейдите во вкладку BOOT. В списке устройств, переместите то, которое вам необходимо. Например если вы используете диск для восстановления на CD, то переместите ваш CD/DVD-Rom в вверх этого списка.
Теперь же давайте перейдем к методам решения ошибки 0xc0000098.
Метод №1 Перестройка и починка Главной Загрузочной Записи, Сектора загрузки и конфигурационных файлов запуска
В этом методе вам понадобиться использовать тот самый восстановочный диск, который поминался ранее.
- Как только окажетесь внутри БИОСа, пройдите к настройкам загрузки и используя инструкции БИОСа, выставьте на первое место в загрузке нужное вам устройство(флэш-накопитель или CD-Rom).
- Когда ваш компьютер будет запущен через диск для восстановления, выставьте в диалоговом окне нужные вам настройки и язык, а затем нажмите «Далее».
- В нижнем левом углу, нажмите на «Починить ваш компьютер» и выберите «Диагностика проблем».
- На экране «Диагностики проблем», выберите «Расширенные опции» и кликните на «Командную строку». Для Windows Vista и Windows 7 она находится в «Опциях Восстановления».
- В открытой «Командной строке» вводите следующие команды и нажимайте Enter, после введения каждой из них:
- bootrec /scanos
- bootrec /fixmbr
- bootrec /fixboot
- bootrec /rebuildbcd
Метод №2 Восстановление загрузки
Еще один метод требующий наличия восстановочного диска. Мы будет использовать встроенный в него инструмент для починки конфигурационных файлов запуска(или просто загрузки).
- Используйте шаги 1-4 с предыдущего метода, что бы добраться до «Починить ваш компьютер».
- Выберите вашу установку, а затем из списка предложенных опций, выберите «Восстановление загрузки».
Дождитесь окончания процесса. Если «Восстановление загрузки» найдет ошибку, то оно попытается исправить ее. Это должно заставить ошибку 0xc0000098 перестать проявлять себя.
Метод №3 Запустить проверку системных файлов
Утилита для проверки системный файлов автоматически сканирует вашу систему на наличие различных неполадок и попытается их исправить.
- Используя шаги из первого метода, доберитесь до «Починить ваш компьютер».
- Далее выберите «Командную строку».
- В открытой «Командной строке» введите следующую команду и нажимайте Enter:
- sfc /scannow /offbootdir=C:\ /offwindir=C:\Windows\
- Подождите пока утилита просканирует вашу систему. Она исправит ошибку 0xc0000098, если это будет возможно.
Метод №4 Запустить утилиту CHKDSK
Если предыдущих метод потерпел поражение, то вы можете попробовать запустить утилиту CHKDSK. Эта встроенная в систему программа проверит ваш диск и исправит ошибки в системных файлах.
- Используя шаги 1-3 из предыдущего метода для открытия «Командной строки».
- Далее, в «Командной строке», впишите следующую команду и нажмите Enter:
- chkdsk C: /f
- Дождитесь окончания процесса восстановления. Утилита попытается исправить возникшую ошибку 0xc0000098.
Несмотря на солидный возраст операционной системы Windows 10, Microsoft до сих пор не смогли залатать все дыры в ней.
by | Sep 29, 2017 | Blog, Windows & Mac, Windows Troubleshooting, Youtube |
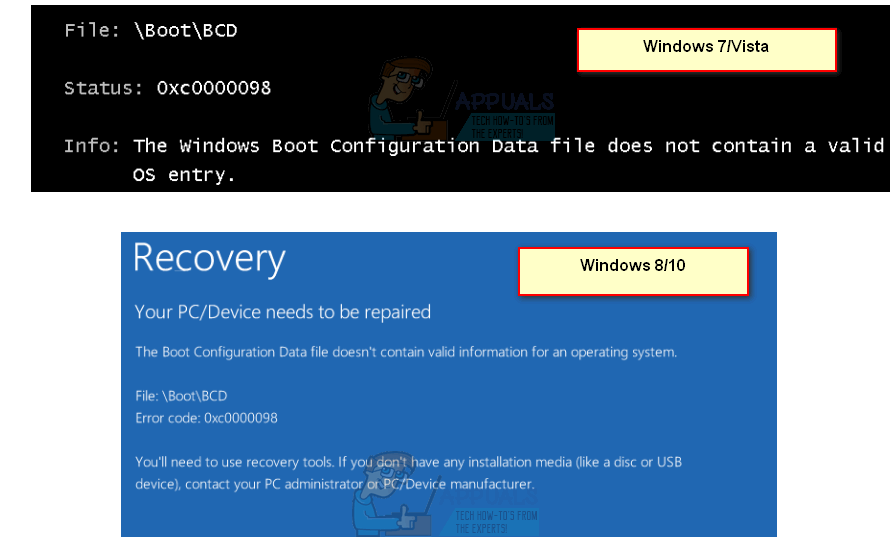
When you turn on your computer (laptop or desktop) with Windows 10, 8.1, 8 operating system, do you see Fix :\bcd 0xc0000098 error message? If you do, you came to the right place!
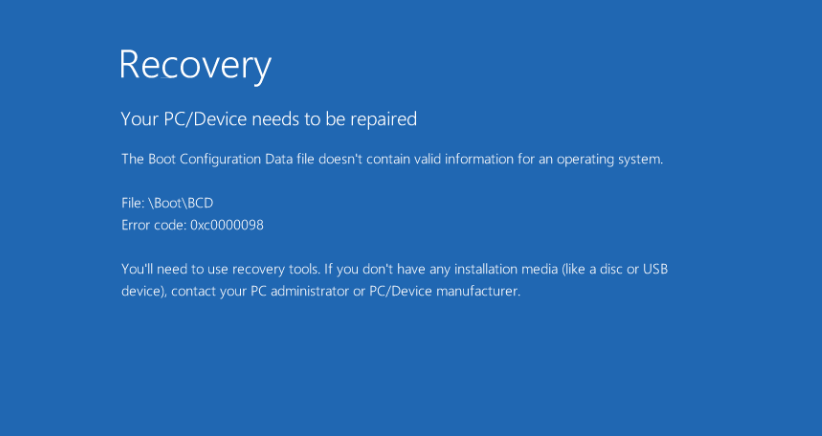
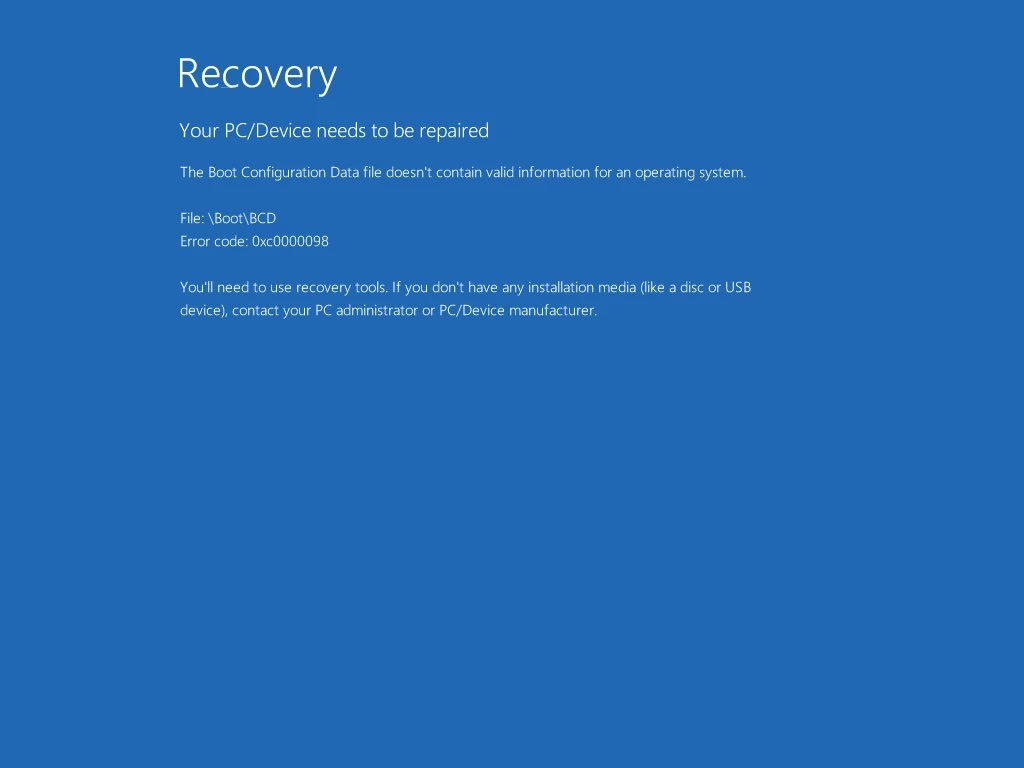
Hello all the reader in the world! Thanks for visiting P&T blog. We always enjoy to upload solutions for Windows and Mac issues (even iOS and Android..) Today’s issue is regarding a startup error message of Windows. This error can occur on many different Windows like Windows 10, Windows 8.1, Windows 8, Windows 7, Windows Vista, and even on Windows XP. For us, we noticed this problem yesterday. We did received a Toshiba laptop from a customer. He said that all of a sudden, his laptop won’t boot. We did power up the laptop, and as soon as we turned it on, we saw the message: Your PC/Device needs to be repaired. The boot Configuration Data file doesn’t contain valid information for an operating system. File: \BCD Error code: 0xc0000098 You’ll need to use recovery tools. If you don’t have any installation media (like a disc or USB device), contact your PC administrator or PC/Device manufacturer error message in a blue screen. Today, we did fix the issue, and we are going to share how we did fix that problem! 😀 😀 Yes! Let’s go ahead and fix it quickly!
Here is How to fix File: \BCD Error code: 0xc0000098
This error code and message are telling you that you have problems with your OS boot records. It happens on all of Windows OS. No matter what Windows you have. This could caused by software issues & hardware issues of your hard drive. If you can find out if your hard drive is performing okay first, you can try this method, but if your hard drive has physical damages, you should consider to replace the existing hard drive first. Let’s try to fix and create new boot records! This will make your computer working again.
- You need to open Windows CMD (Command Prompt) in order for you to do this, you need Windows installation disc. You don’t have one? Don’t worry you can download Windows 10, Windows 8.1 and Windows 8 iso image directly from Microsoft, and you can create an installation disc (DVD or USB). Here is how to do: https://www.pntbrother.com/how-to-download-windows-10-8-iso-from-microsoft-for-free/
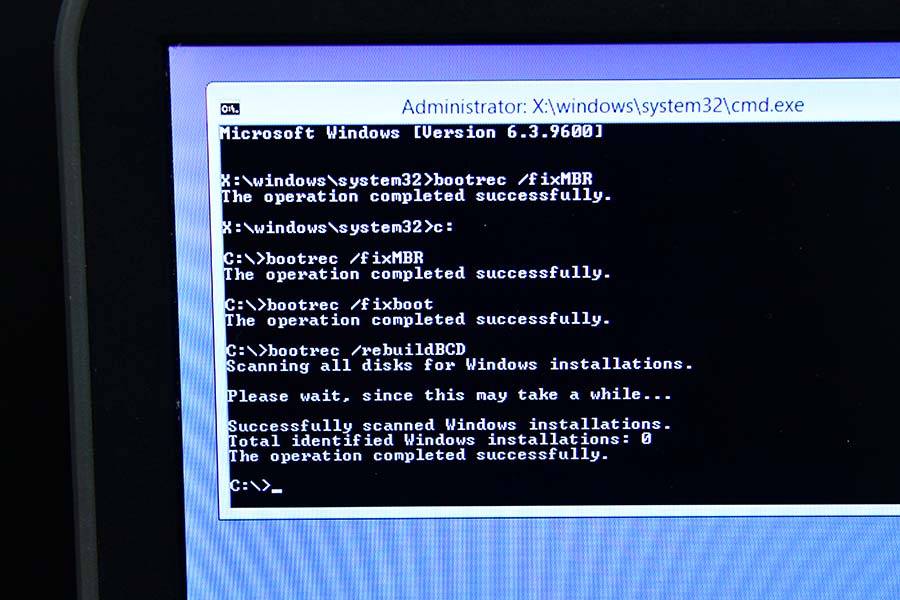
- Already have a Windows installation disc? Boot from the disc, click “Troubleshoot” and open “Command Promp”. Type the following command:
- c: (if your main drive letter is e then you need to type e: if it is d, then it is d:)
- bootrec /fixMBR
- bootrec /fixboot
- bootrec /rebuildBCD
- Make sure that all of your commands are successfully completed.
- Exit from Command Prompt, and restart your computer.
We hope all of you are free from the problem! 😀 😀 😀 If you have any problems related with this issue, leave a comment. Let’s fix it together! Have a nice day! Don’t forget to follow us!
Don’t forget to Like | Share | Subscribe !
Thank you for visiting our blog. Have a nice day 
You may also like
The 0xc0000098 error appears when there is a corrupted Boot Configuration Data file. Windows won’t allow you to boot, rendering your device useless. This error can be caused from hardware errors, such as a damaged hard drive or bad RAM, so after fixing this with the solution below, it’s good to see if these two components are all good.
This is an issue that hit a lot of users, from Windows Vista up until Windows 10, and it can be frustrating for someone who doesn’t really see what is actually happening. No users are excluded, and you won’t be able to use your device with Windows until you solve the problem
Fortunately, there is a solution that solves this issue and fixes the corrupted BCD file. After it, Windows will boot just fine and you’ll be able to continue using your system again. Keep in mind though, that you will need to use a Windows recovery drive, whether it’s an installation USB or a CD/DVD, you will need it, so get your hands on one before you start.
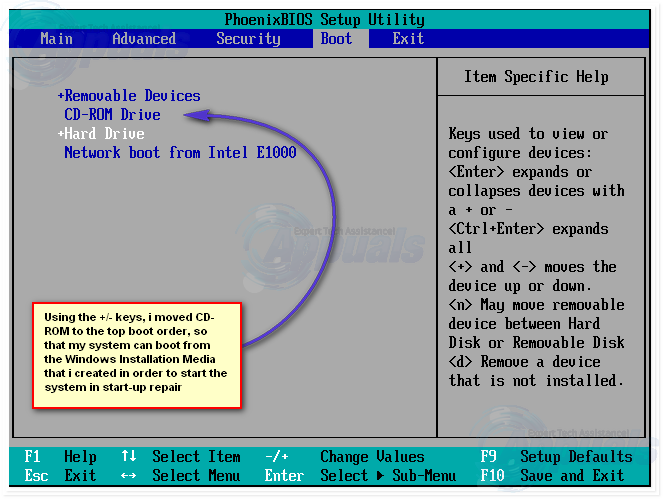
How to BOOT into BIOS to change Boot Order
Before you proceed with the instructions given in this article, it is important that you read this para regarding changing bios and booting from usb or discs.
Restart your computer. Enter your computer’s BIOS (or UEFI) settings as soon as it starts up. The key that you need to press to enter these settings depends on the manufacturer of your computer’s motherboard and can be anything from Esc, Delete or F2 to F8, F10 or F12. This is displayed on the post screen, and the manual that was supplied with your system. A quick google search asking “how to enter bios” followed by model number will also list results. Navigate to the Boot. You must know how to boot and change boot order since this will be needed to perform the solutions below.
Rebuild and repair the Master Boot Record, Boot Sector and Boot Configuration Data (Windows 7/8 and 10)
This step will require you to use the recovery drive mentioned earlier, so we will start there. If you do not have access to the recovery media, checkout this guide on bootable media using rufus (Windows 8 and 10) and for Windows 7/Vista see steps (here)
- Once inside the BIOS, navigate to the boot options and using the instructions within the BIOS, set the first boot device to the USB or DVD drive, depending on which one you have. This will tell the computer that it should first try to boot from there, which is what we need.
- Once the computer is booted from the recovery drive, in the Windows Setup dialog box, set everything to the appropriate values, select your language and click Next.
- In the lower left corner, click on Repair your computer, and choose Troubleshoot from the Choose an option screen.
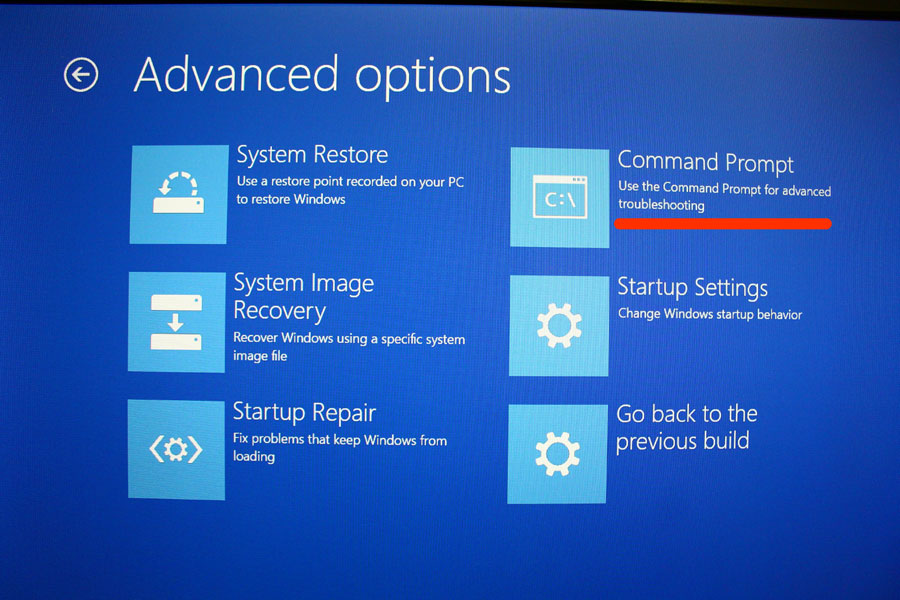
- In the Troubleshoot screen, click Advanced Options, and click on Command Prompt. For Windows 7 and Vista, choose Command Prompt from the “Recovery Options” screen.
- When the Command Prompt opens, type the following commands, pressing Enter on your keyboard after each one of them:
bootrec /scanos

bootrec /fixmbr

bootrec /fixboot

bootrec /rebuildbcd
Method 2: Use Startup Repair
Another method that requires a Windows recovery drive, this will use the built-in tools to repair the Boot Configuration Data file.
- Using steps 1 through 4 of the previous method, get to the Repair your computer
- Select your install, and from the list of available recovery options, choose Startup Repair.
Wait for the tool to scan your installation. If Startup Repair finds an error, it will attempt to fix it if possible, which should prevent the 0xc0000098 error from appearing again. You can also view detailed Startup Repair steps with pictures.
Method 3: Run the System File Checker utility to scan your system
The System File Checker (sfc) tool is used to automatically scan the system files of your computer, and try to repair them if needed.
- Using the steps from the first method, get to the screen that says Repair your computer.
- Select the Windows installation drive, and click
- From the System Recovery Options box, choose Command Prompt.
- In the Command Prompt, type the following command, and press Enter on your keyboard to execute it:
sfc /scannow /offbootdir=C:\ /offwindir=C:\Windows\
Replace C:\ with the letter of the drive where Windows is installed, and C:\Windows\ with the folder where Windows is.
- Wait for the SFC utility to scan your system. It will repair the error if possible and you won’t have to worry about it.
Method 4: Run the CHKDSK utility
If the previous methods failed, you can try the CHKDSK utility, also a built-in tool that checks your disk and fixes file system errors.
- Using steps 1-3 from the previous method, open the Command Prompt from the Windows recovery drive.
- In the Command Prompt, type the following command, followed by an Enter for execution:
chkdsk C: /f
Replace C: with the letter of the drive where you have installed Windows.
- Wait for the utility to finish. If it finds any errors, it will try to fix them, along with the 0xc0000098 error that you have been facing.
Even though Windows 10 has been out for over a year now, Microsoft still hasn’t managed to iron out all imperfections, and some hardware problems are manifested in a much worse manner than they should be. This is one of them, and even though it is advisable to check your hardware after you’ve fixed your system, by following the steps in the aforementioned method you should be able to boot into Windows again.
Kevin Arrows
Kevin Arrows is a highly experienced and knowledgeable technology specialist with over a decade of industry experience. He holds a Microsoft Certified Technology Specialist (MCTS) certification and has a deep passion for staying up-to-date on the latest tech developments. Kevin has written extensively on a wide range of tech-related topics, showcasing his expertise and knowledge in areas such as software development, cybersecurity, and cloud computing. His contributions to the tech field have been widely recognized and respected by his peers, and he is highly regarded for his ability to explain complex technical concepts in a clear and concise manner.
While booting your PC, Windows gives you a BSOD with the error code 0xc0000098. It can be rather frustrating not being able to use your device. You just get stuck at the blue/black screen. But don’t panic. This is a most common Windows error and it’s never hard to fix it at all…
About the error 0xc0000098
During the start-up process, the Boot Configuration Data (BCD) is very essential to provide required information to load the operating system. If the Boot Configuration Data is missing or corrupted, Windows won’t be able to load operating system and gives you the error 0xc0000098.
Try these fixes
Below you will get to know all possible fixes to solve your boot error 0xc0000098. You may not have to try them all; just work your way down the list until you find the one that works for you.
- Rebuild BCD manually
- Try Startup Repair
- Perform a CHKDSK
- Run System File Checker
- Perform a clean install of Windows
Fix 1: Rebuild BCD manually
Since this is a BSOD error, you won’t be able to access your PC normally. To repair your PC, you’ll need to use a Windows recovery drive: an installation USB media or a CD/DVD.
Step 1: Prepare installation media
If you don’t have one, you need to create USB/DVD bootable media yourself. Here is how to do it:
Note: You can skip to Step 2 if you already have a (DVD/USB) installation media.
1) Go to Windows 10 download page. (Or Windows 11, Windows 8, Windows 7)
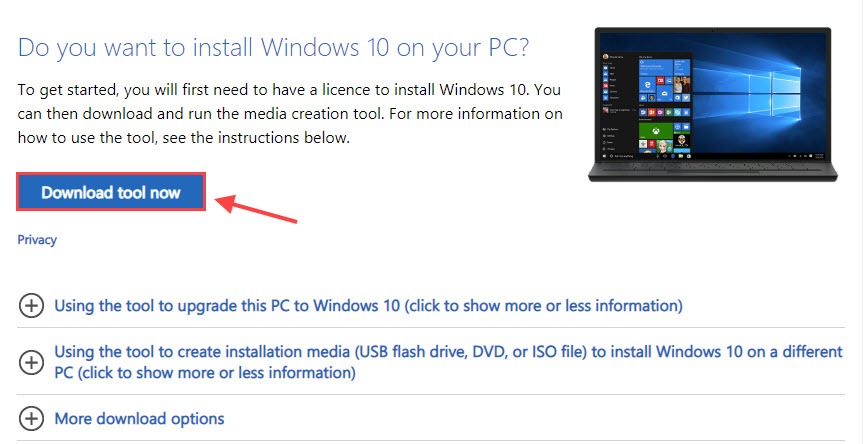
2) Download the installation media and save it on your computer.
3) Double-click the Media Creation Tool to launch the tool.
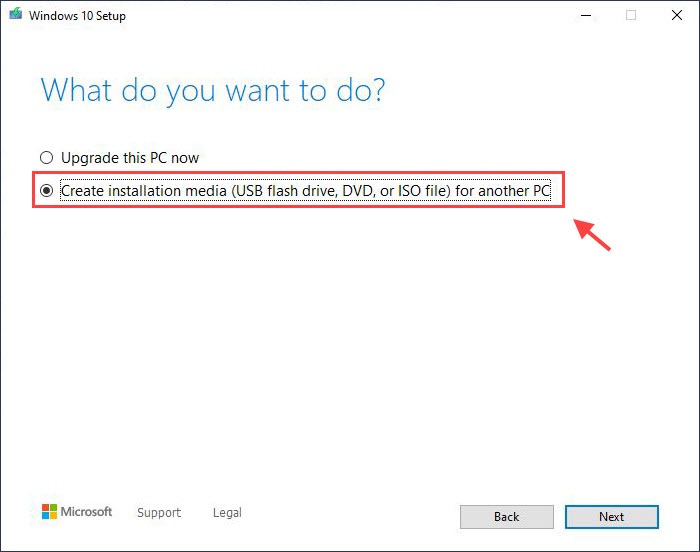
4) Select the Create installation media (USB flash drive, DVD, or ISO file) for another PC option.
5) Select the language, edition, and architecture (64-bit or 32-bit) for the Windows system.
6) Choose your preferred media. If you choose a USB flash drive, make sure you have a blank USB flash drive with at least 8GB of space.
7) Follow the on-screen instructions to finish the setup.
Step 2: Change the boot order to USB/DVD
Change the boot order in the BIOS setup. If you use a bootable USB drive, please put Removable Devices as the first boot choice. Otherwise, your PC will boot normally from your hard drive.
1) Turn on your device.
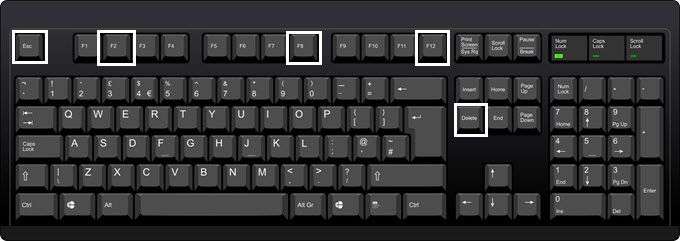
2) As soon as your computer starts booting up, press the function key to enter BIOS.
Note: The key to access BIOS can vary from Esc, Delete to F2, F8, F12, depending on your manufacturer and computer model.
3) Once in BIOS, go to the Boot sector and set Removable Devices or CD-Rom Drive as the first boot device.
4) Save the changes and exit.
Step 3: Boot with an Installation or Repair disc or USB drive
1) Boot your PC from the bootable CD/DVD/USB.
2) In the Windows Setup menu, click Next.
3) Select Repair your computer in the lower-left corner.
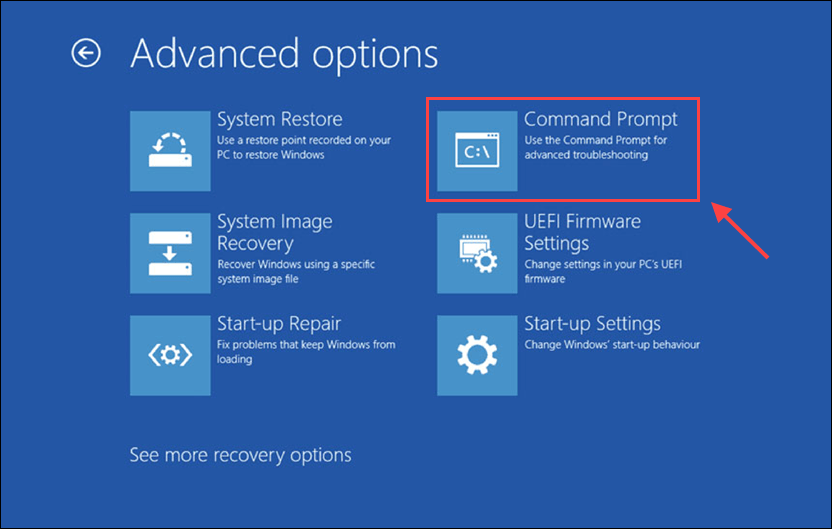
4) Go to Troubleshoot > Advanced Options > Command Prompt.
5) In Command Prompt, type the following command lines and hit Enter after each command. (There’s a space between bootrec and /.)
bootrec /scanos

bootrec /fixmbr

bootrec /fixboot

bootrec /rebuildbcd
Type Y and press Enter if you’re prompted for permission.
6) After you have entered the commands above, close the Command Prompt and Reboot your PC.
The 0xc0000098 error should now be fixed as your PC begins to load. If not, try the fix below.
Fix 2: Startup Repair
Startup Repair is a built-in tool to diagnose and repair some common problems on Windows. You may need to run Startup Repair (even 2 or 3 times).
1) Boot your PC from your setup disk (USB/DVD/CD).
2) Select Repair your computer and go to Troubleshoot > Advanced Options > Startup Repair.

3) Startup Repair will begin scanning your installation for known issues and will attempt a repair if it finds any.
4) If it fails, you can run Startup Repair again.
Fix 3: CHKDSK
CHKDSK, short for “check disk”, aims to check disk and verify system files for any errors.
1) Boot your device from your installation media and go to Command Prompt.
2) Type the following command line and press Enter.
chkdsk C: /f /r /x
- C: is the letter of the drive where Windows is installed, you can change it if you’ve installed it on another drive.
- r directs to find out the error.
- x symbolizes the volume that requires scanning.
3) CHKDSK will manage to fix the problems it finds.
4) Close Command Prompt and restart your device to check if the Windows system can load up again.
Fix 4: System File Checker
The error 0xc0000098 can also be caused by missing or corrupt system files. System File Checker (SFC) can help you to restore the missing files and repair any problematic ones.
1) Again go to Command Prompt and type the following command and hit Enter.
sfc /scannow /offbootdir=c:\ /offwindir=c:\windows
This command is slightly different from sfc /scannow because this is done with a different installation of Windows (/offwindir=c:\windows) on a different drive (/offbootdir=c:).
2) Wait for the scan to finish.
Fix 5: Perform a clean install of Windows
If neither of the fixes above did the trick, then you need to do a clean reinstall of Windows to fix your issues and return your PC to a cleaner state.
1) Boot from your installation media and select Next.
2) Select Install now > check the I accept box > Next > select Custom: Install Windows only (advanced).
3) If multiple disks are displayed, you’ll only need to delete all partitions from the disk where you want to install Windows.
3) Highlight each drive/partition in the list and select Delete. When the Windows Setup notification appears, select OK.
4) Do this for every drive in the list except the one that says Unallocated Space. When you’re finished, only Drive 0 Unallocated Space should remain.
5) Select Next.
6) The Windows setup screen requests you choose your language/keyboard layout, remove the external storage drive from your device, and select OK. This will restart your device.
7) Your device should be working properly now.
Pro tip: Update the essential drivers
If the new setup fails to add some essential drivers correctly after a clean installation, such as for the network adapter and graphics card, you’ll need to update the driver whether through Windows Update or Device Manager.
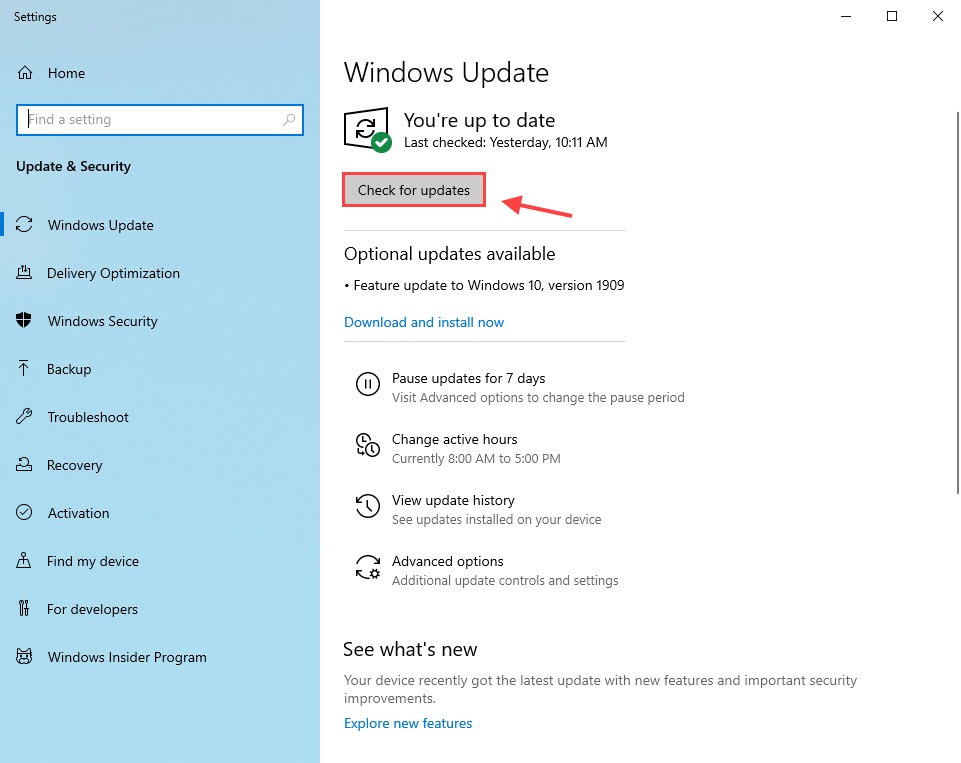
1. Check for updates
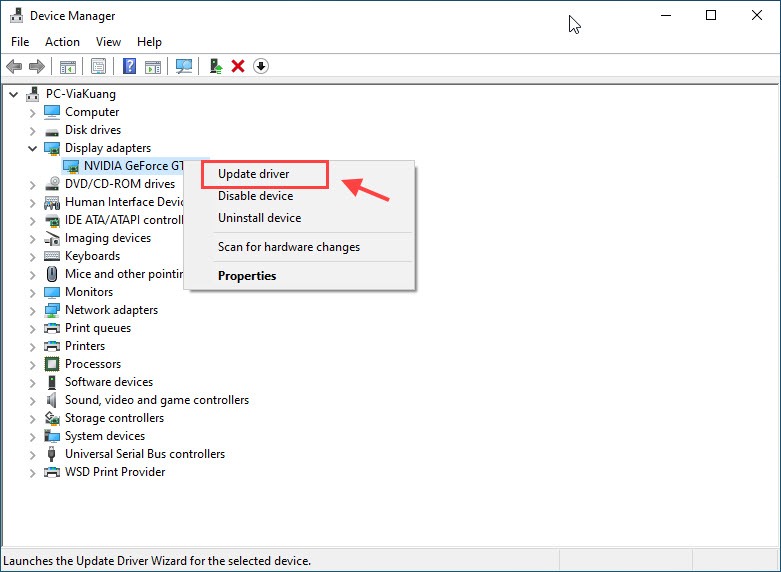
2. Device Manager
3. Download from the manufacturer’s website
Although Windows does a pretty good job detecting and installing most device drivers automatically, it can’t always update all of your drivers because of the OEM (Original equipment manufacturer) restrictions. In that case, you need to go to the manufacturer’s website for new drivers and install it manually.
4. Update all of your drivers automatically (Recommended)
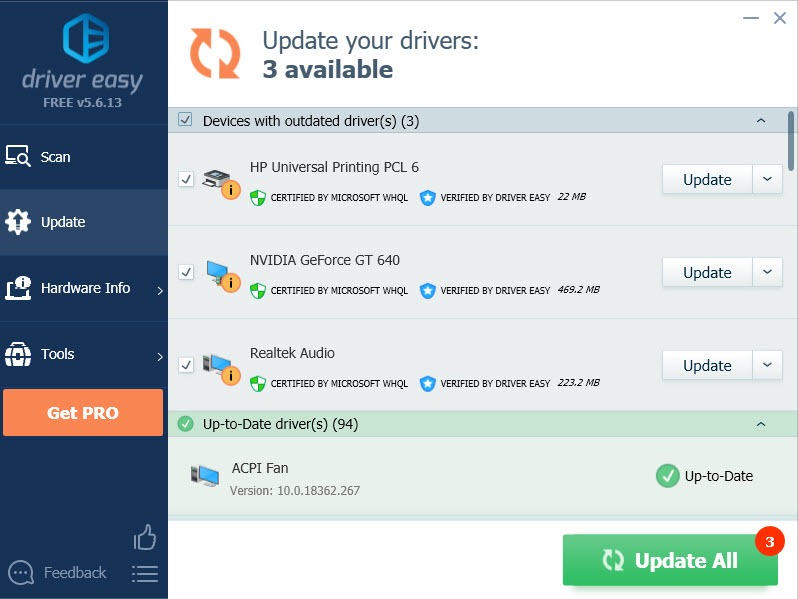
If you don’t have the time, patience or computer skills to update these drivers manually, you can do it automatically with Driver Easy.
Driver Easy will automatically recognize your system and find the correct drivers for it. You don’t need to know exactly what system your computer is running, you don’t need to risk downloading and installing the wrong driver, and you don’t need to worry about making a mistake when installing.
All the drivers in Driver Easy come straight from the manufacturer.
You can update your drivers automatically with either the FREE or the Pro version of Driver Easy. But with the Pro version it takes just 2 clicks:
1) Download and install Driver Easy.
2) Run Driver Easy and click the Scan Now button. Driver Easy will then scan your computer and detect any problem drivers.

3) Click Update All to automatically download and install the correct version of all essential and peripheral drivers that are missing or out of date on your system (this requires the Pro version – you’ll be prompted to upgrade when you click Update All. You get full support and a no-questions-asked 30-day money back guarantee.)
If you need assistance or have any questions, please contact Driver Easy’s support team at support@drivereasy.com.
Good to go? Hopefully, one of the fixes above did the trick for you. Feel free to leave us a comment if you have further questions or suggestions.