
В этой публикации, друзья, рассмотрим, как узнать, какие программы используют Интернет. По разным причинам нам может понадобиться знать это. Можем столкнуться с необходимостью контроля трафика в условиях лимитного интернет-подключения или ограниченной пропускной способности канала. Можем заботиться о своей безопасности и конфиденциальности, увы, не всем программам можно доверять в этом плане. Можем искать решения по улучшению производительности, искать причины низкой скорости Интернета. Так как же узнать в Windows, какие программы активно сообщаются с Интернетом?
Какие программы используют Интернет в данный момент, оперативно подскажет диспетчер задач Windows. Запускаем его, можно в меню по клавишам Win+X, можно в контекстном меню на панели задач, а можно клавишами Ctrl+Shift+Esc. Смотрим столбец «Сеть», кликом по его названию можем отсортировать активные процессы по степени нагрузки на сеть, чтобы вверху столбца были активно использующие сеть процессы. Если по названию процесса непонятно, что за таковой, какой программе или системной функции принадлежит, можно в контекстном меню на этом процессе использовать возможности по открытию расположения файла и поиска информации в Интернете.
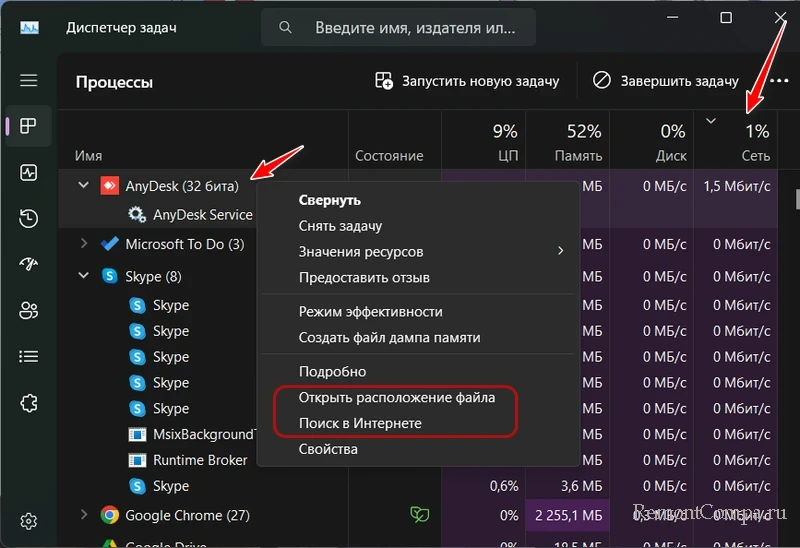
Но, друзья, столбец «Сеть» отображает активность локальной сети, а не конкретно использование Интернета. Если у вас будут запущены какие-то процессы, связанные с локальной сетью, к примеру, фоновый бэкап данных на сетевое хранилище, в таком случае программа-бэкапер будет работать только внутри локальной сети. Т.е. по столбцу «Сеть» о том, что та или иная программа активно использует Интернет, можем судить, если только она не выполняет операций внутри локальной сети.
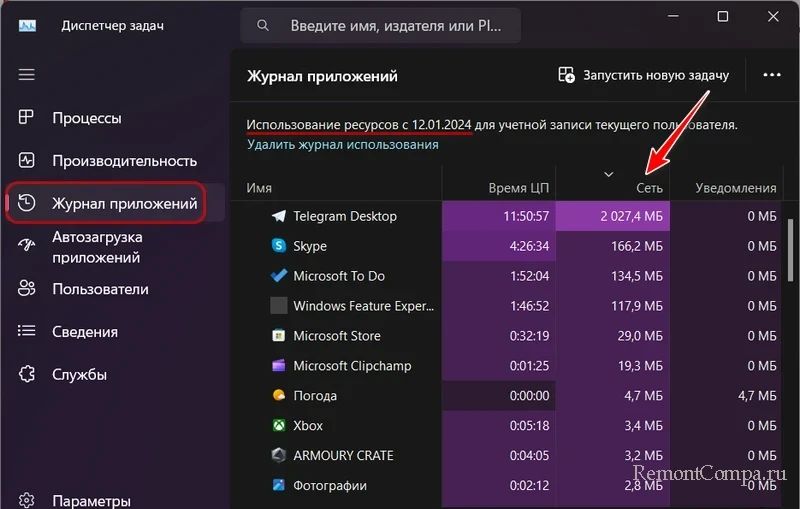
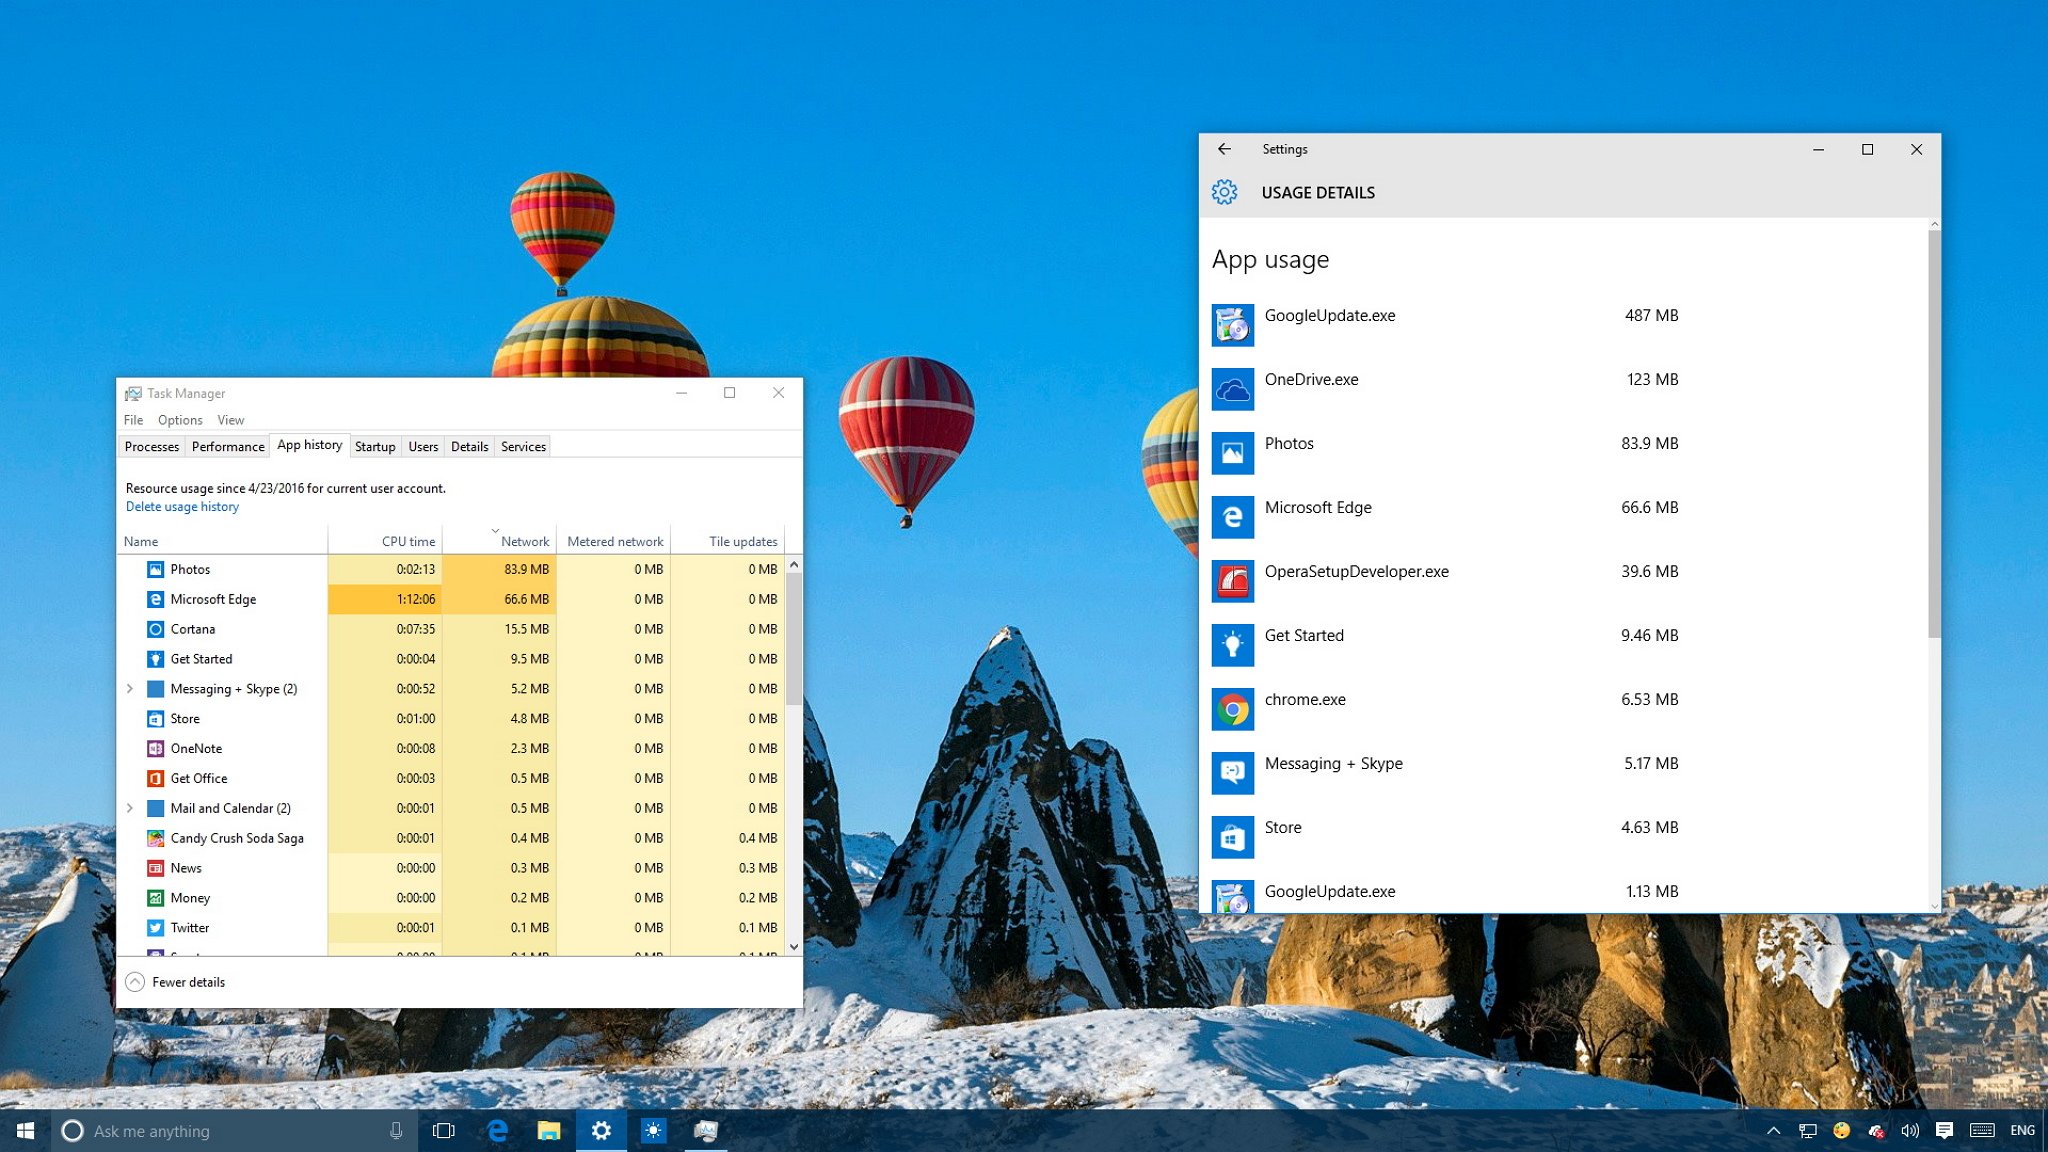
Далее можем переключиться на вкладку диспетчера задач «Журнал приложений». Здесь нам предлагается статистика использования, в частности, сети за промежуток времени в 30 дней, начиная с даты, указанной вверху вкладки. Можем отсортировать данные по столбцу «Сеть». Сам же этот столбец показывает нам объём трафика, использованный каждой программой за 30 дней. И, опять же, друзья, диспетчер задач не отображает раздельный учёт трафика для локальной сети и Интернета. Столбец «Сеть» показывает общий трафик — отправленный и полученный в локальной сети и Интернете.
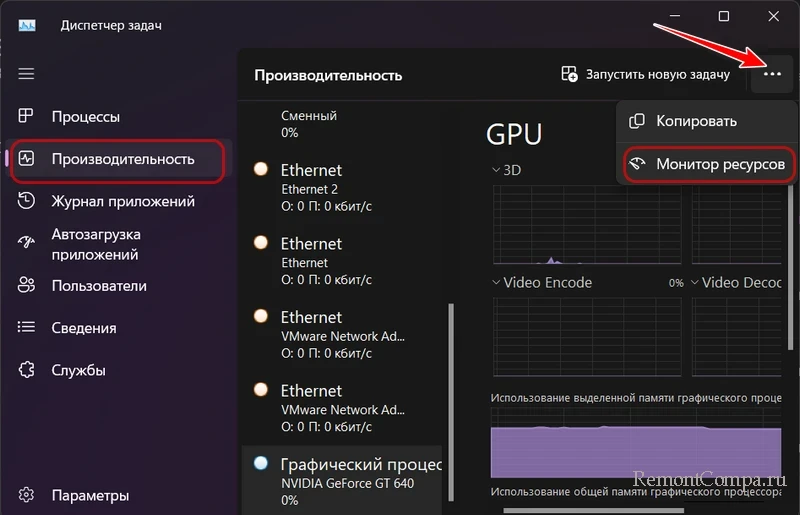
Больше о том, какие программы используют Интернет, расскажет системный монитор ресурсов Windows. Можем запустить его, просто введя в поиск Windows запрос «монитор ресурсов». А можем запустить из диспетчера задач, во вкладке «Производительность».
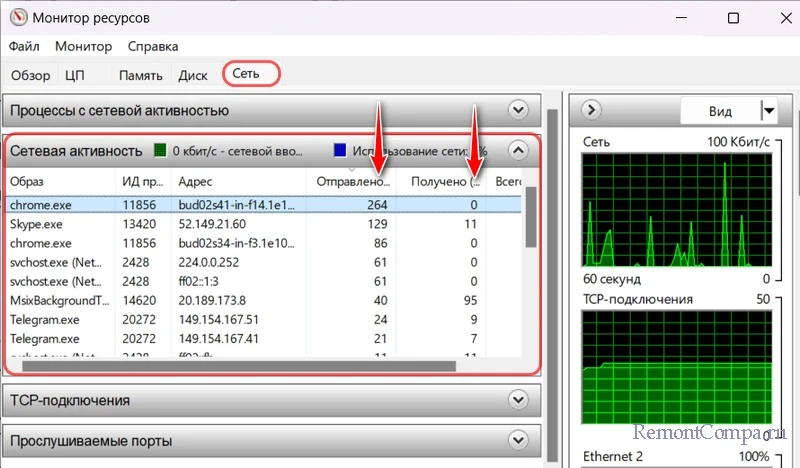
В окне монитора ресурсов Windows смотрим раздел «Сеть». Первая вкладка «Процессы с сетевой активностью» покажет нам активные в данный момент процессы, которые используют сеть, с указанием объёма отправленных и полученных данных. При необходимости можем отсортировать столбцы отправки и получения данных, чтобы видеть, какие из активных в данный момент программ более других используют сетевой трафик.
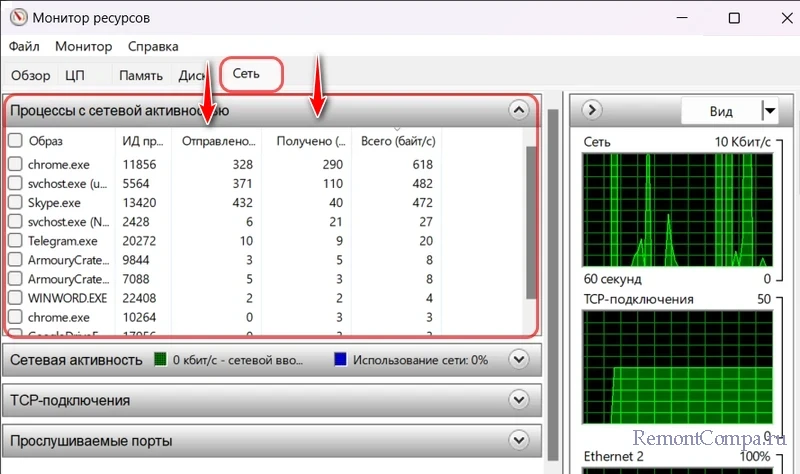
Следующая вкладка «Сетевая активность» отображает те же активные процессы, но более детализировано, с указанием адресов, с которыми сообщаются программы и системные функции. Здесь также будем видеть объём отправленного и полученного программами и системными функциями трафика. И сможем отсортировать столбцы отправки и получения данных для выявления самых активных потребителей сетевого трафика.
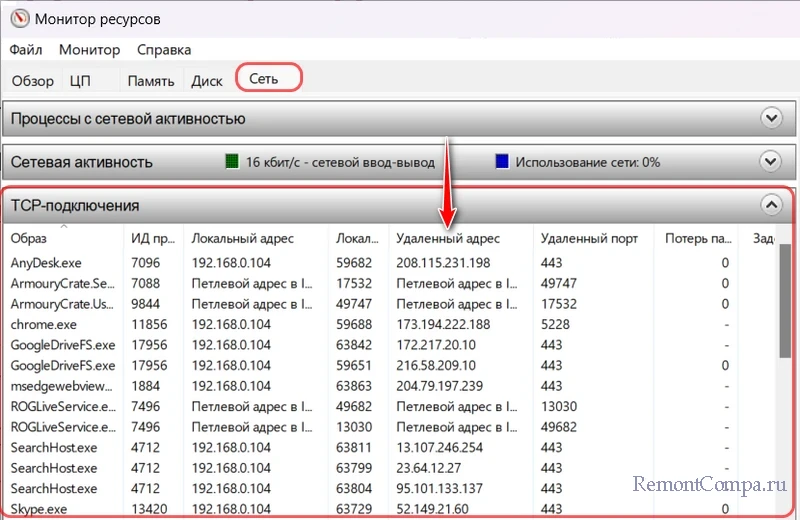
Всё это, как и в случае с диспетчером задач Windows, информация об общем трафике, и в локальной сети, и в Интернете. Как разобраться конкретно с Интернет-трафиком? Более всего информации получим во вкладке монитора ресурсов «TCP-подключения». В числе прочих детальных сведений об активных процессах, использующих сеть, здесь будут указаны IP-адреса, к которым подключаются программы. Это столбец «Удалённый адрес».
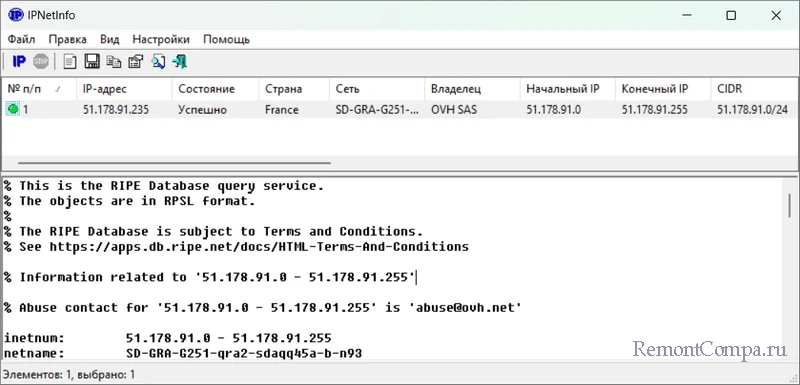
Если какой-то активный процесс у нас вызывает сомнения, можем ввести его IP-адрес в адресную строку браузера. В некоторых случаях, если IP-адрес принадлежит веб-серверу, сможем увидеть сайт, который хостится на этом сервере. Но, друзья, IP-адрес может принадлежать техническому серверу, не предназначенному для доступа пользователей. IP-адреса – это не всегда веб-сайты, но, возможно, интернет-поисковик выдаст об интересующем нас IP-адресе какую-то информацию.
Получить кое-какую информацию по IP-адресу также можно с помощью бесплатной портативной утилиты от NirSoft — IPNetInfo.
Какие программы используют Интернет, можно узнать из статистики использования Интернета в системных параметрах Windows начиная с версии 10. В приложении «Параметры» нам нужен раздел «Сеть и Интернет». В нём жмём «Использование данных».
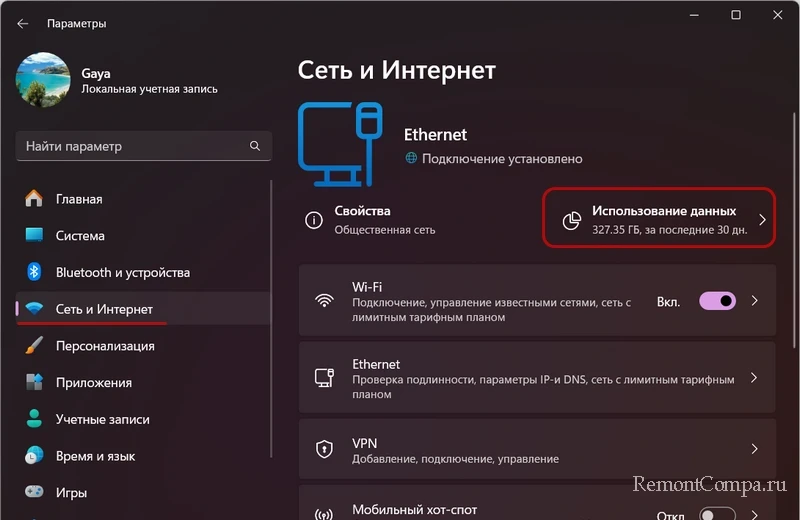
Указываем нужное нам интернет-подключение – проводное Ethernet, Wi-Fi или другое. Можем установить период, за который нам нужна статистика – 30 дней, 7 дней, последние 24 часа. И смотрим объём интернет-трафика, использованного программами и самой Windows.
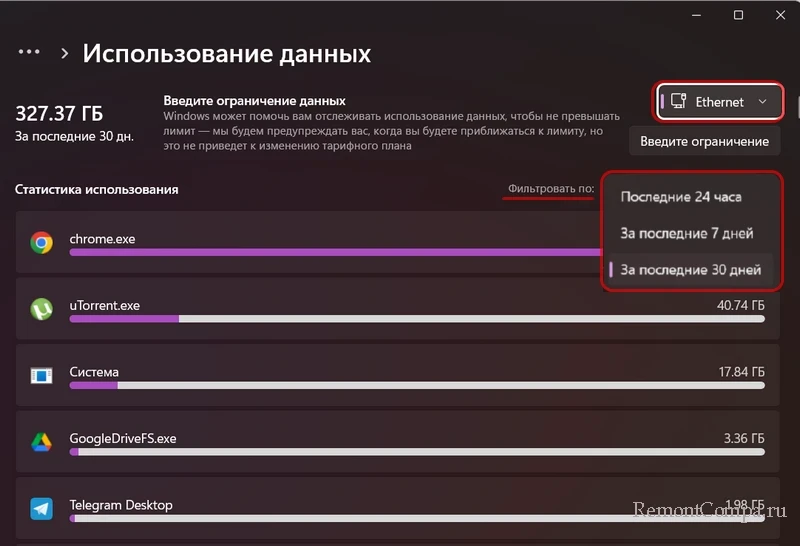
Здесь же, в статистике использования Интернета при необходимости можем установить лимит интернет-трафика на компьютере.
Ну и, друзья, стороннее решение, с помощью которого можно узнать, какие программы используют Интернет – программа GlassWire. Это сетевой менеджер и файервол, программа предназначена для мониторинга сети и обеспечения сетевой безопасности. Отслеживает сетевую активность, обнаруживает подозрительные сетевые подключения, может блокировать нежелательные подключения. Детально о программе GlassWire.
Любым из этих способов, друзья, сможем определить, какие программы наиболее активно используют Интернет. И что же делать с такими программами?
Если это системные функции Windows, тут ничего не поделаешь. Вмешательство в сообщение Windows с Интернетом может быть чревато впоследствии проблемами с системным функционалом. Можно разве что в качестве временного решения приостановить обновления Windows, настроить интернет-подключение как лимитное, либо вовсе отключить обновления Windows, если их процессы сильно нагружают сеть.
Браузер, мессенджеры, клиентский софт типа почтовиков, облачных хранилищ, онлайн-игр и т.п. – с этими программами также ничего не поделать, они без беспрепятственного доступа к Интернету не имеют смысла. Но, возможно, в настройках этих программ можно выбрать меньшую периодику обращения к интернет-серверам или обновления контента. Возможно, в настройках этих программ есть иные способы оптимизации использования интернет-трафика, например, для лимитных интернет-подключений.
А вот с программами, которые должны работать локально, но почему-то активно сообщаются с Интернетом, необходимо разбираться. Можно:
- Проверить компьютер на вирусы;
- Обновить программу до последней версии. Возможно, используемая версия устарела и использует больше трафика, чем необходимо;
- Убрать программу из автозагрузки, если она работает в фоне, но её активность постоянно не нужна;
- Ограничить фоновую работу приложений из Microsoft Store, если их постоянная активность не нужна;
- Заблокировать программе доступ к Интернету, если он не нужен для непосредственного использования её функций.
Quick Links
-
What Does (And Doesn’t) The Windows 10 Network Usage Monitor Do?
-
How To Check Network Usage In Windows 10
Mobile and broadband data caps alike have made people very conscientious of their data usage. Windows 10 includes a built-in network usage monitor that, unlike its predecessor, is actually a pretty useful way to keep an eye on your bandwidth consumption. Read on as we show you how.
What Does (And Doesn’t) The Windows 10 Network Usage Monitor Do?
In Windows 8 Microsoft introduced new ways to monitor your network usage, albeit the initial incarnation of the built-in feature was shortsightedly limited to just Windows Store apps (such that if you used Skype from the Windows Store it would count that data but if you used Skype for Desktop, aka «normal» Skype then it would not).
The network usage and bandwidth monitoring in Windows 10 significantly improves upon the Windows 8 system by including data for all apps, not just Windows Store supplied applications. As such it’s an excellent way to easily check which apps are using the most (or least) data over the previous 30 day window.
As handy and improved as the Windows 10 network usage apps are there’s an important thing to note: they only monitor, as you would expect, the data consumption for the computer you access them on. If you need more advanced network-wide monitoring to keep tabs on all the computers and devices on your network (and not just a single PC) we suggest checking out our article: How to Monitor Your Internet Bandwidth Usage and Avoid Exceeding Data Caps.
If all you need is a quick check to see what is using the most bandwidth over the last 30 day period, however, the built-in tools are fast, easy, and always on.
How To Check Network Usage In Windows 10
There are two ways to natively check the network usage in Windows 10, but we strongly prefer one method over the other. None the less we’ll highlight both methods and explain why one offers a clear benefit.
The first method is a holdover from the Task Manager update in Windows 8. To view network usage via the Task Manager access the Task Manager via keyboard shortcut (CTRL+SHIFT+ESC) or type «task manager» in the Start Menu search box.
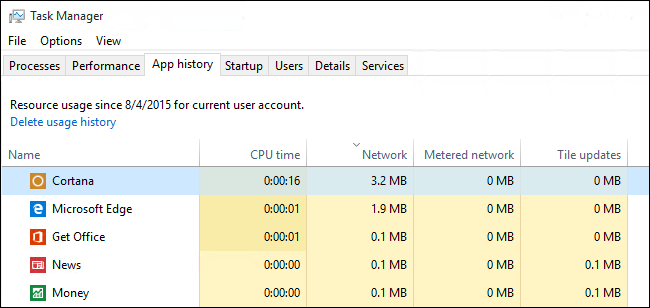
In the Task Manager select the «App history» tab. There you’ll find two columns related to data consumption: «Network» and «Metered network». (Metered network was a feature introduced in Windows 8.1 to help manage data use on capped/paid data connections, you can read more about it here.)
While it’s great this information is right at hand in the Task Manager, you’ll notice something in our screenshot above. All the visible apps are either core Windows apps are Windows Store apps. Maddeningly, the Task Manager still does not display data usage for regular old traditional Windows applications.
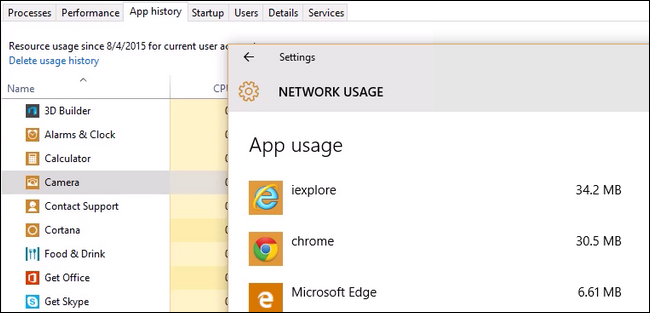
In fact if we sort the apps in the Task Manager by name and then compare the list to the other place you can check network usage, in the network settings menu, you’ll see that Chrome appears on the «Network Usage» list and not the list in Task Manager. Why they couldn’t use the same data they clearly have in both panels is a mystery.
As such if you want to get a better picture of the data use on your computer you rely on the information in the network settings section. Navigate to Settings -> Network & Internet. Select the top item on the left hand navigation pane «Data usage».
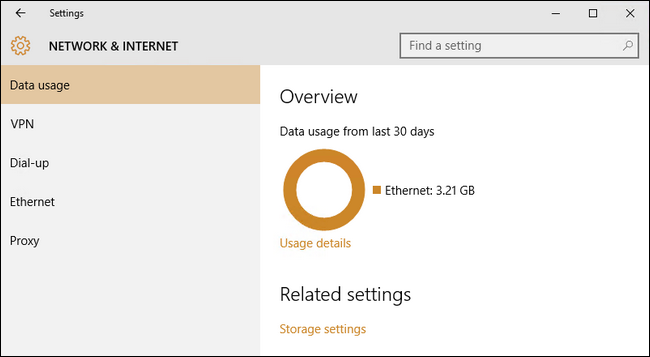
Here you’ll see a general overview of the last 30 days. The circular graph will show you data used over different connections (in the case of our screenshot we’ve just used Ethernet but on a laptop you’ve used on both wired and Wi-Fi networks you’ll see a mix of sources).
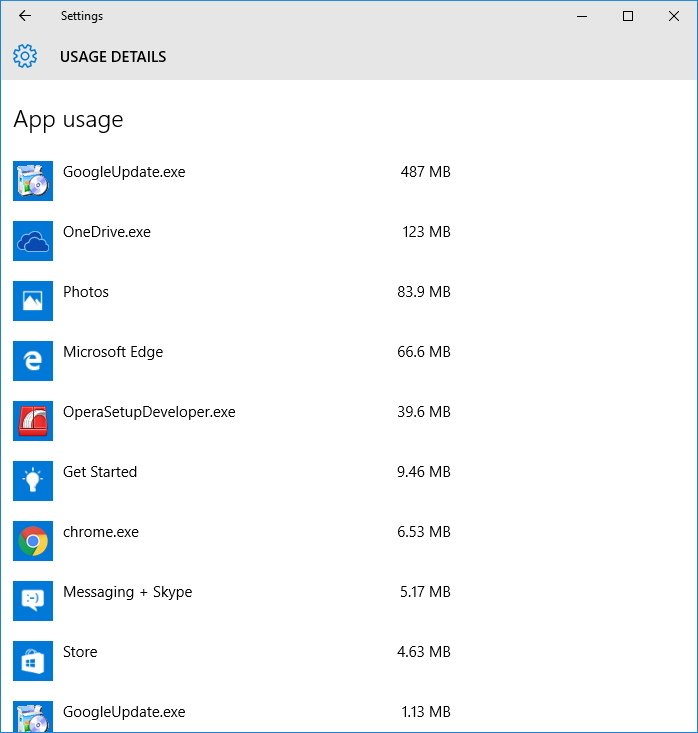
You can dig deeper and get a more granular overview by clicking on the small link under the the graph labeled «Usage details».
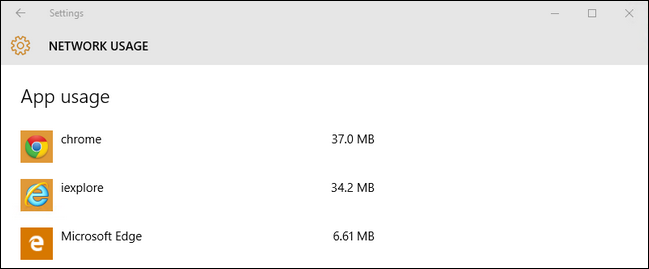
Here we find the missing data on apps from outside the Windows Store (which is most of the apps most people are using). Chrome, missing from the Task Manager list altogether, shows up right at the top as expected.
Have a pressing Windows 10 question? Shoot us an email at ask@howtogeek.com and we’ll do our best to answer it.
Internet service providers are constantly trying to improve their network speeds to lure customers into faster data plans. But sometimes these faster plans come with restrictions — the dreaded metered internet connections, enforcing a limit on the amount of data you can send and receive.
If you find yourself in such an unfortunate situation, it will be critical for you to monitor your network data usage regularly. Thankfully, Windows 10 includes tools to monitor network usage to prevent you going over your data cap.
In Windows 10 there are two different ways to monitor the data that apps can send and receive in a given month, and in this Windows 10 guide, we’ll show you how you can monitor your network usage using the Settings app and Task Manager, and their pros and cons.
How to check network usage with Task Manager
- Right-click the taskbar, and click Task Manager.
- If you see the smaller version of the Task Manager, click the More details button on the bottom left corner.
- Click the App history tab.
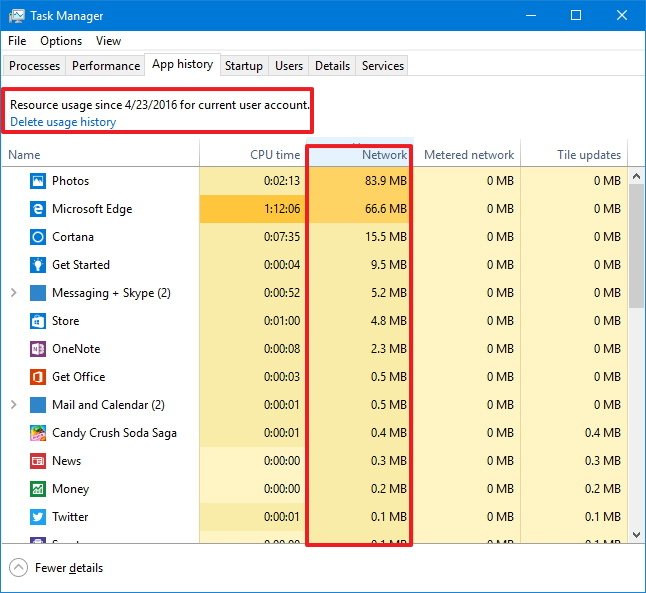
In this section, you’ll see the date since Windows 10 began monitoring the data usage on your apps. You can also click the Delete usage history link to reset the data usage counter, but remember that it’ll also reset automatically every 30 days.
The data that is more usable to you is the Network column which tracks the data usage for your apps. You’ll also see the «Metered network» column, but this information is irrelevant unless you configure your Wi-Fi connection as metered.
Oddly enough, the problem with the App history tab is that it only tracks Universal Windows Platform (UWP) apps, you can’t view network usage for desktop applications, such as Chrome, the desktop version of Office apps, and others.
How to check network usage with Settings
- Use the Windows key + I keyboard shortcut to open the Settings app.
- Click Network & internet.
- Click Data usage. Under Overview, you’ll see the total data usage from the last 30 days for Wi-Fi and Ethernet connections.
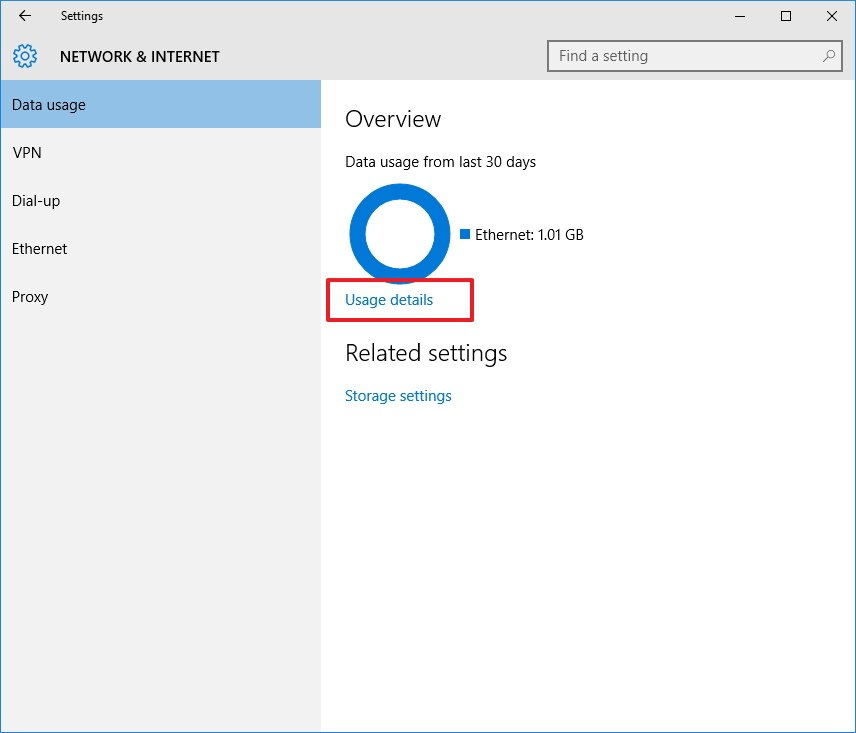
- Click the Usage details link to view network data usage for all your applications installed on your computer.
The biggest advantage of the Settings app is that you can not only view Universal Windows Platform (UWP) apps, but you can also see data usage for traditional desktop applications.
All the latest news, reviews, and guides for Windows and Xbox diehards.
However, the Usage details page shows only the total network data usage, and unlike the Task Manager, you can’t view metered network usage, tile updates, or CPU time information. In addition, this view won’t give you the option to reset the usage history or since the date when the data usage is being tracked.
As you can see, there are pros and cons with either tool, but you should consider using both to have a complete overview of which apps are using the most data and help you to manage your metered internet connection plan better. Of course, if these tools aren’t enough, you can always find different software solutions online, or in some cases, you can configure your router to monitor your data usage — just to name a few.
How do you monitor network data usage in your network? Tell us in the comments below.
More Windows 10 resources
For more help articles, coverage, and answers on Windows 10, you can visit the following resources:
- Windows 10 on Windows Central – All you need to know
- Windows 10 help, tips, and tricks
- Windows 10 forums on Windows Central
Mauro Huculak has been a Windows How-To Expert contributor for WindowsCentral.com for nearly a decade and has over 15 years of experience writing comprehensive guides. He also has an IT background and has achieved different professional certifications from Microsoft, Cisco, VMware, and CompTIA. He has been recognized as a Microsoft MVP for many years.
Windows 10 and Windows 11 have a built-in bandwidth monitoring tool that tracks your network data usage on a per-network basis over the last 30 days. This tool makes it easy to view your overall network data usage and see which applications are consuming the most data.
While it may not be as feature-rich as third-party applications, it provides a good overview. Knowing your monthly data usage can also help you decide if you need to enable the metered connection (on Windows 10) setting for specific networks, such as when using mobile data via a hotspot.
In this tutorial, I will show you how to view your network data usage in Windows 10 and 11 with just a few clicks. Let’s get started.
- Advantages of monitoring network data usage
- How to view network data usage in Windows
Advantages of monitoring network data usage
Monitoring network data usage over a period of time has several significant advantages that can potentially improve the overall network performance, resolve network issues, and make informed decisions for specific applications or networks.
- Improve network performance: By tracking data usage over an extended period, you can identify patterns and trends in your network usage. This can help you identify potential bottlenecks or other issues that may be impacting network performance and take steps to address them.
- Better allocation of network resources: By monitoring data usage, you can better understand how different applications and users are using the network. This can help you make more informed decisions about how to allocate network resources, such as bandwidth, to ensure that the network is being used efficiently.
- Increased visibility and control: Monitoring data usage over a longer period can give you a complete picture of how the network is being used. This can help you identify potential security threats or other issues and take steps to prevent them.
- Improved troubleshooting: By tracking data usage over a longer period of time, you can more easily identify any issues that may arise and take steps to troubleshoot and resolve them. This can help improve the overall reliability and stability of your network.
Bandwidth monitoring is a built-in feature of both Windows 10 and 11 and is enabled by default. In fact, it is integrated into the Settings app. So, all you have to do is find the network data usage page in the settings app. Let me show you how.
On Windows 11
- Launch the “Settings” app.
- Select “Network & Internet” on the sidebar.
- Press the “Data usage” button at the top.
- You will see the overall network data usage at the top.
- Below, you will see per application network data usage.
- With that, you now know how to view network data usage in Windows 11.
Detailed Steps (With Screenshots)
First, press the Windows key + I to open Settings. Once it opens, go to the Network & Internet tab and click on the Data Usage option on the top-right corner.

In the “Data Usage” page, you will see the overall data usage for the current network in the top left corner. Under the Usage Statistics section, you will see per-application network usage.

If you are using multiple networks, you can switch between them using the Network dropdown menu on the top-right corner.

By default, the default data usage statistics are for the last 30 days. If you want, you can change to Last 7 days or Last 24 hours using the “Filter” dropdown menu.

On Windows 10
- Press Windows key + I to open Settings.
- Click on Network & Internet.
- Go to the Status tab.
- Click the Data Usage button on the right panel.
- You will see the overall network data usage at the top.
- Below, you will see per application network data usage.
Detailed Steps (With Screenshots)
First, use the Windows key + I keyboard shortcut to launch the Settings app in Windows 10. You can also search for it in the Start menu or click the “Settings” button in the Action Center.
After opening it, click on the Network & Internet option and go to the Status tab.
On this page, you will see the network usage data for the last 30 days next to your network name. For detailed statistics, click the Data Usage button.

You will see per-application data usage on this page. If you are using multiple networks, you can switch between them using the “Choose a network” dropdown menu.
Note: Unfortunately, unlike in Windows 11, there is no way to select a specific number of days to filter and check bandwidth consumption.

Wrapping Up — Viewing Network Data Usage in Windows 10 & 11
As you can see, it is pretty simple to see how much data you are using per network and per application in both Windows 10 and Windows 11. You can limit the data usage by enabling a metered connection when needed. Alternatively, you can also set a data limit by pressing the Enter Limit button on Windows 11’s and Windows 10’s Data Usage page.
Once the data limit is set, you’ll see usage statistics based on it, and Windows will restrict background data usage and alert you when nearing or exceeding the limit.
If you have any questions or need help, comment below. I’ll be happy to assist.