
Applies ToWindows 11 Windows 10
Поддержка Windows 10 прекратится в октябре 2025 г.
После 14 октября 2025 г. корпорация Майкрософт больше не будет предоставлять бесплатные обновления программного обеспечения из Центра обновления Windows, техническую помощь и исправления безопасности для Windows 10. Ваш компьютер по-прежнему будет работать, но мы рекомендуем перейти на Windows 11.
Подробнее
Вам может потребоваться изменить параметры запуска Windows для устранения неполадок, оптимизации процессов запуска или изменения поведения загрузки системы для конкретных задач.
Например, распространенный вариант устранения неполадок заключается в включении безопасного режима, который запускает Windows в ограниченном состоянии, когда запускаются только базовые службы и драйверы. Если проблема не возникает при запуске в безопасном режиме, можно исключить параметры по умолчанию, базовые драйверы устройств и службы в качестве возможных причин.
Другие параметры запуска включают дополнительные функции, предназначенные для использования системными администраторами и ИТ-специалистами.
В этой статье описывается изменение режима запуска Windows и доступные параметры.
Изменение параметров запуска
Примечание: Если вы зашифровали устройство, вам потребуется ключ BitLocker для выполнения этой задачи. Если вы не знаете ключ BitLocker, см. раздел Поиск ключа восстановления BitLocker.
-
Доступ к среде восстановления Windows
-
В Windows RE выберите Устранение неполадок > Дополнительные параметры > Параметры запуска > Перезапуск
-
Выберите Перезапустить.
-
После перезагрузки устройства на экране Параметры запуска выберите один из доступных параметров или нажмите клавишу ВВОД , чтобы обычно загрузить Windows.
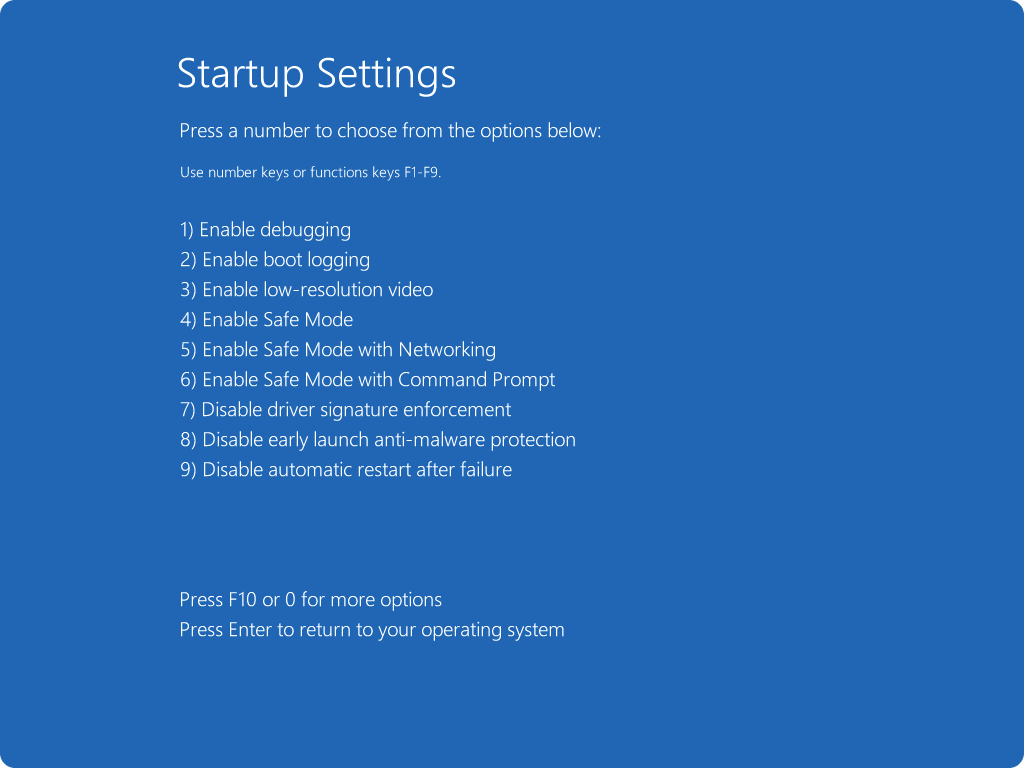
Список параметров запуска
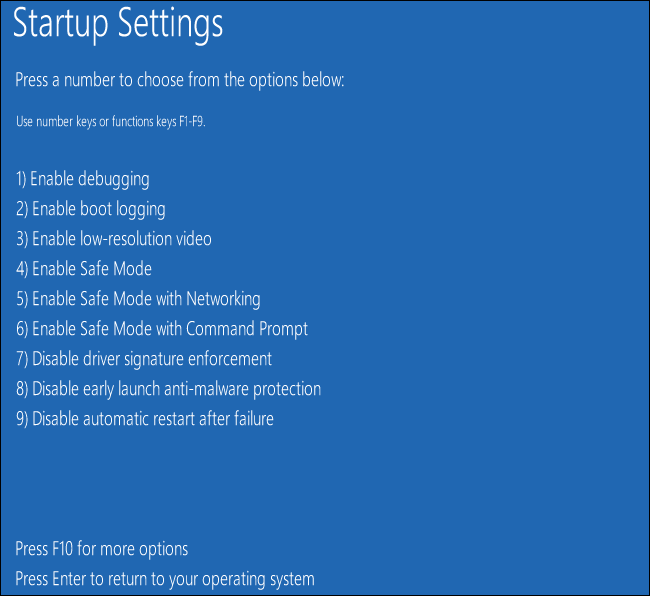
Ниже приведен список параметров запуска, которые можно выбрать. Чтобы выбрать один, используйте числовые ключи или функциональные клавиши F1–F9:
-
Включите отладку.Запускает Windows в режиме расширенного устранения неполадок, предназначенном для ИТ-специалистов и системных администраторов
-
Включите ведение журнала загрузки. Создает файл ntbtlog.txt, в котором перечислены все драйверы, установленные во время запуска и которые могут быть полезны для расширенного устранения неполадок.
-
Включите видео с низким разрешением. Запуск Windows с использованием текущего видеодрайвера и низкими значениями разрешения и частоты обновления изображения. Этот режим можно использовать для сброса параметров отображения
-
Включите безопасный режим. В безопасном режиме запуск Windows выполняется с использованием ограниченного набора файлов и драйверов. Если проблема не возникает в безопасном режиме, это означает, что параметры по умолчанию и базовые драйверы устройств не вызывают проблему. Наблюдение за Windows в безопасном режиме позволяет сузить источник проблемы и помочь в устранении неполадок на устройстве
-
Безопасный режим с загрузкой сетевых драйверов. Безопасный режим с сетью добавляет сетевые драйверы и службы, необходимые для доступа к Интернету и другим компьютерам в сети.
-
Безопасный режим с поддержкой командной строки. Запуск Windows в безопасном режиме с окном командной строки вместо обычного интерфейса Windows
-
Отключите принудительное применение подписи драйвера. Разрешает установку драйверов, содержащих неправильные подписи
-
Отключите защиту от вредоносных программ при раннем запуске
. Защита от вредоносных программ при раннем запуске (ELAM) — это функция безопасности в Windows, которая позволяет запускать программное обеспечение для защиты от вредоносных программ перед всеми остальными сторонними компонентами во время загрузки. ELAM гарантирует, что система не инициализирует неизвестные драйверы загрузки, которые могут быть вредоносными. Выберите этот параметр, чтобы временно отключить ELAM -
Отключить автоматическую перезагрузку при отказе системы. Запрет автоматического перезапуска Windows в случае сбоя в работе системы. Выберите этот параметр только в том случае, если Windows зависает в цикле, в котором Windows завершается сбоем, пытается перезапустить и повторно завершается сбоем.
Вы можете нажать клавишу ВВОД , чтобы запустить Windows в обычном режиме.
Что делать, если Windows продолжит загрузку в безопасном режиме?
Перезапуска устройства должно быть достаточно для выхода из безопасного режима обратно в обычный режим. Однако если по какой-либо причине устройство по-прежнему загружается в безопасном режиме, попробуйте выполнить следующее:
-
Нажмите клавишу Windows + R.
-
В полеОткрыть введите msconfig и нажмите кнопку ОК.
-
Выберите вкладку «Загрузка«
-
В разделе Параметры загрузки снимите флажок Безопасная загрузка.
Нужна дополнительная помощь?
Нужны дополнительные параметры?
Изучите преимущества подписки, просмотрите учебные курсы, узнайте, как защитить свое устройство и т. д.
Все способы:
- Получение доступа к выбору способа загрузки
- «Включить отладку»
- «Включить ведение журнала загрузки»
- «Включить видеорежим с низким разрешением»
- Варианты «Безопасного режима»
- «Отключить обязательную проверку подписи драйверов»
- «Отключить ранний запуск антивредоносной защиты»
- «Отключить автоматический перезапуск после сбоя»
- Вопросы и ответы: 0
В ОС семейства Windows предусмотрены особые варианты запуска, предназначенные для диагностических целей, и сегодня мы расскажем о таковых в «десятке».
Получение доступа к выбору способа загрузки
Чтобы вызвать меню выбора режимов, необходимо выполнить следующее:
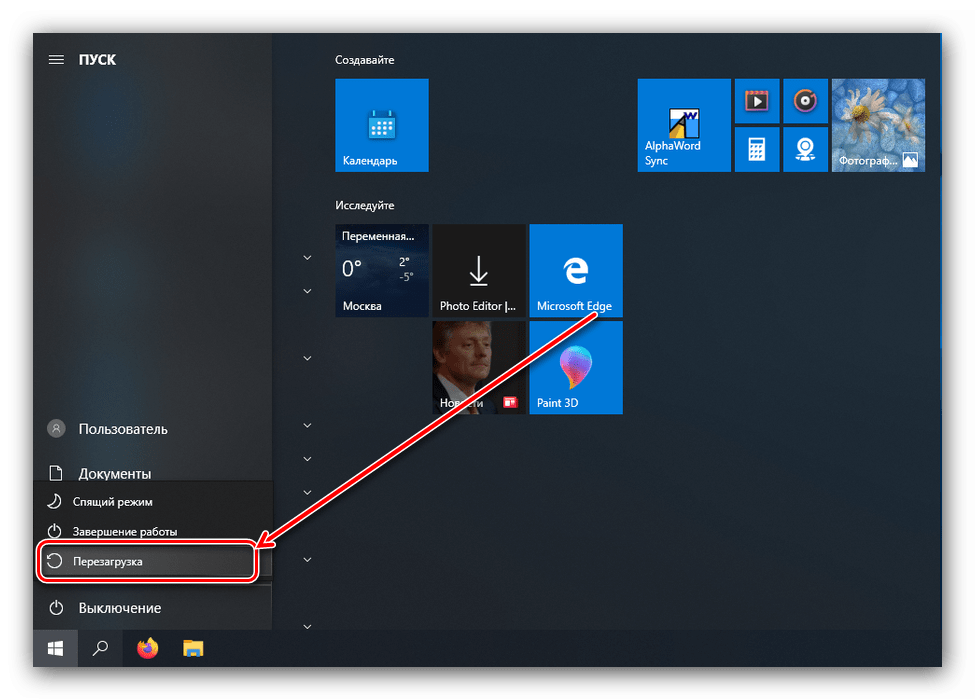
- Если система загружается и работоспособна, воспользуйтесь одним из способов входа в загрузочное меню — например, перейдите по пути «Пуск» — «Выключение», затем зажмите клавишу Shift и кликните «Перезагрузка».

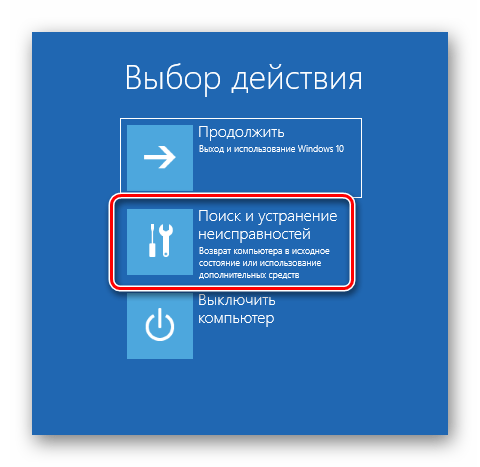
Если система не стартует, при включении компьютера появится соответствующее сообщение, воспользуйтесь в нём кнопкой «Дополнительные варианты восстановления».
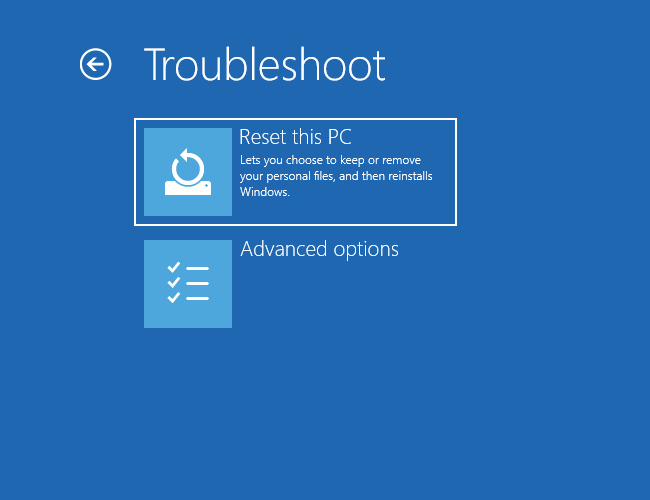
- Выберите опцию «Поиск и устранение неисправностей».
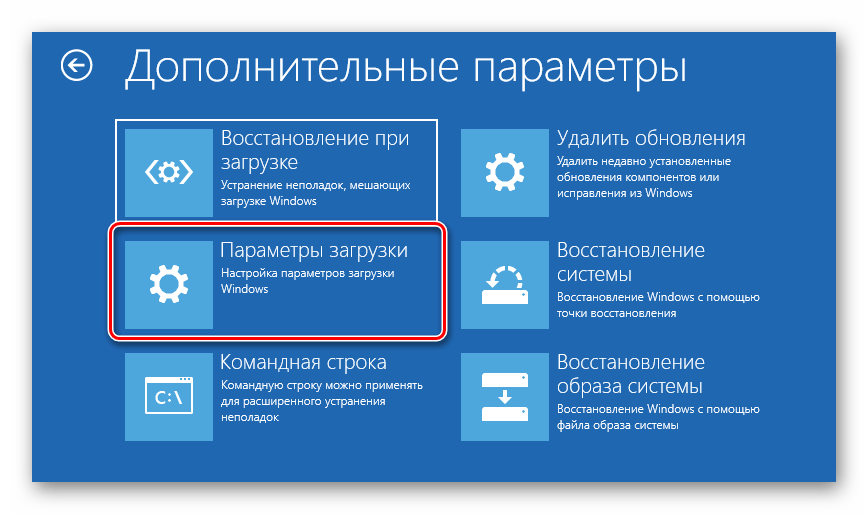
- Затем укажите «Дополнительные параметры».
- Откройте пункт «Параметры загрузки».
- Воспользуйтесь кнопкой «Перезагрузить».


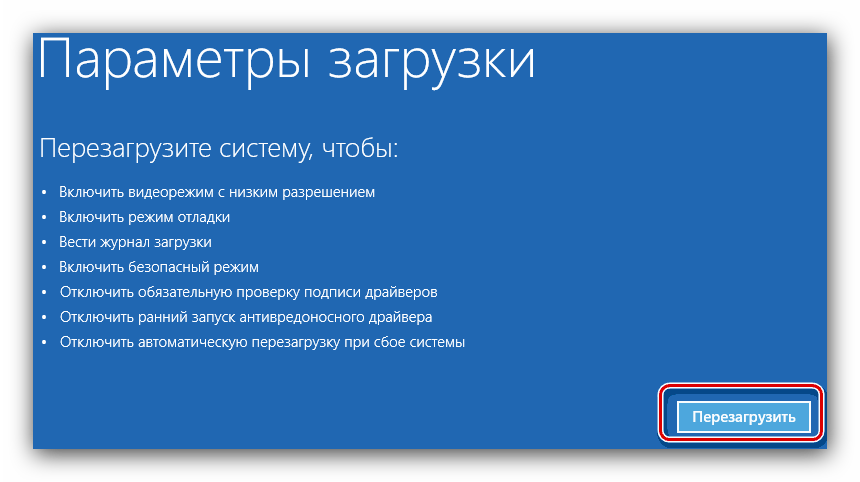
После загрузки появится следующее меню.
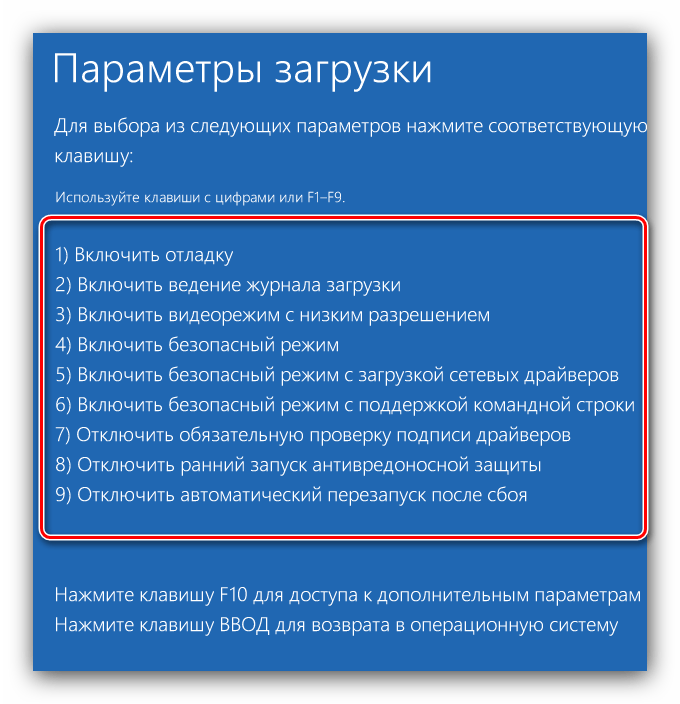
Далее мы рассмотрим каждый из этих пунктов.
«Включить отладку»
Первый из них, доступный по нажатию клавиши F1, активирует отладку ядра: продвинутый метод диагностики, при котором информация о старте Виндовс может быть передана на другой компьютер или устройство с запущенным отладчиком. Этот метод рекомендуется для опытных пользователей.
«Включить ведение журнала загрузки»
Следующий вариант, который активируется нажатием на F2, подразумевает ведение подробного журнала запуска, в частности загруженных драйверов, что поможет определить сбойный элемент ПО. Лог хранится в документе ntbtlog.txt в установочной папке Виндовс – как правило, это C:\Windows. Если ОС запускается корректно, загляните в указанный файл для определения причины проблем. Чтобы просмотреть ntbtlog.txt, если система стартует со сбоями, выберите одну из опций «Безопасного режима», о которых мы поговорим ниже.

«Включить видеорежим с низким разрешением»
Иногда бывает так, что ОС не загружается, поскольку монитор не поддерживают стандартные для «десятки» разрешение и цветовое пространство. В такой ситуации доступ к системе возможен с опцией запуска под названием «Включить видеорежим с низким разрешением» — щелкните F3, чтобы ею воспользоваться.
Варианты «Безопасного режима»
Наиболее часто используемая дополнительная опция загрузки — «Безопасный режим», у которого есть три вариации:
- «Включить безопасный режим» – стандартный вариант, при котором отключаются все изменения в ОС. Для его выбора нажмите F4;

Читайте также: Как войти в «Безопасный режим» в Windows 10
- «Включить безопасный режим с загрузкой сетевых драйверов» – продвинутая разновидность предыдущего, запускаемая по нажатию F5, где дополнительно активируются доступ в интернет и поддержка сетевых протоколов, что может понадобиться системным администраторам;
- «Включить безопасный режим с поддержкой командной строки» – вместе с критически важными компонентами запускается ещё и «Командная строка» со всеми её утилитами, что полезно как для диагностики, так и ради восстановления работоспособности ОС. Данную опцию можно вызвать нажатием на F6.

«Отключить обязательную проверку подписи драйверов»
Ещё с Windows Vista компания Microsoft в целях безопасности требует, чтобы все драйвера имели сертифицированную цифровую подпись – в противном случае пакет просто откажется устанавливаться. Однако разработчики знают о том, что для задач тестирования может потребоваться инсталляция неподписанных драйверов, и предлагают особый метод запуска, который активируется нажатием на F7 в окне дополнительных параметров. Обратите внимание, что обычному пользователю этим вариантом стоит пользоваться только в самом крайнем случае.
«Отключить ранний запуск антивредоносной защиты»
В «десятке» Windows Defender стал ещё более продвинутым и запускается одновременно с системой. Данное антивирусное ПО нередко замедляет старт ОС или вовсе мешает ему, если вы столкнулись с ложным срабатыванием. Для устранения подобных проблем следует воспользоваться вариантом без запуска драйвера антивируса, доступным по нажатию клавиши F8.
«Отключить автоматический перезапуск после сбоя»
Виндовс 10, как и предыдущие редакции ОС от Майкрософт, по умолчанию перезапускается, если в процессе её работы произошел сбой. Данная возможность не всегда полезна – например, во время тестирования ПО либо какого-то из новых устройств. Деактивировать автоматический перезапуск можно посредством специального режима — для его использования нажмите на клавишу F9.
Мы кратко рассмотрели дополнительные варианты загрузки Windows 10. Как видим, не все из них будут полезны рядовому пользователю.
Наша группа в TelegramПолезные советы и помощь
Sign in to your How-To Geek account

Quick Links
-
Troubleshoot on Windows 8 and 8.1
-
Troubleshoot on Windows 10
Windows 8 and 10’s advanced startup tools function differently than the tools on previous versions of Windows. If your Windows 8 or 10 system can’t boot properly, the tools will appear automatically so you can fix the problem.
We’ve covered several ways to access the advanced startup options if your PC is working properly, including through the PC settings application. You can also create a recovery drive to ensure you’ll always be able to access these options.
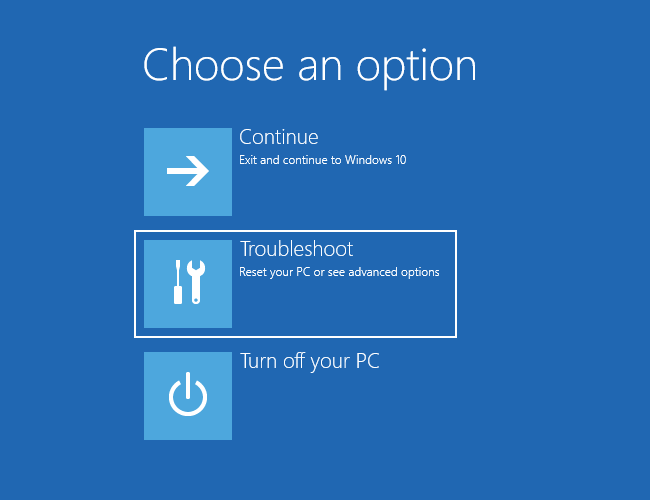
Choose an Option
Once you’ve accessed the advanced startup options, you’ll need to click (or tap) the Troubleshoot option to access the troubleshooting and repair options. The Continue and Turn off your PC options will continue booting to Windows (assuming there isn’t a problem) or power off your computer.
Troubleshoot on Windows 8 and 8.1
The Troubleshoot screen provides easy access to the Refresh and Reset your PC options. This is particularly useful if you want to refresh or reset your PC, but can’t get into Windows.
- Refresh your PC: Refreshing your PC restores its system software to its factory state without deleting your files or installed Modern apps. However, any installed desktop apps will be removed.
- Reset your PC: Resetting your PC (not to be confused with rebooting your PC) resets it to its factory state. Any personal files and settings on your computer will be deleted.
If you just want to fix your computer and you’re not sure which option to pick, try Refreshing your PC so you don’t lose all your files.
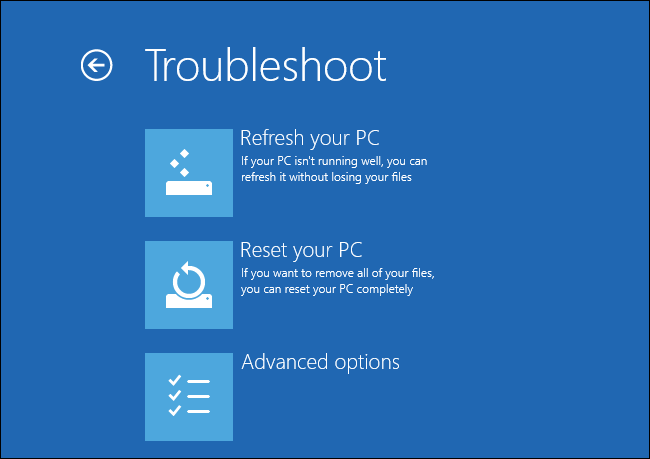
For more advanced troubleshooting and repair tools, click (or tap) «Advanced Options.»
Troubleshoot on Windows 10
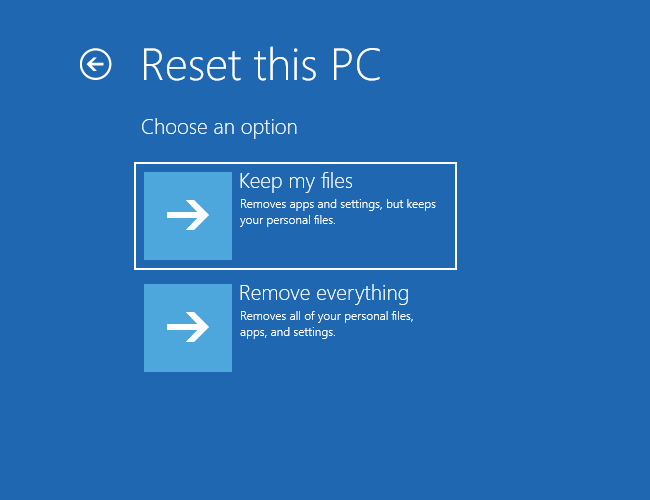
The Troubleshoot screen is a bit different on Windows 10. The «Refresh your PC» feature has consolidated into the «Reset your PC» feature.
The Reset this PC screen has two options:
- Keep My Files: Keep my files is equivalent to Refresh my PC on Windows 8 and 8.1. Everything related to Windows gets completely reinstalled, all of your installed programs are removed, but files located in your user folder are saved.
- Remove Everything: Remove everything does exactly that — it removes everything. Windows is completely reinstalled, all of your programs are removed, and all of your files are deleted. It fulfills the same function «Reset this PC» on Windows 8 and 8.1
If you aren’t sure which to use, click «Keep My Files» first. Windows will be reinstalled, but most of your files will be saved. You can always come back later and click «Remove Everything» if you want.
Files located in AppData or outside of your user folder will not be saved. Be sure to back up these files manually.
Click «Advanced Options» to access more advanced repair tools. They’ll be useful if you’re experiencing problems but don’t want to reinstall Windows.
Advanced Options
The Advanced options screen holds the advanced troubleshooting and repair options.
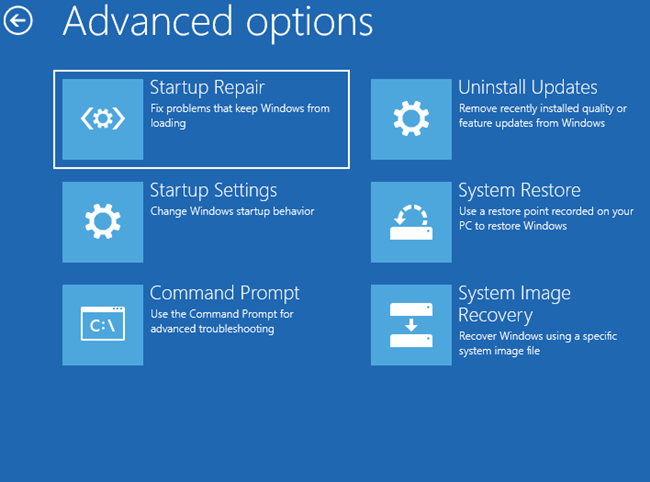
- System Restore: Restore your computer to an earlier restore point. This is the same as using System Restore within Windows. However, if Windows 8 can’t boot, it may boot properly after you restore your PC to a working state.
- System Image Recovery: Restore your computer using a system image file. The system image overwrites your computer’s state and files. You’ll need to use Windows 7’s backup tools in Windows 8 to create a system image.
- Automatic Repair: Try to automatically repair issues that can prevent Windows from booting properly. If your computer can’t boot into Windows, this option is worth a try.
- Command Prompt: Open a Recovery Environment Command Prompt. This will allow you to run a variety of commands to troubleshoot and fix your computer. This option should only be used by advanced users who know what they’re doing.
- Startup Settings: The Startup Settings option allows you to modify a number of startup options. For example, you can enable Safe Mode from here. You can also disable automatic restart after failure — this option will allow you to see the error message if your PC is constantly blue-screening and rebooting.
- Uninstall Updates: Removes the most recently installed updates. If your computer started malfunctioning immediately after an update, this is the first thing you should try.
The advanced options here may allow you to fix the problem — the Automatic Repair option is particularly useful, and the System Restore or Safe Mode options may help you boot your computer. If none of these options work, you’ll need to perform a refresh (or a full reset.)
6 Methods for accessing the ASO Boot Menu in Windows 11, 10, or 8
Updated on March 13, 2023
What to Know
- Hold down SHIFT while restarting, or go to Settings > Update & Security > Recovery > Restart now.
- If Windows does not start, boot from your Windows installation media or a recovery drive.
- To boot directly into ASO, choose the boot option for System Recovery, Advanced Startup, Recovery, etc.
This article explains how to access the Advanced Startup Options in Windows 11, 10, or 8.
What Are Advanced Startup Options in Windows?
The Advanced Startup Options (ASO) menu, available in Windows 11, Windows 10, and Windows 8, is the central fix-it location for the entire operating system.
From here you can access Windows diagnostic and repair tools like Reset This PC, System Restore, Command Prompt, Startup Repair, and much more.
It’s also where you access Startup Settings, the menu that includes Safe Mode, among other startup methods that could help you access Windows if it’s having problems starting. In other words, Advanced Startup Options functions as the Windows 11/10/8 boot menu.
How Do I Access Windows Advanced Startup Options?
This menu should appear automatically after two consecutive startup errors. However, if you need to open it manually, there are six different ways to do so.
The best way to decide which method to use is to base your decision on what level of access you have to Windows right now:
- If Windows starts normally: Use any method, but 1, 2, or 3 will be easiest.
- If Windows does not start: Use methods 4, 5, or 6. Method 1 will also work if you can at least get to the Windows logon screen.
Time Required: Accessing ASO is easy and can take anywhere from a few seconds to a few minutes, depending on which method you use.
All of these means of getting to the Advanced Startup Options menu work equally well in any edition of Windows 11, Windows 10, Windows 8, or Windows 8.1 unless noted otherwise.
Method 1: SHIFT + Restart
This is by far the easiest way to get this done. Just hold down either SHIFT key while selecting Restart, available from any power icon.
Power icons are available throughout Windows, as well as from the sign-in/lock screen.
All you do now is wait while the Advanced Startup Options menu opens!
This method doesn’t seem to work with the on-screen keyboard. You’ll need to have a physical keyboard connected to your computer or device to open it this way.
Method 2: Settings Menu
-
In Windows 11, right-click the Start button and choose Settings.
In Windows 10, select the Start button, and then choose the settings button followed by Update & Security.
In Windows 8, swipe from the right to open the charms bar. Select Change PC settings. Choose Update and recovery from the list on the left (or General prior to Windows 8.1).
-
Choose Recovery from the list of options.
-
In the Advanced startup section, select Restart now.
-
Wait through the Please wait message until Advanced Startup Options opens.
Method 3: Shutdown Command
-
Open Command Prompt.
Another option is to open Run (use the WIN+R keyboard shortcut) if you can’t get Command Prompt started for some reason, probably related to the issue you’re having that has you here in the first place!
-
Save any open files before continuing or you’ll lose any changes you’ve made since your last save.
-
Execute the shutdown command in the following way:
shutdown /r /oTo cancel the shutdown command once executed (like if you forgot to save your work!) execute shutdown /a in the same Command Prompt window.
-
Select Close to the signoff warning message that appears a few seconds later.
-
After several seconds, during which nothing seems to be happening, Windows will then close and you’ll see a Please wait message.
-
Wait just a few seconds more until the Advanced Startup Options menu opens.
Method 4: Boot From Your Windows Installation Media
-
Insert into your computer a Windows 11, Windows 10, or Windows 8 DVD or a flash drive with the Windows installation files on it.
You can borrow someone else’s disc (or other media) if you need to. You’re not installing or reinstalling Windows, you’re just accessing Advanced Startup Options—no product key or license breaking required.
-
Boot from the disc or boot from the USB device, whatever your situation calls for.
-
Select Next from the Windows Setup screen.
-
Choose Repair your computer at the bottom of the window.
-
Advanced Startup Options will start, almost immediately.
Method 5: Boot From a Windows 11/10/8 Recovery Drive
-
Insert your Windows 11, Windows 10, or Windows 8 Recovery Drive into a free USB port.
Don’t worry if you weren’t proactive and never got around to creating a Recovery Drive. If you or a friend has a computer with the same version of Windows, see How to Create a Windows Recovery Drive for instructions.
-
Boot your computer from the flash drive.
-
On the Choose your keyboard layout screen, select U.S. or whatever keyboard layout you’d like to use.
-
Advanced Startup Options will begin instantly.
Method 6: Boot Directly to Advanced Startup Options
-
Start or restart your computer or device.
-
Choose the boot option for System Recovery, Advanced Startup, Recovery, etc.
On some Windows 11/10/8 computers, for example, pressing F11 starts System Recovery.
What this option is called is configurable by your hardware maker, so the options mentioned here are just some that we’ve seen or heard. Whatever the name, it should be clear that what you’re about to do is a boot to the advanced recovery features included in Windows.
The ability to boot directly to Advanced Startup Options isn’t one that’s available with a traditional BIOS. Your computer will need to support UEFI and then also be configured properly to boot directly to the ASO menu. Fortunately, this is very common these days.
-
Wait for Advanced Startup Options to begin.
What About F8 and SHIFT+F8?
Neither F8 nor SHIFT+F8 is a reliable option for booting to the Advanced Startup Options menu. See our guide on how to start Windows in Safe Mode for more on this.
If you need to access Advanced Startup Options, you can do so with any of the several methods listed above.
How to Exit Advanced Startup Options
Whenever you’re finished using the ASO menu, you can choose Continue to restart your computer. Assuming it’s working properly now, this will boot you back into Windows.
Your other option is Turn off your PC, which will do just that.
FAQ
-
Press the Windows key + X and then select Run to open the Run window, or press the Windows key + R to open the Run window immediately. Type in «msconfig» and select OK to run MSConfig. Select the Boot tab, then choose the OS type you want to set as the new default and select Set as default > Apply > OK.
-
Press the Windows key + R to open the Run window, then type in «msconfig» and press Enter. Select the Boot tab, choose the item you want to remove, then select Delete.
-
You’ll need to access your computer’s BIOS, which you can do by pressing the correct key on your keyboard multiple times as Windows is starting up. Depending on the manufacturer this could be F12, F2, Esc, or Delete. Then select your desired boot device from the list.
Thanks for letting us know!
Get the Latest Tech News Delivered Every Day
Subscribe
-
Home
-
News
- 9 Ways to Access Advanced Startup/Boot Options Windows 10
By Alisa |
Last Updated
This post lists 9 ways to allow you access Advanced Startup/Boot Options in Windows 10. Open Windows 10 Advanced Options menu to use Startup Repair, System Restore, Reset this PC, System Image Recovery, Command Prompt tools or boot Windows 10 PC into Safe Mode to troubleshoot PC problems. MiniTool software helps you boot computer and recover lost data with ease.
Windows 10 offers the Advanced Startup Options (also known as Advance Boot Options Windows 10) feature to help users to troubleshoot many Windows 10 problems.
After you access Advanced Options Windows 10 menu, you can repair Windows 10 problems with the diagnostic and repair tools it offer. You can use the tools like Reset this PC, Startup Repair, System Restore, System Image Recovery, Command Prompt to diagnose and fix Windows 10 errors. You can also access Startup Settings from Windows 10 Advanced options to start Windows 10 in Safe Mode if your computer has problems to start.
There are many ways to access Advanced Options Windows 10. This post introduces 9 ways to you. Some ways lets you directly get into Windows 10 boot options menu when PC can start, while some others enable you to access Advanced Startup Options Windows 10 when PC/laptop won’t turn on.
Quick Video Guide:
Way 1. Access Advanced Startup Options Windows 10 from Settings
If your Windows 10 PC can boot, you can click Start -> Settings -> Update & Security -> Recovery, and click Restart now button under Advanced startup to access Advanced Startup Options window.
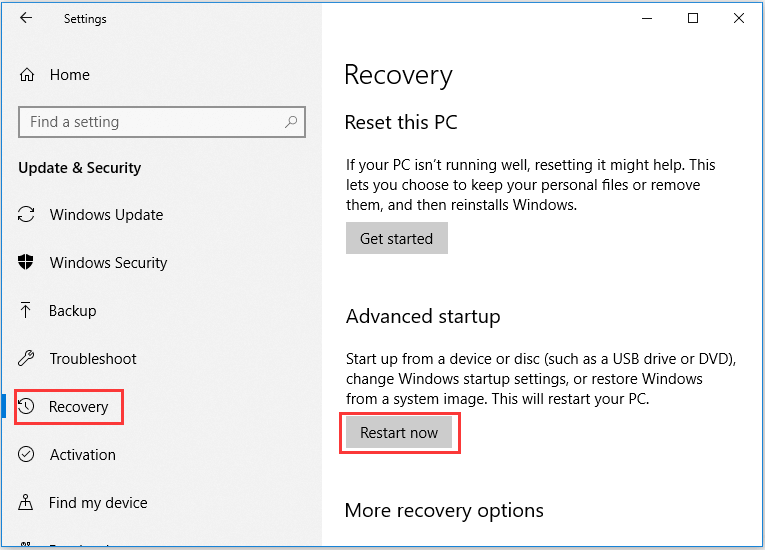
Way 2. Access Advanced Boot Options Windows 10 with Shift + Restart
Another easy way to access Advanced Options window is through Shift + Restart. You can click Start -> Power, press and hold Shift key on the keyboard and click Restart button. This will take you into the Advanced Startup Options menu in Windows 10.
Way 3. Access Advanced Options Windows 10 from Sign-in Screen
If you are in the sign-in screen, you can click Power button at the lower-right. Press and hold Shift and click Restart. This will also open Advanced Options dialog.
You can press Ctrl + Alt + Delete keys on the keyboard at the same time to open the Task Manager menu. Then click Power button, press and hold Shift key on the keyboard and click Restart button.
Way 5. Hit F11 to Access Advanced Startup Options Windows 10
For some computers, you can hit F11 key on the keyboard as soon as the computer powers on, and this can help you access Advanced Options menu in Windows 10.
Way 6. Access Windows 10 Boot Options with Command Prompt
You can also use Command Prompt to access the Advanced Startup Options in Windows 10.
- Press Windows + R keys on the keyboard, and type cmd in Windows Run. Press Ctrl + Shift + Enter key to run Command Prompt as administrator.
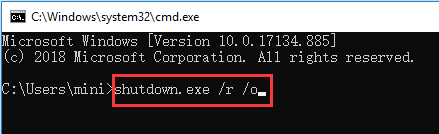
- You can then type this command line: shutdown. exe /r /o, and hit Enter.
- Click Close when you see You’re about to be signed out. And after a while, your Windows 10 computer will restart into Windows 10 recovery mode and enter Advanced Options window.
Way 7. Turn Off and On Windows 10 PC 3 Times to Access Advanced Options
This way and the following two ways below helps you access Advanced Startup Options Windows 10 when your PC can’t boot.
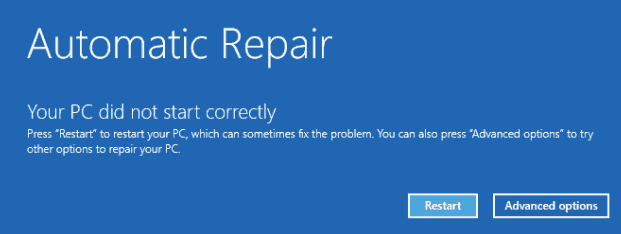
Press the Power button on your computer to start your computer. When you see the Windows logo during booting, immediately press the Power button again to shut down the computer. Repeat the power-on and power-off operation 3 times. In the third restart, your computer should enter into Windows Recovery Environment (WinRE).
After you select your account and input the account password, you can see the Automatic Repair Window, you can click Advanced options button to get to Windows 10 Advanced boot options Window.
Way 8. Access Windows 10 Advanced Options with Recovery Drive/Disk
- If the above ways fail to get you into Advanced Options window, you can create a Windows 10 repair/recovery disk or USB drive to boot your Windows 10 PC and enter into Windows 10 recovery mode.
- Insert the Windows 10 recovery USB drive or DVD disc to your computer USB port, and boot Windows 10 computer from the Windows 10 recovery drive/disk.
- Then choose a keyboard layout and Windows 10 Advanced Boot Options window will auto open up.
Way 9. Get to Advanced Options Windows 10 with Installation Disc/Drive
If you have a Windows 10 installation disc or USB drive, you can access Windows 10 Advanced Options menu thought installation media.
- Plug in the Windows 10 installation CD/DVD disc or USB flash drive to your computer, and boot the computer from the inserted DVD disc or USB drive in BIOS.
- After you enter into Windows Setup screen, choose computer language and other preferences and click Next.
- Next click Repair your computer. Advanced Startup Options window will open.
Use Advanced Options on Windows 10 to Repair Windows 10 Issues
By using the 9 ways above, you can easily enter into Advanced Options screen in Windows 10. You can then use the tools in it to troubleshoot and fix your Windows 10 computer problems. You can reset your Windows 10 PC to factory status, perform a system restore to go back to a previous healthy point, boot your computer to Safe Mode, use startup repair to fix Windows 10 startup problems, boot to Command Prompt in Windows 10, etc.
About The Author
Position: Columnist
Alisa is a professional English editor with 4-year experience. She loves writing and focuses on sharing detailed solutions and thoughts for computer problems, data recovery & backup, digital gadgets, tech news, etc. Through her articles, users can always easily get related problems solved and find what they want. In spare time, she likes basketball, badminton, tennis, cycling, running, and singing. She is very funny and energetic in life, and always brings friends lots of laughs.