
Contents
- Outline
- Introduction
-
Prerequisites
-
Dummy headlines
- Notes about speed
- Notes about size
- Notes about bootability
- The flash hardware
-
Dummy headlines
-
Creating a bootable Ubuntu USB flash drive from Windows
-
Rufus
- balenaEtcher
- Pendrivelinux’s Universal USB Installer
- UNetbootin
- Win32 Disk Imager
-
Rufus
-
Creating a bootable Ubuntu USB flash drive from Ubuntu
-
Install and run Startup Disk Creator alias usb-creator
- UNetbootin
- mkusb — dd image of iso file to USB device safely
-
Install and run Startup Disk Creator alias usb-creator
- Creating a bootable Ubuntu USB flash drive from Mac OSX
-
UEFI
-
Test if running in UEFI mode
- Boot and install
- Stable portable systems — good for USB sticks
- Creating an EFI-only image
- Ubuntu single boot in UEFI mode
-
Test if running in UEFI mode
-
Alternative methods
-
‘Do it yourself’
- Portable installed system booting from UEFI and BIOS
- Multiboot pendrives
- Booting ISO files on internal drive
- Booting USB drives with grub2 and iso files ‘grub-n-iso’
-
‘Do it yourself’
-
Booting the Computer from USB
- Boot menu
- Edit the BIOS settings
-
Select ‘hard disk/USB-HDD0’
- Chainloading
- PLoP Boot Manager
- Flow chart for trouble-shooting
- Known Issues
-
Postrequisites — restore the USB stick
-
- gparted
- Disks
- mkusb
-
- See also
Outline
The general procedure to install Ubuntu (or Ubuntu flavour, Kubuntu, Lubuntu, Xubuntu, …) from a USB flash drive is:
-
Get the correct Ubuntu installation file, ‘the iso file’, via this link or Ubuntu flavour via this link. Download the iso file into your running computer (for example into the directory Downloads in the internal drive, not into the USB flash drive that you want to make into a USB boot drive).
-
Check with sha256sum (or another checksum tool) that the download was good.
- Put Ubuntu onto your USB flash drive alias ‘stick’ alias ‘pendrive’ alias ‘thumb’. Tools for this purpose are described in this help page.
- Configure your computer to boot from USB flash drive and boot from it.
-
Try Ubuntu (Kubuntu, Lubuntu, Xubuntu, …) before installing it.
- Install Ubuntu to your internal drive (hard disk drive or solid state drive or external drive).
See also: Installation/FromUSBStickQuick for beginners starting from Windows.
Introduction
Ubuntu can be installed from a USB flash drive. This may be necessary for most new portable computers without DVD drives and is handy for others because a USB flash drive is so convenient. Also, you can configure Ubuntu on the USB flash drive to save changes you make, unlike a read-only CD/DVD disk.
Booting from a USB flash drive created with usb-creator alias Startup Disk Creator and mkusb will behave just as if you had booted from the install CD. It will show the language selection and then the install menu, from which you can install Ubuntu onto the computer’s hard drive or launch the LiveCD environment. Other utilities, e.g. UNetbootin, may create slightly different boot drives or if on UEFI might not work at all with Debian iso files due to a bug
Note: This article uses the term «USB flash drive» alongside USB stick, USB drive, USB device, USB pendrive and thumb drive.
Prerequisites
To create a USB installation device, you will need:
-
an 8 GB USB flash device/drive/stick. If the iso file is smaller than 4 GB, it is possible to use a 4 GB USB device, at least with some of the methods. Files on this USB device will be erased, so backup the files you want to keep before making the device bootable. Some of the tools require that this USB device is properly formatted and mounted while other tools will overwrite whatever is on the target device. Please follow the instructions for each tool.
-
an Ubuntu flavour ISO file downloaded from an official web page, ubuntu.com/download or http://releases.ubuntu.com, stored in your running computer (for example in the directory Downloads in the internal drive, not in the USB flash drive that you want to make into a USB boot drive).
-
Check with sha256sum (or another checksum tool) that the download was good. In Linux there is the tool ‘sha256sum’. In Windows you can do it with Rufus: click on the circle with a tick mark (more about Rufus here.)
Dummy headlines
After a major remake of this help page the following headlines are kept here because they may be linked to from other web sites. Several other headlines further down in the page are also kept for this reason.
Notes about speed
Notes about size
Notes about bootability
The flash hardware
There is a detailed description at the sub-page /pre
Creating a bootable Ubuntu USB flash drive from Windows
There are various methods available for Windows to create a bootable Ubuntu USB flash drive.
NEVER try to use one of your hard disk drives or partitions in this process unless you really know what you are doing, as data will get erased.
Rufus
Rufus is the tool in Windows that is recommended officially by Ubuntu. A tutorial is available from here.
Download Rufus.
balenaEtcher
Download balenaEtcher
Pendrivelinux’s Universal USB Installer
Download Universal USB Installer
UNetbootin
Download UNetbootin
Win32 Disk Imager
Download Win32 Disk Imager
There is a detailed description at /fromWindows including Rufus, balena Etcher, Universal USB Installer, Unetbootin and Win32 Disk Imager.
Creating a bootable Ubuntu USB flash drive from Ubuntu
Install and run Startup Disk Creator alias usb-creator
-
The Ubuntu Startup Disk Creator is dedicated to creating USB boot drives for Ubuntu and Ubuntu family flavours (Kubuntu, Lubuntu … Xubuntu).
- Use another tool (e.g. ‘UNetbootin’ or ‘mkusb’), if you want to create a USB boot drive with another Linux distro (alias Linux operating system).
You can find usb-creator-gtk by typing «Startup Disk Creator» (Ubuntu Desktop) or usb-creator-kde in K-Menu—>Applications—>System—>Startup Disk Creator (Kubuntu). If it is not there, then you can install it using the Ubuntu Software Center.
- Insert and mount the USB drive. Inserting the USB drive should auto-mount it.
- Start the Startup Disk Creator
- In the top pane of the Startup Disk Creator, pick the .iso file that you downloaded.
- If the .iso file isn’t listed, click «Other» to locate and select the .iso file that you downloaded.
- In the bottom pane of the Startup Disk Creator, pick the target device, the USB flash drive. If more than one choice, please check carefully, until you are sure that you will be writing to the correct device.
- After checking that you are pointing to the correct target device, the USB flash drive, you can start the action.
-
You must enter a password because this is a risky operation. Use the password of the current user ID (the same as for login and running tasks with ‘sudo’. Password is not required when installing from a ‘live’ system (booted from a DVD disk or another USB flash drive).
The Startup Disk Creator clones the iso file, which means that you need neither erase nor format the target drive. It will be completely overwritten anyway by the cloning process. The Startup Disk Creator looks like this in Ubuntu 18.04 LTS:
Screenshots: Startup Disk Creator — to SSD or pendrive
Notes
-
NEVER try to use one of your hard disk drives or SSDs or partitions in this process unless you really know what you are doing, as data will get erased.
-
There are bugs that affect the Ubuntu Startup Disk Creator, when you run it in old Ubuntu versions in BIOS mode and try to create USB boot drives with other versions. In the Ubuntu Startup Disk Creator version 0.3.2 in Ubuntu 16.04 LTS, these bugs are no longer a problem, so you can install any version of the Ubuntu flavours from 16.04 LTS and newer versions.
UNetbootin
-
Download UNetbootin
- UNetbootin works in and with most Linux distros.
- It is an extracting tool (not a cloning tool).
- It can make a persistence file up to 4GB in size to save data and defaults.
mkusb — dd image of iso file to USB device safely
-
Install mkusb via PPA
-
If you want to clone from a general image file to a drive, you can use mkusb. It lets you clone to any drive that is not busy, also an internal drive, and there are very obvious warnings to prevent mistakes.
- mkusb can also
- run in Debian and many linux distros that are similar to Ubuntu and Debian,
- clone from iso files of most Linux distros to create USB boot drives,
- create persistent live drives of the Ubuntu family and Debian, using all available drive space for persistence and/or data storage,
- restore a USB boot drive to a standard storage device.
There is a detailed description at /fromUbuntu including the Startup Disk Creator, UNetbootin and mkusb.
Creating a bootable Ubuntu USB flash drive from Mac OSX
See How to install Ubuntu on MacBook using USB flash drive and this Ubuntu Forum thread by Quackers
UEFI
There is a good wiki page about booting with UEFI, and a good tutorial thread, UEFI Installing — Tips.
Test if running in UEFI mode
You may want to test if your Ubuntu flavour is running in [U]EFI mode. An installed system and a live system too is using the directory /sys/firmware/efi, so you can run the following command line,
test -d /sys/firmware/efi && echo efi || echo bios
The following command line is more robust and also easier to understand, so you may prefer it (if you copy & paste and are not bothered by typing a long command line),
if test -d /sys/firmware/efi; then echo efi; else echo bios; fi
Boot and install
Stable portable systems — good for USB sticks
Creating an EFI-only image
Ubuntu single boot in UEFI mode
There are more details at the sub-page /uefi
Alternative methods
‘Do it yourself’
When the boot structure is modified in Ubuntu or the booting software, there can be problems until the extracting tools are modified to manage the modification. It is worthwhile to find a method that is as simple as possible and to learn how to use it in order to manage the extraction also when the boot structure is modified.
- For an UEFI only boot flash drive you need no installer
- Make the drive boot both in UEFI mode and BIOS mode
See this link: Installation/iso2usb#Do_it_yourself
Portable installed system booting from UEFI and BIOS
Multiboot pendrives
Booting ISO files on internal drive
Booting USB drives with grub2 and iso files ‘grub-n-iso’
There are more details at the sub-page /alt
Booting the Computer from USB
Remove all unneeded USB items, but keep the network cable attached.
Instead of editing BIOS settings, you can choose a boot device from the boot menu. Press the function key to enter the boot menu when your computer is booting. Typically, the boot screen displays which key you need to press. It maybe one of F12, F10, F9.
Edit the BIOS settings
Insert the bootable USB flash drive that you just created in your target computer and restart it. Most newer computers can boot from a USB flash drive. If your computer does not automatically do so, you might need to edit the BIOS settings.
Restart your computer, and watch for a message telling you which key, hotkey to press to enter the BIOS setup.
- It will usually be one of F1, F2, F9, F10, DEL, Enter or ESC.
- The hotkey should be described in the user manual provided by the manufacturer of the computer (a printed or electronic document).
-
You can also search your hardware on boot-keys.org.
Press this hotkey continuously or tap repeatedly (different between computers) while your computer is booting to edit your BIOS settings. (On HP Mini Netbooks, the correct key is usually F9.)
Select ‘hard disk/USB-HDD0’
Note: with some motherboards you have to select ‘hard disk/USB-HDD0’ to choose the USB flash disk. It may work like this because the system sees the USB drive ‘a mass storage device’ as a hard disk drive, and it should be at the top of the boot order list.
So you need to edit the Boot Order. Depending on your computer, and how your USB key was formatted, you should see an entry for «removable drive» or «USB media». Move this to the top of the list to make the computer attempt to boot from the USB device before booting from the hard disk.
Chainloading
PLoP Boot Manager
- For old computers that cannot boot from USB
Flow chart for trouble-shooting
-
See this link: Why Doesn’t a Bootable USB Boot
There are more details at the sub-page /bootUSB
Known Issues
-
There are problems with the versions of the Startup Disk Creator alias usb-creator in versions of Ubuntu older than 16.04 LTS. There are similar problems with old versions of Unetbootin. Until these problems are solved other tools work, for example mkusb and Win32DiskImager described in the following links, https://help.ubuntu.com/community/mkusb and https://wiki.ubuntu.com/Win32DiskImager/iso2usb
-
The version 0.3.2 (and newer versions) of the Startup Disk Creator alias usb-creator in Ubuntu 16.04 LTS (and newer versions) clones the iso file and creates a read-only file system. This method is very robust, but if you want to re-use the USB stick as a storage drive, you must restore it. Two methods are described in the next paragraph.
Postrequisites — restore the USB stick
‘Postrequisites’ — after installation: how to restore the USB stick to a standard storage drive. The standard is an MSDOS partition table (MBR) and a partition with the FAT32 file system.
gparted
Disks
mkusb
There is a detailed description at the sub-page /post
See also
-
FromUSBStickQuick for beginners starting from Windows
-
USB Installation Media: custom, manual, older versions, and technical instructions and troubleshooting. There are also network installation options available.
-
Why Doesn’t a Bootable USB Boot: flowchart and lists of possible causes to help troubleshooting
-
MinimalCD alias mini.iso
-
booting with grub2
-
booting with UEFI
-
Ubuntu Forums tutorial «Howto make USB boot drives»
-
Ubuntu Forums tutorial «Howto help USB boot drives»
-
Ubuntu Forums tutorial «How to create an external USB bootable Linux hard drive (without dual-boot)»
-
Unetbootin for Linux, Windows, Mac OS X
-
Paul Sutton’s Unetbootin how to
-
Rufus — Create bootable USB drives the easy way (from Windows)
-
Pendrivelinux about Multisystem
-
Pendrivelinux about grub2
-
YUMI – Multiboot USB Creator
-
Choosing between Live USB and Full USB Installation
-
Try Ubuntu (Kubuntu, Lubuntu, Xubuntu, …) before installing it
-
LiveCD/Persistence
-
Dual Boot with Windows
-
Discussion about tools to create USB boot drives at the Ubuntu Forums «http://ubuntuforums.org/showthread.php?t=2291946»
CategoryLive CategoryInstallation CategoryInstallation CategoryInstallation
Тема сегодняшней инструкции — создание загрузочной флешки Ubuntu. Речь пойдет не об установке Ubuntu на флешку (о чем я напишу в ближайшие два-три дня), а именно о создании загрузочного накопителя для установки операционной системы с него или же использования в режиме LiveUSB. Делать это мы будем из Windows и из Ubuntu. Рекомендую также посмотреть отличный способ создания загрузочных флешек Linux, в том числе Ubuntu с помощью Linux Live USB Creator (с возможностью запуска Ubuntu в Live-режиме внутри Windows 10, 8 и 7).
Для того, чтобы сделать загрузочную флешку с Ubuntu Linux, вам потребуется дистрибутив этой операционной системы. Последнюю версию образа ISO Ubuntu вы всегда можете бесплатно скачать на сайте, воспользовавшись ссылками на сайте http://ubuntu.ru/get. Вы можете воспользоваться и официальной страницей загрузки http://www.ubuntu.com/getubuntu/download, однако по ссылке, которую я дал вначале, вся информация представлена на русском и имеется возможность:
- Скачать образ Ubuntu с торрента
- С FTP Яндекс
- Имеется полный список зеркал для загрузки образов ISO Ubuntu
После того, как нужный образ Ubuntu уже на Вашем компьютере, приступим непосредственно к созданию загрузочного USB накопителя. (Если вас интересует сам процесс установки, см. Установка Ubuntu с флешки)
Создание загрузочной флешки Ubuntu в Windows 10, 8 и Windows 7
Для того, чтобы быстро и легко сделать загрузочную флешку с Ubuntu из под Windows, вы можете воспользоваться бесплатной программой Unetbootin, последняя версия которой всегда доступна на сайте http://sourceforge.net/projects/unetbootin/files/latest/download.
Также, прежде чем приступить, отформатируйте флешку в FAT32, используя стандартные настройки форматирования в Windows.
Программа Unetbootin не требует установки — ее достаточно скачать и запустить, чтобы использовать на компьютере. После запуска, в главном окне программы Вам потребуется выполнить всего три действия:

Загрузочная флешка Ubuntu в Unetbootin
- Указать путь к образу ISO с Ubuntu (Я использовал Ubuntu 13.04 Desktop).
- Выбрать букву флешки (если подключена одна флешка, скорее всего, она определится автоматически).
- Нажать кнопку «Ок» и дождаться завершения работы программы.

Программа Unetbootin в работе
Стоит отметить, что когда я делал загрузочную флешку с Ubuntu 13.04 в рамках написания данной статьи, на этапе «установка загрузчика» программа Unetbootin как будто бы зависла (Не отвечает) и продолжалось это в течение примерно десяти-пятнадцати минут. После этого она очнулась и завершила процесс создания. Так что не пугайтесь и не снимайте задачу, если подобное произойдет и у Вас.
Для того, чтобы выполнить загрузку с флешки для установки Ubuntu на компьютер или использования флешки в качестве LiveUSB, Вам потребуется установить загрузку с флешки в BIOS (по ссылке описано, как это сделать).
Примечание: Unetbootin — не единственная Windows программа, с помощью которой можно сделать загрузочную флешку с Ubuntu Linux. Эту же операцию можно проделать в WinSetupFromUSB, XBoot и многих других, ознакомиться с которыми можно в статье Создание загрузочной флешки — лучшие программы.
Как сделать загрузочный носитель Ubuntu из самой Ubuntu
Может так оказаться, что на всех компьютерах в Вашем доме уже установлена операционная система Ubuntu, а загрузочная флешка Вам требуется, чтобы распространить влияние секты Убунтоводов. Это не сложно.

Найдите стандартное приложение «Создание загрузочного диска» (Startup Disk Creator) в списке приложений.
Укажите путь к образу диска, а также к флешке, которую требуется превратить в загрузочную. Нажмите кнопку «Создать загрузочный диск». К сожалению, на скриншоте я не смог показать весь процесс создания, так как Ubuntu запущен на виртуальной машине, куда не смонтированы флешки и прочее. Но, тем не менее, думаю представленных здесь картинок будет вполне достаточно для того, чтобы каких-либо вопросов не возникло.
Есть также возможность сделать загрузочную флешку с Ubuntu и в Mac OS X, но у меня сейчас отсутствует возможность показать, как это делается. Обязательно расскажу об этом в одной из следующих статей.
Записав дистрибутив на внешний носитель, вы сможете установить новую ОС или опробовать её работу в Live-режиме.
Чтобы запустить Linux на своём компьютере безо всяких виртуальных машин, вам понадобится загрузочная флешка. Для этой задачи подойдёт носитель объёмом от 4 ГБ. Все данные с него будут стёрты, поэтому предварительно скопируйте нужные файлы куда-то ещё. После этого воспользуйтесь нашей инструкцией.
1. Загрузите ISO-образ

Для создания загрузочной флешки вам понадобится один из дистрибутивов Linux. Они распространяются в формате образа диска ISO. Чтобы вы не ломали голову, на каком дистрибутиве остановиться, мы собрали проверенные варианты.
В качестве примера возьмём Ubuntu из-за её популярности, но для других Linux действия идентичны. Откройте сайт Ubuntu, перейдите в раздел Download и нажмите на зелёную кнопку, чтобы скачать ISO-файл системы. Если разработчик предлагает загрузить ISO через торрент, воспользуйтесь этой возможностью. Так выйдет быстрее.
2. Запишите образ на носитель
Действия будут несколько различаться в зависимости от операционной системы вашего компьютера.
Windows

Пожалуй, идеальный инструмент для записи загрузочных ISO-файлов на флешки в Windows — это Rufus. Программа отличается быстротой и может работать даже без установки.
- Скачайте Rufus с официального сайта, установите и запустите. Либо просто откройте без инсталляции, если выбрали переносную версию.
- Укажите носитель, на который нужно записать образ. Если в компьютер вставлена одна флешка, то Rufus выберет её по умолчанию.
- Выберите скачанный образ ISO. Скорее всего, он будет находиться в папке «Загрузки». Другие параметры для продвинутых пользователей не трогайте: Rufus сам знает, что делать.
- Нажмите на кнопку «Старт». Если понадобится подтверждение, нажмите «Да» и OK. И ждите, пока Rufus не закончит работу.
macOS

- Загрузите приложение balenaEtcher и переместите его в папку с программами, затем запустите.
- Нажмите Select Image и укажите скачанный вами ISO.
- Щёлкните Select target и выберите нужный носитель.
- Теперь нажмите Flash, чтобы начать запись.
Возможно, понадобится ввести пароль суперпользователя macOS. Сделайте это и ждите, пока процесс не завершится.
Linux
Есть целых три способа создать загрузочную флешку на этой ОС.
Startup Disk Creator

Это встроенный инструмент для создания загрузочных флешек. Он есть в Ubuntu и многих её производных. Программу можно найти в меню запуска по названию «Создание загрузочного диска» или Startup Disk Creator.
Откройте приложение, нажмите «Обзор» и укажите нужный ISO-образ. Затем выберите носитель и щёлкните «Создать загрузочный диск». Если понадобится, введите свой пароль суперпользователя Linux.
Etcher

Ещё один вариант — кроссплатформенный Etcher.
- Скачайте программу с официального сайта, распакуйте ZIP-архив и запустите.
- Нажмите Flasf from file и укажите скачанный вами ISO.
- Щёлкните Select target и выберите нужный носитель.
- Нажмите Flash, чтобы начать запись.
- Введите пароль суперпользователя, если система его запросит, и ждите.
dd

Это терминальная команда Linux, работающая во всех дистрибутивах. Полезна, если хотите быстро создать загрузочную флешку, ничего не устанавливая.
- Откройте «Терминал» и введите команду
lsblk. Вы увидите имена всех ваших накопителей в виде sda1, sda2, sdb1 и так далее. Запомните имя флешки, например sdb1. - Введите команду
sudo umount /dev/sdb1и пароль суперпользователя. Это отключит флешку, сделав её доступной для записи. - Теперь введите команду
sudo dd if=путь/к/образу/ubuntu.iso of=/dev/sdb1 bs=4M.
Вместо путь/к/образу подставьте адрес папки, где лежит ISO-образ. Или, чтобы не путаться в адресах, переложите образ в свою домашнюю папку. Если файл называется ubuntu-20.04.1-desktop-amd64.iso, команда будет выглядеть вот так:sudo dd if=ubuntu-20.04.1-desktop-amd64.iso of=/dev/sdb1 bs=4M.
Подождите несколько минут. Когда в командной строке снова появится курсор и отчёт о том, сколько данных было скопировано, можете извлечь флешку.
3. Загрузитесь с флешки

Теперь нужно запустить Linux с флешки. Вот как это сделать:
- Вставьте загрузочный носитель с Linux в компьютер.
- Перезагрузите устройство. Когда компьютер начнёт загружаться снова, жмите на клавишу перехода в настройки BIOS. Обычно это F2, F8, F9 или F12 — зависит от производителя оборудования. Чаще всего нужная клавиша высвечивается на экране во время загрузки BIOS.
- В меню BIOS перейдите в раздел загрузки Boot, если система не перенаправила вас туда сразу.
- Выберите вашу флешку, сохраните настройки и перезагрузитесь.
После этого компьютер должен загрузиться с выбранной флешки.
Как создать загрузочную флешку
Вслед за перфокартами и дискетами постепенно отходят в прошлое и такие носители информации, как CD и DVD. Оптические приводы уже не входят в стандартные комплектации современных компьютеров, а в некоторых случаях (нетбуки, неттопы) и вовсе не предусмотрены. Сегодня их успешно заменяют высокоскоростной интернет и USB-флеш-накопители или просто «флешки». Но если запись файлов на флешку вопросов обычно не вызывает, то создание загрузочной флешки для установки или просто загрузки операционной системы требует использования специальных программ и более детального описания.
В данной статье мы рассмотрим две программы, позволяющие создавать загрузочную флешку:
- Universal USB Installer для Windows
- Startup Disk Creator для Linux
Нам понадобятся:
- Флешка объемом 1-4 гигабайта или более (в зависимости от размера дистрибутива системы).
- Образ диска в формате ISO, который будем копировать на флешку.
- Компьютер с системой Windows 7 (XP, Vista), либо Ubuntu Linux.
- Программа для записи на флешку.
Создание загрузочной флешки в среде Windows
Для создания загрузочной флешки под Windows будем использовать программу Universal USB Installer. Она бесплатна и довольно проста в использовании. Программа позволяет установить на флешку множество операционных систем, включая Windows 8/7/Vista, различные версии Ubuntu Linux, Debian, Fedora, OpenSUSE, Puppy Linux, ArchLinux, Gentoo и множество других, а также LiveCD для восстановления системы и проверки на вирусы. Полный список совместимых операционных систем приведен на сайте программы.
Скачать бесплатно Universal USB Installer можно на официальном сайте. Для этого нажимаем на кнопку «Download UUI» внизу страницы. Вместе с программой также распространяется исходный код.
Рис. 1
После загрузки запускаем программу, принимаем лицензию GNU — нажимаем кнопку «I Agree».
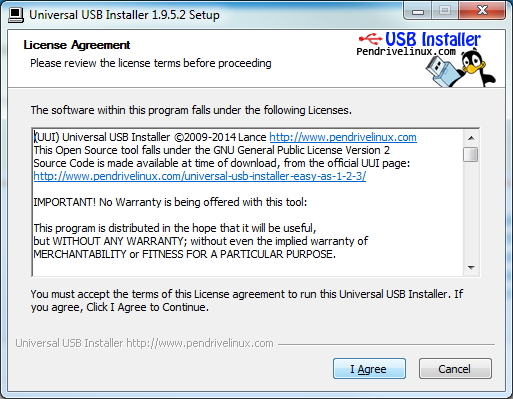
Рис. 2
Выбираем название дистрибутива в выпадающем списке (на рисунке выбран Ubuntu). Если не нашли нужный дистрибутив, то в самом конце списка выбираем «Try Unlisted Linux ISO». Нажимаем кнопку «Browse» и указываем путь к ISO-файлу с дистрибутивом (о том, как бесплатно скачать Linux, читайте в статье «Как установить Ubuntu»). Чуть ниже выбираем диск с флешкой (на рисунке выбран F:\). Также можно загрузить ISO-образ, поставив галочку напротив названия дистрибутива. Если USB-диск не отформатирован или имеет формат, отличный от FAT32 или NTFS, то ставим галочку возле надписи «Format». Нажимаем кнопку «Create» внизу окна.
Обратите внимание! Если галочка «Format» отмечена, то при создании загрузочной флешки все данные на ней будут уничтожены!
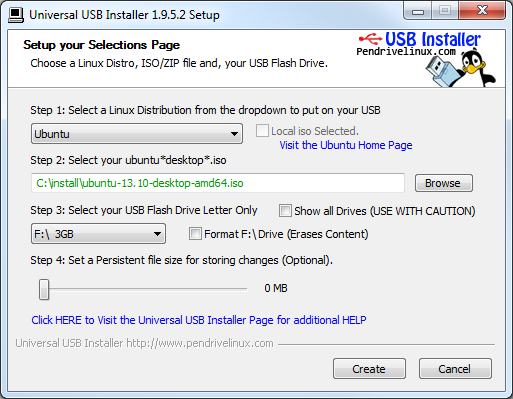
Рис. 3
Программа предупредит о том, что собирается установить загрузчик и дистрибутив Ubuntu на диск. Внимательно проверьте, правильно ли выбран диск, открыв «Мой компьютер» и нажмите «Да».
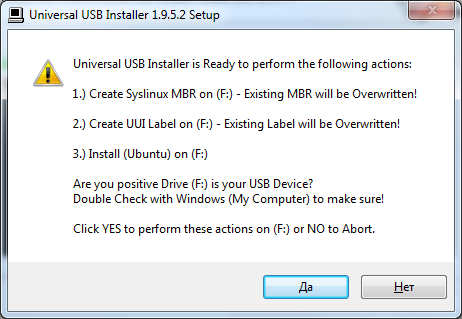
Рис. 4
Ждем окончания процесса установки, о чем компьютер нам сообщит надписью «Installation Complete!».
Примечание: Обращаем внимание, что программа Universal USB Installer позволяет создать загрузочную флешку не только для Linux, но и для любой другой операционной системы, если у Вас есть ISO образ ее дистрибутива.
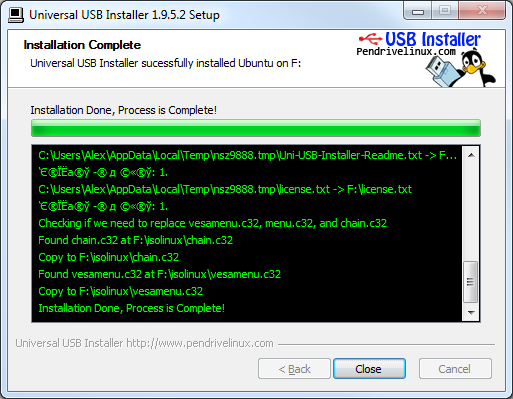
Рис. 5
Создание загрузочной флешки в среде Linux
Записать загрузочную флешку под Linux можно с помощью программы Startup Disk Creator (Создание загрузочного диска). Эта программа входит в состав инсталлятора Ubuntu Linux. Загружаемся с установочного диска Ubuntu, выбираем русский язык и нажимаем клавишу «Запустить Ubuntu». Если Ubuntu уже была установлена на жесткий диск, то следует просто загрузить систему.
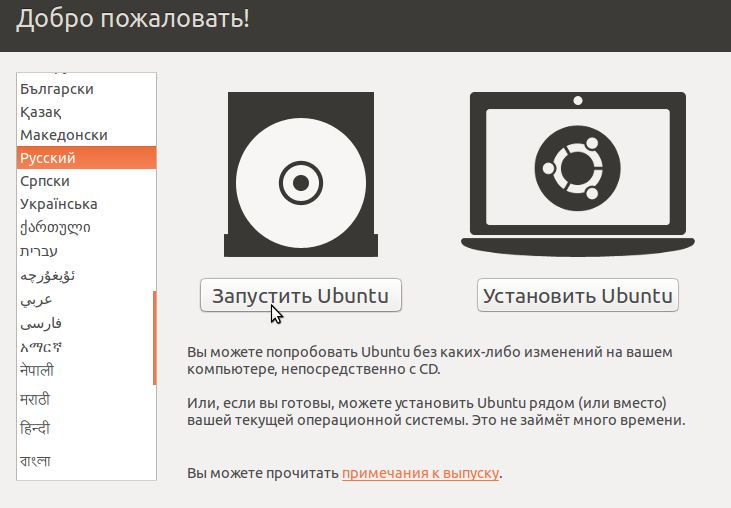
Рис. 6
Вставляем флешку в компьютер. Открываем терминал (Ctrl+Alt+T) и запускаем программу (для запуска программы нужно набрать ее название в терминале нажать «Enter»): usb-creator-gtk.
Откроется окно:
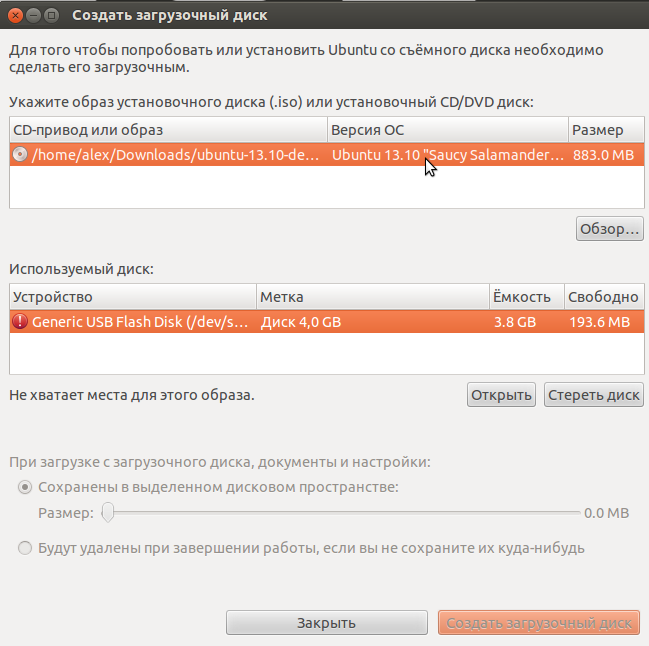
Рис. 7
В таблице в верхней части окна мышкой выбираем образ диска для установки. Если нужный образ в списке отсутствует, то нажимаем кнопку «Обзор» и указываем путь к файлу с образом. В таблице ниже показаны найденные флеш-накопители. Выделите нужную также, как Вы выделили образ. Если после выбора отображается сообщение, что места не хватает, то нажимаем кнопку «Стереть диск» (если на флешке есть важные файлы, нужно предварительно их сохранить).
Можно настроить программу так, что после завершения работы с системой после загрузки с флешки все созданные документы будут удаляться, либо сохраняться на этой же флешке. Во втором случае выберите пункт «Сохранены в выделенном дисковом пространстве» и укажите курсором нужный размер для документов.
Нажимаем кнопку «Создать загрузочный диск». Ждем окончания записи файлов. Если программа была запущена с обычными привилегиями, нужно будет ввести пароль суперпользователя.
Через некоторое время компьютер сообщит о завершении установки.

Рис. 8
Creating a bootable USB drive is one of the most preferred ways of testing and installing a Linux operating system on a PC. This is so because most modern PCs don’t come with a DVD drive anymore. Further, USB drives are easily portable and less delicate than a CD / DVD.
Many graphical tools abound that can help you create a bootable USB drive. One of the most widely used tools is Rufus, a simple yet very effective tool. Sadly, it’s only available for Windows systems.
Thankfully, Ubuntu ships with its own tool called Startup Disk Creator. The tool is easy to use and allows you to create a bootable Ubuntu USB disk in no time.
With a bootable Ubuntu USB drive you can perform the following operations:
- Install Ubuntu on your PC.
- Try out Ubuntu desktop without installing it on your hard drive.
- Boot into Ubuntu on another PC and run it.
- Perform diagnostic operations such as repairing or fixing a broken configuration.
With that in mind, let’s see how you can create a bootable Ubuntu USB startup disk.
Requirements
For this exercise, ensure that you have the following prerequisites before you get started:
- A USB drive – Minimum 4GB.
- Ubuntu ISO image ( We will use Ubuntu 20.04 ISO ).
- A stable internet connection for downloading the Ubuntu ISO image – If you don’t have one.
In this guide, we will explore three methods that you can use to create a bootable Ubuntu USB startup disk.
On this page:
- How to Create Bootable Ubuntu USB Startup Disk Using Graphic Tool
- How to Create Bootable Ubuntu USB Startup Disk Using ddrescue Command
- How to Create Bootable Ubuntu USB Startup Disk Using dd Command
Let’s shift gears and see how you can create a startup Ubuntu.
Creating Ubuntu USB Startup Disk Using Graphic Tool
The Startup disk creator is Ubuntu’s native tool that comes preinstalled in every modern Ubuntu release. It allows a user to create a Live USB drive from an ISO image is a simple yet fast and effective way.
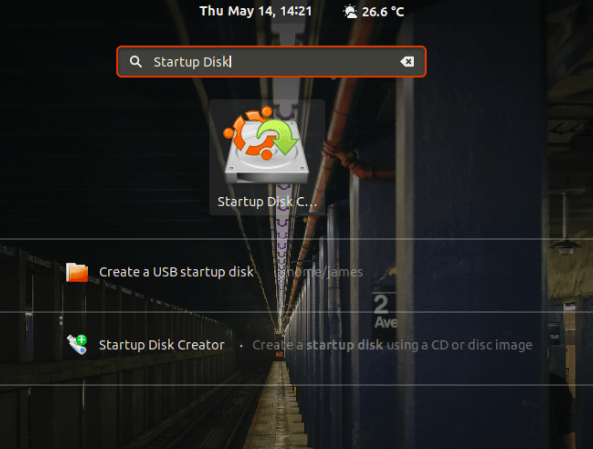
To launch Startup Disk creator, click on ‘Activities’ at the top left corner of your desktop and search for the tool in the application manager as shown. Next, click on the ‘Startup Disk Creator’ option to launch it.
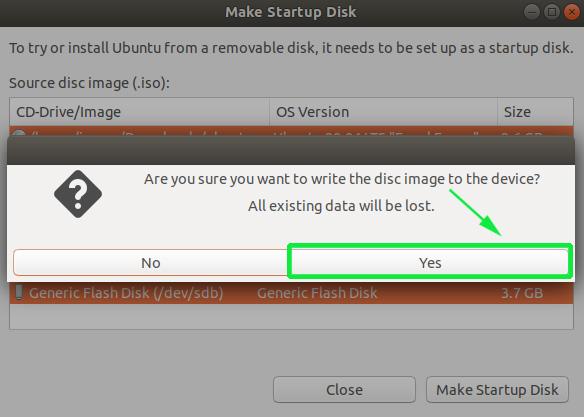
Once launched, you will get a window as shown. The upper section displays the path of the ISO image, the version of the ISO file and its size. If all options are okay, proceed and hit the ‘Make Startup Disk’ option to commence the process of creating the bootable USB drive.
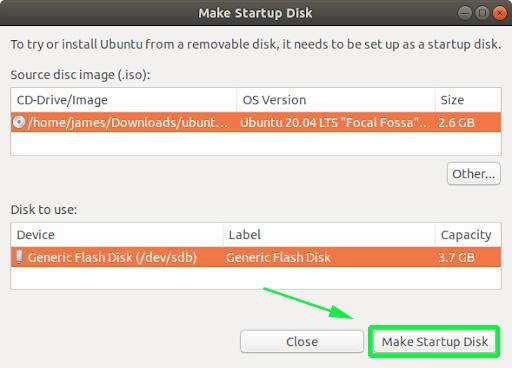
Thereafter, you will get a pop-up notification asking you whether to proceed with the creation or abort. Click on the ‘Yes’ option to initialize the creation of the bootable drive. Provide your password to authenticate and start the process.
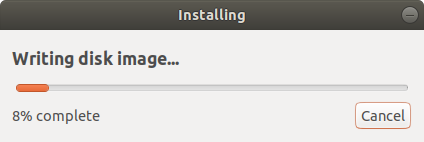
The Startup Disk Creator tool will begin writing the disk image onto the USB drive. This should only a few minutes to be completed.
Once complete, you will get the notification pop-up below indicating that all went well. To try out Ubuntu, click on the ‘Test Disk’ button. If you want to go ahead and start using the bootable drive, simply click ‘Quit’.

Creating Ubuntu USB Startup Disk Using DDrescue Command
The ddrescue tool is a popular data recovery tool that you can use to recover data from failed storage devices such as hard drives, pen drives, etc. Additionally, you can use the ddrescue tool to convert an ISO image to a startup USB drive.
To install ddrescue on Ubuntu / Debian systems execute the command.
$ sudo apt install gddrescue
NOTE: Repositories refer to it as gddrescue. However when invoking it on the terminal use ddrescue.
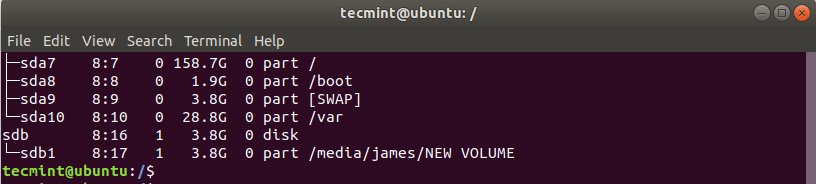
Next, we need to verify the block device volume of the USB drive. To achieve this, use the lsblk command as shown below:
$ lsblk
The output below confirms that our USB drive is denoted by /dev/sdb.
Now use the syntax below to create a bootable USB stick.
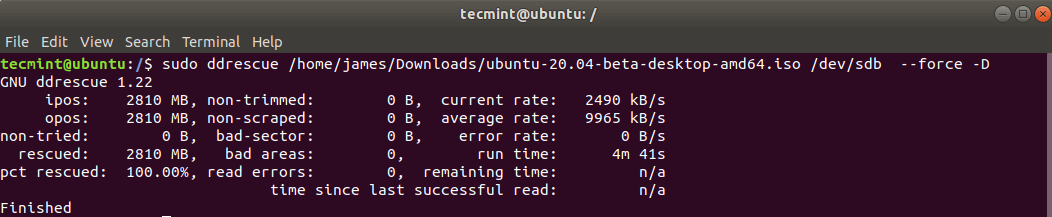
$ sudo ddrescue path/to/.iso /dev/sdx --force -D
For example to create a Ubuntu 20.04 startup disk we executed the command below.
$ sudo ddrescue ubuntu-20.04-beta-desktop-amd64.iso /dev/sdb --force -D
The process takes a few minutes and your bootable USB drive will be ready in no time.
Creating Ubuntu USB Startup Disk Using dd Command
Another simple and easy to use command-line tool you can use to create a startup disk is the dd command. To use the tool, plug in your USB drive and identify the device volume using the lsblk command.
Next, unmount the USB drive using the command below:
$ sudo umount /dev/sdb
Once the USB drive is unmounted, run the following command:
$ sudo dd if=ubuntu-20.04-beta-desktop-amd64.iso of=/dev/sdb bs=4M
Where Ubuntu-20.04-beta-desktop-amd64.iso is the ISO file and bs=4M is an optional argument to help accelerate the process of creating the bootable drive.

You can now eject your Live USB drive and plug it to any PC and either try out or install Ubuntu.
This brings us to the end of this topic. We hope you found this guide useful and that you can now comfortably create a bootable USB startup disk using all the methods explained herein.