
Перед установкой новой версии Microsoft Office на компьютере, рекомендуется удалить все предыдущие версии Office (одновременное использование разных версий Office на одном компьютере поддерживается, но не рекомендуется из-за потенциальных проблем). В этой статье мы рассмотрим несколько скриптов и утилит для автоматического удаления любых ранее установленных на компьютере версий Microsoft Office. Вы можете использовать данные скрипты в сценариях автоматической установки или удаления Office на компьютерах пользователей через SCCM, Intune, GPO, или другие средства развертывания.
Содержание:
- Автоматическое удаление Office с помощью утилиты Microsoft SaRa
- Удаление MSI версий Office с помощью Office Deployment Tool
- OffScrub: VBS скрипты для удаления MS Offce OffScrub
- Удаление Microsoft.Office.Desktop с помощью PowerShell
Автоматическое удаление Office с помощью утилиты Microsoft SaRa
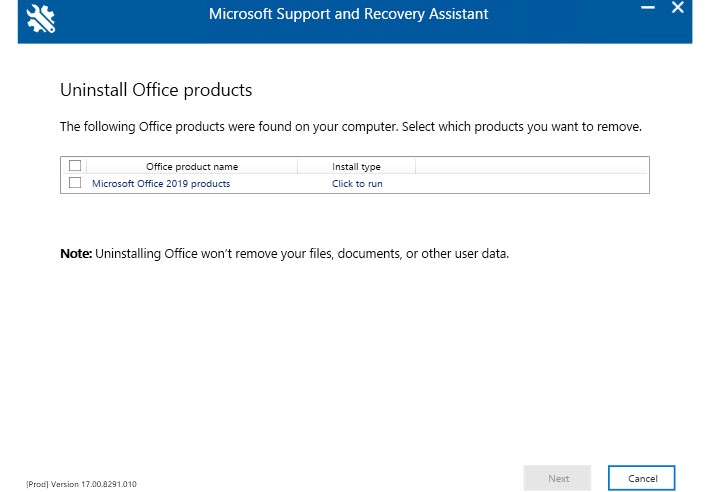
Microsoft Support and Recovery Assistant (Microsoft SaRA, https://aka.ms/SaRA-FirstScreen) это утилита для диагностики и исправления ошибок Microsoft Office (включая Office 365, Microsoft 365, Outlook, Teams и т.д.). Microsoft SaRa предоставляет пользователям простой графический мастер для исправления типовых ошибок программ из пакета Office, установки, проверки активации и полного удаления MS Office. Утилиты MSFT SaRa вполне можно использовать для удаления Office на одном компьютере.
Кроме графической версии SaRa, доступна еще и консольная утилита SaRA_CommandLine, которую можно использовать для удаления пакета Office из командной строки. Соотвественно, вы можете исопльзовать ее в ваших сценариях автоматизации и скриптах. Поддерживаются все версии Windows, начиная с Windows 7 (с установленными .Net Framework 4.5) и заканчивая Windows 10 и 11.
Вы можете использовать консольную утилиту SaRA для удаления следующих версий Office: Office 365, Office 2021, 2019, 2016, 2013, 2010. Поддерживается удаление как MSI, так Click-to-Run (С2R) дистрибутивов Office.
Рассмотрим, как использовать SaRACmd для удаления любой версии Office:
- Скачайте последнею доступную версию SaRACmd https://aka.ms/SaRA_CommandLineVersionFiles (17.00.8256.000);
- Распакуйте архив в папку на диске;
- Запустите командную строку с правами администратора и перейдите в каталог с SaRACmd:
CD C:\Tools\SaRACmd - Для удаления всех версий Office, которые установлены на компьютере, выполните команду:
SaRAcmd.exe -S OfficeScrubScenario –AcceptEula -Officeversion All - Если нужно удалить конкретную версию MS Office (например, только MS Office 2016), используйте такую команду:
SaRAcmd.exe -S OfficeScrubScenario -AcceptEula -Officeversion 2016 - Утилита SaRAcmd после окончания работы возвращает код ошибки. Например, если удаление выполнение успешно появится сообщение:
00: Successfully completed this scenario. We recommend you restart the computer to finish any remaining cleanup tasks. Scenario finished with exit code: [0].

Можно указать путь к каталогу, в который SaRAcmd должна записывать логи:
-LogFolder <Output Path>
.

Например, на моем компьютере утилита вернула ошибку:
06: Office programs are running. Please close all open Office programs and then re-run this scenario. Scenario finished with exit code: [6].
В моем случае удалению помешал установленный клиент MS Teams настроенный на автозапуск (возможно такая же проблема с MS Teams Chat, встроенный по умолчанию в Windows 11).
Поэтому перед запуском команды удаления нужно завершить все запущенные процессы Office. Можно завершить процессы с помощью PowerShell командлета Stop-Process:
Stop-Process -Name winword.exe -Confirm
Stop-Process -Name excel.exe -Confirm
И т.д.
Проверяются следующие процессы: lync, winword, excel, msaccess, mstore, infopath, setlang, msouc, ois, onenote, outlook, powerpnt, mspub, groove, visio, winproj, graph, teams.
Или с помощью taskkill:
taskkill /f /im excel.exe
taskkill /f /im teams.exe
...
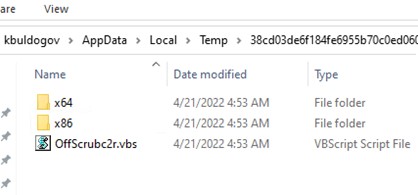
Обратите внимание, что “под капотом” SaRAcmd выполняется скрипт OffScrubC2R.vbs для удаления продуктов Office Click To Run (C2R). Это видно в диспетчере задач по процессу cscript.exe, который выполняет файл OffScrubC2R.vbs из
%UserProfile%\AppData\Local\Temp
.

Скрипты OffScrub описаны ниже в следующем разделе статьи.
Вы можете использовать утилиту SaRAcmd для удаления Office на удаленных компьютерах через PowerShell Remoting (Enter-PSSession или Invoke-Command)
Удаление MSI версий Office с помощью Office Deployment Tool
Если вы используете Microsoft Office Deployment Tool (ODT) для установки C2R версий Office 2019, 2021 или Microsoft 365 Apps на компьютерах компании, вы можете прямо во время установки удалить предыдущие MSI версии Office. Для этого в конфигурационный файл configuration.xml нужно добавить параметр
RemoveMSI
.
Пример конфигурационного файла:
<Configuration>
  <Add OfficeClientEdition="64" Channel="Current" >
   <Product ID="O365ProPlusRetail">
    <Language ID="en-us" />
   </Product>
   </Add>
  <RemoveMSI />
</Configuration>
Параметр RemoveMSI удалит все версии MS Office (2007, 2010, 2013, 2016), а также Office, Visio, Project, которые установлены с помощью Windows Installer (MSI).
OffScrub: VBS скрипты для удаления MS Offce OffScrub
Скрипты OffScrub представляют собой VBS сценарии для автоматизации удаления продуктов Microsoft Office. Данные скрипты позволяют полностью очистить систему от следов ранее установленного Office, в независимости от его текущий работоспособности. Данные скрипты широко используются сотрудниками Premier поддержки Microsoft (PFE). На текущий момент скрипты Offscrub не развиваются и являются Depreciated, но вы вполне можете использовать их OffScrub своих сценариях.
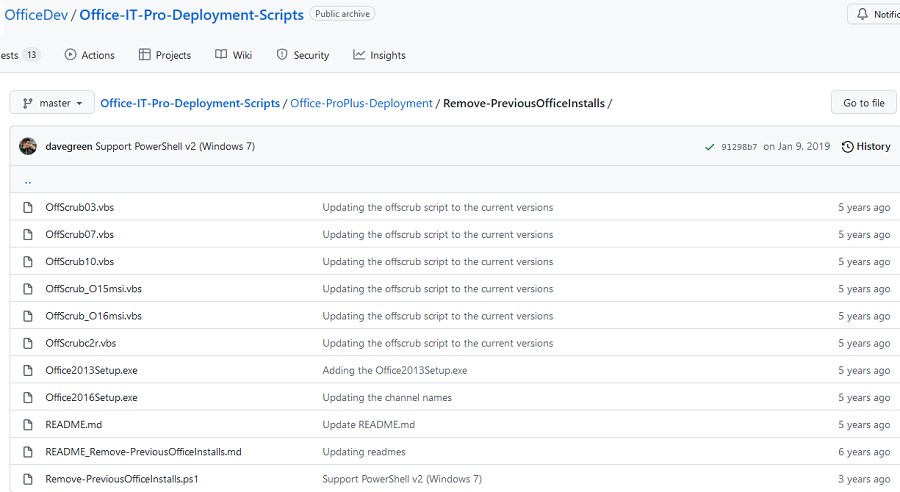
На данный момент скрипты OffScrub доступны в архивном GitHub репозитарии разработчиков Office: https://github.com/OfficeDev/Office-IT-Pro-Deployment-Scripts/tree/master/Office-ProPlus-Deployment/Remove-PreviousOfficeInstalls
Основные преимущества в использования OffScrub для удаления Office:
- Возможность удаления старой версии даже при отсутствии или повреждения исходных файлов установки или кэша Office;
- Куст пользователя в реестре не затрагивается;
- Обеспечивается полное удаление;
- Удаление устаревших настроек и всех продуктов (в т.ч. Project, Visio, Visio Viewer).
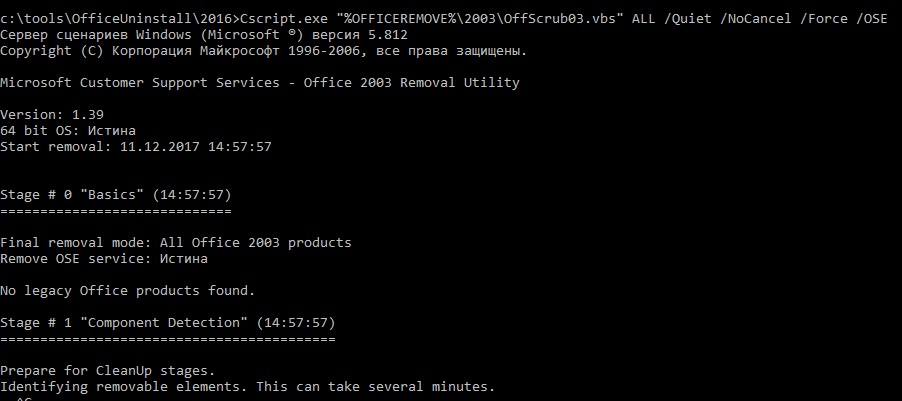
Как использовать скрипты OffScrub для удаления MS Office.
Я создал отдельный каталог для каждой версии Office:
set OFFICEREMOVE=C:\tools\OfficeUninstall\
md "%OFFICEREMOVE%\2003"
md "%OFFICEREMOVE%\2007"
md "%OFFICEREMOVE%\2010"
md "%OFFICEREMOVE%\2013"
md "%OFFICEREMOVE%\2016"
md "%OFFICEREMOVE%\O365"
Скачайте и сохраните каждый vbs файл из GitHub в собственный каталог. Должна получиться такая структура каталогов:
- 2003\OffScrub03.vbs
- 2007\OffScrub07.vbs
- 2010\OffScrub10.vbs
- 2013\OffScrub_O15msi.vbs
- 2016\OffScrub_O16msi.vbs
- O365\OffScrubc2r.vbs
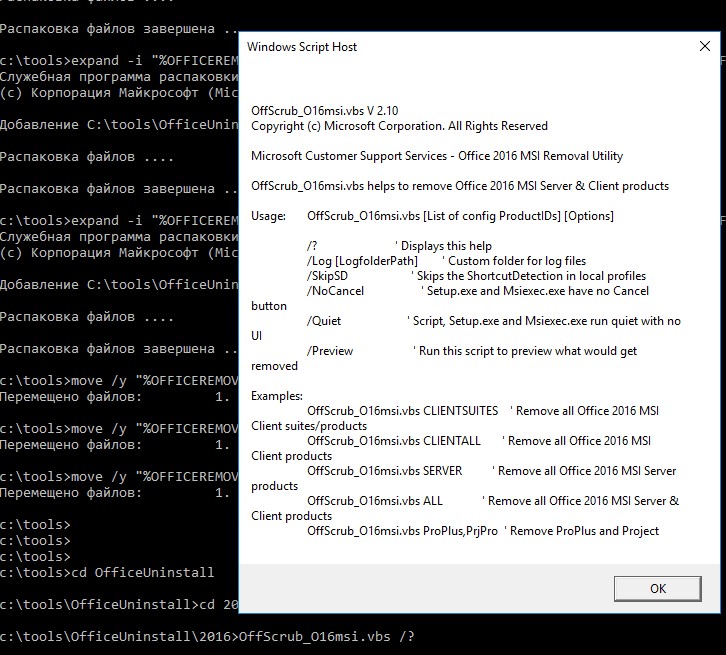
Список доступных аргументов любого vbs скрипта OffScrub можно получить так:
OffScrub_O16msi.vbs /?
Microsoft Customer Support Service – Office 2016 MSI Removal Utility
OffScrub_O16msi.vbs helps to remove Office 2016 MSI Server and Client products
Usage: OffScrub_O16msi.vbs [List of config ProductIDs] [Options]
Чтобы скрипт удаления Office работал корректно на 64 битных версиях Windows, при запуске их 32-битным клиентом Configuration Manager (SCCM), нужно запускать соответствующую версию cscript.exe. Поэтому на 64 битной системе для запуска сценариев нужно запускать процессор cscript.exe из каталога
C:\Windows\SysWOW64
.
Данного функционала можно добиться скриптом NativeCScript.cmd:
@echo off
if "%PROCESSOR_ARCHITEW6432%"=="AMD64" (
"%SystemRoot%\Sysnative\cscript.exe" %*
) else (
"%SystemRoot%\System32\cscript.exe" %*
)
Готовый архив со всеми необходимыми файлами можно скачать с нашего сайта: OfficeUninstall.zip (1,4 Мб)
Ниже указаны команды для полного удаления различных версий Microsoft Office:
| Версия | Команда |
| Office 2003 |
Cscript.exe "%OFFICEREMOVE%\2003\OffScrub03.vbs” ALL /Quiet /NoCancel /Force /OSEКоманда для удаления через SCCM: "%SystemRoot%\System32\cmd.exe" /C "NativeCScript.cmd //B //NoLogo "2003\OffScrub03.vbs" ALL /Quiet /NoCancel /Force /OSE"
|
| Office 2007 |
Cscript.exe "%OFFICEREMOVE%\2007\OffScrub07.vbs” ALL /Quiet /NoCancel /Force /OSESCCM: "%SystemRoot%\System32\cmd.exe" /C "NativeCScript.cmd //B //NoLogo "2007\OffScrub07.vbs" ALL /Quiet /NoCancel /Force /OSE"
|
| Office 2010 |
Cscript.exe "%OFFICEREMOVE%\2010\OffScrub10.vbs” ALL /Quiet /NoCancel /Force /OSESCCM: "%SystemRoot%\System32\cmd.exe" /C "NativeCScript.cmd //B //NoLogo "2010\OffScrub10.vbs" ALL /Quiet /NoCancel /Force /OSE"
|
| Office 2013 |
Cscript.exe "%OFFICEREMOVE%\2013\OffScrub_O15msi.vbs” ALL /Quiet /NoCancel /Force /OSESCCM: "%SystemRoot%\System32\cmd.exe" /C "NativeCScript.cmd //B //NoLogo "2013\OffScrub_O15msi.vbs" ALL /Quiet /NoCancel /Force /OSE"
|
| Office 2016 |
Cscript.exe "%OFFICEREMOVE%\2016\OffScrub_O16msi.vbs” ALL /Quiet /NoCancel /Force /OSESCCM: "%SystemRoot%\System32\cmd.exe" /C "NativeCScript.cmd //B //NoLogo "2016\OffScrub_O16msi.vbs" ALL /Quiet /NoCancel /Force /OSE"
|
| Office 365 (C2R) |
Cscript.exe "%OFFICEREMOVE%\C2R\OffScrubc2r.vbs” ALL /Quiet /NoCancel /Force /OSESCCM: "%SystemRoot%\System32\cmd.exe" /C "NativeCScript.cmd //B //NoLogo "C2R\OffScrubc2r.vbs" ALL /Quiet /NoCancel /OSE"
|
В состав проекта Remove-PreviousOfficeInstalls на Git входит скрипт Remove-PreviousOfficeInstalls.ps1, который должен автоматически определять установленную на компьютере версию MS Office и вызывать один из Offscrub*.vbs скриптов.
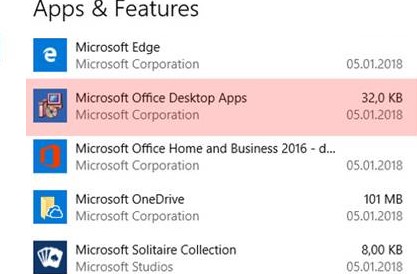
Удаление Microsoft.Office.Desktop с помощью PowerShell
Обратите внимание, что Windows 10 / Windows 11 часто поставляются с предустановленным UWP приложением Microsoft.Office.Desktop.Apps из Microsoft Store. Для удаления такой версии Office из Windows нужно использовать PowerShell:
Get-AppxProvisionedPackage -online | %{if ($_.packagename -match "Microsoft.Office.Desktop") {$_ | Remove-AppxProvisionedPackage -AllUsers}}
Также вы можете использовать команды Get-Package, Uninstall-Package для удаления любого приложения в Windows:
Get-Package -Name "*Office*" | Uninstall-Package
Home
Virtualization
By
Abhishek Silwal

If you no longer need VMware, you might as well uninstall it to free up the space it takes. Additionally, you may need to uninstall it if you encounter any issues while using the app.
This process is very quick to perform. However, due to issues like power failure or conflicts from other applications, such as antivirus, you may not be able to uninstall the VMware.
Uninstalling VMware on Windows
The installation folder of older VMware versions included an uninstall.exe file that you could run to uninstall it. However, for the latest versions, you need to use the app settings or programs and features. You can also use a PowerShell cmdlet to uninstall this application.
If you can’t completely uninstall the program using these methods, you need to manually remove all its files and registry entries.
Using Control Panel
The traditional way of uninstalling an application is through the Programs and Features tool included in the Control Panel. Here’s how you can use it to uninstall VMware:
- Open Run by pressing Win + R.
- Type
appwiz.cpland press Enter to open the Control Panel’s Programs and Features page. - Search for and select VMware Workstation or VMware Player and click on Change.

- Select Next and then Remove.

- Check the option you need to save and click Next.


Through App Settings
Windows 8 introduced the Settings app as an alternative for the Control Panel. You can use its App Settings to uninstall VMware on Windows 10 and later versions. To do so,
- Open Run.
- Enter
ms-settings:appsfeaturesto open the App Settings. - Scroll down and search for VMware workstation or VMware Player.
- Select on it or click on the triple-dot icon next to it and choose Modify. You will be able to select Uninstall on older versions.

- Select Next and then Remove.
- Check the option you need to save and click Next.

With Windows PowerShell
You can also use the Uninstall-Package PowerShell cmdlet to uninstall your apps. Here’s how you can use it to remove VMware:
- Open Run.
- Type
powershelland press Ctrl + Shift + Enter to open the Elevated Windows PowerShell. - Enter the following command:
Get-Package -Name "VMware Workstation*" | Uninstall-Package
Replace Workstation with Player if you want to remove this app instead.
- Type
Yand press Enter if prompted.

Directly Using the Uninstaller/Modify Script
It is also possible to directly run a shortcut for the uninstaller wizard for VMware. First, you need to figure out what the script is through the Registry Editor and then run it. Here are the necessary steps for the complete process:
- Open Run and enter
regeditto open the Registry Editor. - Navigate to
Computer\HKEY_LOCAL_MACHINE\SOFTWARE\Microsoft\Windows\CurrentVersion\Uninstall\{9D6C87F1-2E07-4B8D-99D8-D00248F62D55} - This key is for VMware Workstation 16.x. Other versions may use a separate key. To get there,
- Go to
Computer\HKEY_LOCAL_MACHINE\SOFTWARE\Microsoft\Windows\CurrentVersion\Uninstall\ - Select each key inside Uninstall and check the value of the DisplayName entry. It should show VMware Workstation or VMware Player.

- Go to
- Double-click on ModifyPath and copy its Value data. For older versions, you need to copy the value of UninstallString.

- Open Run and paste the ModifyPath value.
- Replace /l with /x, then press Enter. For example, if the script in ModifyPath is
msiexec.exe /l{9D6C87F1-2E07-4B8D-99D8-D00248F62D55}, you need to entermsiexec.exe /x{9D6C87F1-2E07-4B8D-99D8-D00248F62D55}
- Confirm your choice and follow the onscreen instructions.


Manually Remove VMware Files
If the above uninstallation processes fail, you won’t be able to uninstall the application properly. Then, you also can’t install VMware again on your system due to the persisting files.
In such cases, you need to manually remove the VMware files to clean up the incomplete uninstallation and properly remove the app from your PC.
First, log in with an administrator account and temporarily disable your antivirus and firewall. Then, follow the steps below one by one to manually remove VMware from your system:
Stop VMware Services
- Open Run and enter
services.mscto open Services app. - Search for all services starting with VMware.

- Right-click on them and select Stop.

Uninstall VMware Devices
- Open Run and enter
devmgmt.mscto open the Device Manager. - Select View > Show hidden devices.

- Expand Network Adapters.
- Right-click on the devices starting with VMware and select Uninstall device > Uninstall.

- Then, open Run and enter
ncpa.cplto open Network Connections. - Right-click on a network and select Properties.
- Select VMware Bridge Protocol and click Uninstall.

- Click OK after uninstalling it. Then, do the same for other networks.


Delete VMware Folders and Files
- Press Win + E to open File Explorer.
- Navigate to
C:\Program Files\orC:\Program Files(X86)\and delete the folder VMware.
- Select Yes to provide admin permissions.
- Now, open Run and enter
%programdata% - On the ProgramData folder, delete VMware.
- Then, open Run and enter
%windir%\system32to navigate to this directory. - Delete the following files if available:
vmnat.exevmnetbridge.exeVMNetDHCP.exevmnetdhcp.leasesvmxw2ksetup.dllvnetprobe.exevnetprobelib.dllvnetinst.dllvnetlib.dllvnetlib.exe
- Then open the drivers folder inside System32 and delete these files if present:
vmnet.sysvmnetx.sysVMparport.sysvmx86.sysvmnetadapter.sysvmnetbridge.sysvmnetuserif.syshcmon.sysvmusb.sys


Delete VMware Users and Groups
- Open Run and enter
lusrmgr.mscto open Local Users and Groups Manager. - Double-click on Users and look for __vmware_user__.
- If it’s there, right-click on it and select Delete > Yes.
- Then, go to Groups and look for __vmware__.
- Use a similar way to delete it as well.


Delete VMware Registries
- Open the Registry Editor
- Navigate to
Computer\HKEY_CLASSES_ROOT\Installer\Products\and select the first key within Products. - Check its Product Name.
- If it’s not VMware Workstation or Player, press the down arrow key to check for the next key inside Products.
- Use steps 3 and 4 to find out the key for VMware and note it down. The key is the folder inside Products.
- Right-click on this key and select Delete > Yes to remove it.
- Then, navigate to
Computer\HKEY_CLASSES_ROOT\Installer\Features\<copied key name>and delete this key as well. For example, the key may beComputer\HKEY_CLASSES_ROOT\Installer\Features\1F78C6D970E2D8B4998D0D20846FD255 - Now, delete the following keys as well:
HKEY_LOCAL_MACHINE\SOFTWARE\Classes\Installer\Features\<copied key name>HKEY_LOCAL_MACHINE\SOFTWARE\Classes\Installer\Products\<copied key name>HKEY_LOCAL_MACHINE\SOFTWARE\Microsoft\Windows\CurrentVersion\Installer\UserData\S-1-5-18\Products\<copied key name>HKEY_CLASSES_ROOT\Installer\UpgradeCodes\3F935F414A4C79542AD9C8D157A3CC39HKEY_LOCAL_MACHINE\SOFTWARE\Wow6432Node\VMware, Inc.\VMware WorkstationHKEY_LOCAL_MACHINE\SOFTWARE\Classes\Applications\vmware.exeHKEY_LOCAL_MACHINE\SOFTWARE\VMware, Inc.
- Then, navigate to
Computer\HKEY_LOCAL_MACHINE\SOFTWARE\Microsoft\Windows\CurrentVersion\Uninstall\ - Select each key inside Uninstall and check the value of the DisplayName entry.
- If it shows VMware Workstation or VMware Player, delete the key altogether.


Uninstalling VMware on Linux
On a Command line-based system like Linux, you can easily use some commands to uninstall VMware on your computer.
Here, we use the commands for the Ubuntu Linux system. Other distros use different commands, so you need to search for and use those accordingly.
Using the Uninstaller
The default way of uninstalling VMware on Linux is by using the uninstaller script. Here’s how you can do so:
- Open the Terminal.
- Enter the following command depending on whether you want to remove VMware Workstation or VMware Player:
sudo vmware-installer -u vmware-playersudo vmware-installer -u vmware-workstation
- You may also need to use the full path for vmware-installer, i.e.,
/usr/bin/vmware-installer

Manually Uninstalling VMware
If uninstalling VMware using the uninstaller fails, you need to manually remove all of its files. To do so,
- Open the Terminal.
- Enter the command below to stop VMware services and processes:
/etc/init.d/vmware stop
- Move the VMware libraries to /tmp using the commands:
uname -r(to check the kernel version)cd /lib/modules/<kernel version>/misc(replace <kernel version> with your kernel version)mv vm* /tmp
- Then, you need to unload the kernel modules,
rmmod vmnet.ormmod vmmon.ormmod vmci.ormmod vmblock.ormmod vmppuser.o
- Now, remove the VMware logon scripts using the commands:
rm /etc/rc2.d/*vmware*rm /etc/rc3.d/*vmware*rm /etc/rc5.d/*vmware*rm /etc/rc6.d/*vmware*
- After that, you can remove the VMware files and directories (if available),
rm -rf /etc/vmware*rm /usr/bin/vmware-usbarbitratorrm /usr/bin/vmnet*rm -r /usr/lib/vmware*rm -r /usr/share/doc/vmware*


VMware Workstation pro is a desktop hypervisor that allow users to run multiple operating systems as virtual machines on Windows operating system; Windows 11 and Windows 10.
Installing and using VMware Workstation on PC is super easy, but when it comes to uninstall VMware workstation, you can’t uninstall it just like any other app and program installed on your computer.

According to various reports whenever they’re trying to uninstall VMware Workstation pro from Windows 11 and Windows 10 either via settings app and control panel the Uninstall button is grayed out. Usually this happens when users don’t have (enough) local admin rights.
In case, you’re admin and still Uninstall button for VMware Workstation is grayed out, then in this blog post we will share quick solution on how to uninstall it.
Note – At this point, I presume that VMware Workstation Pro application is already installed on your Windows 11 and Windows 10.
Let’s learn how to quickly and easily uninstall VMware Workstation from Windows 11 and Windows 10. Here’s what you need to do:
Launch Settings app on your Windows 11 PC.
On Settings app, switch to Apps tab on the left and then on the right side, click on Apps & features.

On this page, scroll down to VMware Workstation app, then click on three dots icon and select Modify. This will run VMware Workstation Pro setup, click Next.

On next screen, you will find three options, click Remove.

If you want to remove everything related to VMware workstation, then uncheck box for both Product configuration and Product license information and then click Next.

At last, click on the Remove button and this will start uninstall the VMware Workstation pro

So this how you can uninstall VMware Workstation Pro from Windows 11 or Windows 10 or fix Uninstall button for VMware Workstation is grayed out.
Why don’t you try this solution and let us know if this helped you or not. If you know any other working solution feel free to share in the comments.
Viney Dhiman, the mind behind GeekerMag, is a seasoned content writer with over 12 years of experience. Specializing in simplifying complex tech concepts, he covers Windows OS, Android, iOS, web apps, and product reviews. His work can be found on popular tech websites like Gizmodo and The Verge, and he has been interviewed by the Microsoft Edge team.
VMware Workstation Pro is renowned for its powerful virtualization capabilities, allowing users to run multiple operating systems on a single physical machine. It’s the go-to solution for developers, testers, and IT professionals for creating isolated environments for their applications. However, there may be times when you need to uninstall or remove VMware Workstation Pro, whether due to upgrading to a newer version, troubleshooting, or simply because you no longer need the software. This article provides a comprehensive guide on how to efficiently uninstall VMware Workstation Pro from Windows 10 or Windows 11.
Understanding VMware Workstation Pro
Before delving into the uninstallation process, it’s important to understand what VMware Workstation Pro is and how it functions. VMware Workstation Pro is a desktop virtualization software platform that enables users to run various guest operating systems on Windows or Linux machines. It comes with features like advanced snapshots, cloning, and network simulation, making it an essential tool for professionals.
Reasons for Uninstallation
There can be several reasons for uninstalling VMware Workstation Pro, including:
- Upgrade: You may want to uninstall your current version to make way for a newer release.
- Performance Issues: Sometimes, the software may cause your system to slow down or may lead to compatibility issues with other applications.
- Error Messages: Frequent error messages or crashes may lead you to consider uninstalling VMware.
- No Longer Needed: Disconnecting from virtualization projects or similar tasks can lead to a decision to remove the software.
Preliminary Steps
Before uninstalling VMware Workstation Pro, it’s prudent to take certain preliminary steps to ensure a smooth process:
-
Backup Virtual Machines: If you have virtual machines running, back them up to avoid losing any data. Export the VMs to a safe location if necessary.
-
Close VMware Workstation: Ensure that VMware Workstation Pro and any virtual machines are closed. If the software is running while you attempt to uninstall it, you may encounter errors.
-
Check System Requirements: Generally, the system’s requirements should not limit uninstallation, but it’s beneficial to understand your system’s performance history with VMware.
Uninstallation Methods
VMware Workstation Pro can be uninstalled using multiple methods. Below, we will cover the most effective ways to remove it from Windows 10 and Windows 11.
Method 1: Uninstall via Control Panel
This is one of the most straightforward methods.
-
Open Control Panel:
- On Windows 10, right-click the Start button and select «Control Panel.»
- On Windows 11, type «Control Panel» in the search bar and hit Enter.
-
Navigate to Programs:
- Click on «Programs,» and then select «Programs and Features.»
-
Find VMware Workstation Pro:
- Scroll through the list of installed applications until you find «VMware Workstation Pro.»
-
Uninstall:
- Right-click on it and select «Uninstall.» Follow the prompts to remove the software completely.
-
Reboot:
- Once the uninstallation process is complete, restart your computer to ensure all components are removed.
Method 2: Uninstall via Settings App
Windows 10 and 11 have streamlined the uninstallation process through their Settings app.
-
Open Settings:
- Press
Win + Ito open the Settings application.
- Press
-
Apps:
- Click on «Apps» from the Settings menu.
-
Locate VMware Workstation Pro:
- Scroll down the list of installed applications until you find «VMware Workstation Pro.»
-
Uninstall:
- Click on it and select «Uninstall.» Confirm any prompts to proceed with the uninstallation.
-
Restart:
- After the process is complete, reboot your computer.
Method 3: Using the VMware Uninstaller
If you encounter any issues with the first two methods or if the program doesn’t completely uninstall, you can use the official VMware uninstaller.
-
Download VMware Tools:
- If you have access to the original installation media or online resources, download the VMware Tools installer.
-
Run the Uninstaller:
- Locate the uninstaller executable (
uninstall.exe) typically found in the installation directory of VMware Workstation.
- Locate the uninstaller executable (
-
Follow the Prompts:
- Run the uninstaller and follow the on-screen prompts to completely remove the software.
-
Reboot:
- Restart your machine.
Post-Uninstallation Cleanup
After removing VMware Workstation Pro, you may want to clean up any residual files and registry entries that the uninstallation process may have left behind.
Clean Temporary Files
-
Open Disk Cleanup:
- Type «Disk Cleanup» in the Windows search bar and select it.
-
Select Drive:
- Choose the drive (usually C:) where VMware was installed.
-
Cleanup Options:
- Check the files that you want to delete (temporary files, system cache, etc.) and click «OK.»
Registry Cleaning
-
Open Registry Editor:
- Type
regeditin the Windows search bar and open the Registry Editor.
- Type
-
Backup Registry:
- Before making any changes, always back up the registry. Click on “File” → “Export” and save it.
-
Navigate to VMware Entries:
- Search for VMware-related entries (e.g., using
Ctrl + Fto find «VMware»).
- Search for VMware-related entries (e.g., using
-
Delete Entries:
- Carefully delete any leftover keys related to VMware (Only do this if you’re comfortable; otherwise, use a cleanup tool).
Use a Third-Party Uninstaller
If residual files and registry entries are a concern, consider using third-party cleanup software. Applications like Revo Uninstaller or CCleaner can assist in removing leftover files and registry entries that are not typical for manual cleanup.
Final Thoughts
Uninstalling VMware Workstation Pro from Windows 10 or Windows 11 can be a straightforward process if approached systematically. Always start by backing up any important data, using control mechanisms to ensure complete removal, and cleaning up afterward to optimize your system’s performance.
Should you choose to reinstall VMware Workstation Pro or switch to another virtualization solution, ensure you have a clear understanding of your virtualization needs and system performance patterns. With technology continuously evolving, staying informed about software updates and best practices will ensure that you get the most out of your virtual environments.
In conclusion, whether you’re moving on from VMware Workstation Pro for better alternatives or simply tidying up your system, thorough uninstallation and cleanup will lend much to your system’s sanctity and performance. With this guidance, you can confidently manage your virtualization software, ensuring a seamless computing experience.