Fix Windows Time Service not working: If you’re facing issues with your clock then it’s possible that Windows Time service might not be working correctly which is why you’re facing this issue but don’t worry as today we are going to discuss how to fix this issue. The main cause seems to be Windows time service which doesn’t start automatically which is causing the delay in date and time. This issue can be fixed by enabling Time Synchronization in Task Scheduler but this fix may or may not work for everyone as every user have different system configuration.

Users have also reported that while manually synchronizing time they face the error message “An error occurred while windows was synchronizing with time.windows.com” but don’t worry as we have got this covered. So without wasting any time let’s see how to Fix Windows Time Service not working with the help of below-listed troubleshooting guide.
Table of Contents
Make sure to create a restore point just in case something goes wrong.
Method 1: Start Windows Time service
1.Press Windows Key + R then type services.msc and hit Enter.
2.Find Windows Time Service in the list then right-click and select Properties.

3.Make sure the Startup type is set to Automatic (Delayed Start) and the service is running, if not then click on start.

4.Click Apply followed by OK.
Method 2: Run SFC and DISM
1.Press Windows Key + X then click on Command Prompt(Admin).
2.Now type the following in the cmd and hit enter:
Sfc /scannow
sfc /scannow /offbootdir=c:\ /offwindir=c:\windows (If above fails then try this one)

3.Wait for the above process to finish and once done restart your PC.
4.Again open cmd and type the following command and hit enter after each one:
a) Dism /Online /Cleanup-Image /CheckHealth
b) Dism /Online /Cleanup-Image /ScanHealth
c) Dism /Online /Cleanup-Image /RestoreHealth

5.Let the DISM command run and wait for it to finish.
6. If the above command doesn’t work then try on the below:
Dism /Image:C:\offline /Cleanup-Image /RestoreHealth /Source:c:\test\mount\windows
Dism /Online /Cleanup-Image /RestoreHealth /Source:c:\test\mount\windows /LimitAccess
Note: Replace the C:\RepairSource\Windows with the location of your repair source (Windows Installation or Recovery Disc).
7.Reboot your PC to save changes and see if you’re able to Fix Windows Time Service not working issue.
Method 3: Use a different synchronization server
1.Press Windows Key + Q to bring up Windows Search then type control and click on Control Panel.
2.Now type date in the Control Panel search and click on Date and Time.
3. On the next window switch to Internet Time tab and click on “Change settings“.

4.Make sure to checkmark “Synchronize with an Internet time server” then from the server dropdown select time.nist.gov.

5.Click Update now button then click OK and see if you’re able to Fix Windows Time Service not working issue.
Method 4: Unregister and then again Register Time Service
1.Press Windows Key + X then select Command Prompt (Admin).
2.Type the following command into cmd and hit Enter after each one:
net stop w32time
w32tm /unregister
w32tm /register
net start w32time
w32tm /resync

3.Wait for the above commands to finish then again follow the method 3.
4.Restart your PC and see if you’re able Fix Windows Time Service not working issue.
Method 5: Temporarily Disable Firewall
1.Type control in Windows Search then click on Control Panel from the search result.
2.Next, click on System and Security and then click on Windows Firewall.

3.Now from the left window pane click on Turn Windows Firewall on or off.
4.Select Turn off Windows Firewall and restart your PC.
If the above method doesn’t work make sure to follow the exact same steps to turn on your Firewall again.
Method 6: Enable Time Synchronization in Task Scheduler
1.Press Windows Key + X then select Control Panel.
2.Click System and Security and then click Administrative Tools.

3.Double click on Task Scheduler and navigate to the following path:
Task Scheduler Library / Microsoft / Windows / Time Synchronization
4.Under Time Synchronization, right-click on Synchronize Time and select Enable.
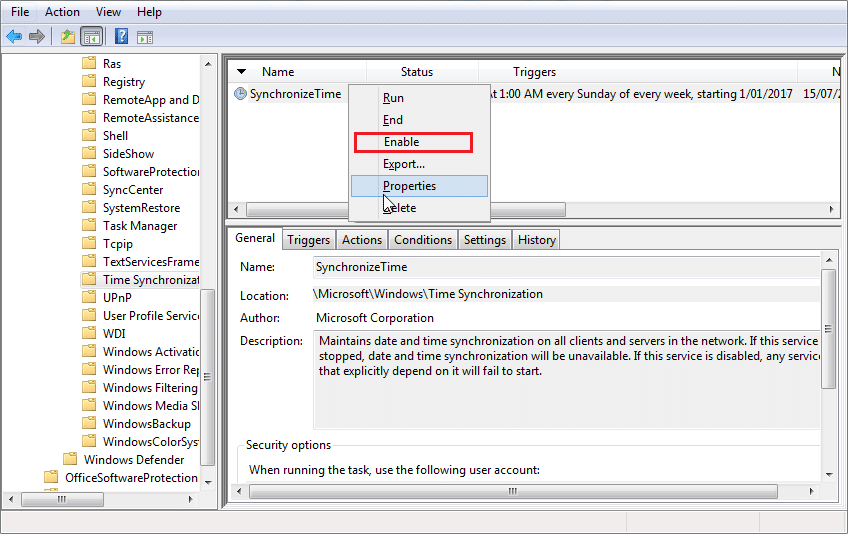
5.Reboot your PC to save changes.
Method 7: Change the default update interval
1.Press Windows Key + R then type regedit and hit Enter to open Registry Editor.
2.Navigate to the following registry key:
HKEY_LOCAL_MACHINE\SYSTEM\CurrentControlSet\Services\W32Time\TimeProviders\NtpClient
3.Select NtpClient then in the right window pane double-click on SpecialPollInterval key.

4.Select Decimal from the Base section then in the value data field type 604800 and click OK.

5.Reboot your PC to save your changes and see if you’re able to Fix Windows Time Service not working issue.
Method 8: Add more Time servers
1.Press Windows Key + R then type regedit and hit Enter to open Registry Editor.
2.Navigate to the following registry key:
HKEY_LOCAL_MACHINE\SOFTWARE\Microsoft\Windows\CurrentVersion\DateTime\Servers
3.Right-click on Servers then select New > String value than name this string as 3.

Note: Check if you already have 3 keys then you need to name this key as 4. Similarly, if you have already have 4 keys then you need to start from 5.
4.Double-click this newly created key then type tick.usno.navy.mil in the value data field and click OK.

5.Now you could add more servers by following the above steps, just use the following in value data field:
time-a.nist.gov
time-b.nist.gov
clock.isc.org
pool.ntp.org
6.Reboot your PC to save changes then again follow the method 2 to change to these time servers.
Recommended:
- Fix Windows 10 Stuck at Preparing Security Options
- Fix If playback doesn’t begin shortly try restarting your device
- How to Schedule Windows 10 Automatic Shutdown
- Fix CD or DVD Drive Not Reading Discs in Windows 10
That’s it you have successfully Fix Windows Time Service not working in Windows 10 but if you still have any questions regarding this post then feel free to ask them in the comment’s section.
The Windows Time Service (W32Time) is a service by Microsoft that provides a clock synchronization for computers without needing any extensive configuration. It is implemented in a DLL file known as W32Time.dll. This library is installed in the %Systemroot%\System32 folder when you’re installing your operating system.
The error you might get, The Windows Time Service is not started, states that due to unknown reasons, the service failed to start and you time and date might not be synchronized. This error is most common with Windows 7 users, due to the fact that Windows 7 uses a different method for the services, unlike the one Vista used. Vista started all services on startup and simply waited for you to need one of them and then made it available, but Windows 7, in an attempt to reduce boot time and overall system speed, doesn’t launch a service until you, or an application, explicitly requires it. While this might not be of a great importance to a regular user, there are computers that depend on their time and date being set correctly and this may lead to bigger problems.
There are a few methods that you can try to solve this issue, two of which requiring the use of a command prompt, the third one making use of the Task Scheduler function found in the Windows operating system, another one checks the Time Zone, and the last one offering a hardware solution.
Method 1: Use the start/networkon command in the command prompt
The Windows Time Service is one of the services that should launch automatically in order to avoid incorrect time and date in a user’s computer, however if that fails, you can run a command that triggers it automatically. The command is best run in an elevated command prompt, which you can run by opening the Start menu, typing cmd in the search box, right clicking on the search result and selecting Run as administrator from the menu. If a User Account Control window appears, click OK. Once you’re inside the command prompt, run the following command:
sc triggerinfo w32time start/networkon stop/networkoff
This command will fix the triggers for the Windows Time service and it should launch automatically when it’s supposed to, fixing your problem.
Method 2: Use the register and unregister commands in the command prompt
This is the second method that requires an elevated command prompt, which you can open with the instructions from the previous method. Once inside, follow these steps:
Type w32tm /debug /disable , and then press Enter
Type w32tm /unregister , and press Enter again, after which you should get a response from the command prompt
Type w32tm /register , and press Enter, which should be followed by another response from the command prompt
Type net start w32time , and press Enter, after which you will get a response from the command prompt that the Windows Time Service is starting, and it will fix your problem
Method 3: Check the Windows Time Service in the Task Scheduler
In this method, you will check the Windows Time Service in the Task Scheduler, and see whether the triggers are all okay. To access the Task Scheduler, open the Control Panel from the Start menu (search for it from the search box if you can’t find it in the Start menu once you click on it), and open the Administrative Tools, inside you will find the Task Scheduler. You will see a pane in the left, in which you should expand the Task Scheduler Library tree, followed by the Microsoft tree, and at the end the Windows tree. In that tree, you should find an entry for Time Synchronization. Left click it, and make sure it is enabled – enable it if it isn’t by right clicking the center pane and selecting Enable. Afterwards, right click the center pane, choose the Properties option from the drop down menu and take a look at the settings in the Triggers tab. Ensure that the service is set to run automatically at system start up.
Method 4: Check whether the Time Zone is set correctly
This can also be a cause for this issue, and the solution is fairly easy. As described in the aforementioned method, access the Control Panel from the Start menu, and open the Date and Time menu. Make sure that the Time Zone is set correctly for your location.
Method 5: Check the BIOS backup battery
In case you fixed the issue but it appears again after a reboot, the cause might be a faulty BIOS backup battery. This means that the settings won’t be saved in the BIOS until you replace the battery, so make sure to do that and you will have no issues with the Windows Time Service again.
While this is a fairly simple error that can be fixed easily, it is a fact that if you don’t take care of it and you depend on your computer having a correct time and date setup, you might run into bigger issues, and nobody wants that. Follow the methods we mentioned earlier and you will have no issues whatsoever in fixing the problem.
Kevin Arrows
Kevin Arrows is a highly experienced and knowledgeable technology specialist with over a decade of industry experience. He holds a Microsoft Certified Technology Specialist (MCTS) certification and has a deep passion for staying up-to-date on the latest tech developments. Kevin has written extensively on a wide range of tech-related topics, showcasing his expertise and knowledge in areas such as software development, cybersecurity, and cloud computing. His contributions to the tech field have been widely recognized and respected by his peers, and he is highly regarded for his ability to explain complex technical concepts in a clear and concise manner.
Для управлением службой времени в Windows используется команда win32tm.exe.
Посмотреть текущие настройки службы времени (выполнять из консоли с правами администратора):
w32tm /query /configuration

Посмотреть текущее состояние службы времени можно командой:
w32tm /query /status

Чтобы понять, что это нам там Windows выводит на экран, нужно разобраться как Windows работает со временем. Служба времени зависит от того является ли компьютер частью централизовано администрируемого домена или нет.
Возможные две ситуации:
- компьютер (сервер) входит в состав рабочей группы, т.е. это домашний компьютер или компьютер в небольшом офисе;
- компьютер (сервер) входит в состав домена Active Directory.
Компьютер входит в состав рабочей группы.
В этом случае централизованного управления компьютером нет, он сам заботиться о синхронизации времени. На нем вывод команды
w32tm /query /configuration будет следующим.

Обратите внимание на параметры:
SpecialPollInterval — интервал синхронизации в секундах, 604800 секунд — это неделя, т.е. синхронизация будет проводиться раз в неделю.
Type — определяет источник синхронизации времени. Возможные значени параметра Type:
NoSync. Служба времени вообще не синхронизируется ни с чем.
NTP. Служба времени синхронизируется с серверами указынными в параметре NtpServer. Типично для домашних компьютеров. Как на скриншоте вверху.
NT5DS. Служба времени синхронизируется используя доменную иерархию (только для компьютеров — членов домена Active Directory). Как на самом первом скриншоте.
AllSync. Служба времени использует все возможные механизмы для синхронизации.
NtpServer — указывает сервреры, с которым может синхроинизировать время компьютер.
Как можно видеть, по умолчанию интервал синхронизации 1 неделя, сервер time.windows.com, значение Type NTP.
Компьютер входит в состав домена Active Directory.
Домен AD — иерархичная централизованная структура. Время на всех компьютерах в домене синхронизируется с контроллерами домена, а те в свою очередь синхронизируются с одним контроллером, выполняющим FSMO роль PDC-Emulator. Синхронизация времени происходит раз в 1 час.
Как узнать какой контроллер — PDC-Emulator? Простейший способ — это выполнить команду из командной строки:
netdom /query fsmo

и вот на нем то и надо настраивать синхнонизацию времени в внешним источников времени, которым является какой либо NTP сервер.
Делается это из командной строки с адмнистративными правами следующим образом (один из способов):
- Останавливаем службу времени W32Time: C:\>net stop w32time
- Конфигурируем внешние источники синхронизации:
C:\> w32tm /config /syncfromflags:manual /manualpeerlist:”0.ru.pool.ntp.org, 1.ru.pool.ntp.org, 2.ru.pool.ntp.org” - Делаем PDC-Emulator надежным источником для клиентов: C:\>w32tm /config /reliable:yes
- Запускаем службу времени w32time : C:\>net start w32time
- Служба должна начать синхронизироваться. Можно проверить как применились настройки уже знакомой командой: C:\>w32tm /query /configuration
- Проверяем Event Viewer на наличие ошибок, относящихся к службе времени.
На остальных компьютерах домена вывод команды C:\>w32tm /query /configuration будет следующим:
Если вы по какой-то причине поменяли конфигурацию службы времени на доменном компьютере, то чтобы вернуть настройки по-умолчанию выполните команду:
w32tm /config /syncfromflags:domhier /update
Иногда при переносе роли PDC-Emulator на другой контроллер домена, старый продолжает считает считать себя сервером времени для всего домена, что может стать причиной ошибок в Системном логе, например таких:
«The time provider NtpClient was unable to find a domain controller to use as a time source. NtpClient will try again in 15 minutes.»
и других веселых глюков. «Успокоить» его можно такой-же командой с небольшим дополнением:
w32tm /config /syncfromflags:domhier /reliable:no /update
Несколько комментариев:
- В примере настройки контроллера домена мы останавливали службу времени, меняли настройки, потом запускали опять. Можно этого не делать, а использовать ключ /update, который принуждает службу времени считать конфигурацию заново.
- Для работы протокола NTP необходимо открыть порт UDP 123 на вход и на выход, на файерволе сервера и внешнем файерволе.
- Существует еще одна старая команда конфигурации времени net time, оставленная для совместимости, с меньшим количеством опций, которую все еще можно использовать.
Accurate time synchronization is vital for the smooth operation of computer systems, especially in environments where multiple devices interact over a network. Network Time Protocol (NTP) ensures that all devices maintain the correct time, which is crucial for logging events, security protocols, and the proper functioning of time-dependent applications. In Windows, NTP settings can be managed through the Windows Registry, providing advanced users and IT professionals with granular control over time synchronization behaviors. This guide will walk you through understanding and configuring NTP settings via the Windows Registry.
Understanding NTP and Its Importance
Network Time Protocol (NTP) is a networking protocol designed to synchronize the clocks of computers over packet-switched, variable-latency data networks. Accurate timekeeping is essential for:
- Security: Ensures the validity of authentication tokens and encryption protocols.
- Logging: Provides accurate timestamps for system and application logs.
- Data Integrity: Prevents issues in databases and file systems that rely on precise time stamps.
- Network Operations: Coordinates tasks and schedules across multiple devices.
Without proper time synchronization, discrepancies can lead to security vulnerabilities, data inconsistencies, and operational inefficiencies.
Windows Time Service Overview
Windows uses the Windows Time Service (W32Time) to synchronize the system clock with configured time sources. By default, Windows Time Service is configured to use NTP servers to keep the system time accurate. The service can operate in different modes, such as:
- NTP Client: Synchronizes the system time with external NTP servers.
- NTP Server: Provides time synchronization services to other devices on the network.
Understanding and configuring the Windows Time Service via the Registry allows for customized synchronization settings tailored to specific network environments.
Locating NTP Settings in the Windows Registry
The NTP settings are primarily located within the Windows Registry under the following path:
HKEY_LOCAL_MACHINE\SYSTEM\CurrentControlSet\Services\W32Time\Parameters
Within this key, several values determine how the Windows Time Service operates, including the NTP server addresses, synchronization frequency, and other related settings.
Key Registry Values for NTP Configuration:
- NtpServer: Specifies the list of NTP servers the system will synchronize with.
- Type: Defines the synchronization type (e.g., NTP, NT5DS).
- AnnounceFlags: Determines the role of the computer in the time synchronization hierarchy.
- SpecialPollInterval: Sets the interval between synchronization attempts.
Warning: Editing the Windows Registry can have significant impacts on your system. Always back up the Registry before making any changes.
Steps to Configure NTP Settings:
1. Open Registry Editor
To edit the Registry, you’ll use the Registry Editor (regedit), a built-in Windows utility.
- Press
Win + Rto open the Run dialog box. - Type
regeditand pressEnter. - If prompted by User Account Control (UAC), click
Yesto allow Registry Editor to make changes.
2. Navigate to the NTP Settings
In Registry Editor, browse to:
HKEY_LOCAL_MACHINE\SYSTEM\CurrentControlSet\Services\W32Time\Parameters
3. Modify the NtpServer Value
- Double-click on
NtpServerin the right pane. - Enter the NTP servers you wish to use, separated by spaces. Each server should be followed by a comma and a flag. For example:
time.windows.com,0x9 time.nist.gov,0x9- The flag
0x9indicates that the server should be used for synchronization and that it’s a reliable time source.
- The flag
4. Set the Synchronization Type
- Double-click on
Type. - Set the value to
NTPto specify that the system should use the NTP server(s) defined inNtpServer.NTP- Other possible values include:
NT5DS: Synchronizes with the domain hierarchy.AllSync: Allows synchronization with all available time sources.
- Other possible values include:
5. Adjust the Polling Interval (Optional)
- Navigate to:
HKEY_LOCAL_MACHINE\SYSTEM\CurrentControlSet\Services\W32Time\TimeProviders\NtpClient - Double-click on
SpecialPollInterval. - Set the value (in seconds) to define how often the system will poll the NTP server. For example, to set it to 1 hour:
3600
6. Enable the NTP Client
- Navigate to:
HKEY_LOCAL_MACHINE\SYSTEM\CurrentControlSet\Services\W32Time\TimeProviders\NtpClient - Double-click on
Enabled. - Set the value to
1to enable the NTP client.
Example Configuration
Suppose you want to configure your system to synchronize with pool.ntp.org every 2 hours. Here’s how you can set it up:
- Set NtpServer:
pool.ntp.org,0x9 - Set Type:
NTP - Set SpecialPollInterval:
7200 - Ensure Enabled is set to 1.
Restarting the Windows Time Service
After making changes to the Registry, it’s essential to restart the Windows Time Service to apply the new settings.
Steps to Restart the Service:
- Open Command Prompt as Administrator:
- Press
Win + Xand select Command Prompt (Admin) or Windows PowerShell (Admin).
- Press
- Stop the Windows Time Service:
net stop w32time - Start the Windows Time Service:
net start w32time - Resynchronize the Time (Optional):
w32tm /resync- Note: If you encounter errors, ensure that the Windows Time Service is configured correctly and that there are no network issues preventing synchronization.
Precautions and Best Practices
- Backup the Registry: Before making any changes, create a backup to prevent potential system issues.
- In Registry Editor, right-click on the
W32Timekey and select Export. Save the.regfile to a safe location.
- In Registry Editor, right-click on the
- Use Trusted NTP Servers: Only use reputable NTP servers to ensure accurate and secure time synchronization.
- Avoid Frequent Polling: Setting the polling interval too low can lead to unnecessary network traffic and may be flagged as suspicious activity.
- Limit Registry Editing to Advanced Users: Incorrect modifications can cause system instability. If unsure, seek assistance from IT professionals.
Troubleshooting NTP Issues
If you encounter problems with time synchronization after configuring NTP settings, consider the following troubleshooting steps:
1. Verify NTP Server Accessibility
Ensure that the NTP servers you specified are reachable and operational.
- Use the
pingcommand to test connectivity:ping pool.ntp.org
2. Check Windows Time Service Status
Ensure that the service is running:
sc query w32time
3. Review Event Logs
- Open Event Viewer (
Win + X> Event Viewer). - Navigate to Windows Logs > System and look for events related to W32Time.
4. Force Time Synchronization
Use the following command to force synchronization:
w32tm /resync /force
5. Reset Windows Time Service Configuration
- Stop the service:
net stop w32time - Unregister the service:
w32tm /unregister - Register the service again:
w32tm /register - Start the service:
net start w32time - Reconfigure NTP settings as needed.
Conclusion
Proper time synchronization is essential for the reliable and secure operation of Windows systems within any networked environment. By configuring NTP settings through the Windows Registry, advanced users can tailor time synchronization behaviors to meet specific requirements. However, caution must be exercised when editing the Registry to prevent system instability. Always ensure you have backups and understand the implications of the changes you make.
Introduction to Windows Time Service
The Windows Time organization is an established organization that allows consistent coordination between your Windows 10 machine and the Internet, regardless. While trading between time areas while journeying.

Maybe the most broadly perceived issue faced by Windows customers is ‘Windows Time Service Not Running‘. Around here at ARZ Blog, we consistently get requests from our customers to fix this issue.
There are two or three techniques that you can endeavor to settle this issue, two of which require the use of a request moment. The third one uses the Task Scheduler work found in the Windows working structure. Another checks the Time Zone, “Unable to Start the Windows Time Service”, and the last one commitment a hardware course of action.
Today, let’s see a couple of methodologies used by our Experienced Support Techs to fix this issue.
Windows Time Service: Understanding the Importance and Functionality
Windows Time Service (W32Time) or the Clock Synchronization Service is a Microsoft Windows organization.
It is obligated for the organization of time and date on Windows structure to show the ideal opportunity as shown by our space. The synchronization is in a general sense done through an NTP (Network Time Protocol) server.
Every structure paying little mind to their space use the NTP. “Unable to Start the Windows Time Service”, an organization to stay aware of the exact time in their systems.
Causes for ‘Windows Time Service Not Running’ on Windows
Accepting that we get the Windows Time Service not running screw up in the Windows system, it will start showing some prohibited time and date. Ideal opportunity in our circumstance is crucial as structure revives, refreshes, etc can be arranged in like manner.
“Unable to Start the Windows Time Service”, Certain reasons for the Windows Time Service not running mistake are given under:
- A wrecked System File related to Windows Time Service
- Missing Windows Time Service
- Inadequate Windows Time Service
Exploring Related Problems of Windows Time Issues and Their Impact
Windows Time organization can sometimes incite explicit issues if it’s not running true to form. Examining this assistance. “Unable to Start the Windows Time Service”, here are some similar issues that customers definite:
1: Windows 10-time organization does not start, access denied, not working, not found, not showing up
- Various issues can occur with Windows Time organization on Windows 10. But you should have the choice to fix by far most of them by using one of our responses.
2: Windows Time organization keeps on halting
- As demonstrated by customers, now and again this helps keep on hating on your PC.
- To fix this issue, make sure to run both SFC and DISM results and look at expecting that resolves the issue.
3: Windows Time organization lost, not presented
- Accepting this assistance is absent on the other hand if it’s not presented. Make sure to reregister the help and check if that handles the issue.
4: Windows Time organization not starting error 1792, 1290, 1079
- Various mix-ups can hold this help back from running and expect you to experience any of these issues. Make sure to endeavor a piece of our responses.
5: Windows Time organization couldn’t be started
- This is another regular issue with the Windows Time organization.
- If this issue occurs, you might have to change the Startup sort of Windows Time organization.
6: Windows Time not coordinating
- This is another common issue achieved by the Windows Times organization.
- Nevertheless, you can fix it by really taking a gander at your booked tasks.
Systems to Fix Windows Time Service Not Running Error
A couple of systems used by our Hosting Expert Planners to fix this screw-up on Windows are given under.

1. Setting Windows to Auto Trigger Windows Time Service
Customarily, Windows Time Service starts normally with Windows startup. Yet it may stop doing as such because of some error or mistake. It can in like manner happen when the Windows Time Service isn’t set to trigger, therefore.
Steps to check or alter and fix this are given underneath:
- Press the Windows Key + R key together to open the request brief and type services. MSc then presses the Enter button.
- The Services window will open up. Then, peer down the once-over of organizations till we sort out Windows Opportunity organization and twofold tap on it.
- Another Windows Time Properties box will open.
- Beginning from the drop overview of the Startup type, select the Automatic decision.
- Check to expect the assistance status is running, in case not, click on Start.
- As of now, click on Apply and Press OK.
“Unable to Start the Windows Time Service”, These methods will start the Windows Time Service and the time on the system will be changed.
2. Using SC Trigger Knowledge to Autostart Windows Time Service
Windows Time Service not running mix-up can moreover be addressed by setting. It to normally noticed using Command Prompt or by setting it to Automatic from Windows Time Properties.
Steps to follow for setting from CMD are given under:
- Open Command Prompt in Admin mode (Run as Administrator).
- Then, give the going with request and press Enter to run it.
sc trigger info w32time start/network on stop/network offAt the point when the request is adequately executed. It will trigger the Windows Time Service to run thus. “Unable to Start the Windows Time Service”, Then, we want to restart the structure.
3. Re-register and Restart Windows Time Service
In this strategy, we will stop, then, re-enlist the Windows Time Service, then, restart it to check whether the Windows Time Service not running issue remains.
The steps to follow are given below:
- Open Command Prompt in Admin mode (Run as Administrator).
- Then, give the going with request and press the Enter key.
- To unregister Windows Time Service and to take out every one of the information from the Registry give the going with request and press Enter.
- Then, to re-register the Windows Time Service and to present the setting normally give the going with request and press Enter.
- Start the help again by giving the going with request and press Enter.
- The going with the request is to synchronize the system and press Enter.
Right after executing these orders. “Unable to Start the Windows Time Service”, we want to restart the structure and check the Windows’ time.
Related Article: Nagios Service Check Timed Out : How to Fix It
4. Using System File Checker and Deployment Imaging Service Management
System archives can oftentimes be spoiled and in like manner. It can cause this issue. SFC Scan Addresses System File Checker result and DISM addresses Deployment Image Servicing and Management.
“Unable to Start the Windows Time Service”, SFC result should be possible with the going progress:
- Open Command Prompt in Admin mode (Run as Administrator).
- Then, give the going with request and press the Enter key.
At the point when the scope is done, restart the system. As of now, keep an eye on the unlikely event that the screw-up Windows Time Service is not running. Say for sure, we can play out a DISM Scan.
DISM Scan can be finished with the following signs of progress:
- Open Command Prompt in Admin mode (Run as Administrator).
- Then, give the going with request and press the Enter key.
DISM/Online/Cleanup-Image/Restore HealthRight when the DISM channel is done. Restart the system again and look at accepting that the issue perseveres. Expecting that the issue is at this point present, repeat the SFC clearly and check to accept the issue is settled.
5. Verifying Windows Time Service in Local System Account
Expecting the Windows Time Service isn’t running. There are chances it isn’t engaged in the Local System Account settings.
“Unable to Start the Windows Time Service”, Steps to fix this are given:
- Open Command Prompt in Admin mode (Run as Administrator).
- Then, type Services. MSc and press Enter.
- Peer down to cut out Windows Opportunity and a while later twofold tap on it.
- The Windows Time Properties take care of shows. Go to the Log On tab and select the Local System account checkbox.
- Click on Apply and then press the OK button.
6. Investigating Task Scheduler for Windows Time Service Settings
Task Scheduler also handles the working of Windows Time Service. In this methodology, we check whether everything is set suitably, or not. Also on the off chance that not set true to form we will fix it.
The steps to follow are:
- Take Task Scheduler Library; click on it to expand.
- In the drawn-out library, look for the Microsoft library. Click on it to develop it.
- From Microsoft’s library look for Windows then click on it to develop.
- Guarantee that Time Organization is Enabled.
We expect to see a decision that says ‘Disable’ in the settings menu. That suggests it is currently enabled. “Unable to Start the Windows Time Service”, Then, we want to check to accept the assistance has proceeded.
7. Using a Different Time Server: Switching to an Alternative Time Server
Windows Time Service isn’t running issue can moreover arise accepting there is an issue with the Time Server. “Unable to Start the Windows Time Service”, We can change Time Server truly to fix this issue.The steps
Steps to follow are:
- Control Panel and thereafter click on the image that says Date and Time
- At the top, click the ‘Online Time’ tab.
- By and by click on the Change Settings decision.
- Under the Server dropdown list. Select time.nist.gov and ssnap onUpdate Now.
- Click on OK to save the changes.
8. Registering the W32Time File (Alternative Method)
This is a substitute way to re-register and restart the help in Command Prompt.
The steps to follow are:
- Open Command Prompt in Admin mode (Run as Administrator).
- Then, give the going with request and press the Enter key (Copy the text and press Enter to execute them in a comparative progression in which it is given).
pushd %Systemroot%\system32

.\net stop w32time

. \w32tm/unregister

. \w32tm/register

.\sc config w32time type= own

.\net start w32time

. \w32tm/config/update/manualpeerlist:"0.pool.ntp.org, 1.pool.ntp.org, 2.pool.ntp.org, 3.pool.ntp.org",0x8/syncfromflags: MANUAL/reliable: yes

. \w32tm/resync

popd
Make an effort not to break the gathering and don’t lose or supersede any individual. “Unable to Start the Windows Time Service”, Make a highlight truly check out it twice before performing it.
Conclusion
To lay it out simply, “Unable to Start the Windows Time Service”, we’ve inspected the explanations behind Windows Time Service Not Running. Also here at ARZ Host, we saw how our Hosting Expert Planners fix them using different techniques.
Latest Posts: