on August 15, 2010
We normally use Services.msc to start or stop or disable or enable any service. We can do the same from windows command line also using net and sc utilities. Below are commands for controlling the operation of a service.
Command to stop a service:
net stop servicename
To start a service:
net start servicename
You need to have administrator privileges to run net start/stop commands. If you are just a normal user on the computer, you would get an error like below.
C:\>net start webclient
System error 5 has occurred.
Access is denied.
C:\>
To disable a service:
sc config servicename start= disabled
To enable a service:
sc config servicename start= demand
To make a service start automatically with system boot:
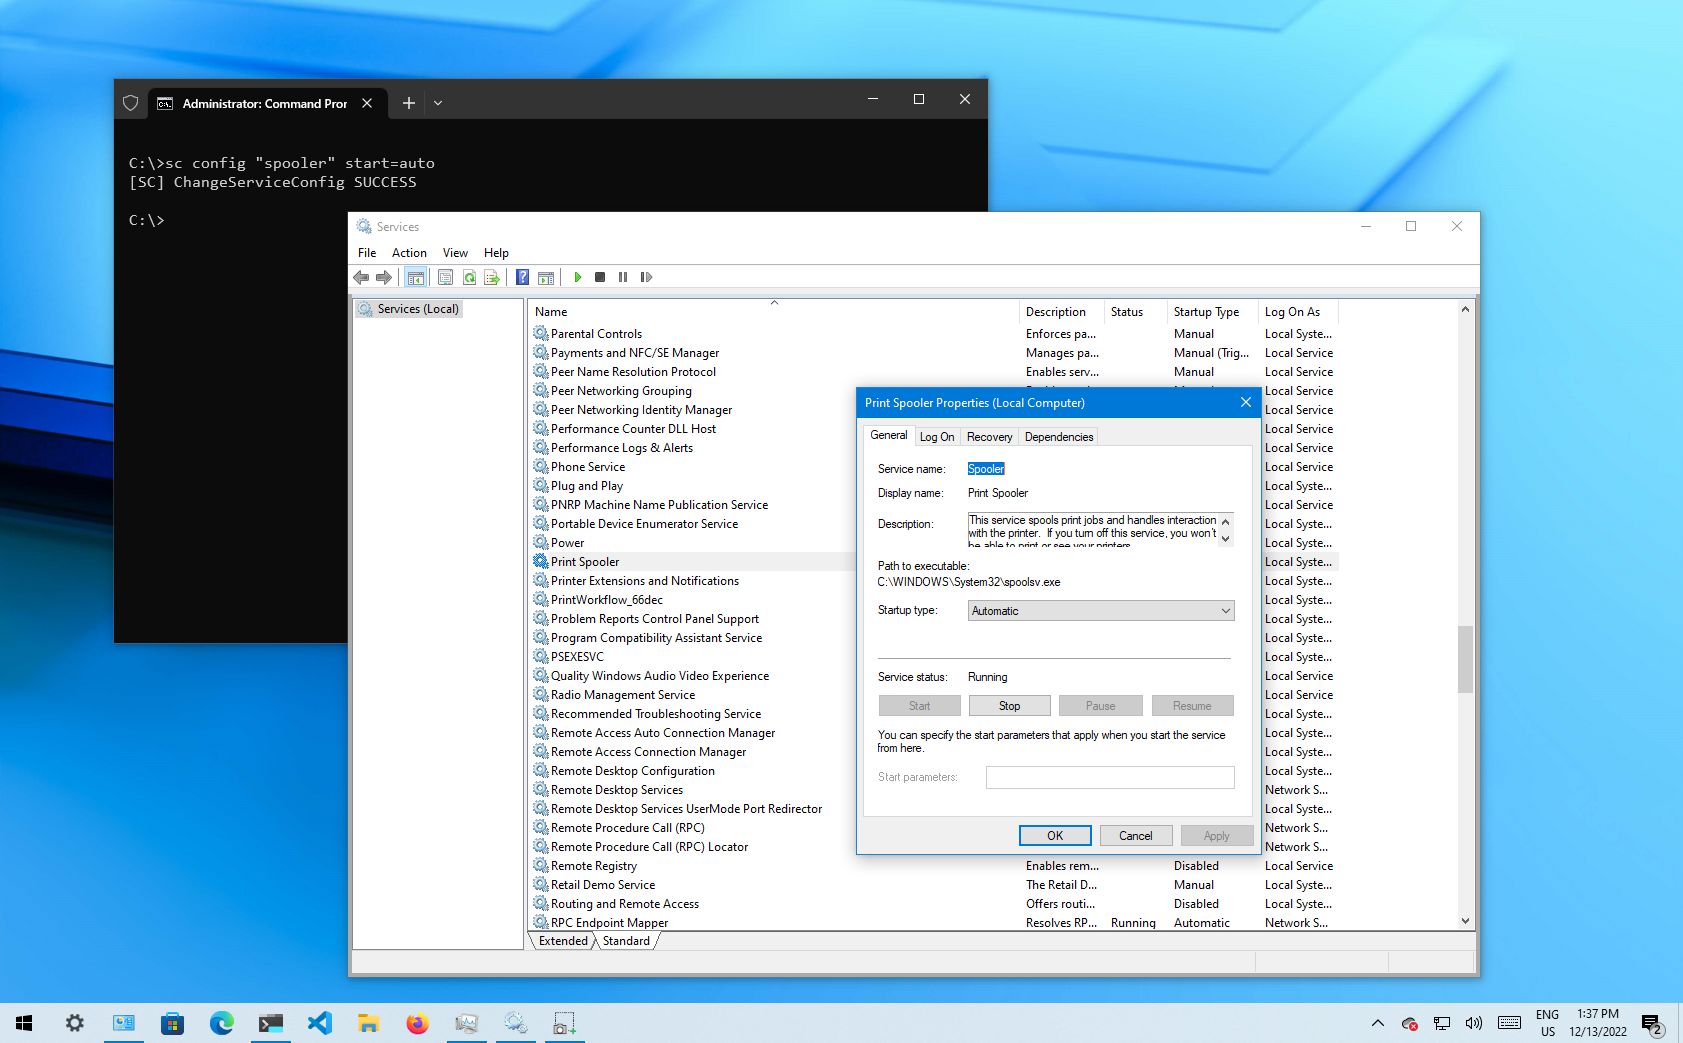
sc config servicename start= auto
Note: Space is mandatory after ‘=’ in the above sc commands.
This SC command works on a Windows 7 machine and also on the down-level editions of Windows i.e Windows XP/2003 and Windows Vista. Again, if you do not have administrator previliges you would get the below error.
C:\>sc config webclient start= auto
[SC] OpenService FAILED 5:
Access is denied.
Note that the service name is not the display name of a service. Each service is given a unique identification name which can be used with net or sc commands. For example, Remote procedure call (RPC) is the display name of the service. But the service name we need to use in the above commands is RpcSs.
So to start Remote procedure call service the command is:
net start RpcSsTo stop Remote procedure call service
net stop RpcSs
These service names are listed below for each service. The first column shows the display name of a service and the second column shows the service name that should be used in net start or net stop or sc config commands.
| Display Name of the service | ServiceName which should be used with ‘net’ and ‘sc config’ commands. |
| Alerter | Alerter |
| Application Layer Gateway Service | ALG |
| Application Management | AppMgmt |
| ASP.NET State Service | aspnet_state |
| Windows Audio | AudioSrv |
| Background Intelligent Transfer Service | BITS |
| Computer Browser | Browser |
| Bluetooth Support Service | BthServ |
| Bluetooth Service | btwdins |
| SMS Agent Host | CcmExec |
| Indexing Service | CiSvc |
| ClipBook | ClipSrv |
| .NET Runtime Optimization Service v2.0.50727_X86 | clr_optimization_v2.0.50727_32 |
| COM+ System Application | COMSysApp |
| Cryptographic Services | CryptSvc |
| Cisco Systems, Inc. VPN Service | CVPND |
| DCOM Server Process Launcher | DcomLaunch |
| DHCP Client | Dhcp |
| Logical Disk Manager Administrative Service | dmadmin |
| Logical Disk Manager | dmserver |
| DNS Client | Dnscache |
| Lenovo Doze Mode Service | DozeSvc |
| Error Reporting Service | ERSvc |
| Event Log | Eventlog |
| COM+ Event System | EventSystem |
| Intel(R) PROSet/Wireless Event Log | EvtEng |
| Fast User Switching Compatibility | FastUserSwitchingCompatibility |
| Windows Presentation Foundation Font Cache 3.0.0.0 | FontCache3.0.0.0 |
| Group Policy Monitor | GPMON_SRV |
| Help and Support | helpsvc |
| HID Input Service | HidServ |
| HTTP SSL | HTTPFilter |
| ThinkPad PM Service | IBMPMSVC |
| Windows CardSpace | idsvc |
| IMAPI CD-Burning COM Service | ImapiService |
| iPassConnectEngine | iPassConnectEngine |
| iPassPeriodicUpdateApp | iPassPeriodicUpdateApp |
| iPassPeriodicUpdateService | iPassPeriodicUpdateService |
| IviRegMgr | IviRegMgr |
| Server | lanmanserver |
| Workstation | lanmanworkstation |
| Lenovo Camera Mute | LENOVO.CAMMUTE |
| Lenovo Microphone Mute | Lenovo.micmute |
| TCP/IP NetBIOS Helper | LmHosts |
| Intel(R) Management and Security Application Local Management Service | LMS |
| McAfee Framework Service | McAfeeFramework |
| McAfee McShield | McShield |
| McAfee Task Manager | McTaskManager |
| Machine Debug Manager | MDM |
| Messenger | Messenger |
| NetMeeting Remote Desktop Sharing | mnmsrvc |
| Distributed Transaction Coordinator | MSDTC |
| Windows Installer | MSIServer |
| Net Driver HPZ12 | Net Driver HPZ12 |
| Network DDE | NetDDE |
| Network DDE DSDM | NetDDEdsdm |
| Net Logon | Netlogon |
| Network Connections | Netman |
| Net.Tcp Port Sharing Service | NetTcpPortSharing |
| Network Location Awareness (NLA) | Nla |
| NT LM Security Support Provider | NtLmSsp |
| Removable Storage | NtmsSvc |
| Microsoft Office Diagnostics Service | odserv |
| Office Source Engine | ose |
| Plug and Play | PlugPlay |
| Pml Driver HPZ12 | Pml Driver HPZ12 |
| IPSEC Services | PolicyAgent |
| Power Manager DBC Service | Power Manager DBC Service |
| Protected Storage | ProtectedStorage |
| Remote Access Auto Connection Manager | RasAuto |
| Remote Access Connection Manager | RasMan |
| Remote Desktop Help Session Manager | RDSessMgr |
| Intel(R) PROSet/Wireless Registry Service | RegSrvc |
| Routing and Remote Access | RemoteAccess |
| Remote Registry | RemoteRegistry |
| Remote Procedure Call (RPC) Locator | RpcLocator |
| Remote Procedure Call (RPC) | RpcSs |
| QoS RSVP | RSVP |
| Intel(R) PROSet/Wireless WiFi Service | S24EventMonitor |
| Security Accounts Manager | SamSs |
| Smart Card | SCardSvr |
| Task Scheduler | Schedule |
| Secondary Logon | seclogon |
| System Event Notification | SENS |
| Windows Firewall/Internet Connection Sharing (ICS) | SharedAccess |
| Shell Hardware Detection | ShellHWDetection |
| Print Spooler | Spooler |
| System Restore Service | srservice |
| SSDP Discovery Service | SSDPSRV |
| Windows Image Acquisition (WIA) | stisvc |
| System Update | SUService |
| MS Software Shadow Copy Provider | SwPrv |
| Performance Logs and Alerts | SysmonLog |
| Telephony | TapiSrv |
| Terminal Services | TermService |
| Themes | Themes |
| ThinkVantage Registry Monitor Service | ThinkVantage Registry Monitor Service |
| Telnet | TlntSvr |
| On Screen Display | TPHKSVC |
| Distributed Link Tracking Client | TrkWks |
| TVT Scheduler | TVT Scheduler |
| Windows User Mode Driver Framework | UMWdf |
| Intel(R) Management & Security Application User Notification Service | UNS |
| Universal Plug and Play Device Host | upnphost |
| Uninterruptible Power Supply | UPS |
| Volume Shadow Copy | VSS |
| Windows Time | W32Time |
| WebClient | WebClient |
| Windows Management Instrumentation | winmgmt |
| Portable Media Serial Number Service | WmdmPmSN |
| Windows Management Instrumentation Driver Extensions | Wmi |
| WMI Performance Adapter | WmiApSrv |
| Security Center | wscsvc |
| Automatic Updates | wuauserv |
| SMS Remote Control Agent | Wuser32 |
| Wireless Zero Configuration | WZCSVC |
| Network Provisioning Service | xmlprov |
Windows Services are the heart of the operating system. From booting the computer up to shutting it down, these services play a crucial role in performing different operations and tasks during your time on the computer.
Every action you perform on your computer is controlled by services running in the background. Normally, you do not even need to interact with any services manually, as the operations are automated through these services.
That said, you may need to occasionally stop a service to perform a certain task, restart it because it was malfunctioning, or even disable a Windows Service permanently because you do not need it. Therefore, you need to know how to manage Windows Services using the Service Manager, the Task Manager, and the command line.
In this article, we discuss all the different methods to manage Windows Services so you have a smooth and error-free experience on your computer.
Table of Contents
On This Page
What are Windows Services and When to Manage Them?
Windows Services are the core of the Windows operating system. The Windows OS could not function without these services, as they control the OS operations, define communication between the GUI and the system hardware and much more.
In simpler words, Windows Services are like regular applications, except that they do not have an interface, and do not require user intervention to start and stop them. They are needed by the Windows OS to create and run long-running processes to fulfill different tasks.
Windows Services run independently without user input, but they can often run into problems. They can get corrupted or can be stopped when in fact you need them to be running. In other instances, you may want to disable, stop, or pause a Windows Service because of its high resource utilization, or for whatever reason.
In such scenarios, you can manage the Windows Services manually and safely, without damaging the operating system itself.
Windows Service Startup Types
There are many different Windows Services in a Windows OS, each with a different function. However, each one o them can have a different startup type.
The startup type can be changed. This defines how and when a service will start, if it will at all. Below are the 4 startup types of Windows Services:
- Automatic – These services start automatically as soon as the computer starts up. These are usually essential services that are needed as the computer is booting up.
- Automatic (Delayed Start) – Such services will start automatically but after a little while of signing into your account. These are usually non-essential services and are set to start after waiting to speed up the boot time.
- Manual – These services need to be started or stopped manually, at the user’s convenience.
- Disabled – These Windows Services are disabled indefinitely unless the startup type is manually changed.
Let us now show you the different methods to manage Windows Services.
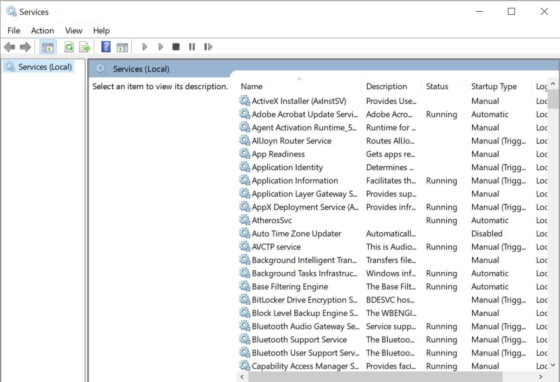
Manage Windows Services from Service Manager
The Service Manager is a built-in Microsoft Management Console in the Windows OS that lists all the Windows Services and their details. It is the ideal GUI-based tool to manage Windows Services on your computer.
How to Open Service Manager
You can open the Service Manager through multiple ways listed below:
-
Type in the following in the Run Command box, or any command line interface, and press Enter.
Services.mscOpen the Service Manager -
The Service Manager can also be opened by searching for “services” in the Start menu or the search box.

Open the Service Manager from the Start menu -
You can also navigate to the following path using File Explorer and open the “services.msc” file from there:
C:\Windows\System32\services.msc

Open Services msc using File Explorer -
To open the Service Manager from the Control Panel, go to the following path:
Control Panel >> System and Security >> Windows Tools >> Services

Open the Service Manager from the Control Panel


Once you have opened the Service Manager, continue to manage the service you need to use the guide below.
Change Startup Type from Service Manager
Before starting or stopping a service, let us show you how to change and manage a service’s startup type that we had discussed earlier.
The Startup type determines whether the service will be able to start (if stopped) or not. For example, if a service’s startup type is set to “Disabled,” then it could not be started using the conventional method. Therefore, its startup type needs to be set to either “Manual,” “Automatic,” or “Automatic (Delayed Start).”
Here are the steps to change a Windows Service’s startup type:
-
Right-click the service inside the Service Manager and click Properties.

Open service properties -
Expand the drop-down menu in front of “Startup Type” and select one of the options. Then click Apply and Ok.
Change the startup type from Service Manager


Start Windows Service from Service Manager
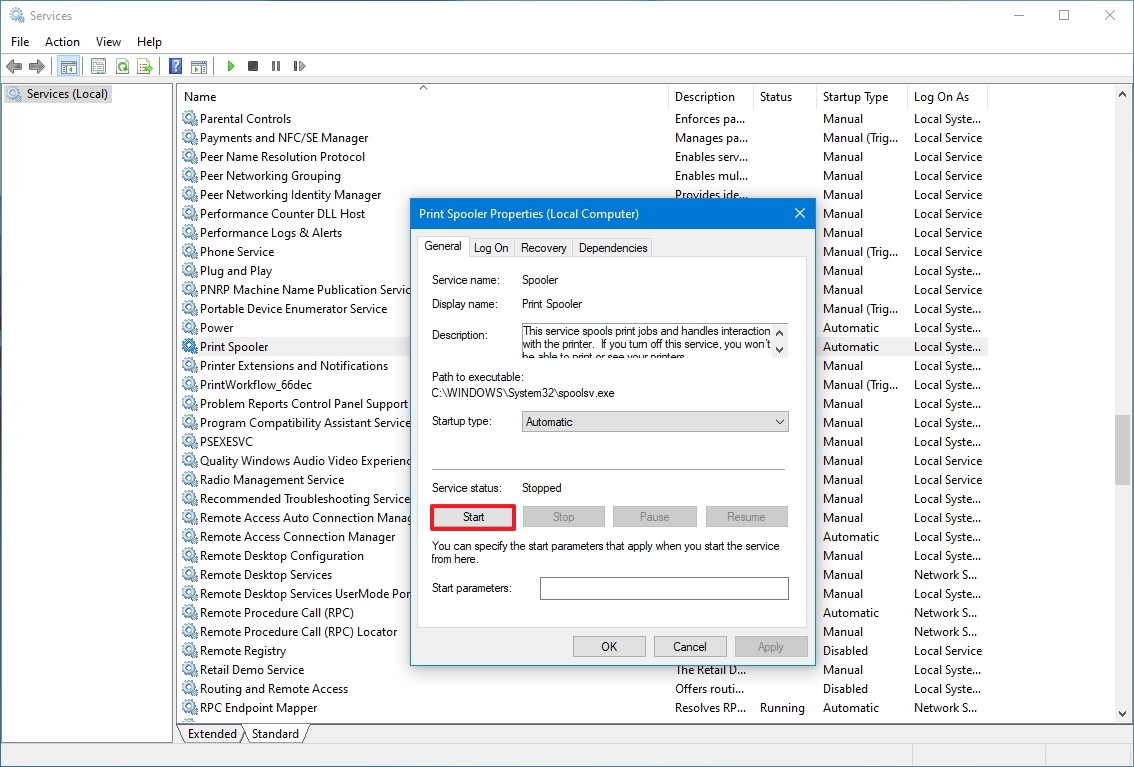
Starting a stopped service is even simpler than changing its startup type. In the Service Manager, right-click on the service that you want to start and then click Start.
Note: The service’s startup type should not be “Disabled.”

Stop Windows Service from Service Manager
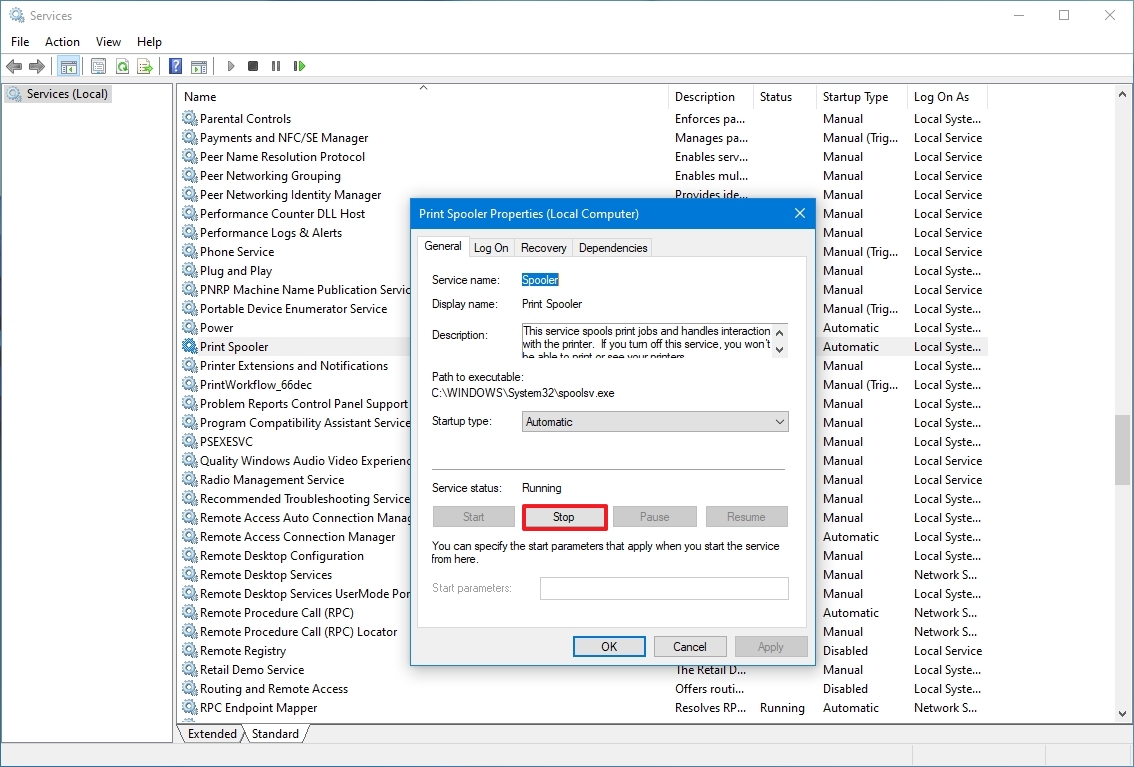
Similar to starting a service, you can also stop it from the context menu. Right-click on the service that you want to stop and click Stop.
Note: Some services cannot be stopped, and therefore, the option to stop them may be greyed out.

Alternatively, you can also Start or Stop service from its Properties window.
Restart Windows Service from Service Manager
You can also restart a service from the Service Manager. This option comes in handy when a service is not functioning as it should.
Right-click on the service that you want to restart and click Restart.
Note: Some services cannot be restarted, and therefore, the option to restart them may be greyed out.

Manage Windows Services from Task Manager
You can also manage the Windows Services from the Task Manager. The Task Manager has a dedicated “Services” tab to manage the services. However, unlike the Service Manager, you cannot change the startup type of a service, and only start, stop, or restart it.
Use the following steps to start, stop, or restart a Windows Service from the Task Manager:
-
Open the Task Manager by pressing the CTRL + Shift + Esc shortcut keys and switch to the Services tab.

Open the Services tab in the Task Manager -
Here, right-click on the service you want to manage and select either Start, Stop, or Restart.
Start, Stop, or Restart Windows Service from the Task Manager


Manage Windows Services from Command Prompt
If you prefer using the Windows command line, then the Command Prompt method to manage Windows Services might be your preferred choice.
The command line offers more control over Windows elements which the graphical interfaces often lack. You can use the Command Prompt to start, stop, or restart a service. Additionally, you can also change its startup type.
You can also achieve the same using PowerShell, discussed in the next section.
Here are a few useful cmdlets that you can use to manage the Windows Services on your computer:
-
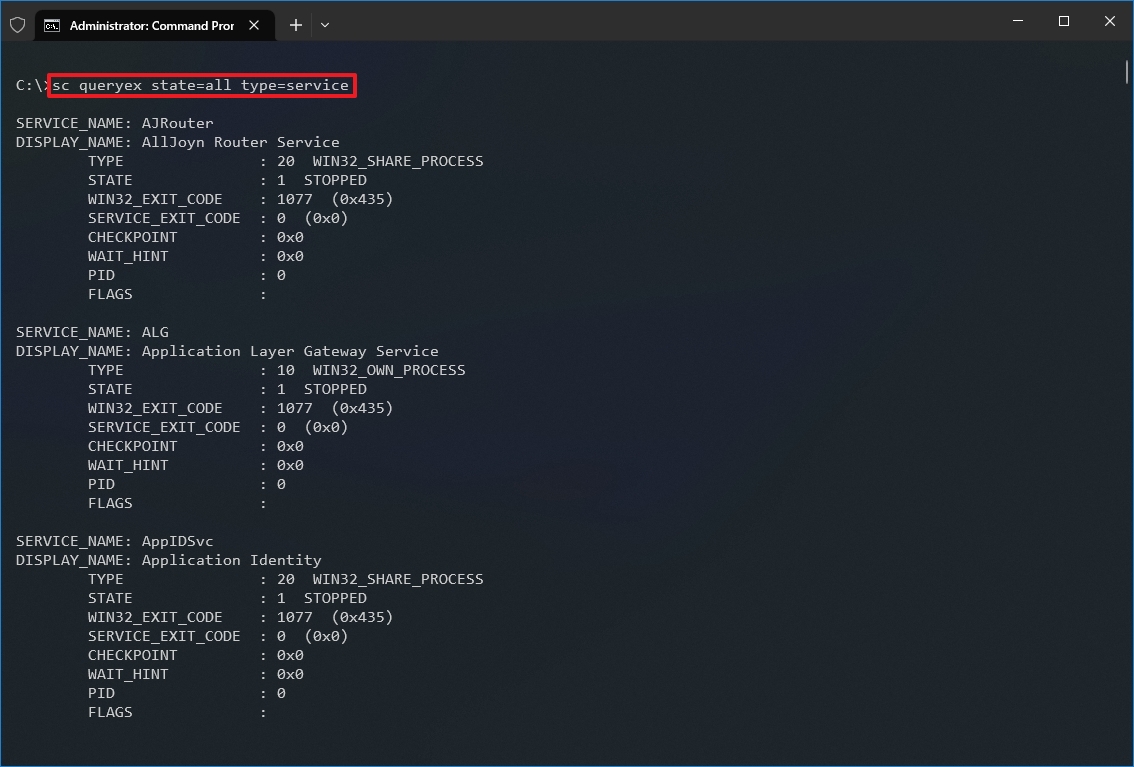
To get a list of all Windows Services and their details, use this cmdlet:
sc queryex state=all type=service
Get Windows Service details in Command Prompt Use the “Service_Name” details as the name of the service that you want to manage in the following steps.
-
To stop a running service from Command Prompt, use this cmdlet while replacing [ServiceName] with the name of the service (as noted in the step above):
sc stop [ServiceName]
Stop Windows Service from Command Prompt -
To start a Windows Service from Command Prompt, use the following command:
sc start [ServiceName]
Start Windows Service from Command Prompt -
To restart a Windows Service from the Command Prompt, there is no direct command You first need to stop the service, and then start it, using the given steps above.
-
To change the startup type of service, use the following command while replacing [ServiceName] with the name of the service, and [SetStartupType] with either “Disabled“, “Manual“, “Automatic“, or “Automatic (Delayed Start)“:
sc config "[ServiceName]" start=[SetStartupType]
Change the startup type of Windows Service from Command Prompt


Manage Windows Services from PowerShell
PowerShell is an advanced Windows CLI that can be used to run scripts and automate tasks. You can also manage the Windows Services just like the Command Prompt using PowerShell. Here is how:
-
To get a list of all Windows Services and their details, use this cmdlet:
Get-Service
Get Windows Service details in PowerShell Use the service names in the “Name” column in the following steps to manage the respective service.
-
To stop a running service from PowerShell, use this cmdlet while replacing [ServiceName] with the name of the service (as noted in the step above):
Stop-Service -Name "[ServiceName]"
Stop Windows Service from PowerShell -
To start a Windows Service from Command Prompt, use the following command:
Start-Service -Name "[ServiceName]"
Start Windows Service from PowerShell -
To restart a Windows Service from PowerShell, use this cmdlet:
Restart-Service -Name "[ServiceName]"
Restart a Windows Service from PowerShell -
To change the startup type of service, use the following command while replacing [ServiceName] with the name of the service, and [SetStartupType] with either “Disabled“, “Manual“, “Automatic“, or “Automatic (Delayed Start)“:
Set-Service -Name "[ServiceName]" -StartupType "[SetStartupType]"
Change the startup type of Windows Service from PowerShell


These are all the methods used to manage Windows Services using native utilities on the local computer. If you are only looking to disable Windows Services, refer to our dedicated guide.
Closing Thoughts
Windows Services are an essential component of the Windows OS, therefore, we suggest that you take caution while managing them. However, only starting, stopping, or restarting Windows Services should do no permanent damage to the operating system. Moreover, if you are stopping, disabling, or restarting a critical Windows service, then you will be automatically prompted that the Windows needs to be rebooted.
This reconfirms that you can go ahead and safely manage the Windows Services using any of the given methods shared in this article.
Configuring services to start in a specific sequence can be essential for ensuring dependencies are met and applications operate correctly in Windows environments. When one service relies on another for functionality, setting the appropriate start order helps maintain system stability and operational efficiency. This article provides a comprehensive guide on how to set a service to start after another service using Windows Service Manager, covering the steps involved, best practices, and the significance of service dependencies.
Understanding Service Dependencies in Windows
In Windows operating systems, services are background processes responsible for executing specific tasks or providing functionality to applications. Service dependencies refer to relationships where one service requires another service to be running or fully operational before it can start or function correctly. Establishing correct service start orders ensures that dependent services are available when needed, preventing operational issues and enhancing system reliability.
Importance of Setting Services to Start After Another Service
Setting services to start after another service is crucial for several reasons:
- Dependency Management: Ensures that services relying on other services are started in the correct order to prevent failures or service startup delays.
- Application Functionality: Supports applications that require specific services to be operational before they can initiate or function correctly.
- System Stability: Maintains system stability by preventing conflicts or errors caused by services attempting to start without their dependencies being available.
Steps to Set a Service to Start After Another Service
To configure a service to start after another service using Windows Service Manager, follow these steps:
- Open Windows Service Manager: Press
Win + Rto open the Run dialog, then typeservices.mscand press Enter. Alternatively, search for “Services” in the Start menu and click on the Services app to open it. - Identify Services: In the Services window, locate the service that you want to configure to start after another service. Note down the names of both the service you want to configure and the service it depends on.
- Access Service Properties: Right-click on the service you want to configure (dependent service) and select “Properties” from the context menu.
- Navigate to Dependencies Tab: In the Properties window of the dependent service, click on the “Dependencies” tab. This tab displays services that the selected service depends on for proper operation.
- Add Dependency: Click the “Add” button under the “This service depends on the following system components” section. In the dialog box that appears, type the name of the service that the dependent service should start after. Click “OK” to add the dependency.
- Apply Changes: Click “Apply” and then “OK” to save the changes and set the service to start after the specified dependency.
- Verify Configuration: Restart the dependent service or restart the Windows operating system to ensure that the service starts in the correct order as configured.
Best Practices for Setting Service Start Order
To optimise service start order configuration in Windows Service Manager, consider implementing the following best practices:
- Document Dependencies: Maintain documentation that outlines service dependencies and their configurations for reference during troubleshooting or system upgrades.
- Regular Testing: Periodically test service start orders to verify that dependencies are correctly configured and services start without errors.
- Automation: Use scripting or automation tools to streamline the process of configuring service dependencies across multiple systems or environments.
- Monitor Service Status: Implement monitoring tools to track service statuses and receive alerts about potential issues related to service dependencies or startup failures.
Conclusion
Configuring services to start after another service using Windows Service Manager is essential for maintaining service dependencies and ensuring smooth operation of applications and system components. By following the outlined steps and adopting best practices, administrators can enhance system reliability, prevent operational disruptions, and optimise service management in Windows environments.
Incorporate proactive service dependency management into your system administration practices to support efficient application deployment, minimise downtime, and improve overall system performance. Whether manageing individual workstations or enterprise-level networks, configuring service start orders effectively contributes to a stable and reliable computing environment.
(Image credit: Future)
On Windows 10, services are programs that run in the background without a user interface and enable system features (such as printing, networking, remote access, File Explorer, Windows Search, updates, etc.) and apps to operate as intended.
Although the system does a pretty good job managing background services, you may sometimes need to control them manually when a feature or app isn’t working correctly or requires you to manage its services manually.
Whatever the case might be, Windows 10 includes at least four methods to stop, start, disable, or enable services using the Services console, Task Manager, Command Prompt, and PowerShell.
This guide will walk you through the steps to manage system and app services on Windows 10.
How to manage services from Services console
Using the Services consoles is perhaps the simplest method to stop, start, disable, or enable one or multiple services on Windows 10.
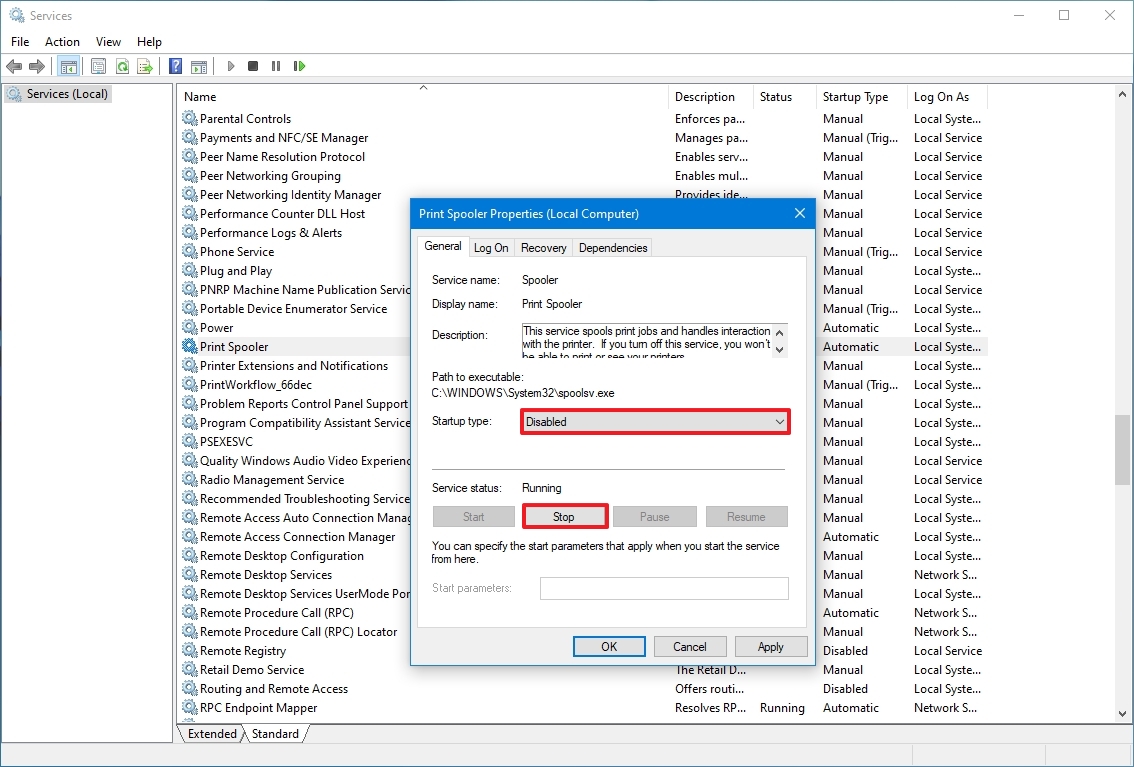
Stop service
To stop a running service using Services, use these steps:
All the latest news, reviews, and guides for Windows and Xbox diehards.
- Open Start.
- Search for Services and click the top result to open the console.
- Double-click the service that you intend to stop.
- Click the Stop button.
- Quick tip: You can also manage the state by right-clicking the service and selecting the option. Or you can select the service and then use the controls at the top to start, stop, pause, or restart.
- Click the Apply button.
- Click the OK button.
Once you complete the steps, the service will stop running on the device.
If you’re unable to stop a system service, consider that some services are required for the operation of Windows 10, and they can’t be stopped.
Start service
To start a service on Windows 10, use these steps:
- Open Start.
- Search for Services and click the top result to open the console.
- Double-click the service that you intend to stop.
- Click the Start button.
- Click the Apply button.
- Click the OK button.
After you complete the steps, the service you specified will start for the current session.
Disable service
To set a service a disabled, use these steps:
- Open Start.
- Search for Services and click the top result to open the console.
- Double-click the service that you intend to stop.
- Click the Stop button.
- Use the «Start type» drop-down menu and select the Disabled option.
- Click the Apply button.
- Click the OK button.
Once you complete the steps, the service will no longer start automatically after restarting your device.
Enable service
To enable a specific service, use these steps:
- Open Start.
- Search for Services and click the top result to open the console.
- Double-click the service that you intend to stop.
- Click the Start button.
- Use the «Start type» drop-down menu and select the Automatic option. These are the Startup types on Windows 10:
- Automatic – service starts at boot.
- Automatic (Delayed Start) – service start after boot.
- Manual – starts service manually as needed.
- Disabled – stops service from running.
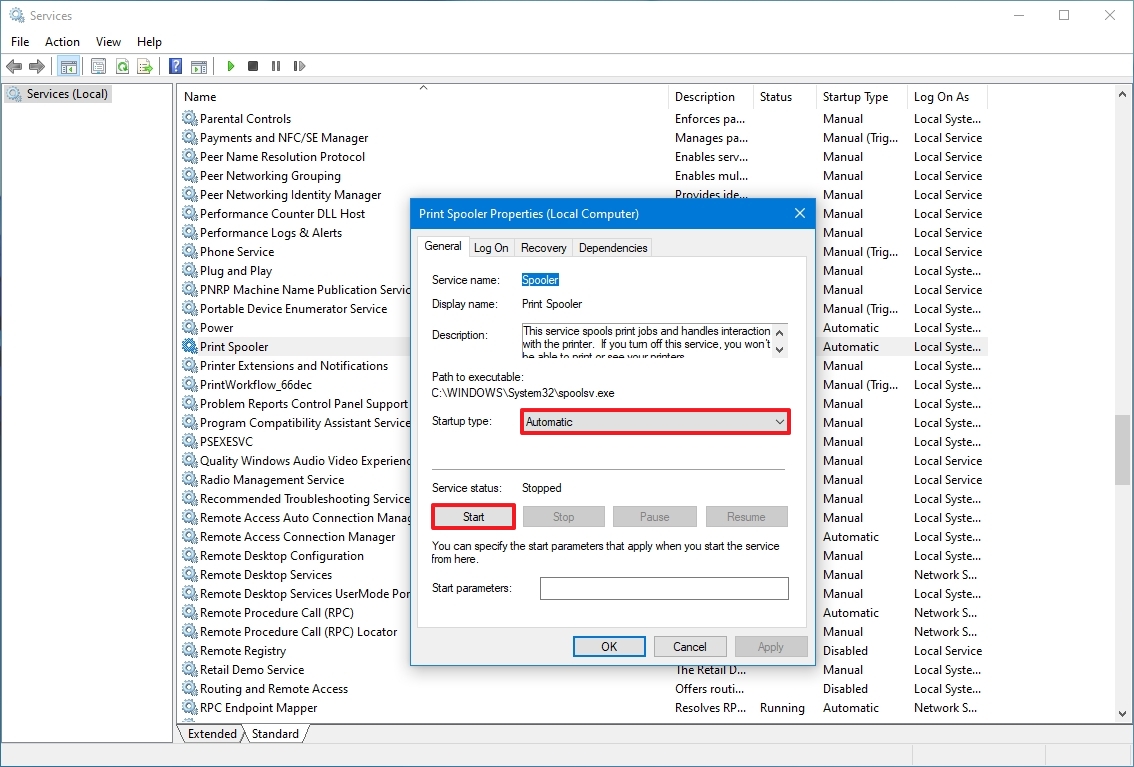
- Click the Apply button.
- Click the OK button.
After you complete the steps, the Windows 10 or app service will enable, but if it was in a stopped state, you’d need to start it manually or restart the device for the service to run.
How to manage services from Task Manager
Task Manager also includes a section to manage services for Windows 10 and apps quickly.
To stop, start, or restart a service using Task Manager, use these steps:
- Open Start.
- Search for Task Manager and click the top result to open the app.
- Quick tip: Windows 10 includes many other ways to open the experience, including right-clicking the taskbar and selecting the Task Manager option, and using the «Ctrl + Shift + ESC» keyboard shortcut.
- Click the Services tab.
- Right-click the service name and select one of the options:
- Stop.
- Start.
- Restart.
- Quick note: Task Manager only displays the service name, not the display name. For example, if you’re using this method, you’ll the «Print Spooler» defined as «Spooler.»
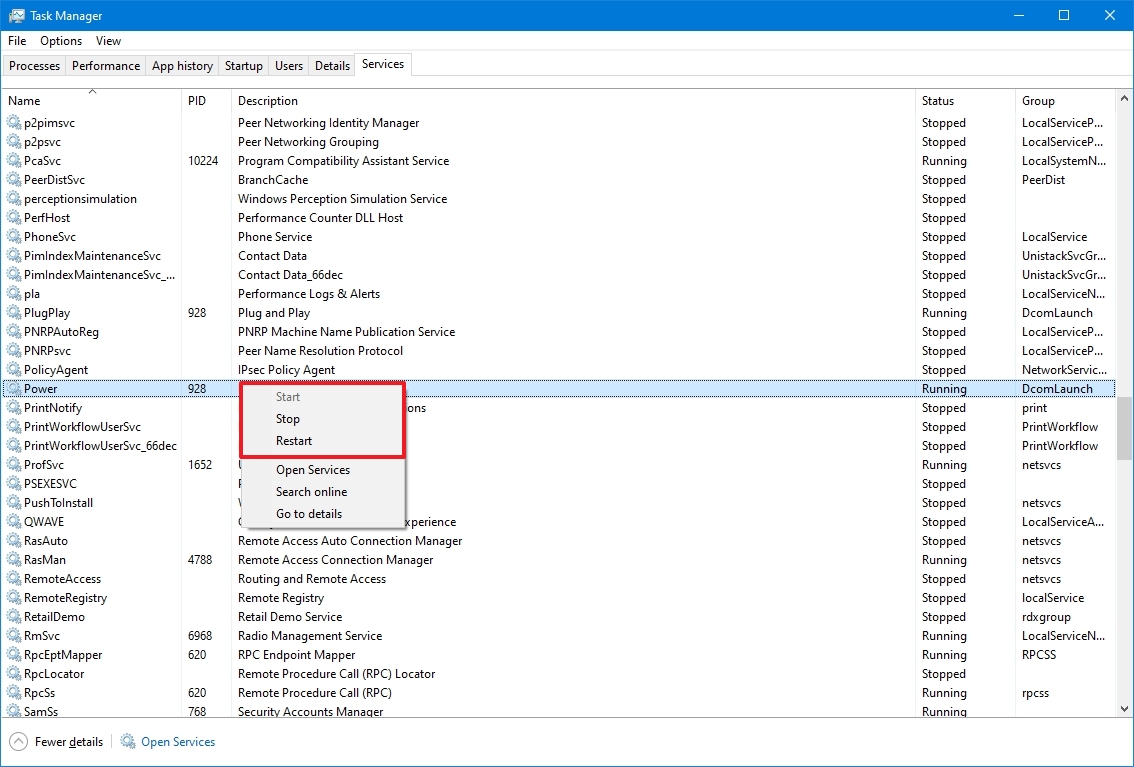
Once you complete the steps, the service will respond to the option you selected.
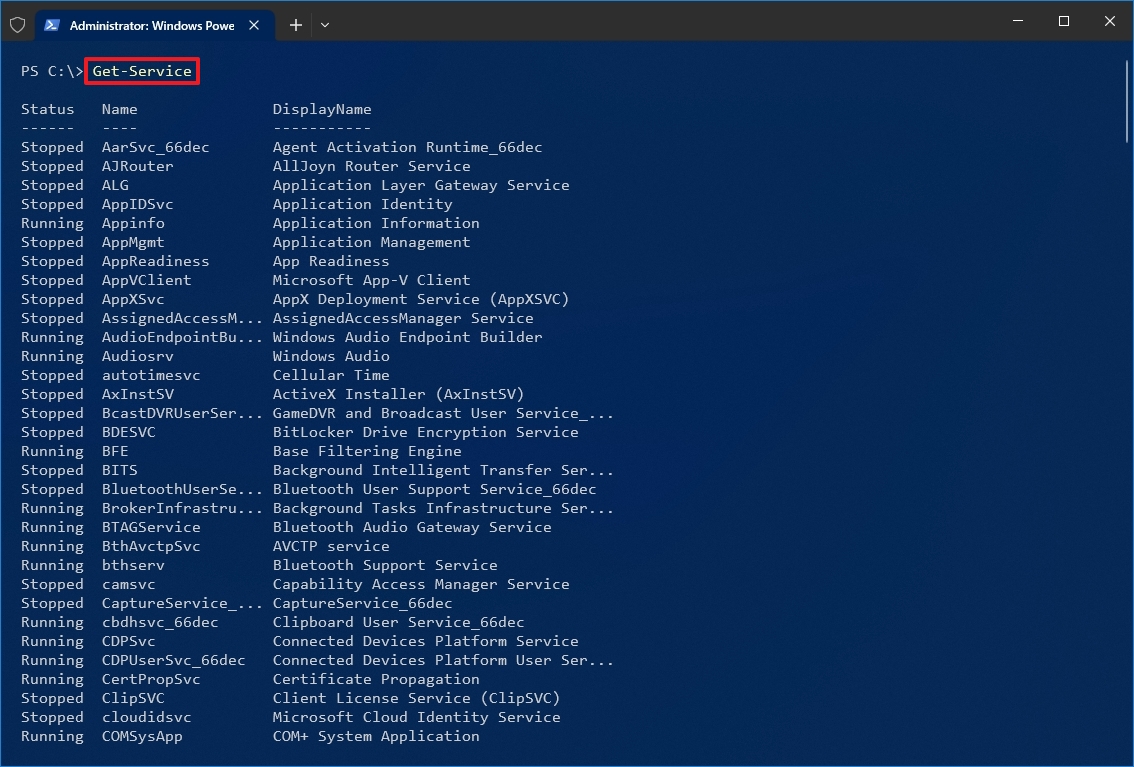
How to manage services from PowerShell
You can also use PowerShell commands to manage background services for Windows 10 and apps.
Stop service
To stop a specific service with PowerShell, use these steps:
- Open Start.
- Search for PowerShell, right-click the top result, and select the Run as administrator option.
- (Optional) Type the following command to view a list of all the services and press Enter: Get-Service
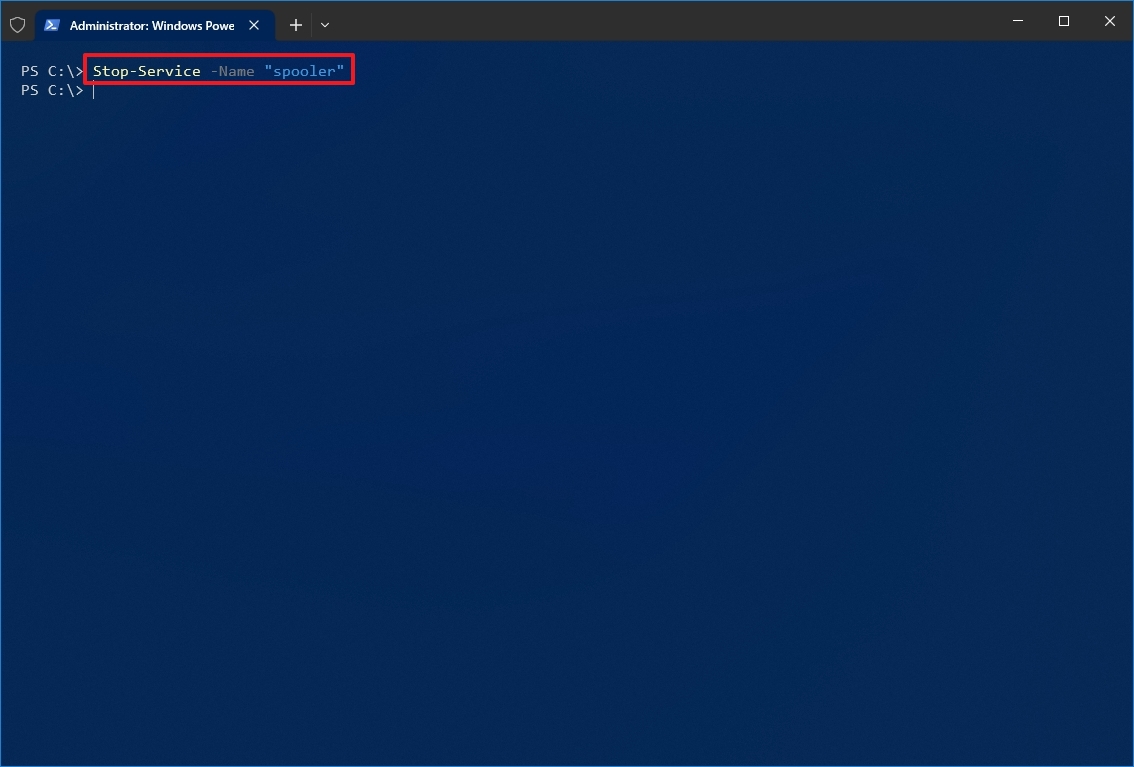
- Type the following command to stop a service and press Enter: Stop-Service -Name «SERVICE-NAME»
For example, this command stops the printer spooler service on Windows 10: Stop-Service -Name «spooler»
In the command, replace «SERVICE-NAME» with the name of the service you intend to stop. If you want to use the display name, replace -Name with -DisplayName and then specify the service’s display name.
Alternatively, you can also use this variant of the command to stop the service: Set-Service -Name «SERVICE-NAME» -Status stopped
In the command, replace «SERVICE-NAME» with the name of the service you intend to stop. If you want to use the display name, replace -Name with -DisplayName and then specify the service’s display name. You only need quotation marks if there’s a space within the name.
- Quick tip: If you’re getting a dependency error, you can append the -force option in either of the commands to stop the service. For example, Stop-Service -Name «SERVICE-NAME» -Force.
After you complete the steps, the PowerShell command will stop the service on your device.
Start service
To start a Windows 10 or app service with PowerShell, use these steps:
- Open Start.
- Search for PowerShell, right-click the top result, and select the Run as administrator option.
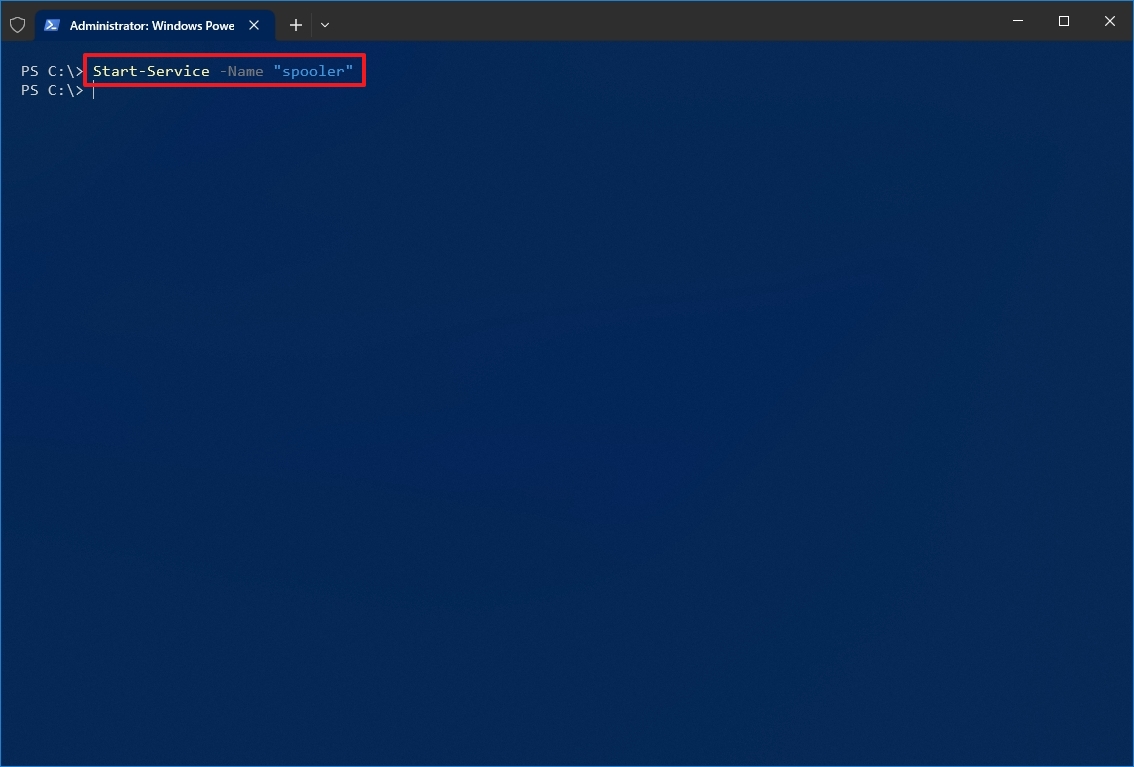
- Type the following command to start a service and press Enter: Start-Service -Name «SERVICE-NAME»
For example, this command starts the printer spooler service on Windows 10: Start-Service -Name «spooler»
In the command, replace «SERVICE-NAME» with the name of the service. Using the display name is supported, replacing -Name with -DisplayName and specifying the service’s display name.
Alternatively, you can also use this variant of the command to start a service: Set-Service -Name «SERVICE-NAME» -Status running
In the command, replace «SERVICE-NAME» with the name of the service. If you want to use the display name, replace -Name with -DisplayName and then specify the service’s display name.
Once you complete the steps, the service will start on your computer.
Disable service
To disable a service using a PowerShell command, use these steps:
- Open Start.
- Search for PowerShell, right-click the top result, and select the Run as administrator option.
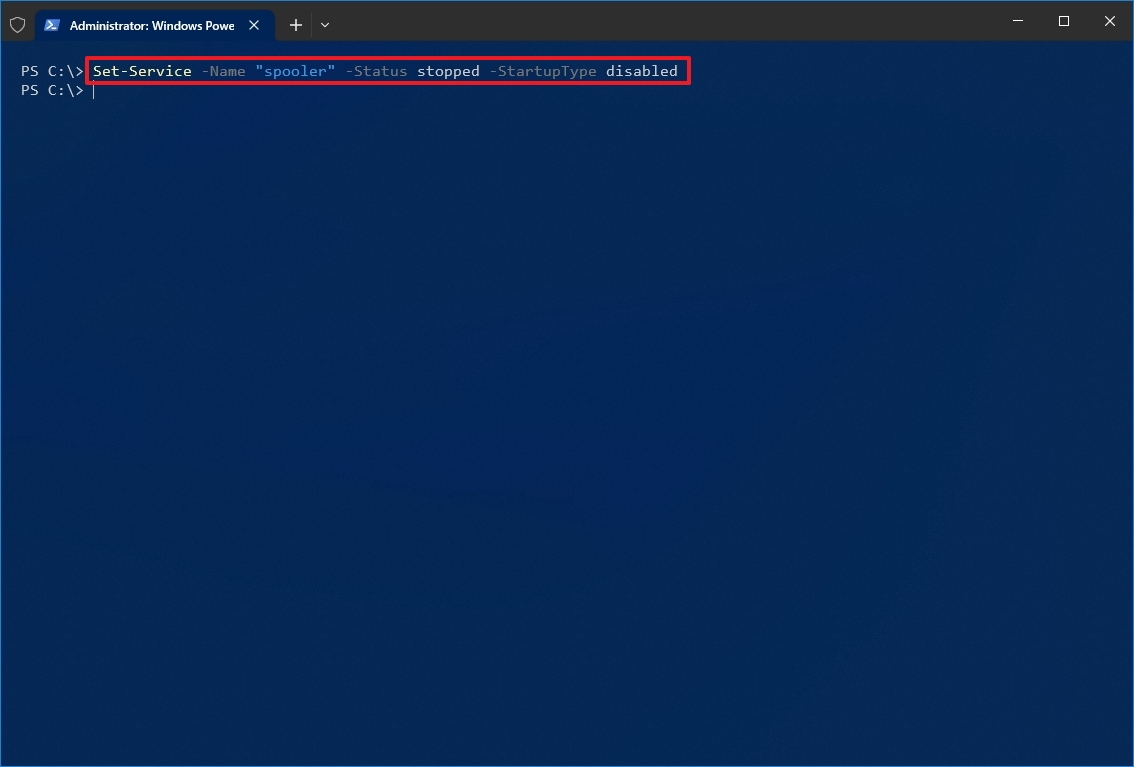
- Type the following command to disable a service and press Enter: Set-Service -Name «SERVICE-NAME» -Status stopped -StartupType disabled
In the command, update «SERVICE-NAME» for the name of the service. If you want to use the service’s display name, replace -Name with -DisplayName and specify the service name. If you want to disable the service without stopping it immediately, you can remove the -Status stopped portion of the command.
For example, this command disables the printer spooler service on Windows 10: Set-Service -Name «spooler» -Status stopped -StartupType disabled
After you complete the steps, the PowerShell command will disable the specified service.
Enable service
To enable a specific background service with PowerShell, use these steps:
- Open Start.
- Search for PowerShell, right-click the top result, and select the Run as administrator option.
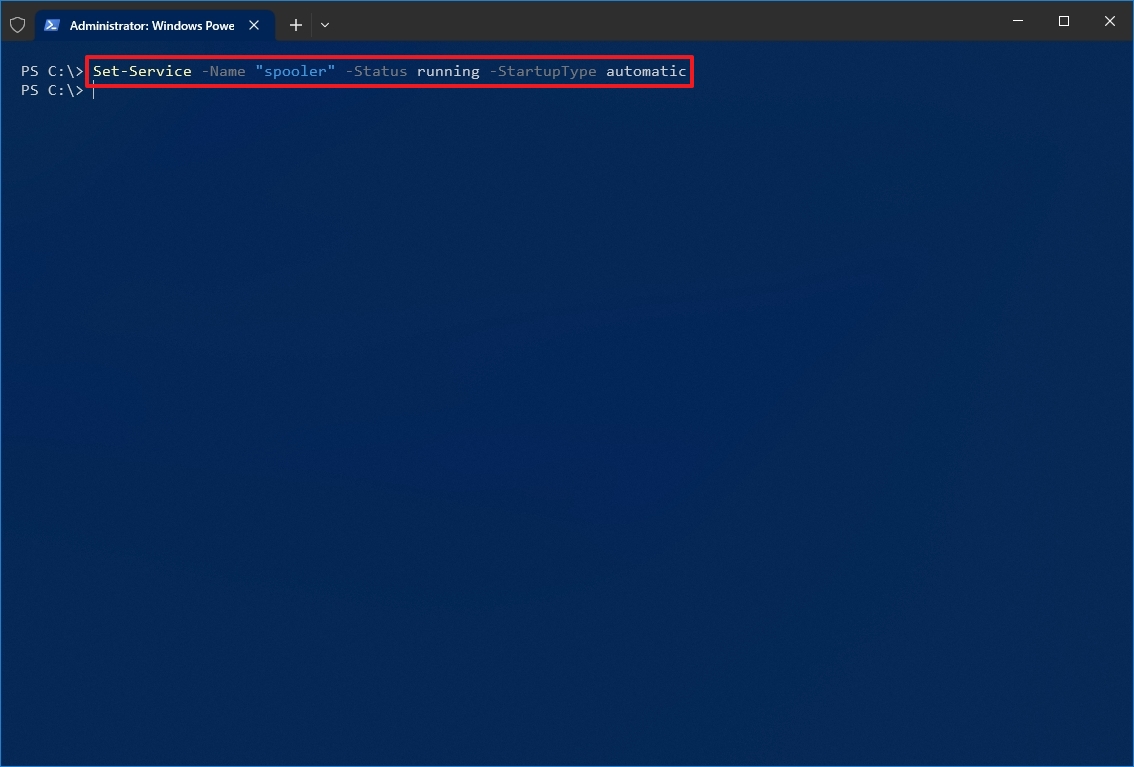
- Type the following command to enable a service and press Enter: Set-Service -Name «SERVICE-NAME» -Status running -StartupType automatic
For example, this command enables the printer spooler service using PowerShell: Set-Service -Name «spooler» -Status running -StartupType automatic
- Quick note: You may able to use the display -DisplayName option, but the command may also prompt you to supply the name of the service, adding an extra step to the process. If you want to enable the service without starting it immediately, you can remove the -Status running portion of the command.
Once you complete the steps, PowerShell will enable the service specified with the command.
How to manage services from Command Prompt
If you’re comfortable using the command line, Command Prompt offers the «net» command (older) to stop or start or the «sc» command (newer) to stop, start, disable, or enable services on Windows 10.
Stop service
To stop a Windows 10 or app service with Command Prompt, use these steps:
- Open Start.
- Search for Command Prompt, right-click the top result, and select the Run as administrator option.
- (Optional) Type the following command to view a list of all the services and press Enter: sc queryex state=all type=service
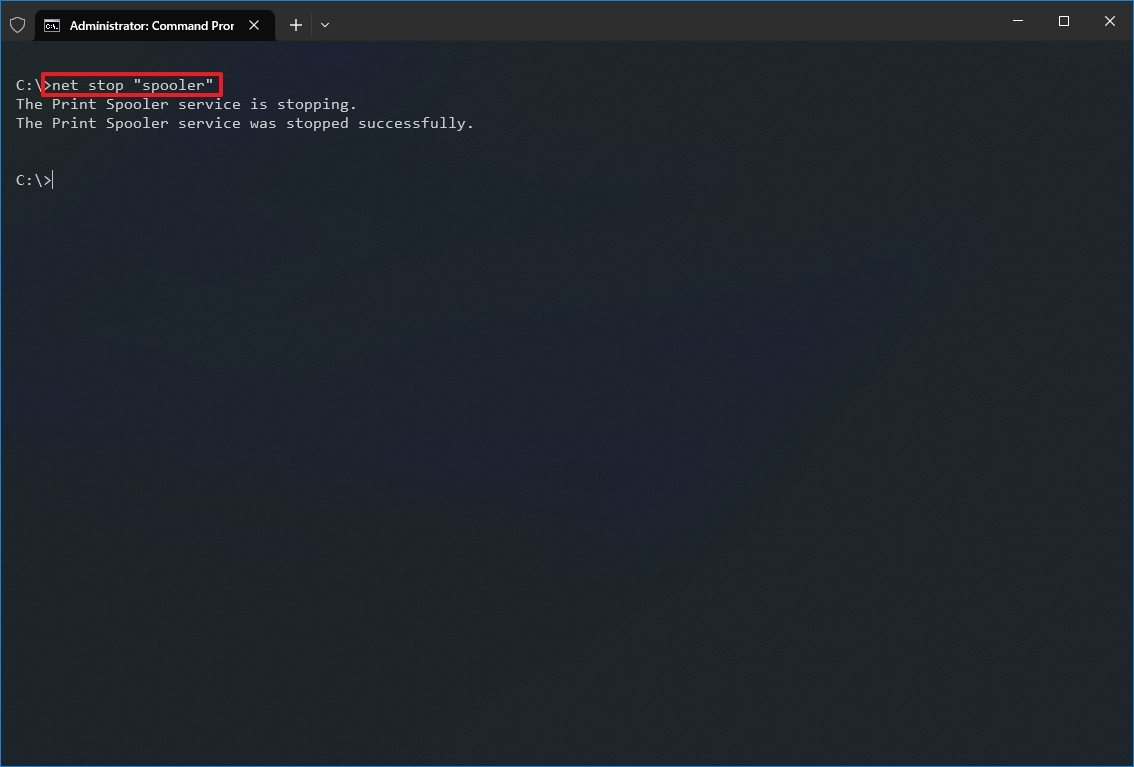
- Type the following command to stop a service and press Enter: net stop «SERVICE-NAME»
In the command, replace «SERVICE-NAME» with the name or display the name of the service. You only need quotation marks if there’s a space within the name. For example, this command stops the printer spooler using the service name: net stop «spooler»
Alternatively, you can also use the more advanced «sc» command: sc stop «SERVICE-NAME»
For example, this command stops the printer spooler using the service name: sc stop «spooler»
After you complete the steps, the command will stop the specified service on Windows 10.
Start service
To start a service with the command line, use these steps:
- Open Start.
- Search for Command Prompt, right-click the top result, and select the Run as administrator option.
- Type the following command to start a service and press Enter:
net start «SERVICE-NAME»
In the command, replace «SERVICE-NAME» with the name or display the name of the service. You only need quotation marks if there’s a space within the name. For example, this command starts the printer spooler using the service name: net start «spooler»
Alternatively, you can also use the «sc» command: sc start «SERVICE-NAME»
For example, this command starts the printer spooler using the service name: sc start «spooler»

Once you complete the steps, the command will execute and start the service you specified.
Disable service
To disable a service with Command Prompt, use these steps:
- Open Start.
- Search for Command Prompt, right-click the top result, and select the Run as administrator option.
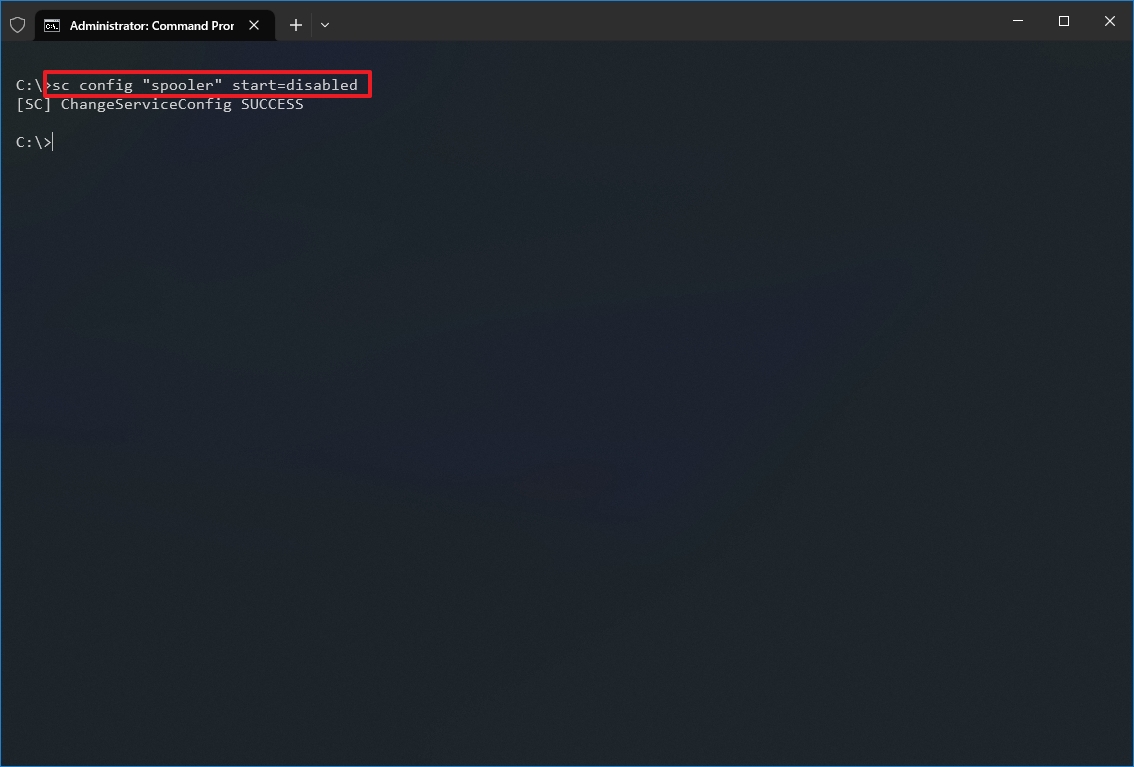
- Type the following command to disable a service and press Enter: sc config «SERVICE-NAME» start=disabled
In the command, replace «SERVICE-NAME» with the name of the service that you want to disable.
For example, this command disables the printer spooler using the service name: sc config «spooler» start=disabled
- (Optional) Type the following command to stop the service and press Enter: sc stop «SERVICE-NAME»
- Quick note: When you disable a service, it doesn’t stop the current state of the service. You can either restart your computer or stop the service using the above command.
After you complete the steps, the sc command will run disabling the Windows 10 or app service you specified.
Enable service
To enable a service with a command, use these steps:
- Open Start.
- Search for Command Prompt, right-click the top result, and select the Run as administrator option.
- Type the following command to enable a particular service and press Enter:
sc config «SERVICE-NAME» start=auto
In the command, replace «SERVICE-NAME» with the name of the service that you want to enable. For example, this command enables the printer spooler automatically using the service name: sc config «spooler» start=auto
These are alternative commands to enable a particular service:
- Manual: sc config «SERVICE-NAME» start=demand
- Automatic Delayed: sc config «SERVICE-NAME» start=delayed-auto

- (Optional) Type the following command to start the service and press Enter: sc start «SERVICE-NAME»
Once you complete the steps, the service will enable and start automatically on reboot according to the command you used.
You can only use the «net» command to start or stop services. The «sc» command allows you to perform more tasks, including start, stop, enable, or disable services, among other options. If you’re choosing to manage services with command lines, then, in either case, it’s best to use the service name instead of the display name.
Also, when using any of the methods outlined above, consider that making modifications to the default settings can alter the operation of one or more features that depend on that service, negatively affecting the experience. Furthermore, if you restart a service, you might be required to start its dependencies manually as well to make the app or feature operational again.
We’re focusing this guide on Windows 10, but the ability to manage services has been available for several years, which means that you can refer to this guide if you’re still running Windows 8.1, Windows 7, and older versions.
More resources
For more helpful articles, coverage, and answers to common questions about Windows 10 and Windows 11, visit the following resources:
- Windows 11 on Windows Central — All you need to know
- Windows 10 on Windows Central — All you need to know

Cutting-edge operating system
A refreshed design in Windows 11 enables you to do what you want effortlessly and safely, with biometric logins for encrypted authentication and advanced antivirus defenses.
Mauro Huculak has been a Windows How-To Expert contributor for WindowsCentral.com for nearly a decade and has over 15 years of experience writing comprehensive guides. He also has an IT background and has achieved different professional certifications from Microsoft, Cisco, VMware, and CompTIA. He has been recognized as a Microsoft MVP for many years.
Table of Contents
In this tutorial, we will see 3 ways to start/stop/restart services in Windows. Services are mostly required when you need to have some long running functionality in your Server. As you might be aware Microsoft Windows has number of services running at any point of time. A service is basically a long running executable applications that run in their own Windows sessions. You can run services in multiple user contexts. You don’t have to necessarily use the logged in user account. A service can be started, stopped and restarted. In Windows System, you can use multiple methods to stop/start/restart service that we will see in below section. More on Microsoft official website.
Also Read: VBoxManage — An Introduction to VirtualBox CLI with Examples
Method 1: Using CMD
a) Open CMD
You can go to search box and type CMD to open the command line. Once it shows up, right click on it and then click on Run as administrator.
b) Start/Stop/Restart a Service
If you want to start a service then you need to use net start <service> command. Here we are starting Windows Update services by using net start wuauserv command as shown below.
C:\>net start wuauserv
The Windows Update service is starting.
The Windows Update service was started successfully.
If you want to stop a service then you need to use net stop <service> command. Here we are stopping Windows Update service by using net stop wuauserv command as shown below.
C:\>net stop wuauserv
The Windows Update service is stopping.
The Windows Update service was stopped successfully.
In CMD, there is no such option called restart so what you can do is that you can perform net stop <service_name> and net start <service_name> simultaneously as shown below. This will work as if you have restarted the service.
C:\>net stop wuauserv && net start wuauserv
The Windows Update service is stopping.
The Windows Update service was stopped successfully.

The Windows Update service is starting.
The Windows Update service was started successfully.
Method 2: Using PowerShell
a) Open PowerShell
You can go to search box and type PowerShell. Once it shows up, right click on it and then click on Run as administrator.
b) Start/Stop/Restart a Service
If you want to start a windows service then you need to use Start-Service -Name <service_name> command. You can also check the progress by using -Verbose option.
PS C:\> Start-Service -Name wuauserv -Verbose
VERBOSE: Performing the operation "Start-Service" on target "Windows Update (wuauserv)".
If you want to stop a windows service then you need to use Stop-Service -Name <service_name> command. You can also check the progress by using -Verbose option.
PS C:\> Stop-Service -Name wuauserv -Verbose
VERBOSE: Performing the operation "Stop-Service" on target "Windows Update (wuauserv)".
If you want to restart a windows service then you need to use Restart-Service -Name <service_name> command. You can also check the progress by using -Verbose option.
PS C:\> Restart-Service -Name wuauserv -Verbose
VERBOSE: Performing the operation "Restart-Service" on target "Windows Update (wuauserv)".
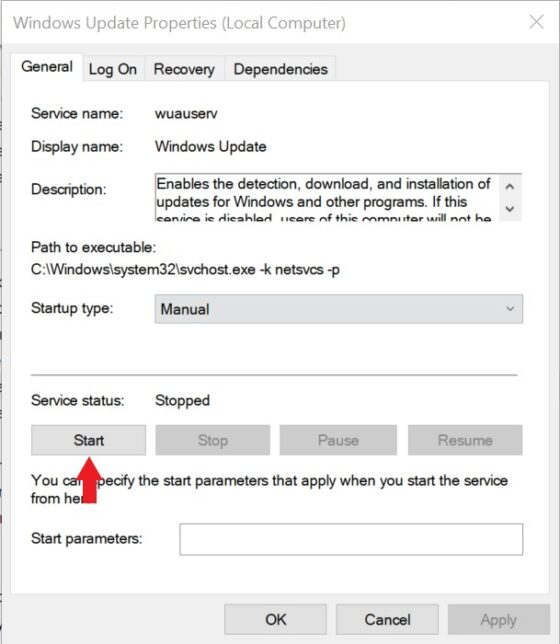
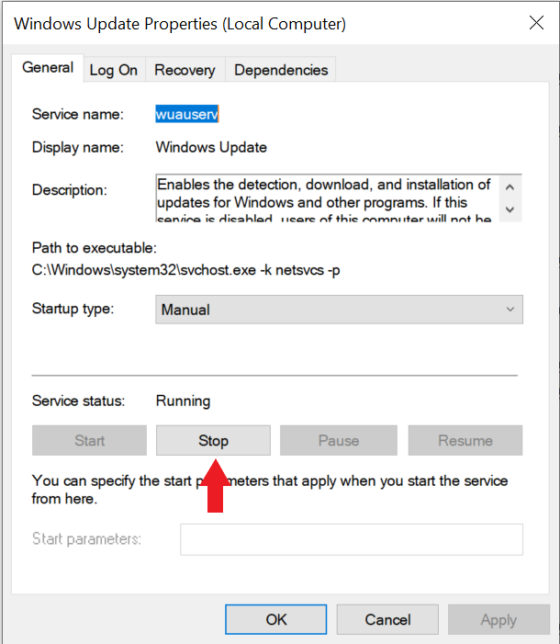
Method 3: Using GUI
a) Open Services
You can open Run prompt by pressing Windows+R and then typing services.msc to open Services or you can directly search services.msc in the Search section to open Services. Once it shows up, right click on it and then select Run as administrator.
b) Start/Stop/Restart a Service
You can double click and open the service as shown below. Then Click on Start to start the service. The other way is to right click on that service and then start from there.
Similarly if you want to stop any service then double click on that service and open it as shown below. Here you can click on Stop to stop the service. Alternatively, you can also right click on that service and then Click on Stop to shutdown the service.
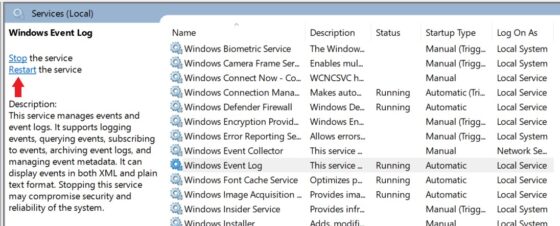
You will also have the option to restart the service. For example here I am restarting the Windows Event Log service by clicking on Restart as shown below. Alternatively, you can also right click on that service and then click on Restart.