
Многие инструкции на этом сайте в качестве одного из первых шагов предлагают запустить PowerShell, обычно от имени администратора. Иногда в комментариях появляется от начинающих пользователей вопрос о том, как это сделать.
В этом руководстве подробно о способах открыть PowerShell, в том числе от администратора, в Windows 10, 8 и Windows 7, а также видео инструкция, где все эти способы показаны наглядно. Также может быть полезно: Способы открыть командную строку от имени администратора.
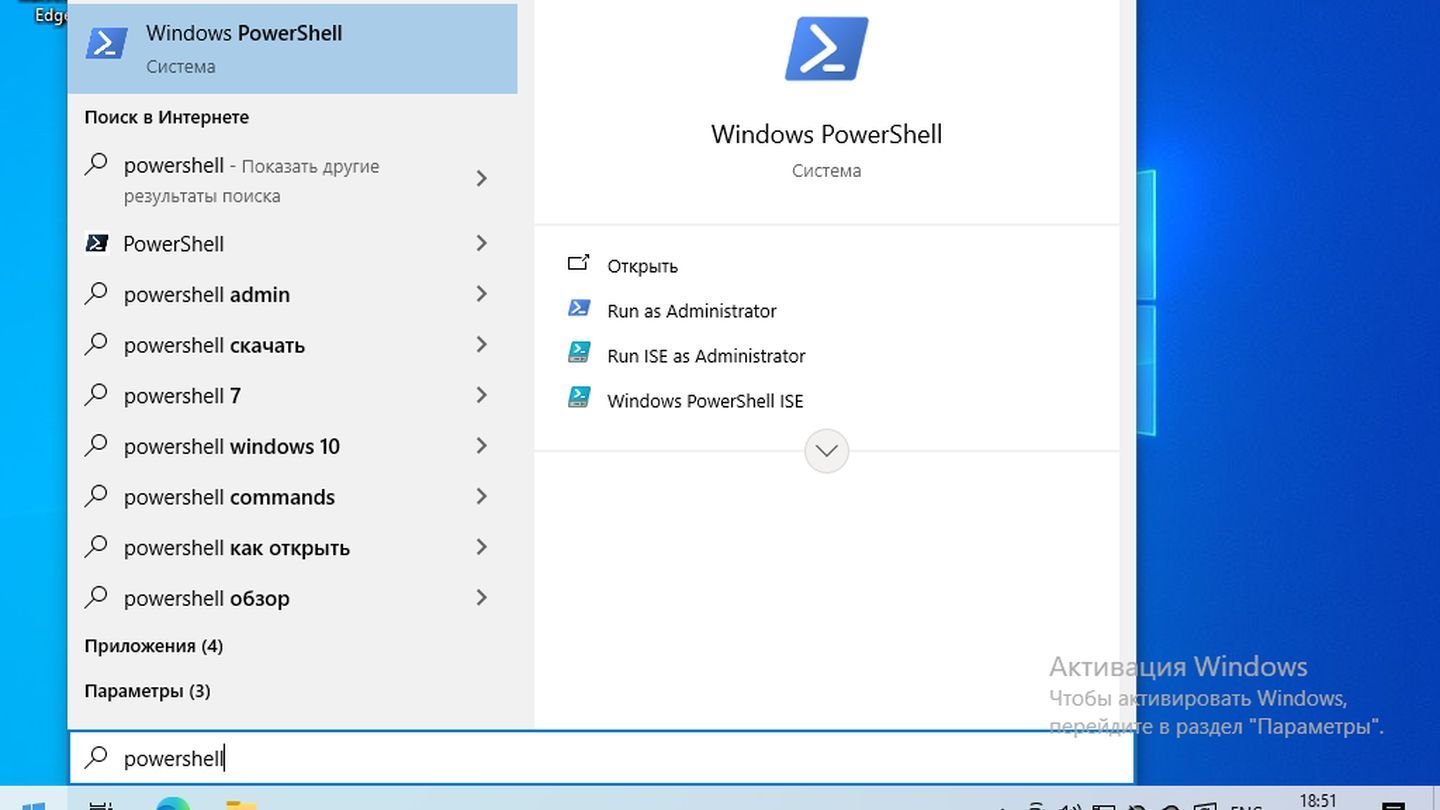
Запуск Windows PowerShell с помощью поиска
Моя первая рекомендация на тему запуска любой утилиты Windows, которую вы не знаете, как запустить — использовать поиск, он поможет почти всегда.
Кнопка поиска есть на панели задач Windows 10, в Windows 8 и 8.1 поле поиска можно открыть клавишами Win+S, а в Windows 7 найти в меню «Пуск». Шаги (на примере 10-ки) будут следующими.
- В поиск начните вводить PowerShell, пока не покажется необходимый результат.
- Если требуется запуск от имени администратора, нажмите по Windows PowerShell правой кнопкой мыши и выберите соответствующий пункт контекстного меню.
Как видите, очень просто и подходит для любой из последних версий Windows.
Как открыть PowerShell через контекстное меню кнопки «Пуск» в Windows 10
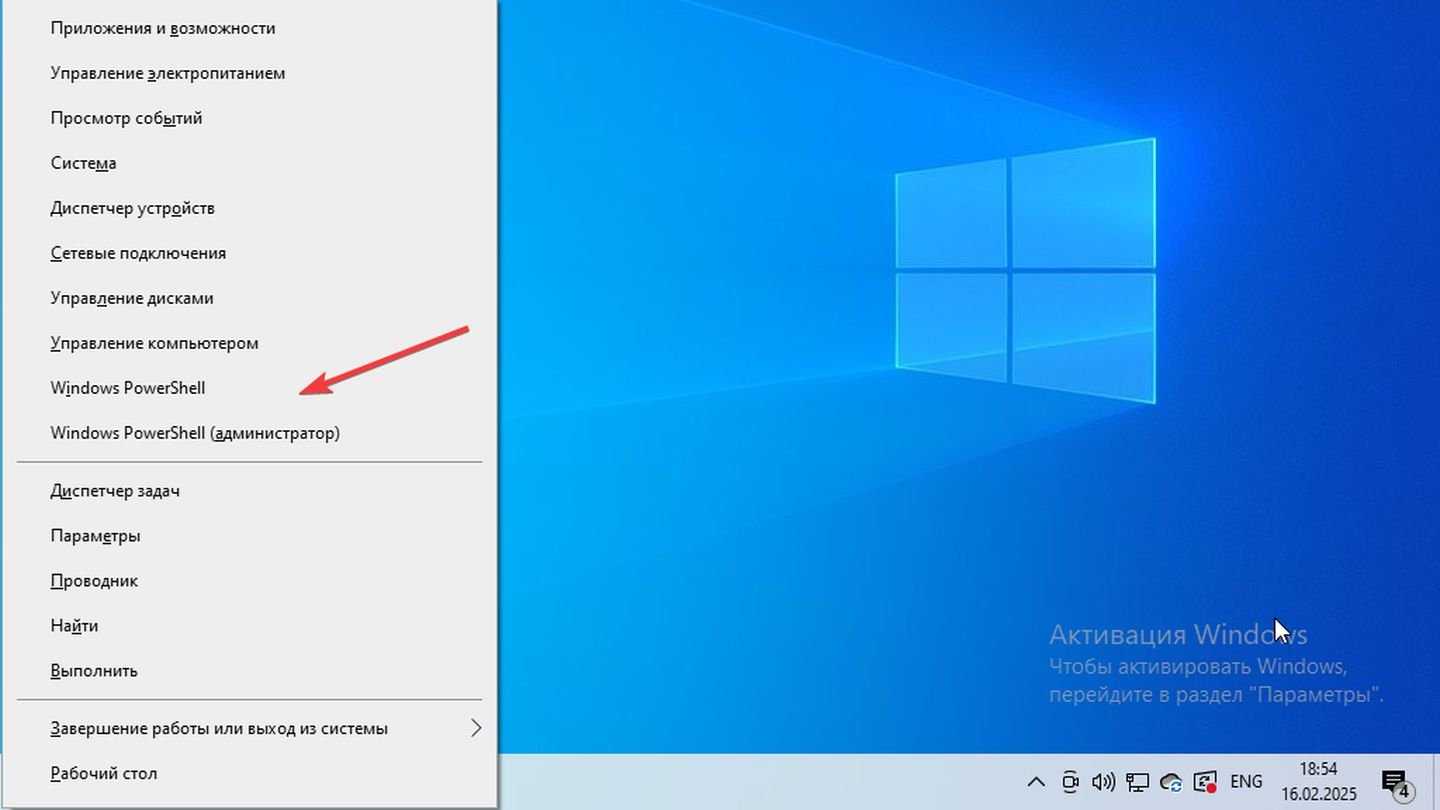
Если на вашем компьютере установлена Windows 10, то, пожалуй, ещё более быстрый способ открыть PowerShell — нажать правой кнопкой мыши по кнопке «Пуск» и выбрать нужный пункт меню (там присутствует сразу два пункта — для простого запуска и от имени администратора). Это же меню можно вызвать, нажав клавиши Win+X на клавиатуре.
Примечание: если в этом меню вместо Windows PowerShell у вас отображается командная строка, то заменить её на PowerShell вы, при желании, можете в Параметры — Персонализация — Панель задач, включив пункт «Заменить командную строку оболочкой Windows Powershell» (в последних версиях Windows 10 параметр включен по умолчанию).
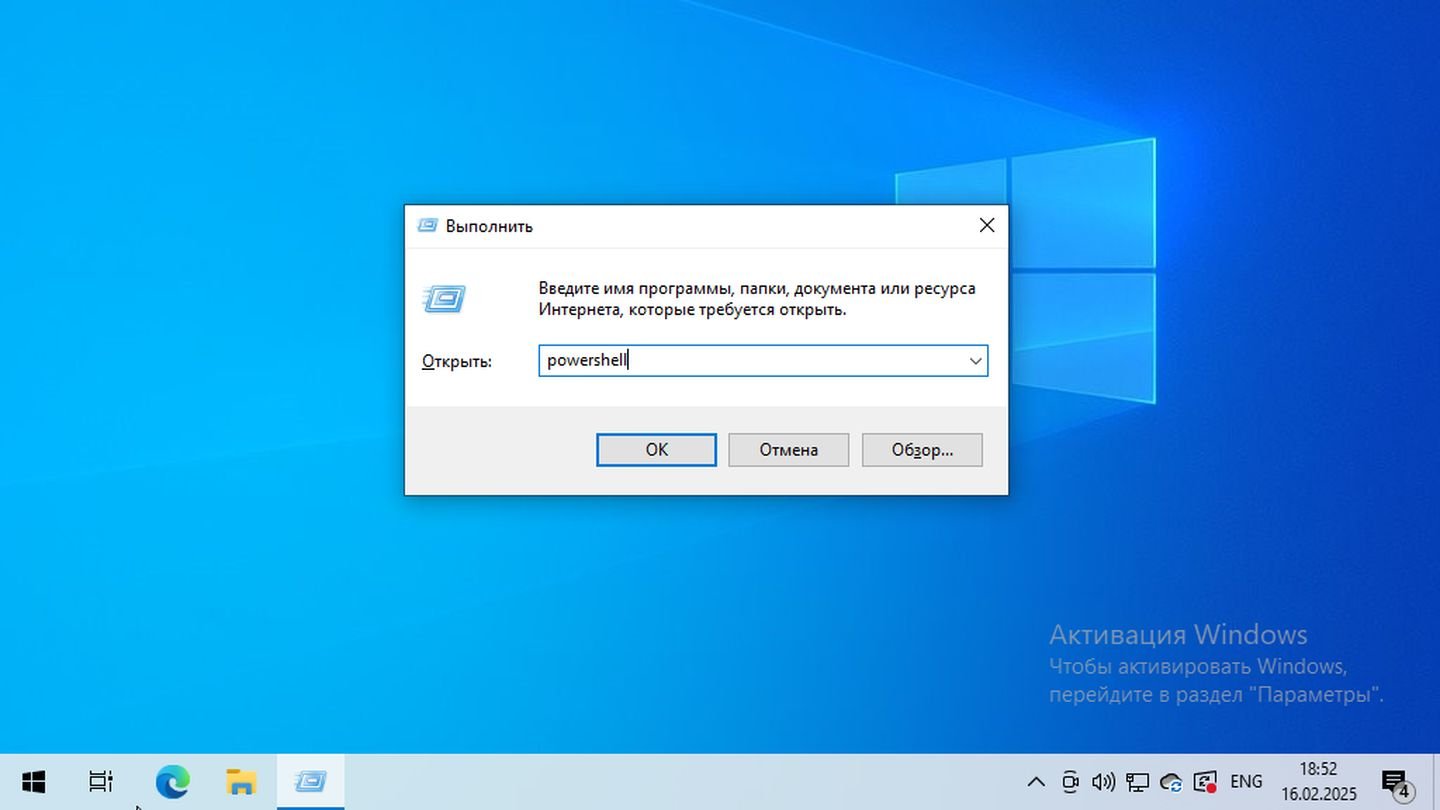
Запуск PowerShell с помощью диалогового окна «Выполнить»
Еще один простой способ запуска PowerShell — использовать окно «Выполнить»:
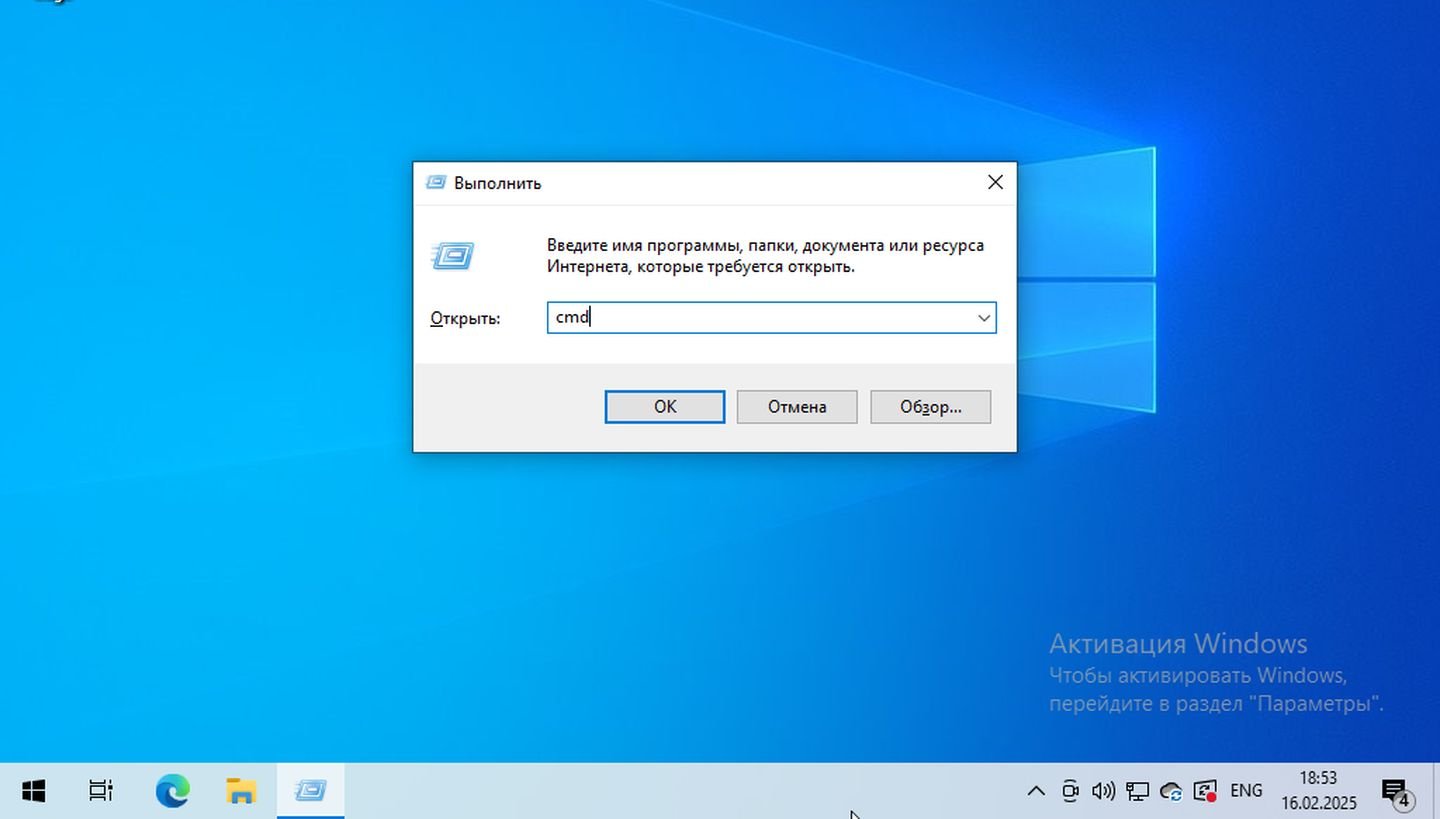
- Нажмите клавиши Win+R на клавиатуре.
- Введите powershell и нажмите Enter или Ок.
При этом в Windows 7 можно установить отметку запуска от имени администратора, а в последней версии Windows 10, если при нажатии Enter или Ok удерживать клавиши Ctrl + Shift, то утилита также запуститься от имени администратора.
Видео инструкция
Другие способы открыть PowerShell
Выше перечислены далеко не все способы открытия Windows PowerShell, но, уверен, что их будет вполне достаточно. Если же нет, то:
Также, бывает, спрашивают, а что такое PowerShell ISE и PowerShell x86, которые находятся, например, при использовании первого способа. Отвечаю: PowerShell ISE — «Интегрированная среда сценариев PowerShell». По сути, с её помощью можно выполнять все те же команды, но, помимо этого, в ней присутствуют дополнительные возможности, облегчающие работу со скриптами PowerShell (справка, инструменты отладки, цветовая разметка, дополнительные горячие клавиши и т.п.). В свою очередь версии x86 нужны в случае, если вы работаете с 32-битными объектами или с удаленной системой x86.
Windows PowerShell for Windows 7 is a powerful command-line interface that allows users to automate tasks and manage system configurations efficiently, exemplified by the simple command to output text to the console:
Write-Host 'Hello, World!'
Understanding PowerShell
Windows PowerShell is a task automation and configuration management framework designed for automating the management of operating systems (Linux, macOS, and especially Windows). It consists of a command-line shell and an associated scripting language built on the .NET Framework. PowerShell’s integration with the .NET environment allows for powerful administrative tools and features tailored specifically for system administrators and advanced users.
Unlocking Windows PowerShell Scriptomatic For Quick Tasks
History of PowerShell
PowerShell was first introduced in 2006, but numerous enhancements were made leading up to the Windows 7 iteration. In Windows 7, PowerShell 2.0 introduced several user-friendly features, such as a more advanced scripting environment, the ability to write more complex scripts, and improved commandlets (cmdlets).
Understanding Microsoft.PowerShell.Commands.Internal.Format.FormatStartData
Getting Started with PowerShell
How to Launch PowerShell in Windows 7
Launching PowerShell in Windows 7 is quite straightforward:
- Method 1 — Start Menu: Click on the Start button and type «PowerShell» into the search bar. Click on «Windows PowerShell» from the results.
- Method 2 — Run dialog: Press `Win + R` to open the Run dialog, type `powershell`, and press Enter.
PowerShell Versions and Editions
If you’re using Windows 7, you most likely have PowerShell 2.0, which comes pre-installed. It’s essential to note that PowerShell versioning does play a role in compatibility and functionality when running scripts or cmdlets, so awareness of the version you’re using is crucial.
Mastering Microsoft.PowerShell.Commands.WriteErrorException
PowerShell Basics
Understanding the PowerShell Environment
Once launched, you’ll find yourself greeted by the PowerShell console, marked by its prompt (PS>). This prompt is your command line for entering commands (cmdlets) to perform various tasks. It’s crucial to understand the various elements of this environment to harness the full power of Windows PowerShell.
PowerShell Commands: Cmdlets
Cmdlets are lightweight commands used in the PowerShell environment. They follow a straightforward structure of Verb-Noun, which helps users remember the commands they might want to use. For example, using the `Get-Help` command provides assistance on other cmdlets, while `Get-Command` gives you a list of all available cmdlets.
To view all available commands, you can use:
Get-Command
This command will display various functions you can utilize within PowerShell, aiding any user in navigating this powerful tool.
PowerShell Aliases
Aliases serve as shorthand for cmdlets, allowing for quicker command entry. For instance:
- `gci` is an alias for `Get-ChildItem`
- `ls` acts as a shortcut for `Get-ChildItem`
- `dir` is another synonym for the same command.
Using aliases can accelerate common tasks. You might run:
Get-ChildItem | ls
Both commands will yield the same result, demonstrating PowerShell’s flexibility.

Windows PowerShell Network Commands Made Easy
Essential PowerShell Cmdlets
File and Directory Management
Managing files and directories is one of the primary uses of PowerShell. Key cmdlets include:
- Get-ChildItem: Lists files and folders in a specified location.
- Copy-Item: Duplicates files and folders.
- Remove-Item: Deletes files and folders.
For example, if you want to see the contents of a folder, you can use:
Get-ChildItem -Path C:\MyFolder
This command reveals all items within the specified directory.
System Information and Management
PowerShell is instrumental for querying system information. You can utilize the following cmdlets:
- Get-Process: Displays running processes on your machine.
- Get-Service: Lists services installed on the computer.
An example of querying active processes based on CPU usage is:
Get-Process | Where-Object {$_.CPU -gt 10}
This command filters processes that are consuming more than 10 CPU seconds, allowing for targeted system monitoring.
User and Group Management
PowerShell simplifies user management through cmdlets like:
- New-LocalUser: Creates a new user account.
- Add-LocalGroupMember: Adds a user to a specified group.
For instance, creating a new user can be performed with:
New-LocalUser -Name "NewUser" -Password (ConvertTo-SecureString "Password" -AsPlainText -Force)
This line not only creates a user named «NewUser» but does so securely by converting the password into a secure string.
Invoke-PowerShell: Mastering Command Execution Effortlessly
Scripting with PowerShell
Introduction to PowerShell Scripting
PowerShell scripting opens the door for automation, enabling the execution of a series of commands without user intervention. It’s beneficial for running repetitive tasks and troubleshooting issues effectively.
Creating Your First PowerShell Script
To create a simple script:
- Open Notepad or any text editor.
- Write your desired commands.
- Save the file with a `.ps1` extension.
Here’s a basic script example that lists files in a directory:
# Simple PowerShell Script
$files = Get-ChildItem "C:\MyFolder"
foreach ($file in $files) {
    Write-Host $file.Name
}
This script retrieves all files and directories in ‘C:\MyFolder’ and prints the names to the console.
PowerShell Windows Toolbox: Essential Commands Simplified
Advanced PowerShell Concepts
Variables and Data Types
Understanding variables is essential in PowerShell. You can define variables to store values, which can then be reused. For instance:
$message = "Hello, PowerShell!"
Write-Host $message
This script defines a variable called `$message` and displays its contents.
Conditional Logic and Loops
Control flow can be managed using `if-else` statements and loops such as `For`, `Foreach`, and `While`. An example is:
$count = 1
while ($count -le 5) {
    Write-Host "Count: $count"
    $count++
}
This code snippet will output the numbers from 1 to 5, demonstrating basic loop functionality within PowerShell scripting.
Functions in PowerShell
Creating functions allows for encapsulation and code reusability. Here’s how to define a simple function:
function Get-Greeting {
    param($name)
    return "Hello, $name!"
}
Get-Greeting -name "World"
This defines a function that takes a parameter and returns a greeting, showcasing modular coding practices.
Open PowerShell Window Here: Your Shortcut to Efficiency
PowerShell Best Practices
Optimizing Performance
When writing PowerShell scripts, keep performance in mind. Avoid expensive operations within loops whenever possible, and leverage built-in cmdlets that are optimized for speed.
Security Practices
Understanding execution policies is vital for security. You can set execution policies using:
Set-ExecutionPolicy RemoteSigned
This command allows scripts created locally to run while ensuring that scripts downloaded from the internet are signed by a trusted publisher.
Mastering the PowerShell Windows Update Command Effortlessly
Troubleshooting Common Issues
Debugging Scripts
When working with scripts, debugging is essential. PowerShell provides tools like `Write-Debug` to glean insights into your script’s execution. Always incorporate error handling to manage unexpected behaviors effectively.
Finding Help
Don’t hesitate to refer to PowerShell’s built-in help system. You can quickly obtain help on any command using:
Get-Help Get-Process
This command will provide you with detailed information about the `Get-Process` cmdlet, including its syntax and examples.
Set Window Title in PowerShell: A Quick Guide
Conclusion
In summary, Windows PowerShell for Windows 7 serves as a powerful tool for task automation and system management. Its cmdlets, scripting capabilities, and robust debugging systems empower users to efficiently navigate the Windows operating system. Through practice and exploration of its features, users can unlock the full potential of PowerShell to streamline their daily tasks and enhance productivity.
PowerShell: List Windows Updates Made Easy
Additional Resources
Whether you are looking to deepen your understanding or stay up to date with PowerShell developments, a wide array of resources is available—from books to online tutorials and community forums. Engaging with these resources is essential for any PowerShell user at any level.
Товарищи, добрый день. Так как у меня появились несколько идей для написания будущих статей, я решил немного подготовить сайт. В будущем, нам скорее всего понадобится инструмент PowerShell, который уже сейчас превосходит по возможностям стандартную командную строку, но все равно развивается параллельно ей. Подробнее лучше прочитать на википедии, а у нас практические знания, поэтому переходим к инструкции. И снова у нас несколько способов:
- Через меню «Пуск»
- Через командную строку
- Через проводник
- Заменой командной строки в контекстном меню «Пуск» (только современные операционные системы)
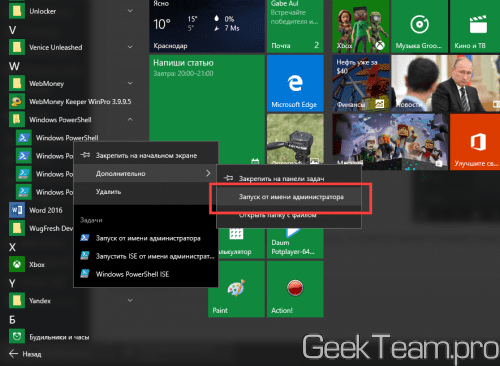
Самый популярный способ у нас будет первым, для Windows 10: открываем меню «Пуск» → «Все программы» → ищем каталог «Windows PowerShell» и выбираем файл нужной разрядности. На 32 битных системах будет только 32 битный исполняющий файл.
Если необходим PowerShell с правами администратора, то кликаем правой клавишей мыши по файлу, выбираем «Дополнительно» и жмем «Запуск от имени администратора».
Для Windows 8.x и старше: Открываем меню «Пуск» → открываем раздел «Все программы» → листаем до раздела служебные и открываем Windows PowerShell этот сриншот сделан на 32 битной системе и здесь уже видно, что файл будет только один.

Запуск от имени администратора по тому же сценарию, правой клавишей по файлу и выбираем «Запустить от имени администратора»

2. Запуск PowerShell через командную строку
Да, для любителей нестандартных путей, тоже способ есть)) Много способов запуска командной строки описаны здесь. Здесь же я опишу способ, который подходит для современных операционных систем. Нажимаем правой клавишей мыши по углу пуск или жмем Win+X, а в открывшемся меню выбираем подходящую командную строку. Если вам необходим PowerShell с правами администратора, то выбираем и командную строку с правами администратора.
В открывшееся окно вводим powershell и жмём Enter. После этого командная строка будет работать полностью как Windows PowerShell.

3. Запуск Windows PowerShell через окно проводника Windows.
Открываем проводник и переходим в одну из папок:
a) 64bit PowerShell если стоит 64 битная система или 32bit PowerShell, если стоит 32 битная система
C:\Windows\System32\WindowsPowerShell\v1.0
b) 32bit PowerShell на 64 битных системах находится в папке:
C:\Windows\syswow64\Windowspowershell\v1.0
Можно просто вставить ссылку в адресную строку.
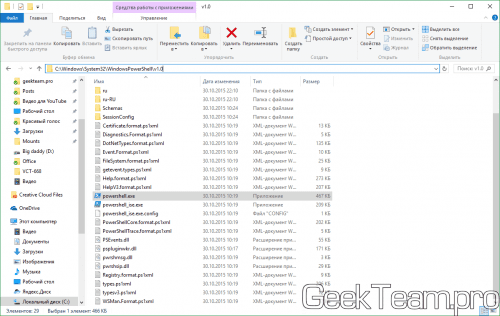
Если вам нужен PowerShell с обычными правами, просто запускаем выделенный файл. Если же с правами администратора, жмём правой клавишей мыши и выбираем «Запуск от имени администратора».

4. Замена командной строки на PowerShell в контекстном меню «Пуск».
Вот во втором способе, мы использовали контекстное меню «Пуска» и там по-умолчанию добавлена командная строка. Это можно исправить. Скажем для системных администраторов, все чаще нужен PowerShell, вместо командной строки и вместе с добавлением контекстного меню, Microsoft добавили возможность замены командной строки на Windows PowerShell. Для этого, необходимо кликнуть правой клавишей мыши по пустому месту на «Панели задач». И выбрать её «Свойства».
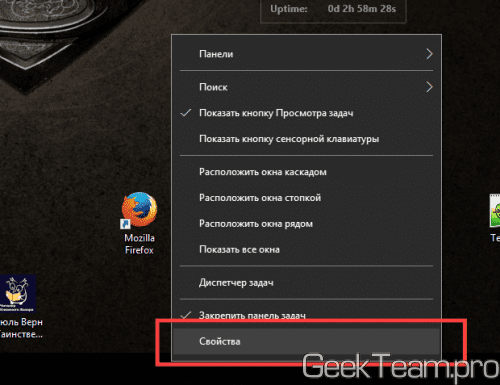
На вкладке «Навигация» ставим галочку на «Заменить командную строку оболочкой Windows PowerShell…» и жмём ОК.
Теперь в контекстном меню можно сразу же запускать Windows PowerShell.
Вроде всё. Надеюсь эта статья оказалась вам полезной, нажмите одну из кнопок ниже, чтобы рассказать о ней друзьям. Также подпишитесь на обновления сайта, введя свой e-mail в поле справа или подписавшись на группу во Вконтакте и канал YouTube.
Спасибо за внимание
Материал сайта geekteam.pro
Windows PowerShell — платформа автоматизации задач и управления конфигурацией, разработанная Microsoft. Очень часто данный инструмент используется при решении проблем с ОС. В этой статье мы расскажем о том, как запустить Windows PowerShell разными способами.
Источник: TechRepublic / Логотип PowerShell
PowerShell — это мощный инструмент, разработанный Microsoft для управления и автоматизации задач в операционных системах Windows.
В отличие от классической командной строки (CMD), PowerShell является более гибким, так как основан на .NET и поддерживает работу с объектами. Это делает его идеальным инструментом для администраторов, разработчиков и опытных пользователей, которые хотят упростить выполнение рутинных задач, автоматизировать сложные процессы и управлять настройками системы более эффективно.
PowerShell предоставляет доступ к сотням командлетов (cmdlets) — встроенных команд, предназначенных для выполнения различных действий, таких как управление файлами, настройка сетевых параметров, работа с реестром Windows и многое другое.
Перечислим основные особенности PowerShell:
- Основан на .NET, что позволяет ему работать с объектами, а не просто с текстом, как это делает CMD;
- Поддерживает использование командлетов (cmdlets) — специализированных команд, которые выполняют различные действия, от управления файлами до работы с учетными записями пользователей;
- Позволяет создавать и запускать сложные сценарии (скрипты), которые могут включать в себя логику обработки ошибок, условия и циклы;
- Поддерживает удаленное администрирование, что делает его полезным для управления серверами и удаленными машинами;
- Интеграция с облачными сервисами, такими как Microsoft Azure, делает PowerShell идеальным инструментом для DevOps-инженеров и системных администраторов.
Есть ли разница между PowerShell и «Терминалом Windows»?
Источник: ZDnet / Изображение Terminal в Windows
Хотя PowerShell и «Терминал Windows» (Windows Terminal) часто упоминаются вместе, это не одно и то же. Windows Terminal — это современное приложение, которое объединяет различные командные оболочки в одном окне, предоставляя улучшенный интерфейс и удобные функции.
Основные различия между PowerShell и Windows Terminal:
- PowerShell — это командная оболочка и язык сценариев, предназначенный для управления Windows и выполнения административных задач;
- Windows Terminal — это оболочка, которая позволяет работать с разными инструментами, включая PowerShell, командную строку (CMD) и подсистему Windows для Linux (WSL);
- В Windows Terminal можно запускать несколько вкладок с разными оболочками, использовать кастомизацию и настраивать параметры под свои нужды.
Чем отличаются PowerShell в Windows 10 и Windows 11?
С выходом Windows 11 PowerShell получил несколько улучшений, которые делают его работу более удобной и производительной. Основные отличия между PowerShell в Windows 10 и Windows 11:
- В Windows 11 PowerShell обновился до версии 7, которая является кроссплатформенной и поддерживает работу не только в Windows, но и в macOS и Linux;
- В Windows 11 PowerShell теперь по умолчанию работает через Windows Terminal, обеспечивая улучшенный пользовательский опыт;
- PowerShell 7 загружается быстрее и работает эффективнее, чем его предшественники;
- В новой версии улучшены существующие команды и добавлены новые возможности, например, улучшенная работа с потоками данных и API Windows;
- В Windows 11 PowerShell получил дополнительные механизмы защиты, такие как расширенные политики выполнения скриптов.
Эти изменения делают PowerShell в Windows 11 более мощным и удобным инструментом для администрирования и автоматизации.
Для чего используют PowerShell?

Источник: MakeUseOf / PowerShell с запущенными командами
PowerShell находит применение во многих сферах, особенно среди системных администраторов и разработчиков. Вот основные задачи, которые решаются с его помощью:
- PowerShell позволяет выполнять административные задачи без необходимости использования графического интерфейса. Например, можно массово изменять параметры учетных записей пользователей в Active Directory;
- Администраторы могут создавать, изменять и удалять учетные записи пользователей и групп в Windows;
- PowerShell позволяет просматривать и изменять параметры реестра, запускать и останавливать системные процессы и службы;
- Можно управлять IP-адресами, настраивать файрвол и проверять сетевое соединение с помощью специальных командлетов;
- PowerShell часто используется для установки, обновления и удаления программ на множестве компьютеров одновременно;
- Позволяет отслеживать логи системы и анализировать данные о сбоях и ошибках;
- PowerShell активно используется в DevOps-процессах для управления облачными ресурсами, например, в Microsoft Azure.
И, как мы отмечали в начале статьи, с помощью PowerShell можно выполнять различные команды, что описаны в руководствах. В том числе на нашем сайте.
Способы запуска PowerShell в Windows 10
Существует множество способов запуска PowerShell в Windows 10. К счастью, чаще всего достаточно пары действий, чтобы запустить платформу.
Поиск в меню «Пуск»
Источник: CQ / Windows 10
- Введите «PowerShell» в строке поиска и выберите соответствующий результат.
Запуск через «Выполнить» (Win + R)
Источник: CQ / Windows 10
- Нажмите Win + R, введите powershell и нажмите Enter.
Запуск через командную строку (CMD)
Источник: CQ / Windows 10
- Нажмите Win + R, введи cmd, затем напишите powershell и нажмите Enter.
Использование контекстного меню «Пуск» (Win + X)
Источник: CQ / Windows 10
- Нажмите Win + X и выберите «Windows PowerShell» или «Windows PowerShell (Администратор)».
Запуск из проводника Windows
Источник: CQ / Windows 10
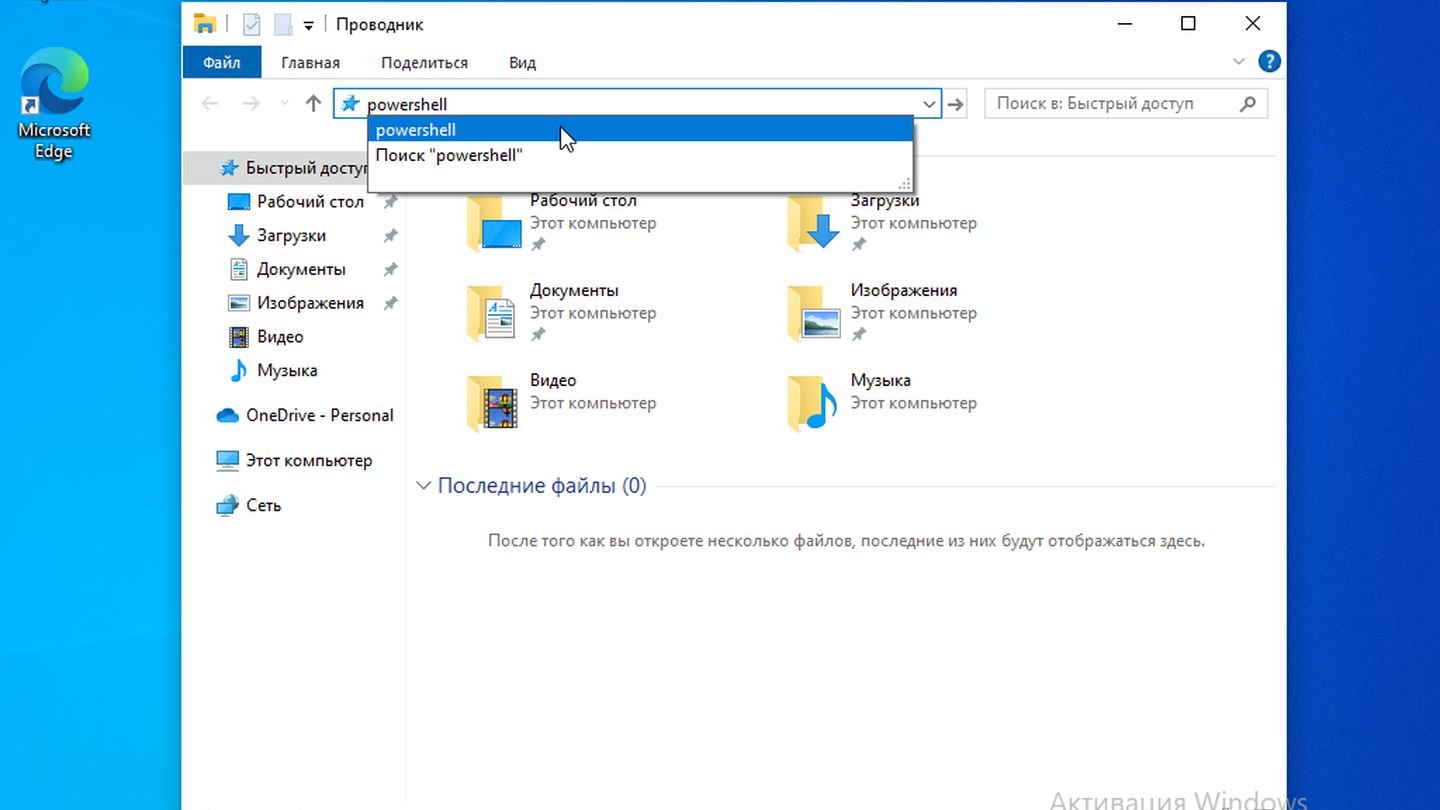
- Откройте любую папку, введите powershell в адресную строку и нажмите Enter.
Открытие через диспетчер задач
Источник: CQ / Windows 10
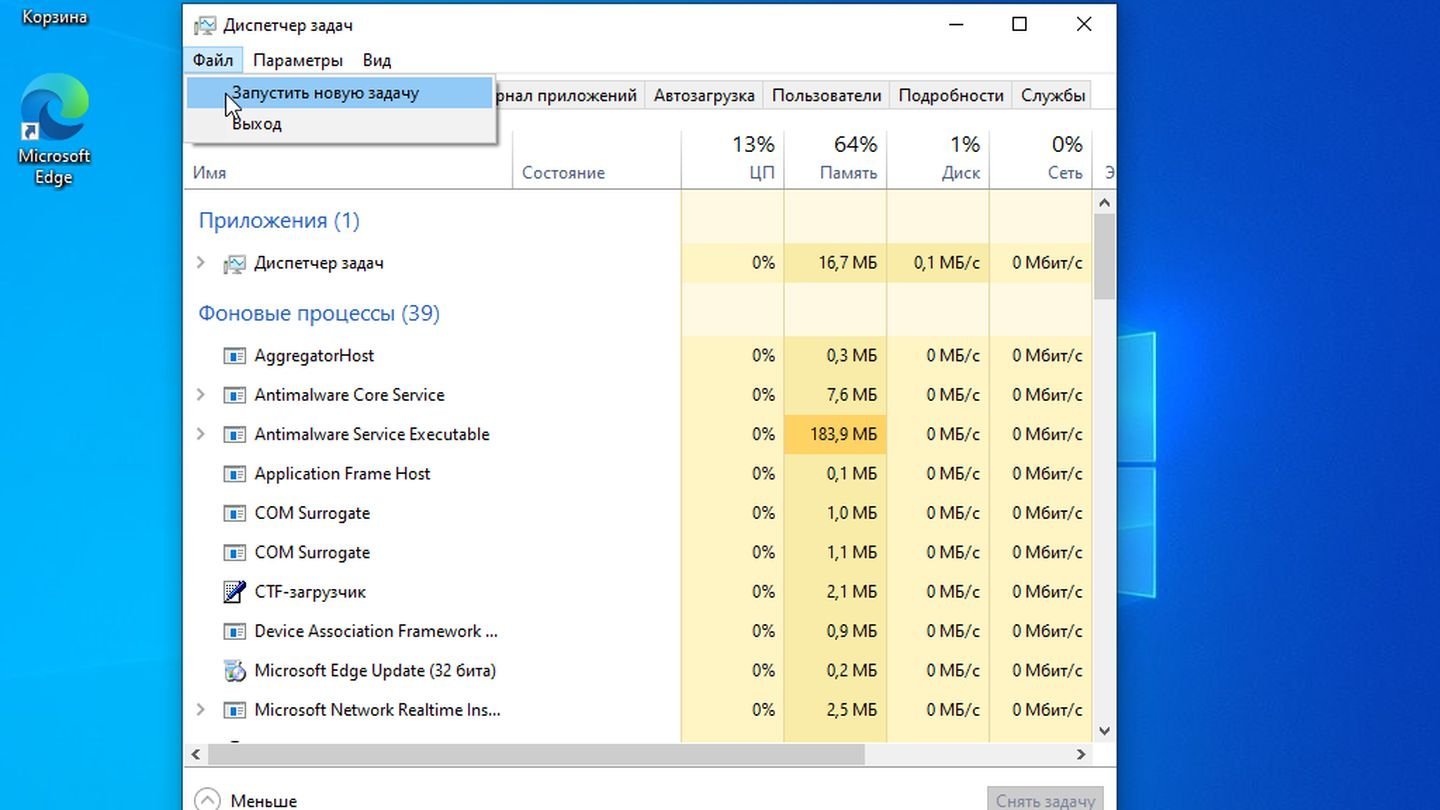
- Откройте диспетчер задач (Ctrl + Shift + Esc), выберите «Файл» → «Запустить новую задачу», введите powershell и нажмите Enter.
Создание ярлыка PowerShell

Источник: CQ / Windows 10
- Нажмите на пустое место на рабочем столе правой кнопкой → «Создать» → «Ярлык»;
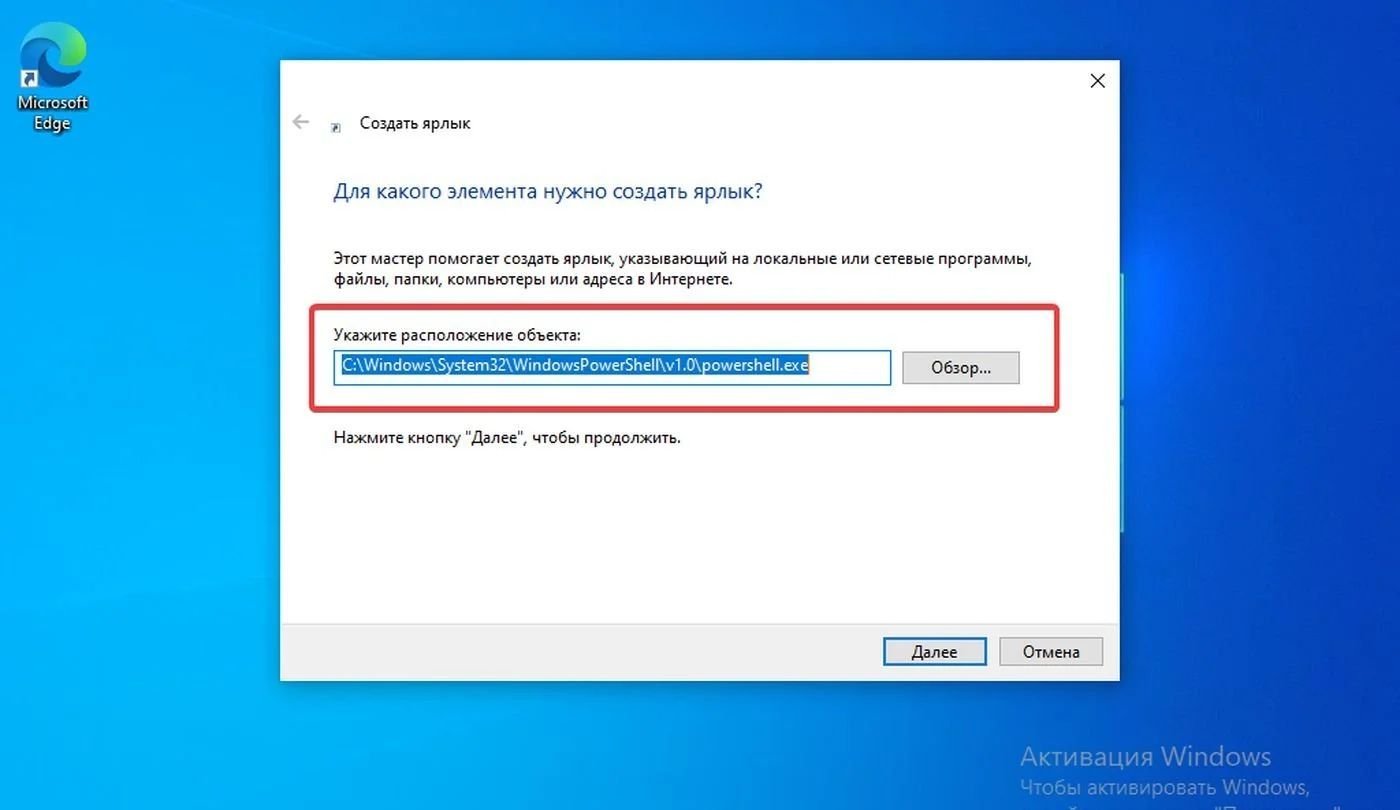
Источник: CQ / Windows 10
- Используйте путь: C:\Windows\System32\WindowsPowerShell\v1.0\powershell.exe.
Использование клавиш Win + Shift + правый клик

Источник: CQ / Windows 10
- Зажмите Shift, кликните правой кнопкой мыши в любой папке и выберите «Открыть окно PowerShell здесь».
Запуск через Windows Terminal
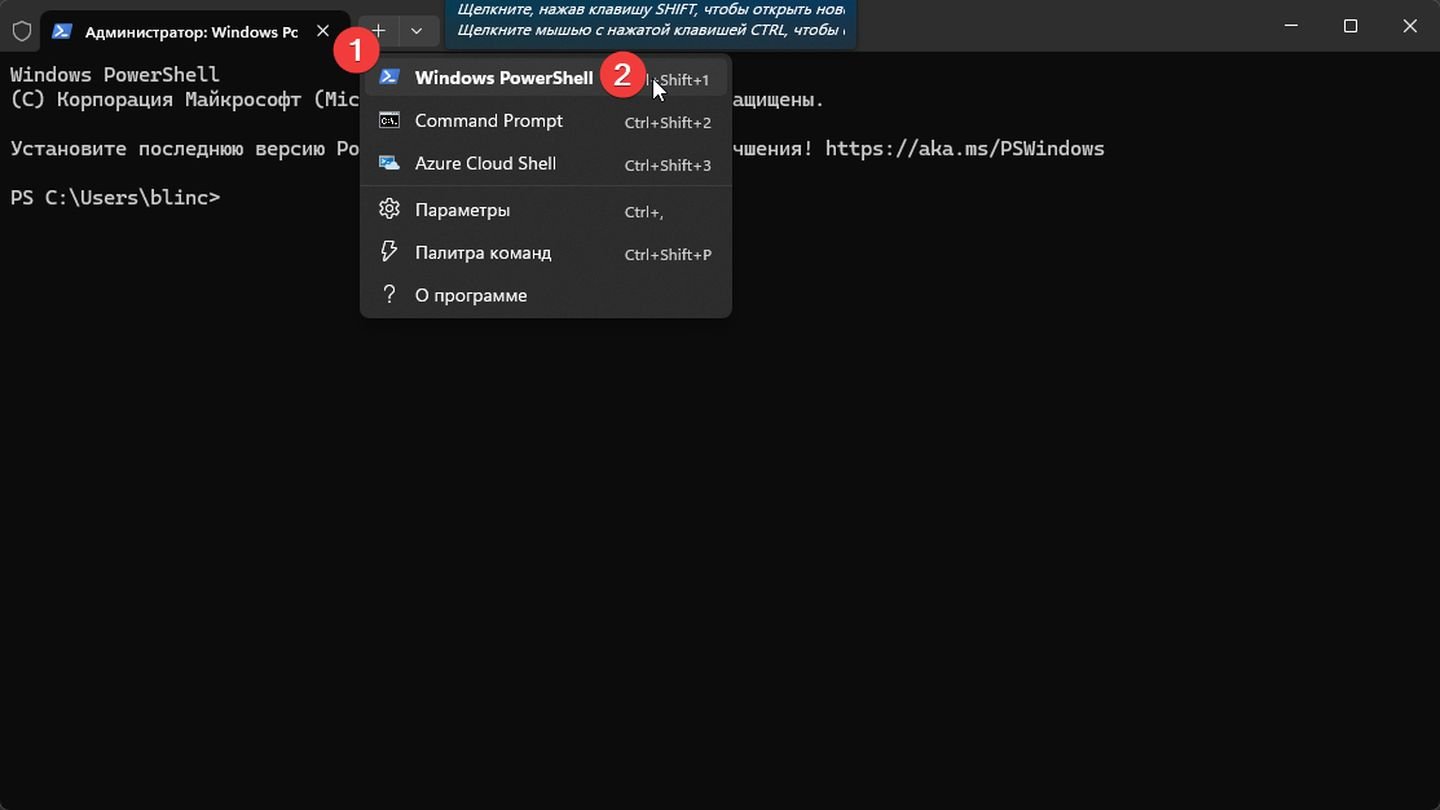
Источник: CQ / Windows 10
- Если у вас установлен Windows Terminal, его можно открыть и переключиться на вкладку PowerShell.
Использование Microsoft Store
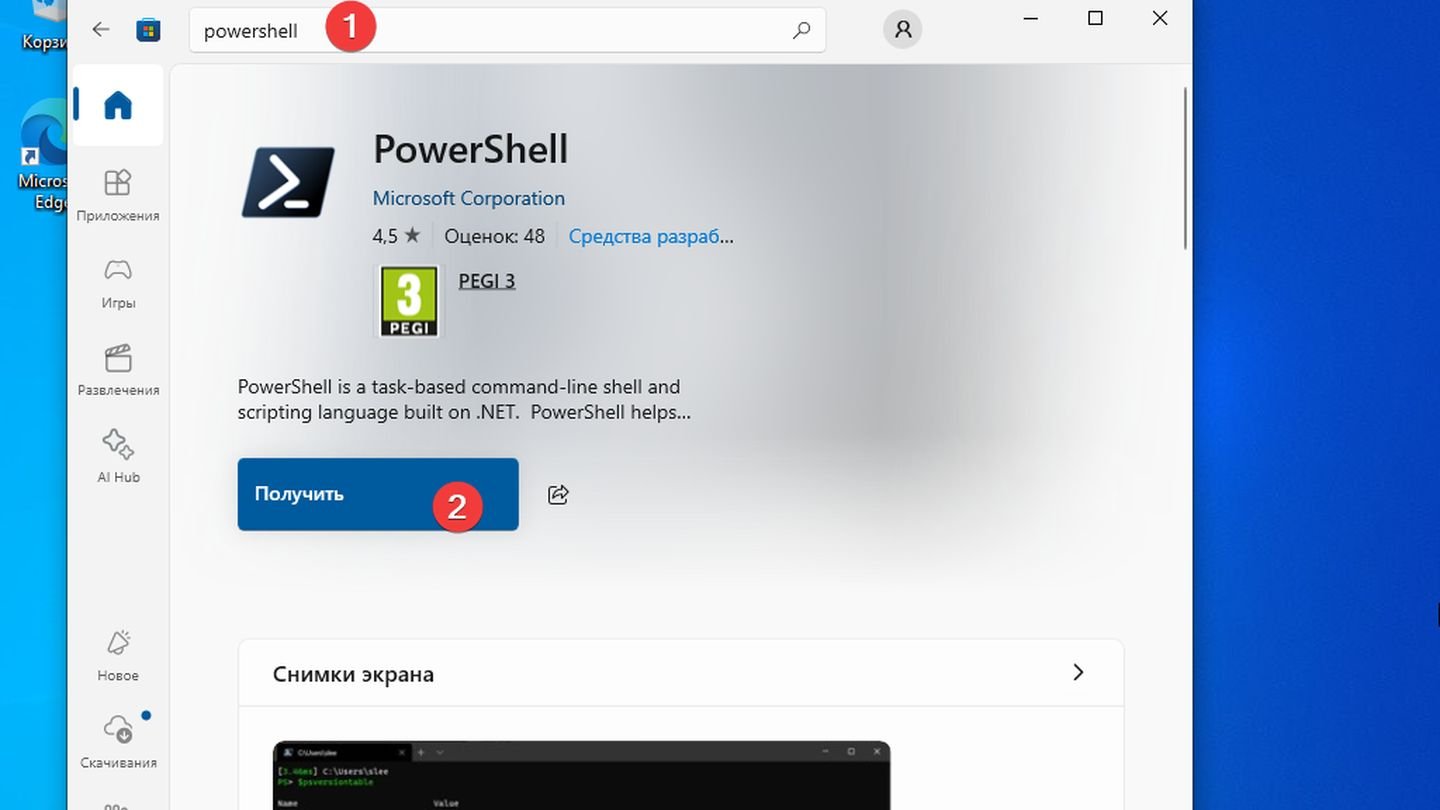
Источник: CQ / Windows 10
- В Windows 10 можно установить PowerShell 7 через Microsoft Store, а затем запускать его из меню «Пуск».
Запуск через папку PowerShell
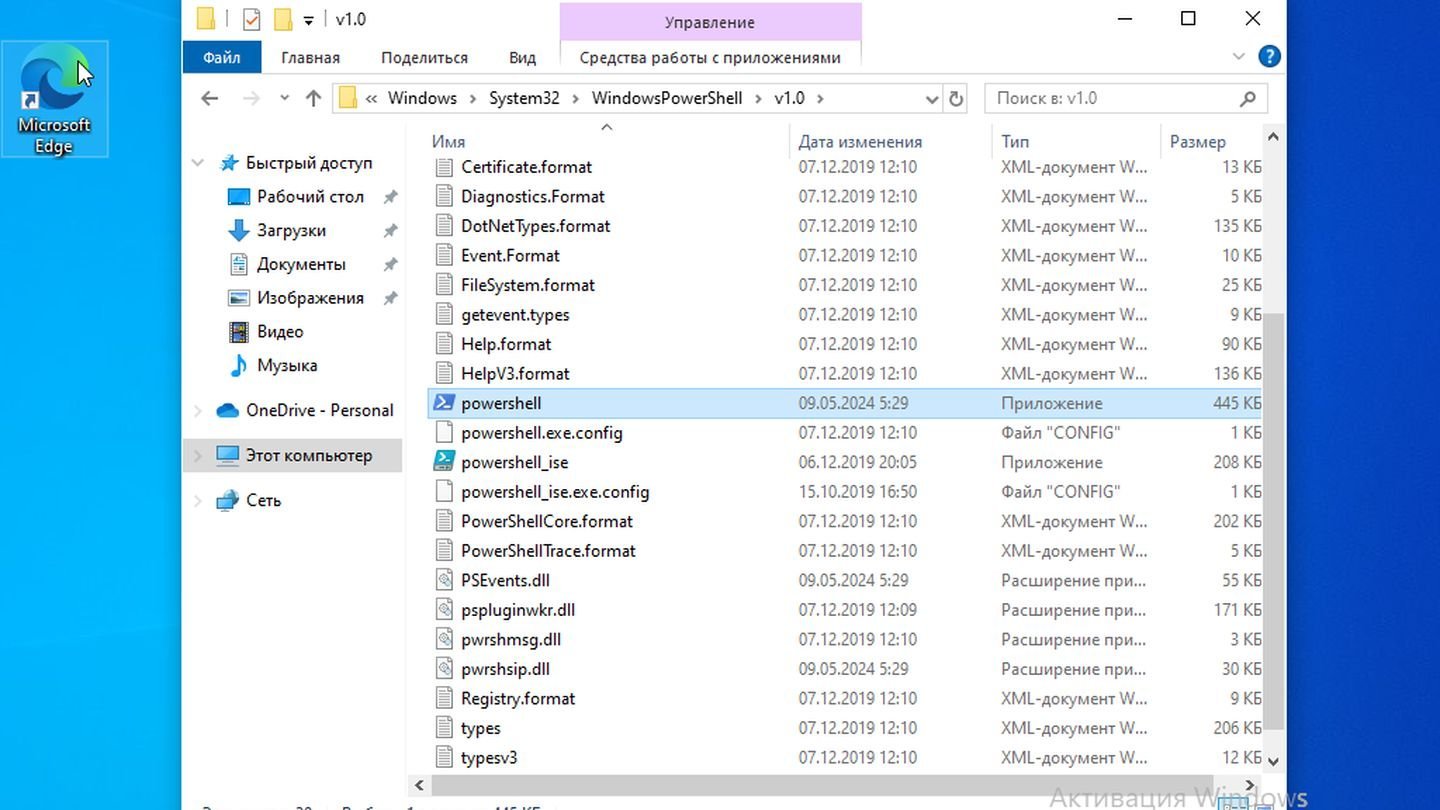
Источник: CQ / Windows 10
- Откройте «Мой компьютер» → Диск с установленной Windows (чаще всего C:/) и проследуйте по пути: C:\Windows\System32\WindowsPowerShell\v1.0\
Использование Планировщика задач
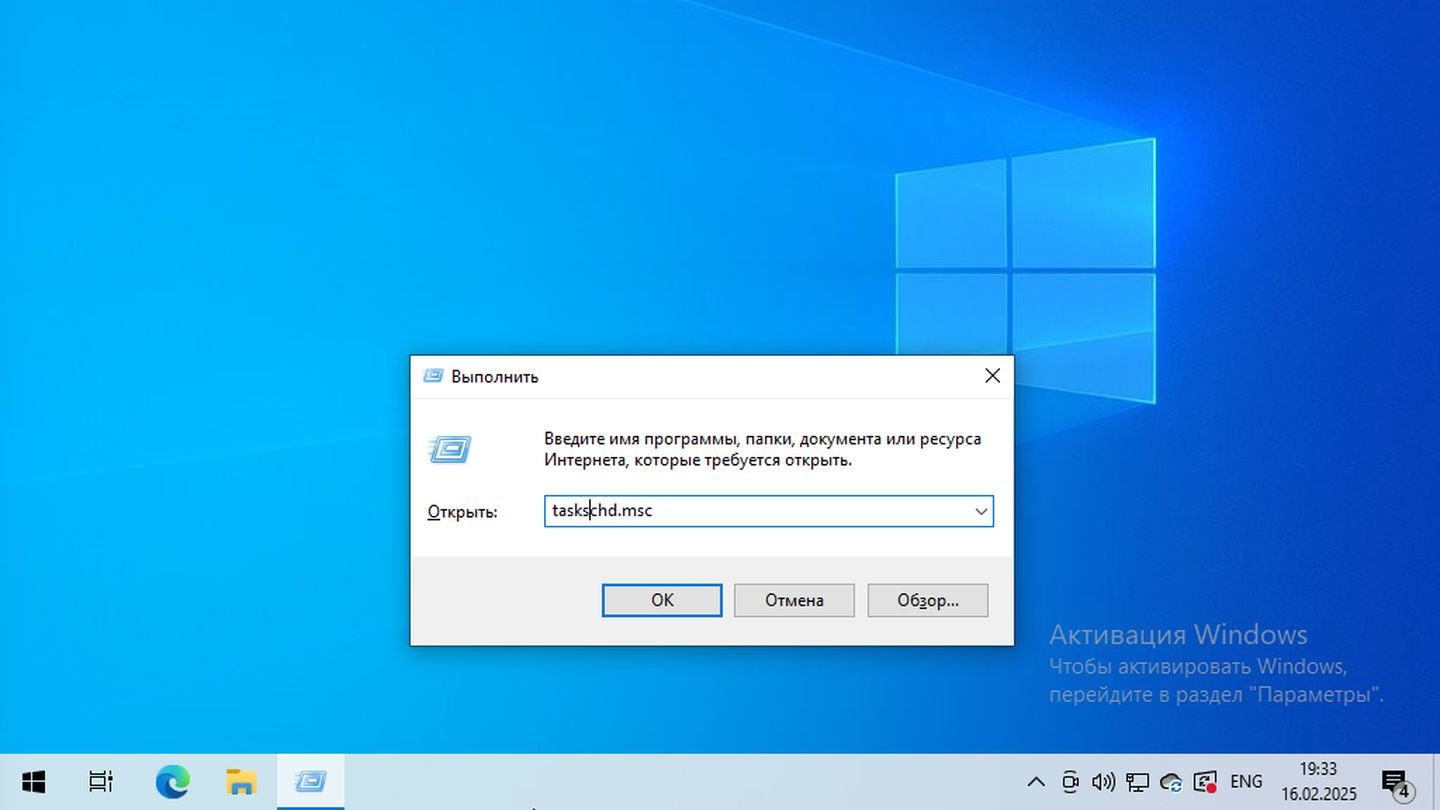
Источник: CQ / Windows 10
- Откройте «Планировщик заданий» (Task Scheduler) с помощью поиска Windows или через Win + R, введя taskschd.msc;

Источник: CQ / Windows 10
- В правой части окна нажмите «Создать простую задачу»;

Источник: CQ / Windows 10
- Введите имя задачи и краткое описание, затем нажмите «Далее»;
Источник: CQ / Windows 10
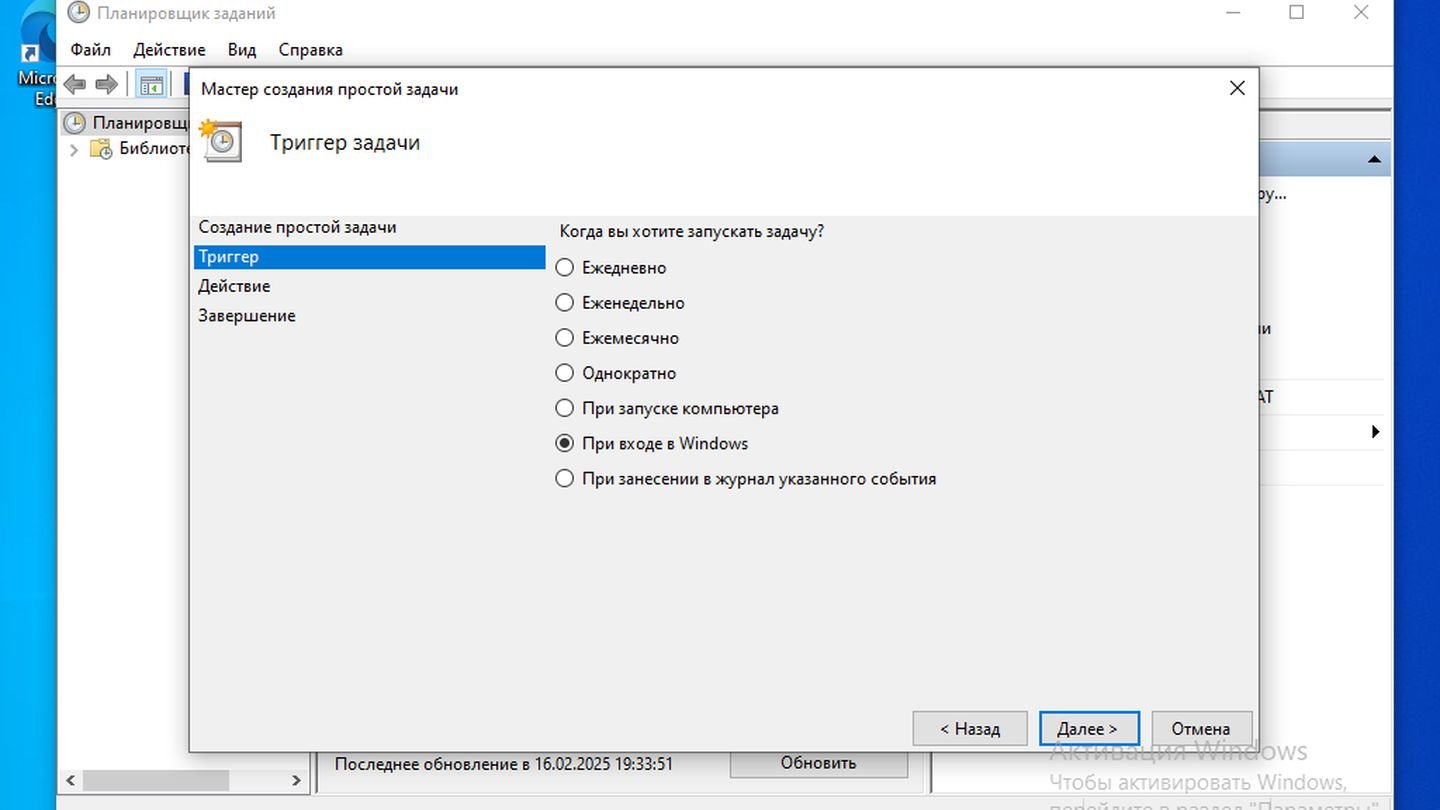
- Выберите, когда задача должна выполняться (например, при входе в систему или по расписанию);
Источник: CQ / Windows 10
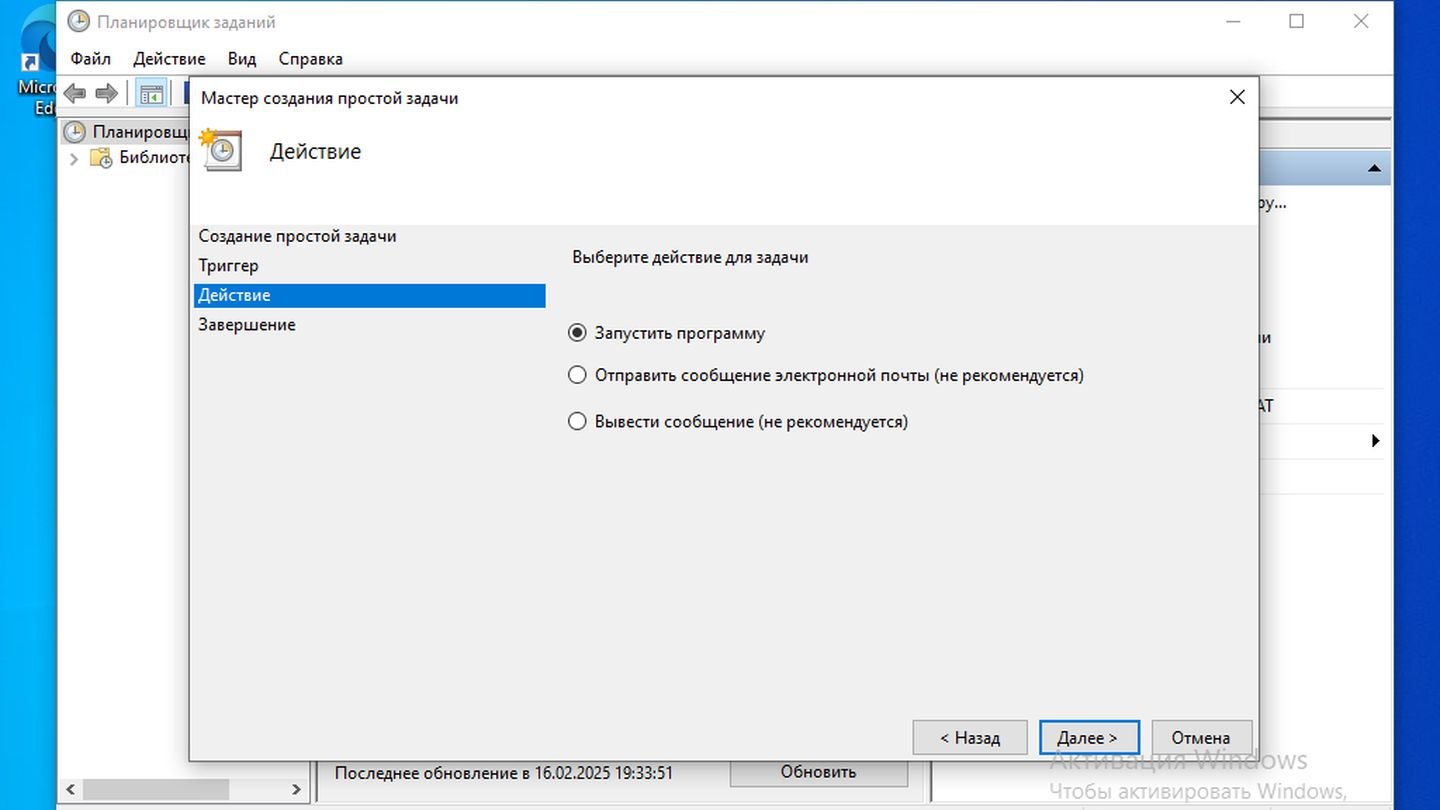
- Укажите, что задача должна выполнять — выберите «Запустить программу»;
Источник: CQ / Windows 10
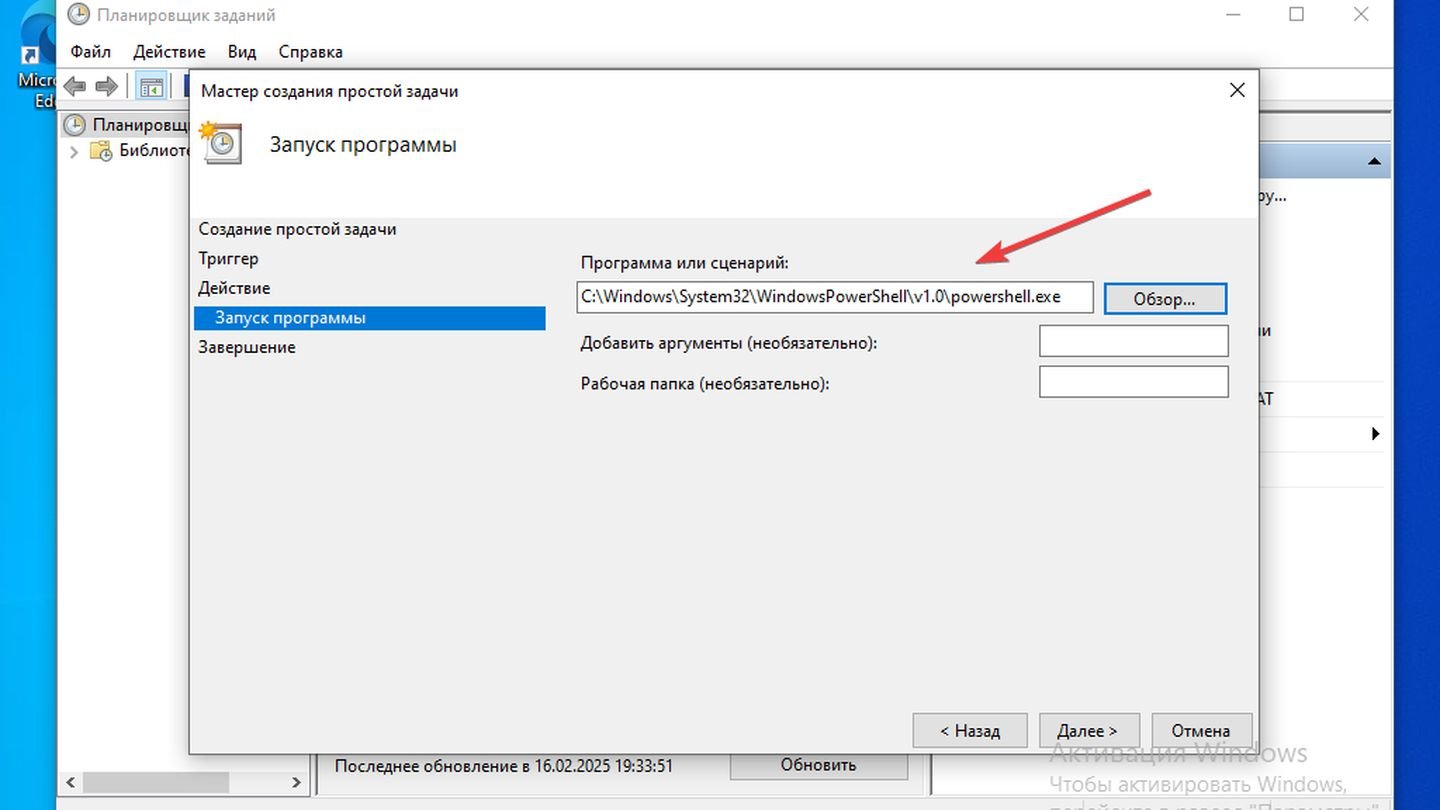
- В поле «Программа или сценарий» введите powershell.exe;
Нажмите «Далее» и завершите создание задачи. Проверьте, работает ли задача, выбрав ее в списке и нажав «Выполнить».
Заглавное фото: patrickjduffy
Читайте также:
- Как найти программу на компьютере с Windows 10
- Как исправить системные ошибки в Windows 10
- Как войти в безопасный режим в Windows 10 и 11
- Не открывается «Диспетчер задач» в Windows — как это исправить
- Как переустановить Windows 10
Download Article
Download Article
- Running PowerShell (Windows)
- Running PowerShell (Mac)
- Running PowerShell (Ubuntu)
- Using Basic PowerShell Commands
- Q&A
- Tips
|
|
|
|
|
PowerShell is a command-line shell used for task automation via a scripting language based on Microsoft’s .NET framework. PowerShell uses commands called cmdlets to integrate with scripts or applications. PowerShell is included natively with Windows and can be opened from the Run command, while Mac and Linux users will need to install it and run it through the Terminal. Once running, there are some basic cmdlets that you can use to familiarize yourself with PowerShell.
-

This will open a Run command window.
- If you don’t want to use the Run command, you can also search the Start menu for “PowerShell”.
- PowerShell is included with versions of Windows 7 or later.
-
Advertisement
-
A new PowerShell window will open.


Advertisement
-
-
You must be running OSX 10.11 or newer.
-
This is the rocket icon in the bottom dock.
-
You can also find the Terminal in «Applications > Utilities».
-
A blank terminal window will appear.
-
A powershell prompt will appear with “PS” displayed. This means that powershell is running and you can use the Terminal to enter cmdlets.


Advertisement
-
-
PowerShell is available for Ubuntu 14.04 or 16.04. They have separate installers listed on the page.
-
You can hit ⊞ Win+Alt+T or click “Home” and search for “Terminal”.
-
You will be prompted to enter your computer password when using the “sudo” command. You may see a failure with unmet dependencies, but this will be resolved soon.
- The installer filename will look like “powershell_6.0.0-alpha.10-1ubuntu1.16.04.1_amd64.deb” or “powershell_6.0.0-alpha.10-1ubuntu1.14.04.1_amd64.deb” depending on which version of Ubuntu you are running.
-
This PowerShell configuration will complete.
-
A powershell prompt will appear and you can run cmdlets in the Terminal.


![Step 4 Enter “sudo dpkg -i [installer filename]” and hit ↵ Enter.](https://www.wikihow.com/images/thumb/5/5a/Run-Powershell-Step-13-Version-2.jpg/v4-460px-Run-Powershell-Step-13-Version-2.jpg)


Advertisement
-
On its own, this cmdlet will display all other cmdlets. You can narrow your search using modifiers.
- For example: “Get-Command Name *Disable*” will display only cmdlets with ‘disable’ in the name.
- All cmdlets are entered by typing them into the PowerShell window and hitting ↵ Enter.
-
This cmdlet will give you all the information regarding another cmdlet, most importantly syntax for how the target cmdlet is used.
- For example: “Get-Help Get-Process” will display all the usable information for the ‘Get-Process’ cmdlet.
-
Alone this will display a full list of processes running on your computer. With a modifier, you can single out processes coming from a specific application.
- For example: “Get-Process winword” will display all processes being run by Microsoft Word.
- Similarly, “Start-Process” can be used to launch an instance of an application/process.
-
This cmdlet needs an object ‘piped’ to it in order to be useful. This is done by adding a “|” between an object and the “Get-Member” cmdlet.
- For example: “Get-Process | Get-Member” will pipe the Get-Process cmdlet to Get-Member, and Get-Member will list all of the properties and methods you can utilize when scripting with Get-Process.
-
The criteria in Where-Object is set by using the following formatting: “{$_[object] [operator] [parameter] }”. Where-Object also needs an object piped to it.
- For example: “Get-Process | Where-Object { $_.name -eq “notepad” }” will run Get-Process with the limitation where the object’s name is equal to “notepad”.
- Other operators include: “-lt” (less than), “-gt” (greater than), “-le” (less than or equal to), “-ge” (greater than or equal to), “-ne” (not equal to), or “-like” (pattern matching).[1]
- Parameters using strings (words) must be enclosed in quotations marks. This is not necessary for integers (numbers).


Advertisement
Add New Question
-
Question
What is the main function of power shell?
Powershell is a coding program (for advanced users) and it is relative to CMD, but with admin all the time.
Ask a Question
200 characters left
Include your email address to get a message when this question is answered.
Submit
Advertisement
-
There are many more cmdlets that can be used with PowerShell to create automation scripts. Microsoft has a reference library containing detailed information for each cmdlet.
Thanks for submitting a tip for review!
Advertisement
About This Article
Thanks to all authors for creating a page that has been read 41,709 times.