
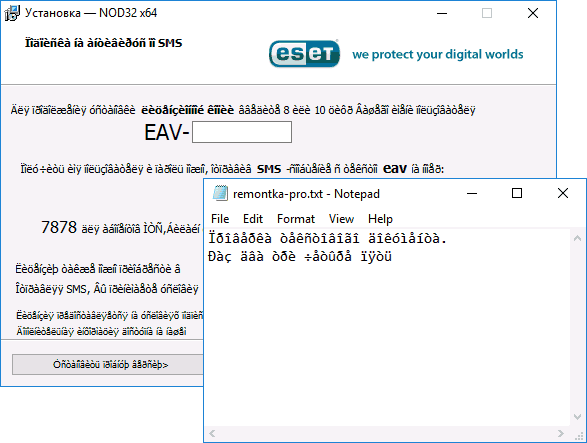
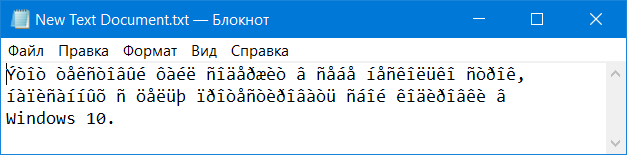
Одна из возможных проблем, с которыми можно столкнуться после установки Windows 10 — кракозябры вместо русских букв в интерфейсе программ, а также в документах. Чаще неправильное отображение кириллицы встречается в изначально англоязычных и не совсем лицензионных версиях системы, но бывают и исключения.
В этой инструкции — о том, как исправить «кракозябры» (или иероглифы), а точнее — отображение кириллицы в Windows 10 несколькими способами. Возможно, также будет полезным: Как установить и включить русский язык интерфейса в Windows 10 (для систем на английском и других языках).
Исправление отображения кириллицы с помощью настроек языка и региональных стандартов Windows 10
Самый простой и чаще всего работающий способ убрать кракозябры и вернуть русские буквы в Windows 10 — исправить некоторые неправильные настройки в параметрах системы.
Для этого потребуется выполнить следующие шаги (примечание: привожу также названия нужных пунктов на английском, так как иногда необходимость исправить кириллицу возникает в англоязычных версиях системы без нужды менять язык интерфейса).
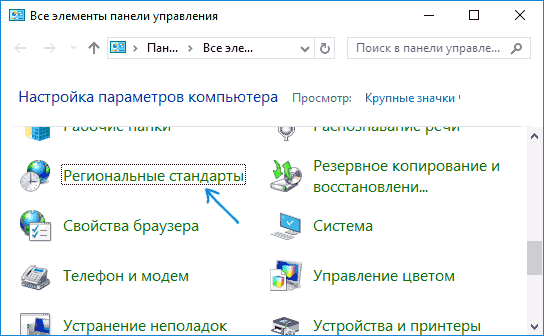
- Откройте панель управления (для этого можно начать набирать «Панель управления» или «Control Panel» в поиске на панели задач.
- Убедитесь, что в поле «Просмотр» (View by) установлено «Значки» (Icons) и выберите пункт «Региональные стандарты» (Region).

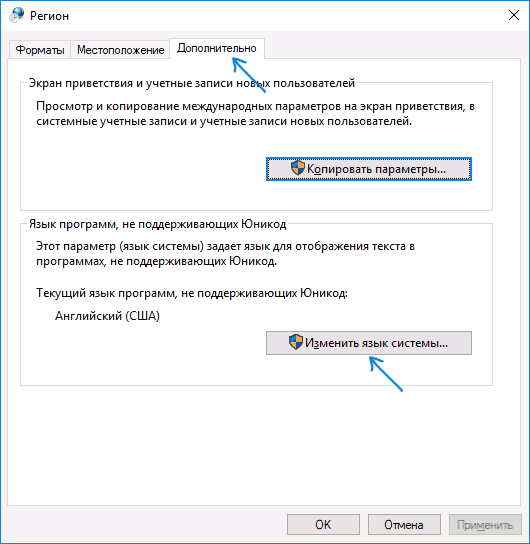
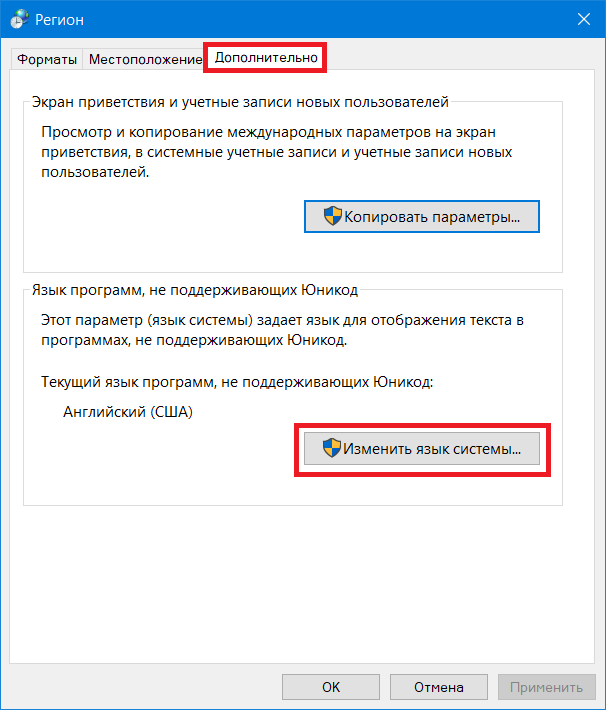
- На вкладке «Дополнительно» (Administrative) в разделе «Язык программ, не поддерживающих Юникод» (Language for non-Unicode programs) нажмите по кнопке «Изменить язык системы» (Change system locale).

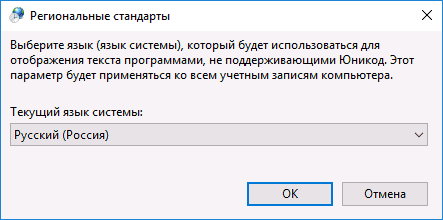
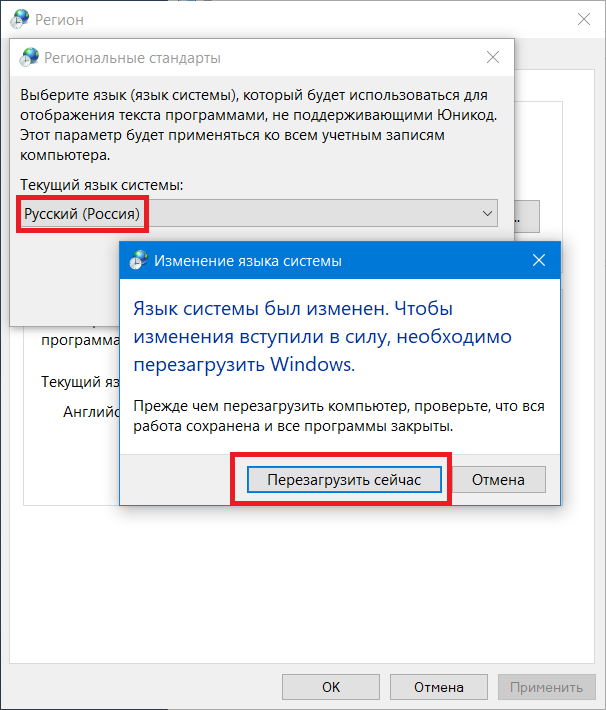
- Выберите русский язык, нажмите «Ок» и подтвердите перезагрузку компьютера.

После перезагрузки проверьте, была ли решена проблема с отображением русских букв в интерфейсе программ и (или) документах — обычно, кракозябры бывают исправлены после этих простых действий.

Как исправить иероглифы Windows 10 путем изменения кодовых страниц
Кодовые страницы представляют собой таблицы, в которых определенным байтам сопоставляются определенные символы, а отображение кириллицы в виде иероглифов в Windows 10 связано обычно с тем, что по умолчанию задана не та кодовая страница и это можно исправить несколькими способами, которые могут быть полезны, когда требуется не изменять язык системы в параметрах.
С помощью редактора реестра
Первый способ — использовать редактор реестра. На мой взгляд, это самый щадящий для системы метод, тем не менее, рекомендую создать точку восстановления прежде чем начинать. Совет про точки восстановления относится и ко всем последующим способам в этом руководстве.
- Нажмите клавиши Win+R на клавиатуре, введите regedit и нажмите Enter, откроется редактор реестра.
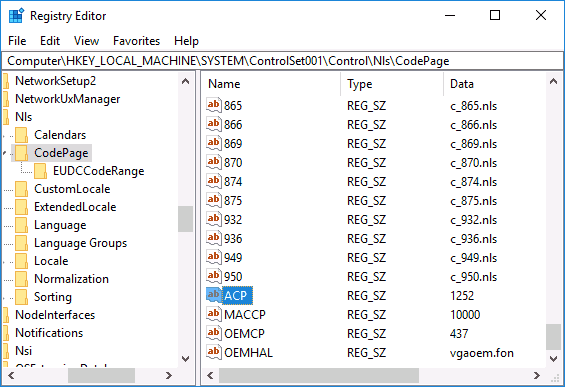
- Перейдите к разделу реестра
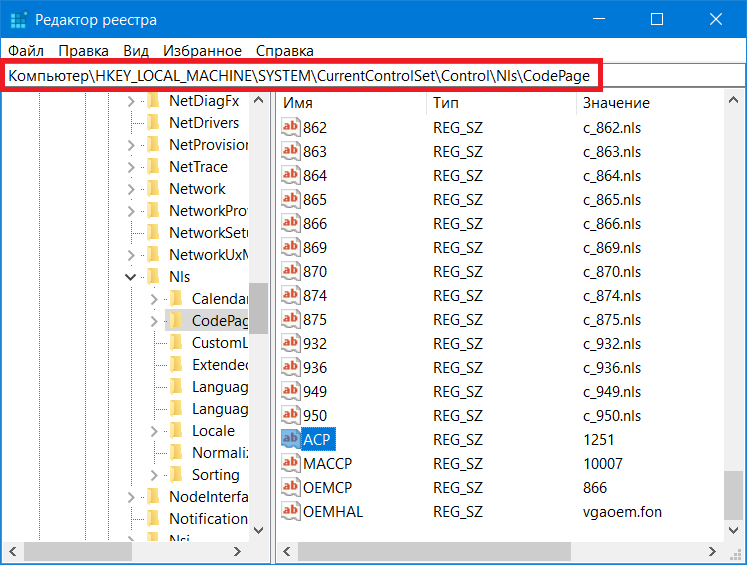
HKEY_LOCAL_MACHINE\SYSTEM\CurrentControlSet\Control\Nls\CodePage
и в правой части пролистайте значения этого раздела до конца.

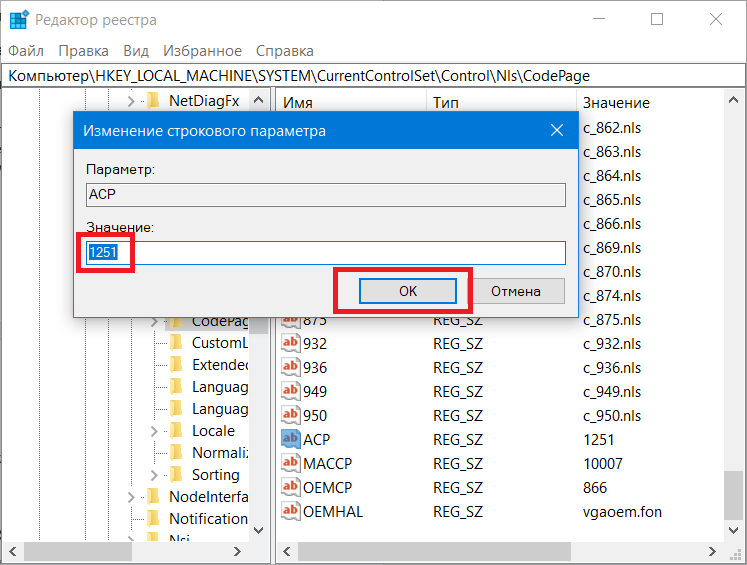
- Дважды нажмите по параметру ACP, установите значение 1251 (кодовая страница для кириллицы), нажмите Ок и закройте редактор реестра.
- Перезагрузите компьютер (именно перезагрузка, а не завершение работы и включение, в Windows 10 это может иметь значение).
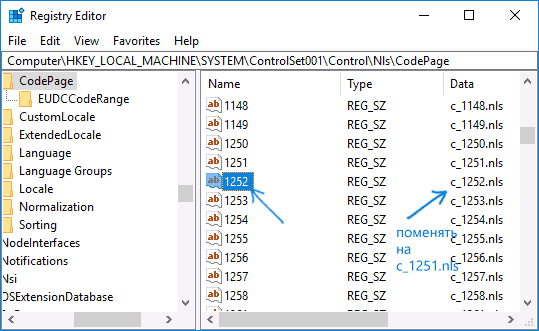
Обычно, это исправляет проблему с отображением русских букв. Вариация способа с помощью редактора реестра (но менее предпочтительная) — посмотреть на текущее значение параметра ACP (обычно — 1252 для изначально англоязычных систем), затем в том же разделе реестра найти параметр с именем 1252 и изменить его значение с c_1252.nls на c_1251.nls.
Путем подмена файла кодовой страницы на c_1251.nls
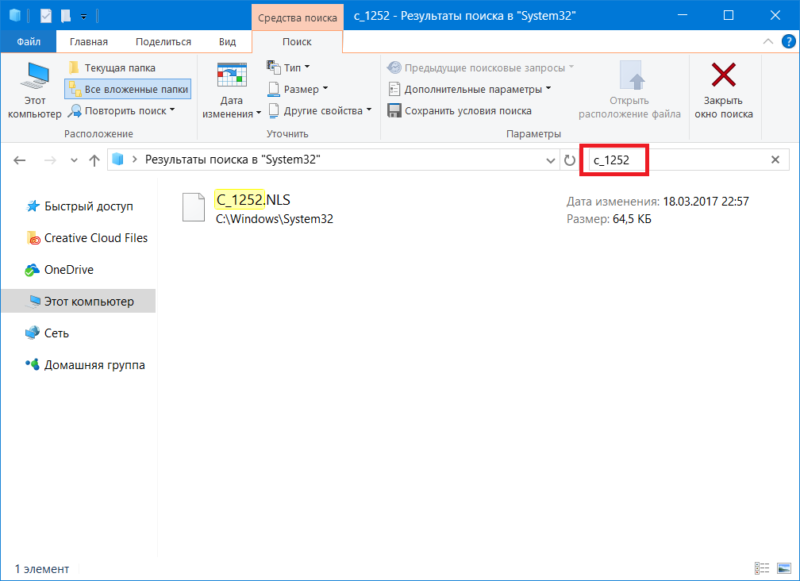
Второй, не рекомендуемый мной способ, но иногда выбираемый теми, кто считает, что правка реестра — это слишком сложно или опасно: подмена файла кодовой страницы в C:\ Windows\ System32 (предполагается, что у вас установлена западно-европейская кодовая страница — 1252, обычно это так. Посмотреть текущую кодовую страницу можно в параметре ACP в реестре, как было описано в предыдущем способе).
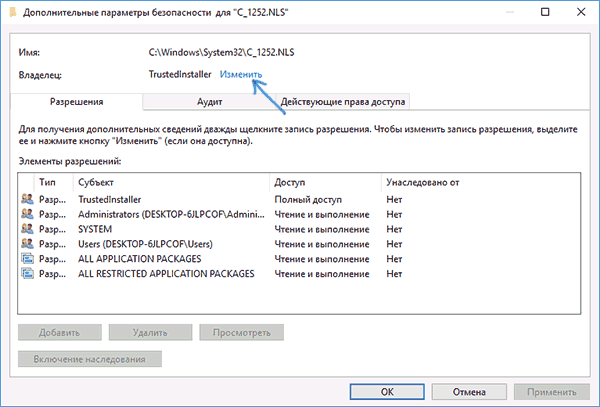
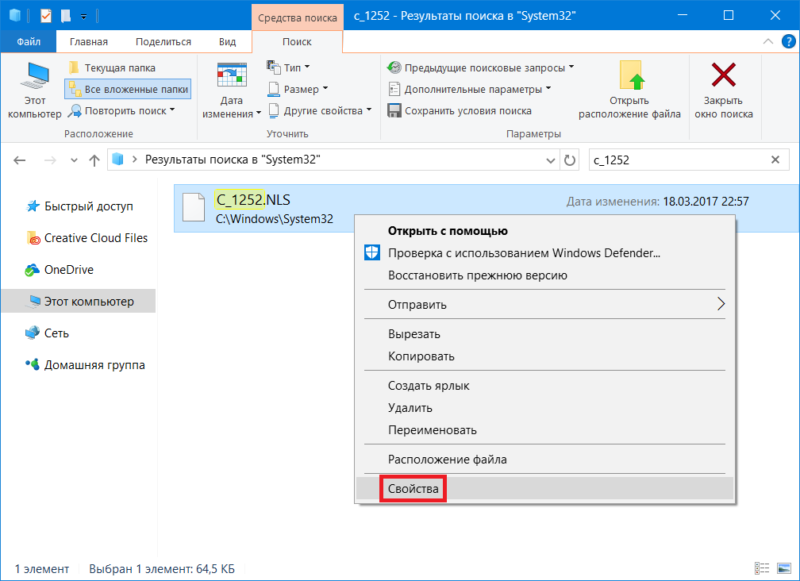
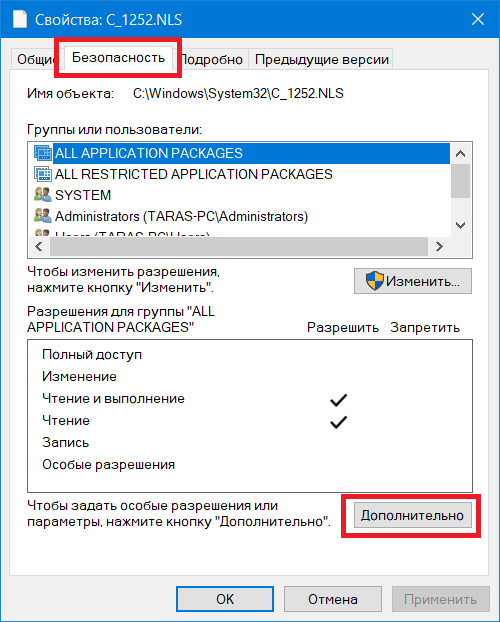
- Зайдите в папку C:\ Windows\ System32 и найдите файл c_1252.NLS, нажмите по нему правой кнопкой мыши, выберите пункт «Свойства» и откройте вкладку «Безопасность». На ней нажмите кнопку «Дополнительно».
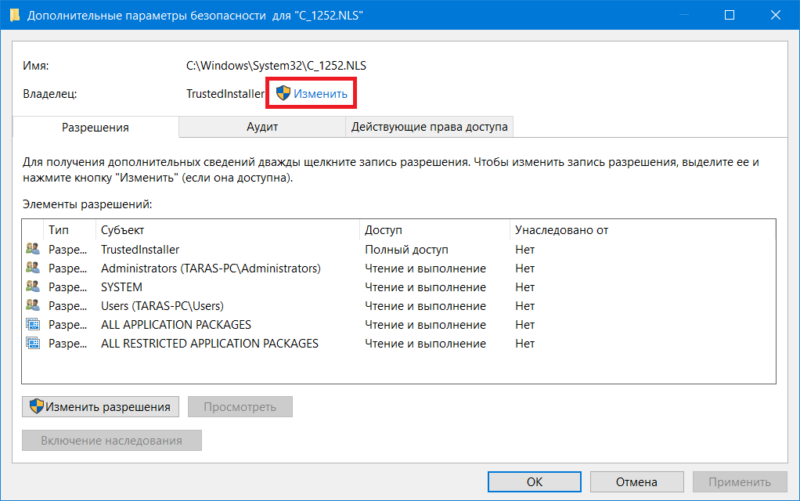
- В поле «Владелец» нажмите «Изменить».

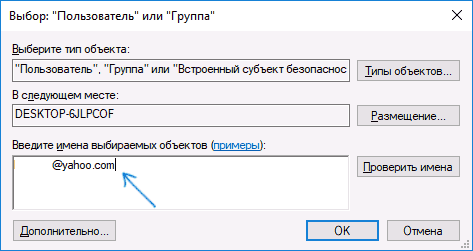
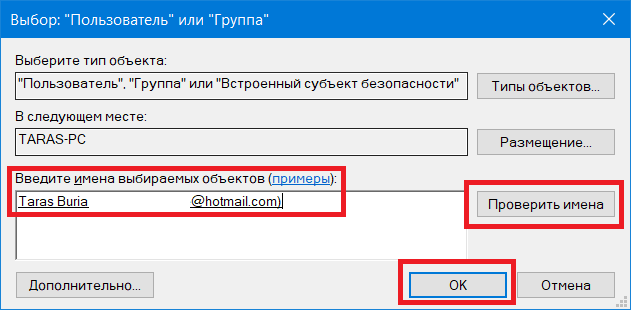
- В поле «Введите имена выбираемых объектов» укажите ваше имя пользователя (с правами администратора). Если в Windows 10 используется учетная запись Майкрософт, вместо имени пользователя укажите адрес электронной почты. Нажмите «Ок» в окне, где указывали пользователя и в следующем (Дополнительные параметры безопасности) окне.

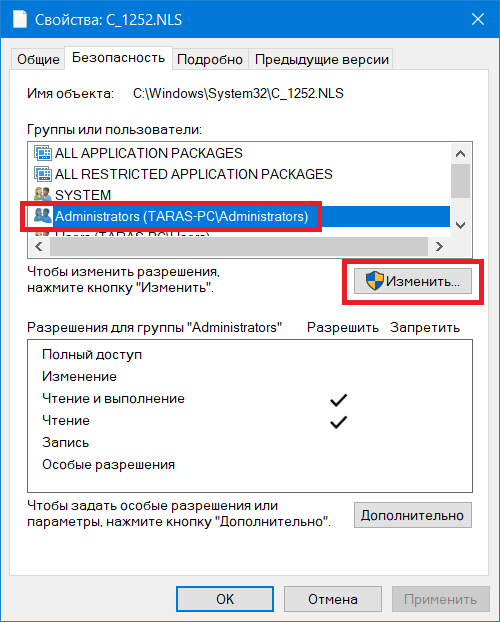
- Вы снова окажетесь на вкладке «Безопасность» в свойствах файла. Нажмите кнопку «Изменить».
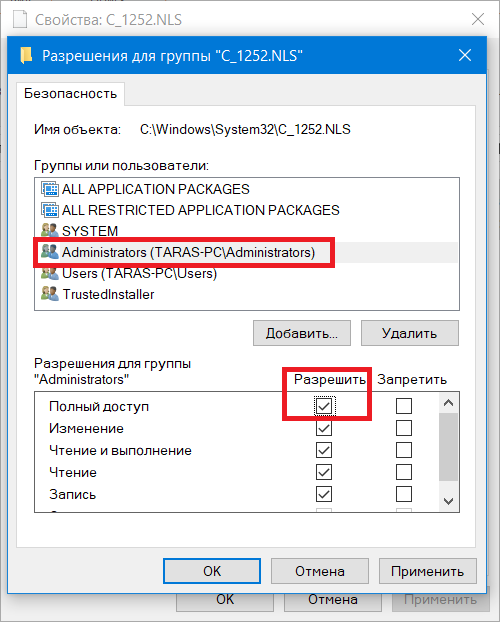
- Выберите пункт «Администраторы» (Administrators) и включите полный доступ для них. Нажмите «Ок» и подтвердите изменение разрешений. Нажмите «Ок» в окне свойств файла.
- Переименуйте файл c_1252.NLS (например, измените расширение на .bak, чтобы не потерять этот файл).
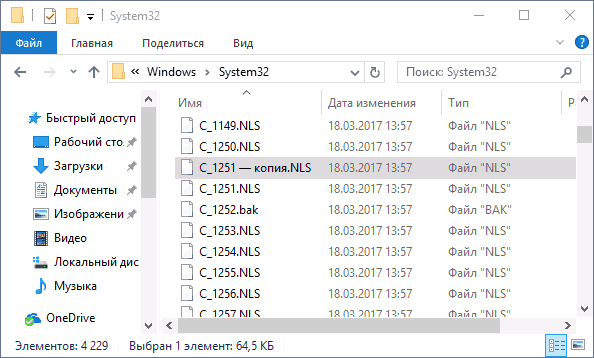
- Удерживая клавишу Ctrl, перетащите находящийся там же в C:\Windows\System32 файл c_1251.NLS (кодовая страница для кириллицы) в другое место этого же окна проводника, чтобы создать копию файла.

- Переименуйте копию файла c_1251.NLS в c_1252.NLS.
- Перезагрузите компьютер.
После перезагрузки Windows 10 кириллица должна будет отображаться не в виде иероглифов, а как обычные русские буквы.
Setting Utf-8 Encoding in Windows 10 allows users to ensure compatibility and proper display of international characters in their applications and documents. With the increasing globalization of communication, it is crucial to have the ability to view and work with text in different languages seamlessly. Utf-8, a widely adopted character encoding standard, offers comprehensive support for a vast range of languages, making it essential for anyone dealing with multilingual content.
To set Utf-8 Encoding in Windows 10, users can follow a straightforward process. First, open the Control Panel by searching for it in the Start menu. Then, navigate to the «Clock and Region» section and select «Region.» In the Region settings, go to the «Administrative» tab, and click on the «Change system locale» button. From there, choose Utf-8 as the default language for non-Unicode programs. By making this adjustment, users can ensure that their Windows 10 system supports Utf-8 encoding, enabling seamless interaction with diverse language content.
To set UTF-8 encoding in Windows 10, follow these steps:
- Open the Control Panel.
- Select «Region» or «Region and Language.»
- Click on the «Administrative» tab.
- Under «Language for non-Unicode programs,» click on «Change system locale.»
- Check the box for «Beta: Use Unicode UTF-8 for worldwide language support.»
- Click «OK» and restart your computer.
By following these steps, you’ll be able to set UTF-8 encoding in Windows 10 and ensure compatibility with international characters and languages.

Understanding Utf-8 Encoding
Utf-8 encoding is a character encoding standard that is commonly used for representing characters in the Unicode character set. It supports almost all characters from all human languages, making it widely used for international communication and data storage. In Windows 10, setting the Utf-8 encoding is crucial to ensure proper display of characters and compatibility with different applications and systems. This article will guide you through the process of setting Utf-8 encoding in Windows 10, empowering you to handle and work with various character sets seamlessly.
Checking Current Encoding Settings
Before diving into the process of setting Utf-8 encoding, it’s important to check the current encoding settings on your Windows 10 system. This will help you understand the current state and determine if any changes are required. Follow the steps below to check the current encoding settings:
1. Open the Control Panel by searching for it in the Windows search bar.
2. In the Control Panel, click on «Clock and Region» and then select «Region.»
3. In the Region window, go to the «Administrative» tab.
4. Under the «Language for non-Unicode programs» section, you will see the current system locale. Note down this information for reference.
Setting Utf-8 as the System Locale
If your current system locale is not Utf-8, you can change it to Utf-8 to enable proper Utf-8 encoding. Follow the steps below to set Utf-8 as the system locale:
1. Open the Control Panel by searching for it in the Windows search bar.
2. In the Control Panel, click on «Clock and Region» and then select «Region.»
3. In the Region window, go to the «Administrative» tab.
4. Under the «Language for non-Unicode programs» section, click on the «Change system locale» button.
5. In the Region Settings window, select «Beta: Use Unicode UTF-8 for worldwide language support» checkbox.
6. Click on «OK» to save the changes and restart your computer for the settings to take effect.
Testing Utf-8 Encoding
After setting Utf-8 as the system locale, it’s important to test whether the changes have been applied successfully. Follow the steps below to test Utf-8 encoding:
- Open a text editor or any application that allows you to input text.
- Type and save some text that includes characters from different languages, such as accents, diacritics, or non-Latin characters.
- Open the saved file and check if all the characters are displayed correctly without any gibberish or question marks.
- If all characters are displayed correctly, it means that Utf-8 encoding is working properly.
Modifying Utf-8 Encoding in Specific Applications
In some cases, you may encounter issues with Utf-8 encoding in specific applications, even after setting it as the system locale. This can happen if the application has its own character encoding settings that override the system settings. Here’s how you can modify Utf-8 encoding in specific applications:
1. Open the application in which you are facing Utf-8 encoding issues.
2. Look for the application’s language or encoding settings, usually found in the preferences or settings menu.
3. Select Utf-8 as the preferred encoding option.
4. Save the changes and restart the application if required.
Common Applications with Utf-8 Encoding Settings
Many popular applications have Utf-8 encoding settings that can be modified to ensure proper character display. Here are a few examples:
| Application | Location of Utf-8 Encoding Settings |
| Notepad++ | Settings > Preferences > New Document > Encoding |
| Sublime Text | View > Encoding |
| Visual Studio Code | File > Save with Encoding |
| Microsoft Office | Options > Advanced > General > File Locations > File Encoding |
| Browsers (Chrome, Firefox, etc.) | Settings > Advanced > Fonts and Encoding |
Using Utf-8 Encoding for Web Development
Utf-8 encoding plays a crucial role in web development, ensuring that websites can display and handle multilingual content properly. When working with web development tools and frameworks, it’s important to set Utf-8 encoding to ensure seamless language support. Here are some key points to remember when using Utf-8 encoding for web development:
- Set the « tag in the « section of your HTML files.
- Ensure that your server-side scripts and databases are also set to Utf-8 encoding.
- If using a content management system (CMS) like WordPress, check the encoding settings in the CMS admin panel.
- Validate and sanitize user input to prevent potential encoding-related security vulnerabilities.
Setting Utf-8 Encoding for File Opening
Besides setting Utf-8 as the system locale, you may also need to specify the encoding when opening specific files to ensure they are interpreted correctly. The steps below will guide you through the process of setting Utf-8 encoding when opening files:
1. Open the application used to open the file, such as a text editor.
2. In the application, locate the file opening or file import feature.
3. Look for an option related to encoding or character set. The terminology may vary depending on the application.
4. Choose Utf-8 or the appropriate encoding option from the available list.
5. Open the desired file with the specified Utf-8 encoding to ensure proper interpretation of the characters.
Conclusion
Setting Utf-8 encoding in Windows 10 is crucial for proper handling and display of multilingual content. By following the steps outlined in this article, you can ensure seamless support for characters from various languages and encoding standards. Whether it’s setting Utf-8 as the system locale, modifying encoding settings in specific applications, or using Utf-8 for web development, understanding and implementing Utf-8 encoding will enhance your experience in working with diverse character sets.

Setting Utf-8 Encoding in Windows 10
Utf-8 encoding is widely used to support international characters and symbols in various software applications, including Windows 10. To set Utf-8 encoding in Windows 10, follow these steps:
Using Registry Editor
1. Press Windows key + R to open the Run dialog box.
2. Type «regedit» and press Enter to open the Registry Editor.
3. Navigate to the following registry key: HKEY_LOCAL_MACHINE\SOFTWARE\Microsoft\Internet Explorer\Main\FeatureControl\FEATURE_BROWSER_EMULATION
4. Right-click on the empty space in the right pane and select «New» -> «DWORD (32-bit) Value».
5. Name the new value «iexplore.exe».
6. Double-click on the «iexplore.exe» value and set the «Value data» to 8888 (Hexadecimal).
Using Notepad
1. Open Notepad.
2. Click on «File» -> «Save As».
3. In the «Encoding» dropdown, select «Utf-8».
4. Choose the desired location and filename for your file, and click «Save».
With these simple
Key Takeaways: How to Set Utf-8 Encoding in Windows 10
- Open the Control Panel by searching for it in the Windows search bar.
- Click on «Clock and Region» and then select «Region» from the options.
- In the Region window, click on the «Administrative» tab.
- Under the «Language for non-Unicode programs» section, click on «Change system locale».
- Check the box next to «Beta: Use Unicode UTF-8 for worldwide language support».
Frequently Asked Questions
Here are some common questions about setting Utf-8 Encoding in Windows 10:
1. How do I change the encoding to Utf-8 in Windows 10?
To change the encoding to Utf-8 in Windows 10, follow these steps:
1. Open the Control Panel by searching for it in the Windows Start Menu.
2. Click on «Clock and Region» and then «Region».
3. In the «Formats» tab, click on «Additional settings».
4. In the «Code page conversion tables» section, select «Utf-8» from the drop-down menu.
5. Click «Apply» and then «OK» to save the changes.
2. Why is Utf-8 encoding important?
Utf-8 encoding is important because it supports a wide range of characters and symbols from different languages. It is a universal encoding standard that allows for seamless communication and compatibility between different systems and devices.
By using Utf-8 encoding, you ensure that your text is correctly displayed and interpreted across platforms, making it essential for international communication, website development, and data storage.
3. Can I change the encoding for specific files or folders?
Yes, you can change the encoding for specific files or folders in Windows 10. Follow these steps:
1. Right-click on the file or folder you want to change the encoding for.
2. Select «Properties» from the context menu.
3. In the «Properties» window, go to the «General» tab.
4. Click on the «Advanced…» button.
5. In the «Advanced Attributes» window, check the box next to «Utf-8» under «File Encoding».
6. Click «OK» to save the changes.
4. How can I check the current encoding of a file in Windows 10?
To check the current encoding of a file in Windows 10, follow these steps:
1. Right-click on the file and select «Properties».
2. In the «Properties» window, go to the «General» tab.
3. Under «Attributes», you will see the «Encoding» information.
5. Can I set Utf-8 as the default encoding in Windows 10?
Yes, you can set Utf-8 as the default encoding in Windows 10. Here’s how:
1. Open the Control Panel and click on «Clock and Region» and then «Region».
2. In the «Formats» tab, click on «Additional settings».
3. In the «Code page conversion tables» section, select «Utf-8» from the drop-down menu.
4. Click «Apply» and then «OK» to save the changes.
To summarize, setting UTF-8 encoding in Windows 10 is an important step to ensure compatibility and proper display of characters in various applications. By following the steps outlined in this article, you can easily change the default encoding settings and avoid any issues with text encoding in your system.
Remember, UTF-8 is a widely accepted and flexible encoding format that supports a wide range of characters from different languages. It is crucial for international communication, web development, and file sharing. Keeping your system’s default encoding as UTF-8 will ensure seamless interactions with texts from around the world.
You can change the default encoding in Windows 10 to one of the other common character encodings, such as ANSI or UTF-8. Most western computers use Windows-1252 as the default encoding, so any software you install will use this encoding. But this doesn’t make Windows-based software any less useful. UTF-16 uses the full eight bits of a byte, while ASCII only uses one-hundred-bits.
Character encodings come in a wide range of variations, and UTF-8 is the most popular standard. Windows 10 displays characters according to the locale they were created in. For example, if the user is in Australia, the system displays the c character as a tilde, which is a cedilla. Moreover, some programs don’t support Unicode, which makes it necessary to change the default encoding in Windows 10.
What is the Default Encoding in Windows? There are several ways to change this setting. The default character encoding in Western Europe and the US is CP-1252. Other Windows systems may use other encodings. To find out what your system uses, visit the Windows Character Encoding Guide. Otherwise, check the Help Center to see if you’re missing anything. It may be useful to check the compatibility list of your computer before changing it.
To change the encoding in Notepad, you can change the settings in the Registry Editor. If you prefer ANSI encoding, you can change the default encoding to UTF-8. By changing this setting, you can prevent the application from displaying unreadable text. However, you should be aware that registry manipulation requires Registry Editor. Make a backup copy of the Registry files and a System Restore point first.
How Do I Change My Encoding to ANSI?
You can change the encoding of Windows 10 by editing the Registry. The Registry editor is located in the Run command window. To start, type regedit and click OK. This will open the Registry editor. Then, select the Notepad registry key on the left side. Find DWORD (32-bit) value named iDefaultEncoding. Double-click the DWORD value to change its value to the desired value.
Windows is configured to use UTF-8 as its default character encoding. If you want to change it to another locale, you must reboot. After a restart, the new locale will be applied. To verify if ANSI files are being read, check user folders. You can also change the language of the System locale, which is the default language for non-Unicode programs.
UTF-8 is the default encoding for Notepad and Word. However, you can change it to ANSI or UTF-8 by manipulating the registry. To change the encoding, open the Registry Editor by pressing Windows Key + R or regedit. Next, change the Value data as 1 to change the default encoding to ANSI. Make sure you close the Registry Editor after changing the encoding.
How Do I Change File Encoding in Windows?
If you’re working in a particular region of the world, you’ll want to change the default file encoding on your Windows 10 machine to UTF-8. By default, Windows uses the UTF-8 character encoding, but you can change this in the Registry. To change this, click on the Default Encoding entry in the System Properties dialog box. Now, you’ll need to change the value of the UTF-8 key in the System Encoding field.
Changing the default file encoding in Windows 10 is actually very simple, and it’s a process that can be done with Notepad. You can change it to either UTF-8 or ANSI encoding. The change is effective immediately and prevents you from having to manually change encoding settings again. Open the Registry Editor and double-click on the DWORD (32-bit) value called iDefaultEncoding.
How Do I Know My System Encoding?
If you’re wondering, “How do I know my system encoding in Window 10?” there are a few options. First, check your keyboard layout. It might not be what you want. If your keyboard layout doesn’t fit your desired character set, you can use the “set-encoding” feature in Windows to change the encoding. You can also change the font size to increase its readable size.
What Character Encoding Does Windows Use?
What character encoding does Windows use? The answer varies between versions of Windows. Windows 3.1 and NT4 used the same codepage. Then, an update in 1998 added the euro and Zz characters to codepage 1252. Fonts with these characters would not display properly on Windows. Currently, Windows uses the ISO standard Latin-1 character set (called ISO 8859-1) which does not include control characters.
In most cases, the operating system will automatically switch between the two encodings, if there is a problem interpreting certain text. UCS-2 was created by the Unicode working group and used 16-bit code points and units. Windows NT 3.1 debuted with the 32-bit Windows API. However, support for the 8-bit encodings was still necessary. So, you may want to switch to a different encoding for your application.
If you want to use UTF-16 for the encoding, make sure your application uses this internally. If you don’t, you’ll run into problems with conversion, data loss, and compatibility. However, UTF-16 is recommended for new Windows applications. In addition, code pages are supported by Windows. If you don’t know which code page you should use, check out the UTF-8 and UTF-7 sections.
What Encoding is ANSI?
When talking about codepages, what is ANSI encoding? If you’re not sure, this is a common question and it will be helpful to learn how to change it. ANSI is a seven-bit character set, which is similar to US-ASCII. While most computer systems do not make a distinction between bytes and characters, some do. For example, Thai has a code page called 874. For those wondering, the codepage number 1258 is not the same as the one used by Windows.
The reason why ANSI encoding is so important is that it can handle a wide range of characters. However, because UTF-8 is so widely used, it is often the best choice for applications. If you want to use UTF-8 encoding on Windows 10, you need to enable it in the Settings menu. It’s easy to change the encoding using Notepad’s file format. Just navigate to File > Save As… and then select UTF-8 from the “Plain Text” menu.
Is ANSI And ASCII Same?
You may be wondering, “Is ANSI and ASCII the same in Windows 10?” You may have heard the two terms mentioned on the internet, but are they really the same? First, it’s important to understand the difference between the two character sets. ANSI is the standard character set used by Windows for many decades. It’s important to understand this because there are a few different ways to type a single digit, like 70 degrees Fahrenheit. You can also type this by holding the Alt key while pressing the 0176 key on the numeric keypad.
The ANSI code uses a bit structure similar to ASCII, but it’s much more extensive. ANSI uses eight bits to encode a character, while plain ASCII only supports a single byte of data. ANSI can represent up to 635,000 characters, making it a more popular option in the global software market. For that reason, Windows 10 users should make sure they install both character sets.
Learn More Here:
1.) Windows Help Center
2.) Windows – Wikipedia
3.) Windows Blog
4.) Windows Central
В данной статье пойдёт речь о кодировках в Windows. Все в жизни хоть раз использовали и писали консольные приложения как таковые. Нету разницы для какой причины. Будь-то выбивание процесса или же просто написать «Привет!!! Я не могу сделать кодировку нормальной, поэтому я смотрю эту статью!».
Тем, кто ещё не понимает, о чём проблема, то вот Вам:
А тут было написано:
echo Я абракадабра, написанная автором.
Но никто ничего не понял.
В любом случае в Windows до 10 кодировка BAT и других языков, не использует кодировку поддерживающую Ваш язык, поэтому все русские символы будут писаться неправильно.
1. Настройка консоли в батнике
Сразу для тех, кто пишет chcp 1251 лучше написать это:
assoc .bat = .mp4
Первый способ устранения проблемы, это Notepad++. Для этого Вам нужно открыть Ваш батник таким способом:
Не бойтесь, у Вас откроется код Вашего батника, а затем Вам нужно будет сделать следующие действия:
Если Вам ничего не помогло, то преобразуйте в UTF-8 без BOM.
2. Написание консольных программ
Нередко люди пишут консольные программы(потому что на некоторых десктопные писать невозможно), а кодировка частая проблема.
Первый способ непосредственно Notepad++, но а если нужно сначала одну кодировку, а потом другую?
Сразу для использующих chcp 1251 пишите это:
del C:\Program Data
echo Mne pofig
pause
Второй способ это написать десктопную программу, или же использовать Visual Studio. Если же не помогает, то есть первое: изменение кодировки вывода(Пример на C++).
#include <iostream>
#include <windows.h>
int main() {
SetConsoleCP(номер_кодировки);
SetConsoleOutputCP(номер_кодировки);
}
Если же не сработает:
#include <math.h> //Не забываем про библиотеку Math.
char bufRus[256];

char* Rus(const char* text) {
      CharToOem(text, bufRus);
      return bufRus
      }
int main {
    cout << "Тут пишите, что угодно!" << endl;
    system("pause")
    return 0
}
3. Изменение chcp 1251
Если же у Вас батник, то напишите в начало:
chcp 1251 >nul
for /f "delims=" %%A in ("Мой текст") do >nul chcp 866& echo.%%A
Теперь у Нас будет нормальный вывод в консоль. На других языках (С++):
SetConsoleOutputCP(1251)
//А тут добавляете тот цикл, который был в батнике
4. Сделать жизнь мёдом
При использовании данного способа Вы не сможете:
- Разрабатывать приложения на Windows ниже 10
- Спасти мир от данной проблемы
- Думать о других людях
- Разрабатывать десктопные приложения, так как Вам жизнь покажется мёдом
- Сменить Windows на версию ниже 10
- Ну и понимать людей, у которых Windows ниже 10
Установить Windows 10. Там кодировка консоли специально подходит для языка страны, и Вам больше не нужно будет беспокоиться об этой проблеме. Но у Вас появится ещё 6 проблем, и вернуться к предыдущей лицензионной версии Windows Вы не сможете.
В Windows 10 есть много различных языковых и региональных параметров, которые пользователь может настраивать соответственно своим предпочтениям. Часто бывает так, что владельцы компьютеров сталкиваются с некорректным отображением кириллических (русский, украинский и другие языки) шрифтов. Вместо нормальных знаков и русских букв почему-то отображаются крякозябры в Windows 10, делающие работу с операционной системой фактически невозможной. При этом сам язык системы может отображаться нормально, но попытка открыть текстовый файл или запустить приложение, в котором используется кириллический текст, приведет к весьма унылому результату:
Причиной этому является сбой кодировки операционной системы. Чинится все предельно просто и потребует от вас лишь несколько кликов и одну перезагрузку компьютера. При этом починка осуществляется как простым способом через Панель управления, так и более сложным через редактор реестра или подмену кодовых таблиц операционной системы. Мы рекомендуем использовать первый метод, так как в 99.99% случае проблема решается именно так.
Читайте также: Как изменить язык в Windows 10.
Примечание: вы не сможете исправить кракозябры в Windows 10, если ваша учетная запись не имеет прав Администратора. Позаботьтесь узнать пароль от учетной записи Администратора, либо убедитесь, что ваш профиль имеет принадлежащий уровень прав доступа (является учетной записью Администратора).
Как исправить кракозябры и иероглифы в Windows 10
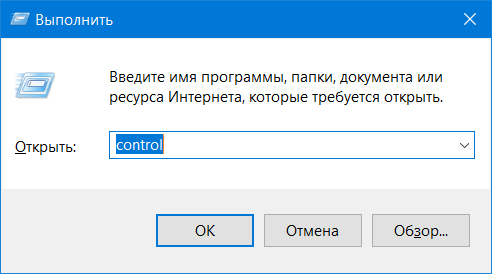
- Нажмите Win + R и введите control. Система откроет классическую Панель управления.

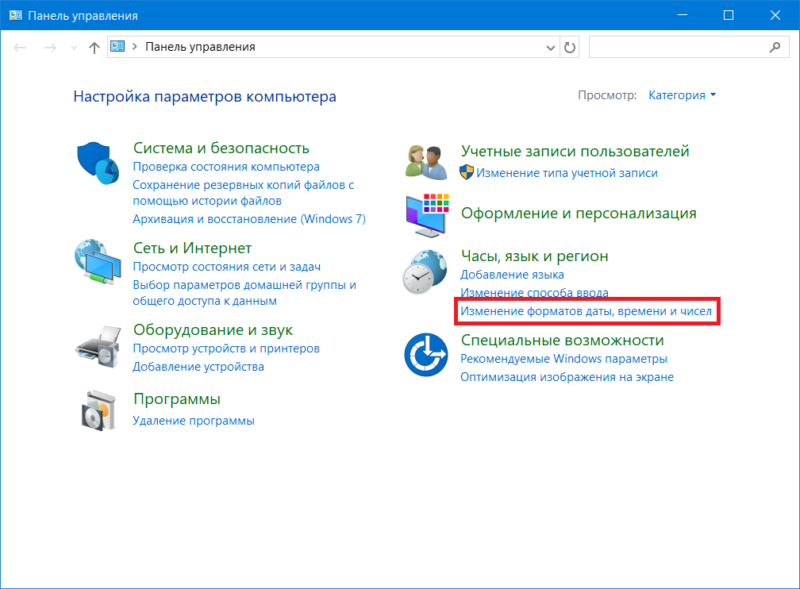
- На главной странице перейдите в группу Часы, язык и регион – Изменение форматов даты, времени и чисел.

- На открывшемся окне Регион откройте вкладку Дополнительно.

- Нажмите кнопку Изменить язык системы в секции окна Язык программ, не поддерживающих Юникод.
- В открывшемся окошке выберите из выпадающего списка необходимый вам язык, к примеру, Русский (Россия). Нажмите Ок.
- Windows предупредит вас, что необходимо перезагрузить компьютер, чтобы изменения вступили в силу. Согласитесь на перезагрузку сейчас и нажмите Перезагрузить сейчас.
После запуска компьютера текст должен отображаться как положено.
Как исправить кодировку в Windows 10 через редактор реестра
К вашему сведению: редактирование реестра всегда связано с определенными рисками навредить операционной системе. Внимательно следите за путями изменяемых ключей, делайте резервное копирование и проверяйте все дважды. Если вы не уверены, что сможете восстановить все обратно в случае поломки, лучше воздержите себя от редактирования реестра. Для перестраховки создайте резервную точку восстановления Windows 10.
- Нажмите кнопки Win + R и введите команду regedit. Она откроет встроенный в операционную систему Редактор реестра.
- Теперь вам надо перейти по адресу Компьютер\HKEY_LOCAL_MACHINE\SYSTEM\CurrentControlSet\Control\Nls\CodePage. Чтобы не тратить время на поиск нужной ветки, просто скопируйте адрес и вставьте в верхнюю адресную строку редактора (она доступна только на компьютерах с Windows 10 Creators Update и выше).

- Опуститесь в самый низ списка и дважды кликните на ключ ACP. Измените его значения на 1251. 1251 – это кодовое обозначение кириллической страницы.
- Нажмите Ок и перезагрузите компьютер.

После этого Windows 10 перестанет отображать иероглифы вместо текста.
Как исправить иероглифы в Windows 10 подменой файла кодовой страницы
Способ далеко не самый удобный, но тоже имеющий право на свое существование. В конце концов, вы сами решаете, каким образом чинить неполадки своего компьютера.
Обратите внимание: в этой инструкции показана подмена кодовой страницы 1252, которая отвечает за западноевропейскую кодировку. Если в системе используется другая кодовая страница, вам понадобится узнать ее номер. На случай, если вы не сможете это сделать, воспользуйтесь методами изменения кодировки Windows 10, которые описаны выше.
- Откройте Проводник и перейдите по адресу C:\Windows\system32. Воспользуйтесь поиском в правой верхней части окна, чтобы найти файл c_1252.NLS.

- Нажмите по нему правой кнопкой мыши и выберите Свойства.
- В окне свойств откройте вкладку Безопасность и затем кликните Дополнительно.

- Откроется окно изменения параметров безопасности для выбранного файла. В его верхней части нажмите Изменить.

- В новом окне пропишите адрес электронной почты вашей учетной записи (у нее должны быть права Администратора) и нажмите Проверить имена. Система должна отобразить полное имя пользователя и его адрес электронной почты. Нажмите Ок.

- Вернитесь к окну Свойства файла C_1252.NLS. В списке Группы или пользователи нажмите Administrators, а затем кнопку Изменить.
- Откроется окно Разрешения для группы. Опять же, в списке Группы или пользователи нажмите Administrators. Затем отметьте пункт Полный доступ в колонке Разрешить. Нажмите Ок, а затем еще раз Ок.
- В окне Проводника кликните по найденному вами файлу C_1252.NLS и нажмите Расположение файла. Проводник покажет вам, где находится этот файл.
- Перейдите на вкладку проводника Вид и убедитесь, что у вас активирован параметр Расширения имен файлов. Если нет – активируйте.
- Теперь нажмите правой кнопкой мыши по файлу C_1252.NLS и выберите Переименовать. Переименуйте его в C_12521.NLS1, к примеру. Это необходимо сделать, чтобы оригинальный файл у вас был на случай необходимости откатить изменения.
- После этого найдите файл C_1251.NLS. Скопируйте его и тут же вставьте. У вас должна появиться копия файла. Переименуйте ее в C_1252.NLS.
- Перезагрузите компьютер.
Таким образом вы заставляете систему использовать нужную вам кодовую страницу в качестве стандартной. Метод весь кустарный, но он должен справиться с поставленной задачей.