
Windows
Windows+AMD support has not officially been made for webui,
but you can install lshqqytiger’s fork of webui that uses Direct-ml.
Training currently doesn’t work, yet a variety of features/extensions do, such as LoRAs and controlnet. Report issues at https://github.com/lshqqytiger/stable-diffusion-webui-directml/issues
- Install Python 3.10.6 (ticking Add to PATH), and git
- paste this line in cmd/terminal:
git clone https://github.com/lshqqytiger/stable-diffusion-webui-directml && cd stable-diffusion-webui-directml && git submodule init && git submodule update
(you can move the program folder somewhere else.) - Double-click webui-user.bat
- If it looks like it is stuck when installing or running, press enter in the terminal and it should continue.
If you have 4-6gb vram, try adding these flags to webui-user.bat like so:
COMMANDLINE_ARGS=--opt-sub-quad-attention --lowvram --disable-nan-check
(The rest below are installation guides for linux with rocm.)
Automatic Installation
(As of 1/15/23 you can just run webui.sh and pytorch+rocm should be automatically installed for you.)
- Enter these commands, which will install webui to your current directory:
sudo apt install git python3.10-venv -y
git clone https://github.com/AUTOMATIC1111/stable-diffusion-webui && cd stable-diffusion-webui
python3.10 -m venv venv
-
Install and run with:
./webui.sh {your_arguments*}
*For many AMD GPUs, you must add --precision full --no-half or --upcast-sampling arguments to avoid NaN errors or crashing.
If --upcast-sampling works as a fix with your card, you should have 2x speed (fp16) compared to running in full precision.
-
Some cards like the Radeon RX 6000 Series and the RX 500 Series will already run fp16 perfectly fine (noted here.)
-
If your card is unable to run SD with the latest pytorch+rocm core package, you can try installing previous versions, by following a more manual installation guide below.
Running natively
Execute the following:
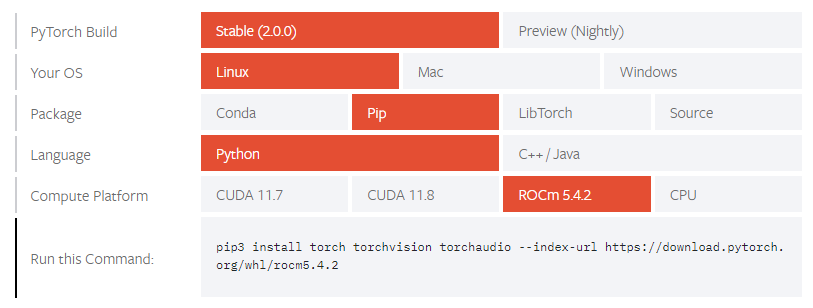
git clone https://github.com/AUTOMATIC1111/stable-diffusion-webui
cd stable-diffusion-webui
python -m venv venv
source venv/bin/activate
python -m pip install --upgrade pip wheel

# It's possible that you don't need "--precision full", dropping "--no-half" however crashes my drivers
TORCH_COMMAND='pip install torch torchvision --extra-index-url https://download.pytorch.org/whl/rocm5.1.1' python launch.py --precision full --no-half
In following runs you will only need to execute:
cd stable-diffusion-webui
# Optional: "git pull" to update the repository
source venv/bin/activate

# It's possible that you don't need "--precision full", dropping "--no-half" however crashes my drivers
TORCH_COMMAND='pip install torch torchvision --extra-index-url https://download.pytorch.org/whl/rocm5.1.1' python launch.py --precision full --no-half
The first generation after starting the WebUI might take very long, and you might see a message similar to this:
MIOpen(HIP): Warning [SQLiteBase] Missing system database file: gfx1030_40.kdb Performance may degrade. Please follow
instructions to install: https://github.com/ROCmSoftwarePlatform/MIOpen#installing-miopen-kernels-package
The next generations should work with regular performance. You can follow the link in the message, and if you happen
to use the same operating system, follow the steps there to fix this issue. If there is no clear way to compile or
install the MIOpen kernels for your operating system, consider following the «Running inside Docker»-guide below.
Running inside Docker
Pull the latest rocm/pytorch Docker image, start the image and attach to the container (taken from the rocm/pytorch
documentation): docker run -it --network=host --device=/dev/kfd --device=/dev/dri --group-add=video --ipc=host --cap-add=SYS_PTRACE --security-opt seccomp=unconfined -v $HOME/dockerx:/dockerx rocm/pytorch
Execute the following inside the container:
cd /dockerx
git clone https://github.com/AUTOMATIC1111/stable-diffusion-webui
cd stable-diffusion-webui
python -m pip install --upgrade pip wheel

# It's possible that you don't need "--precision full", dropping "--no-half" however crashes my drivers
REQS_FILE='requirements.txt' python launch.py --precision full --no-half
Following runs will only require you to restart the container, attach to it again and execute the following inside the
container: Find the container name from this listing: docker container ls --all, select the one matching the
rocm/pytorch image, restart it: docker container restart <container-id> then attach to it: docker exec -it <container-id> bash.
cd /dockerx/stable-diffusion-webui
# Optional: "git pull" to update the repository

# It's possible that you don't need "--precision full", dropping "--no-half" however crashes my drivers
REQS_FILE='requirements.txt' python launch.py --precision full --no-half
The /dockerx folder inside the container should be accessible in your home directory under the same name.
Updating Python version inside Docker
If the web UI becomes incompatible with the pre-installed Python 3.7 version inside the Docker image, here are
instructions on how to update it (assuming you have successfully followed «Running inside Docker»):
Execute the following inside the container:
apt install python3.9-full # Confirm every prompt
update-alternatives --install /usr/local/bin/python python /usr/bin/python3.9 1
echo 'PATH=/usr/local/bin:$PATH' >> ~/.bashrc
Run source ~/.bashrc and proceed by running the same commands as you would with an existing container.
It’s possible that you don’t need «—precision full», dropping «—no-half» however it may not work for everyone. Certain cards like the Radeon RX 6000 Series and the RX 500 Series will function normally without the option --precision full --no-half, saving plenty of VRAM. (noted here.)
Install on AMD and Arch Linux
Install webui on Arch Linux with Arch-specific packages
and possibly other Arch-based Linux distributions (tested Feb 22 2023)
Arch-specific dependencies
- Start with required dependencies and install
pip
sudo pacman -S python-pip
- Install
pytorchwith ROCm backend
Arch [Community] repository offers two pytorch packages, python-pytorch-rocm and python-pytorch-opt-rocm. For CPUs with AVX2 instruction set support, that is, CPU microarchitectures beyond Haswell (Intel, 2013) or Excavator (AMD, 2015), install python-pytorch-opt-rocm to benefit from performance optimizations. Otherwise install python-pytorch-rocm:
# Install either one:
sudo pacman -S python-pytorch-rocm
sudo pacman -S python-pytorch-opt-rocm   # AVX2 CPUs only
- Install
torchvisionwith ROCm backend
python-torchvision-rocm package is located in AUR. Clone the git repository and compile the package on your machine
git clone https://aur.archlinux.org/python-torchvision-rocm.git
cd python-torchvision-rocm
makepkg -si
Confirm all steps until Pacman finishes installing python-torchvision-rocm.
Alternatively, install the python-torchvision-rocm package with a AUR helper.
Setup venv environment
- Manually create a
venvenvironment with system site-packages (this will allows access to systempytorchandtorchvision). Install the remaining Python dependencies
python -m venv venv --system-site-packages
source venv/bin/activate
pip install -r requirements.txt
Launch
Run the following inside the project root to start webui:
source venv/bin/activate
./webui.sh
Depending on the GPU model, you may need to add certain Command Line Arguments and Optimizations to webui-user.sh in order for webui to run properly. Refer to the Automatic Installation section.
Limitations
- GPU model has to be supported by Arch dependencies
See if your GPU is listed as a build architecture in PYTORCH_ROCM_ARCH variable for Tourchvision and PyTorch. References for architectures can be found here. If not, consider building both packages locally or use another installation method.
- Arch dependencies (
pytorch,torchvision) are kept up-to-date by full system updates (pacman -Syu) and compiling, which may not be desirable when dependency combinations with fixed versions are wished
This guide has been tested on AMD Radeon RX6800 with Python 3.10.9, ROCm 5.4.3, PyTorch 1.13.1, Torchvision 0.14.1
Для работы проектов iXBT.com нужны файлы cookie и сервисы аналитики.
Продолжая посещать сайты проектов вы соглашаетесь с нашей
Политикой в отношении файлов cookie
По состоянию статистики Steam на конец января 2023 года, видеокарты компании AMD являются аутсайдерами на рынке графических ускорителей. И всё больше производителей профессионального ПО и игр предпочитают в первую очередь оптимизировать свои продукты под графические решения от компании Nvidia. Такое положение дел не обошло стороной и нейронные сети. В этой небольшой инструкции вы узнаете, как назло общепринятым стандартам, заставить нейронную сеть Stable Diffusion (генерация картинок по любому текстовому запросу) работать c видеокартами AMD.
В настоящее время существует примерно три реализации Stable Diffusion, которые со скрипом, но способны использовать GPU AMD для ускорения обработки задач. Однако все они привязаны к новейшей архитектуре RDNA или работают только под Linux, что автоматом отсеивает большинство красных пользователей, которые не хотят разоряться на покупке новой видеокарты или устанавливать непривычную ОС из-за желания испытать нейронную сеть. Обойдём эти ограничения, заставив нейронную сеть Stable Diffusion работать на Windows 10/11 c любым относительно современным GPU AMD!
Минимальный системные требования:
ОС: Windows 10/11/Linux 64 Бит.
RAM: 8+ Гб.
CPU: 2/4+ ядра 3.0+ ГГц.
GPU: AMD (Возможна работа силами CPU).
1. Скачиваем и устанавливаем необходимые компоненты:
64-bit Git for Windows Setup.
Python 3.10.6 (Не забудьте поставить галочку PATH).
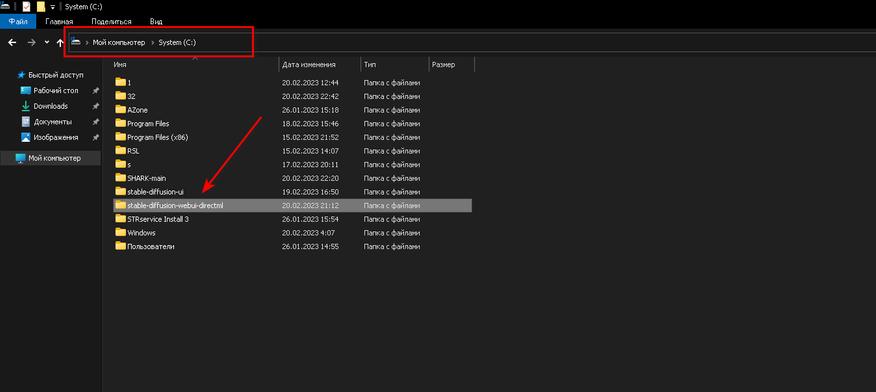
2. Загружаем архив с нейронной сетью.
3. Распаковываем нейронную сеть в корень любого носителя.
4. Скачиваем архивы с модифицированными файлами для работы нейронной сети с видеокартами AMD.
Архивы:
- K-diffusion-directml
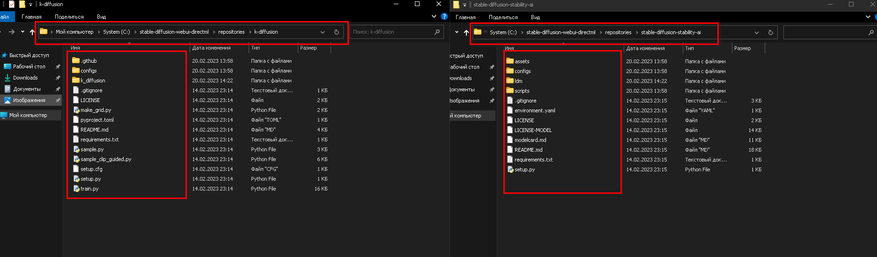
- Stablediffusion-directml
5. Переходим в папку C:\stable-diffusion-webui-directml\repositories и распаковываем все файлы архива k-diffusion-directml-master.zip (Не его папку, а файлы, что внутри неё) в папку k-diffusion. Аналогично поступаем с архивом stablediffusion-directml-main.zip, но его файлы уже распаковываем в папку stable-diffusion-stability-ai.
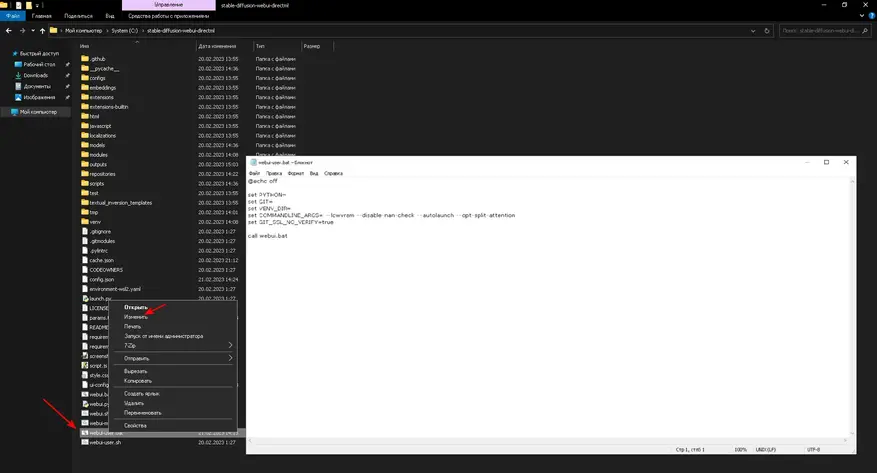
6. Теперь нам необходимо в файл запуска нейронной сети webui-user.bat добавить команды для обхода проверки отсутствующих ядер CUDA и общей оптимизации. Подробнее о параметрах запуска вы всегда можете почитать тут.
@echo off

set PYTHON=
set GIT=
set VENV_DIR=
set COMMANDLINE_ARGS= --lowvram --disable-nan-check --autolaunch --opt-split-attention
set GIT_SSL_NO_VERIFY=true

call webui.bat
Более быстрая генерация (Возможны баги):
@echo off

set PYTHON=
set GIT=
set VENV_DIR=
set COMMANDLINE_ARGS= --lowvram --precision full --no-half --no-half-vae --opt-sub-quad-attention --opt-split-attention-v1 --disable-nan-check --autolaunch
set GIT_SSL_NO_VERIFY=true

call webui.bat
7. Скачиваем обученные модели, чтобы наша нейронная сеть понимала, кого и что ей рисовать. Я остановил свой выбор на NeverEnding Dream.
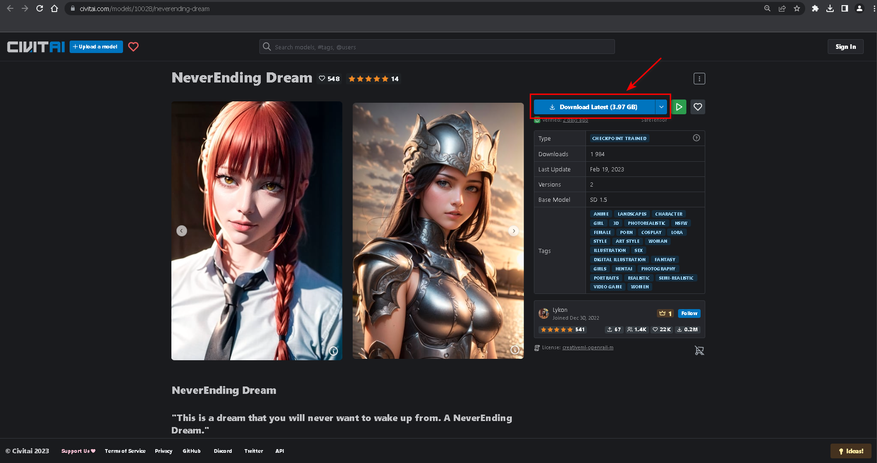
Переносим файл обученной модели в:
C:\stable-diffusion-webui-directml\models\Stable-diffusion
8. Теперь необходимо скачать файл конфигурации VAE для нормализации конечного изображения и перенести его в:
C:\stable-diffusion-webui-directml\models\VAE
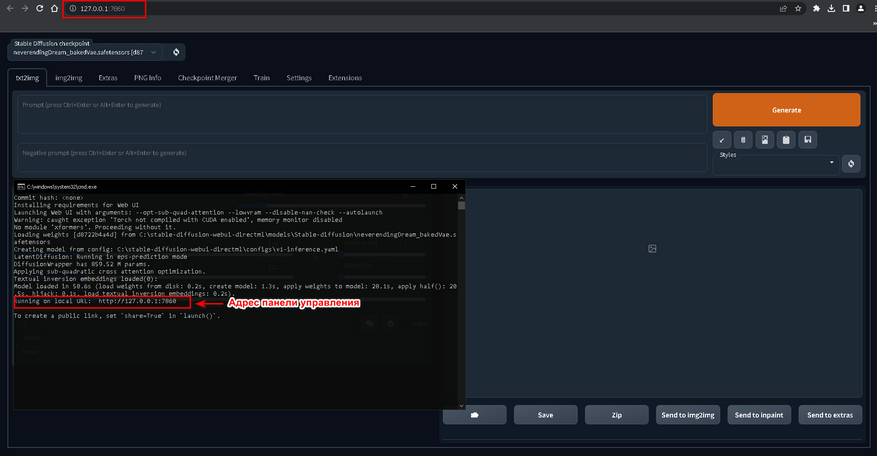
9. Выполняем запуск нейронной сети через файл webui-user.bat в папке C:\stable-diffusion-webui-directm и дожидаемся загрузки и установки всех необходимых компонентов. Если всё прошло успешно, то вас автоматически перенесёт на страницу панели управления нейронной сетью в вашем браузере.
10. Переходим в Setting и в разделе Stable Diffusion выбираем наш VAE. Теперь нам необходимо выбрать алгоритм восстановление лица, который не зависит от наличия CUDA или тензорных ядер Nvidia. Переходим в раздел Face Restoration, выбираем алгоритм GFPGAN. Применяем настройки.
11. Возвращаемся во вкладку txt2img, где для проверки работы ускорения нейронной сети на GPU AMD вводим любой желаемый запрос. По нагрузке на GPU и CPU в диспетчере задач проверяем результат.
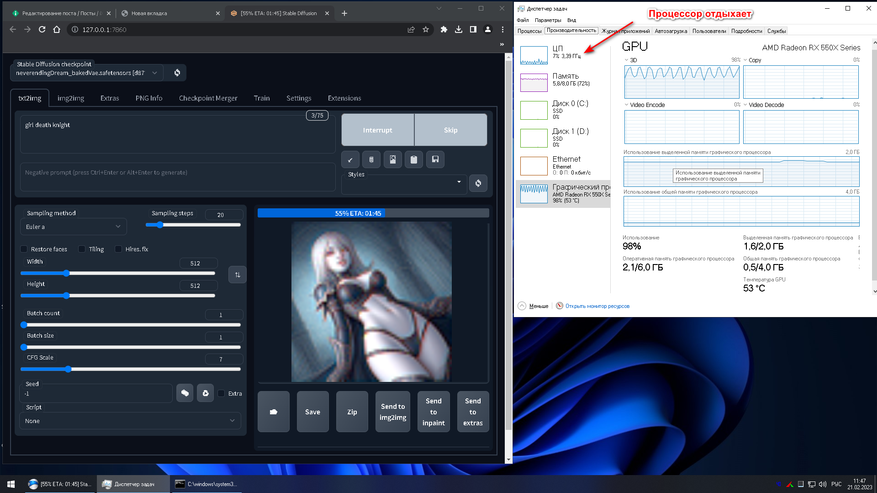
Фанфары, гром и молния! Всё работает.
Конечный результат получился немного пошлый, но зато сразу после удалось создать красивого рыцаря.
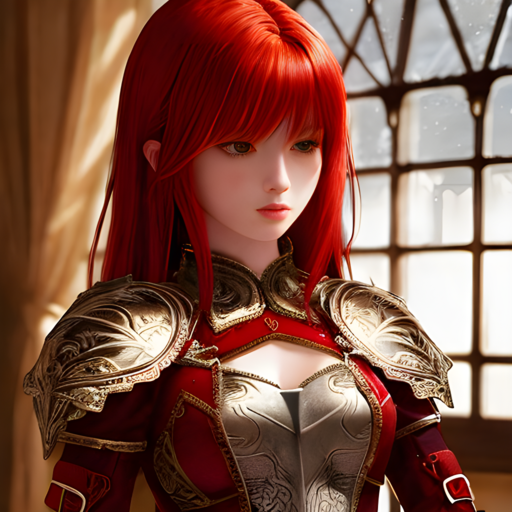
- Запрос: Knight girl with red hair (Девушка рыцарь с красными волосами).
- Модель: NeverEnding Dream.
- Количество проходов: 40 (GPU).
- Сэмплер: PLMS.
- Фильтры и стили: нет.
- Исправление лица: активно.
Несмотря на то что способ является лютыми костылями и проигрывает по качеству реализации генерации готового изображения видеокартам Nvidia, он всё же позволяет намного быстрее создавать готовые шедевры, чем классическое задействование возможностей CPU. Создавайте, делитесь своими творения и никогда не позволяйте компаниям диктовать свои условия.
ПС. Инструкция для видеокарт Nvidia.
Сейчас на главной
Новости
Публикации

В эпоху, когда человечество только осваивало космические просторы, Франция сделала неожиданный выбор, отправив в полет не собаку или обезьяну, а кошку по имени Фелисетт. В октябре 1963 года она…

Нержавеющая
сталь — материал, который ассоциируется
с прочностью, долговечностью и
устойчивостью к коррозии. На первый
взгляд, кажется, что это идеальный выбор
для производства…

Зевота — явление, знакомое каждому. Мы зеваем не только от усталости или скуки, но и когда видим, как зевает другой человек. Почему так происходит? Заразна ли зевота? Чтобы…

Представьте себе бескрайний, почти невообразимо огромный океан. Только вместо воды он наполнен разреженным газом, пылью и заряженными частицами. Этот океан — межзвездная среда,…

Представьте себе место, где чистота возведена в абсолют. Место, где каждая пылинка на счету, а воздух фильтруется с такой тщательностью, что обычный городской смог показался бы густым туманом….

Лет восемь тому назад моим основным смартфоном был «ультрабюджетник» Xiaomi Redmi 5A. Несмотря на простецкую внешность и скромные характеристики, он хорошо справлялся с ролью «рабочей лошадки»…

After a huge boom of image generation models released into the internet, NVIDIA has grabbed the opportunity to support this image generation era. But, due to its monopoly in the market of the powerful GPUs, we had no options.
But, after a long wait a new alternative has emerged that is AMD’s GPUs.
Yeah, AMD and Microsoft working a lot to compete with NVIDIA which is the game changer moment for us in the field of image generation. Now, we have the affordable option to work with not only in gaming but in image generation as well.
In this post, we will walk you through how to get the AI image generation software Stable Diffusion running on AMD Radeon GPUs. We will try to keep things simple and easy to follow.
Table of Contents:
Requirements:
Here’s what you need to use Stable Diffusion on an AMD GPU:
— AMD Radeon 6000 or 7000 series GPU
— Latest AMD drivers
— Windows 10 or 11 64-bit
— At least 8GB RAM
— Git and Python installed
We are running it on a Radeon RX 6800 with a Ryzen 5 3600X CPU and 16GB VRAM.
There’s a cool new tool called Olive from Microsoft that can optimize Stable Diffusion to run much faster on your AMD hardware. Microsoft Olive is a Python program that gets AI models ready to run super fast on AMD GPUs. It takes existing models like Stable Diffusion and converts them into a format that AMD GPUs understand.
It also compresses and shrinks down the model so it takes up less space on your graphics card. This is important because these AI models have millions of parameters and can eat up GPU memory in so instant.
Now, after installing the above perquisites, you will bear with long time consumption of image generation. Generating a single image will take almost 10-20 minutes which is a nightmare for us.

|
| Source: AMD community |
But, not a problem because Microsoft Olive is here which makes our image generation much faster.
AMD claims that they are getting up to 9.9x faster image generation as compared to the previous stage which means it went from 1.87 iterations/sec to 18.59 iterations/sec.
Features:
When preparing Stable Diffusion, Olive does a few key things:
—Model Conversion: Translates the original model from PyTorch format to a format called ONNX that AMD GPUs prefer.
—Graph Optimization: Streamlines and removes unnecessary code from the model translation process which makes the model lighter than before and helps it to run faster.
—Quantization: Reduces the math precision from 32-bit floats to 16-bit floats. This shrinks the model down to use less GPU memory while retaining accuracy.
This lets you get the most out of AI software with AMD hardware. It automatically tunes models to run quicker on Radeon GPUs.
Installation of Automatic1111 with Microsoft Olive:
The installation has a few steps, but it’s pretty easy. Here’s what you need to do:

1. First of all, install Git for windows.


2. Now, install Anaconda or Miniconda from their official home page. (Make sure you add the Anaconda or Miniconda directory path into the environment variable while installing it.)

3. If you haven’t yet installed these drivers then get AMD Software and drivers: Adrenalin Edition 23.7.2 or newer for AMD GPUs from the official page.

It’s recommended to regularly update your AMD GPU’s driver for better performance.
4. Open Anaconda or Miniconda Terminal, whatever you have installed.

5. Create a new environment by typing the following commands onto your command prompt:
We are using Python 3.10.6 version. So, we have to install and create the environment with the required version by typing these commands. Here, «sd_olive» is the name we defined for virtual directory. You can choose yours but make sure not to use any predefined python keywords.
conda create —name sd_olive python=3.10.6
If you found an error («no python found«), means that you are facing python version compatibility issues. What we experienced is to install python 3.10.6 version or python 3.10.9 version. Right now python 3.11x versions are not supported.

6. Now, activate the environment:
conda activate sd_olive
7. Now, you are in a virtual environment. Create a new folder by typing:
mkdir sd-test
Again move to the folder by typing:
cd sd-test

8. Clone the GitHub repository by typing this command:
git clone https://github.com/lshqqytiger/stable-diffusion-webui-directml

9. Move to your stable diffusion installed directory by typing:
cd stable-diffusion-webui-directml

If you get an error «cannot find the path specified» Close your command prompt. And move to your stable diffusion installation folder. On the path directory type cmd and press Enter key to open command prompt. Repeat Step 5 and Step 6. In our case, we installed stable diffusion into C: drive.(It may be different in your case)

10. Update the submodule by typing this command:
git submodule update —init —recursive

11. Open WebUI by typing:
webui-user.bat

12. Now, a new local host web address will be seen like this «http://127.0.0.1:7860«. Just copy and paste this URL to your web browser to open Automatic1111.
The users having lower VRAM (4-6 GB) can use the parameters inside «webui-user.bat» file.
COMMANDLINE_ARGS=—opt-sub-quad-attention —lowvram —disable-nan-check
This uses memory swapping help you to enhance the rendering time.

13. Finally, we have installed Automatic1111. Now, we have to download the supported model for Microsoft Olive which works for optimization.
Recently, we found many people are facing the issues related to installation. So, if you are getting the same then you should follow our AMD errors tutorial where we discussed multiple relevant solutions to fix it.
14. Now for generating an image and optimizing it, we need to download the required model.
Make sure you choose the right compatible model to download and run, because currently not every model on Hugging Face or CivitAI best supported with Microsoft Olive. Right now only Stable Diffusion 1.5 works good.

15. For illustration we have tested Dreamshaper model from hugging face.

Now, go to Automatic1111 click on the ONNX tab, and paste the copied model ID into the input box. At last click on DOWNLOAD to download the model.
If you see a logo behind the download button that will be rotating, it means the model is in downloading state. This may take some time according to your internet speed because each model can be up to ~5-8 GB.

After downloading the model, you will get a confirmation message like this «Model saved C:/……..«

16. Now, we have to optimize using Microsoft Olive otherwise we will face errors. So, click on the Olive tab, then again click Optimized ONNX model, and under ONNX model id paste the copied ID of the model you have downloaded. In our case it’s «Lykon/DreamShaper«.

On the input and output folder also paste the same copied model’s ID remove everything with a slash (in our case it is «DreamShaper«) and select the type of model it is whether it is a normal Stable diffusion model or a Stable Diffusion XL model.
17. At last click on the «Optimize model using Olive» button to start optimizing.

This will take time to optimize on the background. You can see the status on command prompt and a logo will keep on rotating means it in the process.

18. After a few minutes, you will see the message «Optimization complete«. In our case, it took around ~5 minutes.

19. Now, you can generate images by clicking the reload button and selecting the Optimized model version. Put positive, and negative prompts, settings, and click on the Generate button to generate an image.

And here is the output. Really the result is quite incredible and realistic. It took around 21 iterations/second.
No matter what model you use, but you can try our Stable Diffusion Prompt Generator which will help you to generate multiple AI image prompts.
Let’s try something else:


Here, while generating the above image art took around 18 iterations/second.
Extra tips:
If you want to check for confirmation for optimization, type this command to optimize stable diffusion by generating the ONNX model. It may take time to get optimized:
python stable_diffusion.py —optimize
After finishing the optimization the optimized model gets stored on the following folder:
olive\examples\directml\stable_diffusion\models\optimized\runwayml
And the model folder will be named as: “stable-diffusion-v1-5”
If you want to check what different models are supported then you can do so by typing this command:
python stable_diffusion.py —help
To check the optimized model, you can type:
python stable_diffusion.py —interactive —num_images 2
Installing ComfyUI:
ComfyUI a Nodes/graph/flowchart interface for stable Diffusion can be installed and run smoothly on AMD GPU machine. You just need to follow the simple steps for installation:
1. First of all, open your command prompt as administrator and install Anaconda/Miniconda (add path to directory) and GIT installed.

2. Next, create the new python virtual environment as «comfyui» by typing the command on command prompt. (Only python 3.10.x versions are supported):
conda create —name comfyui python=3.10.12

3. Activate the created python environment by typing:
conda activate comfyui
4. Now you have to clone the GitHub repository of ComfyUI. For this use this command:
git clone https://github.com/comfyanonymous/ComfyUI.git
5. Move to the ComfyUI directory (after entering into directory you will see the environment name in bracket at starting):
cd comfyui
6. Now to run the ComfyUI, you need to install perquisites like pytorch with directml for AMD GPU:
pip install torch-directml

7. Installing the perquisites with requirements files:
pip install -r requirements.txt
8. Then you have to launch ComfyUI WebUI using this command:
python main.py —directml
A local URL will pop up with http://127.0.0.1… Just copy and paste into your browser to open your ComfyUI. We are using 7900 AMD GPU that giving us the iteration 5.63/second.

9. Now if you want to reopen the ComfyUI for future use, then there is an easy way. Create a bat file like this with (.bat) extension as we have shown above.

First open your Anaconda/miniconda terminal and type command:
run-comfyui.bat
Just copy and paste the local host URL to your browser:
http://127.0.0.1:8188
Conclusion:
So, now we can enjoy generating images with the optimized model using Microsoft Olive on Amd GPUs which emerges as the new player in the field of image generation.
NVIDIA GPUs are quite costly but now we can use the cheaper alternative that is AMD GPUs and dive into the realism of art generation.
AUTOMATIC1111’s Stable Diffusion WebUI is the most popular and feature-rich way to run Stable Diffusion on your own computer.
In this guide we’ll get you up and running with AUTOMATIC1111 so you can get to prompting with your model of choice.
Keep in mind AUTOMATIC1111 does not have official AMD support. Instead, we’ll be using lshqqytiger’s fork, a variation of AUTOMATIC1111 which uses the AMD supported DirectML.
(You can find the NVIDIA GPU installation instructions here)
Out of all the methods I’ve tested to get AUTOMATIC1111 working on AMD, this is by far the easiest one.
You can use the Docker method to run the official AUTOMATIC1111 repository instead of the fork, but it is much more troublesome.
So let’s get started!
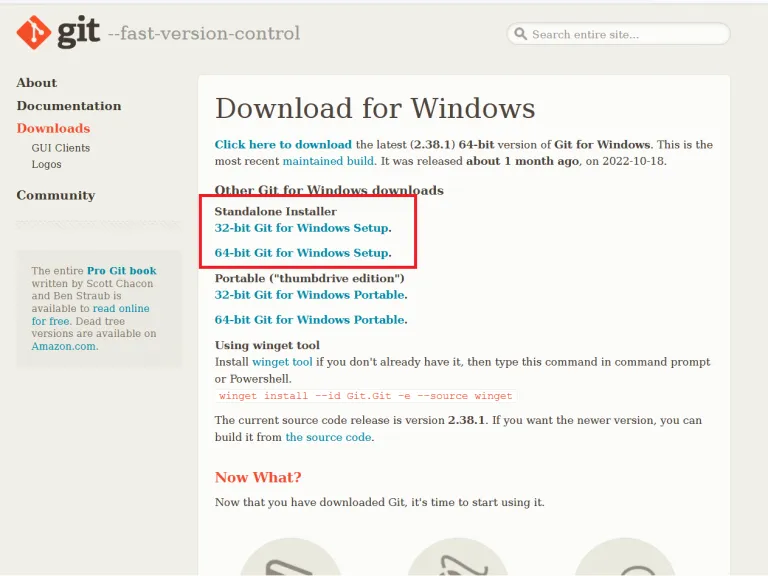
Step 1: Install Git
Go to the official Git website to download Git.
Get the Standalone Installer. Choose the appropriate Git installer for your Windows operating system.
Open the .exe you just downloaded. Click Next to accept the license.
The default options are completely fine. Click Next.

You will be given many screens of options. The defaults are all fine. Click Next for all of them. Git will install.

Step 2: Install Python
Install Python from the official site. You want the latest version of 3.10. Make sure you choose the right version for your platform, 32-bit or 64-bit.
Important: In the installation wizard, make sure you check «Add python.exe to PATH«.

You can go with all of the other default options.
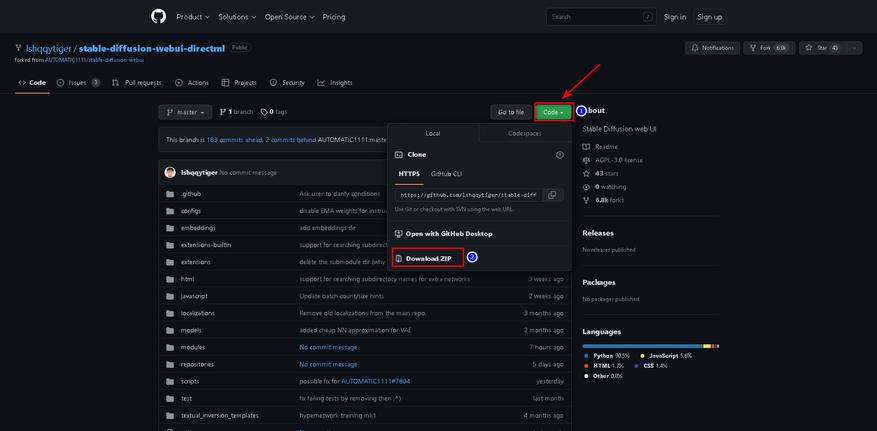
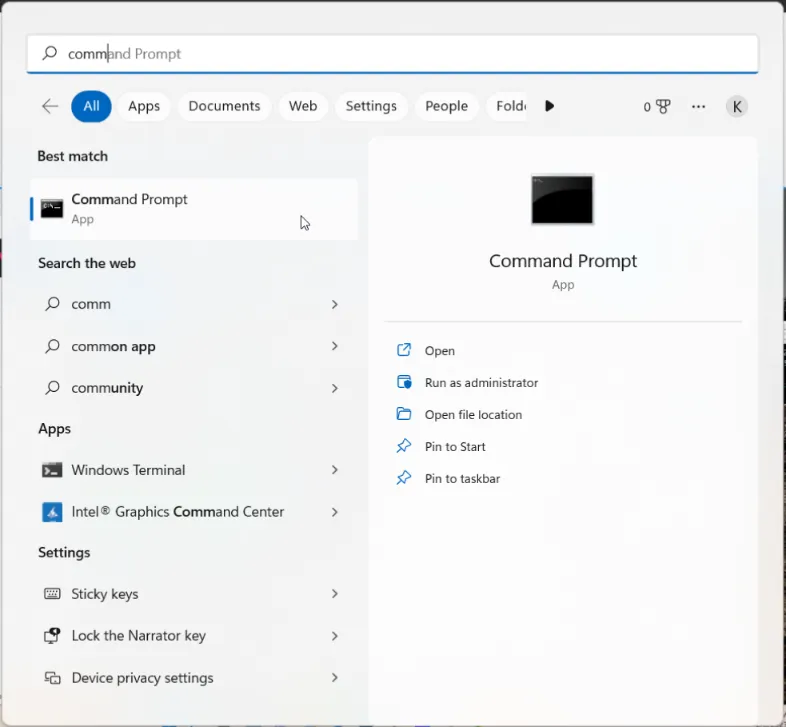
Step 3: Download lshqqytiger’s Version of AUTOMATIC1111 WebUI
Press the Window keyboard key or click on the Windows icon (Start icon). Search for «Command Prompt» and click on the Command Prompt App when it appears.
You should see a line like this:
C:\Users\YOUR_USER_NAME
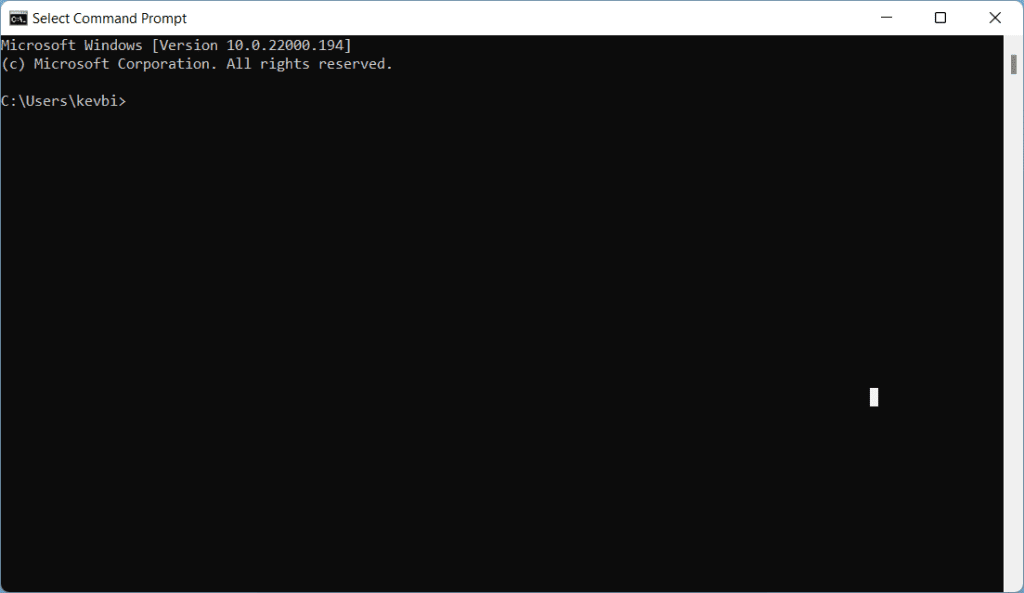
Use this command to move into folder (press Enter to run it):
cd FOLDER_NAMEUse this command to go back up a folder:
cd ..Use this command to list all folders within the folder you are in. This can help you orient yourself:
dirAs an example, I will install Stable Diffusion in my Documents folder. I would type this command:
cd documents
When you are in the folder you want to install Stable Diffusion to, copy and paste the following command and press Enter:
git clone https://github.com/lshqqytiger/stable-diffusion-webui-directml && cd stable-diffusion-webui-directml && git submodule init && git submodule updateGive the WebUI some time to download.
After your download is complete, you’ll be able to see your new folder stable-diffusion-webui-directml in the Windows Explorer.
Configure VRAM Settings
Do this step if you have less than 6GB VRAM. Otherwise, you can skip this step.
Check how much VRAM you have by typing «dxdiag» in the searchbar and clicking dxdiag (DirectX Diagnostic Tool).
Your VRAM will be listed under Display Memory in the Display (or Display 2) tab:

Open the stable-diffusion-webui-directml folder you just downloaded. Find the file named webui-user.bat (Windows Batch File) and right click -> Edit (Windows 11: Right click -> Show more options -> Edit).
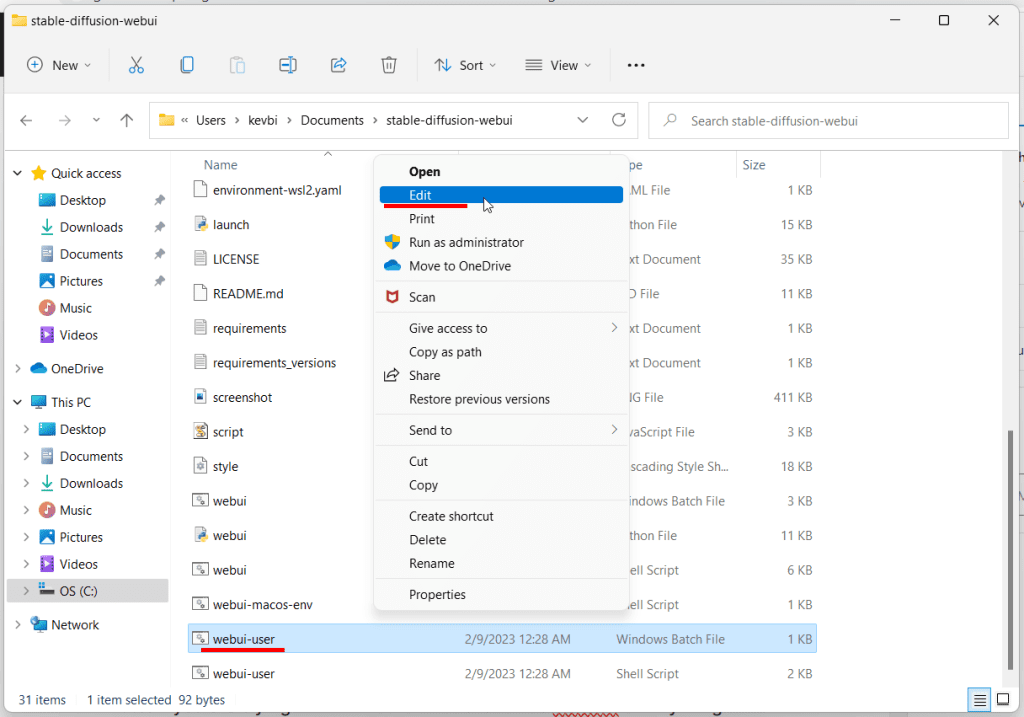
Add this line to the «set COMMANDLINE_ARGS=» line, so that it looks like this:
COMMANDLINE_ARGS=--opt-sub-quad-attention --lowvram --disable-nan-check
Optional: I recommend adding --autolaunch to auto open the URL for you.
Save this file and close it.
Rename your edited webui-user.bat file to webui.settings.bat to avoid your settings being overwritten after you update your WebUI.
Step 4: Run the WebUI
Double click the file you just edited: webui.settings.bat.
It will take several minutes for the Web UI to install the required modules. This step will also download the Stable Diffusion v1.5 model.
If you added —autolaunch to your COMMANDLINE_ARGS in the step above, the WebUI will open in your web browser.
Otherwise, wait for the success message, and then navigate to the URL http://127.0.0.1:7860 to access the WebUI.
Step 5: Testing Our First Prompt
Here’s what your interface will look like:
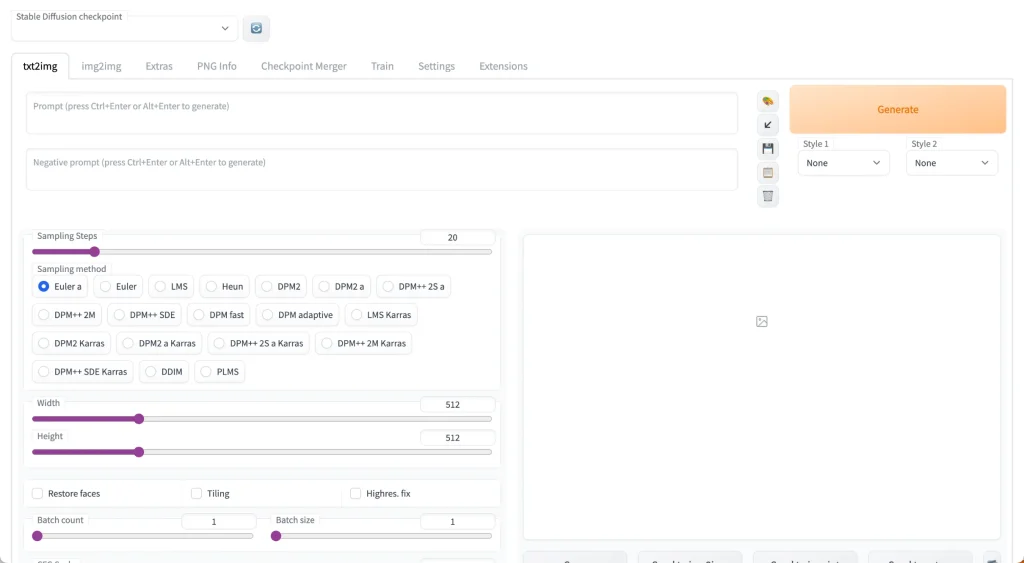
You’ll notice at the top there’s a toggle called “Stable Diffusion Checkpoint”.
You can use this to switch to any of the models you have placed in the stable-diffusion-webui/models/Stable-diffusion folder.
Check out this list of popular models and this list of popular anime models.
For our example, we’ll use Stable Diffusion v1.5 since it comes downloaded with your installation.
The filename is v1-5-pruned-emaonly.safetensors [6ce0161689].
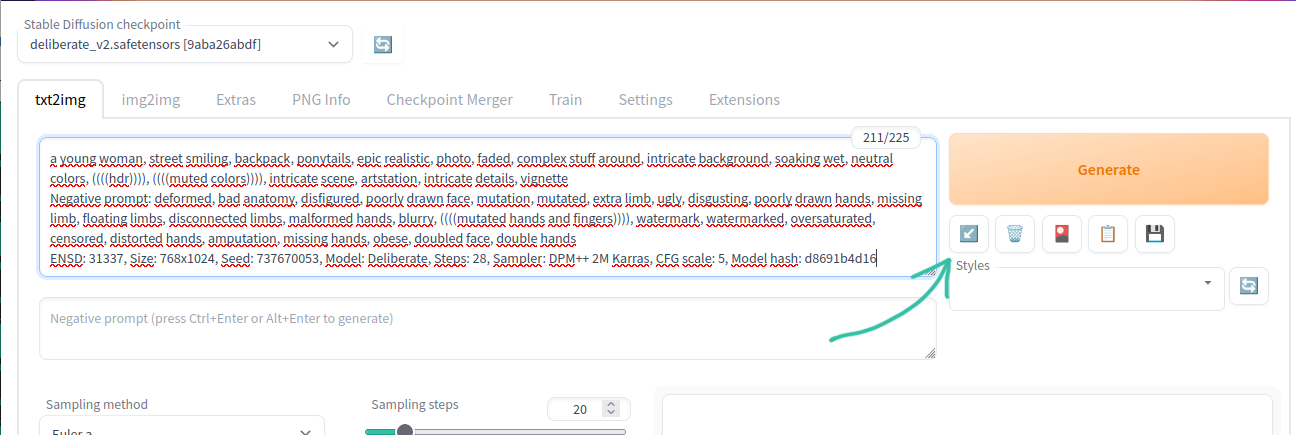
Enter the prompt:
portrait of beautiful girl, brown hair, freckles, tshirt, professional lighting, indoor, artistic photographyNow enter the negative prompt:
lowres, bad anatomy, bad hands, text, error, missing fingers, extra digit, fewer digits, cropped, worst quality, low quality, normal quality, jpeg artifacts,signature, watermark, username, blurry, artist nameSet the height slider to 768 and keep the width at 512 to create a portrait aspect ratio suitable for people.
Set the Seed to 3463 to make sure you get the same result.
Then click Generate and wait for the magic to happen! Here’s what I got:
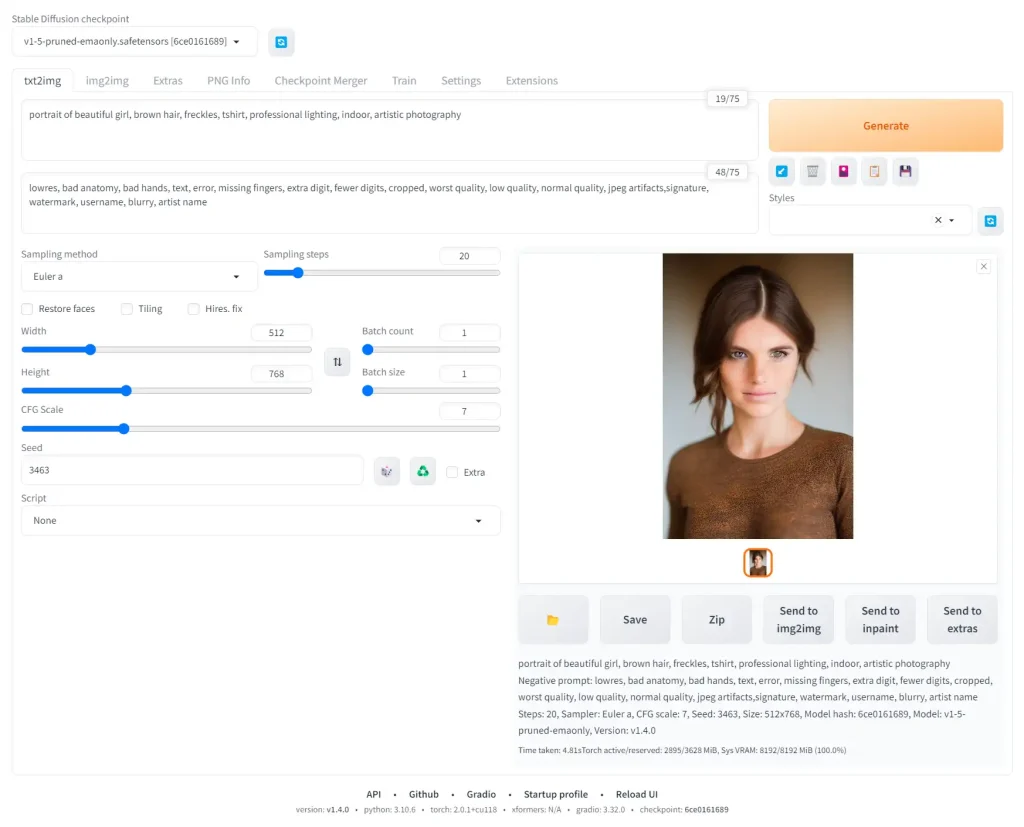
I am using the default sampler Euler a. You can play with these samplers to get an idea of what they do.
Check the official wiki for all the features that have been implemented in AUTOMATIC1111.
You can check out these basic prompts for where to get next:
- Stable Diffusion Prompting guide
I also highly recommend experimenting with popular models:
- list of most popular Stable Diffusion models
Next Steps
From here, the sky is the limit!
I recommend going through the rest of the Stable Diffusion for Beginners series:
Уровень сложностиПростой
Время на прочтение5 мин
Количество просмотров75K
Многие слышали про Midjourney, но про то, что есть локальная Stable Diffusion, которая может даже больше, знает уже куда меньше людей, или они не знают, что она локальная. И если они пробовали её онлайн, то быстро приходили к выводу, что она сильно хуже чем Midjourney и не стоит обращать на неё более внимания. И да, SD появился раньше Midjourney. Для запуска хватит и cpu или 4гб видеопамяти.
Аналогично с chatGPT, про попытку сделать его локальную версию, не требующую супер компьютер, тоже мало кто слышал и знает, несмотря на то, что выходило несколько статей.

Локальная генерация картинок (Stable Diffusion, на видеокартах AMD, на CPU)
Если вы просто поставите SD и попробуете что-то сгенерировать, то вы увидите в лучшем случае что-то такое:

Это совсем не похоже на уровень Midjourney. Все дело в том, что дефолтная SD модель не понимает, что именно вы от неё хотите без дополнительных правок. Поэтому требуется много ключевых слов (промтов) как позитивных, так и негативных, чтобы добиться приемлемого качества.
Для того, чтобы этим не заниматься существуют уже дотюненные модели, где выставлено чтобы пальцев было 5, а тел 1, и другие ожидаемые от модели параметры. Пример, того же запроса, но на модели Deliberate:

Еще один пример, вроде бы у SD 1.5 что-то получается, но это всё равно далеко от ожидаемого.
Локальный запуск
Итак, чтобы локально запустить Stable Diffusion понадобится не так много. Установить один из вариантов веб-интерфейсов. Например, самые интересные это вот эти:
stable-diffusion-webui — https://github.com/AUTOMATIC1111/stable-diffusion-webui
InvokeAI — https://github.com/invoke-ai/InvokeAI
SHARK — https://github.com/nod-ai/SHARK
Все они отличаются какой-то особенностью, из-за чего могут быть полезны все. И все схожи в установке, которая не отличается какой-то сложностью, достаточно просто следовать инструкции.
Для запуска будет достаточно видеокарты на 4гб. Если нет gpu, то доступен запуск на cpu — тогда генерация занимает минуты, и за счет оперативной памяти куда большие разрешения, но времени уйдет на это немыслимо. В зависимости от мощности процессора, генерация 512×512 может занять 3-4 минуты на 6 ядерном cpu.
После этого нужно найти и скачать понравившуюся модель, которые расположены на сайте https://civitai.com/

Если не хочется выбирать и сравнивать, то можете сразу взять Deliberate, она является одной из лучших моделей, у неё отлично и с анатомией, и с пальцами.
Все скачанные модели нужно размещать в папке моделей, либо вручную, для webui это будет путь: stable-diffusion-webui\models\Stable-diffusion\, либо через интерфейс добавления моделей, как у InvokeAI.
Самым продвинутым веб-интерфейсом можно назвать stable-diffusion-webui, где помимо базовых широких возможностей без плагинов, также доступны и различные полезные плагины, например, ControlNet — который позволяет делать много разного, не доступного в базовом виде.
В сочетании с плагином Posex можно делать и позы.
У webui легко возвращать забытые промпты и настройки, для этого есть панель с кнопками под кнопкой Generate. Для сгенерированной картинки достаточно перетянуть её в поле ввода, или скопировать чужие промпты, или взять инфо из PNG Info и нажать на кнопку со стрелкой, после этого все поля будут автоматически заполнены.
У sd есть проблема с повторяемостью результатов. Из-за того, что разные видяхи используют разные ускорители вычислений, то например, если кто-то сгенерировал картинку с xformers на nvidia, на amd вы не сможете повторить её один в один, и наоборот. Но при этом если вы генерируете в разных веб-интерфейсах с одинаковыми настройками на одинаковой машине, результат будет повторяться. Возможно причина в чем-то другом, но в целом такая проблема существует.
Запуск с ускорением на видеокартах AMD
Для своей работы sd использует pytorch, у которого доступны следующие варианты запуска:
На видеокартах nvidia доступно ускорение через CUDA, а на AMD через ROCm (hip). HIP — это прямой аналог cuda, но на данный момент он работает только под linux. Недавно blender для windows добавил поддержку hip, поэтому в целом работы по переносу hip на windows ведутся, но пока для пользователей windows доступны другие варианты, менее удобные, а именно враппер для Vulkan и DirectML.
Таким образом, есть следующие варианты:
-
запускать на linux вместе с hip. Например, stable-diffusion-webui установит всё автоматически. Есть поддержка запуска в docker (под wsl2 не сработает).
-
под windows 2 варианта:
-
использовать для ускорения vulkan — запуск на vulkan сейчас возможен только на sharp, работает почти на том же уровне что и hip, чуть медленнее. Но sharp имеет меньше возможностей и настроек.
-
использовать форк https://github.com/lshqqytiger/stable-diffusion-webui-directml с ускорением через directml. По отзывам не всегда работает стабильно и отваливается с ошибкой о нехватки памяти, там где hip или vulkan работают без проблем. Лечится добавлением ключей запуска, которые замедляют генерацию, но снижают потребление памяти.
-
На данный момент для видеокарт amd самый быстрый вариант это linux + hip. И с этим есть некоторые особенности. Если всё не завелось автоматически и показывается сообщение об отсутствии hip-устройства, нужно явно указать версию HSA. В консоли перед запуском надо вбить один из 3х вариантов (в зависимости от вашей модели видеокарты):
export HSA_OVERRIDE_GFX_VERSION=10.3.0
export HSA_OVERRIDE_GFX_VERSION=9.0.12
export HSA_OVERRIDE_GFX_VERSION=8.3.0
Другой вариант того же самого, например, это вводить команду запуска сразу с указанием нужного:
HSA_OVERRIDE_GFX_VERSION=10.3.0 ~/invokeai/invoke.shЕсли появляется проблема с нехваткой памяти, или видеокарта не поддерживает f16, помогут эти команды (только для webui, в других они выглядят по другому, если вообще есть):
# Если ошибка про half:
--precision full --no-half

# Если хочется генерацию больших разрешений на 8гб памяти:
--medvram

# Если совсем мало памяти, например, 4гб:
--lowvram
Каждый из этих параметров сильно снижает скорость генерации (только medvram не существенно). Также medvram поможет при train.
Локальный chatGPT (только CPU)
С локальным chatGPT ситуация не на столько качественная, как с картинками. Но что-то работает. Есть некоторое количество моделей, которые обучены следовать инструкциям.
Для их локального запуска потребуется либо llama.cpp (https://github.com/ggerganov/llama.cpp), либо alpaca.cpp (https://github.com/antimatter15/alpaca.cpp) и найти нужную модель на huggingface. llama.cpp может запускать модели и от alpaca, и от gpt4all и от vicuna, поэтому можно сразу выбрать его для запуска.
Например, alpaca 30B: https://huggingface.co/Pi3141/alpaca-lora-30B-ggml/tree/main
Или 13B vicuna: https://huggingface.co/eachadea/ggml-vicuna-13b-4bit/tree/main
13B — это размер модели, 13 млрд параметров. Для запуска требуется меньше памяти, чем размер модели. Для alpaca 30B — 25гб памяти, а для vicuna 13B примерно 9.5гб памяти. Для 7B совсем мало требуется памяти, можно запускать на Raspberry Pi 4.
Серия статей на хабре про эти модели: https://habr.com/ru/users/bugman/posts/
Или даже больше, попытка энтузиастов по всему миру сделать открытый аналог chatGPT: https://habr.com/ru/articles/726584/

Для запуска в интерактивном режиме (как chatGPT) нужна команда:
# для llama.cpp
./main -i --interactive-first -r "### Human:" --temp 0 -c 2048 -n -1 -t 12 --ignore-eos --repeat_penalty 1.2 --instruct -m ggml-vicuna-13b-4bit.bin

# для alpaca.cpp (можно указать через --threads количество потоков процессора)
./chat -m ggml-model-q4_0.bin --threads 12
Для запуска 30B на alpaca.cpp, вам придется немного отредактировать файл chat.cpp перед компиляцией, как указано тут: https://huggingface.co/Pi3141/alpaca-lora-30B-ggml/discussions/3
13B vicuna лучше справляется и с текстом и лучше генерирует код, чем 30B alpaca за счет более качественного подхода к обучению vicuna. Но 30B — это 30B, чем больше параметров, тем «начитаннее» бот.
Итог
Нейросетей для запуска локально становится всё больше. Если вы знаете еще какие-то интересные, то делитесь ими в комментариях.